

Page 1
WARNING: Many Go-Ped® service and repair tasks require special knowledg e
and tools. Do not begi n any adjustments, service, or repair on your Power Rack
if you have the slightest doubt about your abili ty to properly complet e them.
Improper adjustments, service, or repair may result in damage to the Power
Rack, and/or an unsafe condition.
WARNING: Any modi fication of this unit voids the warranty, in cluding but not
limited to, using either whee ls or tires not recommended by PMW, attempting to
enhance the speed, range or performance of the unit, and/or equipping the motor with non PMW drive components. Suc h modifications can create DANGEROUS AND HAZARDOUS conditions.
If you ins ist on d oing adjustm ents, service or repair, ask your aut horized Go-P ed® dealer if a
service manual and any s pecialized tools are available. It is al so a goo d idea to ha ve an authorized Go-Ped® dealer chec k the qual ity of your work before you ride jus t to m ake sure you did
everything correctly.
Section 5: Controls
CAUTION: Before you ride - Familiarize yourself with how your equipment works.
•
Red button o n the throttle powers o n and off the GoBik e® Power Rack .
• Rotating the motor up by hand will allow th e motor to lock free disenga ge from the wheel.
• To reengage the mot or flick the latch hook away f rom the s tud and m otor will drop to engage with
the wheel.
• Thumb lever controls speed and power to the motor.
• Use the s upplied power cord and standard power wall outlet to charge.
• Always use bo th hands on the handle b ar, when riding.
WARNING: The GoBike® Pow er Rack ou tlined in this manual uses a frictio n
drive system. Keep clear of rear wheel and its drive components when the Power
Rack is in stalled or severe injury may occur.
Section 6: Maintenance and Parts
CAUTION: Technologi cal advances have made the GoBike® Power Rack and
the components mor e complex then ever. This on going evo lution makes it impossible for thi s manual to provide all the informati on required to properly repair and or maintain your Pow er Rack. In order to help minim ize the chances of
an accident and possible injury, it is critical that you have any repair or maintenance which is not specifically described in this manual performed by an authorized Go-Ped ® dealer.
It is j ust as i mportant that your individual m aintenance requirements will be det ermined by
everything from your riding style to geographic location . Consult your authori zed Go-Ped® dealer
for help wit h determi ning your individual m aintenance requirements .
Batteries
Your GoBike® Power rack uses an inte rnal Li-Ion polymer bat tery pack. The battery pan is
a factory sealed unit and should only be serviced by an authorized Go-Ped® dealer. The
battery will last a long time when properly maintained. These batteries do not have
“memory” so it is OK to only partially discharge them before recharging them.
See Battery care and maintenance see Section 4.3
Page 2

WHAT WE GUARANTEE AND WHAT YOU PROMISE US
Patmont Moto r Werks, a Ne vada Corporatio n (hereinafter referred to as “P.M.W.”) expre ssly warrants tha t each of its pr oducts is
free fro m defects in materia l and workmanshi p under normal o perating condi tions and accor ding to prope r use for a per iod of 90
days from th e date of ori ginal purchase . Normal operati ng conditions require adequa te and routine care and mainte nance by the
purchaser of the product . Proper use mean s that the P.M.W. transp ortation product is to be used only in the man ner intended f or
personal transportation of a single r ider with prope r safety equip ment described o n the RED SAFETY WAR NING LABEL affixed to
the prod uct. P.M.W. Transpor tation Products are intended f or use only wit h the proper sa fety equipment on smoothly paved, safe,
dry, non-oil y surfaces in accordance with local regula tions during d aylight hours. In express consi deration for purchasers
execution of the limited warranty and li ability agre ement, P.M.W. will repai r or replace any part or compone nt, other tha n tires, of
the P.M.W. transp ortation product free of charge to the origi nal purchaser who registers h is/her product under the warran ty
program. Wa rranty service can be obtain ed by calling your local dea ler or the Tech. Lin e at (925) 373 -7827 and foll owing the
instruct ions given by t he service re presentative. Sh ipping costs wil l be at the p urchasers’ expense.
This warranty do es not a pply to tire wear, operation under abnor mal conditio ns or damage to t he unit and vehicl e brought on by
improper use. Racing, competitive or commercial use, or modificati on of the pro duct shall vo id this expre ss limited war ranty. Motor
crankshaft failures on spindle d rive models are not covered under warran ty due to va rying riding styles and the adjustabili ty of the
unit by en d user. Purchaser herewith acknowledges: (a) P.M.W. assumes no liabili ty for any misuse of any of its transportati on
products. (b) Under this limi ted warranty and liabil ity agreement P.M.W. shall have no obligat ion and the purchaser or user shal l have
no re medy against P.M.W., its officers, agents or assigns for any damages , includin g without l imitation, i ncidental, consequential,
special, punitive damages ar ising from direct or i ndirect injury t o person or property, or any ot her loss, whether or n ot occasioned by
neglige nce, or otherwis e, on the part of P.M.W. (c) Purch aser acknowledge s that there is an inherent ri sk in the operat ion of motorcycles, b icycles, mopeds, and all P.M.W. transp ortation products, and herewith assumes th e risk of any injury a rising from operat ion
of any P.M.W. tra nsportation pro duct.
Origina l owner will indemnify and hold P.M.W. harmless and will take full respon sibility for conveyi ng all safety warnings, ins tructions,
and limit ed warranty if unit is sold, lent, or otherwise tran sferred to other p ersons and will in demnify P.M.W. from any clai ms against
it for orig inal owner s’ f ailure to do so . THE EXPRESS LIMITED WARRANTY DESCRIBED ABOVE SHALL BE EXCLUSIVE AND
THERE IS NO OTHER WARRANTY O R LIABILITY, EXPRESS OR IMPLI ED, ARISING BY LAW OR O THERWISE AND WHE THER
OR NOT OCCASIONE D BY SELLER’S NEGLIGENCE. THERE IS N O IMPLIED WARRANTY OF MERCHAN TABILITY OR FITNESS
FOR A PARTICULAR PURPOSE. THERE ARE NO WARRANTIES WHICH EXTEND BEYOND THOSE EXPRESSLY STATED HEREIN.
NOTICE: Some states do not al low the exclusion or limitation of incidental or consequential damages and some stat es do not allow
li mita tio n on ho w long an imp lie d warr ant y las ts, th ere fore , some of the abov e lim itat ion s may no t app ly to y ou.
NOTICE: Your Homeowners Insu rance may not cover either Dir ect or Third Party Liabi lity Claims arisin g from use of this or any other
Go-Ped® p roduct.
PLEASE ACKNOWLEDG E THAT YOU HAVE READ AND UNDERSTAND EACH WARNING
_ This de vice does not co nform to Federa l Motor Vehicle Saf ety standards an d is not inten ded for operat ion on public streets,
roads or highways.
_ Safety helmet, goggles, gloves, elbow, and knee pads, appr opriate shoes, and bright cl othing must be wo rn while operat ing this
device t o reduce potent ial of injury.
_ Do not operate this d evice in traffic , or on wet, f rozen, oily or unpaved surface s. Avoid uneven surf aces, chuckhol es, surface
cracks, o bstacles and nig ht or conditi ons of darkness.
_ Never ca rry passengers and objects that ca n hinder your abilities to safely operate your vehicle .
_ Pregnan t persons shoul d not use this product.
_ Never u se alcohol or drugs before o r while operati ng this device . They slow rea ction time and i mpair judg ment.
_ This pr oduct should no t be used by min ors without adul t supervision .
_ High s peeds, jumps and tri ck maneuvers are dangerous and could result i n loss of cont rol and other a ccidents.
_ Whe n accelerating or climbing hi lls, you wil l need to lean forward, under b raking condit ions you will need to lean b ack, to keep
wheels i n contact with th e ground.
_ Never p ermit a guest to use this device unless the g uest has read th e user manual an d all labels.
_ I agre e to provide my guest with helmet, safety goggles, elbow pads, an d knee pads.
_ This pr oduct should no t be used by p ersons unwilli ng or unable t o take responsi bility for th eir own actions.
_ Read al l additional warnings and instructions i n user manual b efore operatin g this P.M.W. product.
_ Adults purch asing this Un it for Childr en, inclusive but not limit ed to a Parent o r Guardian, a ssume direct lia bility for i njury to the
child, o r to third pa rties to whom the child entrusts the vehicle.
_ Homeowners Insurance may no t cover either Direct or Thir d Party Liabi lity Claims Arisi ng from Use of thi s or any othe r GoPed® prod uct.
_ I here with promise not to entrust this vehicle to any child under the age of 16 (Sixteen) years of age.
WE SETTL E ARGUMENTS B Y ARBITRATION
ANY DISPUTE HEREU NDER WILL BE RESOLVED THROUG H BINDING ARBITRATION IN THE CI TY OF RENO, COUNTY OF
WASHOE, NEVADA, ACCORDIN G TO THE RULES GERMANE TO ARBITRATIONS CO NTAINED IN REVISE D NEVADA
STATUTES.
WE AGREE TO HAVE ANY DISPUTES AR ISING OUT OF TH E MATTERS INCLUDED IN THE ‘ARBITRATION OF DISPUTES’
PROVISION DECIDED BY NEUTRAL ARBITRATION AS PROVIDED BY NEVADA LAW, AND THAT YOU ARE GIVING UP ANY
RIGHTS YO U MIGHT POSSESS TO HAVE THE DISPUTE LITIGATED IN A COURT O R JURY TRIAL. BY SIGNING BELOW YOU
ARE GIVING UP YOUR JUDICIAL RIGHTS TO DISCOVERY AND APPEAL, UNLESS THOSE RIGHTS ARE SPECIFICALLY INCLUDED
IN THE ‘ARBITRATION OF D ISPUTES’ PROVISION. IF YOU REFUSE TO SUBMIT TO ARBITRATION AFTER AGREEING TO THIS
PROVISION, YOU MAY BE COMPELLED TO ARBITRATE UNDER THE AUTHORITY OF THE NEVADA CODE OF CIVIL PROCEDURE.
YOUR AGR EEMENT TO THIS ARBITRATION PROVISION IS VOLU NTARY. You should feel f ree to consult an at torney be fore
signing this li mited warranty and lia bility agre ement. I ha ve read u nderstood an d agreed to be boun d by the limited war ranty and
liabil ity agre ement above and ag ree to submit disp utes ari sing out of matt ers includ ed in the arbi tration of dispute s provisio n to
neutral arbitration.
4.6 Auto-Off Feature
Your Power Rack has an Auto Off feat ure. If you accide ntally leave your Power Rack on when you
are done riding, it will shut off automat ically after 30* minu tes. This helps to keep the ba tteries
from being drained when n ot in use . To restart you si mply turn the Power Rack off and then on
again.
*The 30 minute sett ing can be changed or turned off by your authorized Go-Ped® dealer.
4.7 Economy/Turbo Modes
Your GoBike® Power Rac k is equi pped with two modes of operation, Economy a nd Turbo.
Economy m ode is intended for lower speeds and maximizing the range that yo u can travel on one
charge. Turbo mode is inte nded for higher speed and faster acceleration. Your range will be lower
in this m ode
.
The Economy / Turbo switch is a black rocker style switch on the throttle control. Do NOT confuse it
with the Red Round Power Switch.
The Economy / Turbo switch can be changed while stopped or while moving. Be very cautious about
switching into Turbo mode while in motion!
Economy mode limits power drawn to operate the motor . This has a direct effect on maximum
speed and power but will give your GoBike® the best range and keep the Power Rack operating
efficiently.
Turbo Mode should be used with caution. In this mode, the motor can draw power from the
batteries at an extrem ely high rat e creating tremendous heat in the moto r in a very short ti me. This
is to give the user all of the Power Rack potentia l power to achieve greater speeds, hill clim bing
capability, and im proved accele ration. In this mode, your usable range is greatl y limited. It is
important for the operator to be aware that heavy loads on the m otor is wh at creates over heati ng.
Avoid frequent acc elerations, burnouts, wh eelies, to wing heavy loads, long steep hill c limbs, and
the likes that require the m otor to work extra hard is highly recommended . If you have been
working the motor, carefully feel the temperat ure of the motor. If i t is t oo hot to hold your hand/
finger agains t, then d isengage or help by pedd ling and give it a c hance to cool down before
continuing.
NOTE: Econo/Turbo parameters are fully programmable by your authorized Go-Ped® dealer and can
be tailored to your specific riding needs.
4.8 Disengaging/engaging Motor to Rear Wheel
The GoBike® Power Rack has a unique and simple feature to engage and disengage the drive roller
to the wheel. While the motor is engaged, s imply rotate the motor up until the latching hook catches
the support stud.
To engage the motor to the wheel simply flip the latch out away from the stud and the motor will drop
to engage the wheel.
4.9 GoBike® Power Rack Removal
The GoBike® Power Rack uses a universal seat clamp with a quick disconnecting feature. Use the
quick release lever found on the universal clamp to open the rack clamping gate for removal or
loosing it for fine tune adjustments of rack height.
Page 3
Attention: For more information on the California Go-Pe d® Company and Go-Ped® brand products, please visit us online at www.goped.com
. You will also be able to find your local Go-P ed®
dealer, buy OEM parts, learn about the latest news and Go-Ped® related events, receive product
support infor mation, and get c onnected with other GoPe d® enthusia st.
Please read through this User Manual before attempting to
install or operate the GoBike® Power Rack
Section 4: Usin g your GoBike® Power Rack
4.1) Maximizing Perfomance and Usa ble Range
of your GoBike® Power Rack
4.2) GoBike® Power Rack Intial B reak-in
4.3) Charging and Charging Safety
4.4) Fuel Guage (Flux Capaci tor)
4.5) Power Switch
4.6) Auto-Off Fea ture
4.7) Econom y/Turbo Modes
4.8) Disengag ing/Engaging Motor to Rear Wheel
4.9) GoBike® Power Rack Removal
Section 5: Controls
Section 6: Maintenance and Parts
Contents
Section 1: Important Information
1.1) About thi s Manual
1.2) A SPECIAL NOTE FO R PARENTS
Section 2: Saf ety
2.1) Equipm ent Safety
2.2) Mechanic al Safety Check
2.3) Biking Safety
2.4) Wet Weather Riding
2.5) Night Riding
2.6) Off-Road or Trail Riding
2.7) Stunts, Wheelies, or Jum ps
2.8) Rules t o Bike B y
Section 3: Fitt ing the GoBike®
power Rack to your Bicycle
Thank you for your recent acquisition of a California Go-Ped®
brand product!
We are very happy and proud to welcome you to California Go-Ped®, the World’s Best in Extreme
Fun, Innovation and Quality. By choosing California Go-Ped®, you have selected the highest quality
personal transportation products in the World, which have been handcrafted in the USA since 1985,
using aircraft grade materials and the highest quality components.
As the leader in innovation, design and performance California Go-Ped® has paved the way for
personal transportation by producing lightweight, fuel efficient, durable, performance minded, and
well-balanced machines.
As a new Go-Ped® owner and User, you now have access to the widest dealer network, thousands
of parts for your Go-Ped®, complete warranty coverage and instant access to service.
You are now part of the fastest growing community of ele ctric vehicle enthusiasts in the world.
A technical hot line is availab le if you may need furthe r assis tanc e th at this
manu al does not provid e at 92 5-373-7827
ELECTRICAL HAZARD
- Never modify the electrical system. Alterations could cause a fire resulting in serious injury and or
property damage and/or could ruin the electrical system and/or motor.
- Use of the wrong type battery or charger could cause a fire or explosion resulting in serious injury.
- Use of PMW components in other brands could cause overheating, fire or explosion.
•
Battery Handling
• The battery must be handled by adults only. Dropping the battery could result in serious and
unsafe battery condition.
• Never allow children to charge the battery. Battery charging must be done by adults only. A child
could be injured by the electricity involved in charging the battery in unsafe electrical cord handling.
• Read the safety instructions on the battery and avoid contact with battery terminals.
• Examine the power cord and connectors for exces sive wear or damage each time y ou charge the
battery. If damage or excess ive wear is detected, do not use until you have replaced the worn o r
damaged part.
• The motor may be hot. Handle carefully.
• Keep batteries away from heat or open flames and always recycle at a proper recycling facility.
Caution: Charge your vehicle only in dry locations.
B) Charging
Follow the safety caution and warnings at the beginning of this section 4.3. Your GoBike® Power
Rack has a Li-ion smart charger built inside. In order to recharge the Power Rack all you need to do
is plug one end of the provided charging chord into a standard wall outlet, and the other end into the
plug receptacle on the side of the Power Rack battery compartment. On the other s ide of the battery
compartment is an LED (light emitting diode) indicator. When the charger is energized, the LED will
be “red” as the battery charges, and then it will turn “green” after the battery reaches full charge.
Disconnecting the charging chord will cause the LED to turn off. Leaving the charger on 30 minutes
after the LED turns green will allow the charger to balance the Li-Ion battery cells which will then
optimize battery performance. For safety purposes, it is not recommended to leave the charger
energized longer than 45 minutes after the charged green LED comes on. Though leaving the
batteries uncharged should not harm the Li-Ion batteries, it is recom mended to recharge the Power
Rack after every use.
Please Note: It is not recommended to leave the c harger energized longer than 45 minutes after the
charged green LED comes on and it is recommended to recharge the Power Rack after every use.
4.4 Fuel Gauge (Flux Capacitor)
There are LED’s on the throttle control, which indicate the level of charge in the batteries. When the
Power Rack is turned on and batteries are fully charged all LED’s will illuminate (green, yellow, red).
After some riding, when the batteries are only partially charged the green LED will turn off, leaving
only the yellow and red LED’s illuminated. After more riding, when the batteries are low the yellow
LED will turn off and the red LED will begin flashing. This indicates that you are nearly out of power!
If you continue riding after the red LED begins to flash, the bike will slow and may eventually turn
itself off automatically. This is a safety feature intended to protect the batteries from dam age. If this
occurs, fully charge the batteries and then the Power Rack will be ready to resume operation.
4.5 Power Switch
The power switch is a Re d push button mark ed “ON/OFF” found on the throttle control. Push the
button once to the IN position to turn t he GoBik e® on and again to the OUT posi tion to tu rn the
GoBike® off. When t he scooter is turned on the Flux Capacitor L EDs will be illum inated.
Page 4
A. Helmets: While not al l States or regions requi re riders t o wear approved protective head gear,
common sense dictates that you should wear a DOT, Snell, BSI or CPSC approved helm et. Mos t
serious inci dents involve head injuri es which m ight have been avoided if the rider had worn a
helmet
Section 1: Important Information
1.1 About this Manual
Why you should read this manu al:
This manua l was written to help you understand the operation and ma intenance of your GoBike®
Power Rack. It’s im portant for you to unders tand your new G oBike® Power Rack, its features and
operations. So starting from your first ride you will get the most from your n ew GoBike® Power
Rack and keep it maintained f or optimum perform ance and s afety.
It is als o important that your first ride with your new GoBike® Power Rack is taken in a cont rolled
environment, away from vehicles, obstacles an d other ha zards.
Even if you have previous experience with motorize d scooters, vehicles, bikes, and the lik es, it is
wise to still go t hrough the m anual to help better your understanding of safe operati on, care and
maintenance.
General Warni ng: Bikin g can be a h azardous activity even unde r the best o f
circumstances. P roper main tenance of your b icycle and Pow er Rack is your
responsibility as it helps reduce the risk of injury. This manu al contains m any
“Warnings” and “Cautio ns” concerni ng the possi ble consequ ences of fai lure to
follow ins tructions, perform maintenance, o r inspecting your equipment . Any fall
can result i n serious injury or even dea th, so ope rating wit hin the g uidelines
outlined in this manu al will help red uce those ri sks.
Attention:
• The status of the Go Bike® Power Rack as a “motor vehicle” varie s from state to state and is
subject to drivers licensing, insurance requirements a nd registration.
• You should check wit h a reliable authority in your state to see if the GoBike® P ower Rack must
be registered as a motor vehicle. Your police department or local department of m otor vehic les
may be abl e to answer your question s or direct you to a reliable authority.
• Your insurance polic ies may not provide c overage for accidents i nvolving the use of this device.
To determine if cover age is provided you should contact your insuranc e company or agent.
• The
recommended age and minimum w eight for t he GoBike® Power Rac k is 16 years of age
or older and 100 poun ds
, but thi s is subj ect to the physical coordinati on of the rider, the abilit y of
the rider to wear protect ive gear, use g ood decision making ability, and to take responsibility for
their own actions.
1.2 A SPECIAL NOTE FOR PARENTS
It’s a tragic fact that most children are more likely to have an accident. As a parent or
guardian, you bare the responsibility for the activities and safety of your minor child.
Among these responsibilities are to make sure that the bicycle which your child is riding
is properly fitted to the child; that it is in good repair a nd in safe operating condition; that
you and your child have learned , understand and o bey not only the applicable local
motor vehicle and traffic laws, but also the common sense r ules of safe and responsible
scooting. As a parent you should read this ma nual and go over all key points with your
child before letting your child operate a power assisted vehicle.
Section 2: Safety
2.1 Equipm ent Safety
Warning: Many States or regions require specific safety devices or equipment. It
is your responsibi lity to familiar ize yoursel f with law s of the state or region in
which you ride and to comply with all applicable laws, includi ng properly equipping yourself and your Bicycle.
B) Peddle assistance.
Your GoBike® Power Rack was designed to assist you as you paddle your
bicycle. Of course you are not required to peddle while operating your GoBike® but not peddling is
asking your GoBike® Power Rack to do all the work and its available range will be directly effected
by the work load you ask of it. Here are a few operator tips and tricks that will make a s ignificant
difference in the available range of your GoBike®.
1. Get in the habit of peddling up to speed before applying power. This will eliminate the higher loads
the motor experiences that are created from starting out from a dead stop and accelerating under
power to speed and will make a big deference in usable range.
2. Peddle assisting the GoBike® dramatically reduces the energy consumption of the motor,
therefore the more you peddle assist the further the GoBike® Power Rack’s range will be.
3. Try to keep your speed constant as mush as possible.
4. Avoid using the power rack for climbing hills.
5. Stick to smooth surfaces whenever possible and avoid riding off-road to keep the rolling resistance of the bicycle maximized.
6. Keep cargo weight as low as possible.
7. Do not operate the GoBike® Power Rack with your brakes applied.
C) What you can do to your bicycle to make it better suited for use with the GoBike® Power
Rack.
Naturally, some bikes and bike components work better with the GoBike® Power Rack then
others. A key bike component that works with the GoBike® Power rack are your bike’s tires. Knobby
tires work great in off-road conditions but reduce traction on paved surfaces as well as add additional
vibration and rolling resistance. Tires intended for use on paved surfaces will have an interlocking
tread pattern best suited for the GoBike® Power Rack, Off-Road knobby tires will still work with the
GoBike® but will add a vibration and reduced efficiency and range.
4.2 Gobike® Power Rack Initial Break-In
Like a gasoline powered vehicle your Power Rack does have a short break-in period. There are a
couple reasons for this. First the batteries will begin to hold m ore power after some usage. Second
the motor will break-in and start operating more efficiently. Break-in is best done by operating your
Power Rack in the “Econo” mode during the first complete charge.
4.3 Charging and Charging Safety
A) Charging Safety
Only charge your Power Rack in a clean dry space away from flammable materials.
Though we anticipate none, and have encountered no safety problems while charging the
GoPed® Li-ion polymer packs, there is always a remote possibility that unantic ipated electrical
or electronic dis crepancies due to unint ended uses and conditions could possibl y cause a
malfunction in the future without notice.
To minimize any and all safety concerns, it is recommended not to leave the char ger on
(plugged in) long after the optimum charge has been reached.
To optimize Li-ion battery charging cyc le life it is not recommended to store batteries longer
than 30 days without a fresh recharge each stored month.
To protect the packs from over discharging and damaging cel l(s), the pack BMS will open a
circuit (shu t down) if the voltage sensor detects < 22.5V. Should that happen turning off all
power to the Power Rack, and plugging it in will be needed to reset the circuit for recharge. As
long as the lights on t he “flux capacitor” can be turned on, the on board charger wil l be able to
recharge the batteries.
CAUTION: All charging should be done in a safe location and should not be
left unattended for any le ngth of time, shoul d any unlikely safety issue arise
in the form of smoke or fire, it will not be possible to burn property or cause
injury to people, i.e. outside and away from flammable structures. DO NOT
charge the packs with any charging system other than what isprovided.
Page 5
Your authorized Go-Ped® dealer ma y have a vari ety of attractive approved helm ets, and can
recommend one to suit your needs. Make s ure that it fits c orrectly, is worn c orrectly and is properl y
secured. Ask your dealer to help with the fit and adjustm ent of your helmet, or refe r to the o wner’s
manual provid ed with the helmet. Buckle Up!
WARNING: Always wear an approved helmet when riding your Bicycle. The helmet
should be worn correctly as outlined in the helmet’s owner’s manual . Failure to
wear an approved helmet can result in a serious injury.
B. Protective pads:
Elbow pads, knee pads, and wrist guards are no t required b y most states or
regions. Again, common sense dic tates that you should wear protecti ve pads to help protect
against inju ry. Your authorized Go-Ped® deal er may have a variety of protec tive pads, and can
recommend one to suit your need s. A good set of pa ds should fit com fortably, stay in position at all
times and not have a ny excess strapping, Velcro®, or other protrusions to catc h on anything that
can cause you to lose control.
C. Shoes: Your shoes should h ave good grip, protection, and sup port. Your shoes should have
adequate stra pping or lac es so t hey stay on your feet. M ake sure that laces or other strapping can
not catch or hang-up on any part o f the Bi cycle or other objects. Never ride barefoot or wear
sandals when operating a bicycle.
D. Clothing: Being seen is very important. Brightly colored, re flective helmets an d clothing will
help make riders more noticeable. Clothing should not be so l oose that it can catch on moving
parts or be s nagged on ot her objects.
E. Eye protectio n: Any kind of riding can involve airborne debris , dust, and bugs, so commo n
sense dictat es that you should wear protect ive eyewear.
F. Reflectors: Reflectors are im portant safe ty devices designed to reflec t light in a way that helps
to be seen. The reflec tors are intended to enhance the visibilit y of the vehicle but may not meet
reflector requirements for your a rea.
WARNING: Do not remove the reflectors from your Bicycle. Removing reflectors
may reduce visibility to others. Reflectors are not suitable for use as lights. Riding
at dawn, dusk, or night is not recommended.
2.2 Mecha nical Safety Check
Due to vibration, nuts an d bolts can become loose. Mak e sure tha t all fas teners are securely
fastened and tighten if necess ary
Here is a s imple procedure you should get in the habi t of before you get on your bicycle:
A. Nuts, bolts, and structural: Pick your bicycle up a few inc hes and bounce it off the ground. Do
a quick visual and tac tile inspection of t he whole bi cycle. Make sure you loo k at all visible nuts,
bolts and s tructural welds . If anything sounds , feels or looks loose or shows signs of stres s then
replace, or secure the m. If y ou’re not s ure, ask someone with experience t o check, or ask a n
authorized dealer to show yo u what to look for in a mech anical safe ty check.
B. Tires and Wheels: Check tha t pneumati c tires are properly inflated. Refer to the sidewall of the
tire for recommended PSI. Properly inflated tires will help maximizes y our availabl e range with the
Power Rack. Checking PS I using a tire press ure gauge is recom mended but you can als o bounce
your weight on the bicycl e and com pare tire deflection to how it l ooks when you know the tires are
properly inflated. Spin the wheels and check that the tire s have not yet reac hed the wear m arks on
the tires, have ripped, torn, or show any sign s of distress, and replace a s necessar y. Make sure
the wheels s pin freely and true. If wheels wobble and/or r ub the brakes then take it to a qualified
authorized dealer for a djustments . For im proved GoBik e® perform ance it is recomm ended that
you use a re ar tire t hat does n ot have an a ggressive knobby tread pattern and is properly inflated.
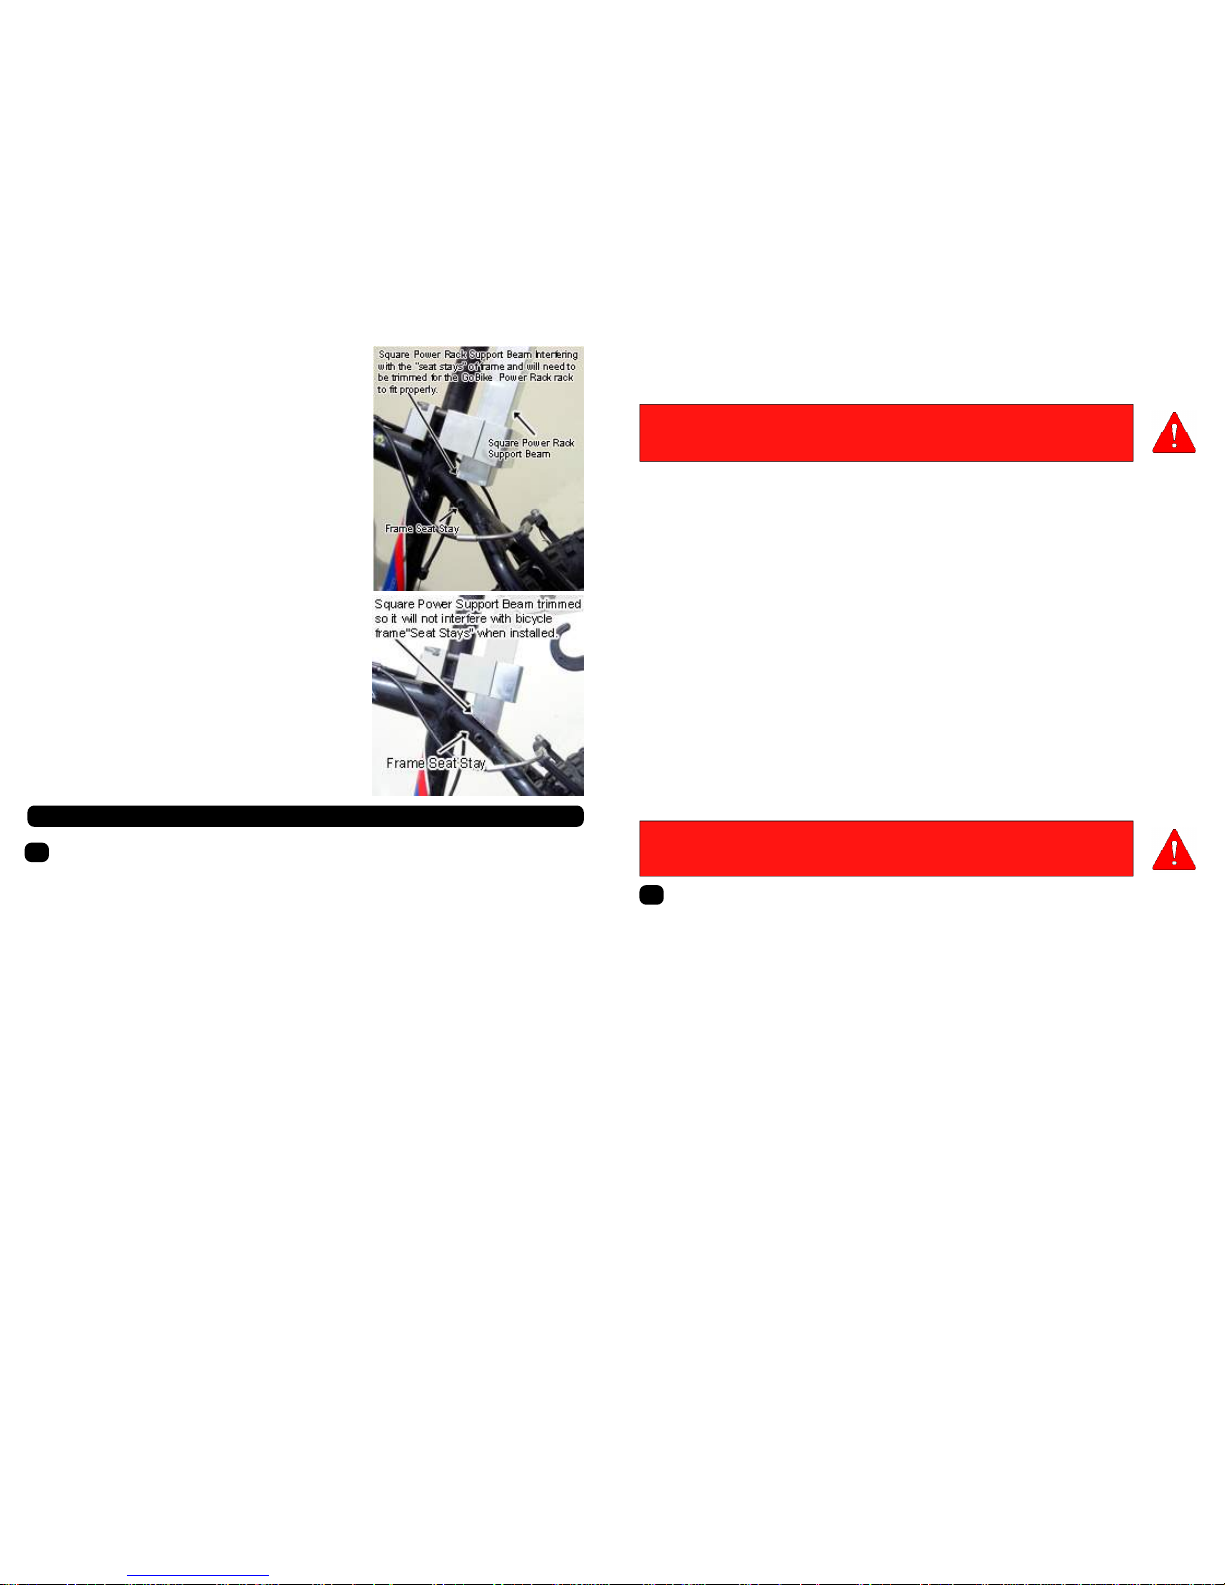
Fig 3
Fig 4
In some c ases the bicycle frame’s “Seat Stays” may
interfere with the GoBike® Power Rack ’s support beam
preventing it from getting withi n the requires 1 to 2 inches
from the tire. (Fig 3)
If this i s the c ase for your bicycle you may need to measure
the distance between the bottom of the GoB ike® Power
Rack to th e tire, subtract 1 1/2" inc h, and with a bench vice
and commo n hacksaw, remove the end of the support beam
for a proper fit. E xample: If the bottom of the power rac k sits
4" inches f rom the tire you will subtrac t 1 1/2" from the 4"
that equals 2 1/2" inches that will need to be rem oved from
the end of the square support be am for a proper drive roller
to tire c ontact. (Fig 4)
Step 5) Remove the right side hand g rip and in stall the
GoBike® thumb throttle controller to the handlebars. You
may need to make s ome minor adjustm ents to shifter levers
and brake levers to not interfere with them. Reinstall the
hand grip or replace with the one provided in the GoBike®
Power Rack kit.
Step 6) Route t he GoBike® throttle cable along the fram e
and secure in position with the provided cable fasteners and
plug the qui ck latc hing pin con nector to t he pin c onnector
found coming from the rack and your read y for your first test
drive.
Note: The quic k releas e on the uni versal seat clamp i s used
to adjust t he rack height.
Section 4: Using your GoBike® Power Rack.
4.1 Maximizing Performance and Usable Range of your GoBike® Pow er Rack
Fossil fue ls have hel ped shape the world we live in today and have s et a very hi gh bar in t erms of
the amount of stored energy per a given volu me and weigh t for other technologies to reach. We
believe there is not going to be a one sing le soluti on to our existing worlds dependency of fossi l
fuels but changes to our fossil fuel life-style and thinking will help u s get the re much quicker. As
new technologies advance, our basic understanding of these technologie s and how we can
maximizes them should also advanc e, to help us get the mos t from t hem as t hey develop . This
section was created t o help you better understand your GoBike® and maximizing performan ce.
Drag, resistanc e, and heat is a c onstant s truggle to maximizes vehicle performance. There are a
few things we can do to improve them to get better performanc e of the G oBike® P ower Rack.
There are a l ot of little th ings that all add up and really make an improvement in perfo rmance if
followed.
A) Keep your motor coo l. Heat creates electrical resistance that can effect performance an d
range. The harde r you make the mo tor work the more heat it will generate a nd the more energy it
will require from the batteries. There are several things we can do to help prevent the motor f rom
working so ha rd and greatly improve o ur usable range.
1. Make sure your bicyc le is properly tuned up and maintained in good working order.
2. Check tire pressure, low tire pressure i ncreases rol ling resis tance that will have a direct effec t
on usable range and spe ed.
3. Make sure your brakes work effic iently and do not drag on the wheel.
4. Your wheels should s pin true and freely.
Page 6
C. Brakes: S queeze the br ake levers and check that th ey are get ting proper contact. Full braking
force is applied when you squeeze the lever and the lever cannot touch the handl e bar or grip. The
brakes should not int erfere with the rotation of the whe el when not applied. Make sure that all
brake surface s are cl ean and fr ee of debris and still within their usable life. Do n ot ride th e bicycle
until the brakes are p roperly adjus ted and working properly.
WARNING: Only ride with properly adjusted brakes.
D. Control levers and cables:
Familiari ze yourself with the leve rs and c ontrols. Sq ueeze and or
twist all levers/cont rols and make sure they are fun ctioning properly. If they stick, move at the
base, or do not get full range o f moti on, make adjustme nts as necessary or take to an authorized
dealer for s ervice. Do not ride the bicycle until the control l evers and cables are properly adjusted.
Due to vibration, nuts an d bolts can become loose. Mak e sure tha t all fas teners are securely
fastened and tighted if necessary. Refer to s ection 2.2 Mechanical Safety Check
2.3) Biking Safety
CAUTION: Like most sports, bicycling invo lves risk of injury and damage. By
choosing to ride a bicycle you assume the responsibility for that risk. This
makes it extremely important that you know, understand, and pr actice the rules
of safe and responsible riding.
Bicycling c an be an e nvironmentally useful, safe and fun way of reducing traffic conge stion and
improving cardiovascular fitness.
A. Know Your Bicycle: Familiarize yoursel f with t he bicycle b efore you rid e. Check the control s
and ride very cautiously until you become familiar with the way the bicycle h andles. Take turns
slowly and gi ve yourself extra stoppi ng distance.
B. Ride Within Your Abilities: To control your bike, you need to kee p it upri ght and m ake it go
where you want it to go. This sect ion cannot teach you how to con trol direct ion, speed o r balance.
Only a lot of practic e will do that. Bel ow are a few things to help you.
D. Turning: New riders tend to have more trouble turning than e xperienced rid ers do. Th e only
way to mak e good safe turns is to practi ce. Always approac h turns very carefully.
E. Braking: Front brak es provide most of your stopping power, but you will need to learn to adjust
your center of gravity t o maintain stability. Again, practice thi s at a safe speed until you are
comfortable with this action.
F. Areas to Ride: Ride in a safe place free of cars in an area which will not di sturb oth er people or
animals an d has a cl ean dry surface.
2.4 Wet Weather Ri ding: Your Gobike® power rack is water res istant but not water proof and so
riding in wet condition s is not recommended and should be avoid ed.
2.5 Night Riding: Riding at night requires adequate lighting so you can avoid obstac les and
others can s ee and avoid you.
2.6 Off-Road or Trial Riding: Riding off-road or on uneven surfaces creates heavy vibrations and
shock loads on the s ophisticated electri cal com ponents and should be avoided.
2.7 Stunts, Wheelies, or Jumps: These stunts can be fun, but it puts incredible amount stress
on everything. Riders who i nsist on jumping risk seri ous damage to their equipment and them selves.
WARNING: Wet weather impairs traction, braking and visibility for riders and
others. The risk of accident dramatically increases in wet conditions.
Fig 2
Fig 1
WARNING: Riding at dawn, dusk, or at times of poor visib ility without a lighting
system which meets local regional law s and without a pproved reflectors is illegal, dangerous and can result in se rious inju ry.
2.8 Rules t o Bike By:
· Always wear your s afety gear.
· Never ride under the i nfluence of alcohol or drugs.
· Learn the local laws and regulati ons.
· Ride def ensively.
· Wear bright colored and/or re flective clothing.
· Avoid riding your bicycle at night or in condit ions of poor visibility.
· Observe and yield the right of way and obey all rules of the ro ad.
· Do not dart out of driveways o r from be tween parked c ars.
· Stop at all stop s igns/lights .
· Be caref ul when chec king traffi c and don’ t swerve when l ooking over your shoulder
· Always go with t raffic flow and keep t o the far side of the road.
· Never ride on sidewalks .
· Avoid riding in b ad weather, wet, muddy, icy condit ions or when visibility is obs cured.
· Do not do stunts, wheelies or jumps.
· You are sharing roads , trails and riding areas with others. Re spect the ir rights, and be to lerant if
they inconvenience you.
· Always yield t o the right of way for pedestrians and animals. Rid e in a way that does not frighte n
or endanger the m, and avoid riding near them whenever pos sible.
· Keep your speed cons istent with the conditions, and keep in mind that speed has a direct relation
to control as well as component stress.
· Never carry passengers.
· Never carry anything that can ob struct vision, or control of your bicycle.
· Everyone m ust be responsible for the en vironment, ride acc ordingly.
.........................Section 3: Fitting the GoBike Power Rack to your Bicycle
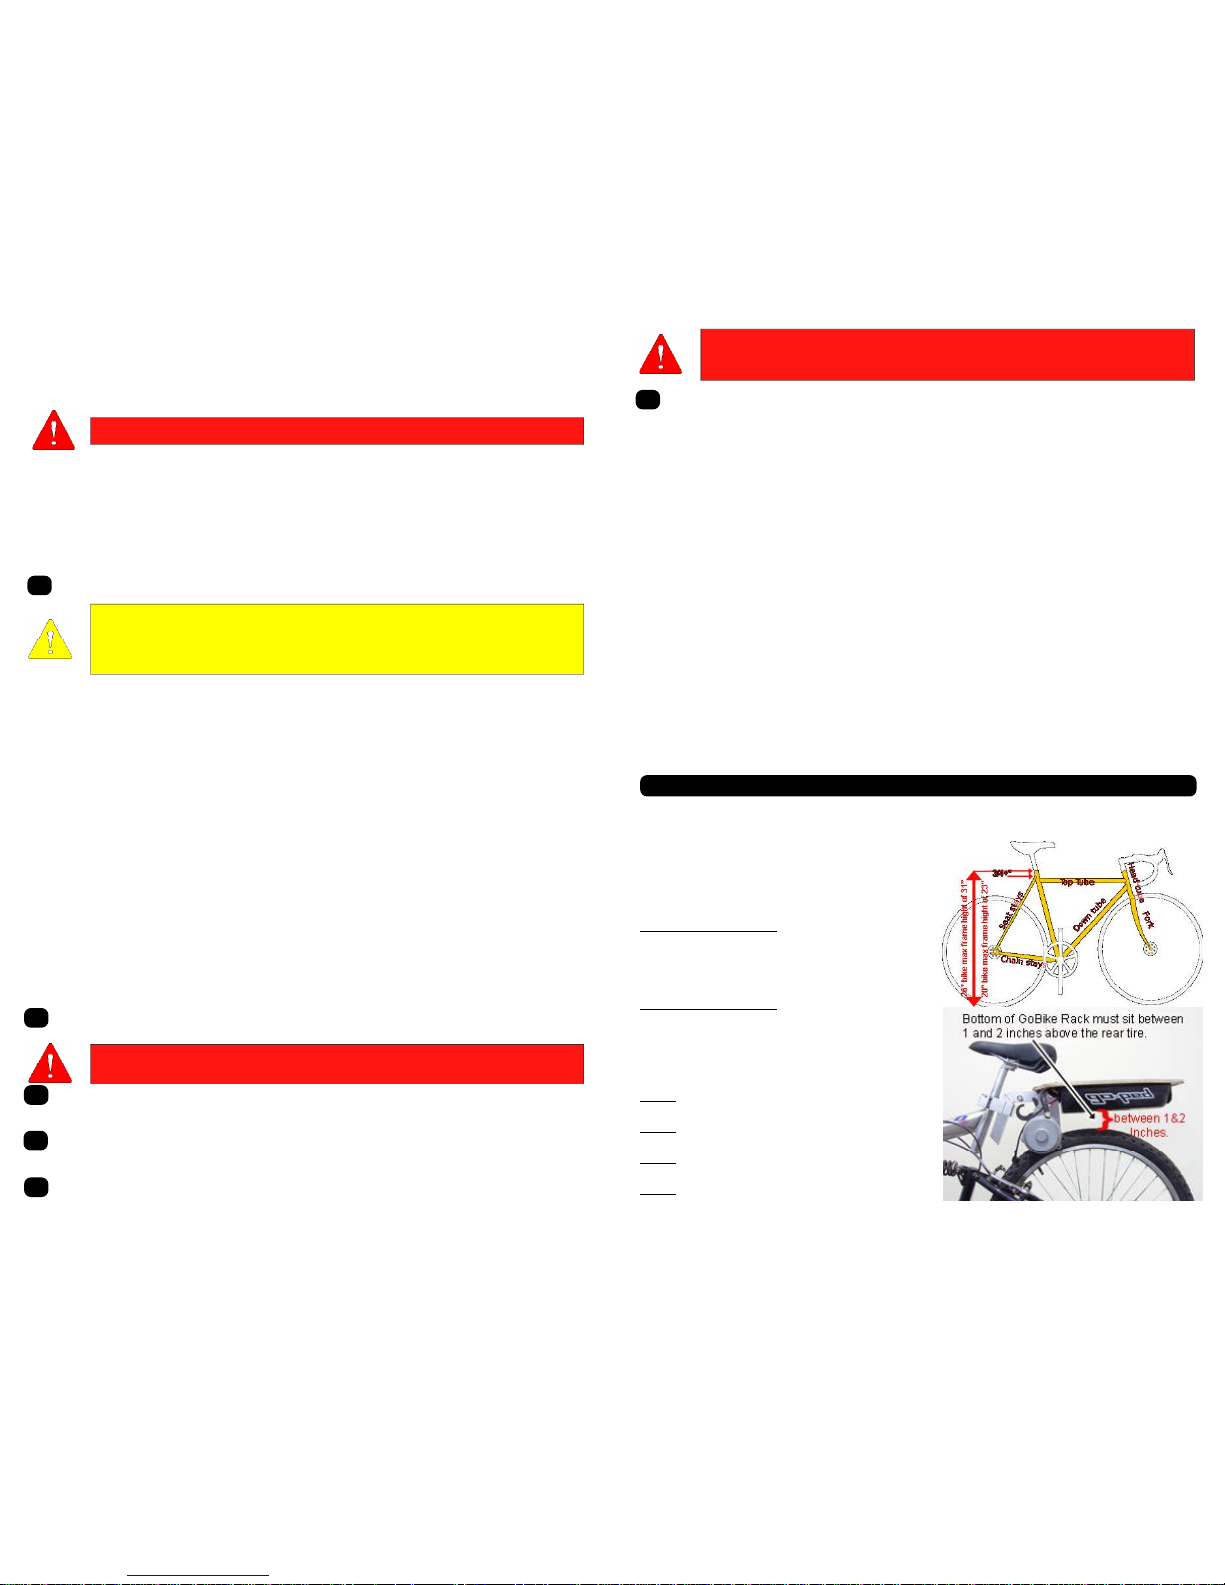
The GoBike® Power Rack is designed to fit and work
with most bicycles available today, however there are a
few limitat ions you should be aware of before
attempting to fit the GoBik e® Power Rac k to your
bicycle. The bicycle frame mus t have a seat tube
longer then 3/4" inch above the top frame tube. Fig 1
26" inch bicycles frames
must have a frame seat tub e
no taller the n 31" inches from ground. If your fram e’s
seat tube is taller t hen 31" inc hes the GoBike®
Power Rack wi ll not have proper tire contact. Fig 1
20" inch bicycles frames
must have a fram e seat
tube no tall er then 23" inches from ground , If your
frame’s seat tube is taller the n 23" inc hes the
GoBike® Power Rack will not have proper tire
contact. Fig 1
Step 1
) Remove your seat pos t clamp and seat/ seat
post assembly.
Step 2
) Install the GoBike® Power Rack’s Universal
Clamp to the bicycle frame’s seat tube.
Step 3
) Install the seat/s eat post as sembly back into
position and tighten the 3 seat clamp bolts.
Step 4
) Place the GoBike® Power Rack support
beam into position i n the uni versal clam p, so that the
bottom of the battery pan will be within 1 to 2 inc hes above the tire. Fig 2
 Loading...