

Goot RX-822AS Operation Manual
1
TAIYO ELECTRIC IND.CO.,LTD.
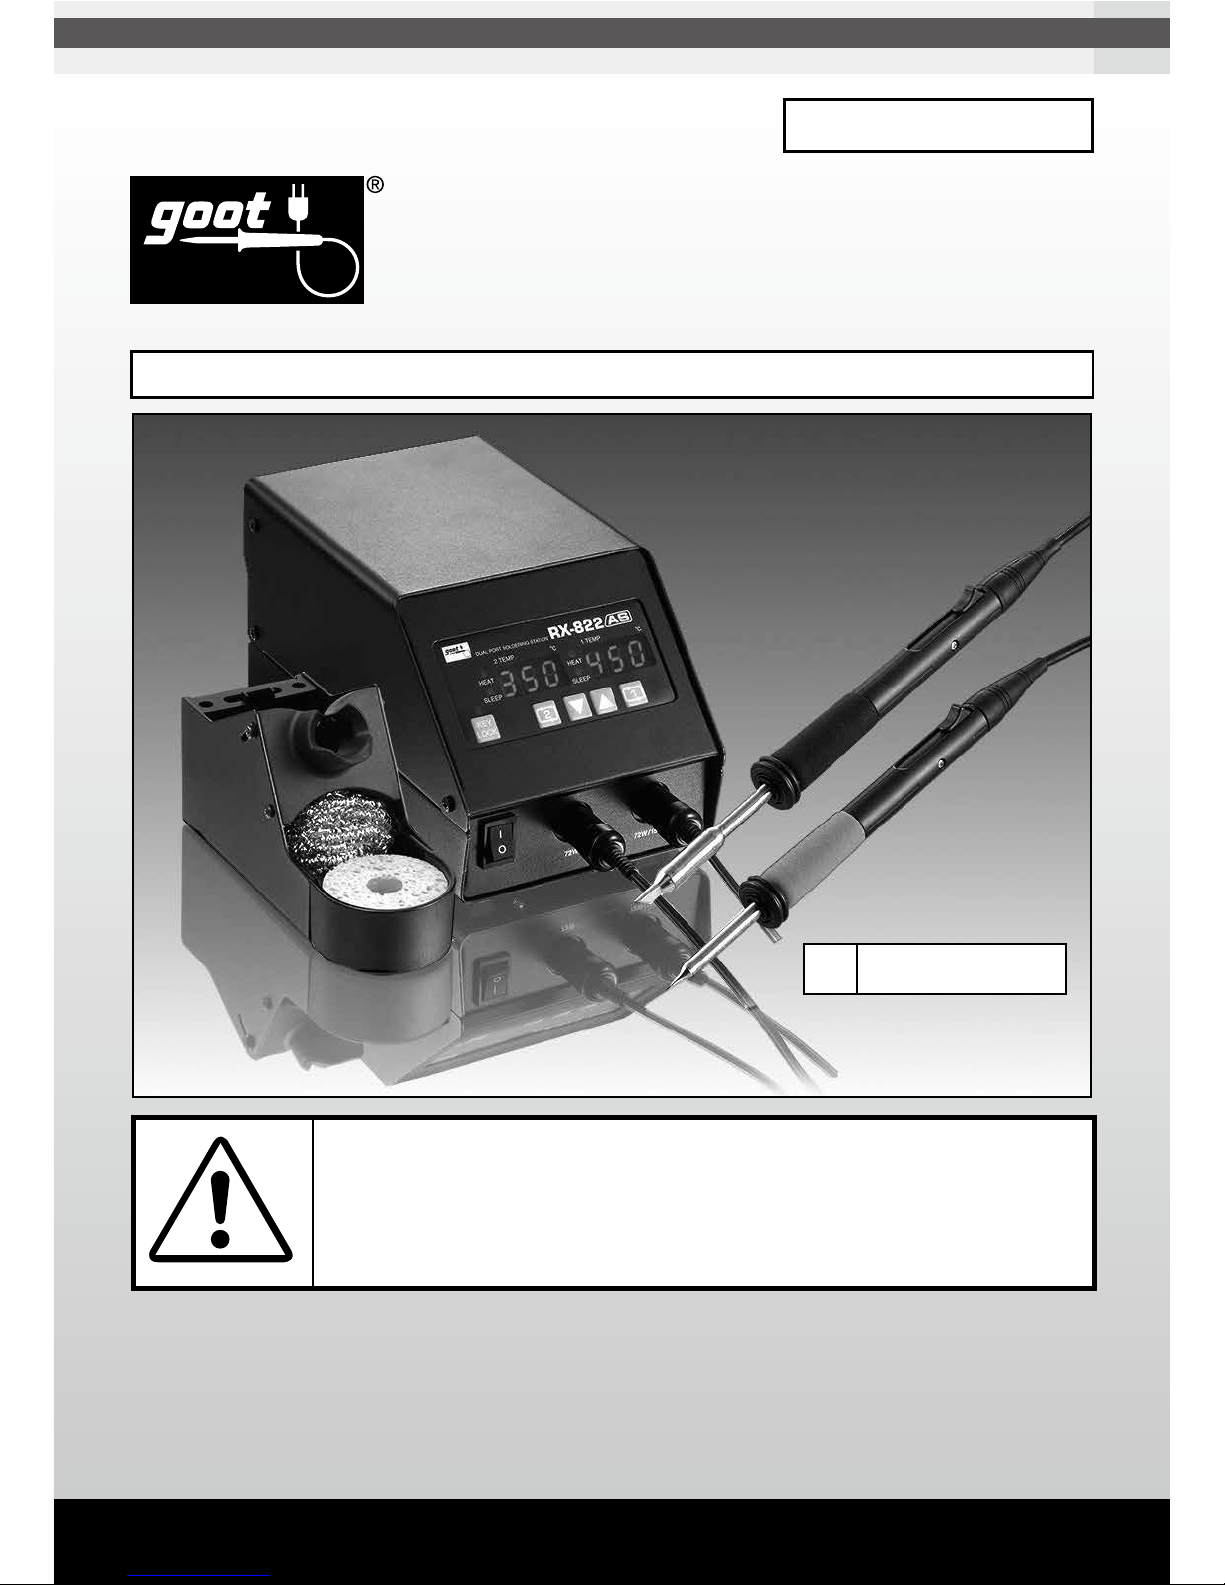
TEMPERATURE CONTROLLED
LEAD-FREE DUAL PORT SOLDERING STATION
RX-822AS
Thank you for buying a goot soldering station. Your new soldering station has been engineered and manufactured to goot's high standards of dependability, ease of operation, and
operator safety. If you follow the instructions and safety precautions in this manual and use
the soldering station properly and only for what it is intended, you will enjoy years of safe,
reliable service. Thank you again for buying a goot soldering station.
WARNING
Before using the soldering station, read the Operation Manual.
Failure to follow the safety precautions and instructions in this
manual could result in serious injury and property damage.
OPERATION MANUAL
KEEP THIS MANUAL FOR FUTURE REFERENCE
TAIYO ELECTRIC IND.CO.,LTD.
Note Tips Not Included.
Tips Sold Separately.
Soldering Iron Stand x 2 included.
TAIYO ELECTRIC IND.CO.,LTD.
2
WARNING
Failure to obey a safety warning could result in serious
injury or death to yourself or to others. Always follow the
safety precautions to reduce the risk of electric shock, fire
or personal injury.
CAUTION
Failure to obey a safety caution may result in a minor or
moderate injury to yourself or to others. Always follow the
safety precautions to reduce the risk of electric shock, fire
or personal injury.
Safety Mark Definitions
Follow all WARNINGS and CAUTIONS in this manual for the safe and correct
use of the soldering station and to protect the operator and others from injury
and damage to property. Please make sure you fully understand all parts of this
manual.

TAIYO ELECTRIC IND.CO.,LTD.
3
1 Table of Contents
1. Table of Contents / Specifications ..................................................3
2. Introduction ...............................................................................5
2.1 Features of the RX-822AS ..............................................................
5
2.2 Unpacking ...............................................................................6
2.3 Name of Parts ...............................................................................7
2.4 Setup ...............................................................................9
3. Rules for Safe Operation .................................................................10
4. Operation Instructions .....................................................................12
4.1 General Control Panel Operation Flow chart ..............................12
4.2 Changing the Set Temperature ....................................................13
4.3 Calibration of the Tip Temperature .............................................. 14
4.4 Calibration Function ......................................................................15
4.5 Sleep Function ............................................................................. 16
Setting the Sleep Temperature (SST) .......................................16
Setting the Sleep Start Time (CT) .............................................17
Setting the Sleep Sensitivity(DIF) .............................................18
4.6 Setting the Shutdown Function....................................................19
4.7 Setting the Temperature Range for the Alarm ............................20
4.8 Control Function for Overshooting ..............................................21
4.9 Setting the Alarm Sound ..............................................................22
4.10 Setting the Temperature Scale Display ......................................23
4.11 Key Lock Function ........................................................................24
Setting and Releasing the Key Lock .........................................24
Changing the Code Number ......................................................25
Resetting the Code Number ......................................................26
4.12 How to Restore Default Setting .................................................27
5. Maintenance .............................................................................28
5.1 How to Change the Tip .................................................................28
5.2 How to Change the Grip Rubber ..................................................29
5.3 How to Change the Fuse ..............................................................29
5.4 Housing Cleaning ..........................................................................30
5.5 How to Use and Maintain a Lead-Free Soldering Iron ...............30
6. Troubleshooting .............................................................................31
7. Replacement Tips .............................................................................32
8. Replacement Parts ..........................................................................34
9. Parameters .............................................................................35
TAIYO ELECTRIC IND.CO.,LTD.
4
MODEL RX-822AS
Voltage 110-120, 220-240V AC
Power Consumption 220–260W
Soldering Iron
Voltage /Wattage
RX-85GAS: Soldering unit [1] side 24V AC / 150W
RX-80GAS: Soldering unit [2] side 24V AC / 72W
Temperature Setting Range 50–450°C (122–842°F)
Dimensions
Control Unit 194(L) X 116(W) X 105(H)mm
RX- 85GAS: Soldering unit [1] side 174mm (with RX-85HRT-5D, w/o cord bushing)
RX-80GAS: Soldering unit [2] side 158mm (with RX- 80HRT- B, w/o cord bushing)
Weight
Control Unit Approx. 4.9kg (w/o cord)
RX- 85GAS: Soldering unit [1] side Approx.39g (with RX-85HRT-5D, w/o cord bushing)
RX-80GAS: Soldering unit [2] side Approx. 28g (with RX-80HRT-B, w/o cord bushing)
Control Unit to Soldering Unit Cord Length RX- 85GAS : 1.5m, RX-80GAS : 1.2m
AC Power Cord Length 1.5m 3 core cord (ground plug)
Leak Voltage Less than 2mV
Ground Resistance Less than 2
Ω
Accessories Soldering Iron Stand (S T-21) X 2
Specifications

TAIYO ELECTRIC IND.CO.,LTD.
5
2 Introduction
1. 2 soldering irons can be used
Can be prepared with 2 different tip types.
Therefore, you can do different types of
work at the same time.
2. 150W and 72W soldering irons can be used
simultaneously
Port [1] can be used for the 150W or 72W.
Port [2] can be used for 72W only. You can-
not use 150W in both parts.
3. The 2 soldering irons can be set to different
temperatures.
Port [1] and [2] can be set to different tem-
peratures. The set temperature and condition can be checked easily with the separate temperature display.
4. Excellent heat recovery
Achieved by combining a compact-high-
output heater with a high-sensitivity-sensor.
It makes difficult work that requires high
heat capacity, easy.
5. New ergonomic design soldering unit (PAT.)
Provides comfortable handling, flexible sol-
dering unit cord and a shorter distance from
the grip to the tip.
6. Fastest in its class
Reaches 350˚C (662˚F) in approx. 6 sec-
onds. (Equipped RX-80HRT series )
7. Easy to replace tip without using tools (PAT.)
Slide-change tip. No tools or heat resis-
tance pads needed.
8. Wide variety tip
9 tips for the RX- 85HRT series and 7 tips
for the RX-85HSRT series are available. A
total of 43 tips with different shapes including the tips for the RX-80HRT series are
available.
9.
Thick iron plating for lead-free soldering
All tips have a thick iron plating to slow ero-
sion caused by lead-free soldering.
10. Key Lock function (PAT.)
Tamper-proof keypad lock using a pass-
word. No tools or cards are needed.
11. Sleep function (PAT.)
The control unit automatically lowers the
temperature when inactive for a preset period of time, preventing overheating. Time
and temperature can be preset when inactive. Can be used with the shut down function.
12. Sleep function release (PAT.)
Sleep mode can be exited by touching the
wet sponge to cause temperature fluctuation.
13. Calibration function (PAT.)
The calibration function digitally offsets the
difference between the tip temperature and
the tip thermometer temperature.
14. Shutdown function
When the unit is not used for a preset time,
the unit enters shutdown mode automatically, to prevent any unexpected accidents.
2-1 Features of the RX-822AS
The RX-822AS includes 2 soldering units per one control unit for lead-free soldering. The
tip is a long-life compact type with integrated heater.
TAIYO ELECTRIC IND.CO.,LTD.
6
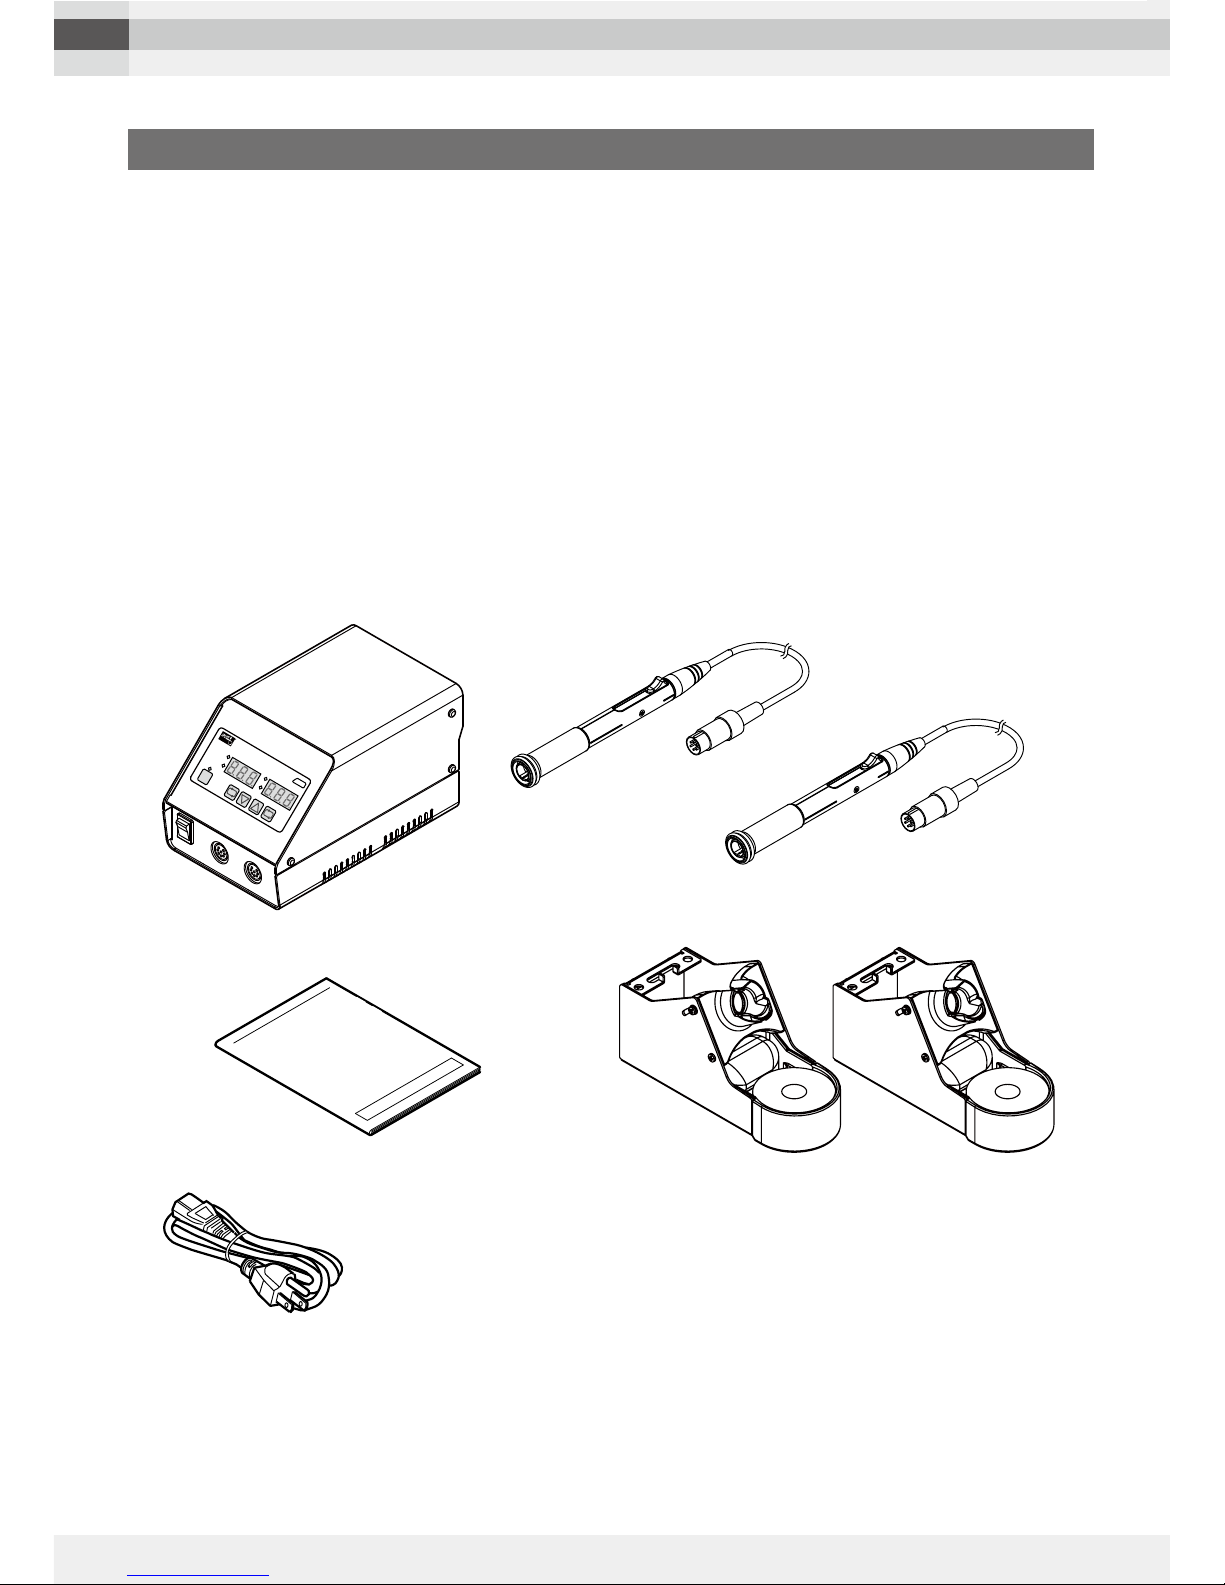
Packing List
■ Control Unit
■ Soldering Unit (RX-85GAS, RX-80GAS)
■ Soldering Iron Stand ST-21 x 2
■ Power Cord
■ Operation Manual
Please make sure that all the items listed below are included, and that the soldering station
functions properly before throwing away the packaging.
2-2 Unpacking
RX-822AS
INSTRUCTION MANUAL
KEY
LOCK
RX-822
HEAT
SLEEP
1.TEMP. ˚C
AS
HEAT
SLEEP
2.TEMP. ˚C
DUAL PORT SOLDER
ING STATION
2
1
Operation Manual
Soldering
Iron Stand
ST-21
Control Unit
Power Cord
Soldering Unit
RX-80GAS
Soldering Unit
RX-85GAS
TAIYO ELECTRIC IND.CO.,LTD.
7
1
0
KEY
LOCK
RX-822
HEAT
SLEEP
1.TEMP. ˚C
AS
HEAT
SLEEP
2.TEMP. ˚C
DUAL PORT SOLDERING STATION
2 1
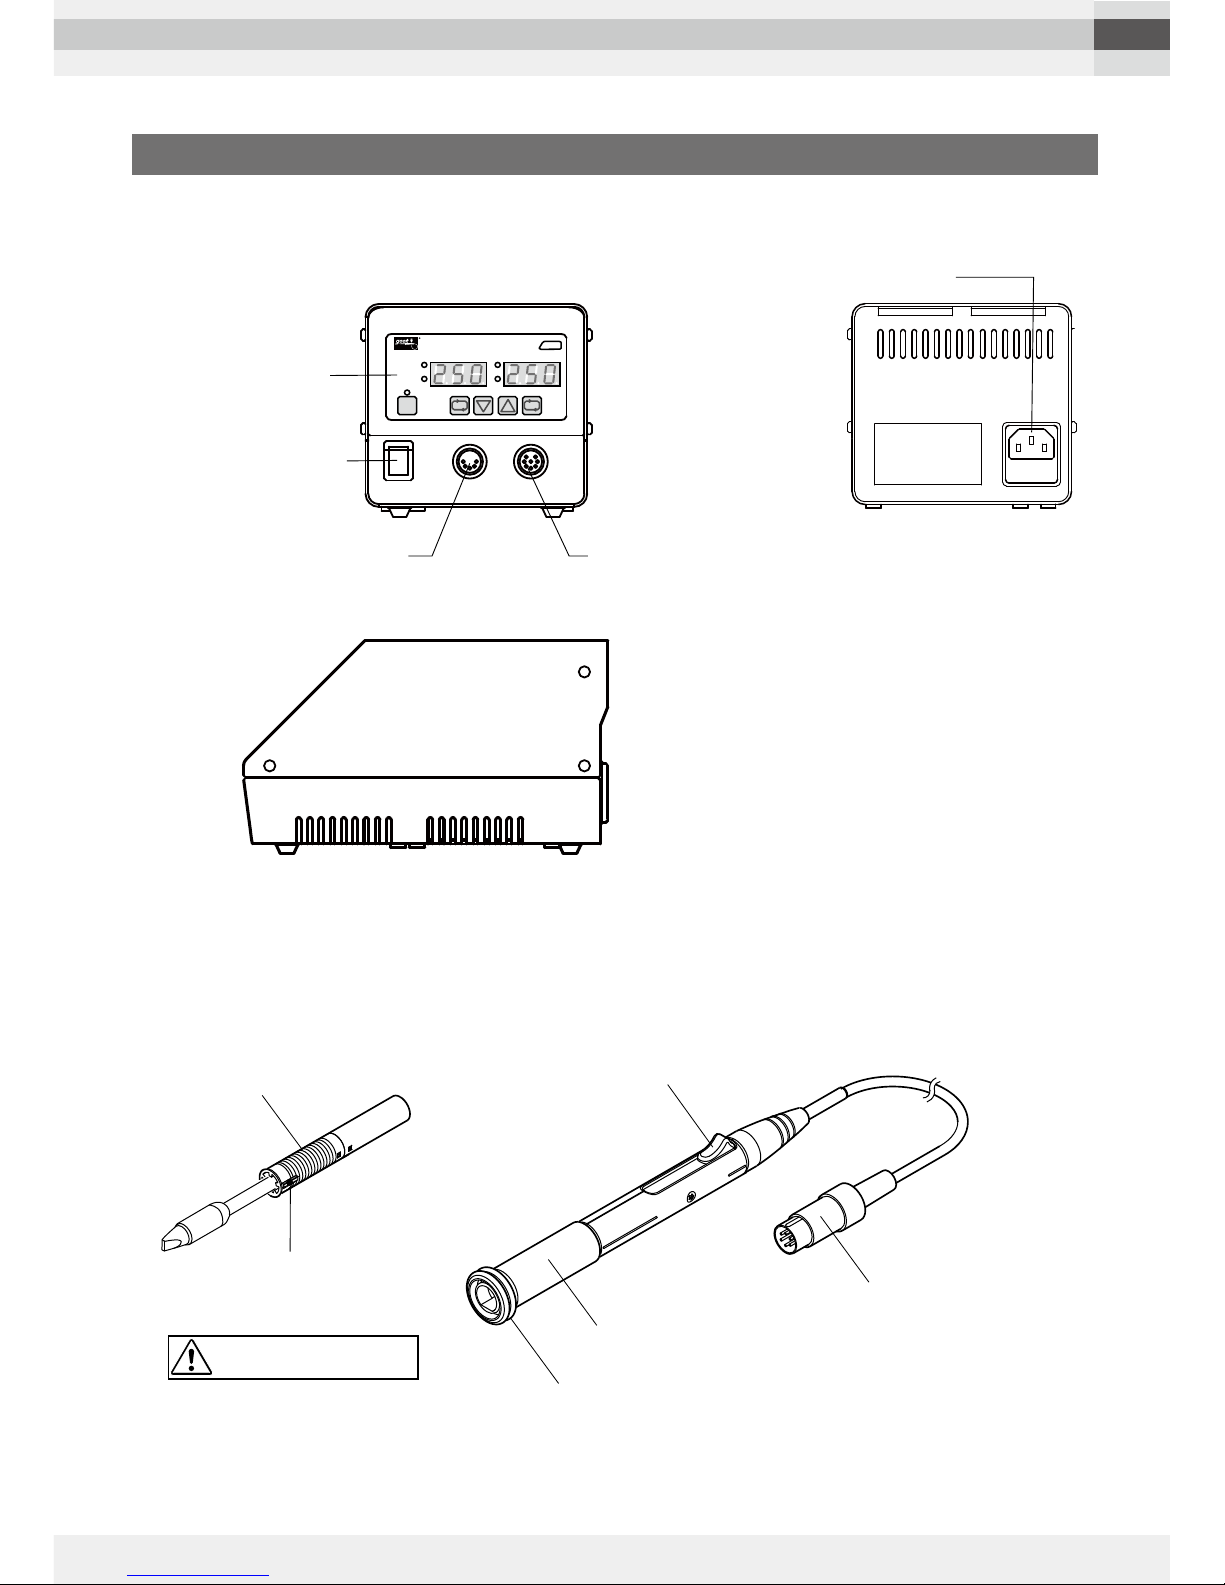
Operation Panel
Power Cord Socket
(With built-in replacement fuse)
Power Switch
Output Terminal for
Soldering unit [2] (72W)
Output Terminal for
Soldering unit [1] (150W/72W)
Tip (Sold separately)
Rib to prevent inserting in the
RX-80GAS soldering unit
Check the direction of the
tip before inserting.
1
0
KEY
LOCK
RX-822
HEAT
SLEEP
1.TEMP. ˚C
AS
HEAT
SLEEP
2.TEMP. ˚C
DUAL PORT SOLDERING STATION
2 1
Operation Panel
Slide Lever
Grip Rubber
Adapter Ring
Soldering Unit
Connector
Power Cord Socket
(With built-in replacement fuse)
Power Switch
Output Terminal for
Soldering unit [2] (72W)
Output Terminal for
Soldering unit [1] (150W/72W)
(Applicable Tip : RX-85HRT/85HSRT)
Control Unit
Soldering Unit
2-3 Name of Parts
TAIYO ELECTRIC IND.CO.,LTD.
8
KEY
LOCK
RX-822
HEAT
SLEEP
1.TEMP. ˚C
AS
HEAT
SLEEP
2.TEMP. ˚C
①
①
⑥
③
②
②
④
④
⑤
⑦ ⑦⑧ ⑨
DUAL PORT SOLDERING STATION
2 1
③
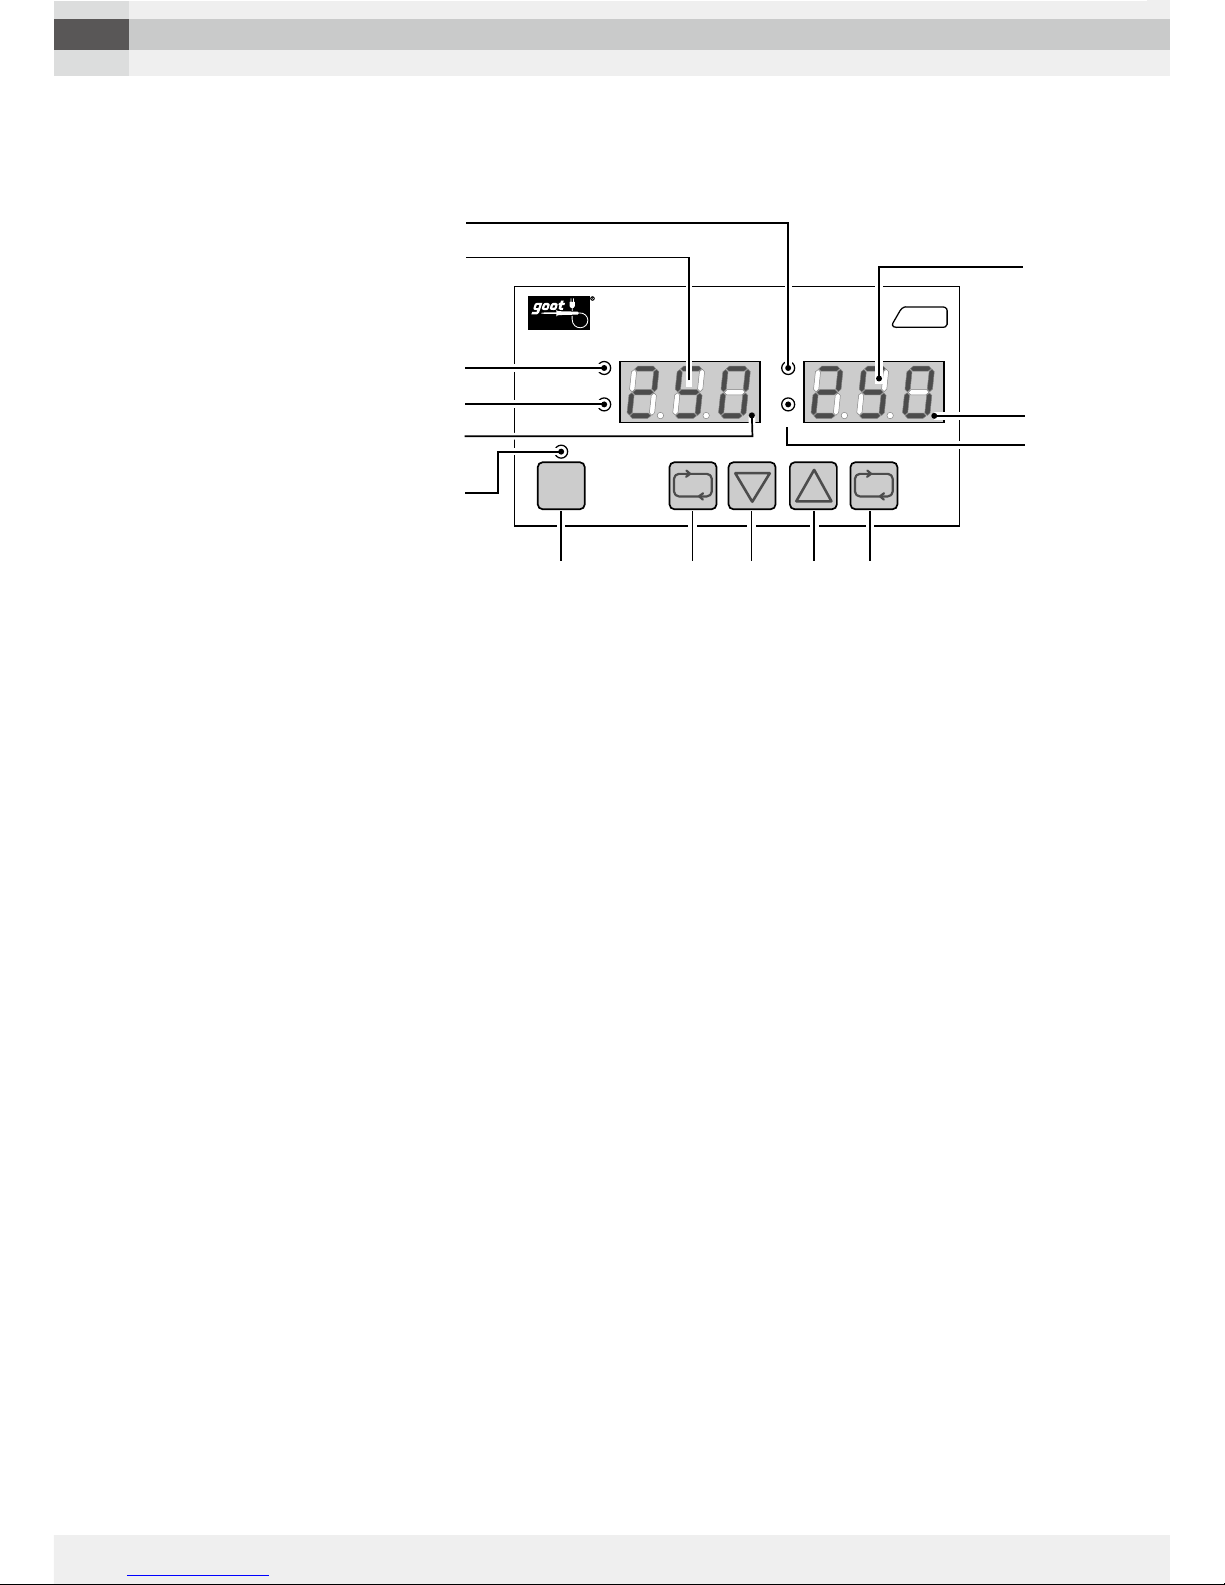
1. HEAT lamp
Lights up when the heater is ON.
2. SLEEP lamp
Flashes while setting the SLEEP function. The flashing will get faster 30
seconds before going into SLEEP mode. Lights up when the unit enters
SLEEP mode.
3. TEMP. display
When the power is turned ON or when SLEEP mode is exited, the TEMP
display shows the tip temperature rise to the set temperature. The TEMP
display shows the set temperature when it is reached.
4. ALARM lamp (to the right of the last digit in the temperature display)
Flashes when the tip temperature is within the DIF range.
Turns off when the tip temperature is out of the DIF range.
Flashes when the tip temperature is out of the upper and lower tempera
-
ture limits.
5. KEY LOCK lamp
Flashes while setting the Key Lock function.
Flashes when the unit is in Key Lock mode.
6. KEY LOCK key
Use to set the Key Lock function.
Use to lock and unlock the keypad.
7. SETTING key
This key is used to set the temperature and parameters.
8. DOWN key
This key is used to reduce the temperature and change the parameter.
9. UP key
This key is used to increase the temperature and change the parameter.
■Operation Panel
TAIYO ELECTRIC IND.CO.,LTD.
9
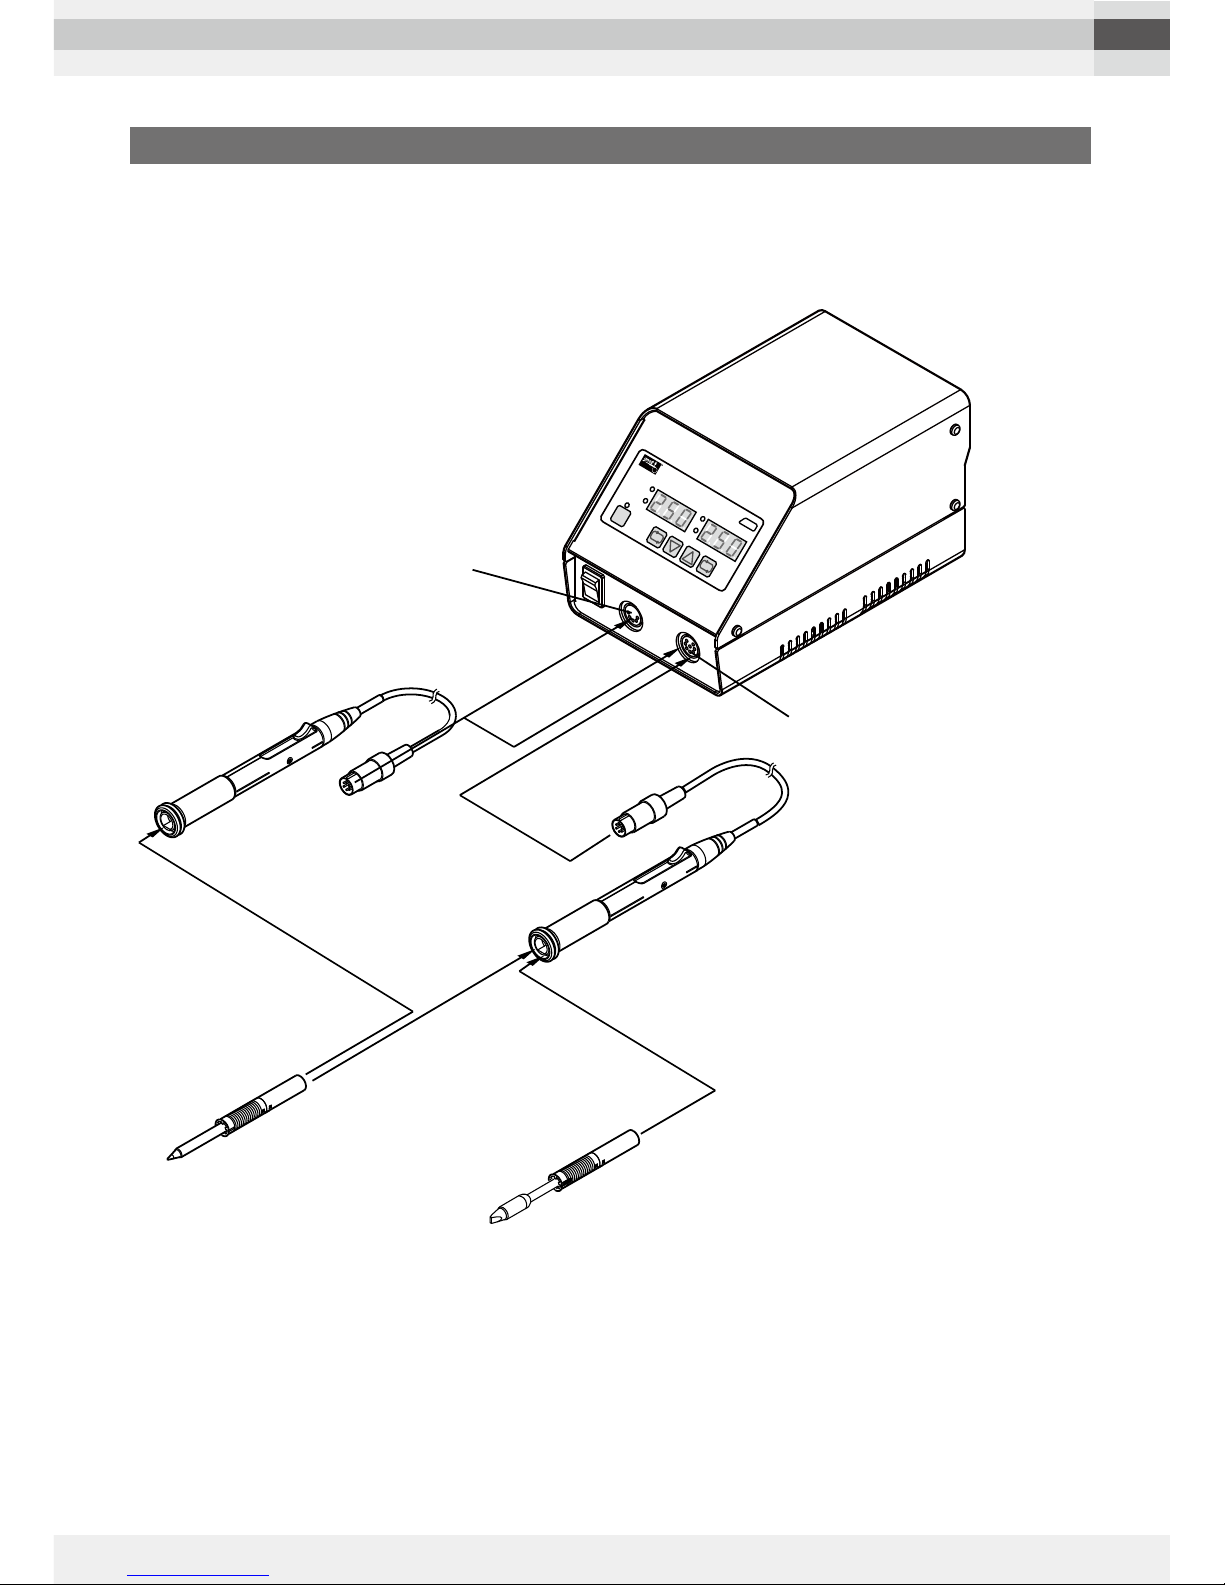
Assemble according to following illustrations. Parts cannot be connected other than as shown.
Connecting parts by force will result in breakage.
2-4 Setup
Soldering unit
RX-80GAS[72W]
Soldering unit
RX-85GAS/RX-80GAS[150W/72W]
RX-80HRT Series
(Sold separately)
[72W integrated heater]
RX-85HRT/RX-85HSRT Series
(Sold separately)
[150W high power integrated heater]
Output Terminal for
Soldering unit [2] (72W)
Output Terminal for
Soldering unit [1] (150W/72W)
KEY
LOCK
RX-822
HEAT
SLEEP
1.TEMP. ˚C
AS
HEAT
SLEEP
2.TEMP. ˚C
DUAL PORT SOLDERING STATION
2
1
TAIYO ELECTRIC IND.CO.,LTD.
10
3 Rules for Safe Operation
1. KNOW YOUR SOLDERING STATION.
Do not attempt to operate this soldering station until you have read thoroughly and
understood completely all instructions, safety, rules, etc. contained in this manual.
Failure to comply may result in accidents involving fire or serious personal injury.
2. DO NOT USE IN DANGEROUS ENVIRONMENTS.
Do not use the soldering station in damp or wet locations or expose it to external envi-
ronmental conditions, particularly rain. Never use it in an explosive atmosphere. The
heat from the heater can ignite fumes. Be sure that the work area is properly lit and
well ventilated.
3. KEEP CHILDREN AND BYSTANDERS AWAY FROM THE SOLDERING STATION.
Do not let bystanders touch the soldering station. All bystanders should be kept a safe
distance from the work area.
4. PROPERLY STORE THE SOLDERING STATION WHEN NOT IN USE.
When not in use, the soldering station should be stored in a dry and locked place.
Keep out of the reach of children.
5. USE FOR THE RIGHT JOB.
This soldering station is an electrical tool used to solder parts and melt solder. Do not
use the soldering station for any other purpose. For example: The soldering station
should never be used to warm water or other liquids.
6. WEAR PROPER APPAREL, SAFETY GLASSES, GLOVES AND MASK.
Do not wear loose clothing (such as a necktie). Tie up long hair. Clothing or hair can
burn on contact with the tip or surrounding heated parts.
7. CONNECT TO THE SPECIFIED AC POWER SUPPLY.
The power voltage for this soldering station is indicated at the back of the con-
trol unit. Never plug the soldering station into any other voltage.
8. DO NOT ABUSE THE POWER CORD AND INSPECT IT PERIODICALLY.
Never pull the power cord to disconnect it from the receptacle. Keep the power cord
away from heat, oil and sharp edges. If it is damaged, contact the nearest distributor
for a replacement.
WARNING
Do not operate the soldering station until you have read
and understood the whole manual and safety instruc
-
tions.
TAIYO ELECTRIC IND.CO.,LTD.
11
WARNING
The RX-822AS is an anti-static model. Be sure to properly ground the soldering station using a grounded
receptacle to prevent electric shocks and anti-static. If
it is not properly grounded, electric shocks will occur.
As the soldering station uses conductive materials,
please be careful not to touch any electrical power
source or a serious injury will result.
9. USE STAND PROVIDED.
Be sure to use the soldering iron stand (ST-21) included with the soldering station. If
this stand is not used, the plastic parts (adapter ring and/or soldering unit housing) of
the soldering iron unit could become damaged. Position the soldering iron stand on a
flat work-surface bench. Follow instructions included with the soldering iron stand to
assemble it.
10.CONCERNING THE TIP.
Allow the tip to cool naturally. Never use any other method to cool it down. For example:
Water should never be poured or sprinkled on the tip to cool it down.
11. The soldering iron is not intended for use by young children or infirm persons
without supervision. Young children should be supervised to ensure that they do
not play with the soldering iron.
 Loading...