

Goot HF-60, HF-40 Operation Manual

WARNING
High temperature s. To avoid injury, do not
touch any part except the gr ip. To prevent
fire, do not use the HF-4 0/60 near flammable substances. If the power cor d is
damaged, stop immediately; tur n off the
power, and unplug to prevent fire or electrical shocks.
CAUTION
Use a proper soldering iron stand to prevent serious burns or fires. Keep out of the reach of children.
Do not use with any power voltage other than the
indicated voltage. Ignition may occur
through the heater. Never use the soldering iron in damp, humid or wet locations
to prevent electric shocks. Turn off the
power and unplu g when not in use. When
unplugging, pull out the plug not the cord.
To prevent fire or persona l injury, be sure
that the tip has sufficiently cooled down
when storing.
Some smoke will be produced during initial
operation, but it will soon stop. There should be no
smoke produced after the initial operation.
FE ATU RES
A dual switching sy stem with high an d low heater
control. (Effective for choosing proper power or
preventing overheating) Operates one-hande d,
equipped with gun -type manua l solder fe ed. Can be
used with
goot SE
series reel solder 45g or 100g (wire
diameter 0.8-1.6mm). The length of solder can be
adjusted with the adjustm ent screw. Available with
long-life Red Tips.
HOW TO USE
1. Attach a solder to the reel holder.
2. Push and hold the “Solder r elease button.” Place
the solder t ip 80-100mm into its inser tion opening,
keeping the solder straight. Solder comes out the
guide nozzle when releasing the "Solder relea se
button" and pulling the trigger. If the solder does
not come out, keep push-holding the "Solder
release button", and pull out the solder; then insert
it again. Crooked solder, or solder of insufficient
length, may re sult in solder misfeed.
3. The length of solder c an be adjusted with the
adjustment screw. The solder fee d length can be
shortened by tightening the screw. (range 4.56mm).
4. When replacing the solder, keep push-holding the
"Solder release button", and pull out the solder.
く な り ま す( 調 整 範 囲
:4.5mm〜6mm
)。
4.
はんだを交換する際は、はんだリリースボタンを押さえた
ままはんだを引 き抜いてください。
※はんだは 、
goot SE
シリーズ
45g 100g
リール巻 きはんだ を
ご使 用ください。他 社製 のリール巻 きはんだ では、リールホル
ダーのプラスチックの芯に、はまらない場合が あります。その
場合は付属 の空リールへ巻き付 けるか又はプラスチック芯を取
り外してご使 用くださ い。
警 告
●火 傷に 充 分 注 意し な がら 使 用してく だ さ い。
また、ご使用中はこての 握り部分以 外は高 温に
なりますから触れないでください。火傷します。
●燃えやすい物の近くで使用しないでください。
火災の 原因になります。●電源コードに傷、損
傷等がある場合は火災、感電等の危険がありま
すのですぐに使用を中止し、プラグをコンセント
から 抜 い てく だ さい 。
注 意
●火 災や 火傷 防 止のた め、必ず こて台を 使 用してください。
●危険ですから小さなこどものそばでは使用しないでくだ
さい。また、使 用 後 はい たずら 防止 のため 、こどもの 手 の
届かない場所に保管してください。●定格以上の電 圧を加
えな いで くださ い 。ヒータ ーが 過 熱 し火 災 の 危 険
があります。●風呂場など、水分や湿気の多い
場所 では絶 対に使 用しないでください。感 電する
恐れがあります。●プラグはコンセントの電 流定
格を 確か めてから、根元 まで 差し込 んでください 。
使用後、または使用を中断する時は必ずプラグ
をコンセントから抜いてください。コード ではな
く、必ずプラグをつまんで抜いてください。●収
納はこて先の温度が充分冷えたのを確認してか
ら行ってください。火傷や火災の原 因になります。
最初に電源を入れた時、煙が出ることがありますがしばらくす
ると 止 まりま す。
2
回目以降 のご使 用では出ません。
特 長
● 強 ・ 弱 の 切 換 ス イッ チ 付( 作 業 に よ っ てW数を 替 え たり、
オーバー ヒート防止 にもなりま す)。●片 手 操作 で 手軽 には
んだ付け作業ができます。●
goot SE
シリーズ
45 g,10 0g
リール巻 はんだ を、リールホルダー に取り付け て使 用でき
ます※( 使用 方 法をご 覧ください)。● はんだ の 送る量 を調
整できるはんだ送り調整 ねじ付。●糸はんだはφ
0.8
〜φ
1.6m m
まで使用で きます。●軽量コンパクトなので長時 間
の片 手作 業が 楽 にできま す。●こて先は長 寿 命こて先 レッド
チップを使 用しています。
使用方法
1.
リールホルダーにはんだ を取り付けてください。
2.
はんだリリースボタンを 押したまま、はん だの 先 端の
80
〜
100mm
をま っすぐ 伸 ばして は ん だ 挿 入 口 から 差 し 込
みます。はんだリリースボタンを 離しレバーを 引くと、は
んだが送ら れていきます。もし、はんだが 送られな い時は 、
はんだリリースボタンを 押したまま、はんだ を 一度 抜 い
て再度 挿入してください。はんだが まっすぐに差し込まれ
ていない時や差し込みが浅い時は、はんだが送られない
場 合 が ありま す。
3.
はんだ 送り量の 調節 ははんだ 送り調整 ねじをドライバー
で回してください。ねじ を締 めるとは んだ 送り量 が小 さ
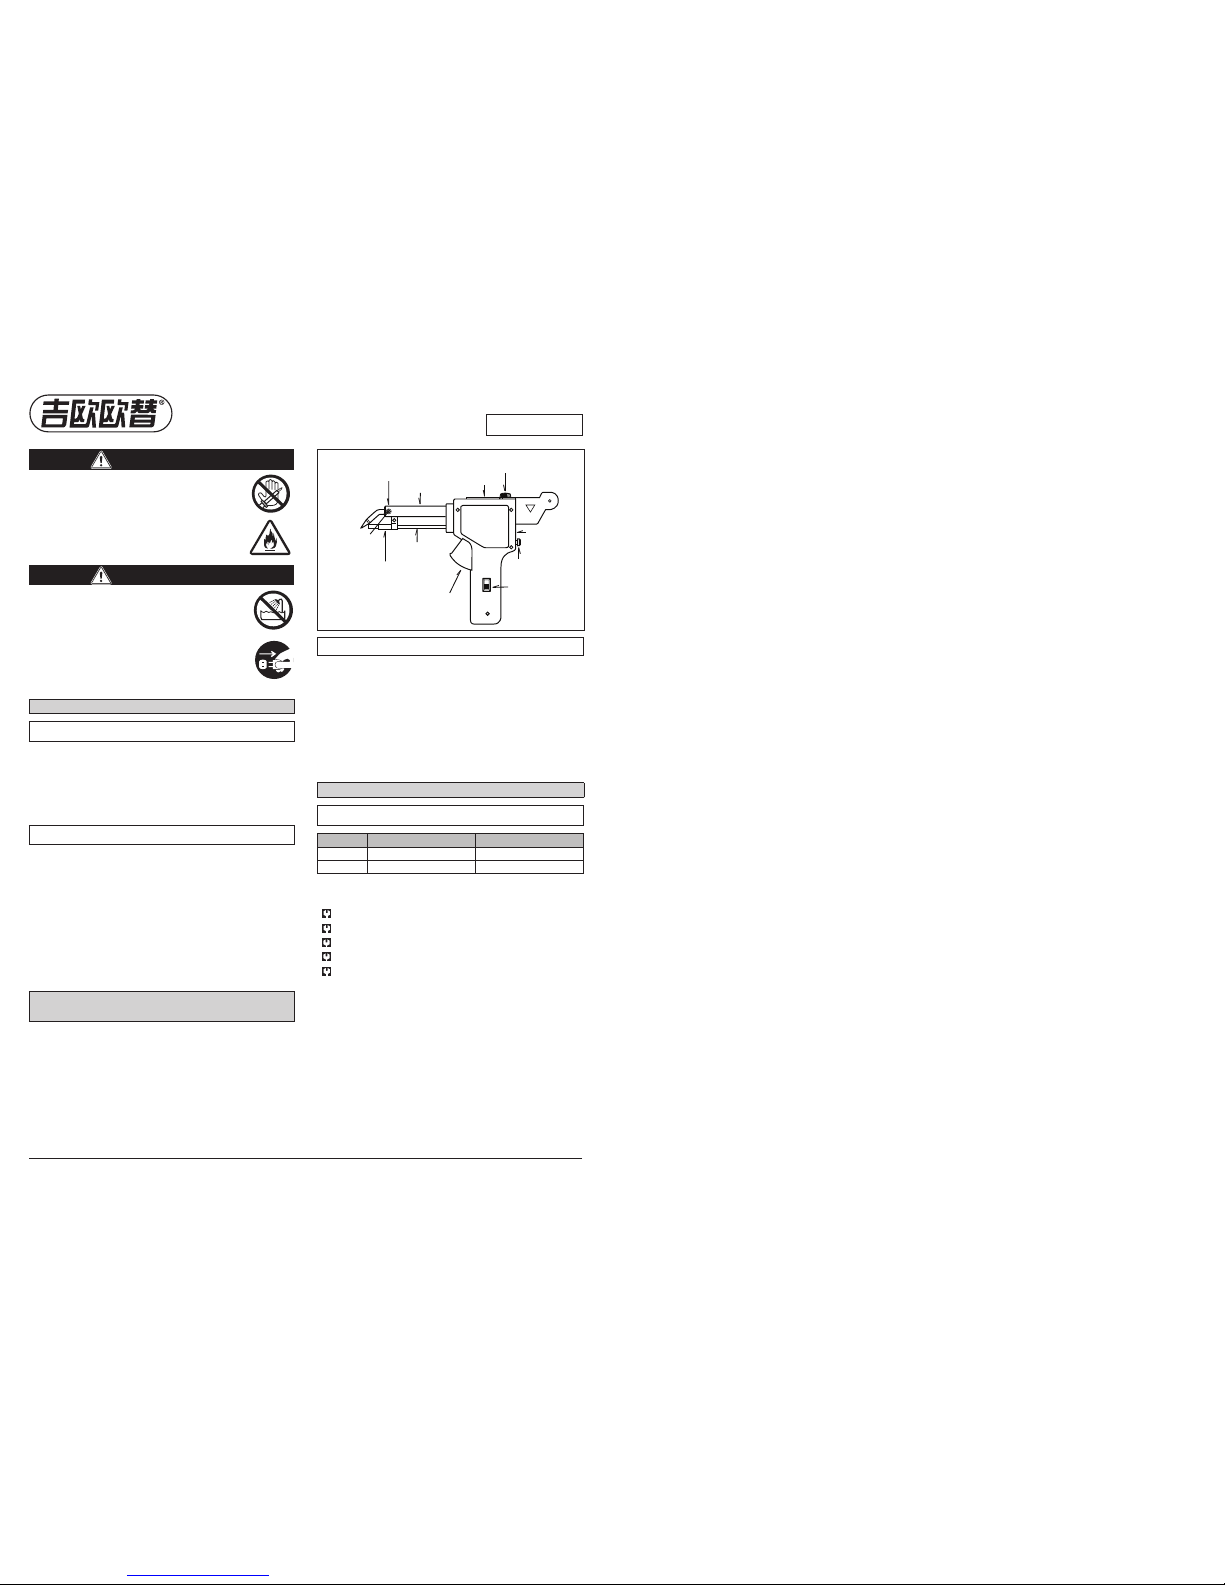
H I
L O
はんだ
リリー スボ タン
はんだ挿入口
リール
ホルダー
はんだ 送り調整ねじ
レバー
ヒーター
止めねじ
H Fガ イドノ ズル
ガイド パ イプ
こて先
こて先
止めねじ(裏側)
ヒーターパイプ
リールホ ルダー
止めねじ
カバー止め
ねじ
強弱切替
スイッチ
H I
L O
Solder
release button
Solder
insertion opening
Reel holder
Solder-adjustment
screw
Trigger
Heater-fixing
screw
Guide nozzle
Guide Pipe
Tip
Tip-fixing
screw (reverse)
Heater pipe
Reel holder-fixing
screw
Plate-fixing
screw
High/Low
switch
手動はんだ送り
はんだこて
MANUAL FEED
SOLDERING IRON
Use with goot SE series reel solder 45g or 100g (wire
diameter 0.8-1.6mm). Other reel solder may not suit
the plastic core of the reel holder. In that case, use
after taking out the pla stic core.
取扱説明書
OPERATION
MANUAL
HF-40/60
HF-40/60
ヒータ ー 交 換 方 法
1.
本体 上部 のカ バー止め ねじをは ずし、カバー を取りは ずし
ます。
2.
ヒー ター のリ ード 線2本がターミナル にそれぞれねじで
固定されていますので、取り外してください。
3.
こて先 止 め ねじと ヒータ ー止 め ねじ を 外し、ヒー ター を 引
き抜 き ま す。
4.
新しいヒーターの 端子をヒーターパイプに 差し込み 、こて
先止 めねじとヒーター 止め ねじで固 定してください。
5.
ヒーターのリード線をターミナル に固定します。
6.
最後に本体上部のカバーを取り付けて作業終了です。
注)カバ ー止め ねじ以 外 のねじ を外して 本体 を分 解す ると、再
組立が 困難になる 場合がありますのでご注意ください。
仕 様
型 番 消費電力
(Hi / Lo)
こて先温度
(Hi / Lo)
HF-40 43W / 22W 450˚C / 340˚C
HF-60 58W / 29W 480˚C / 350˚C
太洋電機産業株式会社
www.goot.co.jp E-mail: info@goot.co.jp
東京
03(3832)1774
大阪
06(6644)3508
新潟
0256(35)5379
広島
084 (951)9010
お客様相 談窓口
■交換部品
HF-4 0
用替 こて先 ・・・・
HF- 40 RT-B
HF-4 0
用替 ヒータ ー ・・・・・・
HF-4 0H
HF-60
用替 こて先 ・・・・
HF-60RT-B
HF-60
用替 ヒータ ー ・・・・・
HF-60H
HF
ガ イドノ ズ ル ・・・・・・・・・
HF-40 N
■ REPLACEMENT PARTS
HF-40 Replacement tip ........... HF- 40R T-B
HF-60 Replacement tip ........... HF -6 0RT-B
HF-40 Replacement Heater ..... HF- 40H
HF-60 Replacement Heater ..... HF- 60H
HF Guide nozzle ...................... HF-4 0N
HEATER REPLACEMENT
1. Take out the top plate after removing the Plate-
fixing screw.
2. Take out the two heater-lead wires fixed to the terminal.
3. Take ou t the heater after re moving both Tip-fixing &
Heater-fixing screws.
4. Insert a new heater into the heater pipe, and fi x both
the Tip-fixing & the Heater-fixing screws.
5. Fix the heater-lead wire to the terminal.
6. Attach the top plate.
Disassembling the device by unscrewing the sc rews
(except the Plate-fixing screw) may make reassem bly
difficult.
SPECIFICATIONS
Model
Power Consumption (Hi / Lo) Tip temperature (Hi / Lo)
HF-40 43W / 22W 450˚C / 340˚C
HF-60 58W / 29W 480˚C / 350˚C
TAIYO ELECTRIC IND.CO.,LTD.
www.goot.co.jp E-mail: info@goot.co.jp
警 告
●请在使用时注意避免烫伤。另外,使用中请勿
触摸烙铁手柄以外的地方,防止高温烫伤。
●请 勿在 易燃 处 使用 。以防 火灾 发 生。
●电源线在老化、破损的情况下会有火灾、触电
的危险,此时请立即停止使用,拔下插头。
注 意
●为避免火灾或烫伤发生,请务必使用烙铁架。
●请勿在小孩处使用。为避免小孩触碰,使用完后,
请保管在小孩接触不到的地方。●请勿增加额定
外 的 电 压 ,发 热 芯 过 热 可 导 致 火 灾 。 ● 请 勿 在 浴 室 、
水分或湿气多的地方使用,以防触电。●使用前
请确认插座功率,插 好插头。使用后或中断使用时,
请务必拔下插头。●请确认焊嘴充分冷却后再收
回工具箱,以防烫伤或火灾发生。
初次接通电源时,会有短暂的冒烟现象。其后不会再出现此情况。
特
点
●配有强弱转换开 关(可根据作业需要转换 适当的瓦数,防
止 过 度 加 热 )。 ● 单 手 操 作 , 轻 便 作 业 。
●锡线 卷芯轴可使 用
goot SE
系列
45g、100g
卷装锡 线。
※(请参考使用方法)●送出锡线的长度可用送锡螺 钉调整。
●可使用直径 φ
0.8~φ1.6m m
的 锡 线 。● 配 有 长 寿 命 焊 嘴 。
使用方法
1.
请在锡线卷芯轴处装入锡线。
2.
按 住 进 锡按 钮 ,从锡 线 装 入 口插 入80~
100m m
拉直的
锡线。松开进锡按钮,然 后按压扳机,送入锡线。若锡线
不能送入,请按住进锡按钮,拔出锡线重新插入。锡线未
笔直插入或插入锡线的长度较短时,会导致锡线无法送入。
3.
请使用螺丝刀,拧开送锡调整螺钉,调节送锡长度。拧
紧螺钉后,送锡长度可变短(可调整范围:
4.5mm
~
6mm
)。
4.
更换锡线时,请按住进锡按钮,然后抽出锡线。
※ 使用其他公司的锡线圈,有可能会导致卷轴无法转 动。此时
请将锡线卷芯轴的塑料部分取下后使用。
H I
L O
进锡按钮
锡线装入口
锡线卷芯轴
送锡调整螺钉
扳机
发热芯固定螺钉
(短螺钉)
导向嘴
导向管
焊嘴
焊嘴固定螺钉
(背面、长螺钉)
发热芯护套
锡线卷芯轴固定螺钉
上盖固定螺钉
强弱转换开关
使用说明书
HF-40/60
发热芯的交换方法
1.
打开本体上盖固定螺钉,取下上盖。
2.
拧开 固 定 在 端 子上的2条发 热芯导 线的 螺钉。
3.
拧开焊嘴固定螺 钉和发热芯固定螺 钉,取 出发热芯。
4.
将新的发热芯插入 发热芯护套,然后拧紧焊嘴固定螺 钉和
发热芯 固定 螺钉。
5.
将发 热 芯 的 导线 固 定 在 端 子上,拧 紧 螺 钉。
6.
最后固定本体上盖,拧紧上盖固定螺钉。
注)请不要随意拆开本体,重新组装 难度很 大。
规
格
型 号 耗电量 (
Hi / Lo
) 焊嘴温度 (
Hi / Lo
)
HF-40 43W / 22W 450˚C / 340˚C
HF-60 58W / 29W 480˚C / 350˚C
交换用配件
HF-4 0
用焊嘴 ·····
HF-40RT-B
HF-4 0
用发热芯 ·······
HF-4 0H
HF-60
用焊嘴 ······
HF-6 0RT-B
HF-60
用发热芯 ·······
HF-60 H
HF
导向嘴 ············
HF-4 0N
太洋電機産業株式会社
www.goot.cn E-mail: info@goot.cn
中国事务所
广东省深圳市南山区南海大道海王大厦A座
16C
邮编 :
5180 33 TEL: 0755-2664-6936 FAX: 0755-2664-6923
手动送锡电烙铁
Printed in J apan, MAY 2012 A9250 AP00
 Loading...