

Google Nest S3004PWBUS User Manual
Nest Protect (Battery)
Detects smoke and carbon monoxide (CO)
User’s Guide
ATTENTION: Please read carefully and save this user’s guide in a safe place.

TABLE OF CONTENTS
Meet your Nest Protect . . . . . . . . . . . . . . . . . . . . . . . . . . . . . . . . . . . . . . . . . . . . . . . . . . . . . . . . . . . . . . . . . . . . . . . . . . . . . . . . . . . . . . . . . . . . . . . . . 3
Location in your home . . . . . . . . . . . . . . . . . . . . . . . . . . . . . . . . . . . . . . . . . . . . . . . . . . . . . . . . . . . . . . . . . . . . . . . . . . . . . . . . . . . . . . . . . . . . . . . . . . . 5
Placement on the ceiling or wall . . . . . . . . . . . . . . . . . . . . . . . . . . . . . . . . . . . . . . . . . . . . . . . . . . . . . . . . . . . . . . . . . . . . . . . . . . . . . . . . . . . . . . 6
Placement on a sloped ceiling . . . . . . . . . . . . . . . . . . . . . . . . . . . . . . . . . . . . . . . . . . . . . . . . . . . . . . . . . . . . . . . . . . . . . . . . . . . . . . . . . . . . . . . . 7
Setup and installation . . . . . . . . . . . . . . . . . . . . . . . . . . . . . . . . . . . . . . . . . . . . . . . . . . . . . . . . . . . . . . . . . . . . . . . . . . . . . . . . . . . . . . . . . . . . . . . . . . 8
Operating instructions . . . . . . . . . . . . . . . . . . . . . . . . . . . . . . . . . . . . . . . . . . . . . . . . . . . . . . . . . . . . . . . . . . . . . . . . . . . . . . . . . . . . . . . . . . . . . . . . . 10
Heads-Up and Emergency Alarms . . . . . . . . . . . . . . . . . . . . . . . . . . . . . . . . . . . . . . . . . . . . . . . . . . . . . . . . . . . . . . . . . . . . . . . . . . . . . . . . . .12
Wireless interconnect . . . . . . . . . . . . . . . . . . . . . . . . . . . . . . . . . . . . . . . . . . . . . . . . . . . . . . . . . . . . . . . . . . . . . . . . . . . . . . . . . . . . . . . . . . . . . . . . . . 13
Testing Nest Protect . . . . . . . . . . . . . . . . . . . . . . . . . . . . . . . . . . . . . . . . . . . . . . . . . . . . . . . . . . . . . . . . . . . . . . . . . . . . . . . . . . . . . . . . . . . . . . . . . . . . 14
General maintenance . . . . . . . . . . . . . . . . . . . . . . . . . . . . . . . . . . . . . . . . . . . . . . . . . . . . . . . . . . . . . . . . . . . . . . . . . . . . . . . . . . . . . . . . . . . . . . . . . .15
Safety . . . . . . . . . . . . . . . . . . . . . . . . . . . . . . . . . . . . . . . . . . . . . . . . . . . . . . . . . . . . . . . . . . . . . . . . . . . . . . . . . . . . . . . . . . . . . . . . . . . . . . . . . . . . . . . . . . . . . . 17
Alarm limitations . . . . . . . . . . . . . . . . . . . . . . . . . . . . . . . . . . . . . . . . . . . . . . . . . . . . . . . . . . . . . . . . . . . . . . . . . . . . . . . . . . . . . . . . . . . . . . . . . . . . . 17
Installation code . . . . . . . . . . . . . . . . . . . . . . . . . . . . . . . . . . . . . . . . . . . . . . . . . . . . . . . . . . . . . . . . . . . . . . . . . . . . . . . . . . . . . . . . . . . . . . . . . . . . .19
Carbon monoxide (CO) precautions . . . . . . . . . . . . . . . . . . . . . . . . . . . . . . . . . . . . . . . . . . . . . . . . . . . . . . . . . . . . . . . . . . . . . . . . . . . . . .21
Fire safety precautions . . . . . . . . . . . . . . . . . . . . . . . . . . . . . . . . . . . . . . . . . . . . . . . . . . . . . . . . . . . . . . . . . . . . . . . . . . . . . . . . . . . . . . . . . . . . . 23
Federal communications commission (FCC) compliance . . . . . . . . . . . . . . . . . . . . . . . . . . . . . . . . . . . . . . . . . . . . . . . . . . . 24
Mobile notifications . . . . . . . . . . . . . . . . . . . . . . . . . . . . . . . . . . . . . . . . . . . . . . . . . . . . . . . . . . . . . . . . . . . . . . . . . . . . . . . . . . . . . . . . . . . . . . . . .24
Limited Warranty . . . . . . . . . . . . . . . . . . . . . . . . . . . . . . . . . . . . . . . . . . . . . . . . . . . . . . . . . . . . . . . . . . . . . . . . . . . . . . . . . . . . . . . . . . . . . . . . . . . . . . . . 25
2
MEET YOUR NEST PROTECT
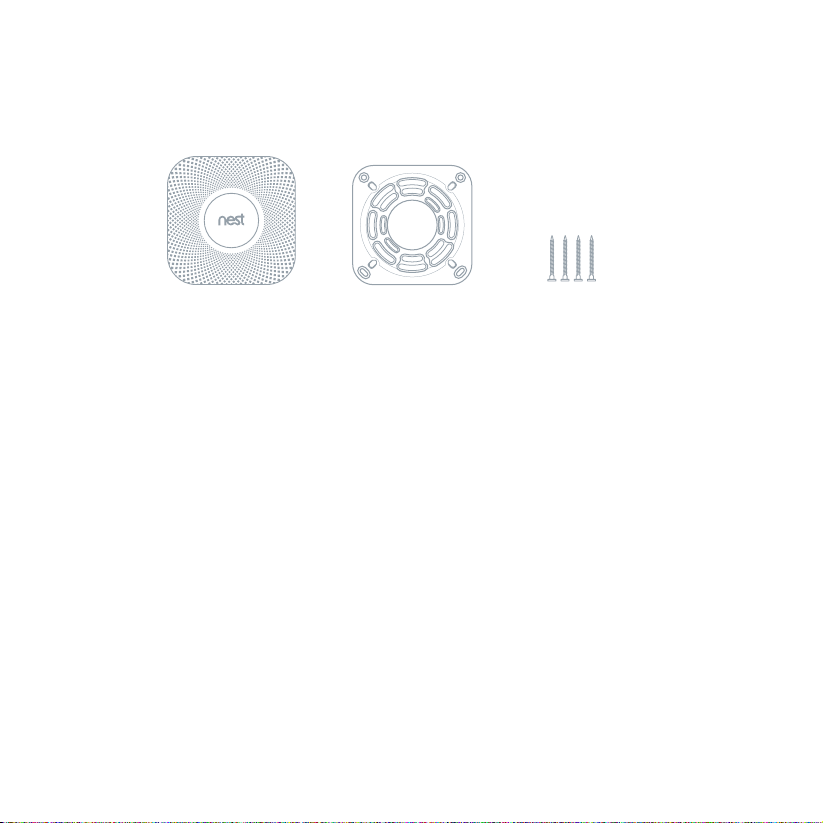
Inside the box you’ll find:
Nest Protect Backplate
Nest Protect is designed to detect smoke and carbon monoxide in a residential environment.
It has multiple sensors to help it understand what’s happening in your home and a photoelectric
sensor to detect slow, smoldering fires. Nest Protect can be used as a single station or multiple
station alarm.
This guide covers the installation of Nest Protect (Battery) - Model number O5A.
4 mounting screws
REQUIREMENTS
Wi-Fi, an iOS or Android smar tphone or tablet, and a free Nest Account are required for wireless
mobile notifications and software updates. During set up, Wi-Fi and a free Nest Account are
required for wireless interconnect and room naming. After all the Nest Protects in your home
are connected, they can communicate with each other without Wi-Fi.
3
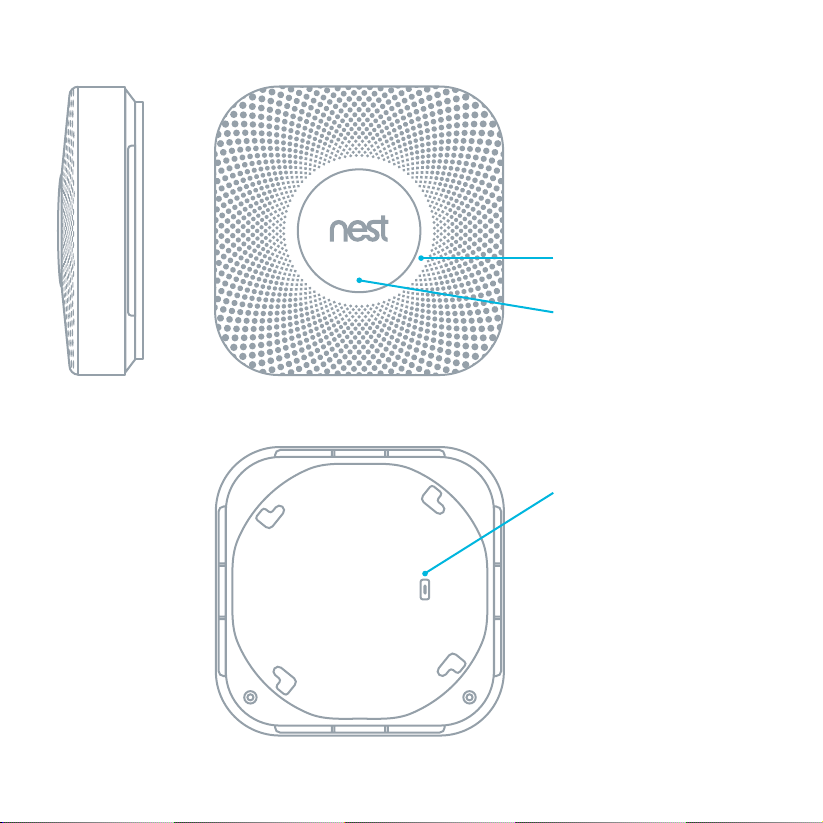
Horn enables Nest Protect
to alert you with a loud
emergency sound.
1.63"
(4 .1cm )
5.28"
(13.4 cm)
Speaker allows Nest Protect
to speak with a human voice.
Light ring changes
color to alert you.
Push the Nest button to
hush alarms and run a test.
Micro-USB connector
(not for normal use).
Battery compartment:
6 AA Energizer® Ultimate
Lithium batteries (L91).
4

LOCATION IN YOUR HOME
The Natio nal Fire Protec tion Associati on recommends installing a s moke alarm in the following areas:
• On every floor, including finished attics and basements.
• Inside and outside every sleeping area.
• At the top of the first-to-second floor stairway and on the basement ceiling near the entry
of the stairs.
• In homes with more than 1,000 square feet on one level, additional alarms may be required.
Nest Protect should be installed at least 10 ft (3 m) away from cooktops or cooking appliances.
Nest Protect should NOT be installed in unfinished attics or garages.
ATTIC
BEDROOM
KITCHEN
HALL
MASTER
BEDROOM
LIVING/
FAMILY
ROOM
GARAGEBASEMENT
5
Maximum
WALL
IS UPRIGHT
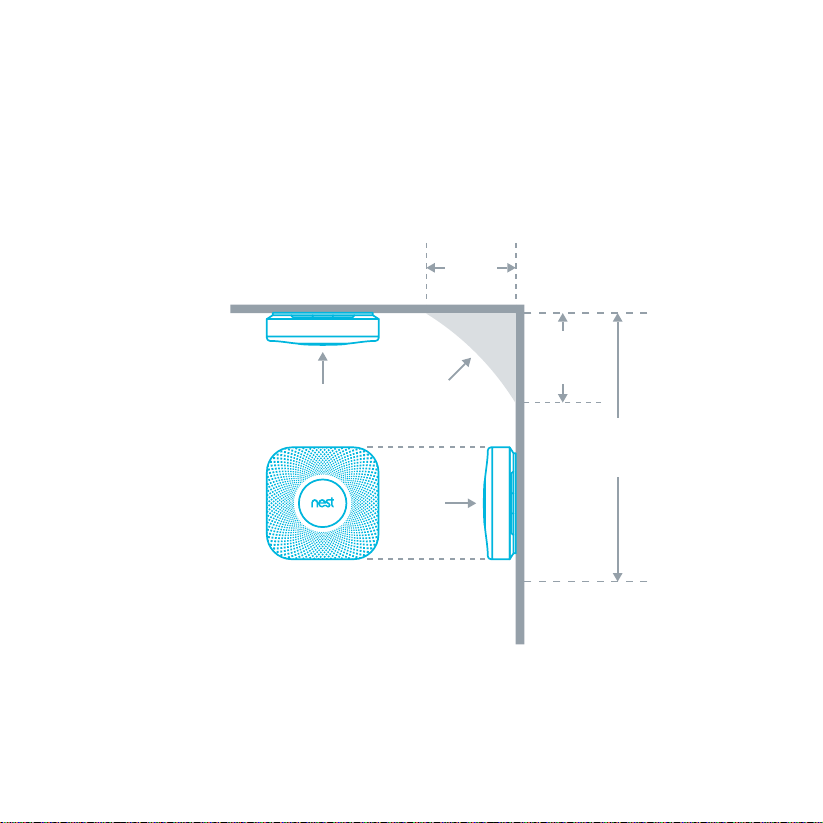
PLACEMENT ON THE CEILING OR WALL
Installing on the ceiling is recommended. Mark where the screws will go using the base as a guide.
Make sure it’s at least 4 inches (10 cm) away from the wall.
4"
CEILING
BEST
HERE
(10cm)
Minimum
NOT IN
THIS AREA
4"
(10cm)
Minimum
12"
(30.5cm)
6
NEST LOGO
Figure 1
OKAY
HERE
SIDE

NOT IN
cm)
PLACEMENT ON A SLOPED CEILING
If you have a sloped, peaked or cathedral ceiling, Nest Protect should be 4 inches to 3 feet
(10cm–1 m) from the highest point.
NOT IN
"
4
(10cm)
(0.9 m)
Figure 2 Figure 3
Figure 4
THIS AREA
ANYWHERE IN
THIS AREA
'
3
3
(0.9 m)
'
NEST LOGO
IS UPRIGHT
ANYWHERE IN
THIS AREA
(0.9 m)
THIS AREA
'
3
(10
"
4
7
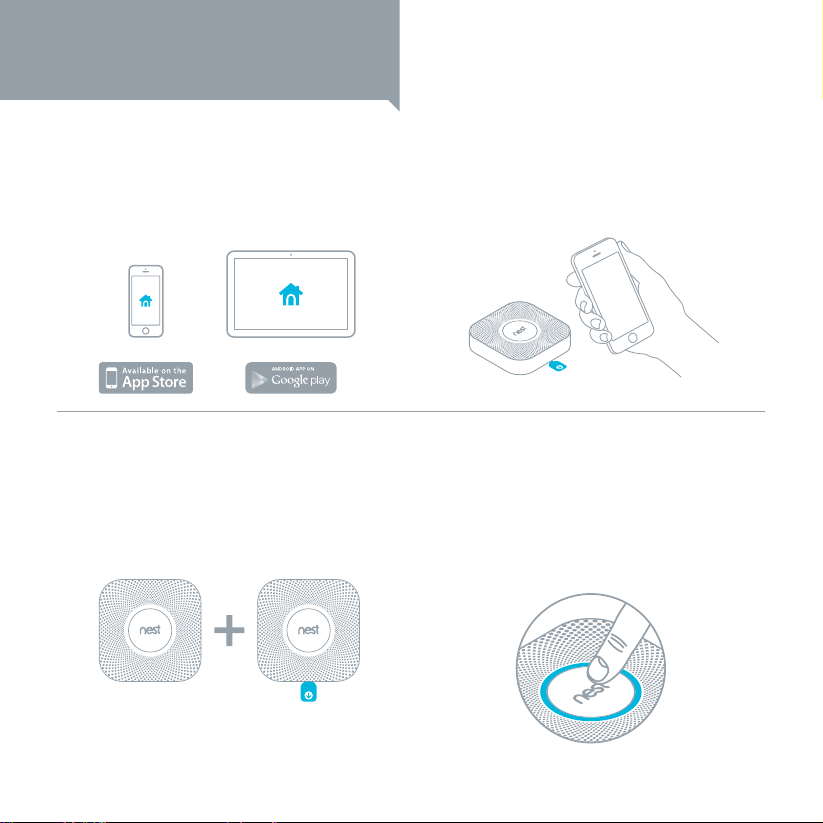
SETUP AND INSTALLATION
1. Get the Nest app
Before you install your Nest Protect on the
ceiling or wall, you’ll need to set it up with
the Nest app. Download the app from the
Apple App Store, Google Play or the Amazon
App Store and create a free Nest Account.
2. Set up Nest Protect with
the Nest app
The Nest app will guide you through each step:
scanning the Nest Protect QR code, connecting
it to the internet, and connecting it to other
Nest Protects in your home.
Watch the video at nest.com/installprotect
3. Have more Nest Protects?
The Nest app will ask you if you have additional
Nest Protects to set up. If so, it’ll take you
through a shorter setup. Make sure to keep
track of which Protects you’ve already set up
and where you’re going to install them.
Already Added New
8
4. Test before you install
Once you’re done setting up all of your Nest
Protec ts, test they’re added to your Nest Account
by pushing the Nest but ton on one Nest Protect
and follow the instruc tions to test. If they’re all
added, every Nest Protec t will speak up.
Now you can install them on the ceiling or wall.
 Loading...