

Google Nest H13000ES, H1500ES User Manual

Nest Secure
User’s Guide

Contents
In the box . . . . . . . . . . . . . . . . . . . . . . . . . . . . . . . . . . . . . . . . . . . . . . . . . . . . . . . . . . . . . . . . . . . . . . . . . . . . . . . . . . . . . . . . . . . . . . . . . . . . . . . . . . . . . . . . . . .4
Do this first
Meet Nest Secure
Placement tips
Where to place Nest Guard
Nest Guard’s standard detection area
Where you can place Nest Detect
Nest Detect’s standard detection area
Dog Pass
Using Nest Secure
Setting the security levels
Arming and disarming
Nest Secure features
Nest Guard features
Nest Detect features
Nest Tag features
Testing, maintenance and other useful information
Safety and regulatory information
Warranty
. . . . . . . . . . . . . . . . . . . . . . . . . . . . . . . . . . . . . . . . . . . . . . . . . . . . . . . . . . . . . . . . . . . . . . . . . . . . . . . . . . . . . . . . . . . . . . . . . . . . . . . . . . . . . . . .5
. . . . . . . . . . . . . . . . . . . . . . . . . . . . . . . . . . . . . . . . . . . . . . . . . . . . . . . . . . . . . . . . . . . . . . . . . . . . . . . . . . . . . . . . . . . . . . . . . . . . . . .6
. . . . . . . . . . . . . . . . . . . . . . . . . . . . . . . . . . . . . . . . . . . . . . . . . . . . . . . . . . . . . . . . . . . . . . . . . . . . . . . . . . . . . . . . . . . . . . . . . . . . . . . . . 10
. . . . . . . . . . . . . . . . . . . . . . . . . . . . . . . . . . . . . . . . . . . . . . . . . . . . . . . . . . . . . . . . . . . . . . . . . . . . . . . . . . . . 10
. . . . . . . . . . . . . . . . . . . . . . . . . . . . . . . . . . . . . . . . . . . . . . . . . . . . . . . . . . . . . . . . . . . . . 12
. . . . . . . . . . . . . . . . . . . . . . . . . . . . . . . . . . . . . . . . . . . . . . . . . . . . . . . . . . . . . . . . . . . . . . . . . . . 13
. . . . . . . . . . . . . . . . . . . . . . . . . . . . . . . . . . . . . . . . . . . . . . . . . . . . . . . . . . . . . . . . . . . . 14
. . . . . . . . . . . . . . . . . . . . . . . . . . . . . . . . . . . . . . . . . . . . . . . . . . . . . . . . . . . . . . . . . . . . . . . . . . . . . . . . . . . . . . . . . . . . . . . . . . . . . . . . . . . . 15
. . . . . . . . . . . . . . . . . . . . . . . . . . . . . . . . . . . . . . . . . . . . . . . . . . . . . . . . . . . . . . . . . . . . . . . . . . . . . . . . . . . . . . . . . . . . . . . . . . . . . 16
. . . . . . . . . . . . . . . . . . . . . . . . . . . . . . . . . . . . . . . . . . . . . . . . . . . . . . . . . . . . . . . . . . . . . . . . . . . . . . . . . . . . . 16
. . . . . . . . . . . . . . . . . . . . . . . . . . . . . . . . . . . . . . . . . . . . . . . . . . . . . . . . . . . . . . . . . . . . . . . . . . . . . . . . . . . . . . . . . . . 17
. . . . . . . . . . . . . . . . . . . . . . . . . . . . . . . . . . . . . . . . . . . . . . . . . . . . . . . . . . . . . . . . . . . . . . . . . . . . . . . . . . . . . . . . . . . . 17
. . . . . . . . . . . . . . . . . . . . . . . . . . . . . . . . . . . . . . . . . . . . . . . . . . . . . . . . . . . . . . . . . . . . . . . . . . . . . . . . . . . . . . . . . . . . . 18
. . . . . . . . . . . . . . . . . . . . . . . . . . . . . . . . . . . . . . . . . . . . . . . . . . . . . . . . . . . . . . . . . . . . . . . . . . . . . . . . . . . . . . . . . . . . 20
. . . . . . . . . . . . . . . . . . . . . . . . . . . . . . . . . . . . . . . . . . . . . . . . . . . . . . . . . . . . . . . . . . . . . . . . . . . . . . . . . . . . . . . . . . . . . . . . . 20
. . . . . . . . . . . . . . . . . . . . . . . . . . . . . . . . . . . . . . . . . . . . . . . . . . . . . . . . 21
. . . . . . . . . . . . . . . . . . . . . . . . . . . . . . . . . . . . . . . . . . . . . . . . . . . . . . . . . . . . . . . . . . . . . . . . . . . . . . .27
. . . . . . . . . . . . . . . . . . . . . . . . . . . . . . . . . . . . . . . . . . . . . . . . . . . . . . . . . . . . . . . . . . . . . . . . . . . . . . . . . . . . . . . . . . . . . . . . . . . . . . . . . . . . . . . . . . 30
Want help?
Go to nest.com/support for installation videos and troubleshooting.
You can also find a Nest Pro to install Nest Secure.
3
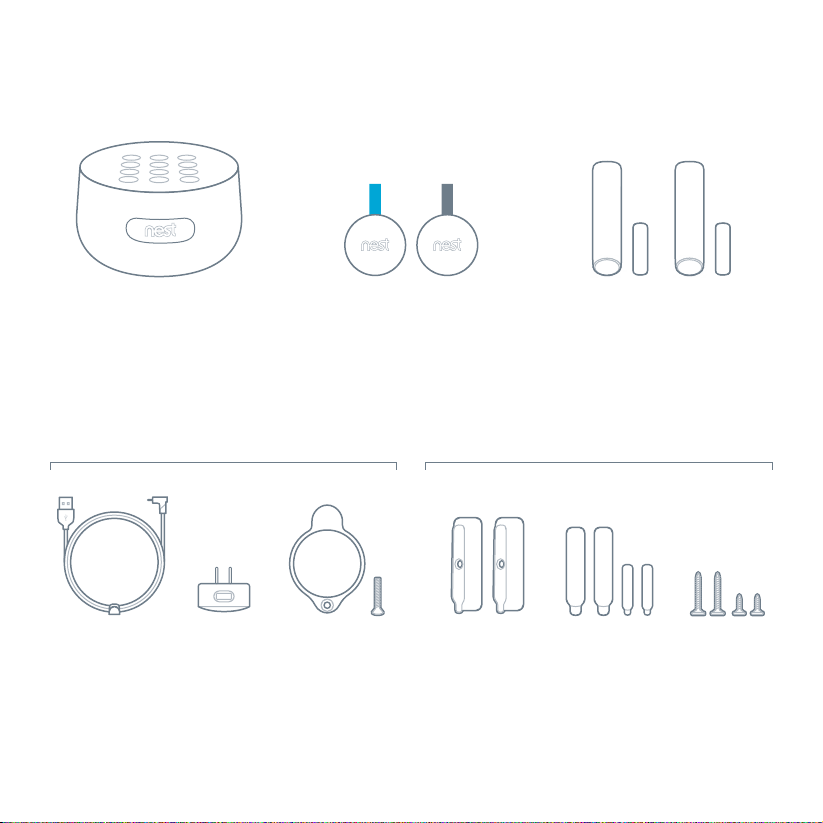
In the box.
Nest Guard
Alarm, motion sensor
and keypad.
Key fob to quickly arm and
For Nest Guard installation For Nest Detect installation
Power cable Power adapter
Power
adapter
bracke t and screw
4
Ne st Ta gs
disarm your home.
backplates
Corner
Nest Detect sensors
with open-close magnets
Sense s when a door or wind ow opens
or when someone walks nearby.
Extra adhesive
mounting strips
Screws
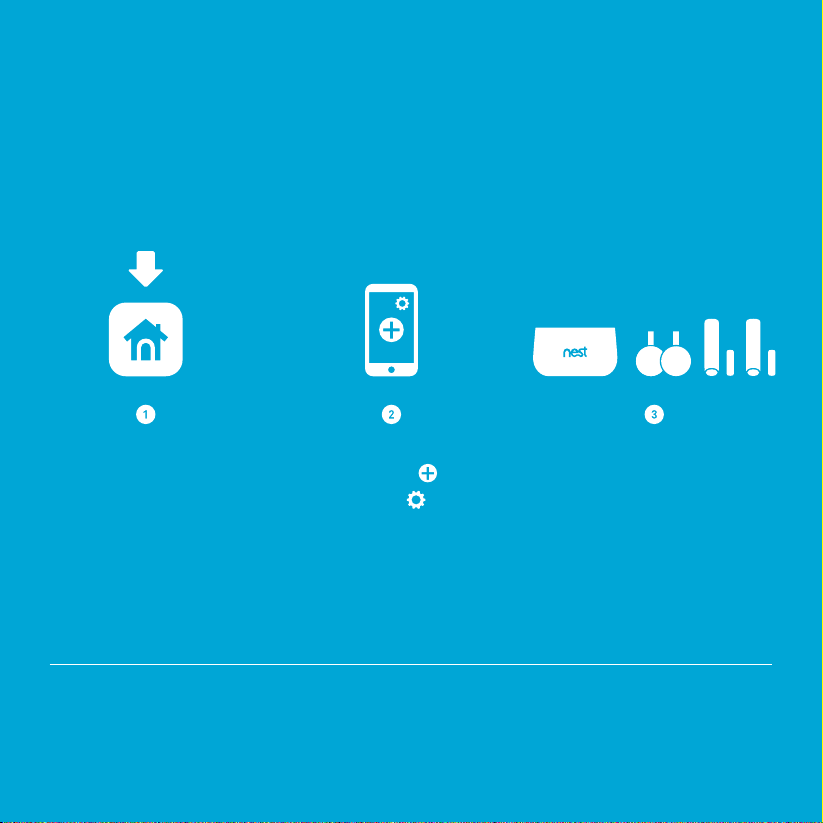
Do this first.
The Nest app will show you how to
set up, install and test everything.
Get the Nest app
for Android or iOS.
Want to see how it’s done?
Go to nest.com/installsecure for installation videos and additional tips.
SYSTEM REQUIREMENTS
To set up and use Ne st Secure you’ll n eed a compatible iOS or Android phone or t ablet with
Blueto oth 4.0, the Nest ap p and a free Nest Account, an unused indo or power outlet , and a
Wi-Fi 802.11 a/b/g/n (2.4GHz or 5GHz) network connec tion. Go to nest.com/requirements
for more information.
Tap the Add button. Add Nest Guard first.
Don’t see a ?
Tap the .
Then add Tags and Detects.
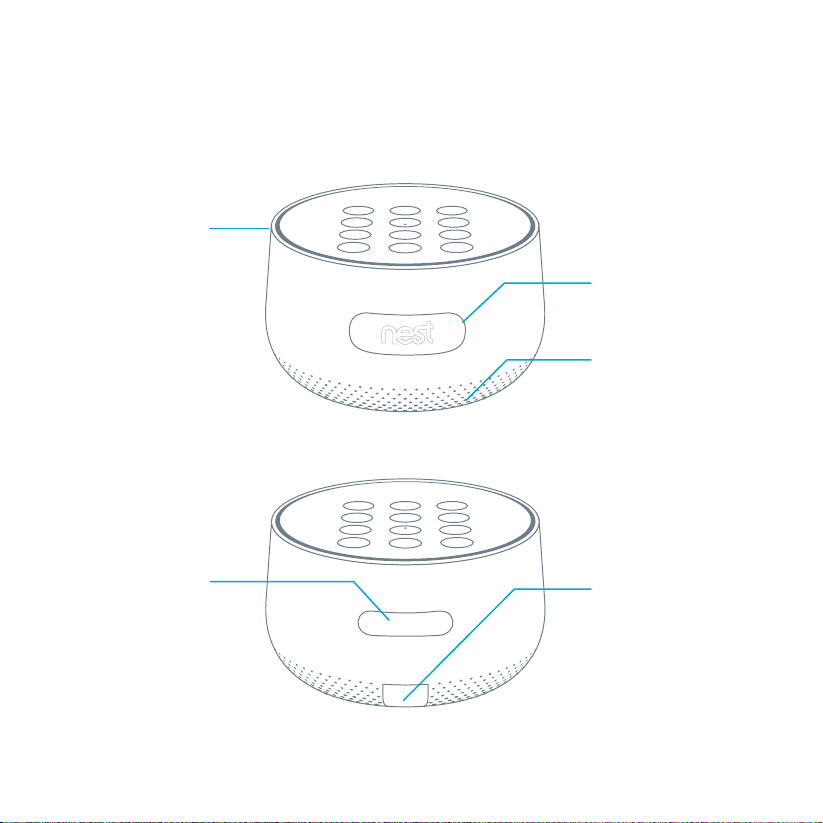
Nest Guard
Alarm, motion sensor and keypad.
Light ring
Shows you the alarm’s
status. Learn mo re
on page 19.
Motion sensor
Detects when someone
walks nearby.
Speaker
For spoke n alerts
and the alarm.
Front
Panic button
Press to instantly
sound the alarm and
send an emergency
alert to everyone who
shares access to your
Nest home.
6
Power port
Plug in the power cable
here. A green light
tells you it’s receiving
AC p ower.
Back
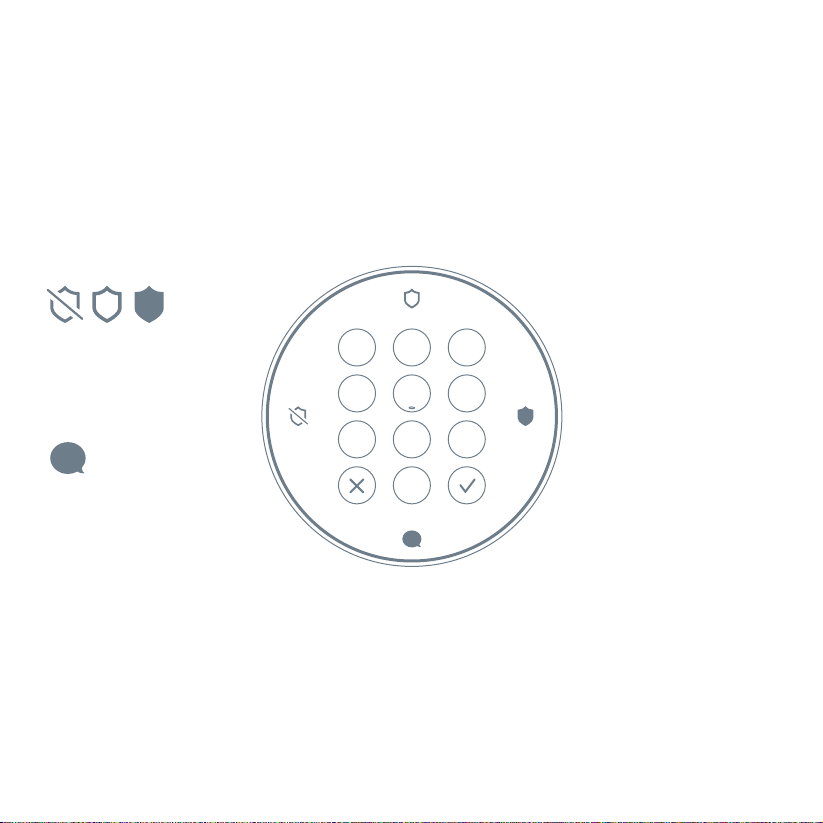
Nest Guard’s illuminated keypad
Guard lights up when you approach, and the buttons
light up as you need them so you’ll know what to do.
1
4
7
23
5
8
0
Security level buttons
Let you switch bet ween
security levels.
Info button
Press when lit to che ck the
status of your security system.
6
9
Keypad
Enter your passco de
or tap Ne st Tag here
to arm and disarm.
7
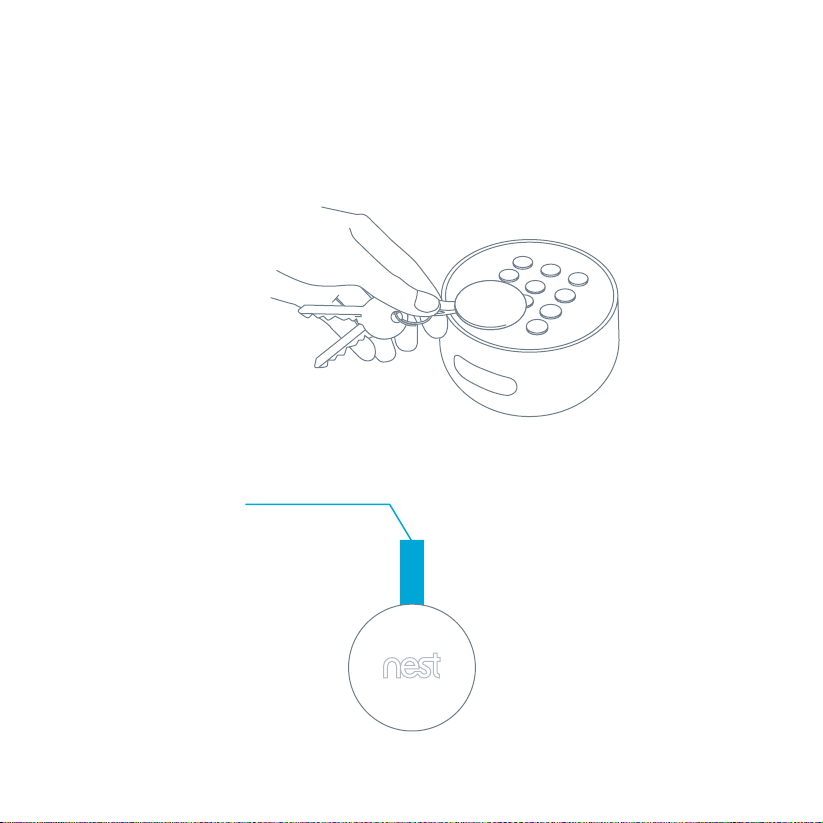
Nest Tag
Key fob lets you arm or disarm without entering a passcode.
Disarm with a tap
Tap and hold Nest Tag on
Guard to arm or disarm
when you’re leaving and
coming home.
Give one to people
you trust
Kids and guests won’t have
to remember a passcode.
You can also set a schedule
that lets them come in at
certain times.
Key loop
Attach to your key ring.
8
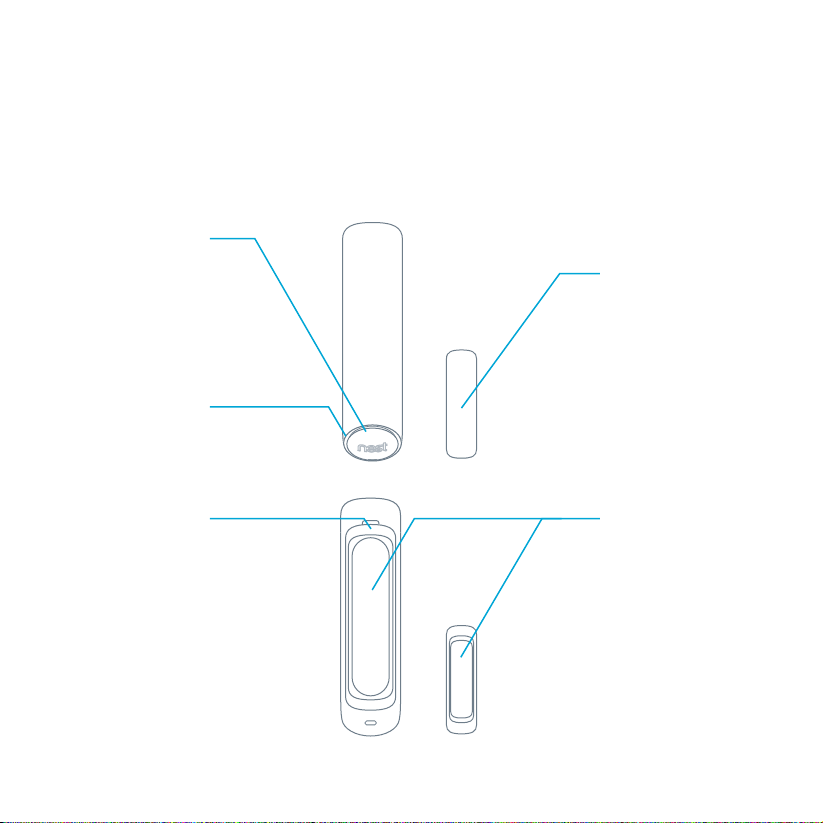
Nest Detect
Nest Detect is a versatile sensor. Put it on a door or window
to know when it opens or closes, or put it on the wall to know
if someone walks nearby.
Motion sensor
and button
Senses when someone
walks by. When Nest
Secur e is armed, pres s
the but ton to open a
door or window without
the alar m going off.
Light ring
Press the button and
the light will show you
Nest De tect’s status.
Open-close magnet
Works wit h Nest Detect
to sense when a door
or window opens or clos es.
Battery
compartment
Includes one CR123A
3V lithium battery.
Mounting backplate
Atta ches Nest Det ect
to a flat sur face.
9
Placement tips
The Nest app will tell you how to install and set up Nest Guard,
Nest Detect and Nest Tag. Here are some tips to get started.
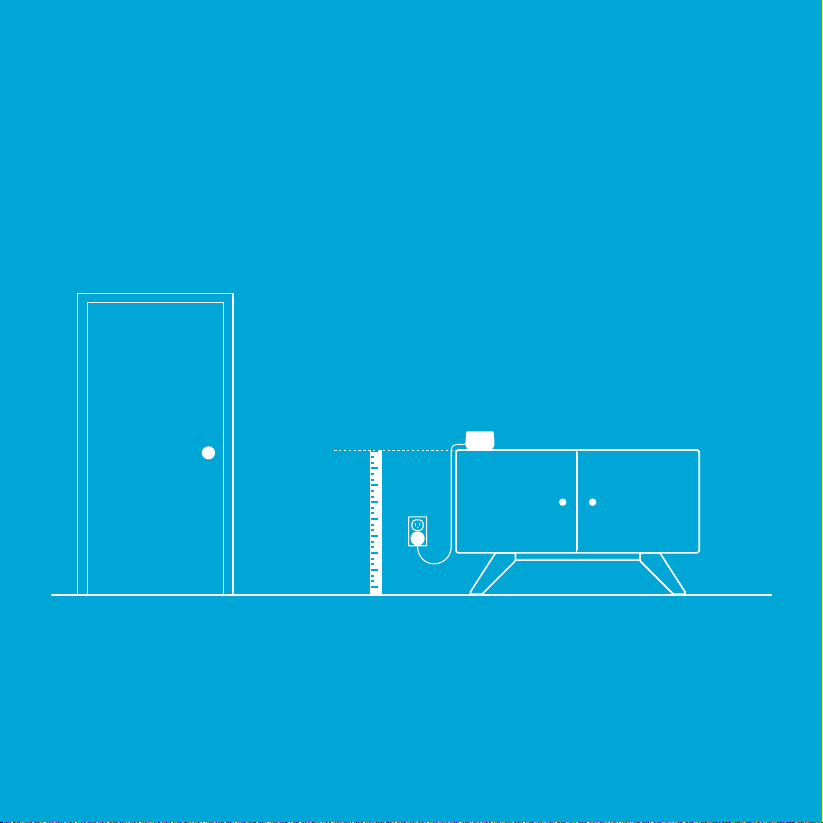
Where to place Nest Guard
28-42 inches
(0.7-1.2 m)
It should be close to where you
come and go.
So it’s easy to access on your way
in and out.
Make sure it’s at the right height.
Put Nest Guard on a table or low shelf so it’s
easy to reach and its motion sensor can see
the room. It must be between 28 and 42 inches
above the floor.
 Loading...