

Page 1

Nest Protect™(Wired 230 V ~ 50 Hz)
Detects smoke and carbon monoxide (CO)
User’s Guide
ATTENTION: Please read carefully, and keep this user’s guide in a safe place.
Page 2

First, a word about privacy.
We’re committed to being open and honest about how
we use data. We will always ask for permission before
sharing personally identifiable information like your email
address, and we keep your data safe with the same
security tools that banks use. Go to nest.com/eu/privacy
to learn more about our Privacy Policy.
2
Page 3

TABLE OF CONTENTS
Meet your Nest Protect . . . . . . . . . . . . . . . . . . . . . . . . . . . . . . . . . . . . . . . . . . . . . . . . . . . . . . . . . . . . . . . . . . . . . . . . . . . . . . . . . . . . . . . . . . . . . . . . . 4
Setup and installation . . . . . . . . . . . . . . . . . . . . . . . . . . . . . . . . . . . . . . . . . . . . . . . . . . . . . . . . . . . . . . . . . . . . . . . . . . . . . . . . . . . . . . . . . . . . . . . . . . 6
Location in your home . . . . . . . . . . . . . . . . . . . . . . . . . . . . . . . . . . . . . . . . . . . . . . . . . . . . . . . . . . . . . . . . . . . . . . . . . . . . . . . . . . . . . . . . . . . . . . . . . . . 8
Placement on the ceiling or wall . . . . . . . . . . . . . . . . . . . . . . . . . . . . . . . . . . . . . . . . . . . . . . . . . . . . . . . . . . . . . . . . . . . . . . . . . . . . . . . . . . . . . 10
Heads-Up and Emergency Alarms . . . . . . . . . . . . . . . . . . . . . . . . . . . . . . . . . . . . . . . . . . . . . . . . . . . . . . . . . . . . . . . . . . . . . . . . . . . . . . . . . .16
Daily Use and Emergency Preparation . . . . . . . . . . . . . . . . . . . . . . . . . . . . . . . . . . . . . . . . . . . . . . . . . . . . . . . . . . . . . . . . . . . . . . . . . . . . . 18
General Maintenance . . . . . . . . . . . . . . . . . . . . . . . . . . . . . . . . . . . . . . . . . . . . . . . . . . . . . . . . . . . . . . . . . . . . . . . . . . . . . . . . . . . . . . . . . . . . . . . . . .20
Safety . . . . . . . . . . . . . . . . . . . . . . . . . . . . . . . . . . . . . . . . . . . . . . . . . . . . . . . . . . . . . . . . . . . . . . . . . . . . . . . . . . . . . . . . . . . . . . . . . . . . . . . . . . . . . . . . . . . . . . 24
Limited Warranty . . . . . . . . . . . . . . . . . . . . . . . . . . . . . . . . . . . . . . . . . . . . . . . . . . . . . . . . . . . . . . . . . . . . . . . . . . . . . . . . . . . . . . . . . . . . . . . . . . . . . . .35
Want to see how it’s done? Go to nest.com/eu/installprotect for installation videos and tips.
0560
0843-CPR-024015
3
Page 4

MEET YOUR NEST PROTECT
Nest Protect is designed to detect smoke and
carbon monoxide in a residential environment.
It has multiple sensors to help it understand
what’s happening in your home, including a
Split-spectrum Sensor to detect a wide range
of slow-smouldering and fast-flaming fires.
The installation of this apparatus should
be carried out by a competent person. This
guide covers the installation of Nest Protect
(Wired 230 V) – model number A14.
Inside the box, you’ll find:
Nest Protect
Back plate
REQUIREMENTS
You need Wi-Fi, an iOS or Android phone or
tablet and a free Nest Account in order to use
some Nest Protect features: spoken room
names, wireless mobile notifications and
software updates. During setup, Wi-Fi and
a free Nest Account are required for wireless
interconnect and room naming. After all the
Nest Protects in your home are connected,
they can communicate with each other
without Wi-Fi.
3 connector blocks
4 mounting screws
230 V AC connector
4
Page 5
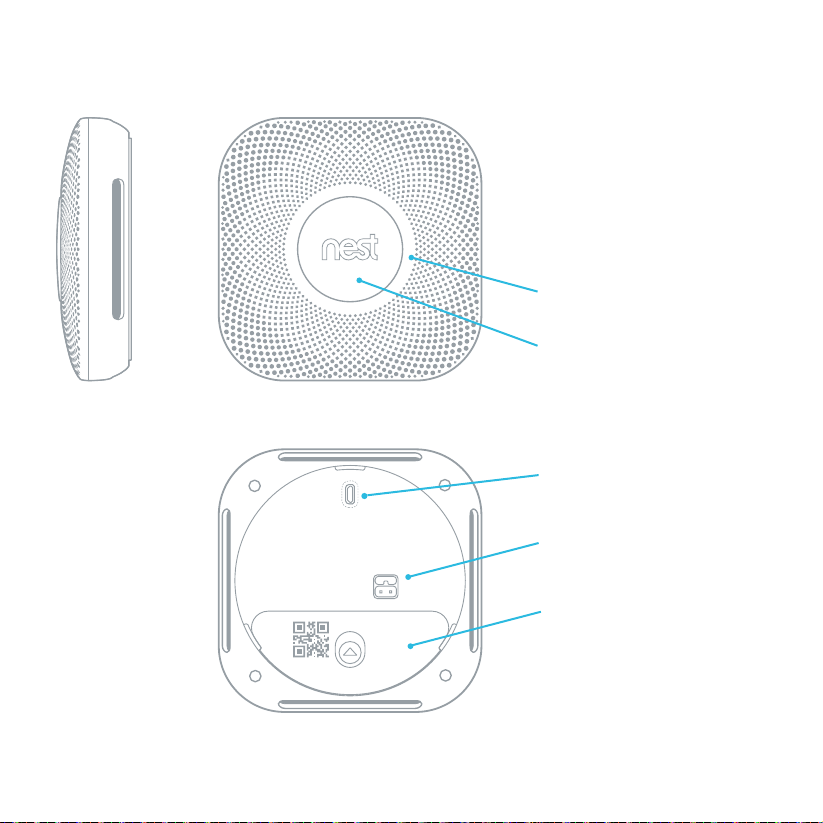
3.9 cm
(1.5 i n)
13.5 cm
(5.3 in)
The siren enables
Nest Protect to
alert you with a loud
emergency sound.
The speaker allows
Nest Protect to speak
with a human voice.
The light ring changes
colour to alert you.
Push the Nest button
to silence alarms or
run a test.
Micro-USB connector
(not for normal use).
AC connector pins for
the 230 V connector.
Backup battery
compartment: Three
AA Energizer® Ultimate
Lithium batteries (L91).
5
Page 6
SETUP AND INSTALLATION
(Professional installation recommended)
The installation of a smoke/CO alarm should
be made by a qualified technician, and all
wiring used to install this alarm should be
made in accordance with with national
regulations. Installation should be done
according to regulations and/or applicable
codes in your local jurisdiction. Permanent
connection to the fixed wiring of the building
should be made in a suitable junction box.
For a complete set of instructions and
warnings, refer to page 24.
1. Get the Nest app
Before you install your Nest Protect on the
ceiling or wall, you’ll need to set it up with
the Nest app. Download the app from the
Apple App Store™ or Google Play™ and create
a free Nest Account. You can use a phone
or tablet for setup.
6
Page 7
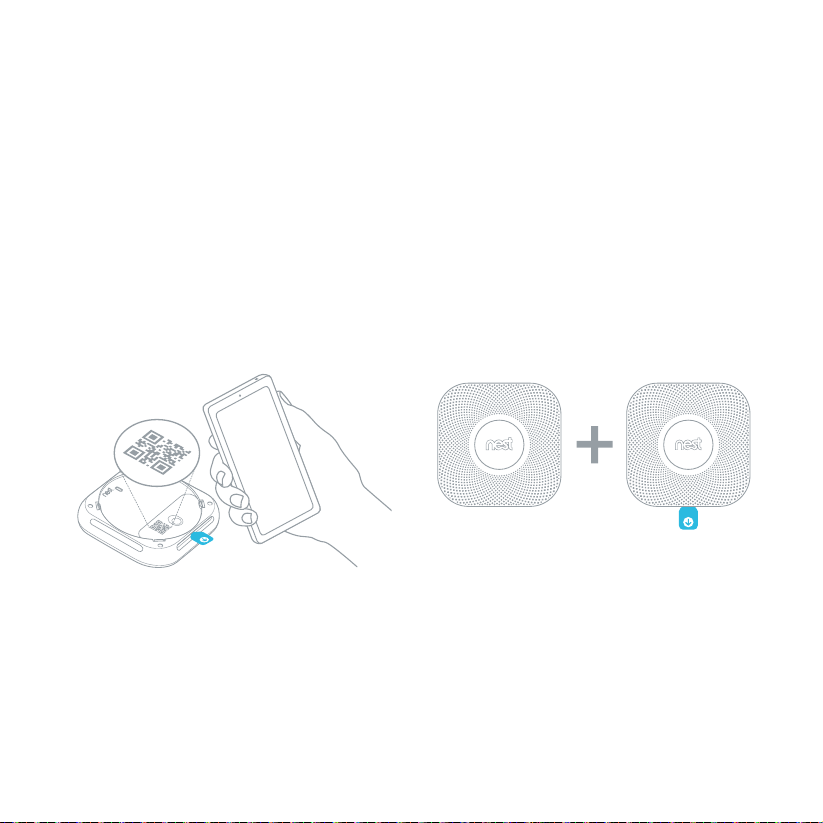
2. Set up Nest Protect
The Nest app will guide you through each
step: scanning the Nest Protect QR code,
connecting it to the Internet and connecting
it to other Nest Protects in your home. Go to
nest.com/eu/installprotect to watch the video.
3. Have more Nest Protects?
The Nest app will ask you if you have additional
Nest Protects to set up. If you do, it’ll take
you through a faster setup. Make sure that
you keep all your Nest Protects together until
they’re all set up and ready to be installed.
Already added New
Tip: Set ever ything ou t on a table for ea sy setup.
Tip: Your Nest Pr otect came pa cked in a plastic c over.
Keep the c over on so that your Nest Pro tect stays clean
until you install it.
7
Page 8
Location in your home
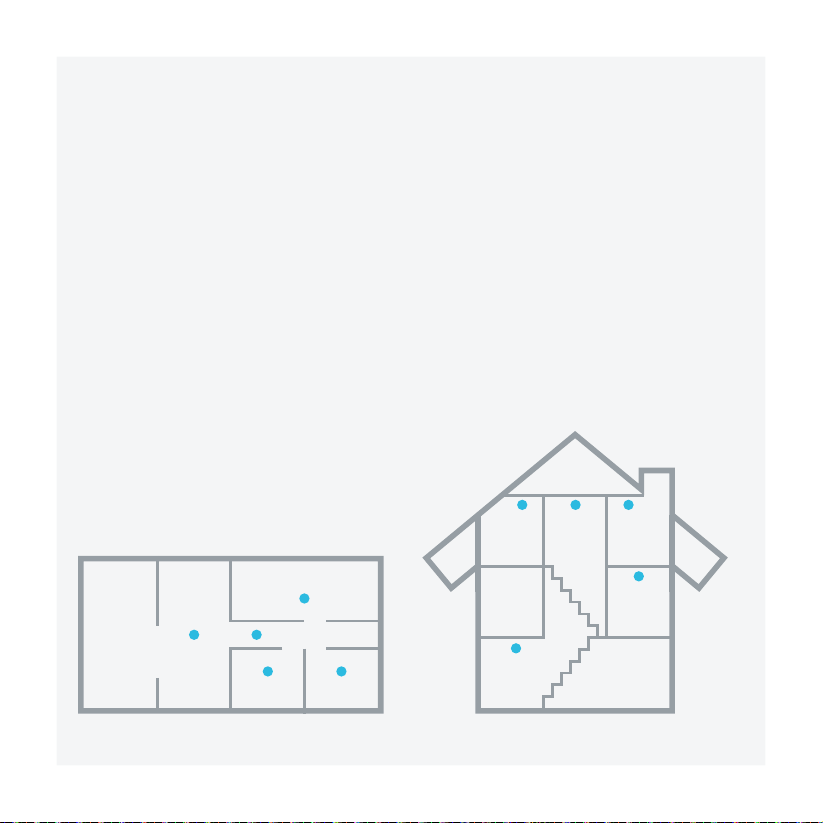
We recommend placing a smoke alarm
on every floor and a carbon monoxide
alarm in every room containing a fuelburning appliance.
The Nest Protect smoke and carbon
monoxide alarm should be inst alled:
• On every floor (smoke alarms are required
by law in cer tain residences).
• In every room containing a fuel-burning
appliance (recommended for CO alarms).
• In every bedroom.
• In remote rooms that are used often but
which may be too far away for anyone to
hear an alarm.
• Outside unused rooms, like the boiler room.
Nest Protect should be installed at least 3 m
(10 ft) away from hobs or cooking appliances.
Make sure that there is a clear space
around all installed Nest Protects so that
they are not obstructed.
Nest Protect should NOT be installed in
unfinished attics or garages.
ATTIC
BEDROOM
KITCHEN
DINING
ROOM
8
FAMILY
ROOM
MASTER BEDROOMLIVING/
KITCHEN
BEDROOMBEDROOM
HALL
MASTER
BEDROOM
LIVING/
FAMILY
ROOM
GARAGECELLAR
Page 9
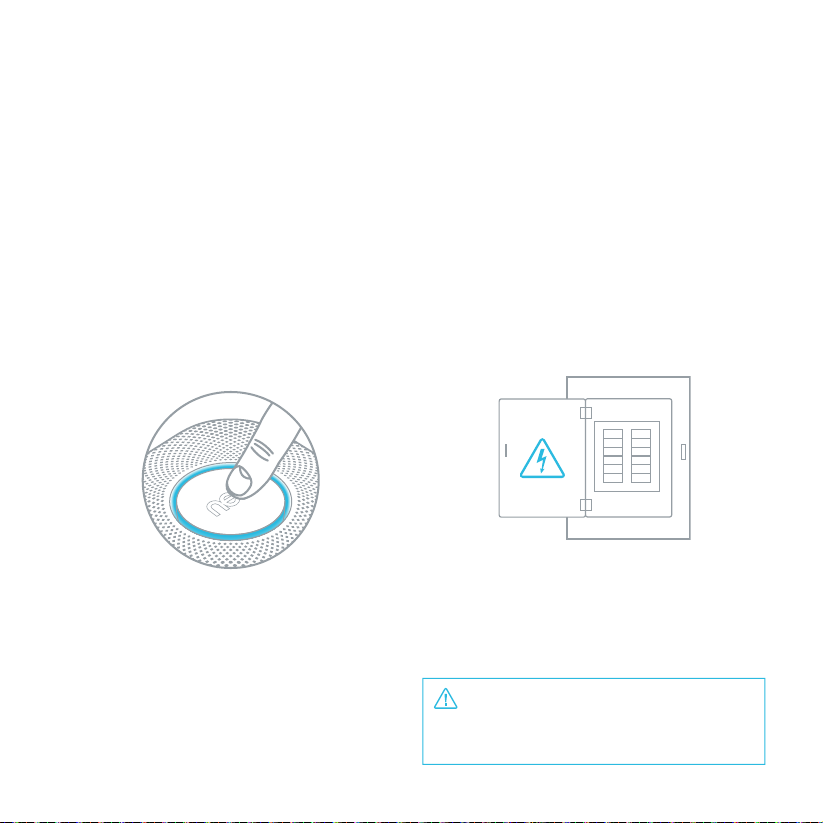
4. Test before you install
Once you’ve finished setting up all your
Nest Protects, make sure that they’ve been
added to your Nest Account. Push the Nest
button on one Nest Protect and follow the
instructions. All your Nest Protects should
speak up. Now you can install them on the
ceiling or wall.
5. Turn off the mains power
Protect yourself, and avoid blowing a fuse.
Switch off the correct circuit breaker for the
room where you are installing Nest Protect,
or remove the fuse from the fuse box.
Fuse box
Tip: To double-check Ne st Protect ’s room name,
press t he Nest button once. You’ll hear the location
that you a ssigned to it dur ing setup. It’ll s ay
something like, “Re ady in the bedroom.”
WARNING
ELECTRICAL SHOCK HAZ ARD
Failure to t urn off the pow er may result in
seriou s electric sh ock, injury an d death.
9
Page 10
GO
T
Minimum
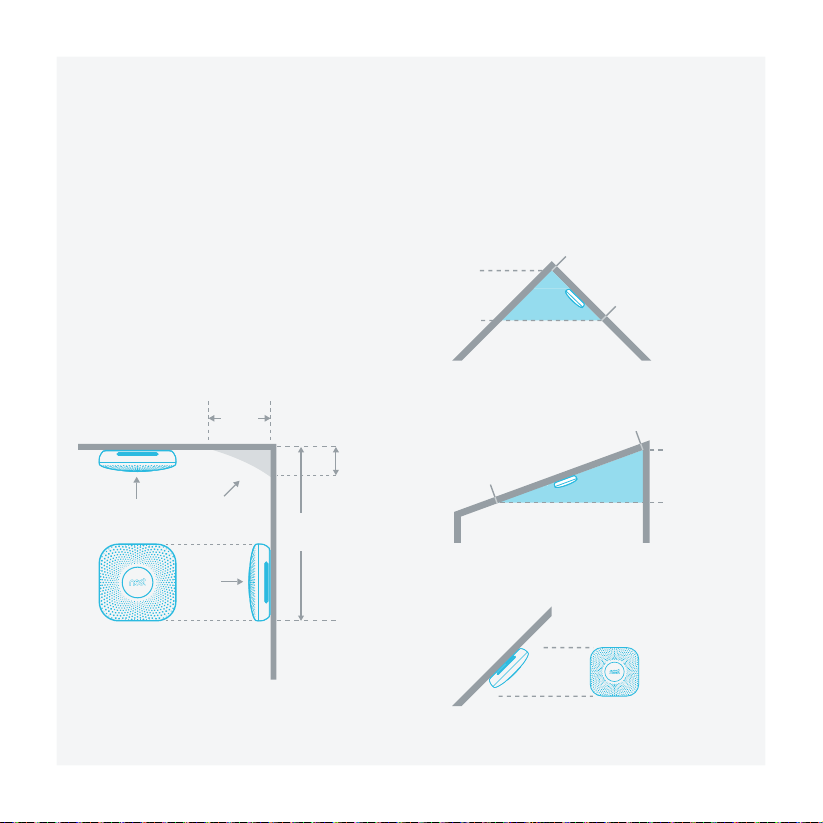
Placement on the ceiling or wall
Installation on the ceiling is recommended.
Use the back plate as a guide to mark where
the screws will go. Make sure that it’s at
least 30 cm (12 inches) away from the wall.
30 cm
THIS AREA
OK
HERE
Minimum
NOT IN
(12 in)
60 cm
Maximum
SIDE
WALL
(24 in)
15 cm
(6 in)
CEILING
BEST
HERE
NEST LOGO
IS UPRIGHT
Placement on a sloping ceiling
If you have a sloping, pitched or cathedral
ceiling, Nest Protect should be 90 cm
(35 inches) from the highest peak.
ANYWHERE IN
90 cm
(35 in)
Figure 2
Figure 3
ANYWHERE IN
THIS AREA
THIS AREA
90 cm
(35 in)
NEST LO
IS UPRIGH
Figure 1
10
Figure 4
Page 11
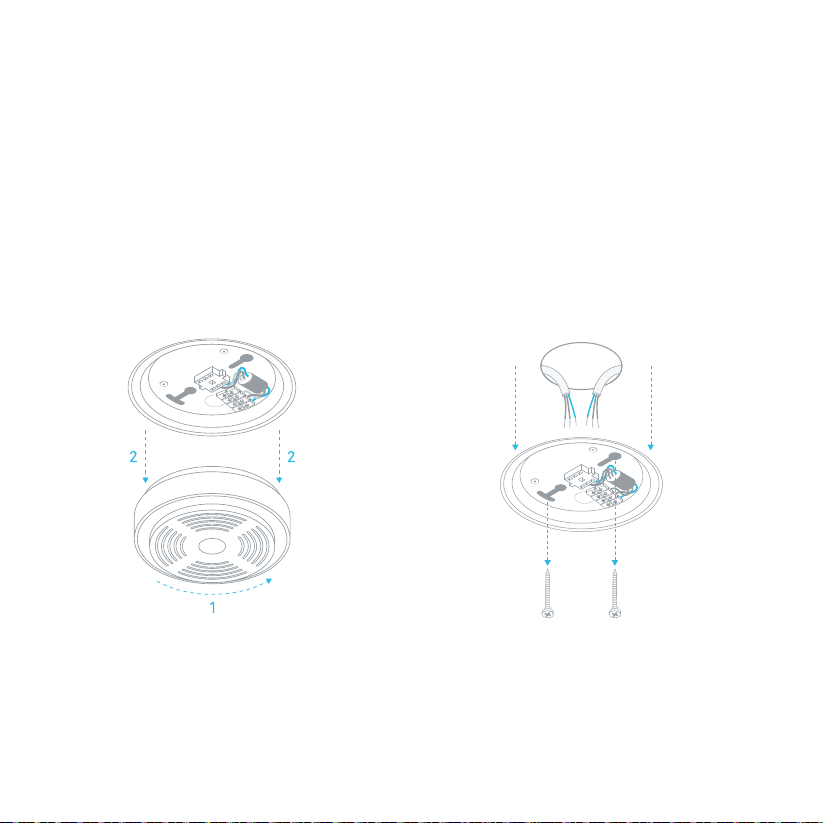
6. Remove your old smoke alarm
To prevent electric shock, make sure that the
green power light is of f on the alarm. You may
have to twist the alarm to release it. Remove it
carefully to avoid damaging your ceiling or wall.
There will be two or four wires attached to the
old back plate. Disconnect them all.
7. Remove the old back plate
Unscrew the back plate from the ceiling or
dry lining box. Save the screws for installing
the Nest back plate later. You’ll see one or
two cables coming from the ceiling.
22
11
Tip: Your old smoke alarm might make a loud noise
when you disconnect it.
11
Page 12
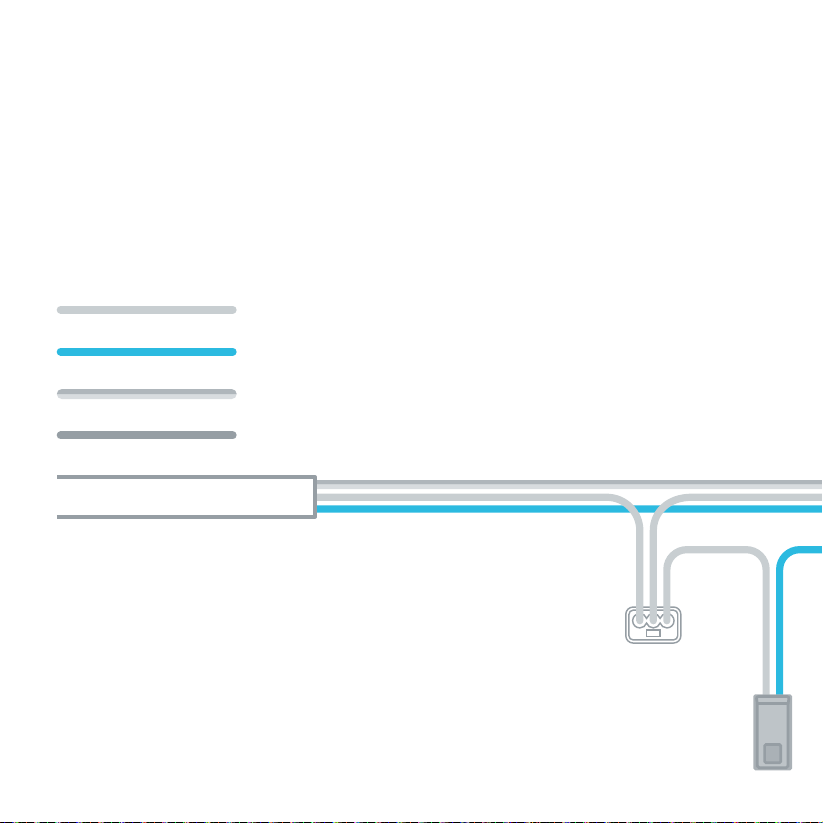
8. Attach the Nest connector
Each cable coming from the ceiling or wall
will have three or four differently coloured
wires. Their colours may vary based on
their age.
Live wir e (brown or marked L)
Neutral wire (blue or marked N)
Earth wire (yellow and green), if present
Interconnect wire (usually black), if present
Wire
Match the live wires coming from the
ceiling to the live wires in the Nest 230 V AC
connector and put them into a connector
block. All the neutral wires go into another
connector block, and the earth wires into
a third terminal block. There is no need for
the Interconnect wire, as Nest Protects
are wirelessly interconnected. If there’s an
interconnect wire, insulate it.
Connector block
230 V wire connector
12
Page 13
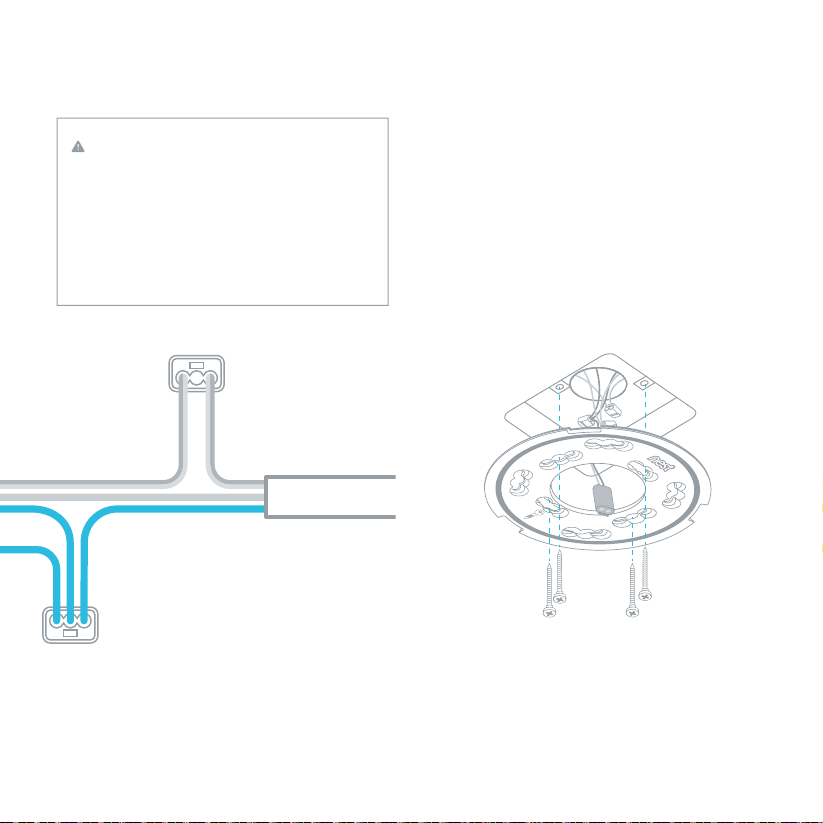
WARNING
Mixing the live and neutral connections
when connecting alarms will damage
all the alarms – ensure that the
same colours are used throughout
the premises for live, neutral and
interconnect wires (if present).
Connector block
9. Install the Nest back plate
Screw the Nest back plate to the existing
electrical box, reusing the existing screws.
You can also screw the back plate directly
into the wall or ceiling with the Nest screws.
Connector block
Wire
Tip: All sm oke alarms pref er to live in a dust-fre e area,
so remo ve any dust befor e you install Ne st Protec t.
13
Page 14
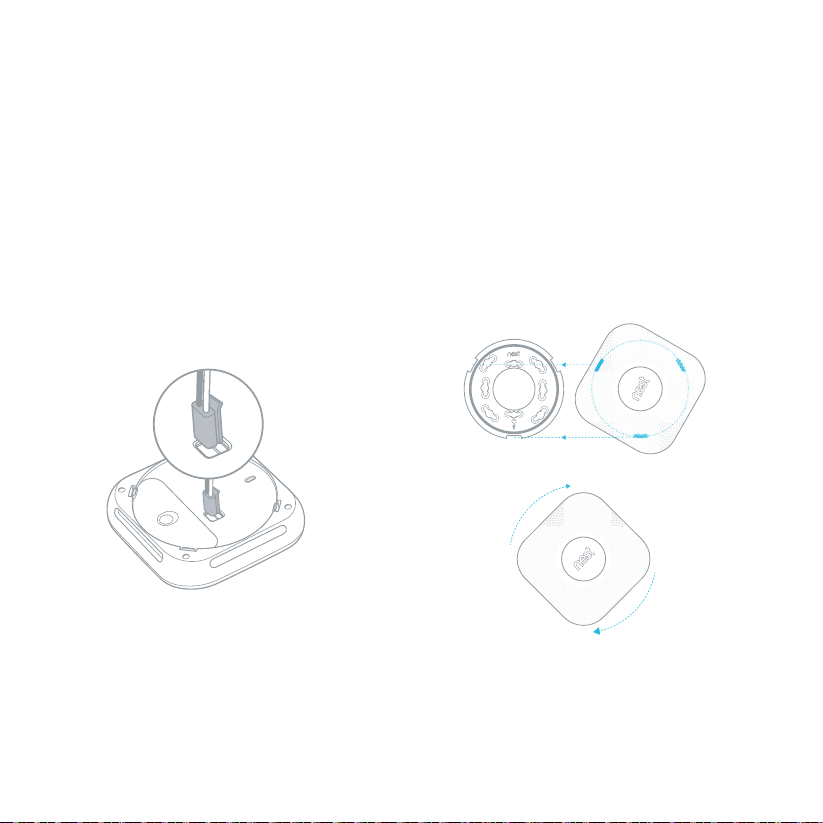
10. Connect power
Plug the 230 V connector into the back
of your Nest Protect.
11. Install your Nest Protect
Tuck any excess wiring into the dry lining box
first. Line up the three tabs on the back of your
Nest Protect with the notches on the back
plate. Hold Nest Protect against the back plate
and turn it clockwise. Continue turning until it’s
square with the wall or ceiling. Install the rest of
your Nest Protects if you have more.
1
1
2
2
Tip: If you e ver need to rem ove it (for cleanin g or batter y
repla cement), turn of f power to your N est Protec t
at the fus e box or remove th e fuse first. T hen turn it
anticlockwise until it disconnects from the back plate.
14
Page 15
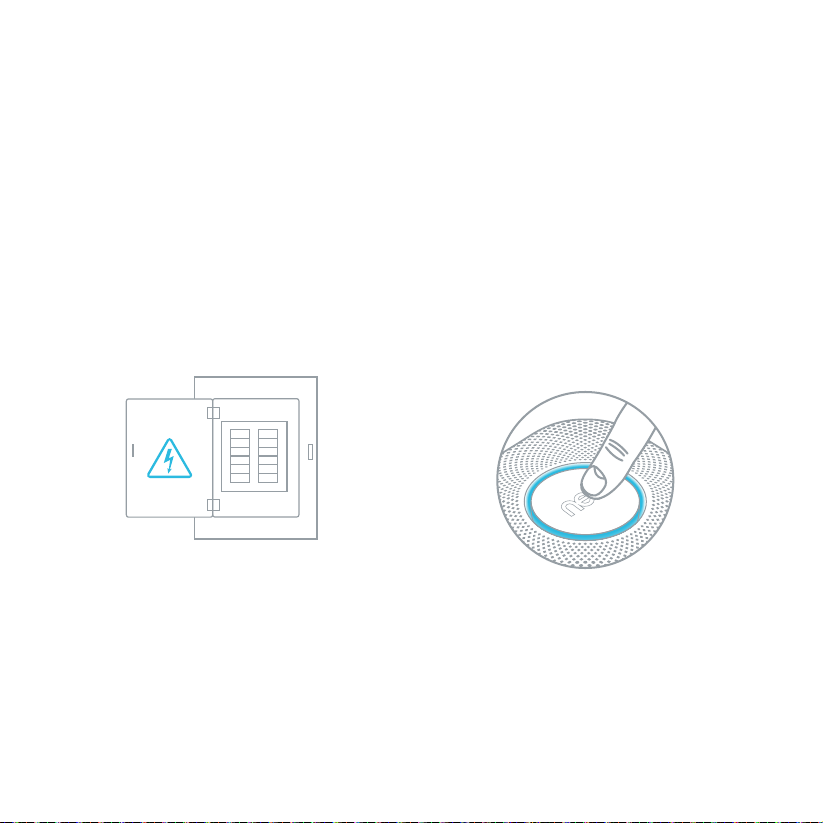
12. Switch mains power back on
or replace the fuse
Fuse box
13. Press to test
Press the Nest button on one Nest Protect.
It will tell you what to do nex t. Every
Nest Protect in the house should speak
up, confirming that they’re connected to
each other.
15
Page 16

HEADSUP AND EMERGENCY ALARMS
ALERTS
When Nest Protect has something to say,
it will speak to you and light up instead of just
beeping. Nest Protect has two kinds of voice
alert: Heads-Up and Emergency Alarm.
When smoke or carbon monoxide levels
are heightened but haven’t yet reached
Emergency Alarm levels, Nest Protect can
sound a Heads-Up as an early warning. Nest
Protect will pulse yellow and tell you where
there’s smoke or carbon monoxide.
You’ll get an Emergency Alarm when smoke
or carbon monoxide reach critical levels.
Nest Protect will pulse red, tell you what room
the emergency is in and sound a loud alarm.
If there’s both smoke and CO present, the
smoke alarm will take priority.
SILENCING
Heads-Up alerts and Emergency Alarms can be
silenced by using the Nest app or pressing the
Nest but ton. Only silence an alarm once you
have checked conditions at the Nest Protect
that first sounded the alarm. Do not silence Nest
Protect by disconnecting it from mains voltage
and removing the batteries. This will disable the
alarm so that it cannot sense smoke or carbon
monoxide, leaving you at risk.
Because there are many different types of fire,
you may experience an Emergency Alarm without
having first having experienced a Heads-Up
alert. This means that critical levels of smoke or
CO occurred extremely quickly and Nest Protect
had to sound the Emergency Alarm.
HAVE MORE THAN ONE NEST PROTECT?
After all the Nest Protects in your home are
connected to each other, if there’s a Heads-Up
or an Emergency Alarm in one room, they’ll all
tell you what the danger is and which room it’s in.
If multiple Nest Protects are interconnected,
a Heads-Up alert or Emergency Alarm can be
silenced only at the Nest Protect that originally
sounded the alert. You’ll need to go to that room
to silence all the Nest Protects in your home.
Always check the conditions near the Nest
Protect that first detected the smoke or carbon
monoxide before silencing it.
16
Page 17

HEADSUP AND EMERGENCY ALARMS
WHAT YOU HEAR
“PLEASE BE AWARE.
THERE’S SM OKE IN THE
[ROOM NAME]. THE
ALA RM MAY SOUND.”
“PLEASE BE AWARE.
THERE’S CARBO N
MONOXIDE IN T HE
[ROOM NAME]. THE
ALA RM MAY SOUND.”
( Alarm siren)
“EMERGENCY. THERE’S
SMOKE IN TH E
ALERTSSILENCING
[ROOM NAME].”
(Al arm siren)
“EMERGENCY. THERE’S
CARBON MONOXIDE
IN THE [ROOM NAME].
MOVE TO FR ESH AIR.”
“SMOKE A LARM SILENC ED.”
“CARBON MONOXIDE
ALA RM SILENCED.”
“THE AL ARM IS OVER.”
WHAT YOU SEE
YELLOW pulses.
YELLOW pulses.
RED puls es.
RED puls es.
YELLOW o r
RED puls es.
GREEN pulses .
WHAT IT MEANS WHAT TO DO
Smoke lev els are rising . Put out t he source of th e
Carbon monoxide
level s have been high
for a while .
The smo ke in the
room has reached
critical levels.
The car bon monoxid e in
the roo m has reache d
critical levels.
You’ve silen ced an
alert.Nest Protec t will
now keep q uiet, unless
smoke or carbon
monoxide remains at
critical levels.
Smoke or carbon
monoxide levels
are decreasing.
smoke. T hen use the Nes t
app or pre ss the Nest
butt on to silence th e alert.
Open a win dow or door
to get fr esh air. Then use
the Nes t app or press th e
Nest bu tton to sile nce
the alert.
Get out of the house
immediately.
1) Keep ca lm and open all
doors and windows.
2) Stop us ing all fuel-bur ning
appliances and ensure
that the y are turned of f.
3) Evacuate the premises
if the C O alarm cont inues
to sound.
4) Call 99 9 or the fire briga de
from outside.
Make sure y ou’re safe and
have put o ut the source o f
smoke or carbon monoxide.
Make sure y ou’re safe and
have put o ut the source o f
smoke or carbon monoxide.
17
Page 18

DAILY USE AND EMERGENCY PREPARATION
DAILY USE
POWER
Nest Protect (Wired 230 V) has a small green
light located at the top of the Nest button.
It will be on as long as Nest Protect is getting
AC power from the electrical wires.
If there’s a wiring problem or power cut, the
green light will turn off and Nest Protect will
switch to backup batteries. You’ll also see a
yellow (instead of green) Nightly Promise light
when you turn off the lights for the night.
NIGHTLY PROMISE
Nest Protect continuously tests itself, so you
don’t have to wonder if it’s working. Nightly
Promise reports on ever y Nest Protect in
your home.
When you turn off the lights for the night, Nest
Protect will glow green for a moment – this
means that everything is working. If it glows
yellow, one of the Nest Protects in your home
needs your attention. For instance, the batteries
are low, Wi-Fi is down or there’s a problem with
the sensors. Just push the Nest button or use
the Nest app to see what’s wrong.
PATHLIGHT
Nest Protect usually has its light turned off, but
it can light your way as you walk underneath it
in the dark. You can enable or disable Pathlight
and set its brightness with the Nest app.
Nest Protect (Wired 230 V) also allows you to
set Pathlight to “Always On” if you want a night
light. It will turn on when it’s dark and stay on
until it’s light again.
18
EMERGENCY PREPARATION
TESTING
We recommend running a weekly manual test.
During a test, all interconnected Nest Protects
in your home check their sensors, power,
Wi-Fi connection, emergency siren, speaker
and microphone.
When you run a test, Nest Protect will give you
a countdown before sounding the alarm so that
you have time to move away from the loud noise.
Test procedure:
1. Start a test by pressing the Nest button twice.
2. Nest Protect will say: “This is only a test. The
alarm will sound.”
3. Ensure that the alarm sounds and the light
illuminates on each Nest Protect.
4. Once the Nest Protect has made sure it’s
working, it’ll tell you that ever ything’s OK.
If you have interconnected Nest Protects,
all of them should speak.
Page 19
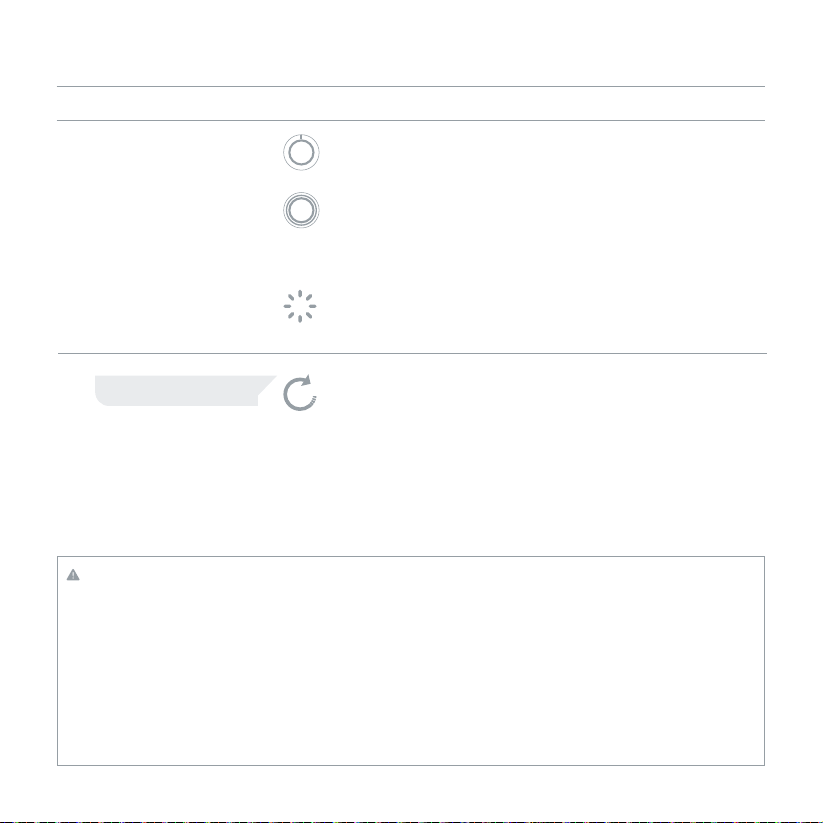
DAILY USE AND EMERGENCY PREPARATION
WHAT YOU HEAR WHAT IT MEANS WHAT TO DOWHAT YOU SEE
GREEN light above
the Nest logo.
You turn off the
room lights for
the nigh t, and
the GREEN light
pulse s once.
DAILY USEEMERGENCY
“READ Y. PRESS TO TE ST.”
PREPARATION
WHITE light.
BLUE rotates.
WARNING
• DO NOT stand close to the alarm when
the siren is sounding. Exposure at close
range may be harmful to your hearing.
When testing, move away before the siren
starts sounding.
• If the alarm ever fails to test correctly,
have it replaced immediately! If the alarm
is not working properly, it cannot alert you
to a problem.
Nest Pr otect is wor king.
The gre en light mean s
AC power is c onnecte d.
Nest Protect has tested
its sensors and batteries
to confir m that they are
working correctly.
Pathli ght lights yo ur way at
night as y ou pass under i t.
It can al so be set to st ay on.
To set up or run
a manual t est.
Sleep we ll, thanks
to Nightly Promise.
Press t he Nest but ton.
Nest Pr otect will wa lk you
throug h the next st eps.
• DO NOT use a match, cigarette or any other
makeshif t fire to test the smoke alarm.
• NE VER use vehicle exhaust to test the CO
alarm! Exhaust may cause permanent
damage and will void your warranty.
• NE VER use an open flame of any kind
to test this alarm. You might accidentally
damage or set fire to the unit or to
your home.
19
Page 20
3
2
1
GENERAL MAINTENANCE
CLEANING YOUR NES T PROTECT
Nest Protect has been designed to be as
maintenance free as possible, but you should
keep it clean. As with any smoke alarm, dust
build-up on the outside or inside of Nest
Protect can stop it from working properly.
To clean Nest Protect:
1. Turn off mains power to Nest Protect or
remove the fuse (see p.9).
2. Remove it from the wall or the ceiling (turn
anticlockwise until it comes off the back
plate and detach the power connector).
3. Wipe the outside with a clean, slightly damp
cloth. Don’t use soap or solvents.
4. Place Nest Protect on a sof t, dry cloth with
the Nest button facing down. Open the
battery compartment door and remove the
batteries. Remove the screws and lift off
the back. Be careful not to lose the screws.
5. Gently vacuum the inside. Make sure that
you clean all the way around the mesh sides
of the smoke chamber (the large
metal circle).
Note: Never use detergents or solvents (like
glass cleaner) on your Nest Protect, and do
not spray air fresheners, hair spray or other
aerosols near it. Do not get water inside the
alarm or paint over it.
REPLACING THE BACKUP BATTERIES
If there is a power cut, Nest Protect will
use three A A Energizer® Ultimate Lithium
batteries (L91) for backup. These batteries
can be purchased at your local retailer.
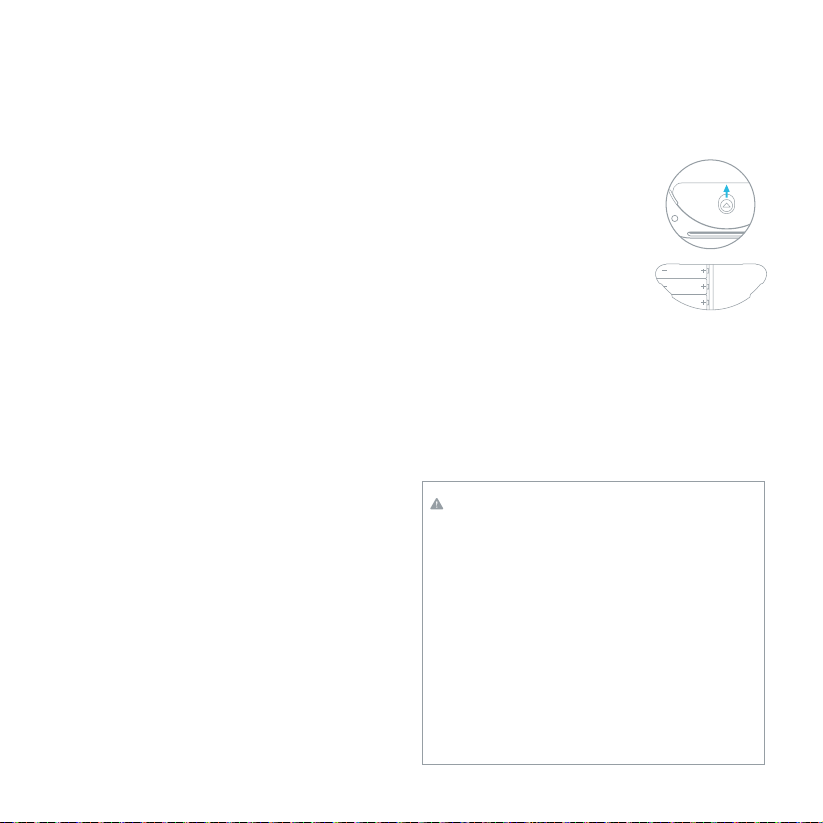
1.
Turn off mains power to Nest Protect or
remove the fuse (see p.9).
20
2. Twist Nest Protect anticlockwise until it
disconnects from the back plate.
3. Detach the power connector
from the back of Nest Protec t
and open the battery door.
4. Replace the batteries. Align
the + positive and - negative
ends with the markings in
the battery compartment.
1
2
3
5. Close the battery
compartment. Do not force the door closed.
6. Re-attach the power connector.
7. Push Nest Protect onto the back plate and
turn it clockwise until you feel it grip.
8. Turn mains power to Nest Protect back on or
replace the fuse.
9. Press the Nest button twice.
WARNING
• Only use batteries specified by Nest. Use
of a different batter y model will have a
detrimental ef fect on the operation of the
smoke alarm. The alarm may not operate
properly with other batteries. Never use
rechargeable batteries, as they may not
provide a c onstant charge.
• Never remove the batteries from a
battery-operated alarm to stop an
unwanted alarm (caused by cooking
smoke, etc.). Removing batteries disables
the alarm so that it cannot sense smoke
or carbon monoxide, leaving you at risk.
Page 21
GENERAL MAINTENANCE
WHAT YOU HEAR WHAT IT MEANS WHAT TO DOWHAT YOU SEE
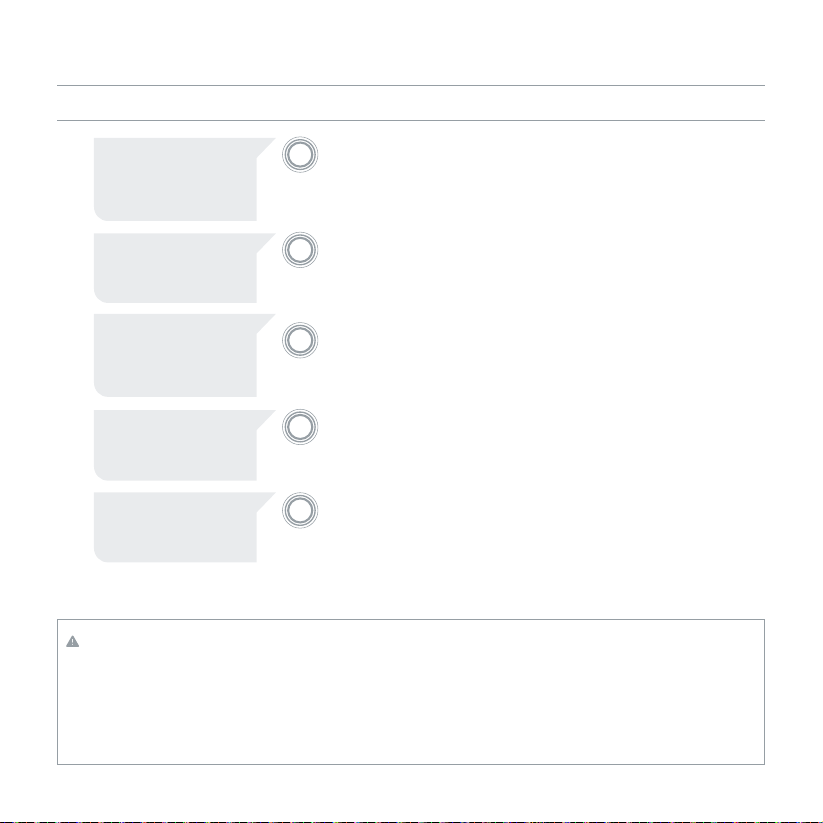
“THE SENS ORS HAVE
FAILED IN THE [ ROOM
NAME]. REPL ACE NEST
PROTEC T NOW.” Single
chirp ev ery 60 sec onds.
“THE BAT TERY IS LOW IN
THE [ROOM NAME].
REPLACE THE B ATTERY
SOON.”
“THE BAT TERY IS LOW IN
THE [ROOM NAME].
REPLACE THE B ATTERY
NOW.” Single ch irp
ever y 60 seconds .
GENERAL MAINTENANCE
“NEST PROTECT C ANNOT
SOUND THE A LARM IN
THE [ROOM NAME].” Two
chirps e very 60 se conds.
“NEST PRO TECT HAS
EXPIRE D. REPLACE NEST
PROTEC T NOW.” Two
chirps e very 60 se conds.
YELLOW pulses.
YELLOW pulses. Change N est Protec t’s
YELLOW pulses. Low battery. Change N est Protec t’s
YELLOW pulses.
YELLOW pulses.
WARNING
• The alarm will not operate without
battery power. The alarm cannot work
until you install the batteries in the
correct position (Match + to +, and - to -).
• This device contains lithium batteries. If
Nest Protect has tested
its se nsors, and th ere is
a problem.
Low battery.
There’s a p roblem with
Nest Protect’s siren.
Nest Pr otect has ex pired
and reached the end of
its life.
Clean ac cording to
instructions on page 16.
If the pr oblem persis ts,
replace Nest Protect.
batteries soon.
batteries now.
Repla ce Nest Prot ect now.
Repla ce Nest Prot ect now.
tampered with, the battery may be short
circuited and create a risk of fire. Never
attempt to open or damage the alarm.
• Replace all batteries at once and only use
new, unused batteries as replacements.
21
Page 22

GENERAL MAINTENANCE
SERVICING
1. Before sending Nest Protect for ser vice,
visit nest.com/eu/support
2. If your Nest Protect needs servicing, contact
our Suppor t team first to get a returns number
3. Send your Nest Protect to:
Nest Labs
(YOUR RETURN NUMBER)
Arvato Distribution GmbH – Technology
Willi-Bleicher-Str. 36
52353 Düren
Germany
EXPIRY
Like any smoke and CO alarm, Nest Protect
has a limited life. You will need to replace Nest
Protect after 10 years with a brand-new Nest
Protect. You can check the replacement date
written on the back of Nest Protect to see when
it will expire.
About two weeks before it expires, Nest Protect
will light up with a yellow light. Press the Nest
button and it will say, “Nest Protect has expired.
Replace it now.” Buy a new alarm and recycle the
expired one. Make sure that you test your new
Nest Protect once it’s installed.
RECYCLING AND DISPOSAL
Nest recognises its responsibility to minimise
the environmental impact of its operations
and products. Once Nest Protect has expired,
you will need to recycle it according to local
regulations. Please visit nest.com/eu/recycle
to learn more about Nest’s commitment to
environmental responsibility and to find where
you can safely recycle your Nest Protect.
22
The WEEE symbol means that your product
should be disposed of separately from
general household waste, in accordance with
local laws and regulations. When Nest Protect
reaches the end of it s life, take it to a collection
point designated by your local authorit y. Some
collection points accept products free of charge.
The separate collection and recycling of your
product will help conserve natural resources and
ensure that it is recycled in a manner that protects
human health and the environment.
RESETTING NEST PR OTECT
You can reset Nest Protect to erase all your
settings and reset the wireless interconnection
with other Nest Protects. You may want to do this
when you move to a new home. Follow the steps
below on each Nest Protect that you want to reset.
1. Press and hold the Nest but ton. Nest will chime
and glow blue.
2. Keep holding the but ton until Nest Protect
begins to say its version number. Then release
the button.
3. Nest Protect will start a verbal countdown and
tell you that it’s erasing all settings. You can
cancel the reset by pressing the Nest button
during the countdown.
4. It will restar t after a few seconds.
Your Nest Protect will still detec t smoke and
carbon monoxide af ter being reset.
Go to nest.com/eu/protect/reset for complete
reset instructions.
TECHNICAL SPECIFICATIONS
• Temperature range: 4 °C (40 °F) to 38 °C (100 °F).
• Humidity range: 20% RH to 80% RH
(non-condensing).
Page 23

WIRELESS INTERCONNECT
Nest Protects connect wirelessly to each other
so that when one speaks, they all speak. This
means that when one Nest Protect raises any
kind of aler t, every Nest Protect in the house will
tell you which room the smoke or CO is in. For
example, if you’re in the bedroom and the alarm
goes off in the basement, the Nest Protect in
the bedroom will tell you where the smoke or CO
is. To silence the alert, go to the room where the
alarm was triggered. All the Nest Protects in the
house can be silenced from there. Either press
the button on the Nest Protect or use the Nest
app to silence the alarm.
Nest Protect does not have a wire for interconnect
because it connects wirelessly. There’s no need to
connec t any Nest Protect wire to the interconnect
wire coming from the ceiling or wall.
Nest Protect - Wired 230 V (model numbers
05C-E and A14) and Nest Protect - Battery
(model numbers 05A-E and A13) are compatible
and can be interconnected wirelessly. Nest
Protect wireless interconnect will not work with
smoke or CO alarms from other brands.
Nest Protects can generally communicate with
each other if they’re 15 m (50 feet) or less apart
inside a home. Some features of a home may
reduce Nest Protect’s wireless interconnect
range, including the number of floors, number
and size of rooms, furniture, type of building
materials, suspended ceilings, ductwork, large
metal appliances and metal studs. This kind of
interference can be overcome by adding more
Nest Protects that can route wireless signals
around obstructions.
WARNING
• The range and proper operation of any
wireless device will vary depending on
its surroundings.
• Nest Protect alarms are not to be used
outdoors or to transmit between buildings.
The alarms will not communicate properly
in those conditions.
• Metal objects and metallic wallpaper
may interfere with signals from wireless
alarms. Test your Nest Protects with metal
doors opened and closed.
Note: Nest Protect can be used as a singlestation or multiple-station alarm. You can
connect up to 18 interconnected Nest Protects
to your Nest Account.
23
Page 24

SAFETY
24
ALARM LIMITATIONS
LIMITATIONS OF SMOKE ALARMS
Alarms reduce deaths resulting from house fires
worldwide. However smoke alarms can only
work if they are properly located, installed and
maintained, and if smoke reaches the alarms.
• Smoke alarms may not wake all individuals.
Make sure that you create an escape plan and
that you practise fire drills with all members
of the family.
• Smoke alarms cannot work without power.
If they are powered by batteries, the smoke
alarms cannot work if the batteries are
missing, dead or disconnected. If they are
wired, the smoke alarms cannot work during
a long power cut and once the backup batter y
is dead. Nest Protect will warn you in advance
when batteries are running low so that you can
replace them.
• Smoke will not be able to reach the smoke
sensor while the dust cover is in place. The
dust cover must be removed.
• Smoke alarms cannot detect fires if the smoke
does not reach the alarms. For example, if a
door is closed, smoke may not reach the smoke
alarm. This is why you should have a smoke
alarm in each bedroom and in the hallways, as
bedroom doors may be closed at night.
• Smoke alarms may not be heard. Although the
smoke alarm comes with a loud, 85-decibel
siren, it may not be heard if: 1) people have
consumed alcohol or drugs, 2) the alarm is
drowned out by noise from stereos, TVs,
traffic, air conditioners or other appliances,
3) residents are hearing impaired or have
high-frequency hearing loss associated with
ageing. Special smoke alarms should be
installed for those who are hearing impaired.
Page 25

• This smoke alarm is not intended to aler t
hearing-impaired residents. Alarms
specifically designed for the hearing impaired,
which feature devices like flashing strobe
lights or low-frequency devices, are available
to alert the hearing impaired in case of fire.
• This smoke alarm alone is not a suitable
substitute for complete fire detection
systems in places housing many people –
such as blocks of flats, condominiums, hotels,
motels, dormitories, hospitals, long-term
health-care facilities, nursing homes, daycare facilities or group homes of any kind –
even if they were once family homes. It is not a
suitable substitute for complete fire detection
systems in warehouses, industrial facilities,
commercial buildings and special-purpose
non- residential buildings, which require
special fire detection and alarm systems.
Depending on the building codes in your area,
this smoke alarm may be used to provide
additional protection in these facilities.
LIMITATIONS OF CARBON MONOXIDE CO ALARMS
• NEVER ignore your carbon monoxide alarm
if it goes off. Refer to “What to do in case of a
carbon monoxide alarm” for more information.
Failure to do so can result in injury or death.
• This CO alarm is designed for use inside a
family home or flat. It is not meant to be used
in common lobbies, hallways or basements
of blocks of flats unless working CO alarms
are also installed in each family living unit. CO
alarms in common areas may not be heard
from inside individual family living units.
• This CO alarm alone is not a suitable substitute
for complete detection systems in places that
house many people, like hotels or dormitories,
unless a CO alarm is also placed in each unit.
• DO NOT use this CO alarm in warehouses,
industrial or commercial buildings, specialpurpose non-residential buildings or aircraft.
This CO alarm is specifically designed for
residential use and may not provide adequate
protection in non-residential applications.
• Some individuals are more sensitive to CO
than others, including people with cardiac or
respiratory problems, infants, unborn babies,
pregnant mothers or elderly people, who can
be more quickly and severely affected by CO.
Members of sensitive populations should
consult their doctors for advice on taking
additional precautions.
• The silence feature is for your convenience
only and will not correct a CO problem. Always
check your home for a potential problem after
any alarm. Failure to do so can result in injur y
or death.
25
Page 26

INSTALLATION CODE
Specific requirements for smoke alarm
installation var y from country to country, and
from region to region. Check with your local Fire
Service for current requirements in your area.
WARNING
Smoke alarms are designed to alert you
with an audible alarm at a level specified
by EN 14604:2005.
WARNING
The smoke alarm accompanying this
user’s guide employs the latest technology
and is independently tested as being
compliant with guidelines established by
the European Committee for Standardization
(CEN). However, as with any electronic
product it may fail and may not sense all
types of fire within sufficient time to alert
you of the danger and provide adequate
time for your escape. In order to maximise
your level of safety always test your smoke
alarm frequently to ensure it is in full
working order.
WARNING
There is a risk of malfunction and
electrical shock, if the smoke alarm
is tampered with.
Your smoke/CO alarm is only suitable for use in
domestic residential applications, as covered in
this user’s guide. It is not suitable for commercial
or industrial applications. It is designed to sense
smoke and carbon monoxide, and alert you. It will
not prevent or extinguish fires.
26
WHERE TO INSTALL A SMOKE ALARM
Nest recommends the following installation.
Multi-family or mixed occupant residence
(Tenancy building, student accommodation)
Your smoke/CO alarm can also be used in
individual flats and bedsits, providing the same
conditions are met as for a single-family
residence. However, there must already be a
primary fire detection system that meets
regulatory requirements for common areas
suchas lobbies and hallways.
Institutions and Hotels
This includes guest houses, hospitals, day-care
facilities, long-term health-care facilities, B&Bs
and halls of residence. Your smoke/CO alarm can
be used in individual sleeping areas/residents’
rooms, provided that the same conditions are
met as for a family residence. However, there
must already be a primary fire detection system
that meets regulatory requirements for common
areas such as lobbies and hallways. Use of this
smoke alarm in common areas may not provide
sufficient fire warning to residents or meet
regulatory requirements.
Commercial and Industrial Premises
This smoke alarm is not intended for any
non-residential, commercial or industrial
application, nor for any other purpose than that
described above.
Page 27

SMOKE DETECTION
Are more smoke alarms desirable?
The required number of smoke alarms might
not provide reliable early-warning protection
for those areas separated by a door from the
areas protected by the required smoke alarms.
For this reason, the use of additional smoke
alarms for those areas is recommended for
increased protection. The additional areas
include the dining room and hallways not
protected by the required smoke alarms.
The installation of smoke alarms in kitchens,
attics (finished or unfinished) or garages is
not normally recommended because these
locations occasionally experience conditions
that can result in improper operation. As Nest
Protect is also a carbon monoxide alarm, we do
not recommend installing it in a boiler room or
a utility room if it contains a water heater or a
boiler. It should be 5–6 m (15–20 ft) from these
appliances to avoid transient conditions and/or
perceived nuisance alarms.
WHERE NOT TO INSTALL YOUR SMOKE ALARMS
For best performance, AVOID installing a smoke
alarm in these areas:
• Where combustion particles are produced.
Burning material creates combustion particles
that could cause your smoke alarm to go
off unnecessarily. Areas to avoid include
poorly ventilated kitchens, garages, boats,
recreational vehicles and boiler rooms. Keep
a smoke alarm at least 6 metres (20 feet) from
the source of combustion particles (cooker,
boiler, water heater, space heater), if possible.
In areas where a 6-metre (20-foot) distance is
not possible – in mobile or smaller homes, for
example – we recommend placing a smoke
alarm as far from these fuel-burning sources
as possible. The placement recommendations
are intended to keep a smoke detector at
a reasonable distance from a fuel- burning
source, reducing “unwanted” alarms.
Unwanted alarms can occur if a smoke alarm
is placed directly next to a fuel-burning source.
Ventilate these areas as much as possible.
• In air streams near kitchens. Air currents can
draw cooking smoke into the sensor of
a smoke alarm near the kitchen.
• In ver y damp, humid or steamy areas, or very
near bathrooms with showers. Keep a smoke
alarm at least 3 metres (10 feet) away from
showers, saunas, dishwashers, etc.
• Where temperatures are regularly below
4°C (40°F) or above 38°C (100°F), including
unheated buildings, outdoor rooms, porches,
or unfinished attics or cellars.
• In ver y dusty, dirty, or greasy areas. Do
not install a smoke alarm directly over the
cooker or range. Clean a laundry room unit
frequently to keep it free of dust or lint.
• Near fresh air vents, ceiling fans, or in very
drafty areas. Drafts can blow smoke away
from a smoke alarm, preventing it from
reaching the sensor.
• In insect-infested areas. Insects can
clog openings to the sensor and cause
unwantedalarms.
• Less than 30.5 cm (12 in) away from
fluorescent lights. Electrical “noise” can
interfere with the sensor.
• In “dead-air” spaces. “Dead-air” spaces may
prevent smoke from reaching a smoke alarm.
27
Page 28

AC INSTALLATION WARNINGS
WHERE NOT TO INSTALL YOUR CARBON
MONOXIDE ALARMS
• Keep the carbon monoxide alarm at least
3 m (10 ft) away from any cooking appliances,
including the hob, oven, microwave, etc.
• This alarm should not be installed in locations
where the temperature is below 4 °C (40 °F)
or above 38 °C (100 °F)
• In an enclosed space (for example, in a
cupboard or behind a cur tain)
• Where it can be obstructed (for example,
by furniture)
• Directly above a sink
• Nex t to a door or window
• Nex t to an extractor fan
• Nex t to an air vent or other similar
ventilation openings
• Where dirt and dust may block the sensor
• In a damp or humid location
EXAMPLES OF WHEN YOUR SMOKE AL ARM
MAY NOT BE EFFEC TIVE
Your alarm may not be effective in protecting
against fire in certain cases:
• Smoking in bed.
• Leaving children unsupervised.
• Cleaning with flammable liquids, like petrol.
• When someone’s clothing is on fire.
• Fires where the smoke is prevented from
reaching the alarm due to a closed door or
other obstruction.
ELECTRICAL SHOCK HAZARD
• Turn off power to the area where you will install
this unit at the circuit breaker or fuse box
before beginning installation. Failure to turn
off the power before installation may result in
serious electrical shock, injury or death.
• Do not restore power until all alarms are
completely installed. Restoring power before
installation is complete may result in serious
electrical shock, injury or death.
• Turn off the power to the area where the
alarm is installed before removing it from
the mounting bracket. Failure to turn off the
power first may result in serious electrical
shock, injury or death.
• If any unit in the series does not alarm,
TURNOFF POWER and recheck connections.
If it does not alarm when you restore power,
replace it immediately.
• Attempting to disconnect the power
connector from the unit when the power is on
may result in electrical shock, serious injury
ordeath.
• Failure to meet any of the above requirements
could damage the units and cause them to
malfunction, removing your protection.
• Improper wiring of the power connector or
the wiring leading to the power connector will
cause damage to the alarm and may lead to a
non-functioning alarm.
• This unit must be powered by a 24-hour,
230 V AC pure sine wave, 50Hz circuit. Be
sure the circuit cannot be turned off by
a switch, dimmer, or ground fault circuit
interrupter. Failure to connect this unit to a
24-hour circuit may prevent it from providing
constantprotection.
28
Page 29

• The alarm cannot be operated from power
derived from a square wave, modified square
wave or modified sine wave, inverter. These
types of inverters are sometimes used to
supply power to the structure in off grid
installations, such as solar or wind derived
power sources. These power sources produce
high peak voltages that will damage the alarm.
• Never disconnect the power from an AC
powered unit to stop an unwanted alarm.
Doing so will disable the unit and remove
your protection. In the case of a true
unwanted alarm open a window or fan
the smoke away from the unit. The alarm
will reset automatically when it returns
tonormaloperation.
• Improper wiring of the power connector or
the wiring leading to the power connector
will cause damage to the alarm and may lead
to a non-functioning alarm. You must test to
ensure proper installation.
• There is a risk of electrical shock, if the smoke
alarm is tampered in any way.
INSTALLATION IN IRELAND
REGULATORY REQUIREMENTS
Nest Protect provides both smoke alarm and
carbon monoxide alarm functionality. When
appropriately installed, Nest Protect will enable
you to comply with Irish regulatory requirements.
This document does not purpor t to provide
guidance on legal requirements. For further
information about legal requirements in Ireland,
you may wish to refer to the relevant legislation,
the current edition of the National Rules for
Electrical Installations (Wiring Rules), relevant
standards and guidance documents.
Smoke alarm requirements
Nest Protect 230 V is suitable for installation
in both new and existing buildings. However,
battery-powered Nest Protects are not suitable
in new buildings or where there is significant
construction or change of use taking place. If in
doubt, consult a registered electrical contractor.
You should install Nest Protect 230 V to comply
with Part B of the Building Regulations and the
Technical Guidance document published under
Part B. The Part B Technical Guidance requires
the provision of a system complying with Part
6 of BS 5839 of 2004 and meeting at least the
requirements of a Grade D system, as set out
in BS 5839, Part 6. When properly installed, a
system comprising Nest Protect 230 V units will
meet this standard.
Carbon monoxide alarm requirements
If you are installing a new heat-producing
appliance (fire, boiler, etc.) after 1 September
2014, Part J of the Building Regulations will
29
Page 30

require the installation of carbon monoxide
alarms. While most building regulations
apply only where there is new construction,
an extension or a significant change of use
and only apply to the parts of the building
affected, Part J applies whenever a heatproducing appliance is installed or replaced.
Carbon Monoxide alarms should be installed
in accordance with the technical guidance
document for Part J www.environ.ie/en/
Publications/DevelopmentandHousing/
BuildingStandards/FileDownLoad,37240,en.pdf
INFORMATION FOR PRO INSTALLERS
Information in this section is intended for
registered electrical contractors. It assumes
that the reader is familiar with the Wiring Rules
and is an Authorised Person, as defined in the
Wiring Rules.
Chapter 56 of the Wiring Rules does not apply to
domestic and similar premises (see rule 560.2).
Accordingly, it is not necessary, among other
things, that fire-resistant supply cables be used
when installing Nest Protect units.
In existing installations, power supply to each
interconnected mains-powered smoke alarm
may be derived from a local, frequently used
lighting circuit. Accordingly, multiple circuits
may supply power to the smoke alarms in a
single installation. Ensure that the power supply
is disconnected at each such smoke alarm
before starting work.
30
Page 31

CARBON MONOXIDE CO PRECAUTIONS
WHAT IS CARBON MONOXIDE?
Carbon Monoxide (CO) is an invisible, odourless,
tasteless gas produced when fuels do not burn
completely, or are exposed to heat (usually fire).
These fuels include: wood, coal, charcoal, oil,
natural gas, gasoline, kerosene and propane.
Common appliances that are often sources
of CO include oil or gas burning boilers, gas
ovens, wood-burning fireplaces, and charcoal
grills. If they are not properly maintained, are
improperly ventilated or malfunction, CO levels
can rise quickly. Additional sources include
space and water heating, cooking, uncontrolled
burning, tobacco smoking, internal combustion
engine. CO is a real danger now that homes are
more energy ef ficient. “Air-tight” homes with
added insulation, sealed windows, and other
weatherproofing can “trap” CO inside.
Electrical appliances typically do not produce CO.
Nest Protect will alarm:
• within 3 minutes at 300 ppm CO
• within 40 minutes at 100 ppm CO
• within 90 minutes at 50 ppm CO
Unit will not sound before 120 minutes of
exposure at 30 ppm.
SYMPTOMS OF CO POISONING
The following symptoms are related to CARBON
MONOXIDE POISONING and are to be discussed
with ALL members of the household:
• Mild Exposure: Slight headache, nausea,
vomiting, fatigue (often described as
‘Flu-like’symptoms).
• Medium Exposure: Severe throbbing
headache, drowsiness, confusion, fast
heart rate.
• Ex treme Exposure: Unconsciousness,
convulsions, cardiorespiratory failure, death.
• Many cases of reported CARBON MONOXIDE
POISONING indicate that while victims are
aware they are not well, they become so
disoriented that they are unable to save
themselves by either exiting the building or
calling for assistance. Young children and
household pets are usually the first affected.
WARNING
This carbon monoxide alarm is designed
to detect carbon monoxide from any
source of combustion. It is NOT designed
to detect any other gas.
Individuals with certain medical problems
should consider using detection devices
with lower COHb alarm capabilities and
consider warning devices that provide
audible and visual signals for carbon
monoxide concentrations of under 30 ppm.
Installation of the apparatus should
not be used as a substitute for proper
installation, use and maintenance of fuelburning appliances, including appropriate
ventilation and exhaust systems.
This apparatus is designed to protect
individuals from the acute ef fects of
carbon monoxide exposure. It will not
fully safeguard individuals with specific
medical conditions. If in doubt, consult
your doctor.
31
Page 32

WHAT TO DO IN CASE OF A CARBON
MONOXIDEALARM
WARNING
Actuation of your CO alarm indicates the
presence of carbon monoxide (CO), which
can KILL YOU.
1. Keep calm and open all doors and windows to
increase the rate of ventilation.
2. Stop using all fuel-burning appliances and
ensure, if possible, that they are turned off.
3. Evacuate the premises if the carbon
monoxide alarm continues to sound.
4. Contact your emergency services.
PHONE NUMBER:
5. Get medical help for anyone suffering the
effects of carbon monoxide poisoning.
6. Call the appropriate appliance servicing
and/or maintenance agency so that the
source of the CO emissions can be identified
and corrected. Do not use the fuel-burning
appliances again until they have been
checked and cleared for use by a competent
person, according to national regulations.
THE FOLLOWING CONDITIONS CAN RESULT IN
TRANSIENT CO SITUATIONS
1. Excessive spillage or reverse venting of fuelburning appliances caused by:
I) Outdoor ambient conditions such as wind
direction and/or velocity, including high
gusts of wind; heavy air in the vent pipes
(cold/humid air with extended periods
between cycles).
II) Negative pressure differential resulting
from the use of exhaust fans.
32
III) Simultaneous operation of several fuel-
burning appliances competing for limited
internal air.
IV) Vent pipe connection vibrating loose from
clothes dryers, boilers or water heaters.
V) Obstructions in, or unconventional vent pipe
designs, which amplif y the situations above.
2. Extended operation of unvented fuel-burning
devices (range, oven, fireplace, etc.).
3. Temperature inversions that can trap exhaust
gases near the ground.
4. Car idling in an open or closed attached
garage, or near a home.
5. NEVER bring a charcoal barbecue inside, and
ALWAYS operate a portable generator outside,
a safe dist ance from the house, and well away
from windows.
WARNING
The following substances in high
concentration can affect the carbon
monoxide sensor and may affect the
reliability of the alarm or cause false
alarms: paint, thinners, solvents,
adhesives, hair sprays, some cleaning
agents, ammonia, acetone, hydrogen
methane, iso-butane, iso-propanol,
ethylene, benzene, toluene, ethyl acetate,
alcohol-based products, volatile oils,
silicone vapour, hydrogen sulphide,
sulphuric acid, hair-grooming products,
high concentrations of dust and oil mist,
soaking or splashing with water.
Page 33

FIRE SAFETY PRECAUTIONS
CREATE AN ESCAPE PLAN TO PRACTISE
Be prepa red when your smoke/CO alarm soun ds its
alarm. De velop a family escape plan, dis cuss it with
all household members, and practice it regularly.
• Make sure ever yone is familiar with the sound
of your smoke/CO alarm and explain what the
sound means.
• Determine TWO exits from each room and have
an escape route to the outside from each exit.
• Teach all the members in your household to
check doors for heat with the back of their hand
before opening them and to use the alternative
exit if the door is hot. Make sure that they do
not open the door if it is hot.
• Teach household members to crawl along the
floor to av oid dangerous smoke, f umes and gases.
• Determine a safe meeting pl ace for all household
members to regroup at outside the building.
PRACTISE FIRE SAFETY
Practise your esc ape plan at least t wice a year,
making sure that ever yone is involved – fr om kids
to grandp arents. Practise the escape plan with
children, including holding one at night when they
are sleeping. If childre n or others do not wake up to
the sound of the smoke ala rm, or if there are infants
or family members wit h mobility limitations, make
sure that someone is a ssigned to help the m for the
fire drill and in the even t of an emergency.
Current s tudies have shown that smoke alarms
may not wake all sleeping individuals, and that it is
the responsibility of individuals in the household
who are capable of assisting others to provide
assist ance to those who may not be woken by the
alarm sound, or to those who may be inc apable of
safely evacuating the area unassisted.
WHAT TO DO IN CASE OF FIRE
• Get out now.
• Don’t panic; stay calm.
• Operate your safe ty plan, as previously planned.
• Alert small children in the home and those who
may need extra assistance.
• Leave the building as quickly as possible. Touch
doors with the back of your hand and make
sure that they are not hot before opening them.
Use an alternative exit, if necessar y. In case of
smoke, crawl along the floor and DO NOT stop
to collect anything. Close doors behind you.
• Assemble at a pre-arranged place outside
the building.
• Once outside, do a head count and call the
fire service.
• DO NOT re-enter the house unless a fire officer
says that it’s safe to do so.
33
Page 34
MOBILE NOTIFICATIONS
WARNING
Nest Protect phone and tablet
notifications require a functional Wi-Fi
connection. They’re only as reliable as
your home’s Wi-Fi network and aren’t a
substitute for a third-party emergency
monitoring service.
This use r’s guide and t he product s describe d herein are
copyr ighted, wi th all rights r eserve d. Under the se copyrig ht
laws, n o part of this i nstalla tion guide may b e copied fo r use
without the written consent of Nest.
Nest L abs (Europe) Ltd. i s a subsidiary o f Nest Labs, I nc.,
a US entit y.
EU DECLARATION OF CONFORMITY
We, Nest Labs Inc. declare, under our sole
responsibility, that this product complies
with the essential requirements of the R&TTE
Directive 1999/5/EC, the European Directives
2006/95/EC and 2004/108/EC.
This device meets the following conformance
standards: EN 300 328, EN 301 489-1, EN
301 489-17, EN 55022, EN 55024, EN62311,
EN61000-3-2 and EN61000-3-3.
Nest Labs Inc. declares that this smoke/
CO alarm is in compliance with the essential
requirements and other relevant provisions of
Directive 1999/5/EC.
A copy of the EU Declaration of Conformity is
available at: nest.com/eu/legal/eudoc
0843
Nest Labs (Europe) Limited
PO Box 12443
Dublin 2
Ireland
15
0843-CPR-0240
EN 14 604:20 05
Smoke Alarm Devices
Model number: A14
Technical data : See User’s Guide
(64-10-0037-GB)
Apple a nd the Apple l ogo are trad emarks of A pple Inc., re gistere d
in the US an d other coun tries. A pp Store is a s ervic e mark of
Apple In c. Google P lay is a trade mark of Goo gle Inc.
34
Page 35

Nest Labs
(Europe) Ltd.
Limited Warranty
™
Nest Protect
smoke and carbon
monoxide alarm
THIS LIMI TED WARRAN TY CONTAINS I MPORTANT
INFORMATION ABOUT YOUR RIGHTS AND OBLIGATIONS, AS
WELL AS LI MITATIONS AND EXCL USIONS THAT MAY APP LY
TO YOU AS PAR T OF THE TERMS A ND CONDITIO NS OF SALE IN
EFFECT AT TH E TIME THAT YOU PURC HASE A NEST PR ODUCT.
YOUR RIGH TS AND THIS LIM ITED WARRA NTY
This Lim ited Warran ty gives y ou specific le gal rights . You may
also hav e other legal r ights that v ary by sta te, provin ce or
jurisd iction. For e xample, the se rights ma y include your r ights
under th e Directi ve 99/44/EC of th e European Pa rliament on
Cer tain Aspec ts of Sale of C onsumer Go ods and Asso ciated
Guara ntees and ot her enactm ents gover ning the sale o f goods.
The disclaimers, exclusions and limitations of liability under
this Lim ited Warran ty will not a pply to the ex tent prohib ited by
applic able law. For a f ull descrip tion of your le gal rights, y ou
should r efer to the l aws applicab le in your juris diction, an d you
may wish t o contact a r elevant co nsumer adv isory ser vice. Thi s
Limite d Warrant y is in additio n to your legal ri ghts in rela tion
to the Pr oducts and d oes not af fect your s tatutor y rights. T his
Limite d Warrant y only applie s to Product s purchas ed and used
in the Eur opean Union .
1. WHAT THIS LIMIT ED WARRAN TY COVER S; PERIOD
OF COVER AGE
Nest L abs (Europe) L td. (“Nest La bs”) warran ts to the owne r
of the en closed pro duct that th e product c ontained in t his
box (“Pr oduct”) w ill be free fr om defect s in material s and
workm anship for a pe riod of two (2) y ears from th e date of
deliv ery follow ing the origi nal retail p urchase (th e “Warrant y
Perio d”). If the Prod uct fails to c onform to th is Limited Wa rranty
during t he Warrant y Period, Ne st Labs will , at its sole di scretion ,
either (a) repair or replace any defective Product or component;
or (b) acc ept the retu rn of the Prod uct and ref und the money
actua lly paid by the o riginal purc haser for th e Product . Repair
or repl acement ma y be made with a n ew or refurbi shed produ ct
or comp onents, at N est Labs’ s ole discret ion, to the ex tent
that thi s is permit ted by local l aws in your juri sdiction. I f the
Produ ct or a compon ent incorp orated wi thin it is no long er
availa ble, Nest La bs may, at Nest L abs’ sole dis cretion, r eplace
the Pro duct with a sim ilar produ ct of similar f unction. A ny
Produ ct that has ei ther been r epaired or re placed un der this
Limite d Warrant y will be cover ed by the ter ms of this Limit ed
Warran ty for the lo nger of (a) nine ty (90) days fr om the date of
delivery of the repaired Product or Replacement Product, or
(b) the re maining Warra nty Perio d. This Limit ed Warrant y is
transferable from the original purchaser to subsequent owners,
but the Wa rranty Pe riod will no t be extend ed in duratio n or
expan ded in cover age for any suc h transfer.
2. TOTAL SATISFACTION RETURNS POLICY
If you are t he original p urchaser o f the Produc t and you are no t
satis fied with this P roduct fo r any reason, y ou may retur n it, at
35
Page 36

your co st, in its ori ginal condi tion, withi n thirty (30) d ays of the
origin al purchas e and receiv e a full refun d.
3.WARRA NTY COND ITIONS; HOW TO G ET SERVIC E IF YOU WANT
TO CLA IM UNDER THIS LI MITED WARRA NTY
Befor e making a cla im under this Li mited Warra nty, the owne r
of the Pr oduct must (a ) notify N est Labs of t he intentio n to claim
by visi ting nest.com/eu/support during the War ranty Per iod and
provi ding a descri ption of the al leged failur e, and (b) compl y with
Nest L abs’ retur ns deliver y instruc tions. Nes t Labs will ha ve
no warr anty oblig ations with r espect to a r eturned P roduct if it
determines, at its reasonable discretion after examination of
the returned Product, that the Product is an Ineligible Product
(define d below). Nest L abs will bear a ll costs of r eturn deli very to
the owne r and will reimb urse stan dard deliv ery cost s incurred
by the own er, except with r espect to a ny Ineligibl e Product, f or
which th e owner will be ar all delive ry cost s.
4. WHAT THIS L IMITED WARR ANTY DOE S NOT COVER
This Lim ited Warran ty does no t cover the fo llowing (coll ectivel y
“Inelig ible Produc ts”): Prod ucts marke d as “sample” or “ Not for
Sale”, or sol d “AS IS”; or Produc ts that have b een subjec t to: (a)
modifications, alterations, tampering, or improper maintenance
or repa irs; (b) handlin g, storag e, install ation, tes ting or use
not in accordance with the user’s guide or other instructions
provi ded by Nest L abs; (c) abuse or mi suse of the Pr oduct; (d)
breakdowns, fluctuations or interruptions in the electricity
supply or the telecommunications network; or (e) Acts of
God, in cluding, but n ot limited t o lightning , flood, torna do,
eart hquake or hurr icane. Thi s Limited Warr anty doe s not cover
consum able part s, includin g batteri es, unless da mage is due to
defec ts in mater ials or workm anship of the P roduct or so ftware
(even if su ch consumab le parts o r softwa re are packa ged or sold
with th e product). N est Labs re commends u sing only auth orised
service providers for maintenance or repair. Unauthorised use of
the Pro duct or sof tware can i mpair the Pro duct‘s pe rforman ce
and may inv alidate thi s Limited Warr anty.
5. DISCL AIMER OF WAR RANTIES
EXCEP T AS STATED ABOVE IN THIS L IMITED WARRA NTY,
AND TO THE M AXIMUM EX TENT PERMIT TED BY APPLI CABLE
LAW, NEST L ABS DISCL AIMS ALL E XPRESS, IMPL IED AND
STATUTORY WARRANTIES AND CONDITIONS WITH RESPECT
TO THE PRO DUCT, INCLUDING THE IM PLIED WARRAN TIES
OF MERCHANTABILITY AND FITNESS FOR A PARTICULAR
PURPO SE. TO THE MA XIMUM EXT ENT PERMITT ED BY
APPLIC ABLE LAW, NES T LABS ALS O LIMITS THE DUR ATION OF
ANY APPLICABLE IMPLIED WARRANTIES OR CONDITIONS TO
THE DUR ATION OF THIS LIMIT ED WARRANT Y.
6. LIMITATION OF D AMAGES
IN ADDITION TO THE WARRANTY DISCLAIMERS ABOVE,
IN N O EVENT WIL L NEST LAB S BE LIABLE F OR ANY INDIREC T,
36
CONSEQUENTIAL, INCIDENTAL, EXEMPLARY OR SPECIAL
DAMAGE S, INCLUDING A NY DAMAGES F OR LOST DATA OR
LOST PROFITS, ARISING FROM, OR RELATING TO THIS LIMITED
WARRA NTY OR THE P RODUCT, AND NES T LABS’ T OTAL CUMUL ATIVE
LIABIL ITY ARI SING FROM, OR REL ATED TO THIS LIM ITED WARRA NTY
OR THE PRO DUCT WILL NO T EXCEED THE AM OUNT ACTUA LLY PAID
FOR THE PR ODUCT BY THE O RIGINAL PUR CHASER.
7. LIMITATION OF LIABILITY
IF YOU CHOO SE TO USE THEM, ONLI NE SERVICES OFF ERED
BY NEST L ABS, INC., A US A FFILIATE OF NEST L ABS,
(“SERVICES”) PROVIDE YOU WITH INFORMATION (“PRODUCT
INFORMATION”) REGARDING YOUR NEST PRODUCTS OR
OTHER PERIPHERAL S CONNECTED TO YOUR PRODUCT S
(“PRODUCT PERIPHERALS”). THE TYPE OF PRODUCT
PERIPHER ALS THAT MAY BE CONNE CTED TO YOUR PROD UCT
MAY CHANGE F ROM TIME TO TIME. WI THOUT LIMIT ING THE
GENERA LITY OF THE D ISCLAIMER S ABOVE, ALL PR ODUCT
INFORMATI ON IS PROVIDED FO R YOUR CONVENIEN CE, “AS
IS” AND “AS AVAIL ABLE”. NEST LA BS OR ITS AFFIL IATE DOES
NOT REPRE SENT, WARRANT OR GU ARANTEE T HAT PRODUCT
INFORMATI ON WILL BE AVAILAB LE, ACCURATE O R RELIABLE,
OR THAT PROD UCT INFORMATIO N OR USE OF THE SERV ICES
OR PRODU CT WILL PROVI DE SAFET Y IN YOUR HOME. YOU
USE ALL PR ODUCT INFORM ATION, THE SERVI CES AND THE
PRODU CT AT YOUR OWN DISCRE TION AND RISK . YOU WILL BE
SOLELY RESP ONSIBLE FOR (A ND NEST LAB S AND ITS AFFILI ATE
DISCL AIM) ANY AND A LL LOSS, LIA BILITY OR DA MAGES,
INCLUDING TO YOUR WIRING, FIXTURES, ELECTRICITY, HOME,
PRODUCT, PRODUCT PERIPHERALS, COMPUTER, MOBILE
DEVI CE, AND ALL OTHER I TEMS AND PETS IN Y OUR HOME,
RESULTING FROM YOUR USE OF THE PRODUCT INFORMATION,
SERVICES OR PRODUCT. PRODUCT INFORMATION PROVIDED BY
THE SERV ICES IS NOT INTEND ED AS A SUBSTIT UTE FOR DIREC T
MEANS OF OBTAINING THE INFORMATION.
8. VARIATION S THAT MIGHT APPLY TO TH IS LIMITED WARR ANTY
Some jur isdictio ns do not allow li mitation s on how long an
implie d warrant y lasts or sp ecific exclu sions, so so me of the
limit ations set ou t above may no t apply to you. If a ny court
or relevant authority decides that any of these limitations is
unenf orceable, i t should be de emed modifie d to the minimum
exte nt necess ary to make i t enforce able. If this mo dification i s
not pos sible, the re levant pro vision shou ld be deemed d eleted.
Any mod ification or d eletion wil l not affec t the validi ty of the
rest o f this Limite d Warranty.
9. CONTACT INFORMATION
Pleas e direct any qu estions ab out this Limi ted Warran ty
to Nest L abs (Europ e) Ltd. at the addr ess locat ed at:
nest.com/eu/contact
064-00020-GB
 Loading...