

Google Nexus 7 2013, Nexus 7 Manual Book

Guidebook 2013
For Android™ mobile technology platform 4.3

NEXUS 7 (2013) GUIDEBOOK ii
Copyright © 2013 Google Inc. All rights reserved.
Edition 1.4
Google, Android, Gmail, Google Maps, Chrome, Nexus, Google Play, YouTube, Google+, and other trademarks are property of Google Inc. A list of
Google trademarks is available at http://www.google.com/permissions/
trademark/our-trademarks.html. ASUS and the ASUS logo are trademarks
of ASUSTek Computer Inc. All other marks and trademarks are properties
of their respective owners.
The content of this guidebook may differ in some details from the product
or its software. For best results, make sure you’re running the latest Android system update. To check, go to Settings > System > About tablet >
System updates.
All information in this guidebook is subject to change without notice.
The Nexus 7 (2013) tablet is certied by ASUS under the names ASUS Pad
K008 (Wi-Fi) and ASUS Pad K009 (LTE).
For online help and support, visit support.google.com/nexus. To download
a printable PDF version of this eBook, open the Nexus 7 support page and
scroll to the bottom.

NEXUS 7 (2013) GUIDEBOOK iii
Table of contents
1. Get started 1
Insert & activate a SIM card 1
Charge the battery 4
Set up your tablet 5
Get around 6
Use your Home screens 8
Touch & type 10
Type text by speaking 11
2. Explore your tablet 13
Swipe up for Google Now 13
Swipe down for notications & settings 15
Relax with Google Play 17
Use & customize the lock screen 20
Try Face Unlock 21
Share content with Android Beam 22
Change the wallpaper 23
Take a screenshot 24
Connect to keyboards, mice, & other devices 24
3. Use the keyboard 27
Enter & edit text 27
Try Gesture Typing 29
Use keyboard dictionaries 30

NEXUS 7 (2013) GUIDEBOOK iv
4. Try some apps 32
Use All Apps 32
Start Gmail 33
Find People 34
Manage your Calendar 35
Open & use Clock 36
Manage downloads 37
5. Google Now & Search 39
About Google Now 39
Use Google Now 43
Turn Google Now on or off 46
Control location access, reporting, & history 46
Use your voice on Android 50
Voice Actions commands 52
Google Now Card list 54
About Gmail Cards 63
About the Activity summary card 64
About the Stocks card 64
About the Research topics card 65
Search settings 65

NEXUS 7 (2013) GUIDEBOOK v
6. Settings 67
7. Accessibility 68
Appendix: Hardware reference 70
What’s in the box 70
Nexus 7 (2013) hardware 71
Specs (Wi-Fi models) 73
Specs (32GB + LTE) 75

NEXUS 7 (2013) GUIDEBOOK GET STARTED 1
1
Get started
Insert & activate a SIM card
Applies only to Nexus 7 (2013) LTE.
To use your tablet with mobile network data, you must rst insert
& activate a SIM card. If no card is installed, the message “No SIM
card” appears on the tablet’s lock screen.
Only Nexus 7 (2013) LTE can accept a SIM card. Wi-Fi versions of
the tablet can’t.
WArNING: The SIM card ejection tool and the SIM card tray
included with Nexus 7 are very small objects that represent
a choking hazard. Please keep them out of reach of small
children.
WAR NING: Do not insert SIM card ejection tool or any
other objects into microphone. Inserting the SIM card
ejection tool or other objects into the microphone with
force may result in overheating, which can cause
personal injury or property damage. Refer to diagram on
page 71 of this manual.
NEXUS 7 (2013) GUIDEBOOK GET STARTED
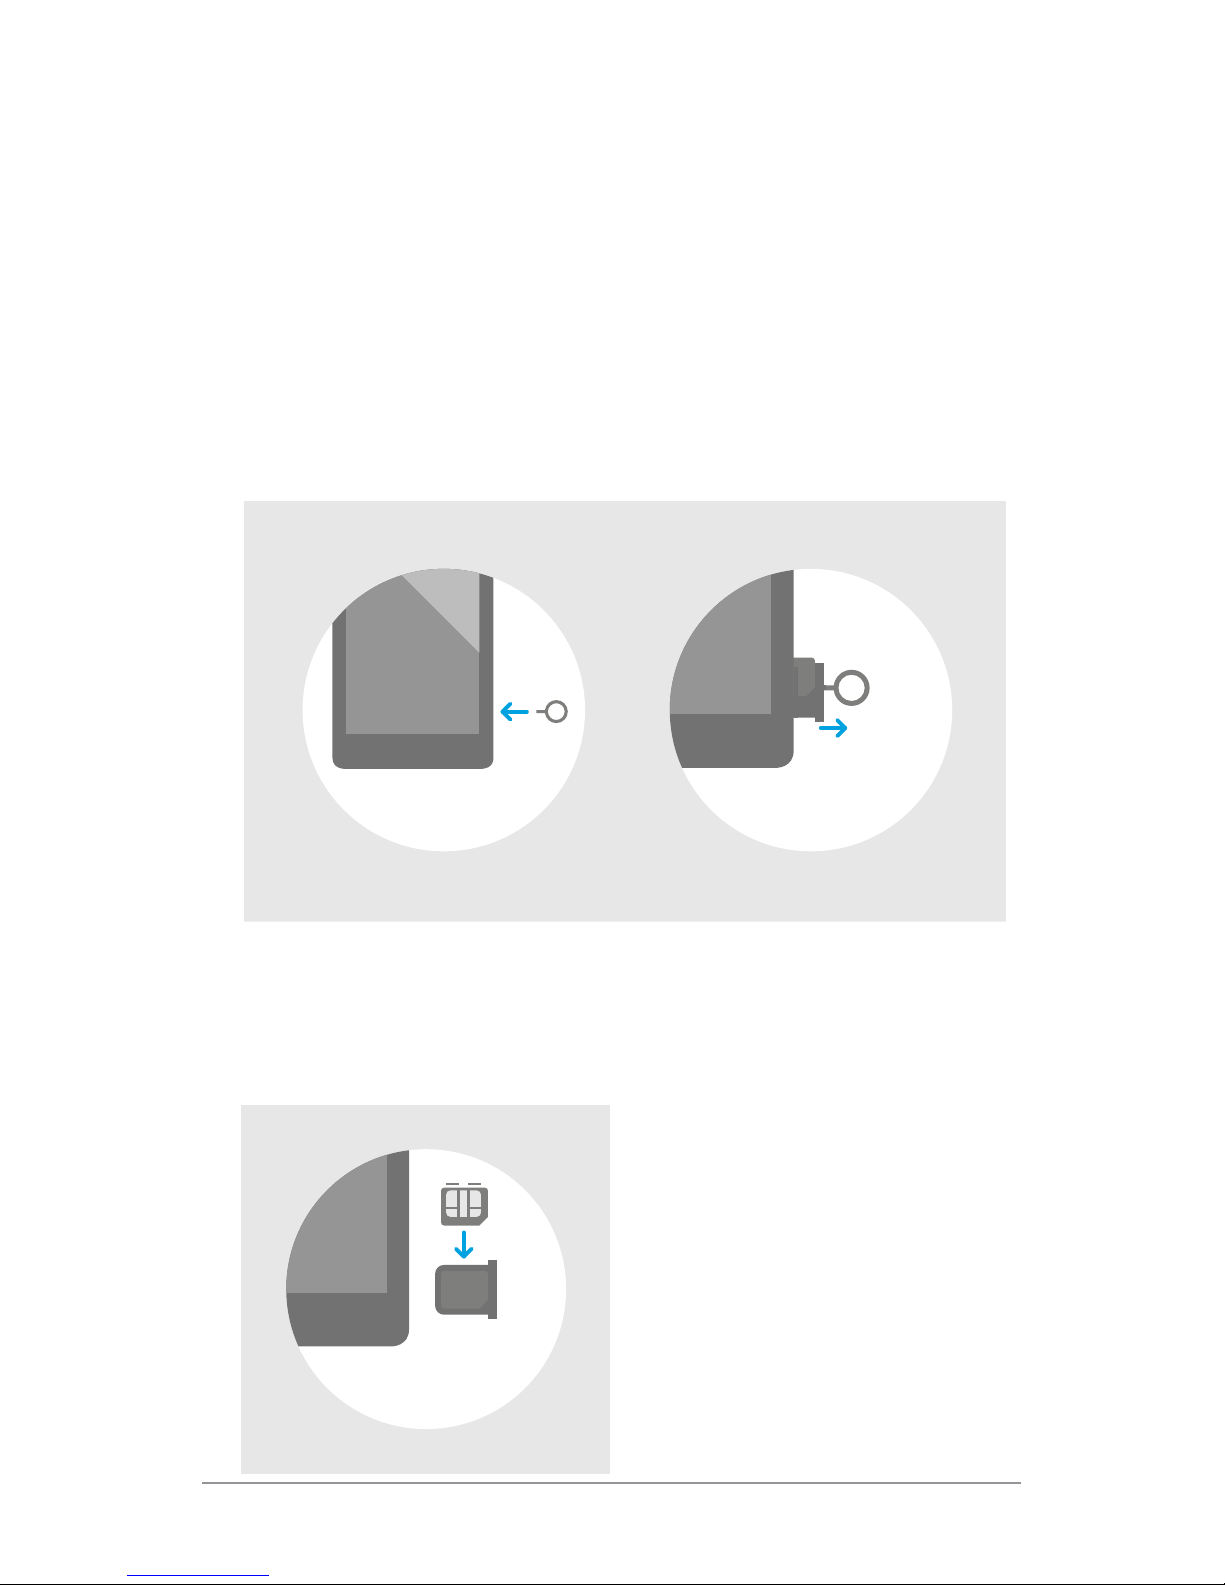
Insert the SIM ejection tool that comes with the tablet (or a
paperclip) into the hole on the tray, and push rmly but gently
until the tray pops out.
4. Remove the tray and place the micro SIM card inside it, with
the angled corner tting snugly into the angled corner of the
tray.
1. Turn your tablet off and place it on a flat surface with the
screen facing up, with the camera at the top and the Power
button on the right.
2. Tilt the right side slightly and locate the SIM card tray near the
bottom and the small hole in the tray door.
3.
2
To insert a new SI M card:
NEXUS 7 (2013) GUIDEBOOK GET STARTED 3
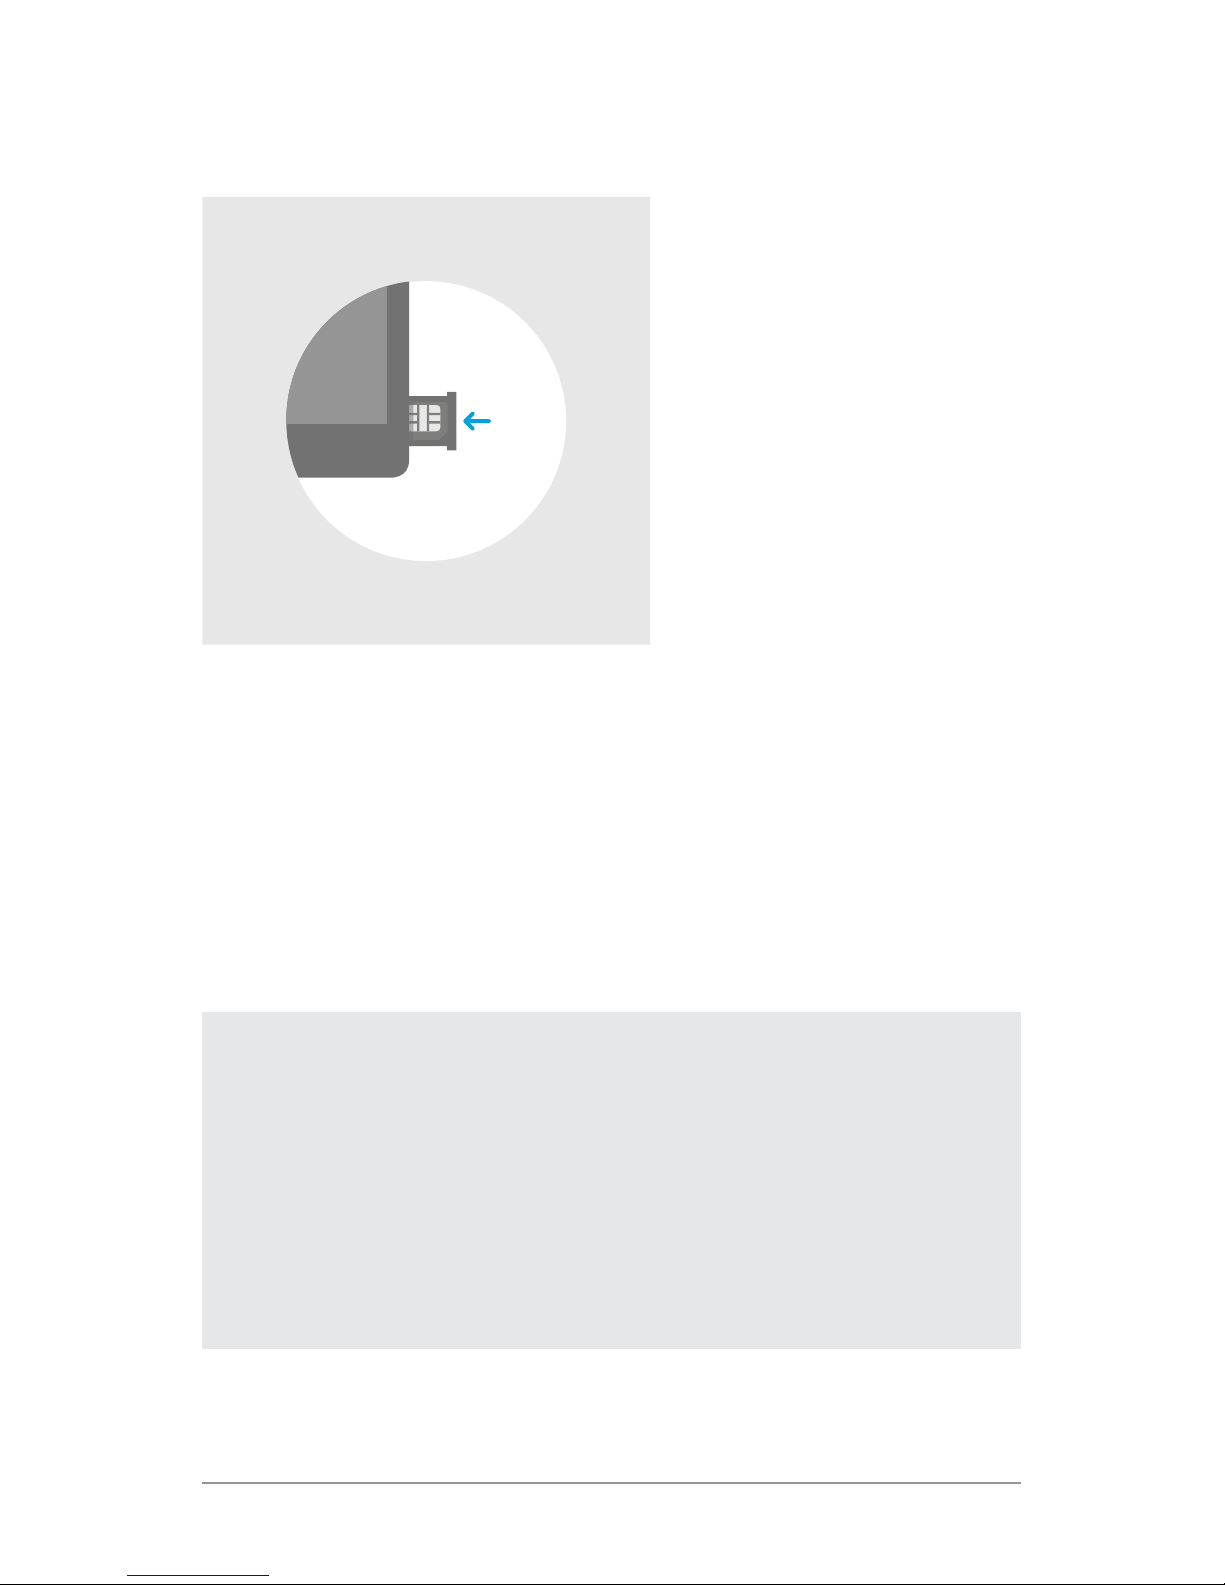
5. Carefully reposition the tray in the slot and push it gently back
into the tablet.
To activate a SIM card:
1. After completing the setup instructions, open the Settings app
and turn off Wi-Fi. Once Wi-Fi is off, you’ll see a notication at
the top of your screen.
2. Swipe down the notication shade and touch the notication.
3. Follow the activation instructions provided by your carrier.
IMPORTANT: Some carriers may take a minute or more to
activate your SIM card. If you nd it’s taking a long time to
activate, you may want to try restarting your tablet. Some
mobile service providers may require you to enter and then
exit airplane mode, or to use an SMS app from the Google
Play store to manage your data. Contact your own mobile
service provider for additional details.
NEXUS 7 (2013) GUIDEBOOK GET STARTED 4
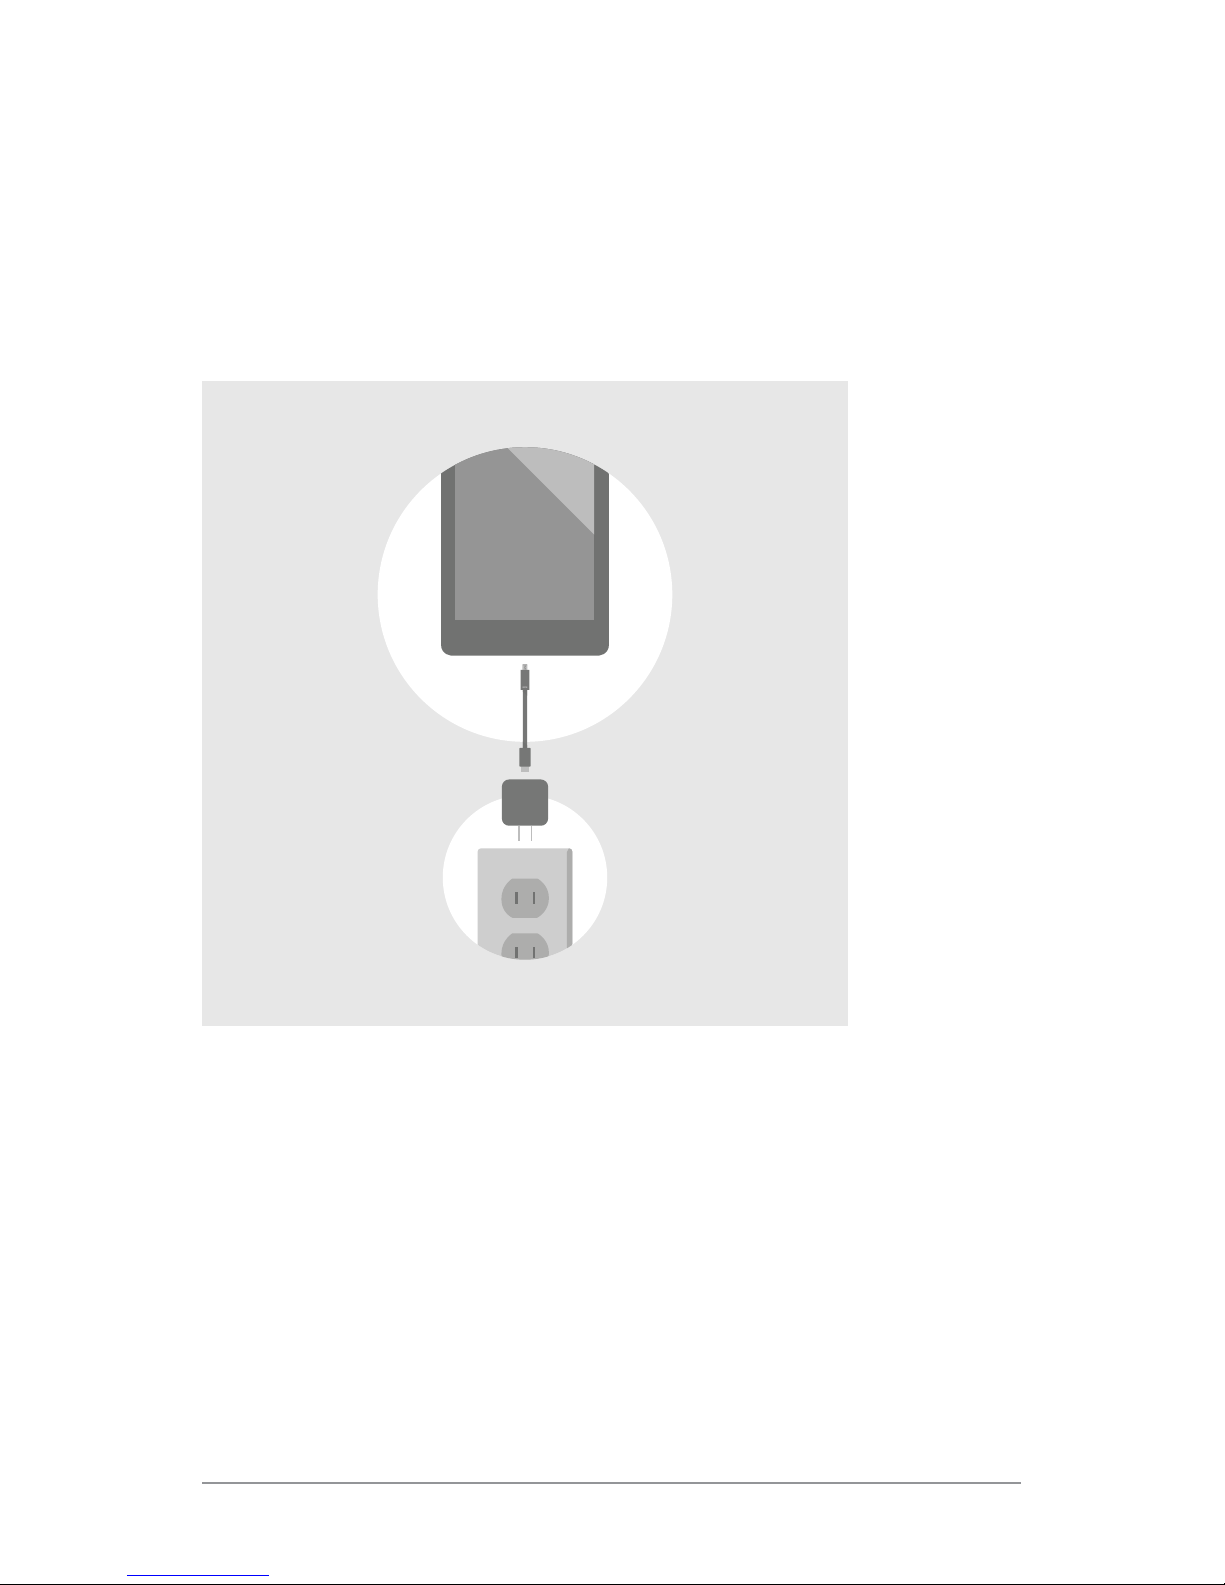
Charge the battery
The battery may not be fully charged at rst. It’s a good idea to
fully charge it as soon as you can.
Connect the micro USB cable to Nexus 7 and to the charging unit,
and the charging unit to a power outlet:
• The USB charging unit varies by country or region.
• Use only the USB charging unit and micro USB cable that
come with your Nexus 7 (2013). Using a different charging unit
or cable may damage your tablet.
• To avoid risk of injury or damaging your device, peel the pro-
tective lm from the USB charging unit and USB cable before
charging the battery.

NEXUS 7 (2013) GUIDEBOOK GET STARTED 5
• The input voltage range between the wall outlet and this
charging unit is AC 100V–240V, and the charging unit’s output
voltage is DC5.2V, 1.35A.
• Your Nexus 7 can be charged via the USB port on a computer
only when Nexus 7 is in sleep mode (screen off) or turned off.
Charging through the USB port will take longer than charging
with the USB charging unit.
Set up your tablet
To turn on your Nexus 7, press the Power button on the right edge
near the top for a few seconds, then release it.
The rst time you turn on the tablet, you’ll see a Welcome screen.
• To choose a different language, touch the menu.
• To continue, touch the
Play icon and follow the instructions.
IMPORTANT: You must have a Wi-Fi connection to complete the setup process.
When prompted, you can sign in with your Google Account or create one at that time. You can also choose to skip this step and
create one later.
An email address that you use for any of the following counts as
a Google Account:
• Gmail
• YouTube
• Google Apps
• AdWords
• Any other Google product

NEXUS 7 (2013) GUIDEBOOK GET STARTED 6
When you sign in with a Google Account, all the email, contacts,
Calendar events, and other data associated with that account are
automatically synced with your tablet.
If you have multiple Google Accounts, you can add the others
later.
Get around
Every Home screen shows the Favorites tray: another quick way
to get to your books, magazines, apps, movies, and music.
At the bottom of every screen, no matter what you’re doing, you’ll
always nd these three navigation buttons:
Back
Opens the previous screen you were working in, even
if it was in a different app. Once you back up to the
Home screen, you can’t go back any further in your
history.
Home
Opens Home. If you’re viewing a left or right Home
screen, opens the central Home screen. To open Google Now, swipe up.

NEXUS 7 (2013) GUIDEBOOK GET STARTED 7
Recent apps
Opens a list of thumbnail images of apps you’ve
worked with recently. To open an app, touch it. To remove a thumbnail from the list, swipe it left or right.
If you don’t use these buttons often, they may shrink to dots or
fade away, depending on the current app. To bring them back,
touch their location.
Settings
On the All Apps screen available from the Favorites tray, notice the Settings icon. This brings you
to the Settings screens for your tablet, where you
can adjust things like network, sound, and account
settings, among many others.
TIP: You can use Quick Settings to toggle Wi-Fi, change display brightness, and more. To open Quick Settings, swipe
down from the top right corner of any screen.
At the top of the screen you’ll nd Google Search, which lets you
search your tablet or the Internet. Touch Google to type your
search terms, or the
Microphone icon to speak them.
Many screens in apps and Settings include a
Menu icon. Touch
it to explore additional options, often including a Help item that
provides more information about that screen.
NEXUS 7 (2013) GUIDEBOOK GET STARTED 8
Use your Home screens
Browse Home screens
To move between Home screens, swipe left or right.
The My Library widget displays music, movies, magazines, and
books you already have:
When you’re ready to shop for more, try the suggestions in one of
the Play Recommendations widgets:
Touch to
avoid future
suggestions
like this
Touch to
learn more
Touch to see a
different suggestion
NEXUS 7 (2013) GUIDEBOOK GET STARTED 9
To resize a widget, touch & hold, then let go and drag the blue
dots. To remove it, touch & hold, then drag it to the Remove icon
at the top of the screen.
Organize Home screens
To add an app or widget to a Home screen:
1. Go to the Home screen where you want to place the app or
widget.
2. Touch the
All Apps icon.
3. Swipe right, if necessary, to nd the app or widget you want.
4. Touch & hold the app or widget until the Home screen appears,
slide it into place, and lift your nger.
To move an app or widget icon to a different location on a Home
screen:
1. Touch & hold the icon.
2. Slide your nger to the new position.
To move between Home screens, slide toward the edge of the
screen.
To bump another icon out of the way, slide slowly into it.
3. Lift your nger.
The icon drops into its new position.
To create a folder, slide one icon quickly over another.
To rename a folder, touch its name.

NEXUS 7 (2013) GUIDEBOOK GET STARTED 10
Touch & type
To select or activate something, touch it.
To type something, such as a name, password, or search terms,
just touch where you want to type. A keyboard pops up that lets
you type into the eld.
Other common gestures include:
• Touch & hold. Touch & hold an item on the screen by touching
it and not lifting your nger until it responds.
• Drag. Touch & hold an item for a moment and then, without lift-
ing your nger, move your nger on the screen until you reach
the target position. For example, you can move apps around
on the Home screen.
• Swipe or slide. Quickly move your nger across the surface of
the screen, without pausing when you rst touch (so you don’t
drag something instead). For example, you can slide a Home
screen left or right to view the other Home screens.
• Double-tap. Tap quickly twice on a webpage, map, or other
screen to zoom. For example, double-tap a picture in Chrome
to zoom in, and double-tap again to zoom out.
• Pinch. In some apps (such as Maps, Chrome, and Gallery), you
can zoom in and out by placing two ngers on the screen at
once and pinching them together (to zoom out) or spreading
them apart (to zoom in).
• Rotate the screen. The orientation of most screens rotates
with your device as you turn it. To lock or unlock the screen’s
vertical orientation, swipe down from the top right of any
screen and touch the Rotation icon in Quick Settings.

NEXUS 7 (2013) GUIDEBOOK GET STARTED 11
To change your tablet’s notication sounds, volumes, and more, go to
Settings > Device >
Sound.
To change your tablet’s brightness, font size, and
more, go to
Settings > Device > Display.
Type text by speaking
You can speak to enter text in most places that you can enter text
with the onscreen keyboard.
1. Touch a text eld, or a location in text you’ve already entered
in a text eld.
2. Touch the
Microphone key on the onscreen keyboard.
3. When you see the microphone image, speak what you want
to type.
Say “comma,” “period,” “question mark,” “exclamation mark,” or
“exclamation point” to enter punctuation.
When you pause, what you spoke is transcribed by the speech-rec-
ognition service and entered in the text eld, underlined. You can
touch the Delete key to erase the underlined text. If you start typing or entering more text by speaking, the underline disappears.
To improve processing of your voice input, Google may record a
few seconds of ambient background noise in temporary memory
at any time. This recording remains on the device only fleetingly
and is not sent to Google.
Settings

NEXUS 7 (2013) GUIDEBOOK GET STARTED 12
To change your tablet’s speech settings, go to Set-
tings > Personal > Language & input.
Settings
NEXUS 7 (2013) GUIDEBOOK EXPLORE YOUR TABLET 13
2
Explore your tablet
Swipe up for Google Now
Google Now is about getting you just the right information, at just
the right time.
It tells you today’s weather before you start your day, how much
trafc to expect before you leave for work, and even your favorite
team’s score while they’re playing.
All of this happens automatically. Google Now intelligently brings
you the information you want to see, when you want to see it. No
digging required.
For example, here’s a Google Now card that appears when you’re
about to start your commute home:

NEXUS 7 (2013) GUIDEBOOK EXPLORE YOUR TABLET 14
Give it a try! Swipe your nger up from the bottom of any screen,
or touch the Google Search bar at the top of the Home screen.
When you want to see more cards, touch Show more cards at the
bottom of the screen. When you don’t need them any more, swipe
them out of the way.
You’re in control
When you decide to use Google Now, you’re turning on Location
Reporting and Location History. Google Now also uses location
information provided by Google’s location service and GPS, if
those are currently turned on.
Google Now also uses data that you may have stored in other
Google products. For example, if you have searches stored in
your Web History, Google Now can show cards based on sports
scores, flight status, and so on.
Similarly, Google Now can use data that you may have stored
in third-party products that you allow Google to access. For example, your tablet’s synced calendar may include entries from
non-Google calendar products. If you have a synced calendar entry for a dentist appointment that includes the dentist’s address,
Google Now can check trafc and suggest when to leave.
You’re in control. You can choose exactly which cards you’d like
to see, adjust the details of what they display, and adjust your
privacy settings.
For more information about Google Now and your location information, see “Chapter 5, Use Google Now & Search.”

NEXUS 7 (2013) GUIDEBOOK EXPLORE YOUR TABLET 15
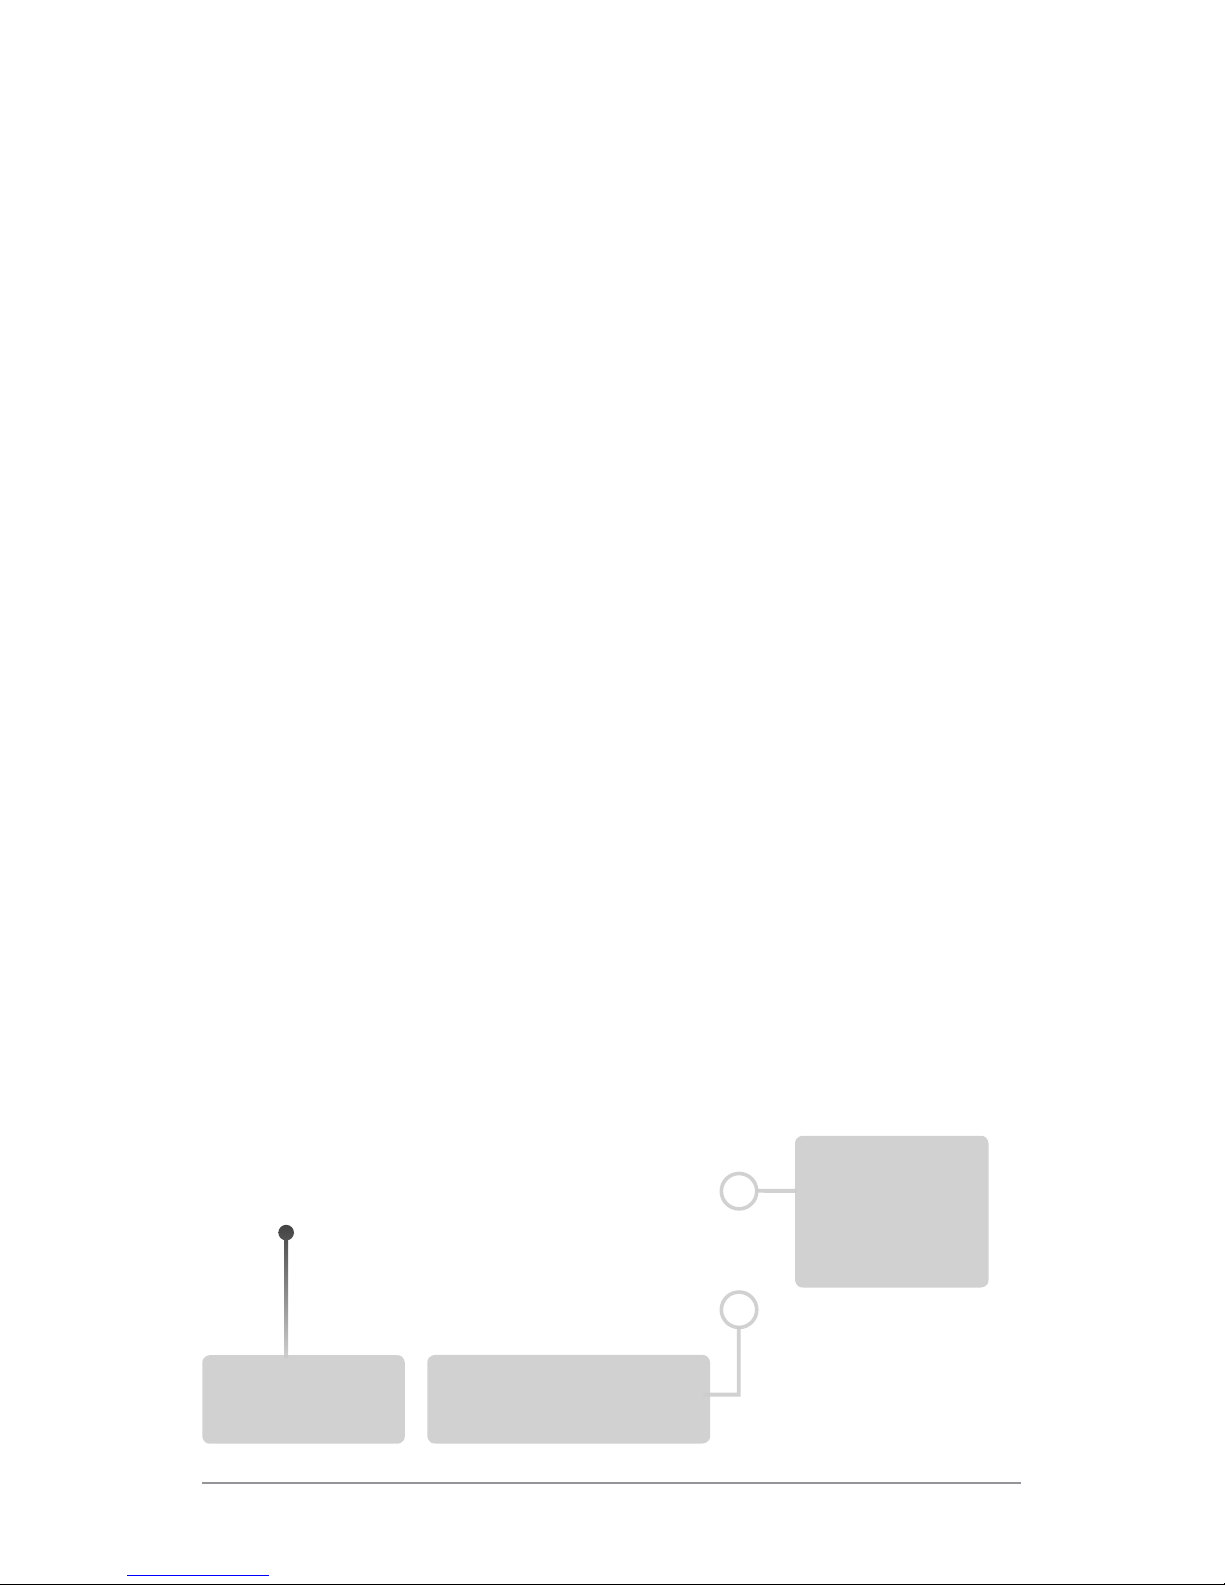
Swipe down for notications & settings
Notications alert you to the arrival of new messages, calendar
events, and alarms, as well as ongoing events, such as video
downloads.
When a notication arrives, its icon appears at the top of the
screen. Icons for pending notications appear on the left, and
system icons showing things like Wi-Fi signal or battery strength
on the right:
To open the notication shade, swipe down from the top left corner of any screen.
Certain notications can be expanded to show more information,
such as email previews or calendar events. The one at the top is
always expanded when possible.
To open the related app, touch the notication icon on the left.
Some notications also allow you to take specic actions by
touching icons within the notication. For example, Calendar notications allow you to Snooze (remind you later) or send email
to other guests.
When you’re nished with a notication, just swipe it away. To dismiss all notications, touch the Dismiss icon at the top right of
the notication shade.
Bluetooth, Wi-Fi, &
battery status
Pending
notications

NEXUS 7 (2013) GUIDEBOOK EXPLORE YOUR TABLET 16
You can perform these actions from the notication shade:
Touch to
respond
to other
guests
Swipe down
using one
nger to
expand
certain
notications
Dismiss all
Quick Settings
Use Quick Settings to easily access Wi-Fi settings, manage display brightness, open the main Settings menu, and more. To
open Quick Settings, swipe down from the top right corner of any
screen:
NEXUS 7 (2013) GUIDEBOOK EXPLORE YOUR TABLET 17
Relax with Google Play
Google Play brings together all your favorite content in one place
– movies, TV shows, books, music, magazines, apps, and more –
so you can reach it from any of your devices.
Use Google Play widgets
These widgets are available on your Home screens:
• My Library. Displays your most recently used music, books,
and so on. Touch any of the images to see your content.
• Recommended on Play. Suggests music, movies, and other
content that may interest you. Touch the suggestion to learn
more about it.
• Recommended apps. Recommends apps that you can add to
your Home screen. Touch the recommendation to learn more
about it.
Touch to open
all settings
Touch a square
to open the
specic setting
NEXUS 7 (2013) GUIDEBOOK EXPLORE YOUR TABLET 18
To resize a widget, touch & hold, then let go and drag the blue
dots. To remove it, touch & hold, then drag it to the Remove icon
at the top of the screen.
To add another Google Play widget, touch the
All Apps icon,
then Widgets, and swipe from right to left until you see the one
you want. Then touch & hold, and let go in the Home screen location you want.
Shop on Google Play
To open the Google Play Store app, touch the Play
Store icon in your Favorites tray on every Home
screen.
Most things you purchase on Google Play are available from your computer as well as from any of your
Android mobile devices. (Android apps are one exception – they run only on Android devices.)
Sign in to play.google.com to get your entertainment from
anywhere.
Find your content
If you purchased on Google Play in the past, you’ll automatically
Touch to
avoid future
suggestions
like this
Touch to learn more
Touch to see a
different suggestion
Play Store
NEXUS 7 (2013) GUIDEBOOK EXPLORE YOUR TABLET 19
have access to this content on your Nexus 7 — just make sure
you’re signed in using the same account that you used to purchase it.
You can get to your content using any of the Google Play icons
in your Favorites tray, including Books, Magazines, Movies, and
Music.
Or, touch the
Play Store icon to open Google Play. In the top
right corner, to the left of the Menu and Search icons, you’ll nd
a My Library icon corresponding to the section of Google Play
you’re currently viewing. For example, while browsing the Movies
& TV section, you’ll see the Google Play Movies app icon, which
will take you to My Movies & TV:
You can quickly access your content this way, from the Google
Play Store app, even if you originally purchased it on Google Play
using a different phone or tablet. If you get a new device, all your
media will automatically be waiting for you here when you turn
on and sign in.
Google Play settings
To adjust your Google Play settings, switch accounts, or get help,
choose the option you want from the
Menu in the top right
corner.
The Google Play Settings screen lets you control when you’re no-
tied about updates to apps and games, clear your search history,
Touch icon in this location to
see your content of that type
NEXUS 7 (2013) GUIDEBOOK EXPLORE YOUR TABLET 20
and enable user controls. To lter Android apps based on maturity level or require a PIN before completing any purchase, touch
Content ltering or Set or change PIN.
Google Play support
For more detailed information about Google Play, including phone
and email support options, visit support.google.com/googleplay.
Use & customize the lock screen
You can add widgets to the lock screen and swipe between them.
Lock screen widgets let you scan recent Gmail messages, Calendar entries, and other app content without unlocking your screen.
If your tablet is set up for more than one user, you may need to
touch your image at the bottom of the screen to see your own
lock screen.
To set or change the type of lock, go to to
Settings > Personal
> Security > Screen lock.
To open Google Now from the lock screen, swipe up from the
bottom of the lock screen. Enter your PIN, pattern, or password
if prompted.
Add a widget to the lock screen
1. If the lock screen has no widgets yet, you’ll see a large Plus
icon. If you don’t see it, swipe any existing widgets from left to
right until it appears.
2. Touch the
Plus icon. If prompted, enter your PIN, pattern,
or password.
A list of widgets appears. Apps that support lock screen widgets can add their own widgets to this list.
 Loading...