

Google Nest Protect User Manual
Let’s get started
Google Nest Protect (Wired 230 V ~ 50 Hz)
Smoke and carbon monoxide alarm
User Guide

2

Don’t want to install your Nest Protect yourself?
If you’d like a professional to install your Nest Protects, contact one of our Nest Pros.
Your Nest Pro will:
• remove your old smoke alarms;
• install your Nest Protects;
• connect your Nest Protects to Wi-Fi or help you connect them yourself;
• ensure all Nest Protects are wirelessly interconnected and
• give you a quick demo and answer your questions.
Find a Nest Pro installer near you at g.co/nest/install
The installation of Nest Protect should be carried out in accordance with the latest regulations.
3
Table of contents
Meet your Nest Protect. . . . . . . . . . . . . . . . . . . . . . . . . . . . . . . . . . . . . . . . . . . . . . . . . . . . . . . . . . . . . . . . . . . . . . . . . . . . . . . . . . . . . . . . . . . . . . . . . .5
Setup and installation
Location in your home
Placement on the ceiling or wall
Heads-Up and Emergency Alarms
Daily Use and Emergency Preparation
General Maintenance
Visit g.co/nest/protectbasics to learn more about installing, using and
troubleshooting Nest Protect.
. . . . . . . . . . . . . . . . . . . . . . . . . . . . . . . . . . . . . . . . . . . . . . . . . . . . . . . . . . . . . . . . . . . . . . . . . . . . . . . . . . . . . . . . . . . . . . . . . . . .7
. . . . . . . . . . . . . . . . . . . . . . . . . . . . . . . . . . . . . . . . . . . . . . . . . . . . . . . . . . . . . . . . . . . . . . . . . . . . . . . . . . . . . . . . . . . . . . . . . . .9
. . . . . . . . . . . . . . . . . . . . . . . . . . . . . . . . . . . . . . . . . . . . . . . . . . . . . . . . . . . . . . . . . . . . . . . . . . . . . . . . . . . . . . . 11
. . . . . . . . . . . . . . . . . . . . . . . . . . . . . . . . . . . . . . . . . . . . . . . . . . . . . . . . . . . . . . . . . . . . . . . . . . . . . . . . . . . .16
. . . . . . . . . . . . . . . . . . . . . . . . . . . . . . . . . . . . . . . . . . . . . . . . . . . . . . . . . . . . . . . . . . . . . . . . . . . . . . . .18
. . . . . . . . . . . . . . . . . . . . . . . . . . . . . . . . . . . . . . . . . . . . . . . . . . . . . . . . . . . . . . . . . . . . . . . . . . . . . . . . . . . . . . . . . . . . . . . . . . 20
0843-CPR-0240
097-00005-00
4
Meet your Nest Protect
Nest Protect is designed to detect smoke and carbon
monoxide in a residential environment.
It has multiple sensors to help it understand what’s
happening in your home, including a Split-Spectrum
Sensor to detect a wide range of slow-smouldering
and fast-aming res.
The installation of this apparatus should be carried
out by a competent person. This guide covers the
installation of Nest Protect (Wired 230 V) – model
number A14.
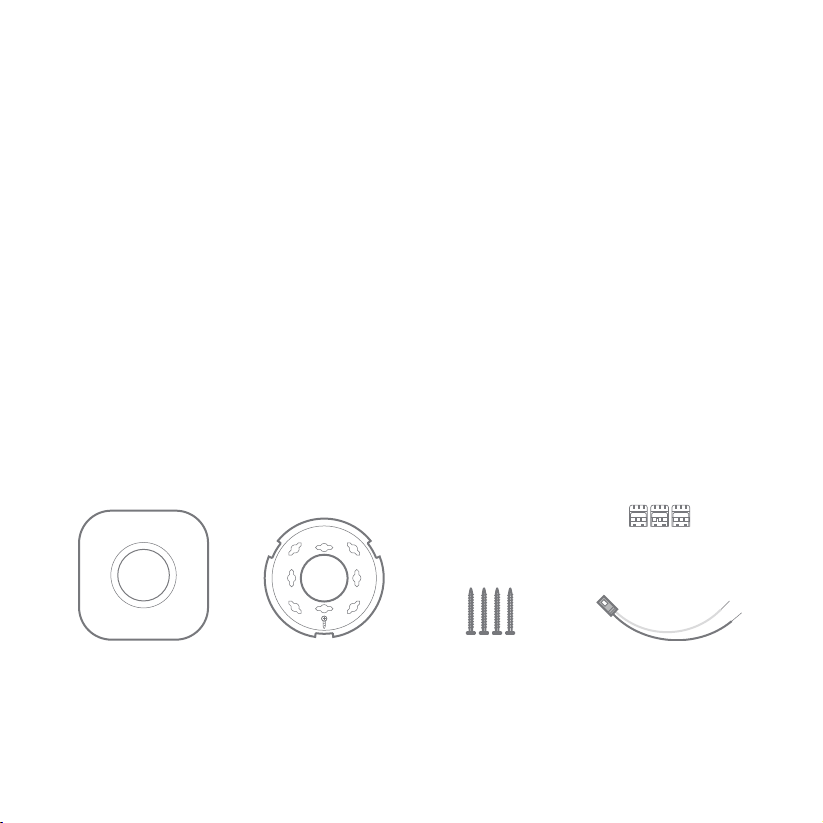
Inside the box you’ll nd:
Nest Protect
Back plate
Requirements
You need Wi-Fi, an iOS or Android phon e or tablet,
and a free a ccount in order to use some Nest Protect
features: spoken room names, wireless mobile
notications, and soware updates. During setup,
Wi-Fi an d a free account are required for wi reless
interconnect and room naming. Aer all the Nest
Protects in your home are connected, they can
communicate with each other without Wi-Fi.
3 terminal blocks
4 mounting screws
230V connector
5
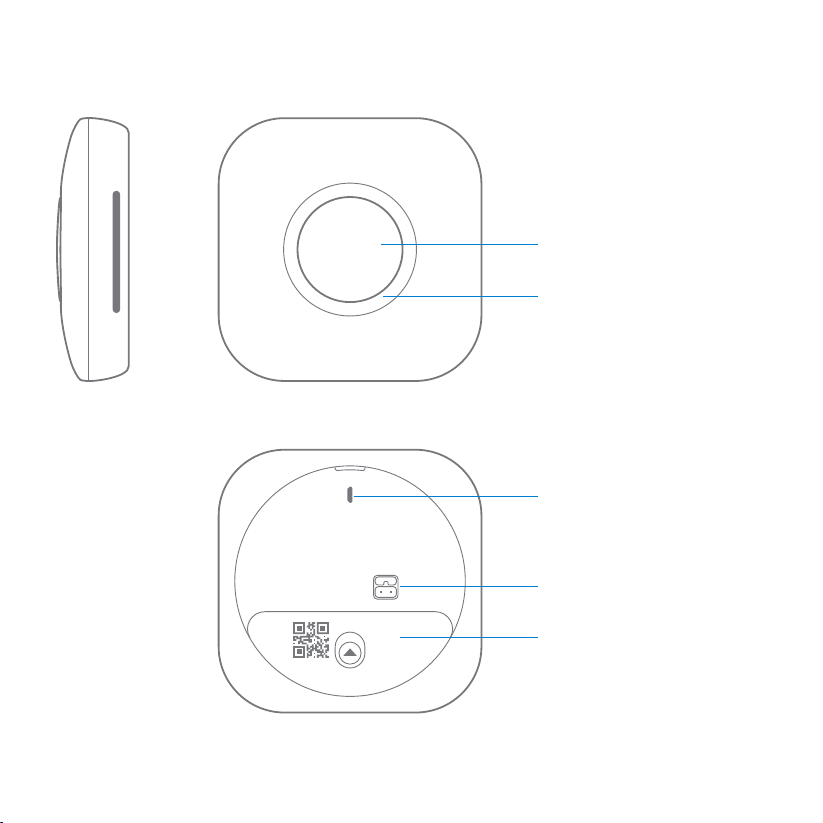
The horn enables Nest
Protect to ale you with
a loud emergency sound.
The speaker allows Nest
Protect to speak with
a human voice.
6
3.9 c m
(1.5 i n)
13.5 cm
(5.3 in)
Push the buon to silence
alarms or run a test.
The light ring changes
colour to ale you.
Micro-USB connector
(not for normal use).
AC connector pins for
the 230V connector.
Baery compament: Three
AA Energizer® Ultimate Lithium
baeries (L91).
Setup and installation
(Professional installation recommended)
The installation of a smoke/CO alarm should be made
by a qualied technician, and all wiring used to install
this ala rm should be made in accordance with national
regulations. Installation should be done according
to regulations and/or applicable codes in your local
jurisdiction. Permanent connection to the xed wiring
of the building should be made in a suitable junction box.
Refer to the included Safety and Warranty document
for regulatory information and additional precautions.
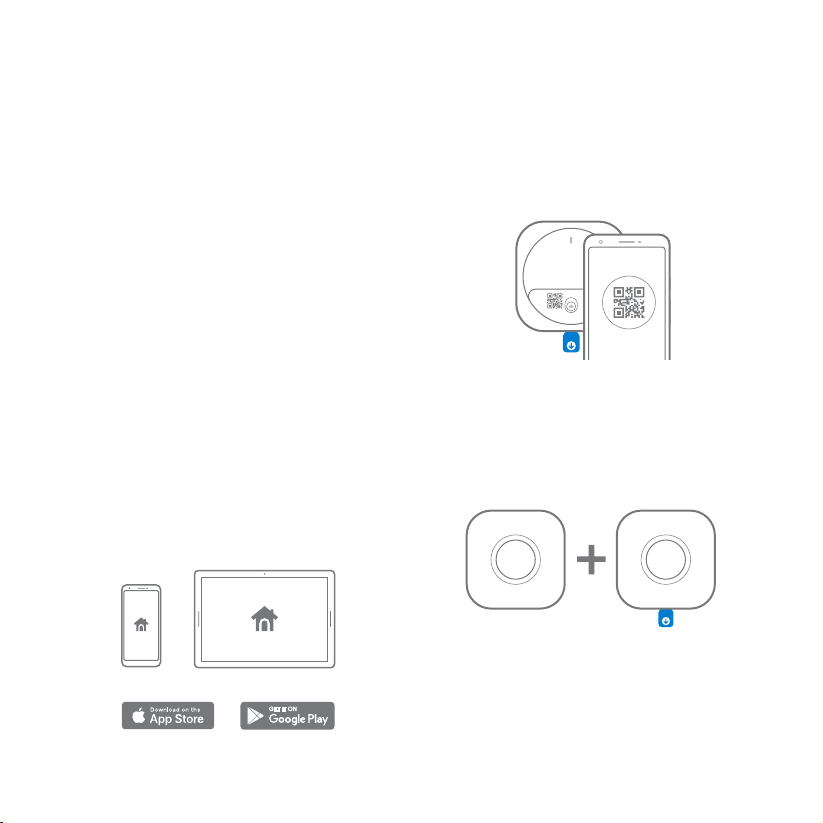
1. Get the Nest app
Before you install your Nest Protect on the ceilin g
or wall, you’ll need to set it up with the Nest app.
Download the app from the Apple App Store or
Googl e Play and create a free a ccount. You can use
a phone or tablet for setup.
2. Set up Nest Protect
The Nes t app will guide yo u through each ste p: scanning
the Nest Protect QR cod e, connecting it to the Internet,
and connecting it to other Nest Protects in your home.
Go to g.co/nest/installprotect to watch the video.
Tip: Set everything out on a table for easy setup.
3. Have more Nest Protects?
The Nest app will ask you if you have additional Nest
Protects to s et up. If you do, it’ll ta ke you through a faste r
setup. Ma ke sure that you keep al l your Nest Protects
togethe r until they’re all set up and ready to be installed.
Already added New
GET IT ON
Tip: Your Nest Protect came packed in a plastic
cover. Keep the cover on so that your Nest Protect
stays clean until you install it.
7

4. Test before you install
Once you’ve nished seing up all your Nest Protec ts,
make sure that they’ve bee n added to your acco unt.
Push the buon on one Nest Protect and follow the
instructions. All your Nest Protects should speak
up. Now you can install them on the ceiling or wall.
5. Turn o the mains power
Protect yourself, and avoid blowing a fuse. Switch o
the correct circuit breaker for the room where you
are installing Nest Protect, or remove the fuse from
the fuse box.
Fuse box
Tip: To double-check Nest Protect’s room name, press
the buon once. You’ll hear the location that you
assigned to it during setup. It’ll say something like,
“Ready in the bedroom.”
8
WARNING
ELECTRICAL SHOCK HAZARD
Failure to turn o the power may result in
serious electric shock, injury and death.
 Loading...