

Page 1

Nest Cam Outdoor
Installation Guide
Page 2

First, a word about privacy.
Contents
We’re committed to being open and honest about
how we use data. We’ll always ask for permission
before sharing personally identifiable information
like your email address, and we work hard to keep
your data safe. To learn more about our Privacy
Policy, go to nest.com/privacy
In the box . . . . . . . . . . . . . . . . . . . . . . . . . . . . . . . . . . . . . . . . . . . . . . . . . . . . . . . . . . . . . . . . . . . . . . . . . . . . . . . . . . . . . . . . . . . . . . . . . . . . . . . . . . . . . . . . . . . 4
What you’ll need
Do this first
Choose a good spot
Mount your camera
Limited warranty
. . . . . . . . . . . . . . . . . . . . . . . . . . . . . . . . . . . . . . . . . . . . . . . . . . . . . . . . . . . . . . . . . . . . . . . . . . . . . . . . . . . . . . . . . . . . . . . . . . . . . . . . . . . . . . . . . . . . . 14
Safety
. . . . . . . . . . . . . . . . . . . . . . . . . . . . . . . . . . . . . . . . . . . . . . . . . . . . . . . . . . . . . . . . . . . . . . . . . . . . . . . . . . . . . . . . . . . . . . . . . . . . . . . . . . 5
. . . . . . . . . . . . . . . . . . . . . . . . . . . . . . . . . . . . . . . . . . . . . . . . . . . . . . . . . . . . . . . . . . . . . . . . . . . . . . . . . . . . . . . . . . . . . . . . . . . . . . . . . . . . . . . .6
. . . . . . . . . . . . . . . . . . . . . . . . . . . . . . . . . . . . . . . . . . . . . . . . . . . . . . . . . . . . . . . . . . . . . . . . . . . . . . . . . . . . . . . . . . . . . . . . . . . . .8
. . . . . . . . . . . . . . . . . . . . . . . . . . . . . . . . . . . . . . . . . . . . . . . . . . . . . . . . . . . . . . . . . . . . . . . . . . . . . . . . . . . . . . . . . . . . . . . . . . . . 10
. . . . . . . . . . . . . . . . . . . . . . . . . . . . . . . . . . . . . . . . . . . . . . . . . . . . . . . . . . . . . . . . . . . . . . . . . . . . . . . . . . . . . . . . . . . . . . . . . . . . . . . 12
Want to see how it’s done?
Go to nest.com/installnestcam for installation videos and additional tips.
¿Prefieres leer esto en español? Visita nest.com/es-guide
2 3
Page 3
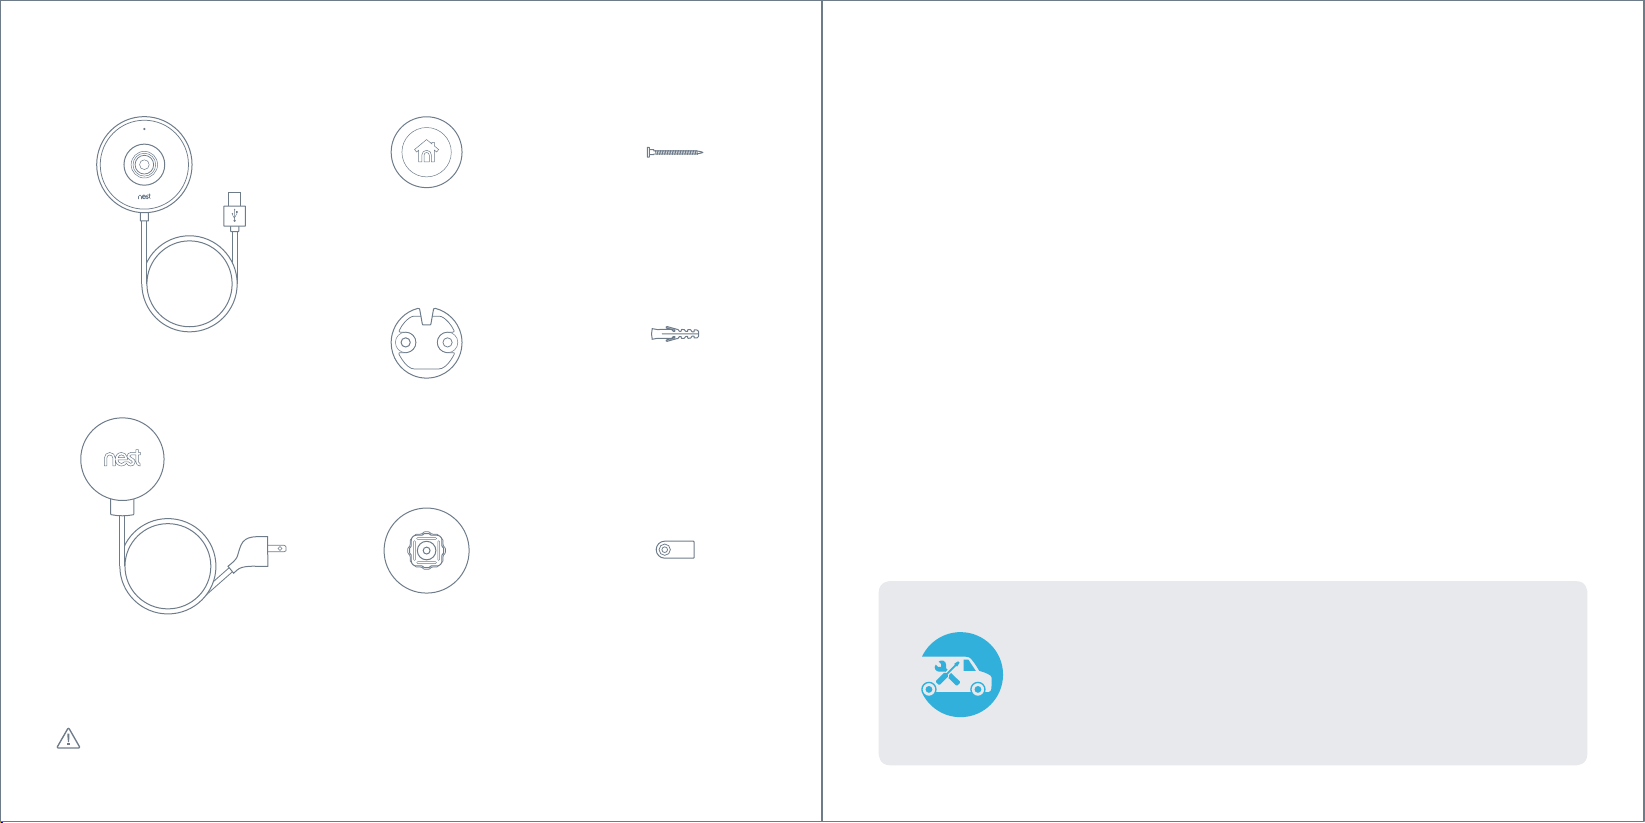
In the box.
What you’ll need.
Mounting magnet
Camera
Camera wall plate
Power adapter
CAUTION: The mounting magnet is very strong. Mind your fingers
and keep it in the box until you’re ready to use it.
Adapter wall plate
12 wall screws
12 wall anchors
9 cable clips
• Wi-Fi and a working broadband internet
connection with at least 2 Mbps upload
speed. DSL may not qualify.
• A phone or tablet with iOS 8 or later
or Android 4 or later
• A Nest Account
• A power outlet
• A Phillips screwdriver or power drill
with Phillips driver bit
Don’t want to do it yourself?
Nest Cam Outdoor is designed for easy DIY installation,
or you can hire a Nest Pro. They’ll take care of the
installation and make sure everything’s up and running.
Find a local Nest Pro at nest.com/install
Other items you may need
• Drill bit (3/32" for pilot holes. Or 7/32"
if you’re using wall anchors.)
• Ladder
No outdoor outlet?
You can plug Nest Cam Outdoor into an
indoor outlet. This requires some extra
steps, which may include drilling through
your home’s exterior wall. Keep in mind
that you’ll need to know where any in-wall
pipes and wiring are.
4 5
Page 4

Do this first.
1. Turn on Nest Cam indoors
Start by turning on your camera inside the
house to get everything set up before you
take it outside.
Connect your Nest Cam’s cable to the power
adapter. Push and twist the USB connector
into place. Then plug the adapter into a power
outlet. Your Nest Cam will turn on and you’ll
see a blue light.
2. Add it to your Nest Account
Download the Nest app from the App Store®
or Google Play
up” to create an account. Then tap Add,
choose Nest Cam and follow the instructions.
If you already have a Nest Account: Ta p the
settings icon in the top-right corner of the
app home screen. Then tap “Add product,”
choose Nest Cam and follow the steps.
If you need help, go to nest.com/pair
™
. Open the app and tap “Sign
3. Bring your camera outside
Once you’ve added Nest Cam to your
account, unplug it and take it to the spot
you’ve chosen outdoors.
Plug it into the outlet you want to use and
wait for the green light to turn on. Nest Cam
will reconnect to your Wi-Fi network
automatically. This may take a minute or two.
Keep Nest Cam plugged in for the rest
of the installation.
→ See location tips on the next page.
4. Make sure it’s streaming
Before you mount the camera, make sure
it can get Wi-Fi in the spot you’ve picked.
Hold your Nest Cam where you’d like to mount
it and check to make sure it’s streaming
video to the Nest app. If you don’t see video,
the Wi-Fi may not be strong enough there –
you’ll need to find a different spot or move
your Wi-Fi router.
6 7
Page 5

Choose a good spot.
12'
11'
10'
9'
8'
7'
6'
5'
4'
3'
2'
1'
Avoid direct sunlight.
Nest Cam Outdoor is designed to operate
between –4° and 104°F (–20° to 40°C).
If it gets hotter or colder, image qualit y may
be affected.
Keep it in range of your router.
Make sure to pick a place within range of
your network. Thick or insulated walls can
greatly reduce the strength of your Wi-Fi
signal even if your router is close by, so you
should try streaming video before you
mount your camera.
Learn more at nest.com/wifihelp
Consider the surroundings.
Is a post, plant or porch light blocking the
view? It might throw off exposure, focus
or Night Vision. If you start noticing glare,
adjust the camera so the horizon is out
of frame.
Place it up high.
But not too high. We find 7 to 10 feet above
the ground, tilted downward, is best – close
enough to see someone’s face and talk with
them through the camera. Check the video
in the Nest app to make sure Nest Cam is
seeing what you want to see.
Page 6

Mount your camera.
5. Place the mounting magnet
Screw the wall plate onto your wall. It’s a
good idea to drill pilot holes first. If the wall
is made of a material like brick or stone,
you may need to use the included wall anchors
to hold the screws.
Next, put the magnet onto the wall plate.
Got a magnetic surface nearby? The mounting
magnet may be all you need. Just put it
where you’d like the camera to be and move
on to the next step.
6. Attach the camera
Put Nest Cam onto the mounting magnet
and aim it where you like. Use the video
stream in the Nest app to fine-tune your
camera’s position.
7. Mount the power adapter
Before you mount the power adapter to the
wall, take a minute to plan the route of the
cable from your outlet to the camera. Be sure
to leave some slack at both ends.
We recommend installing the weatherproof
adapter at least 18 inches above the ground
in case of flooding or deep snow.
Mount the adapter wall plate with the flat
side flush to the wall. When that’s done, snap
the power adapter into place.
8. Secure the cable
Fasten the cable to the wall using as many
of the included cable clips as you need. It’s
a good idea to route the cable along a ledge
or another hidden place, and you can paint
it to match your house. Don’t pull the cable too
tight in case you want to adjust the camera
angle later on.
Tip: If the camera wall plate sticks to the
mounting magnet, you can use a screwdriver
to help pry them apart.
10 11
Tip: Some outdoor outlets have covers you
can lock in place. Use a zip tie or padlock
to keep the cover shut.
Page 7

Nest Labs, Inc.
Limited Warranty
Nest Cam Outdoor
For more information, visit nest.com
Need help? Contact us at nest.com/support
For FCC Compliance Statement, visit
nest.com/legal/fcc-compliance-notice
Please recycle Nest’s packaging.
RECYCLING AND DISPOSAL
Visit nest.com/recycle
THIS LIMITED WARRANTY CONTAINS IMPORTANT INFORMATION
ABOUT YO UR RIGHTS AND O BLIGATIONS, A S WELL AS
LIMITATIONS A ND EXCLUSIONS T HAT MAY APPLY TO YOU.
1. WHAT THIS LIMIT ED WARRANT Y COVERS;
PERIOD OF COVERAGE
Nest L abs, Inc. (“Ne st Labs”), 3 400 Hillvie w Avenue, Palo A lto,
Calif ornia USA, wa rrants to th e owner of the enc losed prod uct
that th e product co ntained in th is box (“Produ ct”) will be f ree
from de fects in ma terials and wo rkmanship f or a period of t wo
(2) year s from the date o f deliver y following th e original re tail
purch ase (the “Warr anty Per iod”). If the Pr oduct fail s to conform
to this Li mited Warran ty during the Wa rranty Pe riod, Nest
Labs w ill, at its sol e discretio n, either (a) re pair or re place any
defec tive Produ ct or compon ent; or (b) acc ept the retur n of the
Produ ct and refun d the money ac tually paid by t he original
purchaser for the Product. Repair or replacement may be made
with a new o r refurbis hed produc t or componen ts, at Nest
Labs’ sole discretion. If the Product or a component incorporated
within i t is no longer ava ilable, Nes t Labs may, at Nes t Labs’
sole discretion, replace the Product with a similar product of
simila r function. T his is your sole an d exclusive re medy for
breac h of this Limite d Warranty. An y Product tha t has either
been r epaired or re placed unde r this Limited Wa rranty wil l
be cove red by the ter ms of this Limit ed Warrant y for the longe r
of (a) nine ty (90) days fr om the date of d elivery o f the repair ed
Produ ct or replac ement Prod uct, or (b) the r emaining Warr anty
Perio d. This Limit ed Warrant y is transfe rable from t he original
purch aser to subse quent owner s, but the Warr anty Peri od will
not be ex tended in du ration or exp anded in cove rage for any
such transfer.
2. TOTAL SATIS FACTION RET URN POLICY
If you are t he original p urchaser of t he Product a nd you are not
satis fied with this Pr oduct for any r eason, you m ay return
it in its o riginal cond ition within t hirty (30) day s of the origina l
purch ase and rece ive a full ref und.
3. WARRA NTY CONDI TIONS; HOW TO GE T SERVICE IF YOU
WANT TO CL AIM UNDER THIS L IMITED WARRA NTY
Befor e making a clai m under this Limi ted Warrant y, the owner
of the Pr oduct must (a) n otify Nes t Labs of the in tention to
claim by v isiting nes t.com/supp ort during th e Warranty P eriod
and pro viding a desc ription of t he alleged f ailure, and (b) c omply
with Ne st Labs’ re turn shippin g instruct ions. Nest L abs will have
no warr anty obliga tions with re spect to a re turned Pro duct
if it det ermines, in i ts reasona ble discret ion after ex amination
of the re turned Pro duct, that t he Produc t is an Ineligib le Product
(define d below). Nest L abs will bear al l costs of re turn shippin g
to owner a nd will reimbu rse any shippi ng costs inc urred by the
owner, exce pt with resp ect to any Inel igible Prod uct, for whic h
owner wi ll bear all ship ping costs .
4. WHAT THIS L IMITED WARRA NTY DOES NO T COVER
This Lim ited Warran ty does not c over the fol lowing (colle ctively
“Ineligible Products”): (i) Products marked as “sample” or “Not
for Sal e”, or sold “AS IS”; ( ii) Product s that have bee n subject
to: (a) modifications, alterations, tampering, or improper
maintenance or repairs; (b) handling, storage, installation,
testi ng, or use no t in accorda nce with the U ser’s Guide , Placeme nt
Guidelines, or other instructions provided by Nest Labs;
(c) abuse or m isuse of the Pr oduct; (d) br eakdowns, fl uctuation s,
or interruptions in electric power or the telecommunications
netw ork; or (e) Acts o f God, includ ing but not limi ted to light ning,
flood, t ornado, ear thquake, or hu rricane; or ( iii) any non-Nes t
Labs b randed har dware produ cts, even if p ackaged or s old with
Nest L abs hardwar e. This Limite d Warrant y does not cov er
consum able part s, including b atterie s, unless dama ge is due
to defe cts in mater ials or workm anship of the Pr oduct, or
sof tware (even if p ackaged or s old with the pr oduct). Nes t Labs
recommends that you use only authorized service providers
for main tenance or re pair. Unauthor ized use of the Pr oduct
or sof tware can im pair the Prod uct’s per formance an d may
invalidate this Limited Warranty.
5. DISCL AIMER OF WARR ANTIES
EXCEP T AS STATED ABOVE IN THIS LIM ITED WARRANT Y, AND
TO THE MA XIMUM EXT ENT PERMITT ED BY APPLICAB LE LAW,
NEST L ABS DISCL AIMS ALL EXP RESS, IMPLIED, A ND STATUTORY
WARRA NTIES AND COND ITIONS WITH R ESPECT TO THE PR ODUCT,
INCLUDING THE IMPLIED WARR ANTIES OF MERCHANTABIL ITY
AND FITN ESS FOR A PARTIC ULAR PURP OSE. TO THE MA XIMUM
EXT ENT PERMITT ED BY APPLICAB LE LAW, NEST LA BS ALSO
LIMITS T HE DURATION OF ANY A PPLICABLE IMP LIED
WARRA NTIES OR CONDIT IONS TO THE DURATIO N OF THIS
LIMITED WARRA NTY.
6. LIMITATION OF D AMAGES
IN ADDIT ION TO THE ABOVE WAR RANTY DI SCLAIMERS, IN N O
EVEN T WILL NEST LA BS BE LIABLE FO R ANY CONSEQU ENTIAL,
INCIDENTAL, EXEMPLARY, OR SPECIAL DAMAGES, INCLUDING
ANY DAM AGES FOR LOST D ATA OR LOST PR OFITS, ARIS ING FROM
OR RELATI NG TO THIS LIMITED WAR RANTY O R THE PRODUCT,
AND NEST L ABS’ TOTAL CUMU LATIVE LIA BILITY ARI SING FROM
OR RELATE D TO THIS LIMITED WARR ANTY OR TH E PRODUCT
WILL NOT E XCEED THE AMOUNT A CTUALLY PAID FOR THE
PRODUCT BY THE ORIGINAL PURCHASER.
7. LIMITATION OF LIABILITY
THE NEST L ABS ONLINE SER VICES (“SERVIC ES”) PROVIDE
YOU INFORMATION (“PRODUCT INFORMATION”) REGARDING
YOUR NEST PRODUC TS OR OTHER PERIPHERALS CONNEC TED
TO YOUR PRODUCTS (“PRODUCT PERIPHERALS”). THE TYPE
OF PRODU CT PERIPHERA LS THAT MAY BE CONNECT ED TO
YOUR PROD UCT MAY CHANGE F ROM TIME TO TIME. WI THOUT
LIMITING THE GENERA LITY OF THE DISCL AIMERS ABOVE,
ALL PRODUCT INFORMATION IS PROVIDED FOR YOUR
CONVE NIENCE,“AS IS”, AND “AS AVAILABL E”. NEST L ABS
DOES NOT R EPRESENT, WARRAN T, OR GUAR ANTEE THAT
PRODUCT INFORMATION WILL BE AVAILABLE, ACCURATE,
OR RELIABLE OR THAT PRODUCT INFORMATION OR USE OF
THE SERV ICES OR PRODUC T WILL PROVIDE S AFETY IN YO UR
HOME. YOU U SE ALL PRODUC T INFORMATION, THE S ERVICES,
AND THE PR ODUCT AT YOUR OWN DISC RETION AND RIS K.
YOU WILL BE S OLELY RESPONSIBLE F OR (AND NEST L ABS
DISCL AIMS) ANY AND AL L LOSS, LIABIL ITY, OR DAMAGES,
INCLUDING TO YOUR WIRING, FIXTURES, ELECTRICITY, HOME,
PRODUCT, PRODUCT PERIPHERALS, COMPUTER, MOBILE
DEVI CE, AND ALL OTHER I TEMS AND PETS IN YO UR HOME,
RESULTING FROM YOUR USE OF THE PRODUCT INFORMATION,
SERVICES, OR PRODUCT. PRODUCT INFORMATION PROVIDED
BY THE SERV ICES IS NOT INTEND ED AS A SUBSTIT UTE FOR
DIRECT ME ANS OF OBTAINING THE INF ORMATION. FOR
EX AMPLE, A NOTIFI CATION PROVIDED T HROUGH THE SER VICE
IS NOT INTE NDED AS A SUBSTIT UTE FOR AUDIBLE A ND
VISIBLE I NDICATIONS IN THE HOME A ND ON THE PRODUC T,
NOR FOR A THI RD PARTY MONIT ORING SERVICE T HAT
MONITOR S ALARM STATE.
8. YOUR RIG HTS AND THIS LIM ITED WARRAN TY
This Lim ited Warran ty gives you s pecific legal r ights. You may
also hav e other legal r ights that var y by state , province, or
jurisd iction. Likew ise, some of the l imitations i n this Limited
Warran ty may not app ly in cert ain states. T he terms of th is
Limited Warranty will apply to the extent permitted by applicable
law. For a f ull descrip tion of your le gal rights yo u should ref er
to the la ws applicable i n your jurisdic tion and you may w ish
to cont act a releva nt consumer a dvisory s ervice.
064-00083-US
12 13
Page 8

Safety
PLACEMENT GUIDELINES
To avoid risk of overheating and burns:
Use only in temperatures between –4° and
104°F (–20° to 40°C).
Keep out of direc t sunlight.
Do not block air flow to Nest Cam.
To avoid risk of fir e and shock:
Use only the provided USB cable and power adapter.
Install in acco rdance with building and installation
codes where you live. For example, if your desired
electrical outlet is exposed to direct rain, the
electrical code may require that the outlet have
a while-in-use cover.
We recom mend using only an e lectrical ou tlet equippe d
with a ground fault circui t interrupter (look for “Test”
and “Reset” buttons on your outlet).
To avoid risk of ot her serious inj ury:
Keep cam era and all components out of the reach
of children and pets.
If your Nes t Cam is installed more than 6.5 feet (2 m)
above th e ground, make sure y ou’ve got a cable c lip
close to the camera head (19.5 inches or 50 cm f rom
the base).
14
Page 9

064-00084-US-A
 Loading...