

Goodyear GY500X User Manual
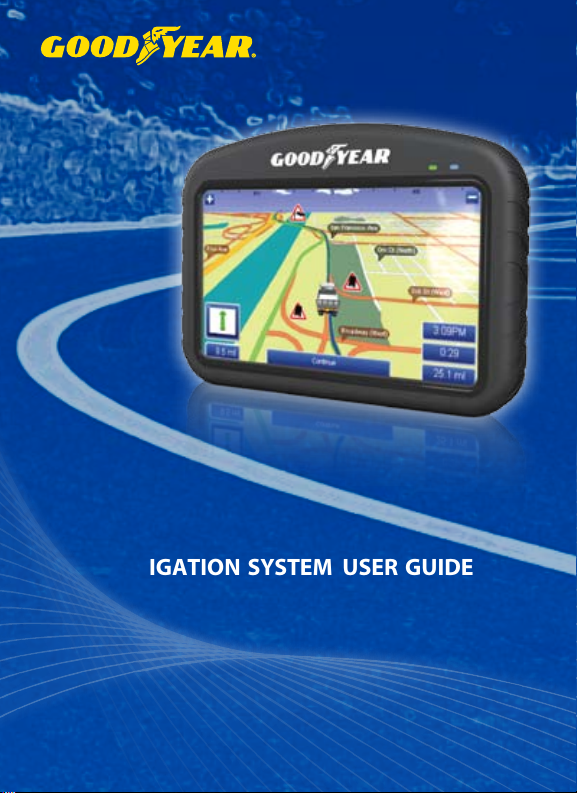
n a v i g a t i o n s y s t e m u s e r g u i d e
sistema de navegaCiÓn manuaL deL usuario
Model, Modelo : GY500X

SAVE THESE INSTRUCTIONS FOR FUTURE REFERENCE
GUARDE ESTAS INSTRUCCIONES PARA FUTURA REFERENCIA

Contents
In the Box 2
Charging your GPS 2
Quick Start Guide 3
The GPS Unit 4
What’s in the Box 5
What’s On Screen 6
Common Tasks 7-10
Set up Vehicle Profiles 7
Plan a Simple Route 7
Plan a Multi-Stop Route 8
Find a Point of Interest near your Current Location 8
Find a Point of Interest near a Specific Location 8
Add/Manage your Favorites 9
Set up your Bluetooth Hands Free Connection 9
Sync your Mobile Phone’s Phonebook to the GPS 9-10
GPS Setup 10
Troubleshooting 11
Warning Information 12
Warning 12
Battery Warnings 12
Important Information 12
FCC Compliance 13
Industry Canada Compliance 13
Limited Warranty 14

In The Box
Your Goodyear GY500X box contains the following items :
(1) Navigation Unit
(1) Instruction Manual
(1) Car Charger
(1) USB Cable
(1) Windshield Mount and Bracket
(1) External Antenna
(1) Dashboard Disc
(1) Home Charger A/C
Note : The USB Cable is used for software upgrades to your GPS unit. It can also be used to
charge your GPS when not in a vehicle – simply turn the GPS to the O position, and connect
the USB cable to the GPS and to a computer to charge.
Charging your GPS
To charge your GPS, plug it into the car charger included with the device. You may also use
the included USB Cable to charge the GPS by connecting it to any computer. For faster
charging, be sure that the GPS unit is switched to the O position. Fully charge for 6 hours
before rst use. The LED indicator on the front of the GPS unit will show Red for charging,
or Green for charging complete.
WARNING : This product contains a non-user-replaceable lithium-ion battery.
See the Battery Warnings section for important battery safety information.
2

Quick Start Guide
• Step 1 : Prepare the GPS Mount
Select a suitable location to mount your GPS unit. Clean and dry the suction
cup and the selected area of your windshield.
Fit the bracket onto the windshield mount, making sure that it locks into place.
Hold the windshield mount at against the windshield (or onto the dashboard disc),
and push the lever back to secure the mount.
• Step 2 : Turn the GPS On
Plug the power cable into the GPS, and the other end into your vehicle’s power outlet.
Activate the unit using the On/O power switch on the back.
Place the GPS onto the mount by tting the bottom of the GPS onto the bracket,
then gently pushing the top of the GPS back until it snaps into the bracket.
Adjust the mount until you have a comfortable viewing angle.
• Step 3 : Software License Agreement
When your GPS starts for the rst time, you will be presented with license agreement.
You must accept the Agreement to continue.
• Step 4 : Vehicle Details
On this page, you can enter your vehicle dimensions, weight, hazardous material levels, and
choose on-screen icons to display, Select each vehicle attribute that you wish the GY500X
to consider for commercial navigation. To save your Vehicle Details for future routes, click
Save/Load Settings.
Note : TO DISABLE COMMERICAL VEHICLE ROUTING and to use the GY500X as a regular
passenger vehicle GPS, click Enabled – the icon will change to “Enabled: No.”
Click the left arrow icon on the bottom right of the screen to continue.
• Step 5 : Goodyear Disclaimer
You must read and accept the Disclaimer to continue.
• Step 6 : Select your Destination
The GY500X comes with two modes – Easy Navigation mode and Full Navigation mode. The unit
starts in Easy Navigation mode by default, and from here you can select An Address, a Point of
Interest, or Just Drive (display map). See “Common Tasks” for a guide on entering your address,
nding a point of interest, or planning a multi-stop route.
• Step 7 : Drive!
The GPS will give you audio prompts and turn-by-turn navigation. It will automatically reroute
if you go o-course, so there’s no need to touch the screen again once your course is set.
Questions? Call customer service toll-free at 1-800-730-3707.
We are available to help Mon-Fri 10am to 6pm EST.
3
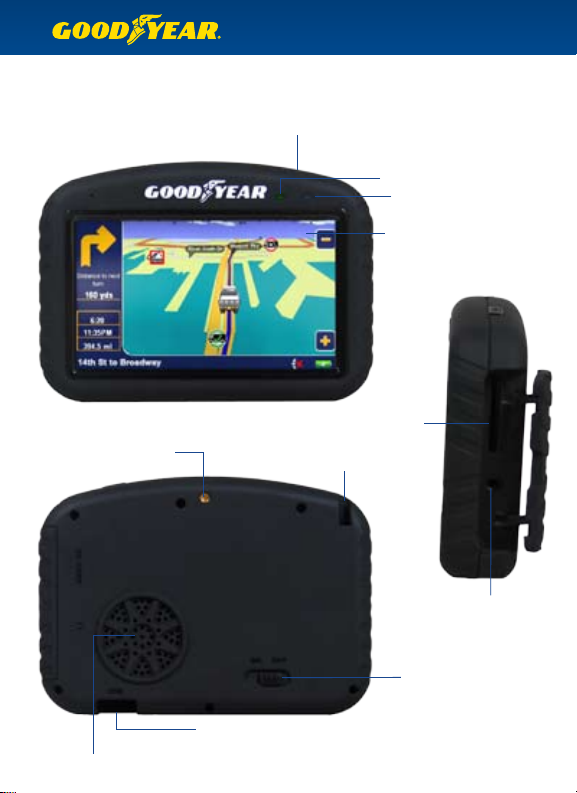
The GPS Unit - GY500X
Sleep / Resume Button
Port for External Antenna
Power Indicator
Bluetooth Indicator
LCD Touchscreen
SD Slot
Stylus
Audio Out
On / O Switch
Mini USB Port for Charging
(on bottom)
Speaker
4
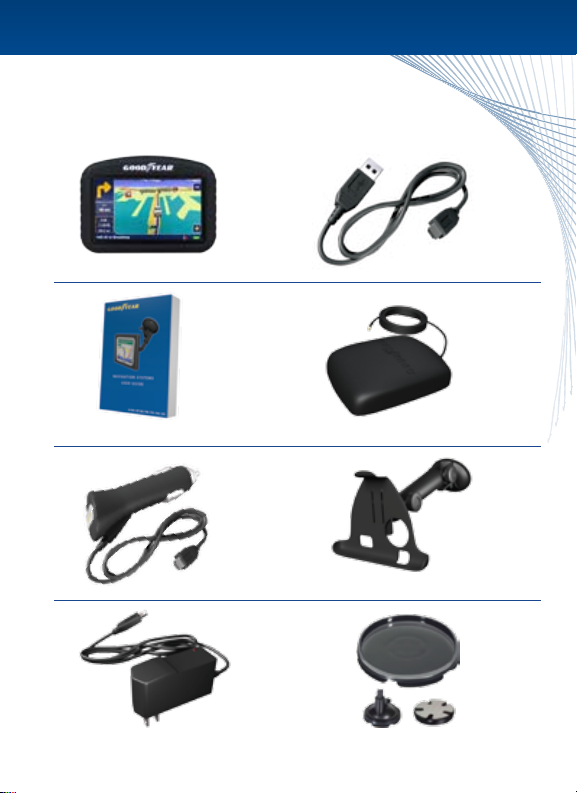
What’s In The Box
GY500X Unit USB Cable
Product Manual
12V Car Charger
A/C Home Charger
25Ft. External Antenna
Windshield Mount and Bracket
Premium Dash Mounting Disc
5
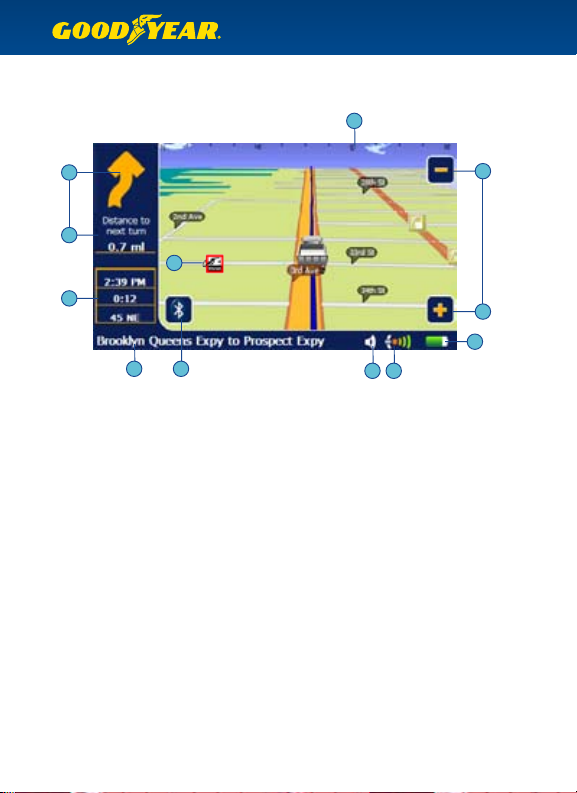
What’s On Screen
Explanation of GPS map screen
2
1
1
10
4
5
6
1 •
The top left bar shows the upcoming turn direction and distance.
The on-screen compass at the top shows your current direction.
2 •
Tap the + or – icons to zoom in or out of the map.
3 •
The left Info. box shows your Estimated Time of Arrival, Journey Time, Distance to Go,
4 •
Speed and Direction, or GPS Signal Strength (Tap any box to change).
Tap to change Current / Next Road.
5 •
6 •
Bluetooth icon.
Volume Settings – tap this icon to raise or lower the speech volume and button volume.
7 •
8 •
GPS Satellite Strength – Red means weak or no signal. You can tap this icon to see a
larger compass, number of satellites present, and your current latitude and longitude.
Battery Indicator – shows current battery strength, or if the GPS unit is plugged
9 •
into a power source.
Local Points of Interest icons show selected locations nearby.
10
•
8
7
3
3
9
6

Common Tasks
This section deals with the most common tasks when using your GY500X.
Some of the tasks have dierent directions depending on whether you are
currently in Easy Navigation or Full Navigation modes.
Set up Vehicle Proles
1) When your GPS rst starts, change the options that are applicable for your vehicle.
For example, if you are driving a large commercial truck, you may select “Favor preferred
truck routes” to select specic routes that are rated for commercial vehicles.
2) Select “Gross Weight,” “Axle Weight,” and “Height,” “Length” and “Width” to set the correct
parameters for your vehicle.
3) Select “Hazardous Materials” to change the HazMat categories applicable to your vehicle load.
4) When done setting up the vehicle, select “Save/Load Settings” and then “Save Current” to
save this prole.
5) Type a name for the prole (i.e. “Truck 1 No Load”) and tap “Go” when nished.
6) The next time you want to select this prole, select “Save/Load Settings” and choose
your named prole..
Tip :
You may save up to 50 vehicle proles.
Plan a Simple Route
In Easy Navigation Mode:
1) Select “An Address”.
2) Follow the on-screen guide to enter the Zip Code, City, or State of the address.
3) Continue with #3 below.
In Full Navigation Mode:
1) Select “Drive To”.
2) Select “Recent” to choose a recent address, or select “Enter Address” for a new address.
Note : You may wish to “Select State” to choose a dierent state than the one listed.
3) Begin typing the City or Zip Code for your address, and tap GO when you see it appear
on screen.
4) Begin typing the Street name for your address, and tap GO when you see it appear on screen.
Tip :
If your street name is not listed, try entering it in a dierent manner. For example, streets
with directionals in them (East, West) might be listed with just the street name. For “East Main St,”
try typing “Main St.” If your street name does not appear, select “Try Wider Search” to look for the
street in surrounding areas. Some streets are listed dierently in dierent maps – for example,
“Route 25” might be listed at “Rt 25” or “US Route 25.” When in doubt, you should consult an online
map site to see how the street is ocially listed.
5) Type the house number and tap GO when it is complete.
7

Plan a Multi-Stop Route (Full Navigation Mode only)
1) Select “Plan Route”.
2) By default, the route will begin from your current location. To change this, select “Start”
and Enter the Address from your start point.
3) Select “End” and select “Enter Address” to input your nal destination.
4) Select “Add Via” to enter any stops along the route – you may select a recent address,
enter a new address, a point of interest, or choose from your favorites.
5) When ready, tap “Options.” From here you can see a full Route Map, view a Demo of the
actual drive, see the Route Text (including all turns, distances per turn, and estimated time),
or hit “Drive” to start your route.
Find a Point of Interest near your Current Location
In Easy Navigation Mode:
1) Where would you like to go - Click “A Point of Interest”.
2) Find your POI by starting with - Click “Your Current Location”.
3) Choose a POI category.
4) The closest POI in your category is listed – you may start typing to nd a specic business,
or hit the down arrow to see a full list sorted by distance.
5) Tap your selected POI to navigate to that location.
In Full Navigation Mode:
1) Select “Drive To”.
2) Select “POI”.
3) Choose a POI category.
4) The closest POI in your category is listed – you may start typing to nd a specic business,
or hit the down arrow to see a full list sorted by distance.
5) Tap your selected POI to navigate to that location.
Tip :
If you do not have a good GPS signal, the GPS will ask you for your start address to
nd a nearby POI.
You can also select a POI while on route – simply tap the map screen, then tap POI.
Tip :
Find a Point of Interest near a Specic Location (Full Navigation Mode only)
1) Select “Enter Address”.
2) Enter your City or Zip code.
3) You may select “POI near town” to nd all POIs in that area, or continue entering a street
name and/or a house number.
4) At any time during the address input, you may select “POI near…” to choose a POI near
your selected city, street, or exact address.
8

Add/Manage your Favorites
You can easily add your commonly used locations, such as Home, Oce,
or favorite coee bar, to your favorites list for easy access.
1) Select “Drive To”.
2) Select “Favorites”.
3) Select “Change”.
4) Select the address for your favorite by choosing from Recent, look for a POI, or enter a new
address by selecting “Town, Street”.
5) Once you nish entering the address, you will see it on the Favorites menu. Tap the Edit icon
on the end of the favorite listing and enter a name of your choice.
Set up your Bluetooth Hands Free Connection
Tip : See the full phone compatibility list at www.thencc.com.
1) Tap the Bluetooth icon on the menu screen or on the map screen.
2) Select “Settings”.
3) On your Bluetooth-enabled phone, be sure that the Bluetooth function is enabled. Depending
on your phone, you may need to select the option that allows other Bluetooth devices to
connect. This may be called “Discovery Mode” or “Allow other Devices to Find Me” or similar.
Consult your phone manufacturer or documentation for assistance.
4) While your phone’s discovery mode is on, select “Search Phone”.
5) When you see your phone model, tap it to select, and then click the Connect icon – this is the
3rd icon from the left on the bottom row.
6) Enter a 4 digit numeric passcode to secure the connection, and tap OK.
7) The screen will show “Pairing mobile phone.” During this time, your phone might ask for the
same numeric passcode that you entered on the GY500X. Enter it to allow the connection
to continue.
8) Your phone may ask you “Do you want to accept this connection?” or “Allow Connections” –
enter Yes to any similar questions.
9) Upon a successful connection, you will now be at the phone menu. You may tap the arrow
at the top left to exit back to navigation.
Tip :
You can pair your GPS with multiple phones. Each time it is turned on, the GY500X will
automatically connect with the phone that is in the vicinity.
Sync your Mobile Phone’s Phonebook to the GPS
You can load the phonebook from your mobile phone onto the GPS. This will allow you to dial
any of your contacts directly from the GPS, and will also show the caller’s name in the Caller ID
screen for incoming calls (if available).
1) Be sure that your phone is paired with the GPS (see Set up your Bluetooth Hands
Free Connection).
2) If you are currently in the navigation system, Tap the Bluetooth Icon to enter the Phone Menu.
3) In the Phone Menu, tap Phone Book.
9
 Loading...