

Goodway REAM-A-MATIC Series, REAM-A-MATIC RAM-4X, REAM-A-MATIC RAM-4, REAM-A-MATIC RAM-PTC Operating & Maintenance Instructions
Underwriters Laboratories Inc.
®
®
C US
TUBE CLEANING MACHINES
REAM-A-MATIC
RAM-4/RAM-4X/RAM-PTC
OPERATING & MAINTENANCE
INSTRUCTIONS
$1.00
®
®

Effective date – September 1, 2002
MADE IN U.S.A.
English . . . . . . . . . . . . . . . . . . . . . . . . . . . . . . . . . . . . . . . . . . . . . . . . . . . 1-7
Español . . . . . . . . . . . . . . . . . . . . . . . . . . . . . . . . . . . . . . . . . . . . . . . . . 8-14
Français . . . . . . . . . . . . . . . . . . . . . . . . . . . . . . . . . . . . . . . . . . . . . . . 15-21
Deutsch . . . . . . . . . . . . . . . . . . . . . . . . . . . . . . . . . . . . . . . . . . . . . . . . 22-28
RAM-4 and RAM-4X Schematic . . . . . . . . . . . . . . . . . . . . . . . . . . . . . . 29
RAM-PTC Schematic . . . . . . . . . . . . . . . . . . . . . . . . . . . . . . . . . . . . . . . 30
SAVE THESE INSTRUCTIONS
CONSERVE ESTAS INSTRUCCIONES
INSTRUCTIONS D’UTILISATION ET DE MAINTENANCE
BETRIEBSANLEITUNG BITTE AUFBEWAHREN
Goodway reserves the right to improve products.
Contact the factory for the latest configuration and uses.
© Copyright 2004 Goodway Technologies Corporation, Stamford, CT, U.S.A.
Goodway is a Trademark of Per K. Reichborn.

IMPORTANT SAFETY INSTRUCTIONS
WARNING: When using electric tools, basic safety precautions should always be
followed to reduce the risk of fire, electric shock and personal injury, including the
following:
1. Read all instructions before using.
2. Keep this manual with the machine at all times.
3. Do not operate without eye protection.
4. Select proper size cleaning tool.
5. Unplug the power cord when servicing the unit or leaving the unit unattended.
6. Turn off all controls before unplugging the power cord.
7. When unplugging the power cord, grasp the plug – not the cord.
8. Do not use the machine if it has a damaged cord or plug.
9. If the machine does not operate properly or has been damaged, return it to fac
tory for service.
10. Do not use the unit in an environment or on objects that are above 175°F (79°C).
11. Do not handle the base unit or plug with wet hands.
12. Do not use unit with combustible fluids or where combustible fluids or fumes
may be present.
13. Keep objects, loose clothing, hair and body parts away from openings and mov
ing parts.
14. Keep unit clean.
15. Do not roll the machine over the power cord, pull the cord, close the door on
the cord or pull the cord around sharp corners. Keep the cord away from hot
surfaces.
16. Do not operate unit when fatigued or under the influence of alcohol or drugs.
17. Do not over reach or stand on unstable support. Keep good footing and bal
ance at all times.
18. Follow maintenance instructions in manual.
19. Stay alert – watch what you are doing.
20. Use only GOODWAY recommended attachments.
21. Save these instructions.
-
-
-
1
WARNING: Keep clear of moving parts. Make sure moving parts will not catch on
anything before beginning the job. This unit is to be used only by trained operators.
GROUNDING INSTRUCTIONS
This product must be grounded. If it should malfunction or break down, grounding
provides a path of least resistance for electric current to reduce the risk of electric
shock. This product is equipped with a cord having an equipment-grounding
conductor and a grounding plug. The plug must be plugged into an appropriate
outlet that is properly installed and grounded in accordance with all local codes
and ordinances. The green (or green and yellow) conductor in the cord is the
grounding wire. Never connect the green (or green and yellow) wire to a live
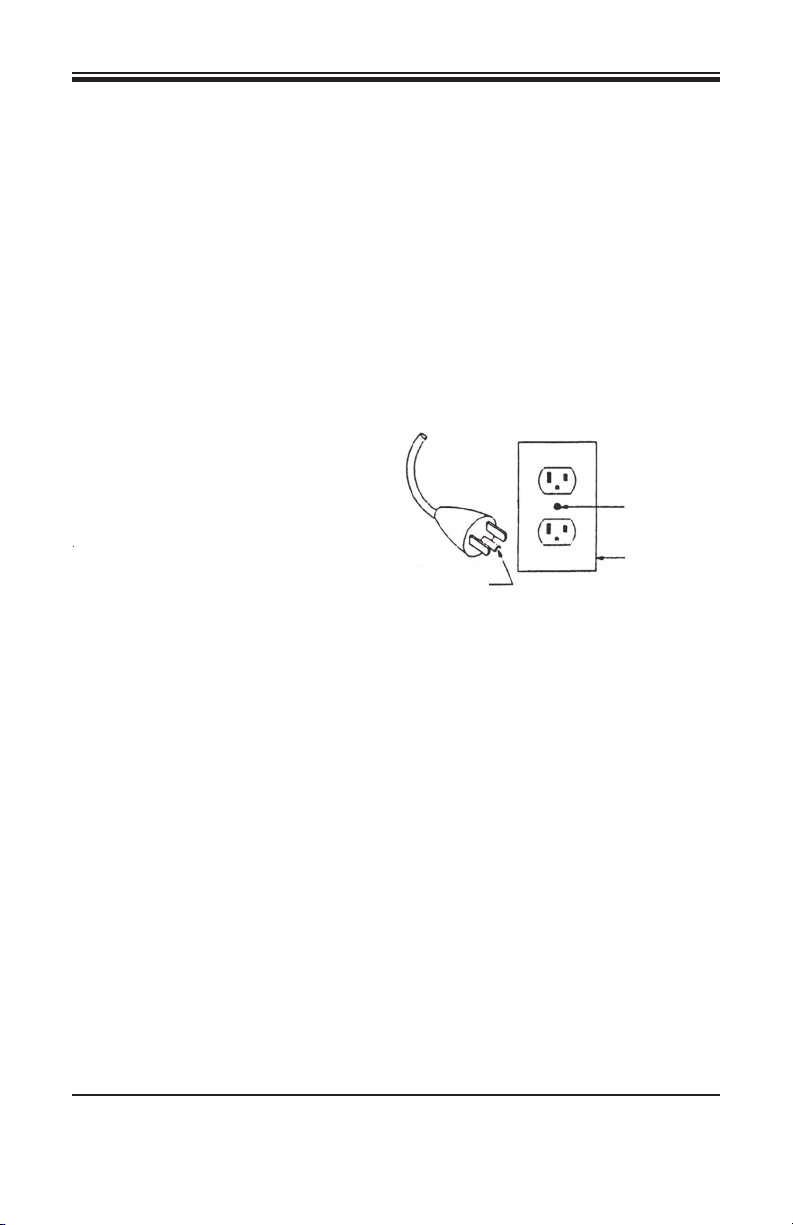
terminal. This product has a plug that looks like that shown here.
DANGER: Improper connection of the
equipment-grounding conductor can
result in a risk of electrocution. Check
with a qualified electrician or service
personnel if you are in doubt as to whether
the outlet is properly grounded.
DO NOT USE ANY TYPE OF ADAPTOR
WITH THIS PRODUCT.
GROUNDING
PIN
METAL SCREW
COVER OF
GROUNDED
OUTLET BOX
The RAM-4, RAM-4X and RAM-PTC are provided with a ground fault circuit
interrupter (GFCI) built into the power supply cord. This device provides
additional protection from the risk of electric shock. Should replacement of
the plug or cord become necessary, use only identical replacement parts that
include GFCI protection.
EXTENSION CORDS
Use only 3-wire extension cords that have 3-prong grounding-type plugs and
3-pole cord connectors that accept the plug from the product. Use only extension
cords that are intended for outdoor use. Use only extension cords having an
electrical rating not less then the rating of the product. Do not use damaged
extension cords. Examine extension cord before using and replace if damaged.
When using an extension cord, be sure to use one heavy enough to carry the
current the product will draw. An undersized cord will cause a drop in line voltage
resulting in loss of power and overheating. The table below shows the correct size
to use depending on cord length and nameplate amperage rating. If in doubt, use
the next heavier gage. The smaller the gage number, the heavier the cord.
2

Minimum Gage of Extension Cords
Ampere
Rating Volts 0-25' (0-7.6m) 26'-50' (7.9-15.3m) 51'-100' (15.6-30.5m) 101'-150' (30.8-45.8m)
8-13 A 120 V 18 16 14 12
4-6.5 A 220 V 18 18 18 16
Do not abuse extension cord and do not yank on any cord disconnect. Keep cord
away from heat and sharp edges. Always disconnect the extension cord from the
receptacle before disconnecting the product from the extension cord.
WARNING: To reduce the risk of electrocution, keep all connections dry and off
the ground. Do not touch plug with wet hands.
THE REAM-A-MATIC – HOW IT WORKS
The Ream-A-Matic uses a flexible shaft, which is available in different lengths
and diameters to fit the size of the tube to be cleaned. As the shaft rotates
inside its watertight nylon casing, the unit feeds water through the casing to the
cleaning tool. While the operator feeds the rotating shaft assembly through the
tube, the water flow flushes out deposits as they are loosened. A solenoid valve
automatically activates the water flow only when the machine is running.
Three models of the Ream-A-Matic are described in this manual: RAM-4,
RAM-4X and RAM-PTC.
The RAM-4 with a 1/2 HP (0.4 kW) motor is designed for cleaning tubes and pipes
1
/4"-1" (6.4-25.4mm) I.D. It is a compact, self-contained, roll-anywhere unit which
permits operation in tight quarters.
The RAM-4X is a heavy-duty version of the RAM-4, equipped with a 1 HP
(0.75 kW) electric motor, it is designed for cleaning tubes over 1" (25.4mm) I.D.
It requires a 1/2" (12.7mm) heavy-duty flexible shaft. The RAM-4X can also be
used for dry applications.
The RAM-PTC Port-A-Ram is a lightweight Ream-A-Matic machine that can
be hand carried, making it ideal for personnel who will use the equipment in
multiple locations. It operates essentially the same as the RAM-4 and performs
the same job. The Port-A-Ram is direct drive so it rotates the cleaning tool at
1,700 rpm.
ASSEMBLY – RAM-4 AND RAM-4X
1. Place the Ream-A-Matic machine on bench or floor with the front
louvered side down.
3

2. Insert the two large plastic thumbscrews through slotted holes in the handle
bar and fasten loosely into the tapped holes in the middle of each side of the
machine.
3. Push the connecting bar up against the drive unit so that the dolly bar is tight
against the bottom of the drive unit.
4. Tighten the two thumbscrews, and turn the machine upright.
CONNECTING FLEXIBLE SHAFTS – ALL MODELS
1. Select the proper size flexible shaft (GTC-701, GTC-702, GTC-703, GTC-704,
GTC-720, GTC-721) for tube diameter and length to be cleaned.
Note:
2. Insert square end of flexible shaft into the square in the drive shaft of the
3. Tighten large nut securely, making sure O-Ring (P/N 805) is in place.
The heavy-duty 1/2" (12.7mm) diameter flexible shaft (GTC-720, 721)
should be used for the RAM-4X machine [O.D. of outer casing is 3/4" (19.1mm)
and 0.955" (24.3mm) respectively].
machine. The shaft may have to be turned slightly for alignment.
OPERATION
CAUTION: Do not operate the Ream-A-Matic without eye protection.
WET APPLICATION – ALL MODELS
1. Connect water hose to water inlet. Water supply should be clean
(use screen washer) to avoid clogging orifice in solenoid valve.
Consult the Goodway catalog for heavy-duty water supply hose.
2. Open water supply line. DO NOT RUN DRY. Solenoid on drive unit will allow
water to flow through the flexible shaft assembly only when the machine is
running.
3. Plug electric cord into an outlet in accordance with voltage and amperage
of the nameplate.
4. Tip the machine over on its back side so that flexible shaft is parallel to floor.
(RAM-4 and RAM-4X).
5. Remove footswitch from tool storage compartment, and position switch in
a convenient position for the operator.
4
6. Select proper size cleaning tool and thread onto end of flexible shaft. Never
use a tool larger than I.D. of tube.
Note: Brush and buffing tools for tubes 7/16"-1" (11.1-25.4mm) I.D. are available
with quick connect couplings.
Note: Most tubes are rolled at tube sheet. Always measure I.D. beyond roll
or consult manufacturer’s manual for tube O.D. and gauge.
7. Locate shaft locator on the outside of the flexible shaft (GTC-701, GTC-702,
GTC-703, GTC-704 and GTC-720 only) in a position so that when the shaft is
fully inserted in the tube, only half the cleaning tool extends outside the other
end of the tube. (GTC-721, GTC-721G and GTC-821 can be marked with a
tape).
8. When necessary, the drive unit can be used separately from the dolly by
removing the two plastic thumbscrews. (RAM-4 and RAM-4X).
9. Uncoil flexible shaft completely and feed it into the tube. DO NOT FORCE
SHAFT DOWN TUBE. Allow machine to do the work. If resistance is felt, back
off 2"-3" (51-76mm) and feed shaft again until it goes easily. If
resistance is too great, use a smaller cleaning tool.
10. For easiest operation, if possible, insert shaft into tube and allow to remain
there for several hours before starting in order to remove loops from flexible
shaft.
DRY APPLICATION – RAM-4X ONLY
The RAM-4X may be adapted for use without water flush. Follow steps 3 through
10 only under “OPERATION – WET APPLICATION”.
Note: Specially designed flexible shaft (GTC-721) for dry application must be
used.
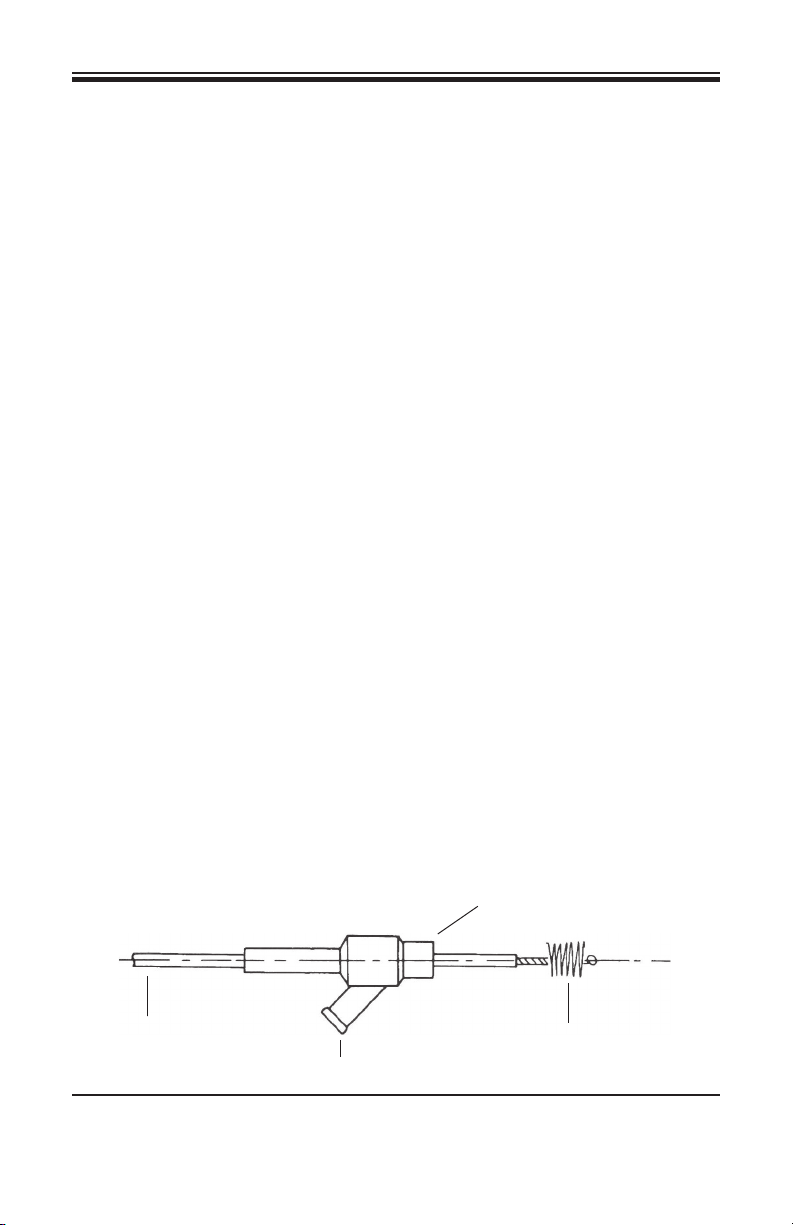
1. VACUUM PICK-UP: Use GTC-DPA assembly as shown below. Extension tube
nozzle (BFN-152S) can be ordered according
to the size of the tube to be cleaned.
Flexible Shaft (GTC-721)
Connect to RAM
Connect to Vacuum
Tube Nozzle (BFN-152S)
Inserted into Tube to be Cleaned
Cleaning Tool
5

2. AIR FLUSH: Compressed air may be used instead of water flush for removal of
deposit simply by connecting an air supply line to the water inlet of the machine.
CAUTIONS
1. The RAM-4X is designed to be used either wet or dry – not both. It is
equipped with a water seal. If used dry, the water seal will no longer
prevent water leakage.
2. Minimum operating radius of flexible shaft is 18" (460mm). However, it
is recommended that the shaft be kept as free from loops as possible.
This is especially critical nearest the drive unit.
3. Do not allow water to freeze in unit.
STORAGE – ALL MODELS
Disconnect water supply line. Disconnect the flexible shaft and drain water
to prevent rusting of shaft. Do not store machine where residual water in
machine may freeze. Refer to Flexible Shaft manual for flexible shaft storage.
USING THE RAM-4 WITH THE OPTIONAL
TWO-DIRECTION FOOTSWITCH
When cleaning internally enhanced tubes, it is sometimes desirable to use a
brush that rotates in both directions. The RAM-6 is best for this application.
However, every RAM-4 is wired for two-direction rotation and only requires
the two-direction footswitch to convert the standard machine.
INSTALLING THE TWO-DIRECTION FOOTSWITCH
1. Disconnect the standard footswitch from the air switch, located inside the
tool box, by pulling the tubing off of the barbed fitting. Be careful not to snap
off the barbed fitting. It is possible to pry the tubing off using the blade of a
small screwdriver but great care must be taken not to break the barb.
2. Connect the twin hose from the two-direction footswitch to the two air
switches located inside the tool box. The air switches are labeled
“FORWARD” and “REVERSE.” When the brush is rotating clockwise when
viewed from behind, the machine is in the “FORWARD” direction. The twin
tubing can be connected to the air switches either way as long as you know
which side of the footswitch activates which air switch.
6

3. Should it become necessary to reconnect the standard footswitch to the
RAM-4, be sure to connect the tubing from the footswitch to the air switch
marked “FORWARD.”
CLEANING INTERNALLY ENHANCED TUBES
1. Select the proper size brush and thread it onto the flexible shaft until it is
hand tight. Hold the shaft coupling with pliers and tighten the jam nut
against the shaft coupling with a wrench. This will prevent the brush from
unthreading when in the reversed direction. USE ONLY BRUSHES WHEN
CLEANING INTERNALLY ENHANCED TUBES.
Note: Use of quick connect brushes eliminates the need for wrenches and
plyers – see the Goodway catalog.
2. Position the shaft locator on the outside of the flexible shaft so that when
the shaft is fully inserted into the tube, the entire bristle portion of the brush
extends outside the tube. The bristles must clear the tube before the brush
can be reversed. Care must be taken not to allow the exposed part of the
flexible shaft to extend beyond the tube end to prevent the wires from being
cut by the sharp end of the tube.
3. The design of the brush and the spiral in the tube cause the brush to move
through the tube with very little assistance from the operator. Depress the
“FORWARD” side of the footswitch to enter the tube. To prevent undue strain
on the flexible shaft, do not change in/out direction or rotation direction until
the brush leaves the opposite end of the tube. Allow rotation to stop before
depressing the “REVERSE” side of the footswitch to exit the tube. The motor
must stop before it can reverse.
Note:
Although the RAM-4 can be used to clean internally enhanced tubes,
the RAM-6 is best for this application as it will allow the brush bristles into
the grooves better. The fixed speed of the RAM-4 requires a fast feed rate,
(the speed of the shaft going into the tube). If the feed rate is not met, the
bristles jump over the grooves leaving them fouled.
CLEANING TOOLS
Consult the Goodway catalog for available cleaning tools and recommended
uses.
7

INSTRUCCIONES IMPORTANTES DE SEGURIDAD
ADVERTENCIA: Cuando se utilicen herramientas eléctricas, siempre se deberán
tomar precauciones para reducir el riesgo de incendios, sacudidas
eléctricas y lesiones personales, incluyendo las siguientes:
1. Lea todas las instrucciones antes de la utilización.
2. Mantenga este manual junto a la máquina en todo momento.
3. No haga funcionar la máquina sin protección para los ojos.
4. Escoja la herramienta limpiadora del tamaño apropiado.
5. Desenchufe el cordón de la corriente cuando esté haciéndole mantenimiento
a la unidad o cuando está dejando la unidad sin atención.
6. Apague todos los controles antes de conectar el cordón de la corriente.
7. Cuando desconecte el cordón de la corriente, jale el enchufe – no el cordón.
8. No opere esta máquina si tiene el cordón de corriente o el enchufe dañado.
9. Si la máquina no funciona correctamente o ha sufrido daños, devuélvala a
la fábrica para su reparación.
10. No use esta unidad en ambientes o en objetos con mas de 175°F (79°C) de
temperatura.
11. No maneje la base de la unidad ni la conecte con las manos mojadas.
12. No use esta unidad con combustibles líquidos o donde haya presencia de humos
combustibles.
13. Mantenga objetos, ropas flojas, cabello y partes del cuerpo lejos de las aberturas
y las piezas móviles.
14. Conserve la unidad bien limpia.
15. No ruede la máquina sobre el cordón de la corriente, jale el cordón, cierre la puerta
sobre el cordón o jale el cordón sobre superficies cortantes. Mantenga el cordón
lejos de superficies calientes.
16. No haga funcionar la unidad cuando esté cansado o bajo los efectos de alcohol
o drogas.
17. No se extienda en exceso ni permanezca de pie sobre objetos inestables.
Mantenga los pies bien asentados y un buen equilibrio en todo momento.
18. Siga las instrucciones de mantenimiento que se dan en el manual.
19. Manténgase alerta y observe siempre lo que está haciendo.
20. Use sólo aditamentos Goodway recomendados.
21. Conserve estas instrucciones.
8
ADVERTENCIA: Mantengase fuera del alcance de partes móviles. Asegúrese que las
partes móviles no se enreden en cualquier cosa antes de empezar el trabajo. Esta unidad
solo debe ser usada por personal que ha sido entrenado en su uso.
INSTRUCCIONES DE TOMA DE TIERRA
Este producto debe tener una conexión a tierra. En caso de que se descomponga o
tenga alguna falla de funcionamiento, la toma de tierra proporciona una trayectoria de
menor resistencia para la corriente eléctrica, de modo que se reduzcan los riesgos de
descargas eléctricas. Este producto va equipado con un cable que tiene un conductor
de puesta a tierra del equipo y una clavija de masa. Esta última se deberá insertar en una
toma apropiada que esté bien instalada y conectada a tierra de conformidad con todos
los códigos y reglamentos locales.
PELIGRO: Una conexión incorrecta del
conductor de puesta a tierra del equipo
puede dar como resultado que haya
riesgos de electrocución. Si tiene dudas
respecto a si la toma de corriente tiene
una conexión adecuada a tierra,
consulte al personal de mantenimiento
o a un electricista competente.
ALAMBRE DE
CONEXIÓN
A TIERRA
NO USE CON ESTE PRODUCTO NINGÚN TIPO DE ADAPTADOR.
Los modelos RAM-4, RAM-4X Y RAM-PTC vienen equipados con un circuito de interruptor
de falla de conexión a tierra (GFCI) dentro del cordón de alimentación de corriente. Este
dispositivo provee protección adicional contra el riesgo de choque eléctrico. Si fuera
necesario reemplazar el enchufe o el cordón, reemplácelo solamente con partes idénticas que tengan la protección GFCI.
TORNILLO DE METAL
CUBIERTA DEL
TOMACORRIENTE CON
CONEXIÓN A TIERRA
CABLES DE EXTENSIÓN
Use sólo cables de extensión de tres conductores, que tengan enchufes de toma de tierra
de tres contactos y conectores de tres puntas que acepten el enchufe del producto.
Utilice sólo cables de extensión para uso en exteriores. Estos últimos se identifican
mediante una inscripción que dice: “Aceptable para uso con aparatos exteriores.
Almacénese al interior cuando no se esté utilizando”. No utilice cables de extensión
dañados. Examine el cable de extensión antes de usarlo y reemplácelo si está dañado.
Cuando emplee un cable de extensión, asegúrese de que sea suficientemente fuerte
para llevar la corriente que consumirá el producto. Un cable de tamaño demasiado
pequeño provocará una caída de voltaje que dará como resultado pérdida de potencia
y recalentamiento. En la tabla que sigue se muestra el tamaño correcto que se deberá
usar, dependiendo de la longitud del cable y el valor nominal de amperaje de la placa de
indicaciones. Si tiene dudas, use el tamaño mayor que sigue. Cuanto más pequeño sea
el número de calibre, tanto más pesado será el cable.
9
 Loading...