

™
GoodLink
Wireless Corporate Messaging
User’s Guide
Version 1.0

GoodLink User’s Guide

™
GoodLink
Wireless Corporate Messaging
User’s Guide
Version 1.0

GoodLink User’s Guide
Last revised 11/30/01
Part Number: 1001595, Revision A
At time of printing, documentation complies with software version 1.0.
Copyright
© 2001 Good Technology, Inc. All rights reserved. Good and GoodLink are trademarks
of Good Technology, Inc. in the United States and/or other countries.
Good Technology, Inc. may have patents or pending patent applications, trademarks,
copyrights or other intellectual property rights covering subject matter in this
document. The furnishing of this document does not give you any license to these
patents, trademarks, copyrights, or other intellectual property rights except as
expressly provided in any written license agreement from Good Technology, Inc.
Microsoft, Windows, Windows NT, Exchange and Outlook are either registered
trademarks or trademarks of Microsoft Corporation in the United States and/or other
countries.
RIM, the RIM logo, Research in Motion, RIM 950 Wireless Handheld, RIM 957 Wireless
Handheld, BlackBerry, BlackBerry Exchange Edition, the BlackBerry logo, the
“envelope in motion” symbol and 'Always On, Always Connected' are registered
trademarks or trademarks of Research in Motion Limited in the United States and/or
other countries.
Mobitex is a trademark of the Swedish Telecommunications Administration that may
be registered in some jurisdictions. Outside In®Wireless Export ©2001 Stellent
Chicago, Inc. All rights reserved. All other companies and product names are
trademarks or registered trademarks of their respective holders.
Disclaimer
No part of this document may be reproduced or transmitted in any form or by any
means, electronic or mechanical, for any purpose, without the express written
permission of Good Technology, Inc.
Information in this document is subject to change without notice. This publication
could include technical inaccuracies or typographical errors. Good Technology, Inc.
may make improvements or changes in the products or the programs described in this
publication at any time.
Good Technology, Inc.
1032 Morse Ave.
Sunnyvale, CA, 94089
Tel. (408) 400-4800 Fax (408) 400-4801
Web site: www.good.com
Email: info@good.com.
Printed In USA.
Warning: Do not use this device while driving.

Contents
1Overview1
Features and Benefits 2
Package Contents 4
System Requirements 5
For Additional Information 6
2 Tutorial: Sending an Email Message 7
Keyboard and Controls 8
Composing a Message 9
Checking the Message 13
3 Using GoodLink Applications – Basics and
Email 15
About GoodLink Applications 16
Basics 17
Opening an Application 17
Using Menus 17
Setting the Text Insertion Point 18
Using Checkboxes 19
GoodLink User’s Guide iii

Changing Dates and Times 19
Returning to the Home Screen 21
Getting Help 21
Turning the Radio On and Off 22
Turning the Handheld Off and On 23
Composing Text 24
Copying and Pasting Text 26
Email 27
Viewing Email Messages 28
Responding to Email Messages 30
Responding to a Meeting Request 31
Finding Messages 33
Viewing Email Attachments 34
Creating Email Messages 35
Using Email Folders 37
Viewing Email Folders 39
Filing Email Messages 40
Deleting Email Messages 41
Filtering Messages 42
Setting Email Options 44
Synching All Incoming Messages 46
Viewing Digitally-Signed or Encrypted Messages 47
Keyboard Command Reference 48
4 Additional Applications 51
Contacts 52
Viewing Contacts 52
Finding Contacts 53
Editing Contacts 54
Adding Contacts 55
Setting Contact Options 56
Using Contacts with Other Applications 57
iv GoodLink User’s Guide

Calendar 58
Viewing Appointments 59
Adding New Appointments 61
Changing Appointments 64
Setting Calendar Options 64
Tas ks 65
Viewing Tasks 65
Adding New Tasks 66
Editing Tasks 69
Setting Task Options 70
Notes 71
Viewing and Editing Notes 71
Adding Notes 73
Deleting Notes 74
Alarm Clock 74
Calculator 76
Working with a Series of Numbers 77
Games 79
5 Preferences and Maintenance 81
Setting Handheld Preferences 81
Using Autotext 83
Passwords 86
Adding a Password 87
Locking and Unlocking Your Handheld 89
Disabling a Password 90
Changing a Password 90
Changing the Time Zone 91
Battery Maintenance 91
Replacing a Battery on the RIM 950 92
Recharging a Battery on the RIM 957 93
GoodLink User’s Guide v

Data Storage and Aging 94
Moving Servers or Changing Email Addresses 95
A Appendix 97
Safety and Regulatory Information 97
FCC Statement (USA only) 98
Specifications 98
Statement of Limited Warranty 100
Good Client Software License Agreement 102
Index 107
vi GoodLink User’s Guide
1 Overview
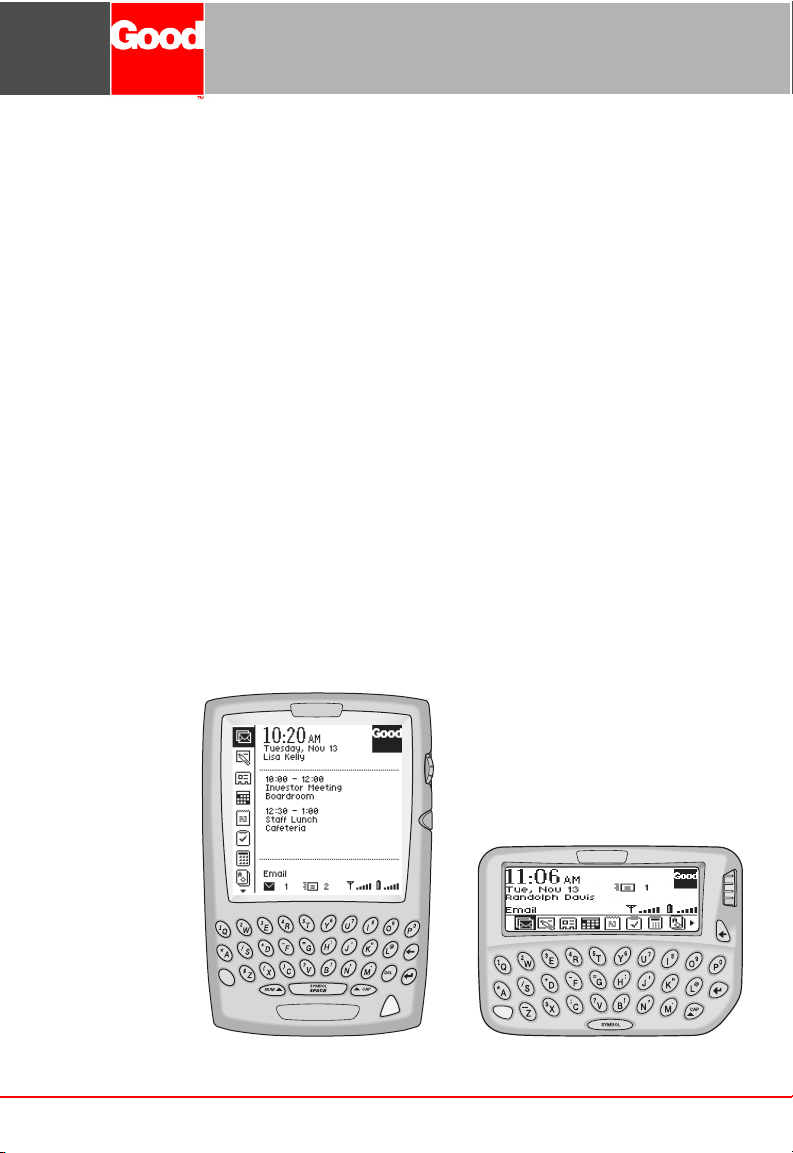
Introducing GoodLink™, the new wireless corporate messaging
service from Good Technology, Inc. GoodLink enables mobile
professionals to stay Always-Up-To-Date
and groupware when away from their desks.
™
with their company email
GoodLink Application software
on a RIM 957 handheld
GoodLink User’s Guide 1
GoodLink Application software
on a RIM 950 handheld
Overview
GoodLink provides mobile workers with a continuously
synchronized wireless connection to company servers enabling them
instant access to the latest corporate email, secure attachments,
contacts, calendar, notes, and tasks.
GoodLink adds Always-Up-To-Date wireless service and easy-to-use
software to handheld devices from Research in Motion (RIM).
GoodLink delivers a complete and secure wireless solution for
accessing corporate messaging accounts through the firewall.
Customers receive everything they need to get started, all in one
complete package:
• Highly-portable wireless handheld devices featuring a built-in
keyboard
• Innovative handheld software
• Highly-reliable server software
• Wireless airtime with national coverage on a leading network
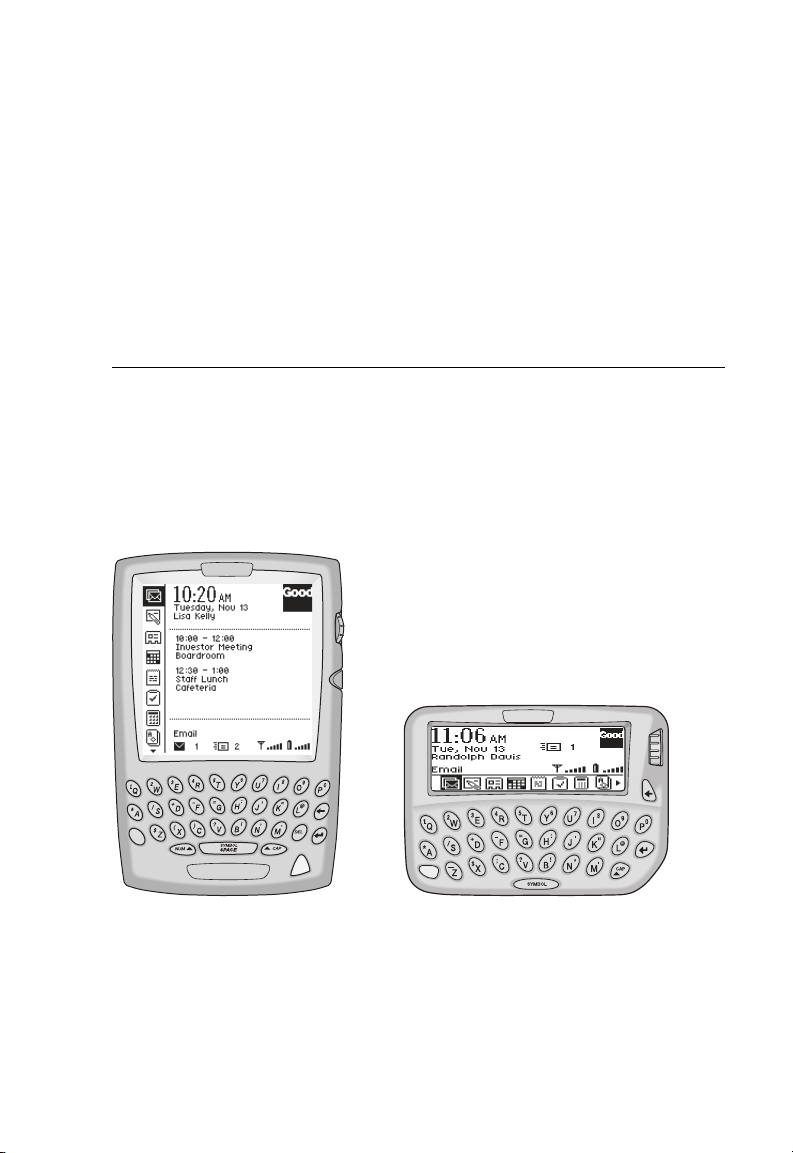
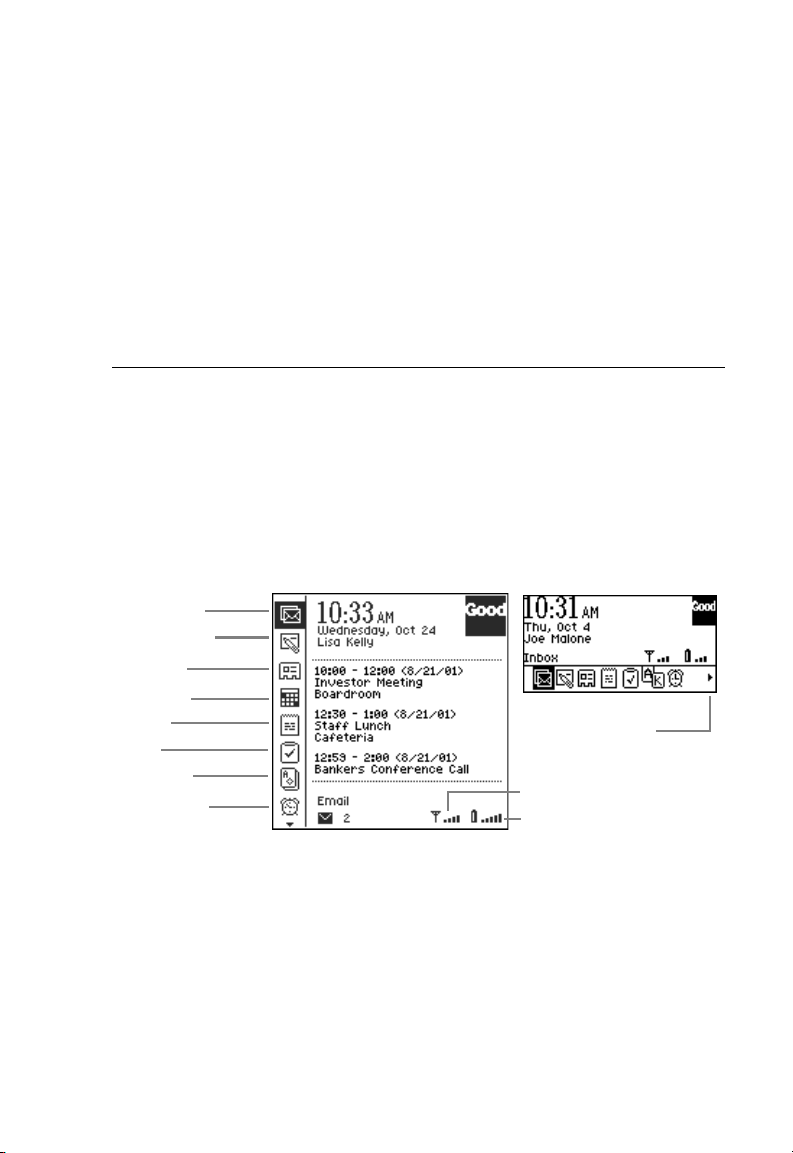
Features and Benefits
Installed on a RIM 950 or RIM 957 wireless handheld, GoodLink is
fully compatible with your Microsoft Outlook and Exchange
environment.
Email Inbox
New Message
Contacts
Calendar
Notes
Ta sk s
Calculator
Alarm Clock
2 GoodLink User’s Guide
Upcoming
appointments
Radio indicator
Battery indicator

Features and Benefits
• You have complete, remote control of your email account.
This includes sending and receiving email messages as well as
deleting, filing, and moving messages. New email messages are
automatically sent to your handheld. GoodLink also includes
customizable alarms, notifications, email signatures, and filters.
• Your contacts, calendar, tasks, and notes are also
Always-Up-To-Date.
You can create and accept meeting requests from your handheld.
• GoodLink provides a secure environment to view and manage
important documents.
You can view Microsoft Word (*.doc), Adobe Acrobat (*.pdf),
Power Point (*.pps), Excel (*.xls), WordPerfect (*.wpd), HTML
(*.htm and *.html), Rich Text (*.rtf), and plain text (*.txt)
documents on the handheld and forward attached documents to
other email users.
• GoodLink is an enterprise-class solution.
All data is encrypted from the corporate firewall to the handheld
and individual password protection is available on the handheld.
• GoodLink is easy to use and support.
GoodLink applications include an intuitive, “walk up and use”
interface. GoodLink works with your existing email account; there
is no new address to administer.
• Nationwide network connectivity provides reliable coverage over
95% of the business population.
Good Technology’s S-WRAP (secure wireless reliability access
protocol) technology enables positive acknowledgement of
messages.
GoodLink User’s Guide 3
Overview
Package Contents
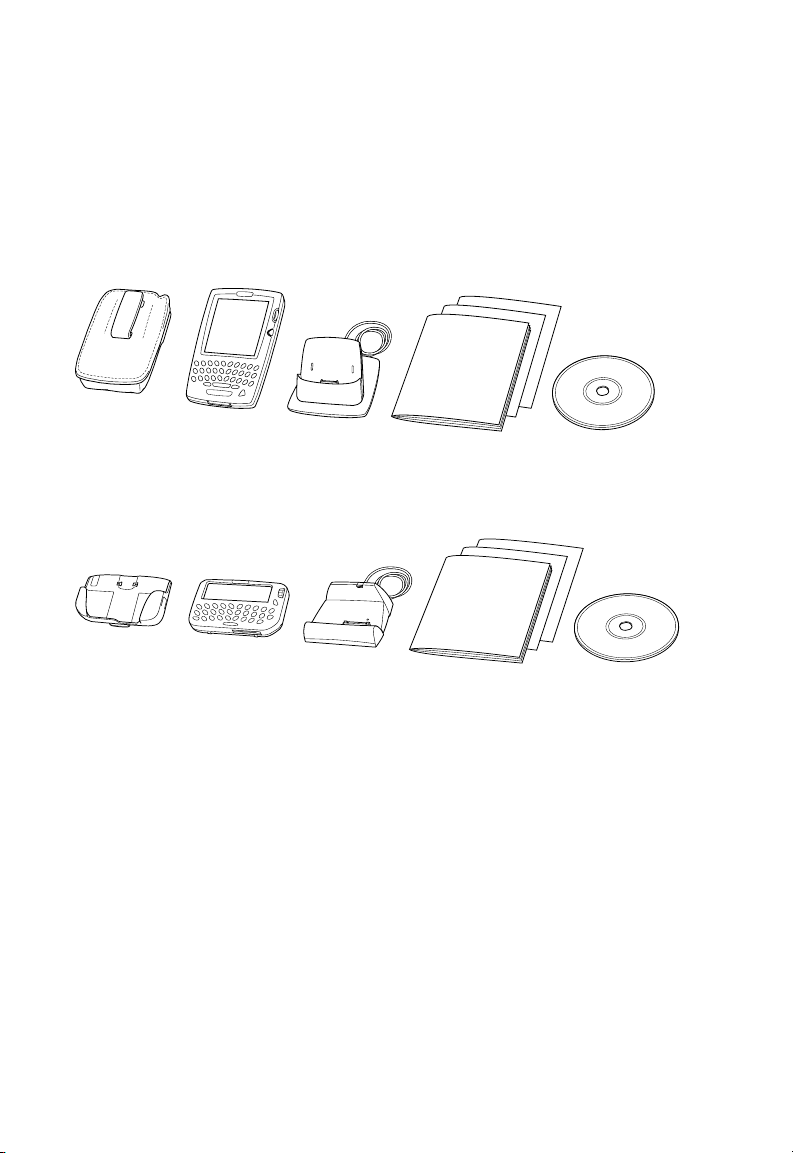
If you are a new user, your package includes the following items.
957 Package Contents.
Carrying Case
957 Device
Cradle
User Guide
and Reference Cards
Software CD
950 Package Contents.
Carrying Case
950 Device
Cradle
User Guide
and Reference Cards
Software CD
Handheld and Carrying Case. Both the RIM 957 and RIM 950 come
with a carrying case that includes a belt clip.
Cradle and Connector Cable. Hardware for connecting your
handheld to your computer. This cradle is required to set up your
handheld. It’s also used to charge the battery on a RIM 957 handheld.
The cradle is not required for synchronization; GoodLink provides
full wireless synchronization.
GoodLink Application Software CD. Desktop software you can use
for setting up your handheld and installing new applications.
4 GoodLink User’s Guide
System Requirements
Quick Start and Quick Reference Cards. The Quick Start card
briefly describes how to prepare your handheld for use. (If your
handheld is already set up, this card might not be included.) The
Quick Reference card contains a summary of important keyboard
commands.
User’s Guide. This guide provides complete instructions for using
your handheld.
Installation Guide (online only). The GoodLink Installation Guide
provides complete instructions for setting up your handheld and
installing the GoodLink Application software. This guide is provided
in Adobe Acrobat format (*.pdf) and is located on the GoodLink
Application Software CD.
Important: If you are upgrading an existing BlackBerry RIM
handheld to use GoodLink Application software, your conversion
package contains the GoodLink Application Software CD, Quick
Start and Quick Reference cards, and User’s Guide. You already have
the handheld and cradle. For more information on upgrading, see the
GoodLink Installation Guide.
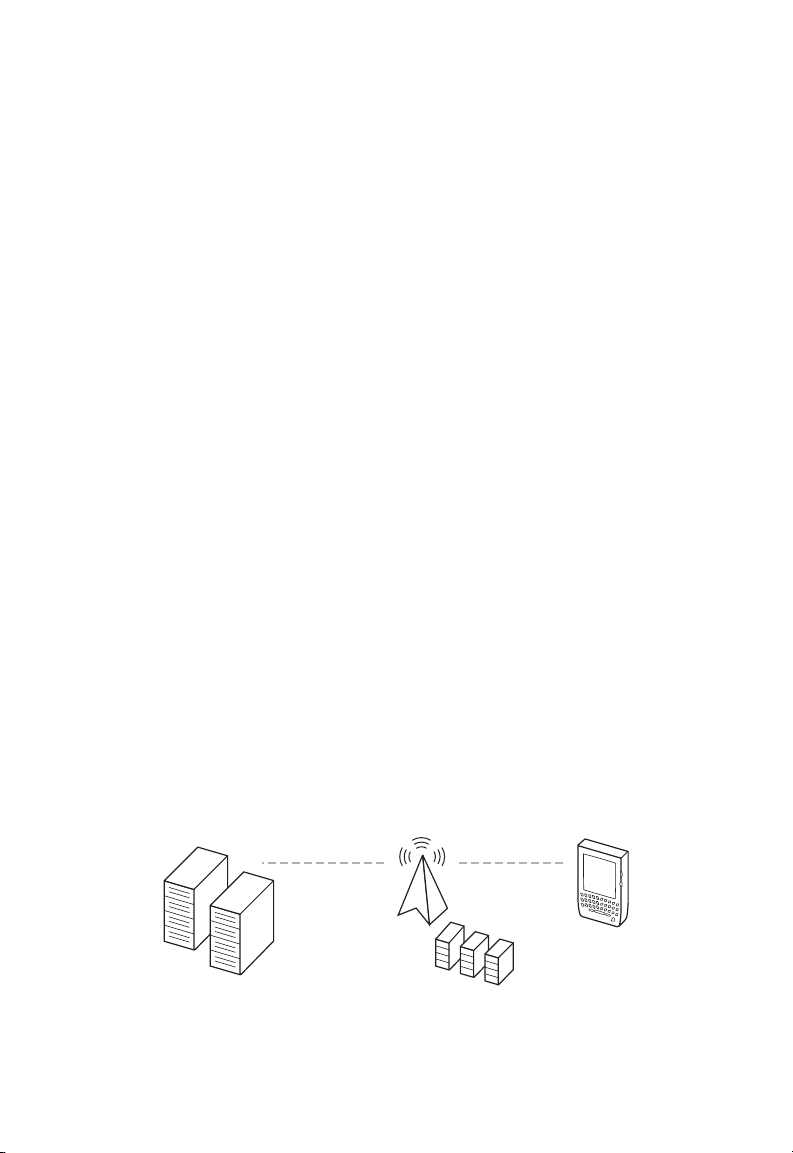
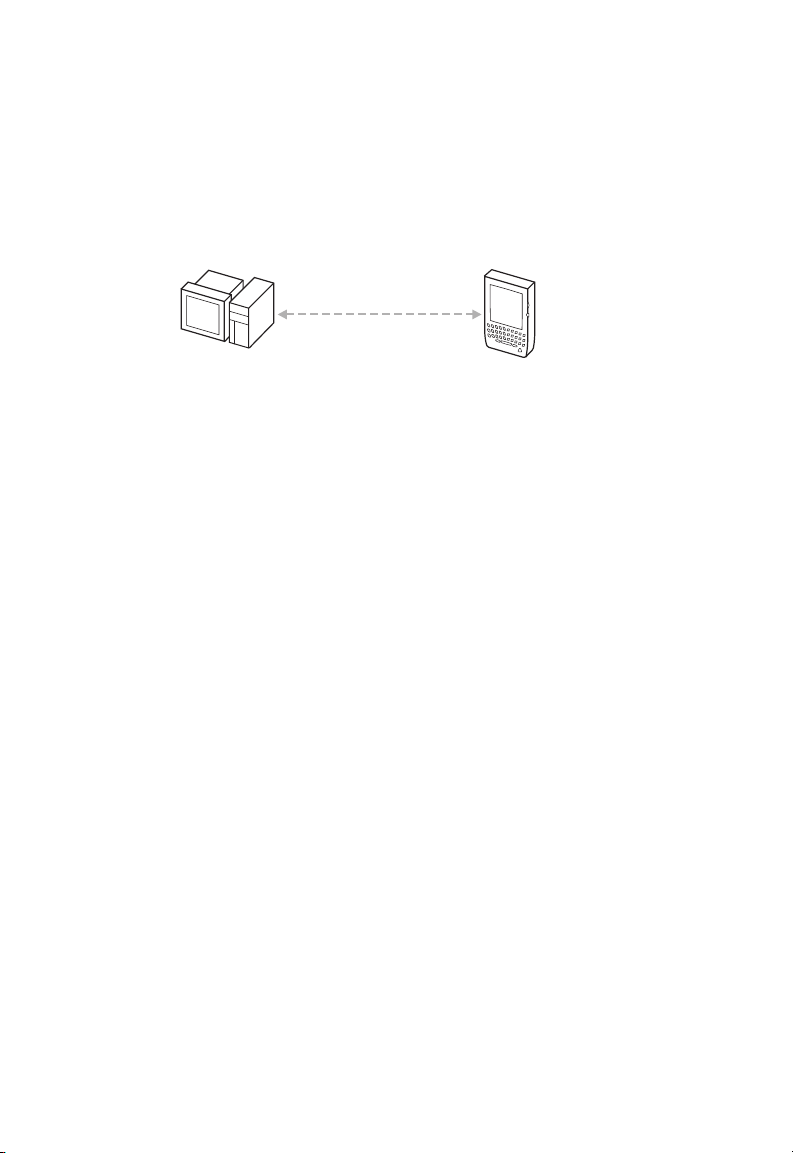
System Requirements
Your handheld works in conjunction with the Microsoft Exchange
Server and GoodLink Server on your corporate network.
Corporate Network
Wireless
Microsoft
Exchange
GoodLink User’s Guide 5
Server
GoodLink
Server
Network
Operations
Center
Handheld
Device
Overview
A
When you turn on the handheld radio, it connects with the GoodLink
wireless network. In turn, this network communicates with your
corporate network. Information from your Outlook account on the
Exchange server is synchronized with information on your handheld.
Outlook
pplications
Continuous
Synchronization
Handheld
Device
Handheld setup instructions in this manual assume your corporation
has a GoodLink Server installed on your network and your handheld
has been added to your account by your Microsoft Exchange
administrator.
For Additional Information
For more information about GoodLink products, visit the Good
Technology Web site at http://www.good.com or contact Customer
Service at 1-408-400-4992.
6 GoodLink User’s Guide
2 Tutorial: Sending an
Email Message
This chapter provides a brief tutorial on how to use your handheld to
send an email message. It’s a good way to try out the handheld and
make sure it’s working properly.
Note: The instructions in this chapter assume your handheld is
already set up. If not, contact your Microsoft Exchange administrator
or follow the instructions in the GoodLink Installation Guide.
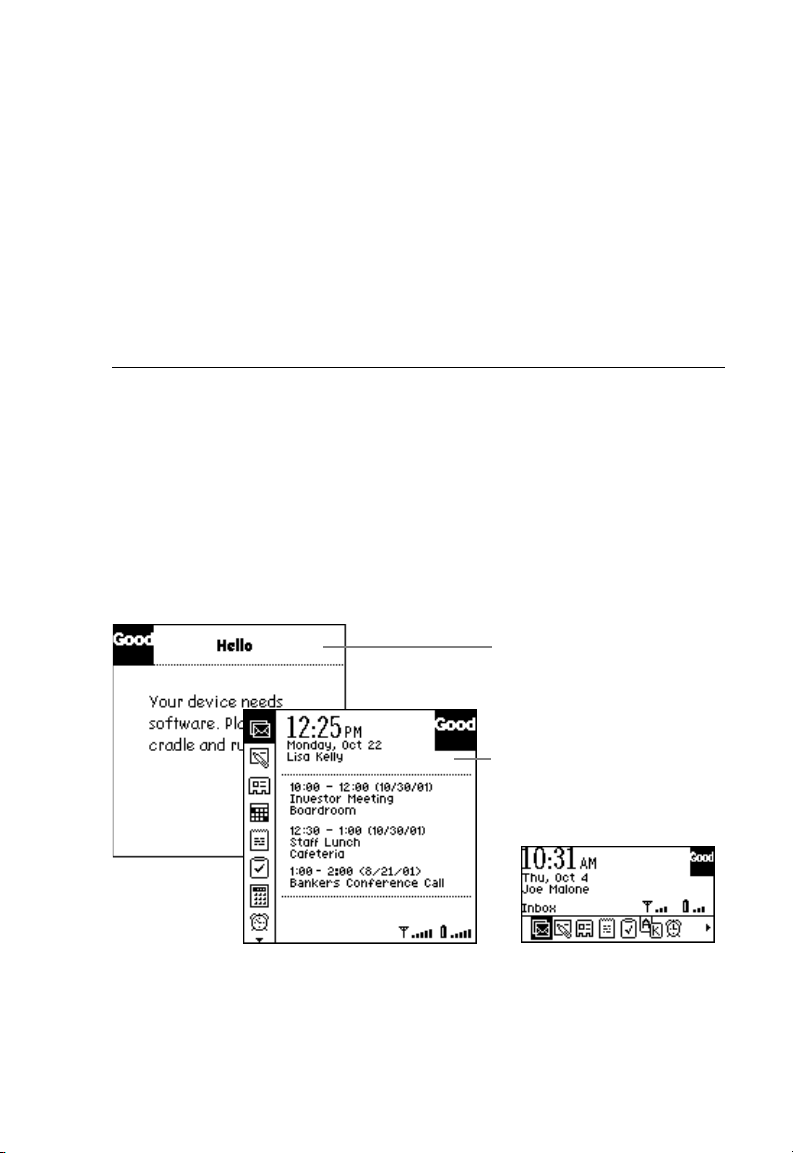
If this message appears,
your handheld is not set
up.
If your handheld is set up,
the home screen appears.
GoodLink User’s Guide 7
Tutorial: Sending an Email Message
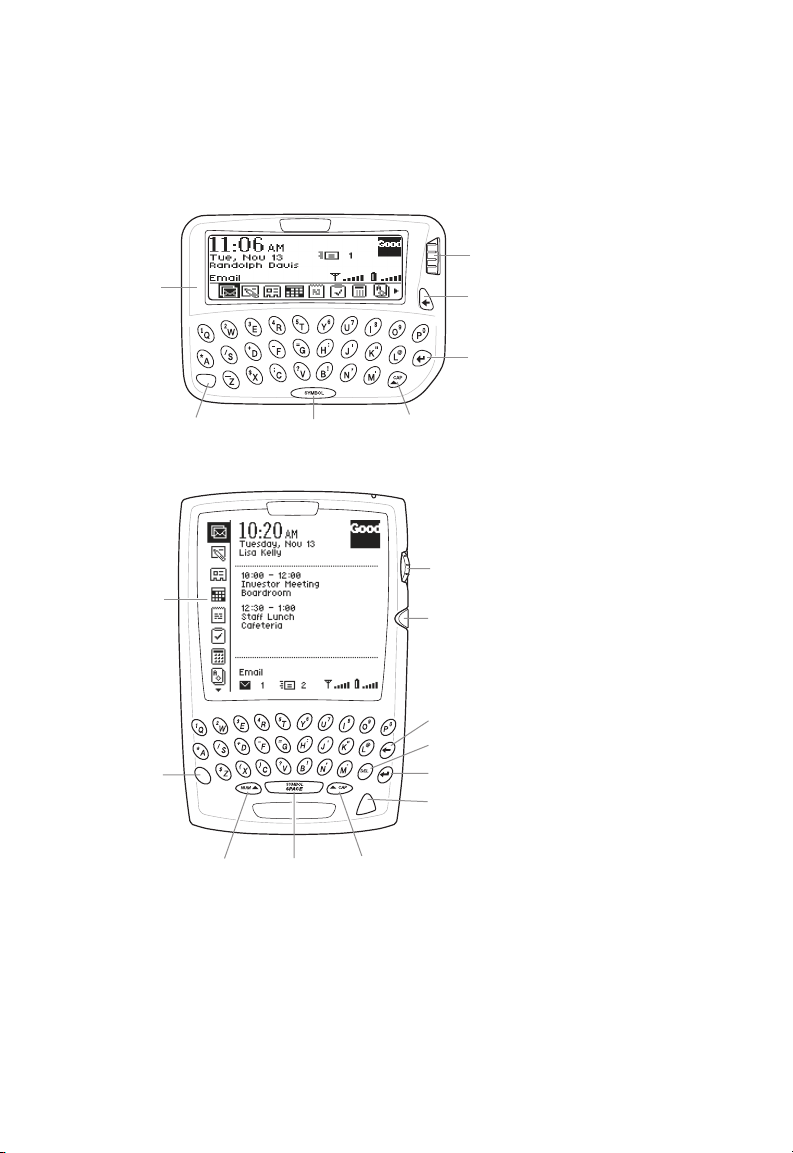
Keyboard and Controls
LCD screen
Trackwheel
Backspace
(Escape) key
Enter key
LCD screen
Alt key
Space keyAlt key
Space keyNum (Shift)
Cap (Shift)
Trackwheel
Escape key
Backspace key
Delete key
Enter key
Power On/Off
Cap (Shift)
8 GoodLink User’s Guide
Composing a Message
Composing a Message
1. If necessary, turn on your handheld.
• On the RIM 957, press the silver button
• On the RIM 950, click (press down and release) the trackwheel.
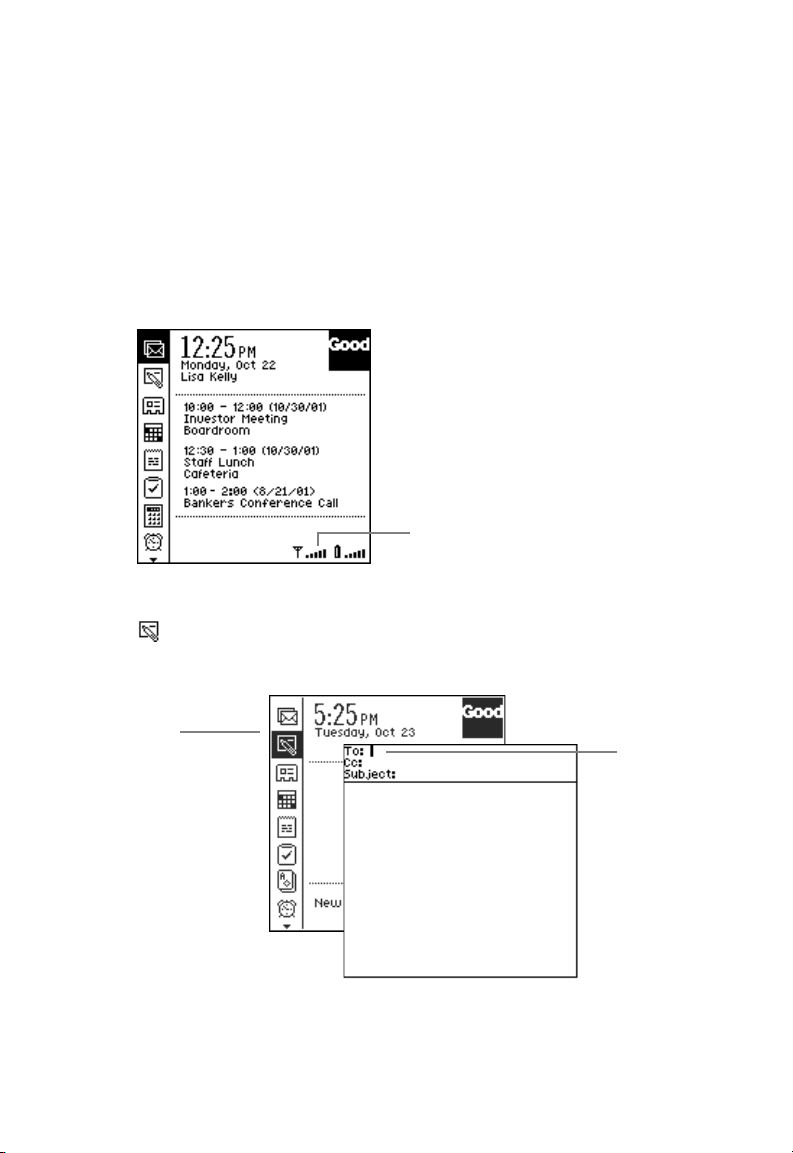
2. Make sure the Radio is on and the signal strength is high.
Multiple bars indicate the
radio signal strength is high.
3. On the home screen, rotate the trackwheel until the New Message
icon is highlighted. This is called scrolling.
4. Click (press and release) the trackwheel.
New Message
icon
Text cursor
GoodLink User’s Guide 9
Tutorial: Sending an Email Message
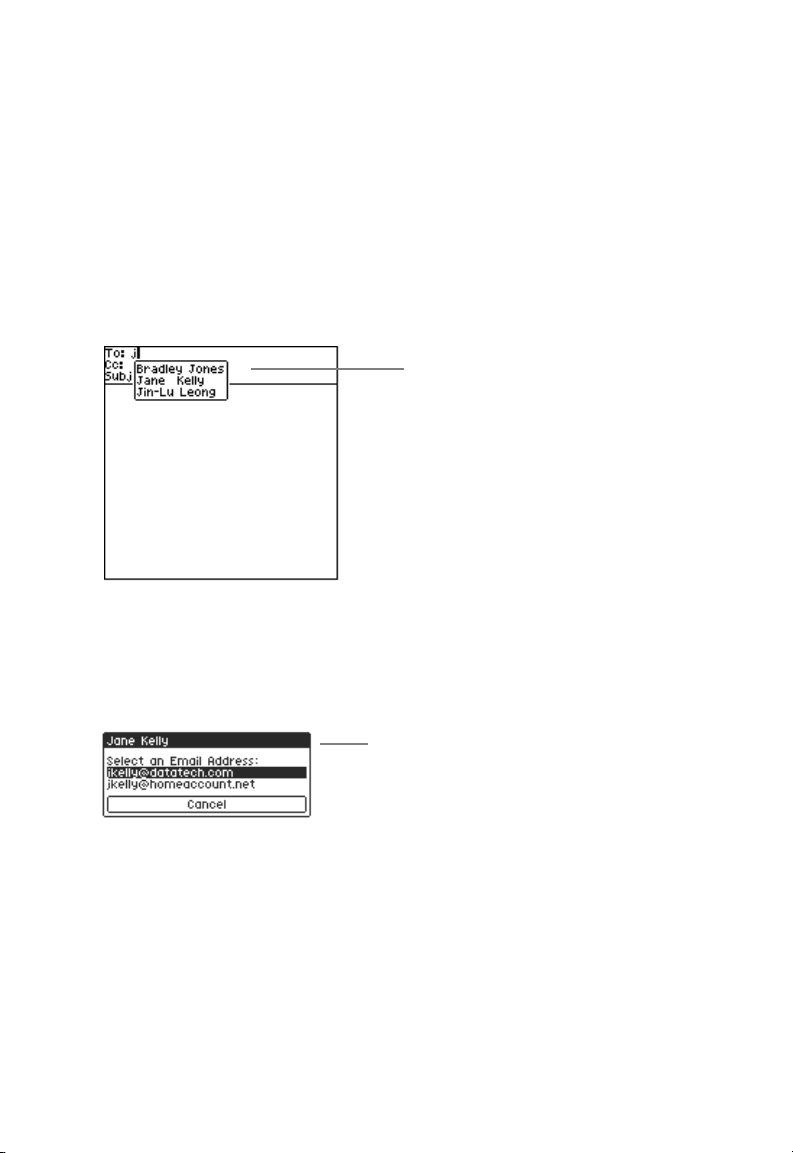
A new, blank email message appears with a text cursor in the
address field. The text cursor marks the insertion point for text as
you type.
5. Type an email address.
As you type, a list of your contacts appears that match the text
you’ve typed. You can type an email address directly, or select a
contact from the list.
List of contacts whose
first name, last name, or
initials match the text you
type
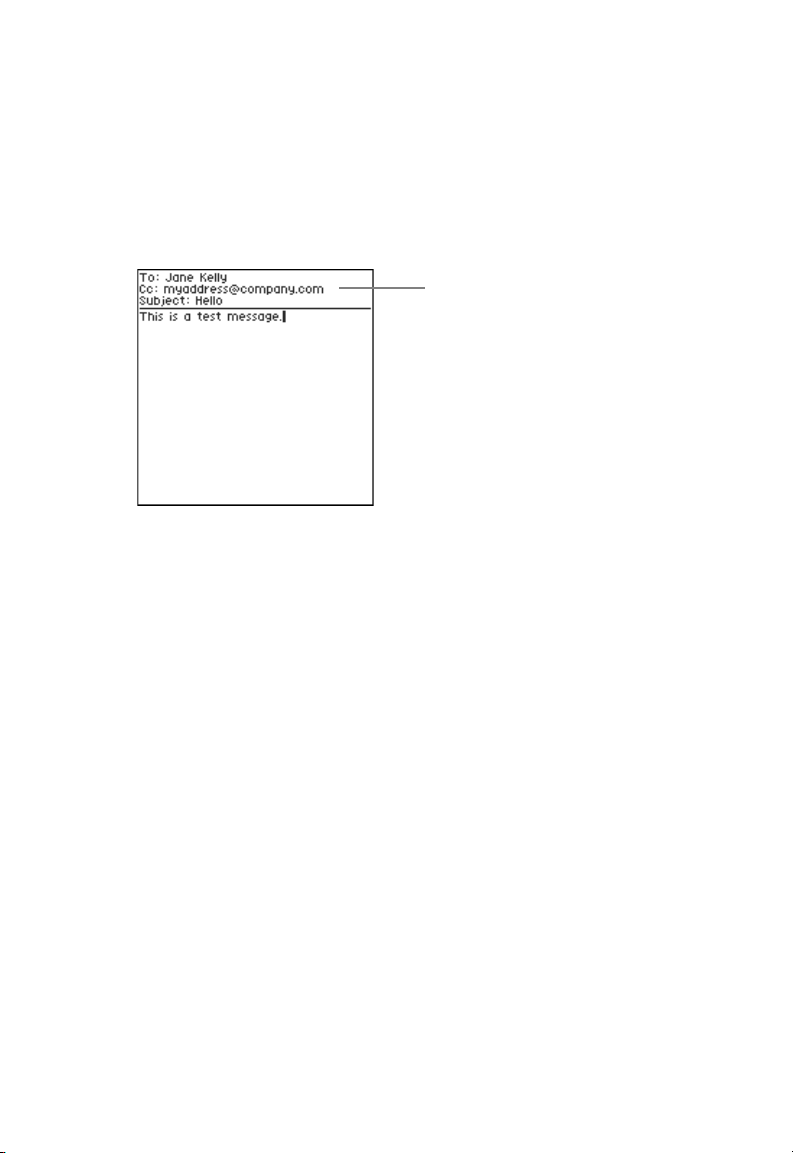
To select a contact, rotate the trackwheel until the contact you
want to use is highlighted. Then click the trackwheel.
Note: If the contact has more than one email address, a message
appears asking you to select the address you want to use.
If a contact has more than one email
address, scroll to select the address
you want to use. Then click.
In addition to selecting an address from the contacts list, you can
use the following shortcuts to type an email address:
• To enter an @ symbol in an email address, press Space twice.
• Press Space again to enter a dot (.) in an email address. Press
Space again to automatically enter a com suffix. You can
continue to press Space to cycle though .com, .net, .gov, and
.org suffixes.
10 GoodLink User’s Guide
Composing a Message
6.
When you finish entering the address, fill out the rest of the email
message as desired.
Rotate the trackwheel to scroll between lines.
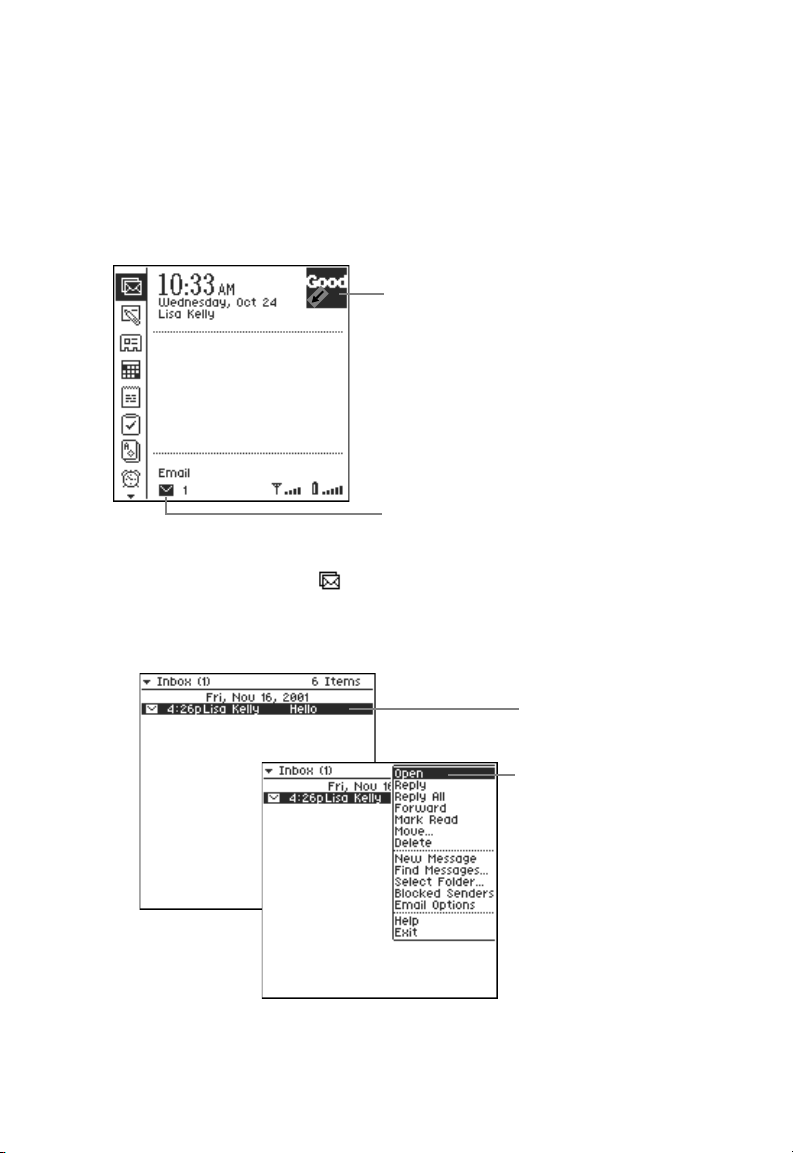
7. Type your own email address on the CC: line.
Include your own email address
on the CC: line so you’ll receive a
copy of the message.
When you create the body of the message, experiment with the
Shift keys (Cap and Num), and the Orange (Alt) key to see how
they work.
As you type, you might notice an Autotext feature. Autotext
automatically types capital letters at the beginning of sentences,
translates abbreviations into complete words, and corrects
common misspellings. For example, if you type ahve, it changes to
have.
GoodLink User’s Guide 11

Tutorial: Sending an Email Message
8.
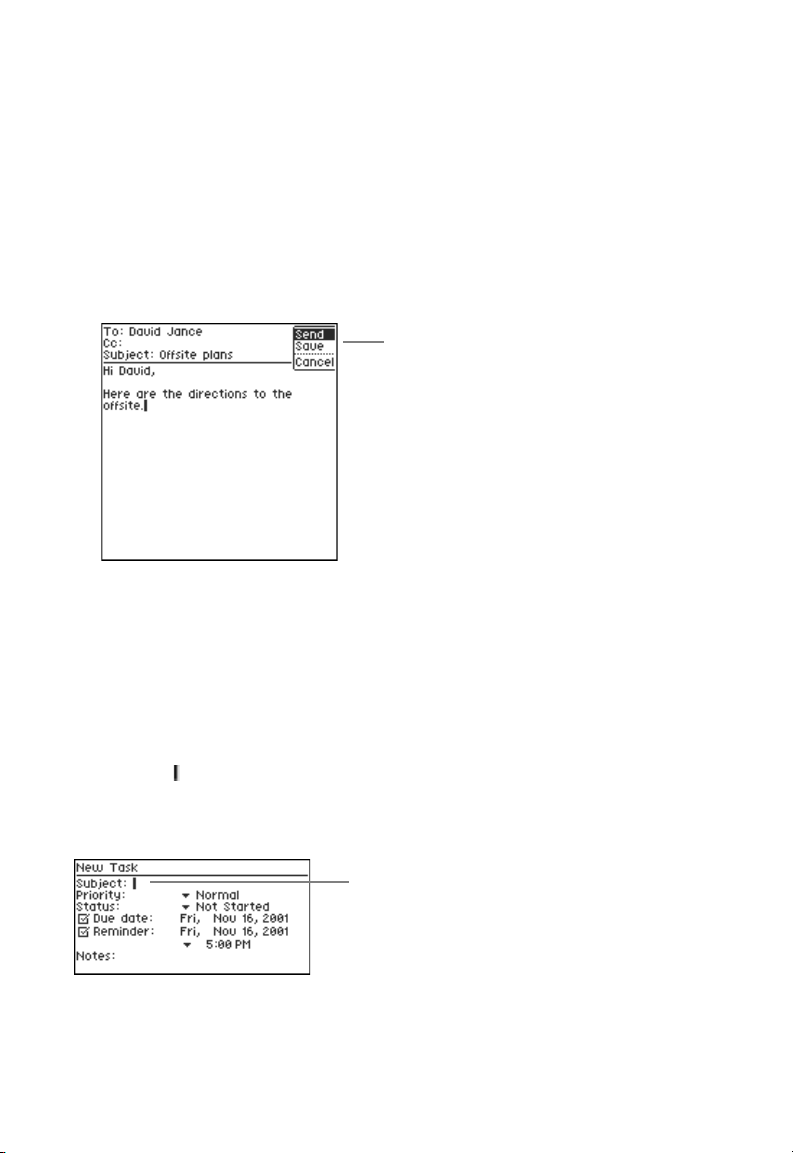
When you’ve finished typing the message, click the trackwheel.
A menu appears.
Click the trackwheel to
display a menu.
9. Choose Send.
The home screen reappears. While the message is being sent,
you’ll see a sending mail icon at the bottom of your screen.
Once the message is sent, the icon disappears.
Arrow indicates the handheld is
sending information.
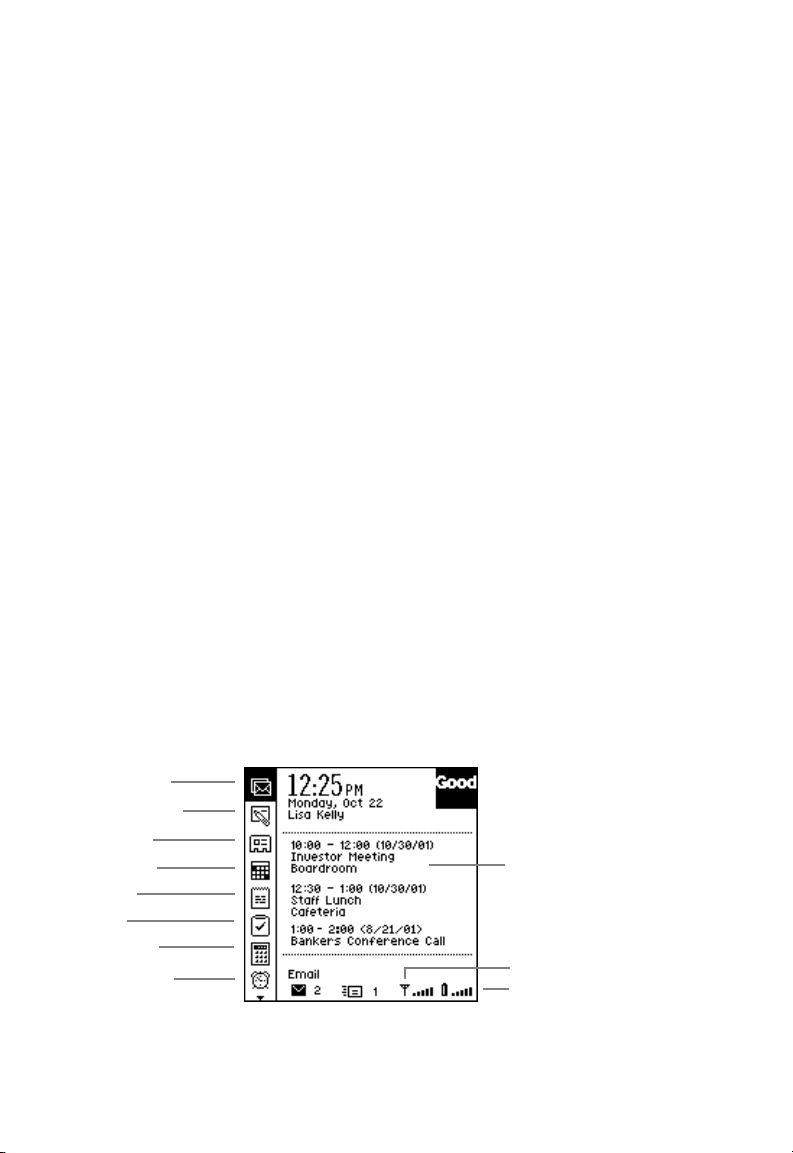
10:00 - 12:00
Investor Meeting
Boardroom
12:30 - 1:00
Staff Lunch
1:00 - 2:00
Personnel Policies
Indicates 1 email message is
being sent
Note: Messages you send are temporarily stored in the Outbox
folder on your handheld. Once a message is sent, a copy is stored
in the Sent Items folder.
12 GoodLink User’s Guide
Checking the Message
Checking the Message
After a few moments, you should receive a notification indicating a
new message has arrived.
Arrow indicates the handheld is
receiving information.
10:00 - 12:00
Investor Meeting
Boardroom
12:30 - 1:00
Staff Lunch
1:00 - 2:00
Personnel Policies
Indicates 1 new email
message has arrived
1. Click the Inbox icon .
Your email Inbox appears. The email message you CC’d to
yourself should be listed.
A copy of the message
you sent
To open the message,
click the message. Then
choose Open from the
menu.
GoodLink User’s Guide 13

Tutorial: Sending an Email Message
2.
To open the message, select the message and click. Then choose
Open from the menu.
When you’ve finished viewing the message, press Escape (or
Backspace).
3. Open the Inbox on your Outlook account. You should see the
same email message as on your handheld.
4. Delete the message from your Outlook account.
After a few moments, information on your handheld is
automatically synchronized with your Outlook account. This
means the email message you deleted in Outlook will also be
deleted from your handheld.
When information is synching, you’ll see the following
communication arrows in the top right corner of your screen.
Indicates the handheld is sending information
Indicates the handheld is receiving information
5. Open your handheld Inbox and check to make sure the message is
gone.
Congratulations! You’ve successfully sent and received your first
email message. Now try composing and sending messages to
additional users. To learn more about Email and other GoodLink
applications, see “Using GoodLink Applications – Basics and Email”
on page 15.
14 GoodLink User’s Guide
3 Using GoodLink
GoodLink
GoodLink
Applications – Basics
and Email
This chapter gives a basic introduction to GoodLink applications and
provides details on how to use the Email application. It also includes
information on using keyboard shortcuts for all GoodLink
applications.
on a RIM 957
Email Inbox
New Message
Contacts
Calendar
Notes
Ta sk s
Games
Alarm Clock
For details on using additional GoodLink applications such as
Contacts, Calendar, Notes, and Tasks, see “Additional Applications”
on page 51.
GoodLink User’s Guide 15
applications
on a RIM 950
Rotate the trackwheel
to see more icons.
Radio signal strength
Battery strength
applications

Using GoodLink Applications – Basics and Email
About GoodLink Applications
GoodLink applications are automatically synchronized with your
Outlook account. Synchronization includes:
• Email messages and folders
Both message status and folder contents are synchronized. For
example:
- Messages marked read on your handheld are marked read in
your Outlook account.
- New messages sent to your Outlook Inbox are automatically
sent to your handheld.
- Messages you delete from the Inbox on your handheld are also
deleted from the Inbox on your Outlook account.
- Email folders you add, delete, or rearrange in your Outlook
account also appear on your handheld.
For more information, on email synchronization, see “Using Email
Folders” on page 37.
• Contacts
All personal contacts are synchronized. Global contacts are not.
• Calendar
Both calendar appointments and meeting requests are
synchronized. You can create, accept, or decline meeting requests
from your handheld.
• Ta sks
Tasks are synchronized. Recurring events in your Outlook account
appear as individual events on the handheld.
• Notes
Notes are synchronized. Up to 4K of text per note is included.
You do not need a cradle or the desktop software installed on your
computer to synchronize. Synchronization happens automatically
whenever the handheld radio is on.
16 GoodLink User’s Guide
Basics
Basics
This section describes some basic procedures you can use to select
items on the screen, type text, and navigate. Information includes:
• Opening an application
• Using menus
• Setting the text insertion point
• Using checkboxes
• Changing dates and times
• Returning to the home screen
• Getting help
• Turning the radio on and off
• Turning the handheld on and off
Opening an Application
Each application is represented by an icon on the home screen. To
open an icon:
1. Rotate the trackwheel until the icon is highlighted. This is called
scrolling.
2. Click the trackwheel to open the icon.
Scroll to highlight the
icon, then click.
Using Menus
Each application includes a set of menus you can use to select
commands.
GoodLink User’s Guide 17
Using GoodLink Applications – Basics and Email
To choose a command from a menu:
1. Open an application and click the trackwheel.
A menu appears at the top right corner of the screen. Menu
commands vary depending on the context of the task. For
example, if you click the trackwheel when you are composing an
email message, the following menu appears.
Menu
2. Rotate the trackwheel until the command you want to choose is
highlighted.
3. Click the trackwheel again to select the command.
Setting the Text Insertion Point
In text documents such as email messages, notes, tasks, or options, a
text cursor appears to mark the insertion point for text you type.
You can scroll through a text document by rotating the trackwheel.
As you scroll, the text cursor moves to a new line.
Text insertion point
18 GoodLink User’s Guide

Basics
To scroll horizontally through lines of text, hold down the Alt key
and rotate the trackwheel.
To scroll horizontally, hold
down the Alt key and rotate
the trackwheel.
Using Checkboxes
Handheld settings often include checkboxes you can use to turn
settings on and off.
Setting is on.
Setting is off.
To turn a setting on or off:
1. Rotate the trackwheel until the checkbox is highlighted.
2. Click the trackwheel.
A check mark appears in the box to indicate the item is selected.
3. To turn the setting off, click the trackwheel again.
The check mark disappears.
Changing Dates and Times
Dates, times, and other settings (such as Notification numbers)
appear as fields you can edit.
To change a date:
1. Scroll to select the field you want to change and click the
trackwheel.
GoodLink User’s Guide 19
Using GoodLink Applications – Basics and Email
The selection changes to an editable field. Rotate the trackwheel
until the desired value appears.
Select the field you want to
change and click.
Rotate the trackwheel until the
desired value appears.
2. Click to confirm the setting.
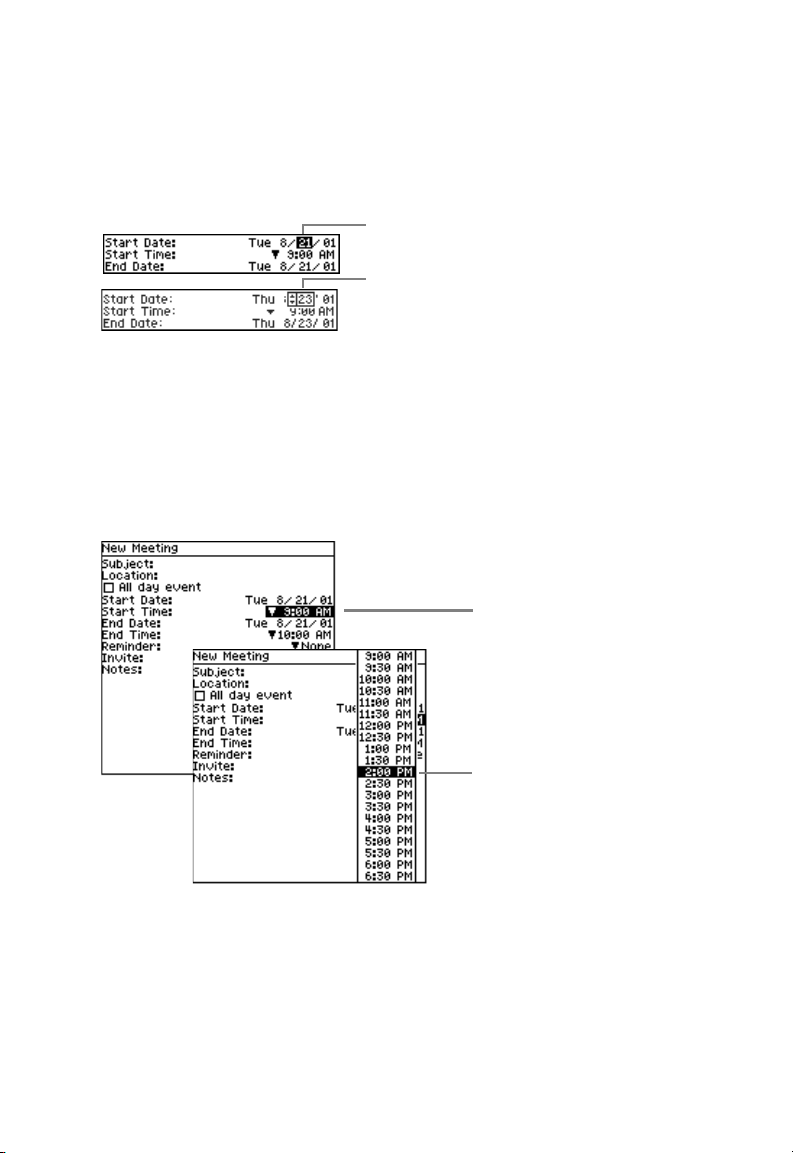
To change a time:
1. Scroll to select the time and click.
A menu of times appears.
2. Scroll to select the desired time and click.
Click to display a
menu of times.
Scroll to select a new
time. Then click.
Note: You can also enter a time by typing. For example, type 524
for 5:24 or 2 for 2:00.
20 GoodLink User’s Guide
Basics
Returning to the Home Screen
To return to a previous screen or quit from a menu:
• On the RIM 957, press the Escape button (or Backspace).
• On the RIM 950, press Backspace.
Press Escape (or Backspace) repeatedly to cycle back to the home
screen.
Getting Help
Your handheld includes context-sensitive Help you can use to learn
about applications.
To get Help:
1. Open an application.
2. Click and choose Help from the menu.
Help command
A Help screen appears with tips for using the application.
3. When you’ve finished reviewing Help, press Escape (or
Backspace) to return to the application screen.
GoodLink User’s Guide 21

Using GoodLink Applications – Basics and Email
Turning the Radio On and Off
The handheld radio connects you to the wireless network, enables
you to send and receive email, and synchronizes your applications.
You can use your handheld without the radio (for example, when
you’re on an airplane), but you must have the radio on to
synchronize. (When you first set up your handheld, the Radio is
turned on automatically.)
If the radio is on, the following indicator appears on your screen.
Make sure the signal strength indicator shows one or more bars. The
bars indicate you are in range of the wireless network.
Indicates radio signal strength (one to four bars)
When the radio is off, a icon appears on the screen.
To turn the Radio on or off:
1. On the home screen, rotate the trackwheel until the Quick Settings
icon is selected.
You might have to scroll down to see the icon.
2. Click the trackwheel.
A Quick Settings menu appears. Use this menu to turn the Radio
on and off.
Click to turn the radio off.
22 GoodLink User’s Guide

Basics
Turning the Handheld Off and On
To turn your handheld off:
1. On the home screen, click the Quick Settings icon .
The Quick Settings menu appears.
Click to turn power off.
2. Choose Turn Power Off.
On the RIM 957, you can also turn power off by holding down the
silver key.
Important: Turning the handheld off does not turn the Radio off. If
the radio must be off (for example, on an airplane), make sure you
use the Turn Radio Off command.
To turn your handheld back on:
• On the RIM 957, press the silver button.
• On the RIM 950, click the trackwheel.
GoodLink User’s Guide 23

Using GoodLink Applications – Basics and Email
Composing Text
The handheld includes a fully-functional QWERTY keyboard you can
use to compose text for email messages, notes, and so on.
Basic Keys
Key Function
letters (A B C ...) Press these keys to type lowercase letters.
Space Press the Space key to type a blank space.
In email addresses, press Space twice to enter an @
symbol. Press Space again to enter a dot (.) in an
email address. Press Space again to automatically
enter a com suffix. You can continue to press Space
to cycle though .com, .net, .gov, and .org suffixes.
Cap + letter To type upper-case letters, hold down the Cap key
then press one or more letter keys. Alternatively,
you can briefly hold down a key to capitalize a
letter. Or, press and release the Cap key then press a
letter key.
When the Cap key is active, an up arrow appears
in the top right corner of the screen.
Note: On the RIM 957, you can also press the Num
key for capital letters.
Alt Press the orange-colored key (called the Alt key) to
type the number or symbol printed in orange at the
top of a key.
When the Alt key is active, an uppercase appears
in the top right corner of the screen.
To scroll horizontally through text, hold down the
Alt key and rotate the trackwheel.
Alt + Cap To set the Cap lock, simultaneously press the Alt
and Cap keys. Press Cap again to release the lock.
Alt + Num To set the Num lock, simultaneously press the Alt
and Num keys. Press Num again to return to release
the lock.
A
24 GoodLink User’s Guide

Composing Text
Basic Keys
Key Function
Enter Press the Enter key to insert a carriage return.
You can also press Enter (instead of clicking the
trackwheel) to select a highlighted icon or object on
the screen (for example, opening the calendar).
Backspace Press the Backspace key to delete a character to the
left of the text cursor.
Del Press the Delete key to delete a character to the right
of the text cursor. (RIM 957 only)
In addition to the letters and symbols printed on the keyboard, press
the Alt and Space keys simultaneously (Alt + Space) to display a set
of symbols you can use in GoodLink applications. (The RIM 957 and
RIM 950 have slightly different symbols on this screen.)
To enter a symbol, scroll to select the
symbol. Then click the trackwheel.
Or, press a corresponding letter on the
keyboard. For example, press the A
key to enter a semicolon (;).
Note: Additional keyboard commands are available. See “Keyboard
Command Reference” on page 48.
GoodLink User’s Guide 25

Using GoodLink Applications – Basics and Email
Copying and Pasting Text
You can use the handheld clipboard to copy and paste text from one
location to another within the same application (for example, from
one email message to another) or between applications (for example,
from a task to an email message).
To copy and paste text:
1. Open an application and select the text you want to copy.
• Scroll to set the insertion point at the beginning of the text you
want to select.
Note: You can press the Alt key and scroll to set the insertion
point in the middle of a line.
• Press a Shift key (Num or Cap).
• Scroll to select the text you want to copy.
Press a Shift key and
scroll to select text.
Choose Copy.
2. Click the trackwheel and choose Copy from the menu.
The text is copied to the clipboard.
3. Navigate to a new location within the application or open a new
application.
26 GoodLink User’s Guide

4.
Set the insertion point. Then click and choose Paste from the
menu.
The text is pasted in the new location.
Set the insertion
point.
Then click and
choose Paste.
The text
appears at the
new location.
Email
Your handheld includes an Email application you can use to manage
email messages. With this application, you can:
• Send and receive email messages
• File email messages in folders
• View email attachments
• Create an email signature and append it to messages
• Search email messages based on Address, Subject, or Body content
• Block messages from specified sources
• Create and respond to meeting requests
GoodLink User’s Guide 27

Using GoodLink Applications – Basics and Email
After you set up your handheld, email messages sent to your
Outlook account also appear in your handheld Inbox. You can use the
Email application on your handheld to open, file, and/or reply to
these messages as desired.
With the exception of the Drafts folder, email messages on your
handheld are synchronized with email messages in your Outlook
account. For details, see “Using Email Folders” on page 37.
Note: If your email is set up to receive messages in a folder rather than
the Inbox, make sure that folder is set for synchronization with your
handheld. Otherwise, new email messages sent to that folder will not
appear on your handheld. For more information, see “Synching All
Incoming Messages” on page 46.
Viewing Email Messages
To view messages in your Inbox:
1. On the home screen, click the Inbox icon .
Your Inbox appears with a list of messages.
An exclamation point (!) indicates
a High priority message.
Unread message
28 GoodLink User’s Guide

Email
2.
Select the message you want to view and click.
A menu appears.
3. Choose Open from the menu.
Choose Open to view
the message.
To se e t he
complete
heading,
scroll
upward.
4. When you’ve finished reviewing the message, press Escape (or
Backspace) to return to the Inbox.
Note: To save delivery time and battery life, email messages are
delivered in 2K increments. For long messages, you may see a
[More] indicator at the bottom of the screen. To view the next part
of the message, scroll to highlight [More], then click the
trackwheel.
GoodLink User’s Guide 29

Using GoodLink Applications – Basics and Email
Tip: In addition to opening the message, you can use this menu to
manage email messages in the Inbox (or other mail folders).
Click to reply to, reply to all, or forward
the message.
Marks the message read/unread
Moves the message to a folder
Deletes the message
Creates a new message
Click to search email messages based
on Author, Subject, or Body test.
Click to view messages in another
folder.
Click to keeps a sender's messages
from being delivered to your handheld.
Responding to Email Messages
1. Open the message you want to respond to.
2. Click the trackwheel and choose Reply or Reply All.
A response screen appears. The original email text is
automatically included with the response.
Tip: When you reply to a message, you cannot delete or edit the
original email text. However, you can copy the text to a new
message then edit it as desired.
30 GoodLink User’s Guide

Email
3.
Type your response.
Type your response.
Click to send the
response.
4. When you’ve finished your response, click the trackwheel and
choose Send.
Messages you send are temporarily stored in the Outbox folder on
your handheld. Once a message is sent, a copy is stored in the Sent
Items folder.
Responding to a Meeting Request
You can use your handheld to respond to a meeting request.
Meetings you accept are automatically added to your calendar.
To respond to a meeting request:
1. Open the Inbox and select the meeting request.
GoodLink User’s Guide 31

Using GoodLink Applications – Basics and Email
2.
Click the trackwheel and choose Open from the menu.
Click to open the
request.
Meeting
request
A description of
the meeting
appears.
A description of the meeting appears.
3. Click the trackwheel and choose a response from the menu.
Choose a response.
32 GoodLink User’s Guide

Email
You can accept, decline, or tentatively accept the request.
A comments screen appears.
4. Add comments if desired. Then click the trackwheel and choose
Send to send your response.
Meetings you accept are automatically added to your calendar.
Finding Messages
You can search for email messages based on Author, Subject, or Body
text. To find messages:
1. Open the Inbox .
2. Click the trackwheel and choose Find Messages.
A Find screen appears.
3. Type the text you want to find. Then select which parts of the
message you want to search.
You can search for text in the Address, Subject, and/or Body of
messages. All email folders on your handheld are searched.
Note: Searching for text in the body of a message takes a little
longer than an Address or Subject search.
GoodLink User’s Guide 33

Using GoodLink Applications – Basics and Email
4.
Click Find.
A list of email messages appears that match search criteria you
specified.
Viewing Email Attachments
You can view the following types of email attachments on your
handheld: Microsoft Word (*.doc), Adobe Acrobat (*.pdf), Power
Point (*.pps), Excel (*.xls), WordPerfect (*.wpd), HTML (*.htm and
*.html), Rich Text (*.rtf), and plain text (*.txt) documents.
To view an attachment:
1. Open the message.
2. Scroll to select the attachment. Then click and choose View from
the menu.
Email attachments are
listed at the top of the
message.
Select the attachment
and click. Then
choose View.
34 GoodLink User’s Guide

After a few moments, the attachment appears.
Attachment size
To save delivery time, attachments are transferred to your
handheld in separate, 2K increments. If desired, you can do other
work on your handheld while the attachment is being delivered.
If you forward a message, the attachment is included
automatically.
Creating Email Messages
To create an email message:
Email
1. On the home screen, click New Message .
A blank message appears.
GoodLink User’s Guide 35

Using GoodLink Applications – Basics and Email
2.
In the To field, begin typing an email address.
As you type, a list of your contacts appears that match the text
you’ve entered.
You can type an email address directly, or select a contact from the
list.
List of contacts that match
the letters you type
Scroll upward to view
or change the message
priority.
3. Fill out the email message as desired. Use the trackwheel to scroll
between fields.
By default, email headings include To, CC, and Subject fields. To
add additional fields:
• In the heading area, click the trackwheel to display a menu.
• Click the field you want to add.
Address fields you can
add to an email heading
36 GoodLink User’s Guide

Email
Tip: To delete a name from a To, CC, or BCC field, select the field
and choose Clear from the menu. (Clear deletes the name, but not
the field.)
4. When you’ve finished composing the email message, choose Send
from the menu.
Using Email Folders
Your handheld comes with a set of folders you can use for managing
email messages. Folders include:
GoodLink Email Folders
Inbox
Outbox
Sent Items
Drafts
Deleted Items
Contains new messages
Contains messages to be sent from the
handheld. Does not contain messages to be
sent from your Outlook account.
Contains a copy of messages sent from the
handheld. Does not contain messages sent
from your Outlook account.
Contains unfinished messages you have
saved on the handheld. Does not contain
drafts saved from your Outlook account.
Contains messages you’ve deleted from the
handheld and from your Outlook account
In addition to the folders listed above, your handheld contains email
folders you’re added to your Outlook account.
GoodLink User’s Guide 37

Using GoodLink Applications – Basics and Email
Outlook Email Fold
Once your handheld is set up, adding, deleting, or rearranging email
folders in your Outlook account produces the same results on your
handheld. (You can create and rearrange folders using your Outlook
account but not your handheld.)
In your Outlook account, folder contents include:
ers
Inbox
Outbox
Sent Items
Drafts
Deleted Items
Some things to remember about email folders include:
• Only email folders stored in your Outlook account on the
Exchange server are included on your handheld. Personal email
folders (*.pst) stored on your computer’s hard disk are not
included.
Contains new messages
Contains messages to be sent from your
Outlook account and messages to be sent
from your handheld
Contains a copy of messages sent from your
Outlook account and messages sent from
your handheld
Contains unfinished messages you have
saved in Outlook. Does not contain drafts
saved on your handheld.
Contains messages you’ve deleted from the
handheld and from your Outlook account
Information in your Outlook account
is synchronized. Information in
personal folders is not.
• If you create sub-folders under Sent Items, Drafts, Deleted Items,
or Outbox on your Outlook account, these folders will not appear
on your handheld.
38 GoodLink User’s Guide

Viewing Email Folders
To view email folders:
1. On the home screen, click the Inbox icon .
The Inbox appears.
2. Click Inbox to display a list of folders.
Click to display
a list of folders.
Select a folder
and click.
The folder’s contents appear.
Email
3. Scroll to select the folder you want to view. Then click.
The contents of the folder appears.
Note: Only messages sent or received after you set up your
handheld appear in the folders.
GoodLink User’s Guide 39

Using GoodLink Applications – Basics and Email
A small plus (+) symbol on a folder indicates the folder contains
sub-folders. Click to display the sub-folders.
Click to expand or
collapse the folder
hierarchy.
Filing Email Messages
To file a message:
1. Select the message you want to file.
2. Click the trackwheel and choose Move.
Click to file a message.
40 GoodLink User’s Guide

Email
A list of folders appears.
Folders with a plus (+) symbol
have sub-folders. Click and
choose Open to display the
sub-folders.
Select the folder you want
to move the message to.
Then click and choose
Select.
3. Navigate to display the folder you want to move the message to.
Then, click the folder and choose Select.
The message appears in the folder you selected.
Deleting Email Messages
To delete an email message:
1. Select the message you want to delete.
2. Click the trackwheel and choose Delete.
Click to delete a message.
GoodLink User’s Guide 41

Using GoodLink Applications – Basics and Email
The email message moves to the Deleted Items folder.
You can also open the message and delete it by choosing Delete
from the menu.
Notes:
• You cannot delete items in the Deleted Items folder on your
handheld. To permanently remove email messages from your
handheld, delete them from the Deleted Items folder on your
Outlook account.
• To make room on your handheld, older email messages may be
deleted automatically. For more information, see “Data Storage
and Aging” on page 94.
Tips:
• To delete more than one message, hold down a Shift key (Cap or
Num) and scroll to select multiple messages. Then click and
choose Delete All.
• On the RIM 957, you can select one or more messages, then press
the Del key to delete them.
• You can retrieve messages deleted on your handheld by opening
the Deleted Items folder.
Filtering Messages
You can filter email messages by blocking messages from a specified
source.
To block email messages:
1. Open a message from the source.
42 GoodLink User’s Guide

2.
Click and choose Block Sender from the menu.
Email messages from that source are no longer sent to your
handheld. However, they will appear in your Outlook account.
Note: To display a list of email sources that are blocked, choose
Blocked Senders from the Inbox menu.
Email
Click to view a list of senders
whose messages are blocked.
To unblock a sender. Click the
sender and choose Delete from
the menu.
You can also filter email messages by setting a special notification
tune for an email contact. The tune will play when email arrives from
that contact. For more information, see “Adding Contacts” on
page 55.
GoodLink User’s Guide 43

Using GoodLink Applications – Basics and Email
Setting Email Options
Email options enable you to specify how to display email messages in
the email list and add an email signature.
Displays the time received and
sender name in email lists
Appends a signature to
email messages
To set email options:
1. Open the Inbox .
2. Click and choose Email Options from the menu.
Click to set email options.
44 GoodLink User’s Guide

Email
A set of options appears. Options include:
Display Time. Click this option to display the time received in
email lists.
Display Name. Click this option to include the sender’s name in
email lists.
Signature. Automatically appends signature text to each email
message you send. For example, an email signature might be:
Mark J. Gee
Manager, Technical Operations
Data Systems, Inc.
(510) 555-1212 x56
To add an email signature:
• Select Append Signature to Emails.
• In the Signature field, type the signature you want to add.
Select this option to append a
signature to email messages.
Type your signature here.
Tip: If you’d like to distinguish between email messages sent from
your handheld and email messages sent from your Outlook
account, you can include this information as part of your
signature. For example:
Mark J. Gee
Manager, Technical Operations
Data Systems, Inc.
(510) 555-1212 x56
Message sent via secure, wireless transmission from Good Technology.
GoodLink User’s Guide 45

Using GoodLink Applications – Basics and Email
Synching All Incoming Messages
By default, all new email messages delivered to the Inbox on your
Outlook account will appear on your handheld. However, if your
Outlook account is set up to move incoming messages to a folder
rather than the Inbox, make sure that folder is set for synchronization
with your handheld. Otherwise, new email messages sent to that
folder will not appear on the handheld—even if you manually move
them to or file them in another folder.
To synchronize messages moved to folders:
1. On the home screen, click Preferences .
A list of preferences appears.
2. Scroll to select the Email Delivery option and click the trackwheel.
A list of folders appears.
Click to add a folder
to the list.
Incoming messages in
these folders will
appear on your
handheld.
3. To add a folder to the list, click the trackwheel and choose Add
Folder from the menu.
A list of your email folders appears.
4. Navigate to select the folder you wish to add. Then click and
choose Select from the menu.
46 GoodLink User’s Guide

Email
Incoming messages moved to this folder will now appear on your
handheld.
5. When you’ve finished adding folders, press Backspace (or
Escape).
Note: You cannot add the Sent Items, Deleted Items, Outbox, or Drafts
folders to this list. These folders have pre-defined synchronization
behavior. For more information, see “Using Email Folders” on
page 37.
Viewing Digitally-Signed or Encrypted Messages
Email messages that are created in Outlook and digitally signed and
encrypted (with a personal certificate) are not sent to your handheld.
Instead, a message appears on your handheld indicating you have
received this type of message. You can use the Outlook application on
your computer to view the message.
Email messages that are digitally signed, but not encrypted (with a
personal certificate), can be viewed on your handheld. Make sure the
sender selects the following Message Options > Security Properties in
Outlook:
• Add digital signature to this message
• Send this message as clear text signed
Make sure the following option is not selected:
• Encrypt message contents and attachments
GoodLink User’s Guide 47

Using GoodLink Applications – Basics and Email
Keyboard Command Reference
The following tables include a list of keyboard shortcuts you can use
with GoodLink applications.
Home Screen Shortcuts
Key Description
E Opens the Email application
C Opens the Calendar application
O Opens the Contacts application
N Opens a new email message (New Message icon)
P Opens preferences (Preferences icon)
Q Opens the Quick Settings menu
T Selects the top (first) application icon
B Selects the bottom (last) application icon
Space Selects the next application icon
Enter Opens the selected application
Note: No home screen shortcuts are available for the Task, Notepad, Games,
Calculator, or Alarm Clock applications.
General Shortcut Rules
Key Description
Enter Opens a selected item
Del Deletes a selected item (RIM 957 only)
T Moves to the top of a screen. Does not apply to edit
screens (for example, editing an email message.)
B Moves to the bottom of a screen. Does not apply to edit
screens (for example, editing an email message.)
48 GoodLink User’s Guide

Keyboard Command Reference
Email Shortcuts
Location Key Description
Email List T Moves to the top of the email list
B Moves to the bottom of the email list
N Moves to the next day’s messages (down
the list)
P Moves to the previous day’s messages (up
the list)
Del Deletes the selected message (RIM 957 only)
Enter Opens the selected message
M Moves selected message to a folder
Email Detail View
(not Edit)
T Moves to the top of the message
B Moves to the bottom of the message
R Reply to sender
A Reply to all
F Forward message
M Moves message to a folder
N Opens the next message
P Opens the previous message
Note: No shortcuts are available for the Email Edit, Reply, or Forward
screens.
Calendar Shortcuts
Location Key Description
Calendar
Overview
GoodLink User’s Guide 49
A Displays the Agenda view
D Displays the Day view
M Displays the Month view
N Displays the next month or day
P Displays the previous month or day
G Starts the Go to... command
T Goes to today (current date)
Enter Opens the current selection. If nothing is
selected, a new appointment is created.
Space Selects the next day

Using GoodLink Applications – Basics and Email
Task Shortcuts
Location Key Description
Task List T Moves to the top of the task list
B Moves to the bottom of the task list
Del Deletes the selected task (RIM 957 only)
Enter Opens the selected task
Task Detail View
(not Edit)
T Moves to the top of the task
B Moves to the bottom of the task
Del Deletes the selected task (RIM 957 only)
Contacts Shortcuts
Location Key Description
Contacts List Enter Opens the selected contact
Del Deletes the selected contact (RIM 957 only)
Contacts Detail
View (not Edit)
Note: You can also use the Find field to locate a contact.
Del Deletes the contact (RIM 957 only)
50 GoodLink User’s Guide

4 Additional Applications
This chapter describes how to use the following GoodLink
applications:
• Contacts
• Calendar
• Ta sks
• Notes
• Calculator
• Alarm Clock
Note: The descriptions in this chapter assume you are familiar with
the information described in “Using GoodLink Applications – Basics
and Email” on page 15.
GoodLink User’s Guide 51

Additional Applications
Contacts
Your handheld includes an address book you can use to manage
contacts. Contacts in your address book are automatically
synchronized with the address book on your Outlook account,
providing you with the latest, most-accurate contact information. For
example, if you change a contact address in your Outlook account,
your handheld contact is updated also. The same if true if you add
(or delete) a contact.
Information in this section includes:
• Viewing contacts
• Finding contacts
• Editing contacts
• Adding contacts
• Setting contact options
• Using contacts in other applications
Viewing Contacts
To vie w con tacts:
1. On the home screen, click Contacts .
A list of contacts appears.
List of contacts in your
address book
52 GoodLink User’s Guide

Contacts
2.
To view detailed information about a contact, click the contact and
choose View from the menu.
Detailed information
about a contact
Finding Contacts
You can find contacts based on the first few characters of a first name
or last name. This feature is useful for working with long lists of
contacts.
1. To find a contact, start typing in the Find field at the bottom of the
screen.
Complete list of contacts
Contacts that match the
characters you typed in
the Find field
Find field
GoodLink User’s Guide 53

Additional Applications
Only contacts that match the characters you type appear in the
list. For example, if you type ma in the Find field, only contacts
whose first or last names start with ma appear.
2. Continue to type until you find the appropriate contact.
Important: If the characters you type do not match any contacts, a
[No Contacts] message appears. To redisplay contacts, press
Backspace to remove characters from the Find field.
Editing Contacts
To edit a co ntac t:
1. On the home screen, click Contacts .
A list of contacts appears.
2. Click a contact and choose Edit from the menu.
Click to edit the contact.
Click to delete the contact.
3. Choose Edit.
A list of fields appears. Type or change information in the fields as
desired. Press Enter to move the insertion point from field to field,
or scroll with the trackwheel.
4. When you’ve finished making changes, click to display a menu.
5. Choose Save.
Shortcut: On the RIM 957, if you press Escape after editing a contact,
a prompt appears asking if you want to save your changes.
54 GoodLink User’s Guide

Adding Contacts
To add a new contact to the address book:
1. On the home screen, click Contacts .
A list of contacts appears.
2. Click and choose New Contact from the menu.
A blank form appears.
Contacts
You must enter a first or last name
for the contact.
Click to set a special notification
tune when you receive email
from this contact.
Scroll to view additional fields.
3. Enter contact information as desired.
You must have a first or last name for the contact. The remaining
fields are optional. You can enter up to three email addresses for a
contact. You can also include notes about the contact.
GoodLink User’s Guide 55

Additional Applications
To move the insertion point to the next field, press Enter or use the
trackwheel to scroll.
To set a special notification tune for the contact, use the Special
Notification menu. There are six tunes to choose from. When you
receive email from this contact, the tune will play.
4. When you have finished entering contact information, click the
trackwheel and choose Save from the menu.
The new contact you added appears in the list of contacts and will
be synchronized with contacts in your Outlook account.
Click to save the contact.
The contact you added
appears in this list.
Setting Contact Options
You can use contact options to change how contacts are sorted and
whether to display the contact’s phone number or company name in
the list of contacts.
To set contact options:
1. On the home screen, click Contacts .
A list of contacts appears.
56 GoodLink User’s Guide

2.
Click and choose Contact Options from the menu.
A list of options appears.
Click to sort by first or last name.
Click to display the phone number or
company name in the contacts list.
Click this box to display a confirmation
message when you delete a contact.
Contacts
3. Select the options you want to set.
4. When you’ve finished setting options, press Escape (or Backspace)
to return to the contacts list.
Using Contacts with Other Applications
You can send email directly from the Contacts application.
1. On the home screen, click Contacts .
2. Select a contact and click. Choose New Message from the menu.
GoodLink User’s Guide 57

Additional Applications
A new email message appears with the name of the contact
filled in.
Calendar
Your handheld includes a Calendar application you can use to
manage your appointments and meetings. With this application you
can:
• View existing appointments
• Add new appointments or edit existing appointments
• View appointments by day, month, or agenda
• Invite attendees to a meeting
• Set appointment reminders
• Create and respond to meeting requests
• Set calendar options
58 GoodLink User’s Guide

Calendar
When you set up your handheld, all your calendar appointments
from the past two months and all future appointments are added to
your handheld.
On the RIM 957, upcoming
appointments appear on the
home screen.
Viewing Appointments
To view your appointments:
1. On the home screen, click the Calendar icon .
The calendar appears with the Day view showing and the current
day selected.
A list of appointments for the day appears.
Click to view the next day.
GoodLink User’s Guide 59

Additional Applications
2.
To view details about an appointment, select the appointment and
click. Then choose View from the menu.
To view appointment details,
click an appointment and
choose View.
You can view calendar appointments by Day, Month, or Agenda. Use
the Calendar menu to change views.
Click to view by month
or agenda.
Click to view the next
month.
Click to view appointments
for the day.
60 GoodLink User’s Guide

Calendar
Adding New Appointments
To add a new appointment:
1. On the home screen, click Calendar .
2. Display the Day, Month, or Agenda view. Then click and choose
New Appointment from the menu.
A new appointment screen appears.
Click to add a new
appointment or meeting.
3. Enter appointment information as desired.
Click to
schedule an
all day event
GoodLink User’s Guide 61
Choose a start and
end date/time for the
appointment.
Click to set an
appointment reminder.

Additional Applications
4.
To invite attendees, scroll to the Invite field and start typing.
As you type, a list of contacts appears that match the letters
you’ve typed.
5. Select a contact from the list.
List of contacts to
invite
You can also type in the email address of an attendee who is not in
your contacts list.
6. To invite additional people, scroll to the Invite field. Then, click
and choose Add Invite from the menu.
Click to invite additional
people.
62 GoodLink User’s Guide

Calendar
An additional Invite field appears. GoodLink will automatically
send email requests to all attendees on the list.
Note: To remove a name from the invitation list, select the name
and choose Clear from the menu. (Clear deletes the name, but not
the field.)
7. When you’ve finished entering your appointment, click the
trackwheel and choose Save from the menu.
Click to save the appointment.
The appointment is added to your calendar.
New appointment
GoodLink User’s Guide 63

Additional Applications
e
Changing Appointments
To change an appointment:
1. Open the Calendar .
2. Select the appointment you want to change and click. Then choose
Edit from the menu.
Click to edit an appointment.
Click to delete an appointment.
Setting Calendar Options
To set calendar options:
1. Open the Calendar .
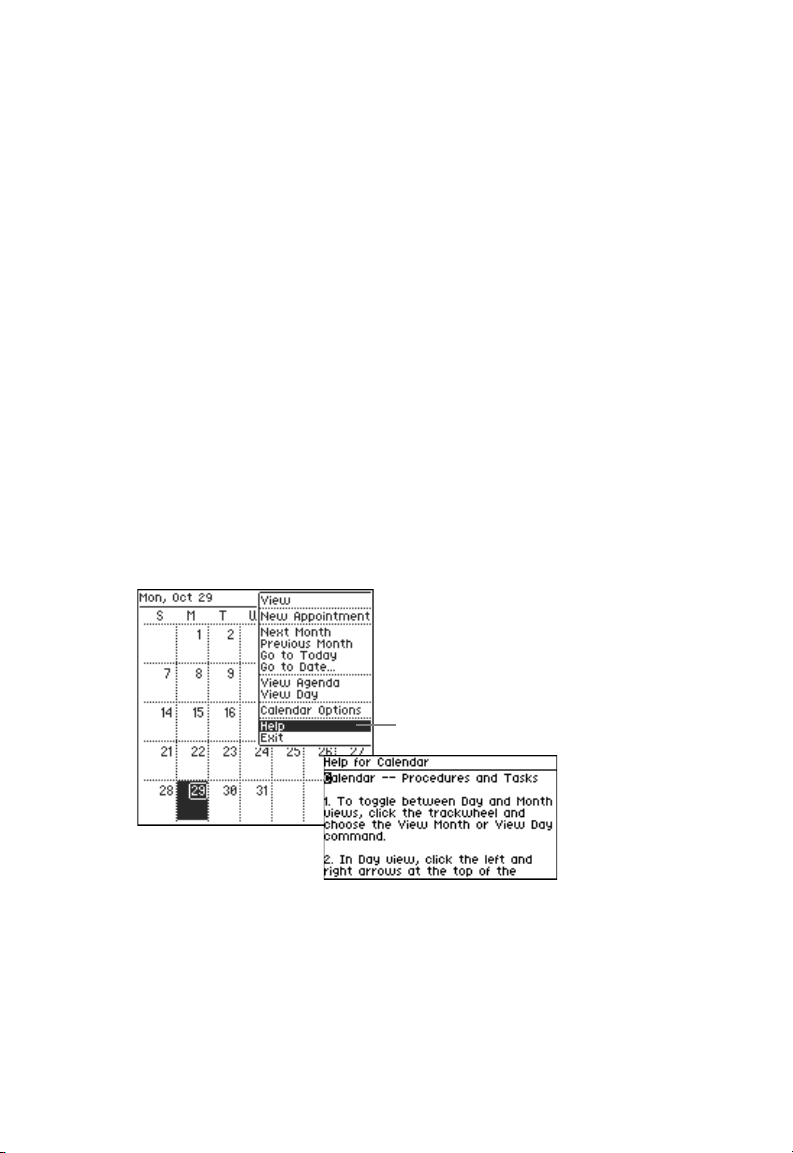
2. Click and choose Calendar Options from the menu.
Sets the start and end times that
appear on the calendar.
Sets a default time for reminders
Click to get a confirmation messag
before deleting appointments.
3. When you’ve finished setting calendar options, press Escape (or
Backspace) to return to the calendar.
64 GoodLink User’s Guide

Tas ks
Tas ks
A task is a personal or work-related errand you want to track through
completion. The Task application enables you to:
• View or edit existing tasks
• Create new tasks
• Specify task priority
• Set task reminders
Tasks are tracked on your calendar just like any other appointment or
meeting. Tasks created on your handheld are automatically
synchronized with tasks in your Outlook account. For example:
• If you add (or delete) a task in Outlook, the task is automatically
added (or deleted) on your handheld and vice versa.
• Marking a task complete on your handheld automatically marks
the task complete on Outlook and vice versa.
Viewing Tasks
To view existing tasks:
1. On the home screen, click Tasks .
A list of tasks appears.
An exclamation point (!)
indicates a High priority.
A check mark indicates
a completed task
Tasks in the task list are sorted by the same criteria you use in
your Outlook account.
Note: If you don’t have any tasks defined, a [No Tasks] message
appears.
GoodLink User’s Guide 65

Additional Applications
2.
Select a task and click. Then choose View from the menu.
A detailed description of the task appears.
3. When you’ve finished reviewing the description, press Escape (or
Backspace) to return to the task list.
Adding New Tasks
To add a new Task:
1. On the home screen, click Tasks .
A list of tasks appears.
2. Click the trackwheel and choose New Task from the menu.
Click to create a new task.
66 GoodLink User’s Guide

A task form appears.
3. Enter a task Subject.
Subject is a short name or description of the task. This description
appears in the task list.
4. Enter a task priority and status.
Tasks can have a High, Normal, or Low priority.
Task status can be Not Started, In Progress, Completed, Waiting
on Someone Else, or Deferred.
5. If desired, set a due date and/or reminder for the task.
Tas ks
Make sure Due
Date is selected.
GoodLink User’s Guide 67
Use these settings
to specify a due
date for the task.

Additional Applications
• To set a due date, select the Date field. Then enter a due date
for the task.
• To set a reminder, select the Reminder field. Then enter a
reminder date and time.
When you set a task reminder, a notification appears at the time
you specify.
6. When you’ve finished defining the task, click to display a menu.
Click to save the task.
7. Choose Save.
The Task list reappears. The new task you created is included in
this list.
The task you created
appears in this list.
68 GoodLink User’s Guide

Tas ks
Editing Tasks
To edit a task:
1. In the task list, click the task you want to edit. Then choose Edit
from the menu.
Click to edit the task.
A task description appears.
2. Change task information as desired.
3. When you’ve finished making changes, click and choose Save
from the menu.
GoodLink User’s Guide 69

Additional Applications
Shortcut: In addition to editing a task, you can use the task menu to
quickly change a task priority or mark a task complete.
Click to change task status.
Click to change a task priority.
Setting Task Options
You can use Task options to sort tasks by due date or priority. To set
Task options:
1. Click Tasks .
2. Click and choose Task Options from the menu.
A list of options appears.
Click to set task options.
Click to sort tasks by
due date or priority.
Select this option to display
a confirmation message
when you delete a task.
70 GoodLink User’s Guide

Notes
3.
Select the options you want to set.
4. When you’ve finished setting options, press Escape (or
Backspace).
Notes
Your handheld includes a Notes application you can use to jot down
questions, ideas, directions, checklists, or any other bits of
information you want to store on your handheld. Notes on your
handheld are automatically synchronized with notes in your Outlook
account.
The Notes application enables you to:
• View or edit existing notes
• Create new notes
• Copy note text to other applications
Viewing and Editing Notes
To vie w notes:
1. On the home screen, click Notes .
A list of notes appears.
If you don’t have any notes defined, a [No Notes] message
appears.
GoodLink User’s Guide 71

Additional Applications
2.
Scroll to select a note and click. Then choose View from the menu.
A detailed description of the note appears.
Click to view the note.
3. To edit the note, click and choose Edit from the menu.
When you’ve finished making changes, click and choose Save
from the menu.
72 GoodLink User’s Guide

Adding Notes
To create a new note:
1. On the home screen, click Notes .
2. Click in the note list and choose New Note from the menu.
Click to add a new note.
A new, blank note appears with an insertion point at the
beginning of the note.
3. Type some text in the note.
Insertion point
Notes
4. When you’ve finished typing, click the trackwheel.
A menu appears.
Click to save the note.
GoodLink User’s Guide 73

Additional Applications
5.
Choose Save.
The list of notes reappears.
The first line of the note
you created appears in
the list of notes.
Deleting Notes
To delete a note, click the note and choose Delete from the menu.
Click to delete the note.
Alarm Clock
GoodLink applications include an alarm clock you can use to notify
you at a specific time.
To set the alarm:
1. On the home screen, click the Alarm Clock icon .
74 GoodLink User’s Guide

Alarm Clock
The alarm screen appears.
Click to activate
the alarm.
2. To activate the alarm, make sure Alarm On is selected.
3. Set an alarm time.
To set an alarm time, click the Hour field and rotate the
trackwheel until the desired hour appears. Then click the
trackwheel again to set the hour.
Repeat this procedure for the Minute and AM/PM fields.
4. To choose a tune for the alarm, click the tune number.
There are six tunes to choose from.
Note: Use the Preferences screen to set The Alarm volume is set in
Preferences. For more information, see “Setting Handheld
Preferences” on page 81.
5. Choose a snooze duration.
You can set the Snooze Duration to 5, 10, 15, 30 minutes or 1 hour.
6. When you’ve finished setting the alarm, press Escape (or
Backspace) to return to the home screen.
When the alarm goes off, a tune plays and a Snooze message
appears.
Click Snooze to activate the Snooze setting or Dismiss to turn off
the alarm.
When you click Dismiss, the alarm remains activated and will go
off again in 24 hours. To permanently turn off the alarm, uncheck
the Alarm On setting.
GoodLink User’s Guide 75

Additional Applications
Note: You can use Notifications preferences to set the alarm
volume. For more information, see See “Setting Handheld
Preferences” on page 81.
Calculator
Your handheld includes a fully-functional calculator you can use to
perform addition, subtraction, and other common mathematical
operations.
To use the calculator:
1. On the home screen, click the Calculator icon .
The calculator screen appears with a zero (0) in the entry area at
the bottom of the screen.
In the calculator screen, you don’t have to press the Alt key to type
numbers and other mathematical symbols.
2. Type the expression you want to compute. For example, to add
two numbers: 5+1
3. Press Enter (or an equal = symbol).
The expression is evaluated and the answer appears on the screen.
Entry area. Numbers you
type appear here.
The calculator keeps a running
total of the numbers you compute.
76 GoodLink User’s Guide

Calculator
The following table lists the keys you can use to perform math
functions on the calculator.
Symbols for Math Functions
Symbol Function Example
+ Addition 3+5
- Subtraction 2-1.0
* Multiplication 5*33
/ Division 56/8
Working with a Series of Numbers
You can maintain a running total by continuing to add expressions to
the last line evaluated. For example:
To create separate calculations, click the trackwheel and choose Clear
to start a new expression.
GoodLink User’s Guide 77

Additional Applications
For example:
Choose Clear to clear
the entry area and start
a new expression.
Two separate expressions
You can also copying results and pasting them into other applications
(for example, an email message). (But, you cannot copy numbers
from other applications into the calculator.)
• To clear the entire calculator screen, click and choose Clear All
from the menu.
• To exit the calculator, click and choose Exit from the menu.
78 GoodLink User’s Guide

Games
Games
Optional games you can install on your handheld include solitaire.
To start a solitaire game:
1. Click the Card Games icon on the home screen.
A solitaire screen appears.
Complete instructions for playing solitaire are provided at
http://www.good.com.
2. When you’ve finished playing the game, press Backspace (Escape)
to exit.
GoodLink User’s Guide 79

Additional Applications
80 GoodLink User’s Guide

5 Preferences and
Maintenance
This chapter describes how to maintain your handheld. Tasks
describe in this chapter include:
• Setting handheld preferences
• Using Autotext
• Using passwords
• Charging or replacing batteries
Setting Handheld Preferences
Your handheld includes a set of preferences you can customize for
your individual use.
To view or change preferences:
• On the home screen, click Preferences .
A list of preferences appears.
GoodLink User’s Guide 81

Preferences and Maintenance
Preferences you can set include:
Option Description
About
GoodLink
Autotext Changes Autotext settings. Autotext includes
Date/Time Sets the date, time, and time zone for the handheld.
Email Delivery Specifies which email messages sent to folders on
Home Screen Sets whether calendar appointments are shown on
Notification Sets the volume level and ring type for email and
Owner Enables you to enter an owner name and other
Screen Sets the contrast between screen background and
Security Enables and disables the handheld password. Also
Status A detailed description of handheld status, such as
Contains Good Technology copyright information.
shortcuts you can use for typing text.
your Outlook account will be synchronized with your
handheld.
the home screen. Also sets the Display name (or other
information) that appears on the home screen.
alarm notification.
Note: You can use the Quick Settings menu to turn
notifications on/off or make them silent.
Notifications-Silent makes your tune notifications
vibrate instead. Notifications-On leaves your current
settings “as is.” Notifications-Off shuts down all
notifications (tune and vibrate).
information (for example, your address and phone
number). This information appears on the password
protection screen when your handheld is locked.
text. Also, sets the font size for onscreen text.
sets the time interval for a security lockout.
Free Memory and handheld Serial Number.
82 GoodLink User’s Guide

Setting Handheld Preferences
Using Autotext
Your handheld includes an Autotext feature to help you compose
text. For example, as you type, Autotext automatically types capital
letters at the beginning of sentences and translates abbreviations into
complete words.
Autotext Features
Item Description
Capitalization Words following periods (.) and a space are
automatically capitalized
Punctuation Pressing Space twice inserts a period (.) automatically
at the end of a word or sentence. The next word is
capitalized automatically.
Spelling Commonly misspelled words are corrected. For
example, thier is replaced with their.
Abbreviations Abbreviations and acronyms are replaced with
complete words. For example, mo is replaced by
month.
Variables Typing ct (for current time) automatically inserts the
time. Typing td (for today’s date) automatically inserts
the current date.
Special Symbols In email address fields, pressing Space twice
automatically inserts an @ symbol. Press Space again to
enter a dot (.) symbol. Press Space again to
automatically enter a com suffix. Continue to press
Space to cycle between .com, .net, .gov, and .org
suffixes.
Numbers In fields where numbers are expected, you can type
numbers without using the Alt key (for example, when
you enter a Contact’s phone number or use the
Calculator).
GoodLink User’s Guide 83

Preferences and Maintenance
To view Autotext settings:
1. On the home screen, click Preferences .
2. Scroll to Autotext and click.
A list of Autotext settings appears. These settings show the
substitutions Autotext makes as you type.
List of Autotext substitutions
Items in <ALLCAPS> indicate that
a variable will be substituted. For
example, <TIME> substitutes the
current time.
To change an Autotext setting:
1. Scroll to select the setting you want to change. Click and choose
Edit from the menu.
Click to edit the setting.
Click to delete the setting.
An edit screen appears.
84 GoodLink User’s Guide

Setting Handheld Preferences
2.
Type new replacement text as desired.
3. When you’ve finished making the change, click the trackwheel.
Then choose Save from the menu.
The Autotext settings are updated to show your change.
To add a new Autotext setting:
1. In the Autotext screen, click and choose New from the menu.
An edit screen appears.
2. Define a new setting. Be sure to include both the original and
replacement text.
GoodLink User’s Guide 85

Preferences and Maintenance
3.
Click the trackwheel, then choose Save from the menu.
The Autotext screen reappears with the new setting you added.
Setting you added
Passwords
You can add a password to your handheld to prevent unauthorized
use. Passwords are case sensitive and can include letters, numbers,
and symbols.
This section includes information on:
• Adding a password
• Locking and unlocking your handheld
• Disabling a password
• Changing a password
86 GoodLink User’s Guide

Passwords
Adding a Password
To add a password:
1. Open Preferences and click Security.
2. Choose Enable from the Password menu.
3. Type a password (at least four characters) for your handheld.
Then press Enter.
.
A confirmation screen appears asking you to enter the password
again.
4. Retype your password. Then press Enter.
GoodLink User’s Guide 87

Preferences and Maintenance
5.
Choose a Security Timeout for the handheld.
Time intervals range from 1 minute to 24 hours. Once a timeout is
set, your handheld is locked automatically if it’s inactive for the
time specified.
6. When you finish setting the password and timeout, press Escape
(or Backspace).
The preferences list reappears.
Once you enable the password, you must enter it whenever:
• You turn on or reset your handheld.
• The security timeout is activated.
• You lock your handheld (by choosing the Lock command on
the Quick Settings menu).
88 GoodLink User’s Guide

Passwords
Locking and Unlocking Your Handheld
To lock your handheld, click Quick Settings . Then choose Lock.
When you handheld is locked, you must enter your password to
unlock it.
To unlock the handheld,
type your password and
press Enter.
Important: If your handheld is locked, you have up to ten
consecutive tries to enter the correct password. As a security
measure, after ten unsuccessful tries, your user data is automatically
removed from the handheld. You’ll receive a warning message before
this happens. If user data is removed, you’ll need to set up your
handheld again to use it.
Tip: Use the Preferences > Owner setting to enter information that
appears on the screen when your handheld is locked. This can
include your full name, address, and contact information.
GoodLink User’s Guide 89

Preferences and Maintenance
Disabling a Password
To disable the password:
1. Open Preferences and click Security.
2. To access the security settings, enter your password and click Ok.
3. Choose Disable from the password menu.
Changing a Password
To change the password:
1. Open Preferences and click Security.
2. To access security settings, type your current password and press
Enter.
3. Choose Enable from the password menu.
4. Type a new password (at least four characters) and press Enter.
Enter the password again to confirm the change.
90 GoodLink User’s Guide

Changing the Time Zone
Changing the Time Zone
The time and date on your handheld is set automatically from your
Outlook account. However, when you’re traveling, you may wish to
change the time zone on your handheld to reflect local time.
To change the time zone:
1. Open Preferences and click Date/Time.
2. Select the time zone and click.
Time zones are defined
relative to Greenwich
Mean Time (GMT).
Rotate the trackwheel to scroll through a list of time zones.
3. When the correct time zone appears, click the trackwheel.
Battery Maintenance
The battery indicator on the home screen shows battery strength for
your handheld.
Battery strength is high.
Battery strength is low.
GoodLink User’s Guide 91

Preferences and Maintenance
Tip: Some things you can do to maximize battery life include:
• Use email filters to block messages from non-critical sources.
• Change notifications to vibrate rather than tone. It requires less
power.
• Turn off the handheld radio when traveling on airplanes or other
out-of-range situations.
• Where possible, use multiple recipients for email messages rather
then sending the message more than once.
Replacing a Battery on the RIM 950
When the battery indicator is low on the RIM 950, you’ll need to
replace the battery. The RIM 950 uses standard AA alkaline batteries.
Battery cover
Battery lock
To replace the battery:
1. Unlock the battery cover on the back of the handheld.
2. Lift off the cover and remove the battery.
3. Insert a new battery.
If the battery is not inserted properly, the handheld vibrates and
beeps.
4. Replace the battery cover and lock it.
92 GoodLink User’s Guide
 Loading...