

Page 1

QUICK START GUIDE
A18 GREY SQUIRREL TRAP
Page 2
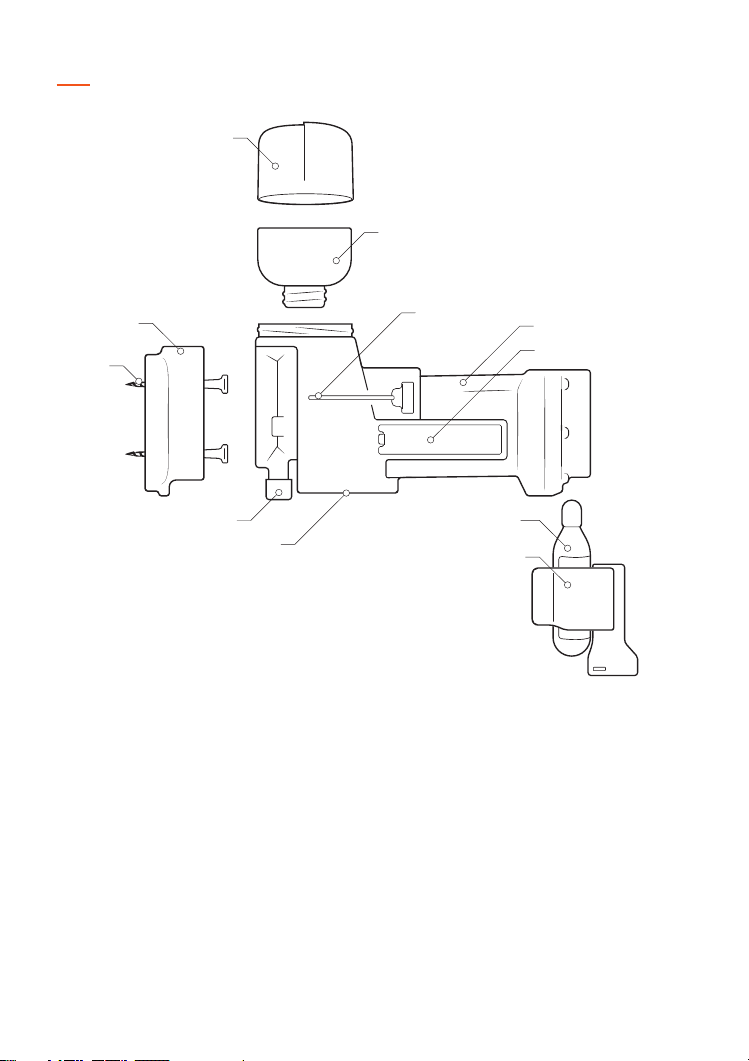
YOUR TRAP – A18 GREY SQUIRREL
SHROUD CAP
LURE BASKET
TREE MOUNT
SCREWS
BLACK TABS
SHROUD ENTRANCE
YOUR CONSTANT CONTROL SYSTEM
CONGRATULATIONS! You are now the owner of
the world’s most advanced pest control technology.
Goodnature’s self-resetting trapping system is designed
so that your trap waits for the pest to activate it,
instead of waiting for you to clear and lure it after each
strike. We call this a constant control system – one that
knocks down the existing grey squirrel population and
is always available to manage the inevitable reinvasion.
Powered using compressed CO² gas, Goodnature
technology combines superb design engineering
principles and behavioural science with the highest
manufacturing standards to deliver a trap that will kill
up to 18 times per canister – the A18 Grey Squirrel Trap.
LEAF TRIGGER
CO² CANISTER
DIGITAL STRIKE
COUNTER
Our lures are scientifically developed to be long
life, ensuring optimal field performance for minimal
maintenance eort. Because they are toxin-free
there is no risk of secondary poisoning to nontarget species such as wildlife, pets, livestock and
working animals. This toxin-free feature in
conjunction with the strike mechanism gives the
Goodnature A18 its certified A-Class humane status.
This quick start guide has been developed to help you
get the best results you can and we hope you enjoy it,
furthermore we appreciate any feedback you’d like to
give us via our website – www.goodnaturetraps.co.uk
Happy trapping!
TRAP BODY
STRIKER
Page 3
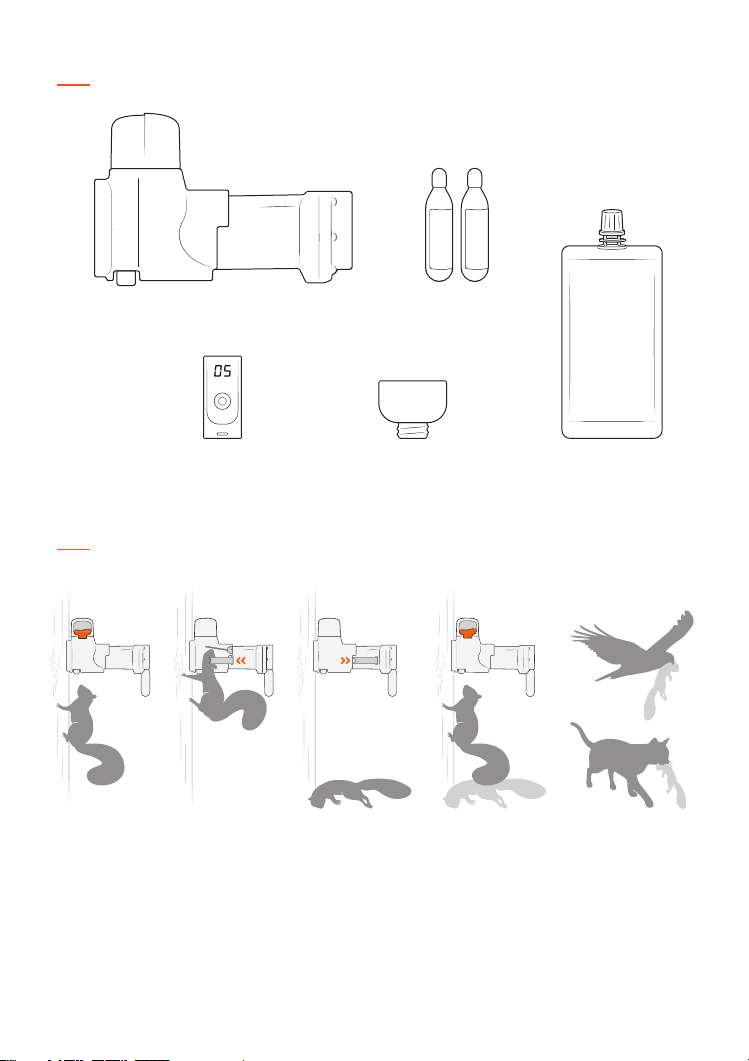
WHAT'S IN THE BOX
A18 GREY SQUIRREL TRAP
2 x CO
CANISTERS
²
DIGTIAL STRIKE COUNTER
HOW IT WORKS
SNIFF SNIFF
Targeted long life
lure attracts squirrels
into the trap.
KAPOW!
Squirrels move the
trigger to get to the
lure, firing the trap.
LURE BASKET 250 g LURE POUCH
AUTO-RESET
The trap clears and
resets immediately
after an A-Class
humane kill.
SNIFF SNIFF...
The long life lure
continues to attract
squirrels for constant
control.
SCAVENGED
Dierent species
scavenge the dead
carcasses from
below the trap.
Page 4
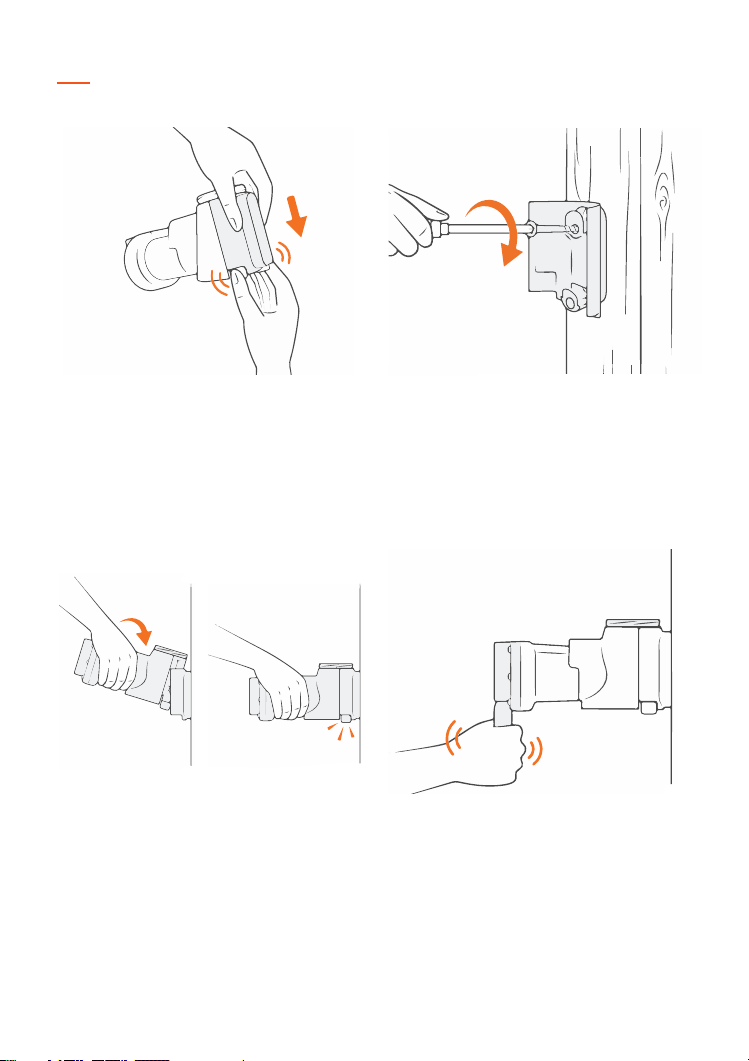
INSTALLING YOUR TRAP
1. SEPARATE THE TREE MOUNT FROM THE
TRAP BODY
Using your forefinger and thumb, press the Black Tabs
inwards and ease the orange Tree Mount along and o
the Trap Body.
3. ATTACH THE TRAP BODY TO THE
TREE MOUNT
Tilt the Trap Body backwards slightly and lower it onto
the top locking tab of the Tree Mount. As you press
downwards the Trap Body will be guided in toward the
Tree Mount and lock in with a click.
2. ATTACH THE TREE MOUNT
Using a screwdriver, screw in the orange Tree Mount
waist–height above the ground onto a straight tree or
post with clear footing. Do not overtighten.
4. POWER/PRESSURISE THE TRAP
Take the CO² Canister, remove the black cap
and be careful to keep the screw thread clean and
free of debris. Screw in the canister until firm.
Hand tighten only.
Page 5
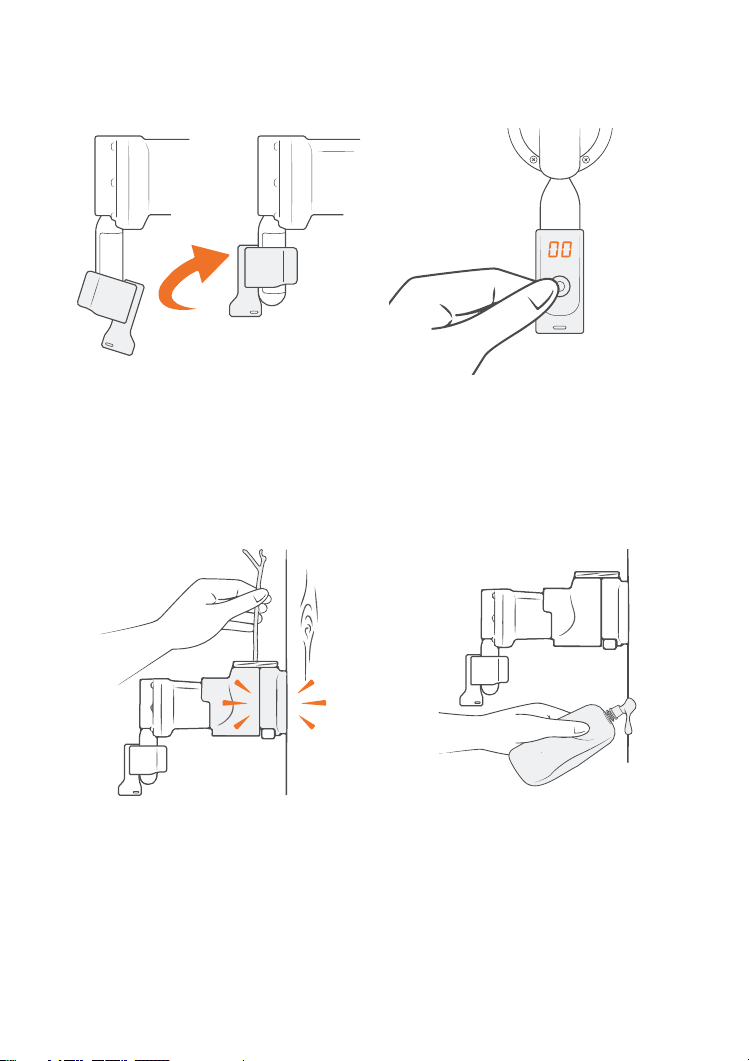
5. ATTACH THE DIGITAL STRIKE COUNTER
Wet the inside of the Counter’s rubber strap for
lubrication. Rotate the Counter anticlockwise as you
ease it up the canister. The Counter display must
face directly away from the tree.
6. ZERO THE COUNTER
Zero the Counter by pressing the button and holding it
down until the display shows ‘00’. The Counter goes to
sleep a few seconds after the button is released.
7. TEST-FIRE YOUR TRAP
To test fire your trap, reach a pen or twig down through
the top of the trap and push down on the Leaf Trigger
(steel wand). The Striker will discharge with a bang
and then retract. Keep your hands clear of the Shroud
Entrance and always treat the trap as live.
8. PRE-FEED THE TREE
Squeeze out a small amount of lure from the 250 g Lure
Pouch and wipe it beneath the trap as pre-feed. This
greatly enhances trapping success through attraction.
Page 6
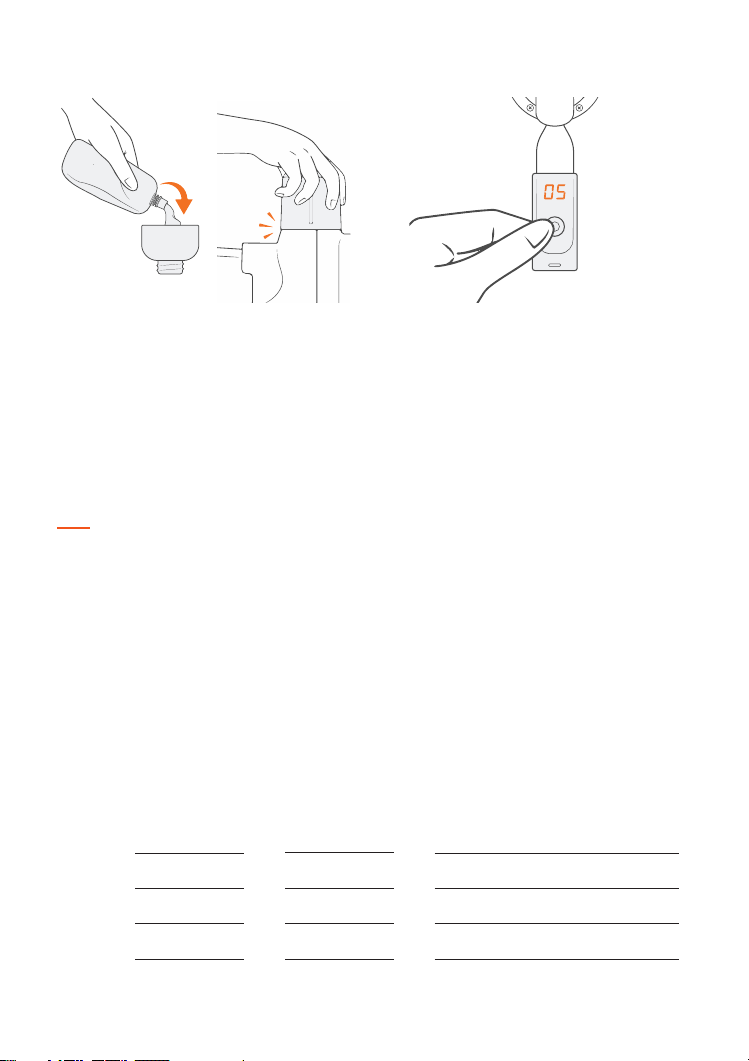
9. LURE THE TRAP AND REPLACE THE
SHROUD CAP
After you have pre-fed the tree, squeeze out a grape
sized dollop of lure into the Lure Basket, making sure
lure is at the mouth of the basket. Screw the Lure
Basket into the top of the trap, then screw on the
Shroud Cap.
MAINTAINING YOUR TRAP
10. CHECKING THE COUNTER
To check the tally on the Counter, quickly press
and release the button. The display will show the
number killed. Pressing and holding the button
down zeroes the Counter.
REFRESH THE LURE MONTHLY
While our lures are long life, they will eventually crust
over or diminish in their scent when exposed to air.
Once a month, remove and discard the spent lure from
the basket and repeat steps 9 and 10 above.
Remember, any quality, humane pest control device
is only as eective as the quality of the lure used to
attract the pest. It is the lure that motivates the target
pest to enter and activate the trap.
6TH Month
Replacement
06/09
E.g.
Date
Installed
06/03
Trap 1
Trap 2
Trap 3
REPLACE THE GAS EVERY 6 MONTHS
You must change the gas canister every 6 months
regardless of how many kills you’ve sighted or if your
counter displays 18 strikes within 6 months.
Use the table below, put a note in your calender or set
an alarm on your phone to keep a record so you know
when you need to replace your gas.
Trap
Location
Back of Garden Shed
Page 7
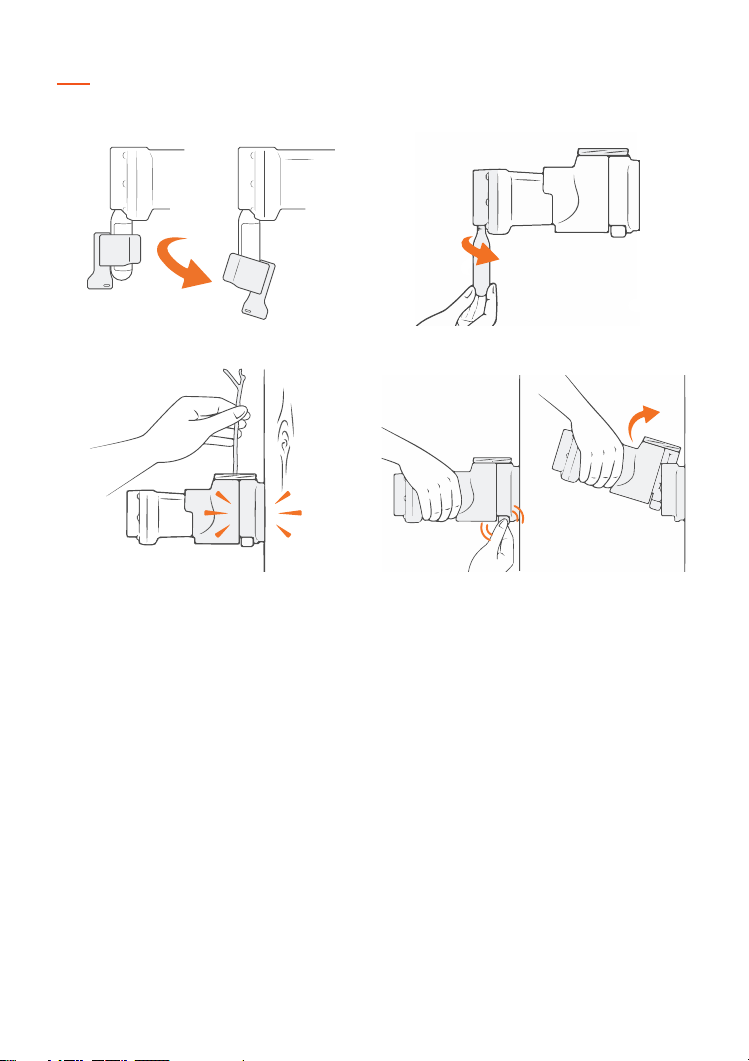
MOVING YOUR TRAP
1. DE-COUPLE
3. DE-PRESSURISE
CONSTANT CONTROL
Rather than move your traps, it is better to add to the
trapping network and increase your pest free area.
If however, you need to move your trap or have found a
better location for it, then it is very important that you
follow the instructions below.
Goodnature develops products for the constant control
of invasive pests. This is achieved by establishing a
permanent network of traps to knock down target
populations and then be ready for the inevitable
reinvasion. Build your network.
HOW TO DO IT SAFELY
To move the trap, first de-couple the Counter and
then de-gas the trap by unscrewing the current CO²
canister from the trap. You may experience the noise of
the remaining gas in the canister escaping, which may
cause the canister to freeze rapidly.
2. DE-GAS
4. DETACH
WARNING:
Although the CO² Canister has been removed the trap
may still be live (pressurised) with one charge remaining
in its chamber. To de-pressurise the trap, firstly remove
the Shroud Cap and unscrew the Lure Basket. Fire the
remaining charge in the trap by reaching a stick down
through the top and pushing down on the Leaf Trigger
(steel wand). The Striker will discharge with a bang.
Always treat the trap as live until you have de-gassed
and de-pressurised it. If the trap doesn’t fire then it has
run out of gas at some earlier point.
With the trap de-pressurised, your trap is now safe
to detach from the tree. Place your palm beneath the
Shroud Entrance and using your thumb and forefinger,
squeeze the Black Tabs and with upward pressure pull
the trap up and o the Tree Mount.
Always keep fingers clear of the Shroud Entrance.
Page 8

TECHNICAL SUPPORT
FAQ’S, WARNINGS AND WARRANTY’S
www.goodnaturetraps.co.uk
 Loading...