

Page 1
XB6CDG
XB7CDGIP_UserGuide Rev2.indd 1 23/11/2009 10:03:52
Portable CD Karaoke System
User Guide
IMPORTANT: Please read all instructions carefully before use and keep for future reference
Page 2
Introduction
XB7CDGIP_UserGuide Rev2.indd 2 10:04:14
Thank you for choosing this Goodmans Portable CD Karaoke System.
Not only can you and your friends sing along to all your favourite songs,
you can also view the song lyrics on your TV screen.
It’s really simple to use: yet full of features with a compact design. After just a few
simple instructions, you will become an expert. Before you attempt to use your
Karaoke System, please read this User Guide thoroughly to familiarise yourself with
all the features available and the sections of the User Guide that describe their
operation.
Throughout this User Guide, the Portable CD Karaoke System will be referred to as
the Karaoke System.
Safety is important
Use of any electrical equipment should be undertaken with care. Please read the
safety section on page 16 before using your Karaoke System. This appliance is
for household use only.
GRAPHICS
CD+G disc, also known as CD+
Graphics are audio discs which contain
backing tracks and lyrics. These are
specifically designed for Karaoke
Systems which are designed to display
on-screen lyrics.
2
Page 3

Introduction
Key features
Karaoke with CD+G discs -
songs using CD+G discs. The Karaoke System can be connected to a TV to display onscreen lyrics. Your voice and the backing tracks will be played through either the built
in speaker, or a connected Sound System/TV.
Lyrics on TV Screen - Displays the lyrics with the tempo of music when playing
CD+G discs.
Auto Voice Control - Lets you replace the original singer's voice with your own voice
when any prerecorded, multiplex karaoke disc is played. To activate, just rotate the
MIC VOLUME DIAL to a comfortable listening level, and the AVC DIAL for the best
balance between playback and microphone levels.
Echo Control - Lets you add an echo to enrich your voice for a concert hall effect.
You and your friends can sing along to all your favourite
3
Page 4

XB7CDGIP_UserGuide Rev2.indd 2 10:04:14
What’s in the box?
Audio/Video RCA Cable
Quick Start Guide
Power Cable
Karaoke System
Scart Adaptor
Microphone
User Guide
Contents
01
Your Karaoke System ................5
02
Getting Started ..........................6
03
Daily Use .................................. 8
04
CD+G Playback .......................10
05
Troubleshooting .......................12
4
06
Specification ...........................15
07
Warnings .................................16
08
Electrical Information ...............18
Guarantee ...............................19
09
Page 5

Front view
01Your Karaoke System
CD Door
Program Indicator
Repeat Indicator
Power Indicator
Power Switch
Repeat Button
Auto Voice Control
Skip Button
Stop Button
Microphone 1 Input
Volume Dial
Rear view
Carry Handle
Video Output
(Composite)
VIDEO OUT AUDIO OUT
Play/Pause Indicator
Open/Close Button
LED Display
Microphone Volume
Dial
Program Button
Echo Dial
Skip Button
Play/Pause Button
Microphone 2 Input
Audio Output
LR
Battery Compartment
AC~
AC Power Input
5
Page 6
XB7CDGIP_UserGuide Rev2.indd 2 10:04:14
02
Getting started
1
2
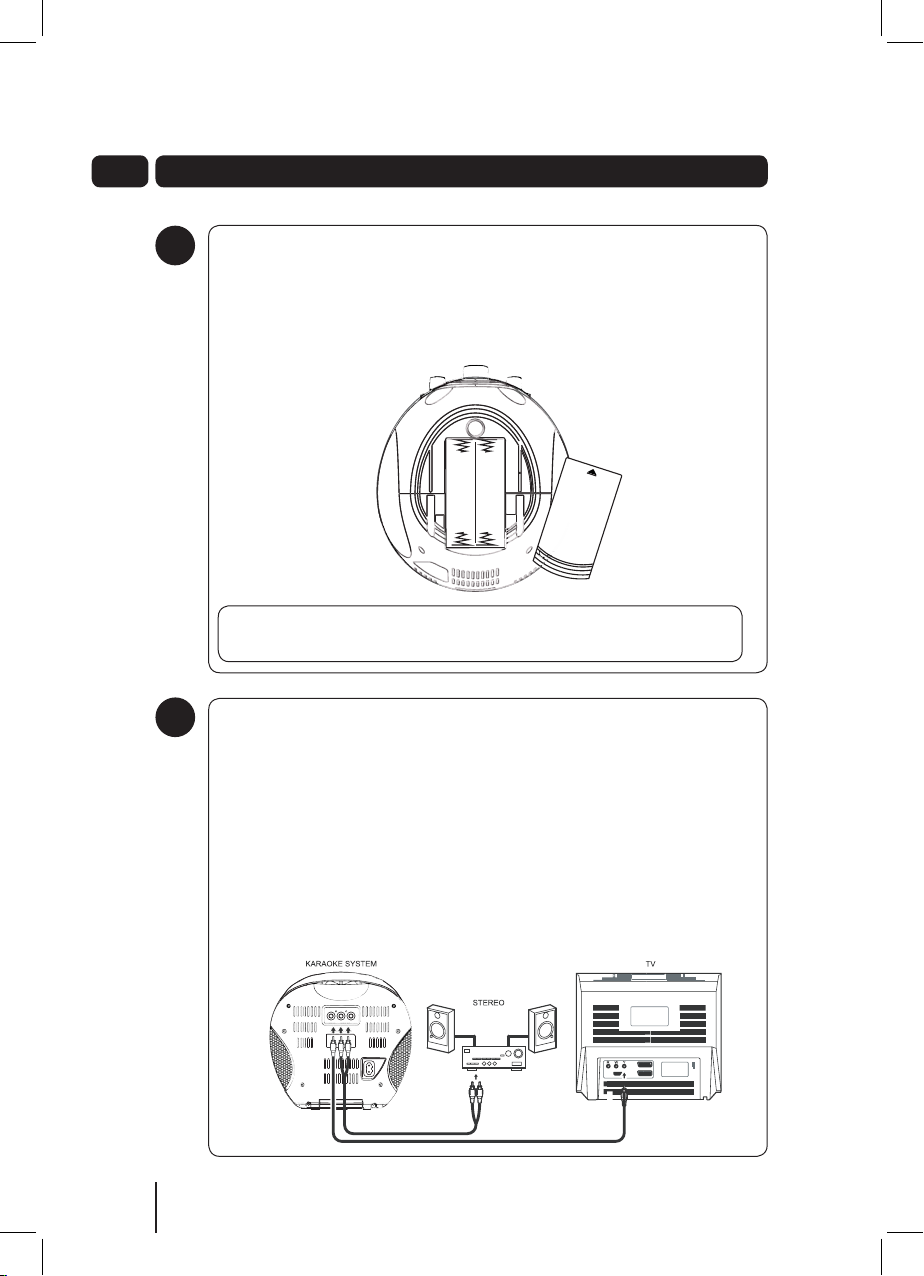
Power the Karaoke System using batteries
The Karaoke System can be powered using eight ‘C’ type batteries.
Insert eight batteries (not supplied) into the Battery Compartment at the
bottom of the Karaoke System observing the polarity markings on the
base of the Battery Compartment.
O
P
E
N
DON’T FORGET! When replacing the batteries make sure that you
use the same size and type.
Connecting to external devices
The Karaoke System can be connected to either the TV or a Stereo Sound
System using the supplied RCA Cables.
To connect the Karaoke System to a TV only, follow the instructions
provided in the Quick Start Guide.
To connect the Karaoke System to a TV and Stereo Sound System:
Use the Yellow RCA Cable to connect the TV and Karaoke System.
Use the Red and White RCA Cable to connect the Stereo Sound System
and Karaoke System.
LR
VIDEO OUT AUDIO OUT
AC~
6
Page 7
Getting started
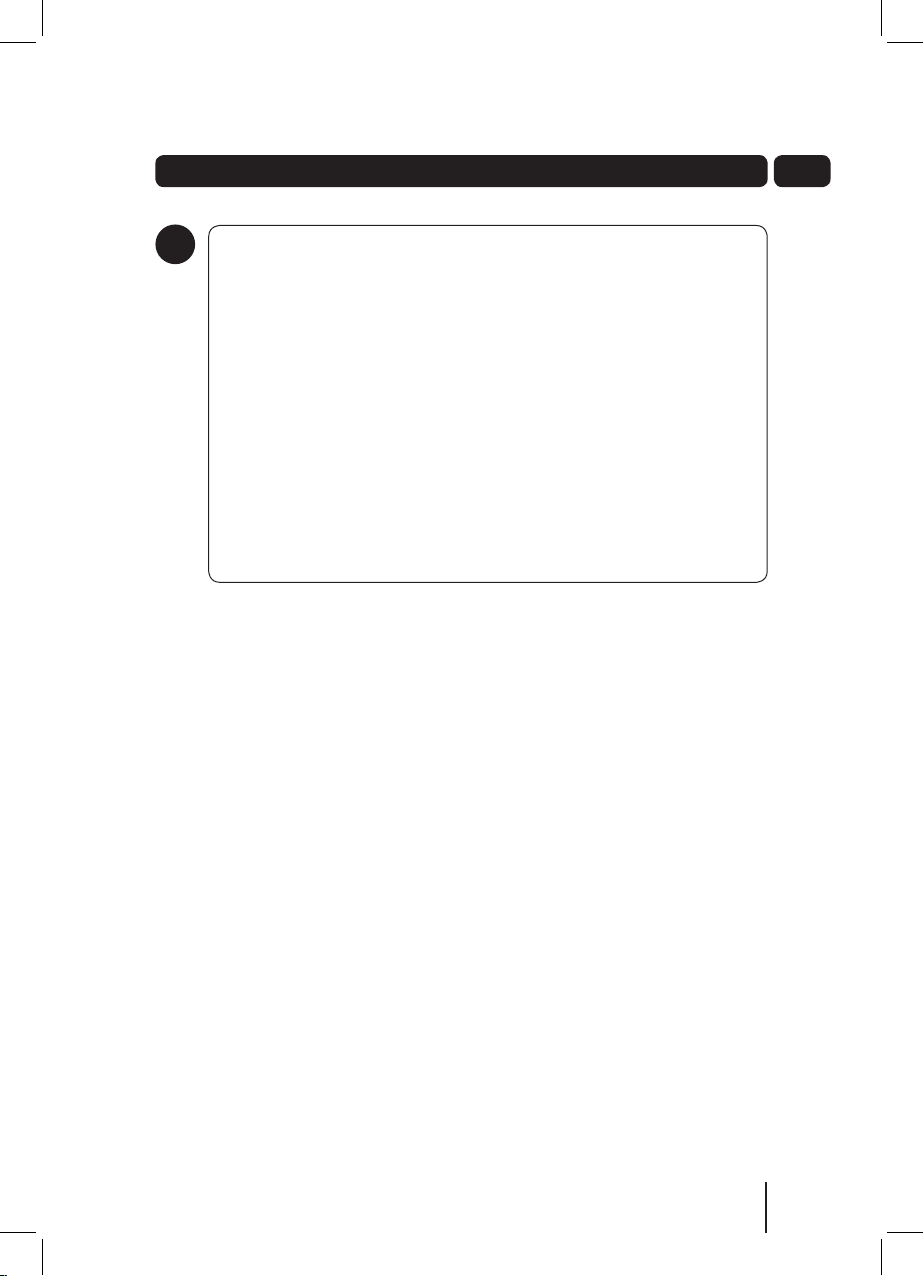
Setting up the Karaoke System
3
Plug the Microphone Jack into the MIC 1 Socket on the front of the
Karaoke System.
Connect the Karaoke System to your TV using the Supplied RCA Cables
(use the supplied SCART adaptor if required).
Turn your TV ON and select the AV source.
Connect the Power Cable to the Power Socket on the rear of the Karaoke
System.
Insert the Power Cable Plug into the wall socket and switch the socket
On.
Load a CD+G disc onto the central spindle.
Rotate the POWER switch to turn the Karaoke System On.
02
7
Page 8
4
03
Daily use
Switching ON
To turn the Karaoke System On,
Rotate the POWER switch to the
ON position.
To turn the Karaoke System Off,
Rotate the POWER switch to the
OFF position.
Using the microphone
Up to two Microphones can be used
with the Karaoke System.
DON’T FORGET! Only one
microphone is supplied with the
Karaoke System.
Insert the Microphone Jack into the
MIC 1 or MIC 2 socket on the front
of the Karaoke System.
Slide the Microphone Power Switch
to the ON position. The microphone
is now On and ready to use.
DON’T FORGET! If the RCA Cable
is connected between the Karaoke
System and a TV, the backing track
will play through the TV speakers.
Adjusting the microphone
volume
To increase the Microphone volume,
rotate the MIC VOLUME DIAL
on the front of the Karaoke System
clockwise.
To decrease the Microphone volume,
rotate the MIC VOLUME DIAL
on the front of the Karaoke System
anticlockwise.
Adjusting the echo effect
An echo effect can be added to your
voice while you sing. The amount of
echo can be adjusted using the ECHO
DIAL.
To increase the echo, rotate the
ECHO DIAL on the front of the
Karaoke System clockwise.
To decrease the echo, rotate the
ECHO DIAL on the front of the
Karaoke System anticlockwise.
Adjusting the master volume
To increase the master volume,
rotate the MASTER VOLUME DIAL
on the front of the Karaoke System
clockwise.
To decrease the master volume,
rotate the MASTER VOLUME DIAL
on the front of the Karaoke System
anticlockwise.
8
Page 9
Daily use
Cutting Backing Vocals while
you Sing
The Karaoke System allows you to reduce
or turn off the vocals of the backing track
while you sing.
To turn off the vocals of the backing
track while you sing, rotate the
AVC DIAL on the front of the
Karaoke System clockwise.
Whenever you sing, the vocals of the
backing track will temporarily stop.
When you stop singing, the backing
vocals will be heard again.
To keep the vocals of the backing
track while you sing, rotate the
AVC DIAL on the front of the Karaoke
System anticlockwise to minimum
setting.
Whenever you sing, the volume of
backing track vocals will be reduced.
When you stop singing, the volume of
the backing vocals will return to normal.
03
DON’T FORGET! The AVC function
only works when using a
prerecorded, multiplex karaoke disc.
9
Page 10
4
04
CD+G playback
Playing CD+G discs
Loading discs
Rotate the POWER switch to the
ON position to turn on the Karaoke
System.
Press the top right hand corner of
the CD Door to open.
Insert the CD+G Disc into the CD
Compartment with the label facing
outwards.
Close the CD Door.
When closed, the Karaoke System
starts to spin the disc.
The LED Display will show the total
number of tracks on the CD+G.
Playback
Press the
playback. The backing track
will begin to play and the lyrics
will appear on the TV screen if
connected.
Press the / II button again to
pause playback. The Play/Pause
indicator will flash on the LED
Display.
Press the eht ot piks ot nottub I
next track.
DON’T FORGET! If you are on the
last track of the disc, the Karaoke
System will return to the first track.
Press the I button to skip to the
previous track.
Press the button to stop playback.
/ II button to begin
Repeat play
You can repeat a single track or all the
tracks on the CD+G disc.
Repeating a single track
To repeat a single track, press the
REPEAT button once. The Repeat
indicator on the LED Display will
begin to flash.
The track will be played continuously
until the button is pressed.
To cancel the repeat function, press
the REPEAT button continuously
until the Repeat Indicator on the LED
Display is no longer lit.
Repeating the entire CD
To repeat all tracks, press the
REPEAT button twice. The Repeat
indicator on the LED Display will be
lit.
The entire disc will be played
continuously until the button is
pressed.
To cancel the repeat function, press
the REPEAT button continuously
until the Repeat Indicator on the LED
Display is no longer lit.
Programming tracks
You can programme the Karaoke
System to play up to a total of 20
tracks in any desired order. You can
also programme the same track to
play several times within a programme
sequence.
While the Karaoke System is in
playback mode, press the button
to stop playback.
10
Page 11
CD+G playback
04
Press the PROG button. The Prog
indicator will begin to flash and the
number 1 will momentarily appear
on the LED Display. This indicates
that you can programme the first
track.
Select the first track using the
and I buttons.
Press the PROG button on the
Karaoke System. The number 2 will
momentarily appear on the LED
Display. This indicates that you can
programme the second track.
Select the second track using the
I dna I buttons.
Repeat steps 4 and 5 until all the
tracks have been programmed.
Press the / II button to begin
playback. The backing track
will begin to play and the lyrics
will appear on the TV screen if
connected.
DON’T FORGET! Playback will stop
after all the programmed tracks
have been played.
To replay the programmed tracks,
press the PROG button followed by
the / II button.
To cancel the programmed sequence
from the memory, press the
button during playback.
I
Audio CD playback
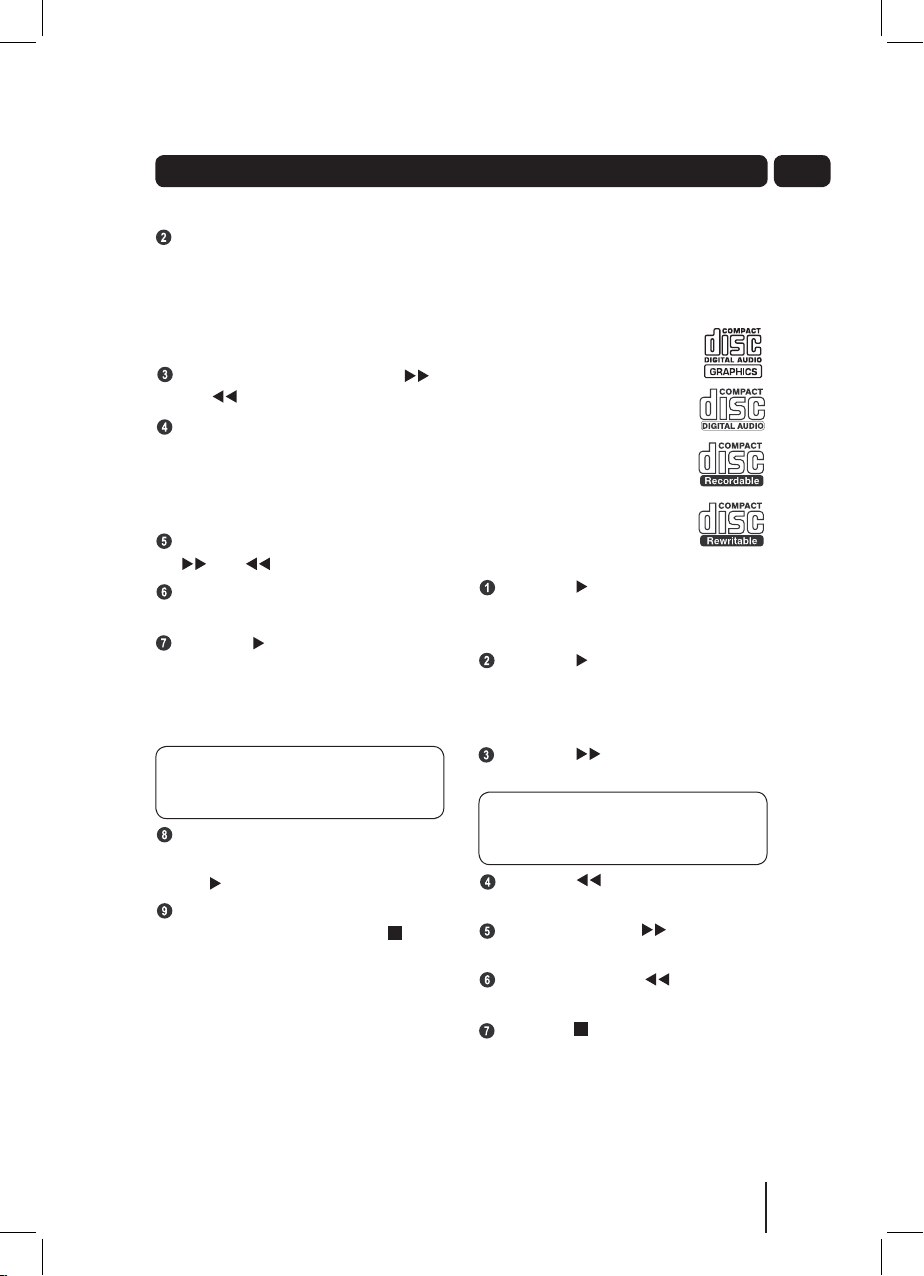
Compatible disc types
The Karaoke System supports playback
of following types of CD:
• CD+G compact Disc
• 8cm/12cm Compact Disc
Audio Discs
• 12cm Compact Disc
Recordable Discs
• 12cm Compact Disc
Re-Writable Discs
Playback
Press the
playback. The first track will begin to
play.
Press the / II button again to
pause playback. The Play/Pause
indicator will flash on the LED
Display.
Press the eht ot piks ot nottub I
next track.
DON’T FORGET! If you are on the
last track of the disc, the Karaoke
System will return to the first track.
Press the I button to skip to the
previous track.
Press and hold the ot nottub I
fast forward within the current track.
Press and hold the I button to
fast rewind the current track.
Press the button to stop playback.
/ II button to begin
11
Page 12
4
05
Troubleshooting
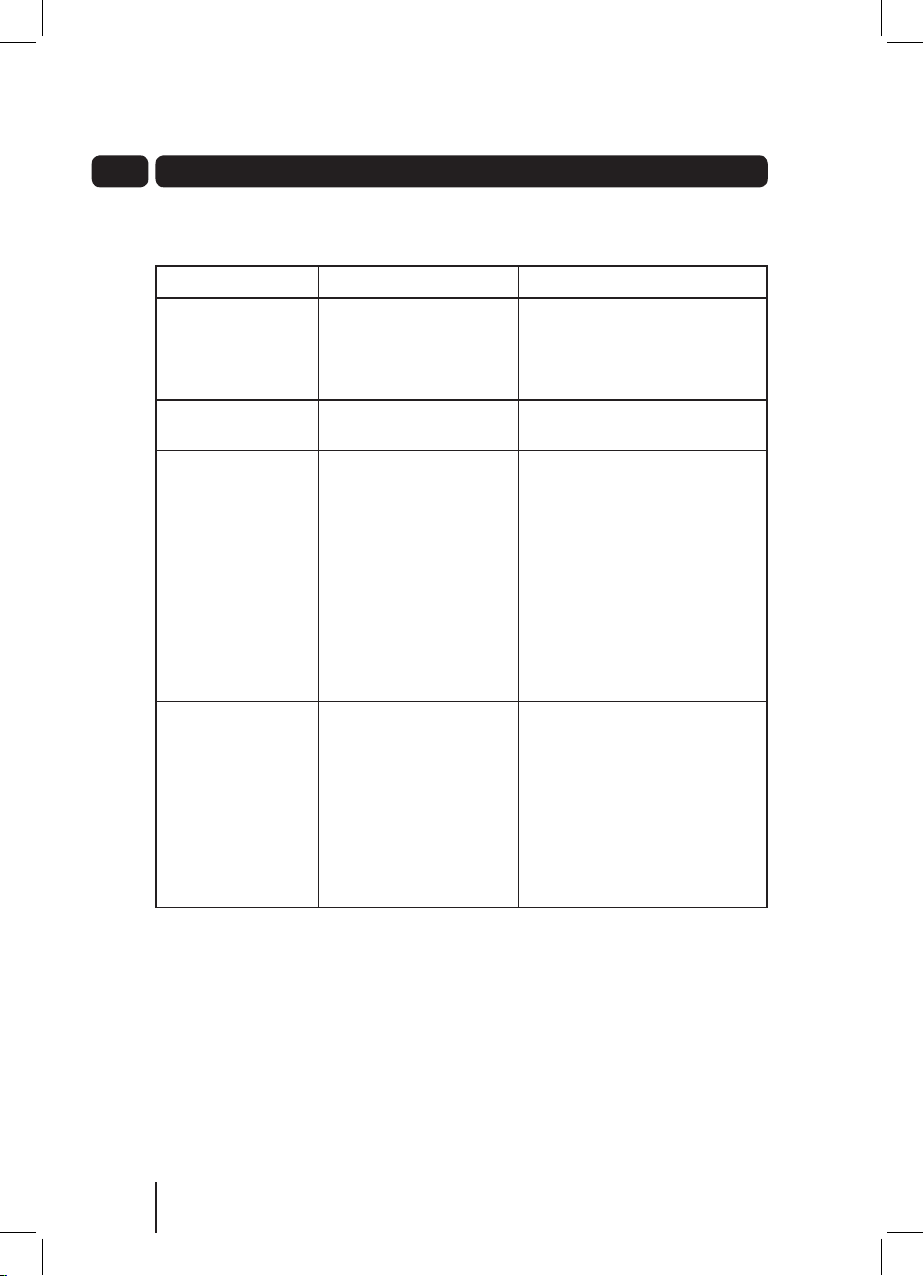
General
Problem Possible Cause What to do
No Power
No sound is heard
There is no sound
from the Karaoke
System when
playing CD+G discs
There is no sound
when singing into
the Microphone
1. The plug is not plugged
into the wall socket.
2. The wall socket is not
turned on.
1. The volume is on the
minimum setting.
1. The POWER switch is
not in the ON position.
2. The CD+G disc is
inserted incorrectly.
3. The master volume
is on the minimum
setting.
1. The Microphone is not
connected to the
Karaoke System.
2. The Microphone is not
switched On.
3. The Microphone
Volume is on the
minimum setting.
1. Ensure the plug is plugged
into the wall socket.
2. Turn on the power at the wall
socket.
1. Increase the master volume.
1. Rotate the POWER switch to
the ON position. See Picture
6 for more information in the
Quick Start Guide.
2. Insert the CD+G disc
correctly. See page 7 for
more information.
3. Increase the master volume.
1. Connect the Microphone to
the Karaoke System. See
page 7 for more information.
2. Switch on the Microphone.
3. Increase the Microphone
Volume.
12
Page 13
Troubleshooting
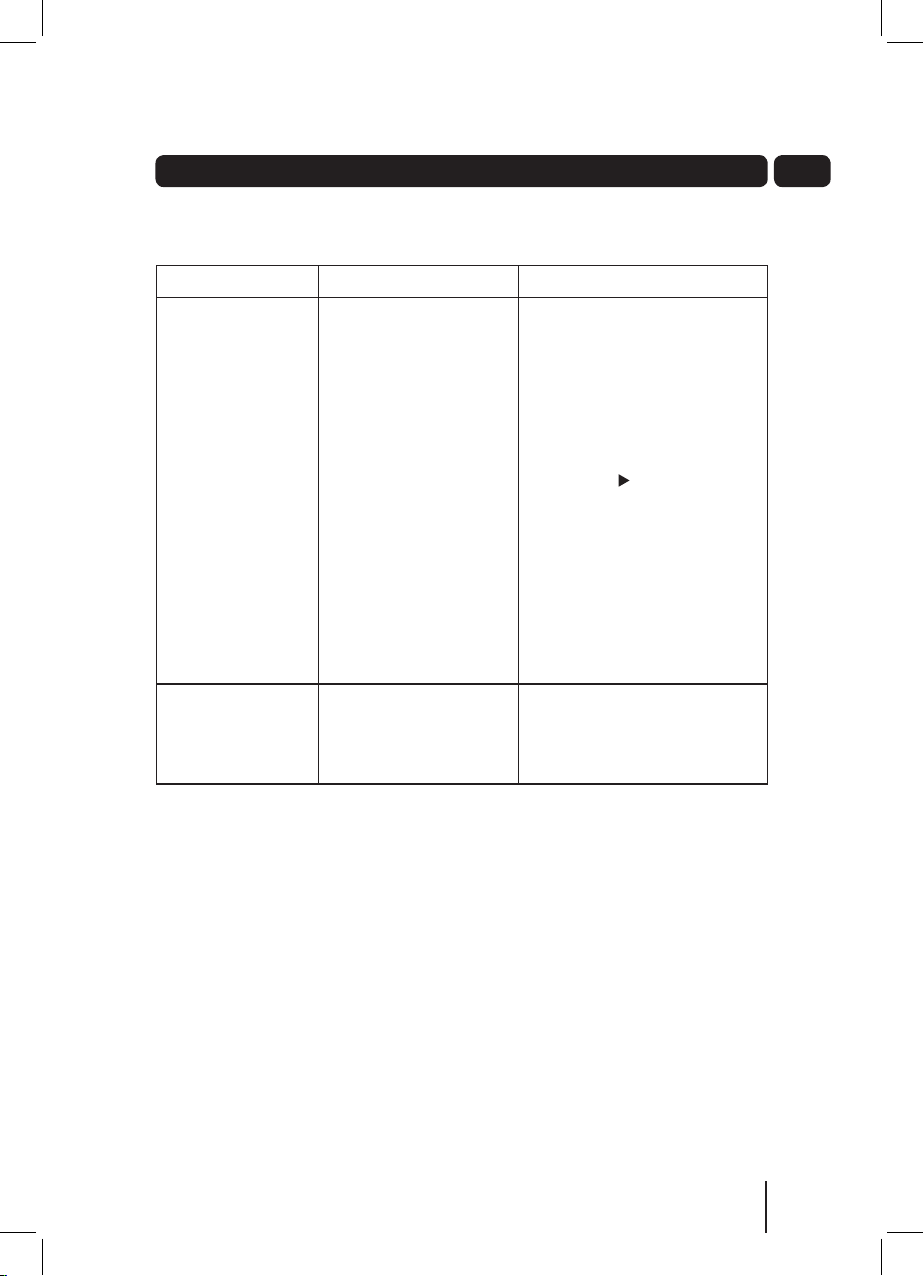
CD
Problem Possible Cause What to do
The CD does not
play
CD Sound Skips
1. The CD is incorrectly
loaded.
2. The CD is an
unsupported format.
3. The CD is paused.
4. The Karaoke System is
not playing CD or
CD+G discs.
5. The CD is dirty or
scratched.
1. The CD is dirty.
2. The CD is warped or
scratched.
1. Ensure the CD is correctly
loaded into the CD
Compartment. See p age 7 f or
more information.
2. Check the format of the CD
is supported. See page 11
for more information.
3. Press the / II button to
continue playback of the CD.
4. Rotate the POWER switch to
ON position.
5. Make sure the CD is not dirty
or scratched. If it is dirty,
clean the CD with a soft
cloth.
1. Clean the CD with a soft
cloth.
2. The CD should be replaced.
05
13
Page 14
4
05 Troubleshooting
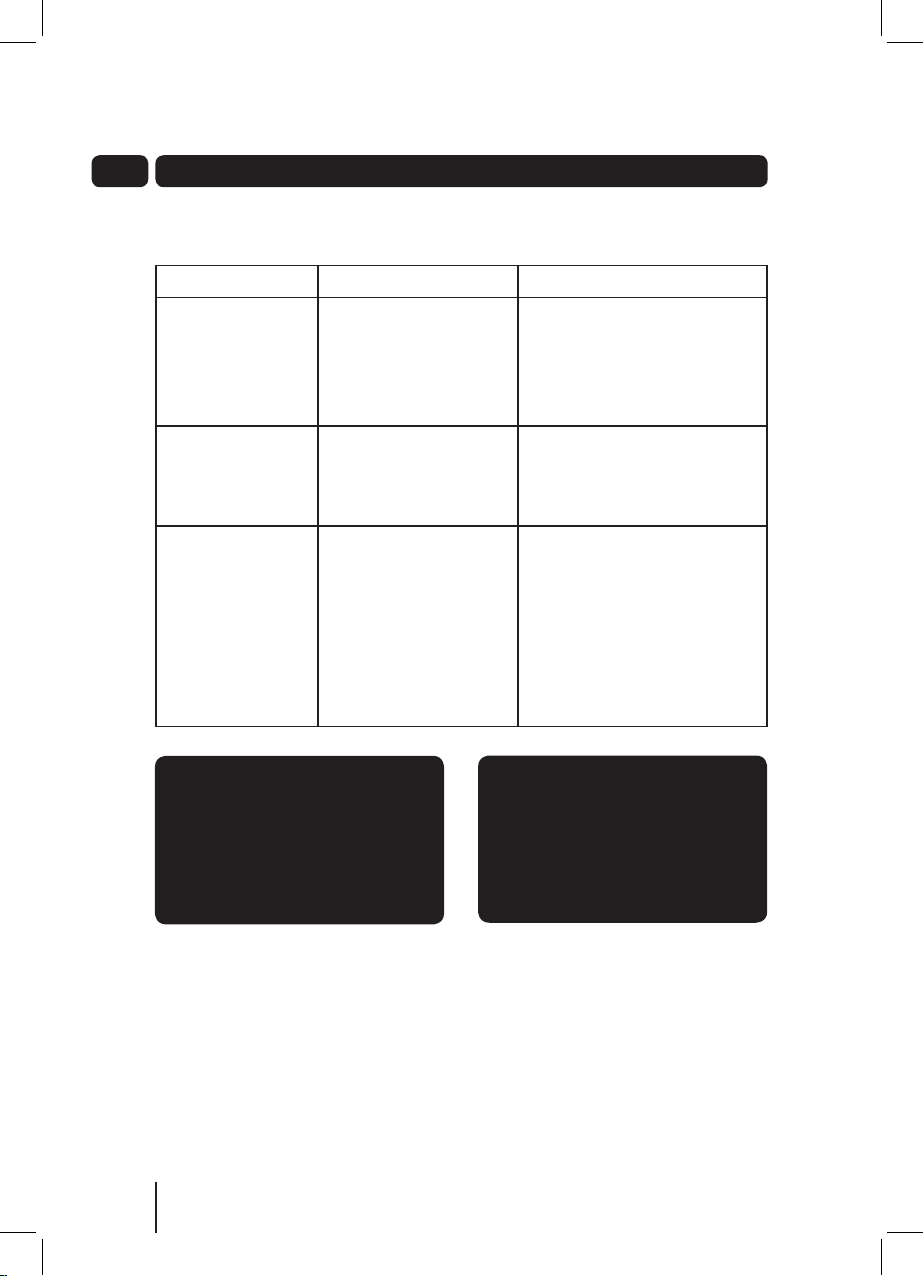
Karaoke
Problem Possible Cause What to do
Some vocals are
still present when
AUTO VOICE
CONTROL is on the
minimum setting
Feedback is heard
when singing
No song lyrics
appear on the TV
screen
1. Backup vocals are
supposed to be
included.
1. Microphone is too
close to unit or the
microphone volume
is too high.
1. Using a non-CD+G
disc.
2. Video cable is not
connected properly to
the TV.
3. AV source on your TV
is not selected.
1. This is normal, only the main
vocal(s) will be reduced.
1. Move the microphone away
from unit or decrease the
microphone volume.
1. Use a CD+G disc.
2. Connect the video cable
(Yellow) to the Karaoke
System VIDEO OUT and to
the TV VIDEO IN.
3. Turn your TV ON and select
the AV source.
Need extra help?
Don’t worry we are just at the
other end of the phone. If you are
experiencing problems using your
new product, before returning it to
the retailer, just call 0871 230 1777.
14
Need a spare part?
In the unlikely event of you needing spare parts, please contact our
spares department on: 0871 230 0790
Page 15
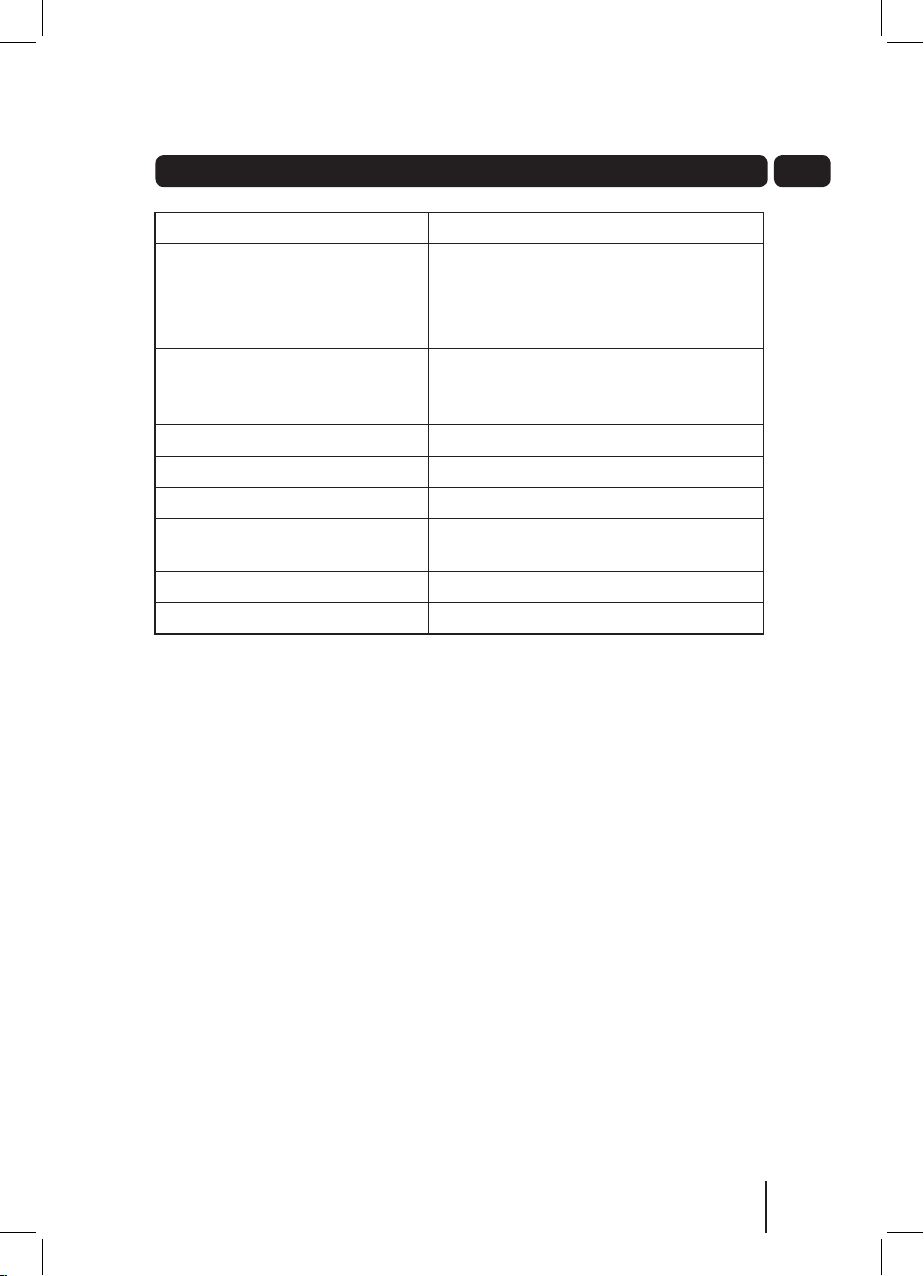
Specifications
Model Number XB6CDG
Power Supply 230V AC 50Hz
12V DC (8 x 1.5V "C" size batteries)
(not included)
Alkaline is recommended for longer life
Power Consumption:
Off Mode
Operating
Frequency Response 100 - 10,000 Hz (+/- 3db)
Power Output 1W x 2 (10% THD)
Speaker 3” 4 ohms
Microphone 60 dB 600 ohms impedance
Unit Dimensions 241 (D) x 210 (W) x 192 (H) mm
Unit Weight 1.5 kgs
0.5W
15W
with 6.3mm dynamic microphone
06
15
Page 16

4
07
Warnings
WEEE
This appliance is labelled in accordance
with European Directive 2002/96/
EG concerning used electrical and
electronic appliances (Waste Electrical
and Electronic Equipment - WEEE).
The guideline determines the framework
for the return and recycling of used
appliances.
Sound levels
Your hearing is very important to you
and to us, so please take care when
using this Karaoke System. It is strongly
recommended that you follow the listed
guidelines in order to prevent possible
damage or loss of hearing.
Establish a safe sound level
Over time your hearing will adapt to
continuous loud sounds and will give
the impression that the volume has in
fact been reduced. What seems normal
to you may in fact be harmful. To guard
against this before your hearing
adapts, set the volume to a low level.
Slowly increase the level until you
can hear comfortably and clearly
and without distortion. Damage to
your hearing is accumulative and is
irreversible. Any ringing or discomfort
in the ears indicates that the volume is
too loud.
Once you have established a
comfortable listening level, do not
increase the sound level .
General safety
This Karaoke System has been designed
and manufactured to meet European
safety standards, but like any electrical
equipment, care must be taken if you
are to obtain the best results and safety
is to be assured.
Do read these operating instructions
before you attempt to use the Karaoke
System.
Do ensure that all electrical connections
(including the mains plug, extension
leads and interconnections between
pieces of equipment) are properly made
in accordance with the manufacturer’s
instructions.
Switch off and remove the mains
plug when making or changing any
connections.
Do consult your dealer if you are ever in
doubt about the installation, operation
or safety of your Karaoke System.
Don’t continue to operate the Karaoke
System if you are ever in doubt about
it working normally, or if it is damaged
in any way. Switch it off, withdraw the
plug from the mains and consult your
dealer.
Don’t remove any fixed covers as this
may expose you to dangerous voltages.
Don’t leave the Karaoke System
switched On when it is unattended
for long periods of time, unless it is
specifically stated that it is designed for
unattended operation or has a standby
mode.
16
Page 17

Warnings
Make sure that other people in your
household are conversant with the
Karaoke System.
Don’t obstruct the ventilation vents on
the Karaoke System, for example with
curtains or soft furnishings.
Don’t allow electrical equipment to be
exposed to rain or moisture.
Store the Karaoke System in a clean,
dry environment.
Do not use any cleaning solutions on
the Karaoke System.
07
17
Page 18
4
08
Electrical information
The mains lead supplied with this Karaoke System is fitted with a BS1363/A 13 amp
plug. If it is not suitable for your supply sockets it must be removed and replaced
with an appropriate plug. If the plug becomes damaged and/or needs to be replaced
please follow the wiring instructions below. The plug removed must be disposed of
immediately. It must not be plugged into a supply socket as this will be an electrical
hazard. If the fuse needs to be replaced it must be of the same rating and ASTA
approved to BS1362. If the plug is changed, a fuse of the appropriate rating must be
fitted in the plug, adapter or at the distribution board. If the fuse in a moulded plug is
replaced, the fuse cover must be refitted before the appliance can be used.
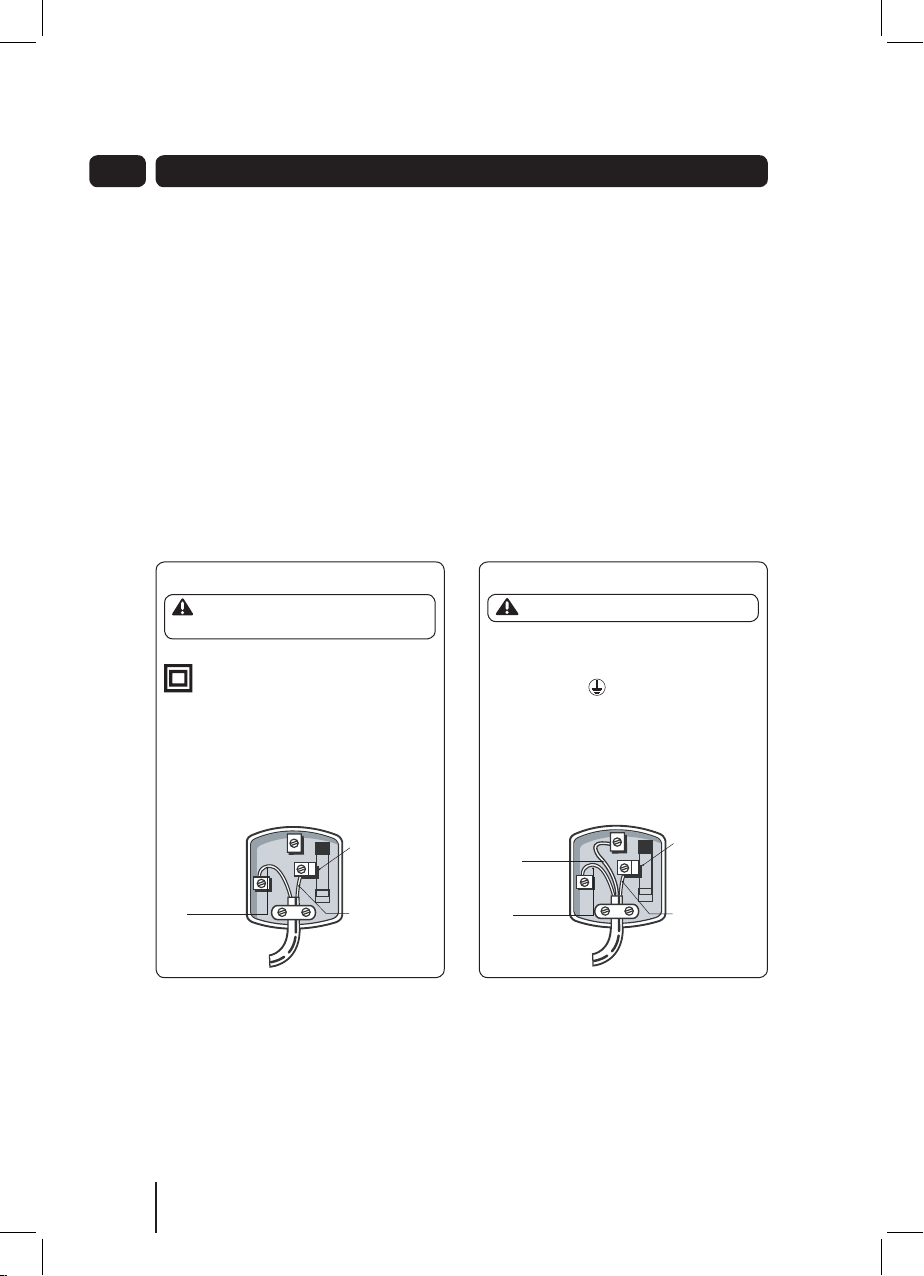
Wiring instructions
The supply cable will be either 2-core or 3-core. Follow the appropriate wiring
instructions given below. In both cases ensure that the outer sheath of the cable is
firmly held by the cable clamp.
2- Core plug
GNINRAW : Do not connect either wire
to the earth terminal.
is Class II and does not require an earth
connection.
The wire coloured blue must be connected to the
terminal marked with the letter N or coloured black.
The wire coloured brown must be connected to the
terminal marked with the letter L or coloured red.
Fuse
Brown (Live)Blue
(Neutral)
3- Core plug
GNINRAW : This appliance must be earthed.
The wire coloured green and yellow must be
connected to the terminal marked with the letter E, or
ecnailppa eroc-2 siht taht setacidni lobmys sihT
by the earth symbol
and yellow.
The wire coloured blue must be connected to the
terminal marked with the letter N or coloured black.
The wire coloured brown must be connected to the
terminal marked with the letter L or coloured red.
Green & yellow
(Earth)
(Neutral)
, or coloured green or green
Fuse
Brown (Live)Blue
18
Page 19

Guarantee
The Karaoke System is guaranteed for twelve months from the date of original
purchase. If any defect due to faulty materials or workmanship, contact the
Goodmans Helpline. Have your receipt of purchase on hand.
The guarantee is subject to the following provisions:
• It is only valid within the boundaries of the country of purchase.
• The product must be correctly installed and operated in accordance with the
instructions contained in this User Guide.
• The Karaoke System must be used solely for domestic purposes.
• The guarantee will be rendered invalid if the Karaoke System is re-sold or has been
damaged by inexpert repair.
• The manufacturer disclaims any liability for incidental or consequential damages.
• The guarantee is in addition to, and does not diminish, your statutory or legal
rights.
09
19
Page 20

Technical Support: 0871 230 1777 Rev5-11052010 XB6CDG IB
 Loading...