

Page 1
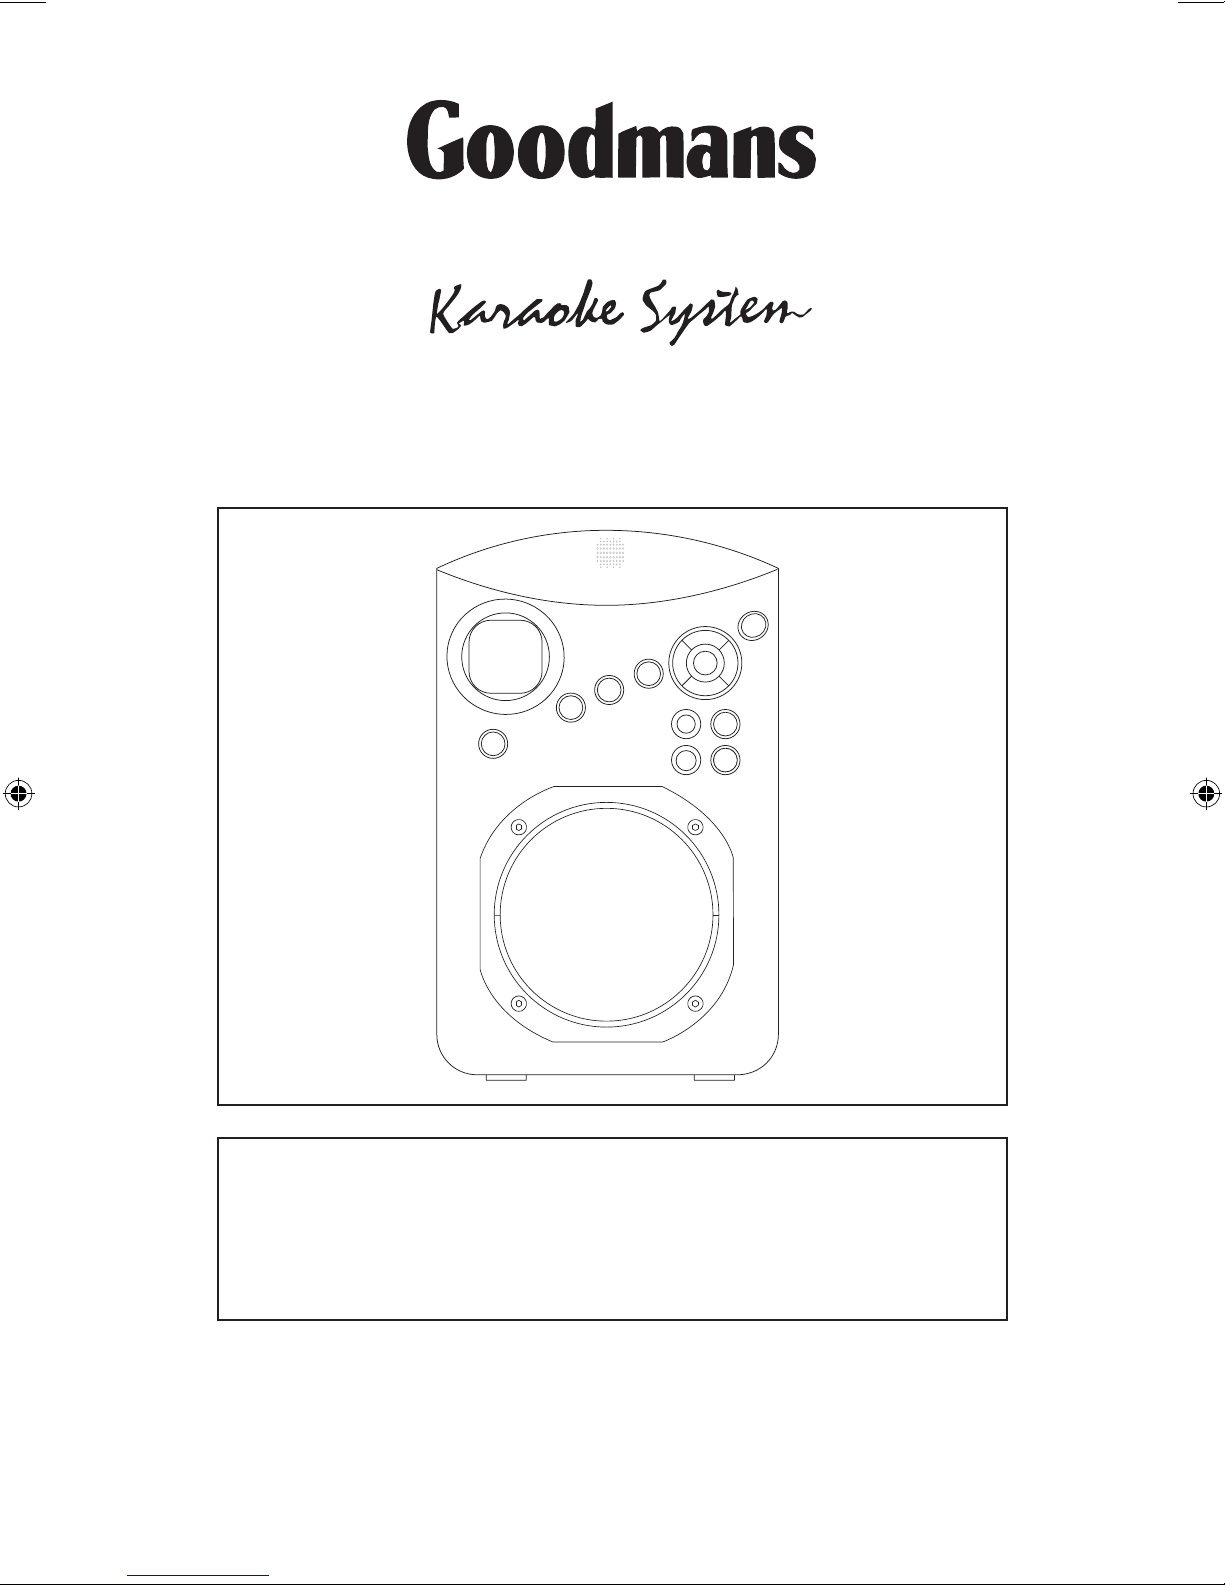
XB5CDG
CDG TV GRAPHICS SYSTEM
VIDEO READY
This product includes the following accessories
1 X Scart Lead
Before operating this unit, please read this Owners Manual carefully.
CONTENTS
1 X Microphone
1 X CD+G Disc
1 X Colour Camera
1
Page 2
1
IMPORTANT SAFEGUARDS
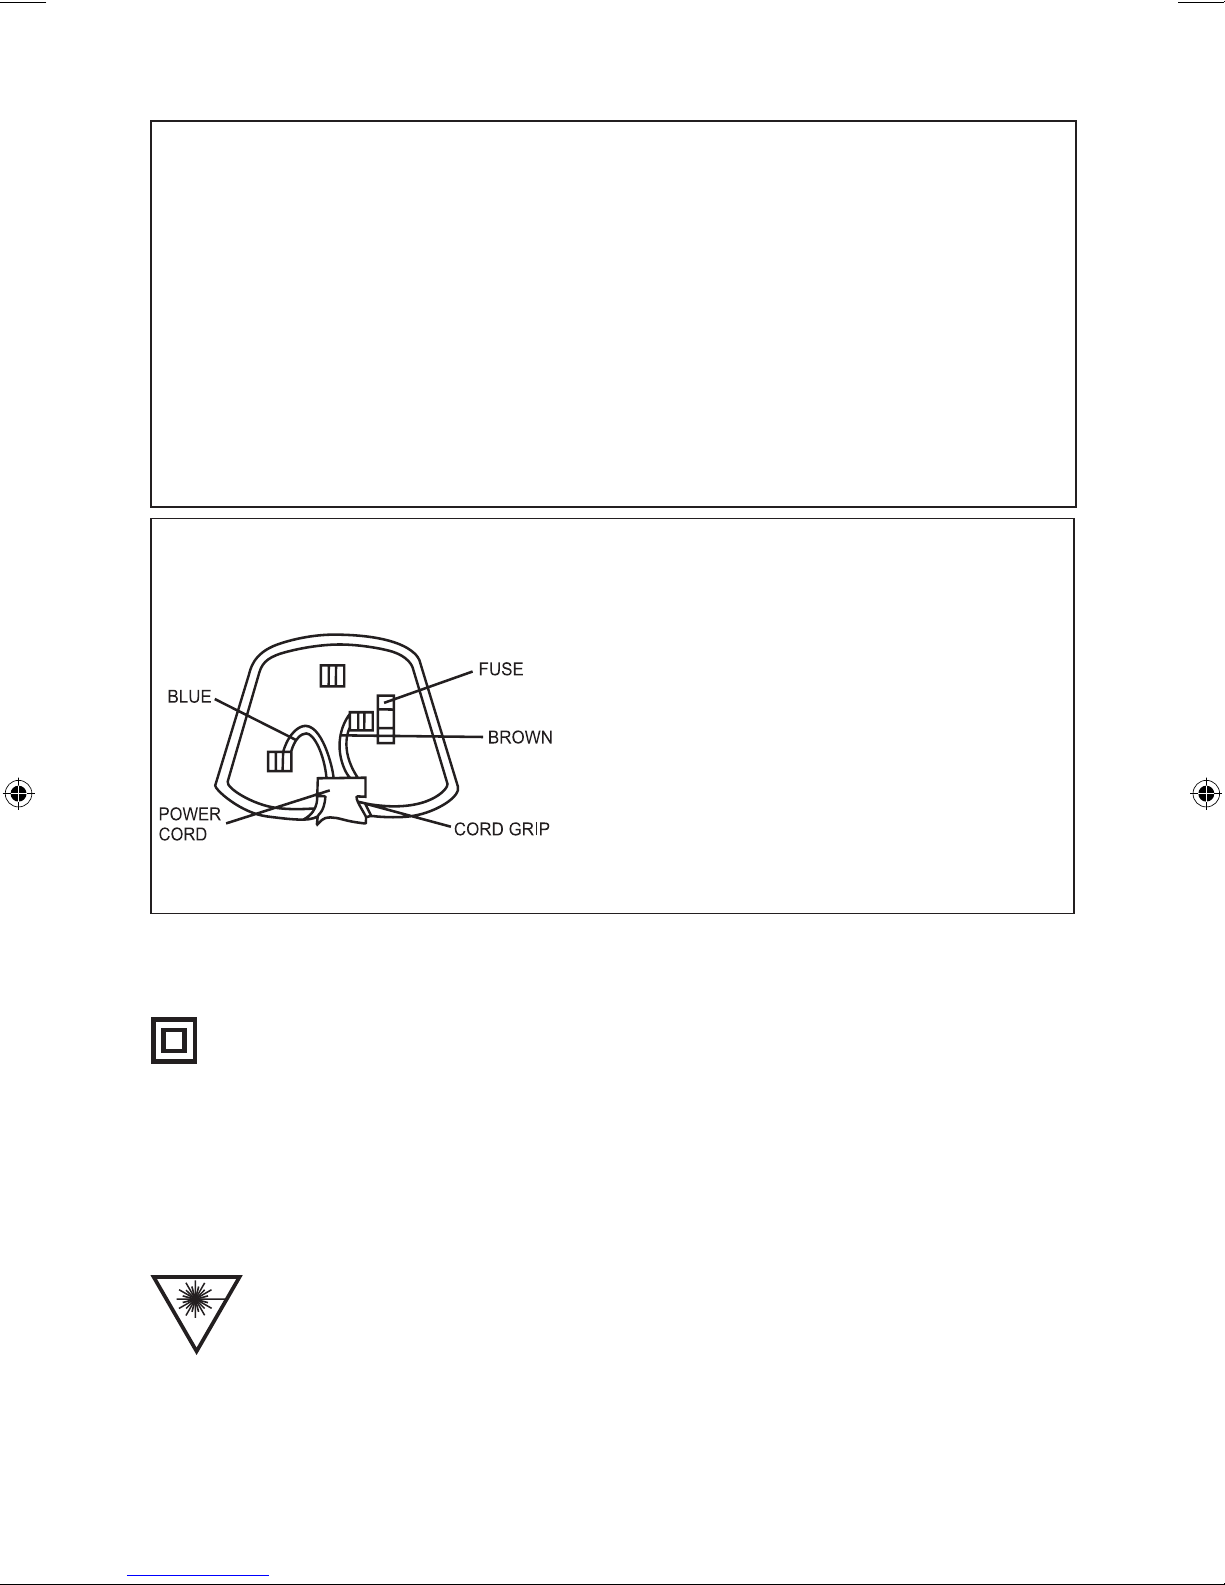
PREFITTED MAINS PLUGS
For your convenience a mains plug has been fitted to this appliance. For your safety please
observe the following information.
1. Should the fuse in the plug fail remove the plug from the wall socket and replace the fuse with
a 3 Amp ASTA approved to BS 1362 fuse.
2. Never use the plug without the fuse cover fitted. Replacement fuse covers are available from
your dealer or most electrical retail outlets.
3. If the mains plug is cut off the cable, rewire the replacement plug in accordance with instruction
give in this manual.
4. CAUTION: Under no circumstances should the discarded plug be inserted into the mains
socket. To prevent a shock hazard carefully dispose of the discarded plug.
Do not leave the plug lying around where children might see it.
WARNING: To prevent fire or shock hazard do not expose this unit to rain or moisture.
WARNING: Under no circumstances must the live or neutral wires be connected to the earth terminal in a 3- pin mains plug.
This symbol means that this unit is double insulated. An earth connection is not required.
CAUTION
CLASS 1 LASER PRODUCT
Use of contents or adjustments of performance of procedures other than those specified
Herein may result in hazardous radiation exposure.
LASER SAFETY
This unit employs a laser, only qualified service personnel should attempt repair.
DANGER: Invisible laser radiation when open and interlock failed or defeated avoid direct
exposure to beam.
CAUTION: hazardous laser radiation when open and intelock defeated.
CAUTION: Dangerous voltages exist inside this unit. do not remove cover (or back). no user
serviceable parts inside refer servicing to qualified service personnel. disconnect from mains
supply when not in use.
This wires in this mains lead are coloured in accordance with the following wiring codes:
Blue........................................................Neutral
Brown..........................................................Live
This wires in this mains lead must be connected
to the terminals in the plug as follows:
Blue Wire...........................................N or Black
Brown Wire...........................................L or Red
Only a 3 Amp fuse should be fitted in the plug or
a 5 Amp fuse at the distribution board.
Page 3

2
MAINTENANCE AND CARE
SOME DO’S AND DON’TS ON THE SAFE USE OF EQUIPMENT
This equipment has been designed and manufactured to meet European safety standards
but like any electrical equipment, care must be taken if you are to obtain the best results
and safety is to be assured.
DO read the operating instructions before you attempt to use the equipment.
DO ensure that all electrical connections (including the mains plug, extension leads
and interconnections between pieces of equipment) are properly made in accord
ance with the manufacturer’s instructions. Switch off and withdraw the mains plug
when making or changing connections.
DO consult your dealer if you are ever in doubt of the installation, operation, or safety
of your equipment.
DON’T continue to operate the equipment if you are in any doubt about it working normally, or if
it is damaged in any way -switch off, withdraw the mains plug and consult your dealer.
DON’T remove any fixed cover as this may expose dangerous voltages.
DON’T leave equipment switched on when it is unattended unless it is specifically stated that
it is designed for unattended operation or has a standby mode. Switch off using the
switch on the equipment and make sure that your family knows how to do this.
Special arrangements may need to be made for infirm or handicapped people.
DON’T obstruct the ventilation of the equipment, for example with curtains or soft furnishings.
Overheating will cause damage and shorten the life of the equipment.
DON’T allow electrical equipment to be exposed to rain or moisture.
Above all -
- Never let anyone, especially children, push anything into holes, slots or any other opening
in the case-this could result in a fatal electric shock.
- Never guess or take chances with electrical equipment of any kind.
- It is better to be safe then sorry!
CLEANING THE UNIT
WARNING
AS WITH ALL MAINS POWERED UNITS, ALWAYS DISCONNECT THE MAINS PLUG FROM
ITS SOCKET, BEFORE ATTEMPING TO CLEAN THE UNIT, ONLY USE A SOFT CLOTH
MOISTENED WITH WARM SOAPY WATER, DO NOT USE HARSH ABRASIVES OR CHEMICALS TO CLEAN WITH AS THIS WILL DAMAGE THE UNIT GRAPHICS OR FINISHING.
Page 4
3
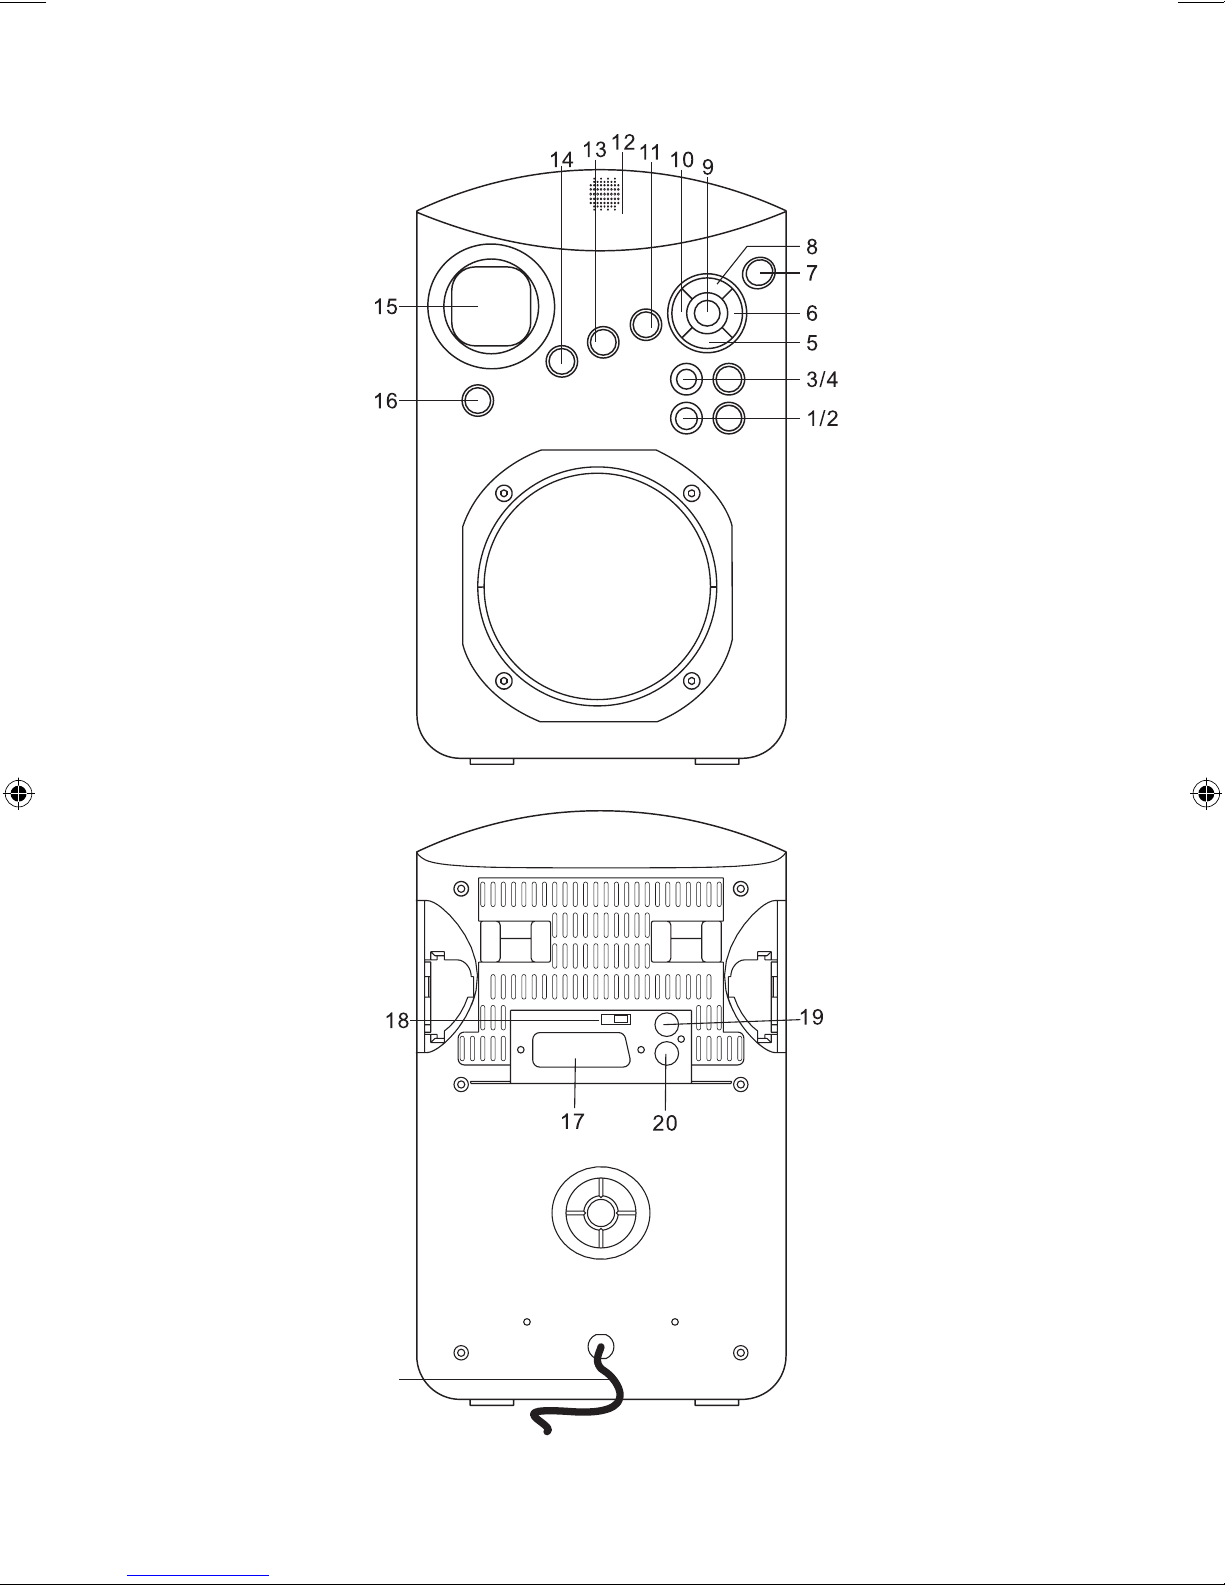
LOCATION OF CONTROLS
Page 5

4
1. MIC 2 input socket
2. MIC 2 volume control
3. MIC 1 input socket
4. MIC 1 volume control
5. C button
6. fP button
7. STANDBY button
8. REPEAT button
9. R / P button
10. Pb button
11. MASTER VOLUME control
12. OPEN/CLOSE button
13. MUSIC / VOCAL button
14. ECHO control
15. DISPLAY
16. AVC control
17. SCART output
18. CD+G or V-CAMERA video switch
19. DC 12V output (Only connect camera DC cable to this socket)
20. CAMERA video in
Page 6

5
INTRODUCTION
The XB5 operates on a power supply of 230V 50Hz AC.
The XB5 contains the following facilities:
1. Digital audio CD and Graphic player:
2. 2 microphones Input sockets (1 mic is supplied).
3. AVC (Auto Vocal Control) facility.
4. Talk or sing along to music (demo disc supplied).
5. Separate variable microphone volume and system volume controls.
6. Microphone ECHO control and Music / Vocal control.
7. The Audio Out is stereo source but is played in mono through the single speaker
located on the XB5.
INSTALLATION
Carefully remove the unit from its packaging and place it on a firm flat surface. Avoid
installation near heaters or in area subject to direct sunlight. Ensure good air circulation.
Protect the unit from dust, moisture and water. Avoid strong magnetic field, e.g. near,
TVs or speakers.
Insert the mains plug into an AC mains supply socket.
Note: Save the carton and packing material, they will be useful if you ever have to transport the unit.
VIDEO & AUDIO OUT
SCART SOCKET AND CABLE
This unit is supplied with a scart cable.
Connect this scart cable to your XB5 and TV to see the lyrics and AUDIO L/R of the CDG
disc on your TV.
USING THE MICROPHONE
The microphone may be used in conjunction with all other sections of the XB5.
PUBLIC ADDRESS
1. Insert microphone into either of the microphone input sockets.
2. Adjust MIC 1 or MIC 2 volume level and master volume control as required.
3. To add ambience to your voice adjust the ECHO control as required.
Note: To prevent howling / whistle occurring ensure that the XB5 is facing away from the
person using the microphone.
8. CD or CAMERA
or AV on your TV. Insert a CDG disc and after short while you will see the CDG disc
graphics on the TV and hear the audio through both TV and XB5 speakers.
Note: If the TV has been correctly switched to AV/Scart mode and you do not see the
CD graphics make sure that the CD/Camera switch (18) on the back panel is set to the
CD position and not the camera position.
After connecting to your TV power up both the TV and XB5. Select Scart
Page 7

USING THE CAMERA
1. Connect the supplied scart cable to unit and TV. Switch on TV and select Scart / AV
input.
CAMERA
DC OUT
VIDEO IN
VIDEO SWITCH: Slide switch to Camera position.
TV
Scart cable
2. Connect the camera to the DC and Video input sockets located at the rear of the unit.
a. Insert the camera RCA(video) into the “VIDEO IN” socket of the unit.
b. Insert the camera DC plug into the “DC OUT” socket of the unit.
3. Move the video switch to camera position.
4. Power up the XB5 and camera image will appear on the TV. If image does not show
on TV then check that AV or scart function has been selected on the TV remote. You
can now insert a CD disc press play and sing along with the music. Note that the
wording will not show at the same time as the camera is ON. To see the wording on
the TV you will need to switch the function switch on the back panel from CAMERA
to CD. The Camera will now no longer be operating.
Note: The camera focus is factory preset and cannot be adjusted. Optimum focus range
is set at approx 1 - 2 Metres although good results will be obtained further away.
6
Page 8

7
HANDLING COMPACT DISCS
To remove a disc from its storage case, press down on the centre of the case and lift the
disc out, holding it carefully by the edges.
Fingerprints and dust should be carefully wiped off the disc’s recorded surface with soft
cloth. Unlike conventional records, compact discs have no grooves to collect dust and
microscopic debris so gently wiping with a soft cloth should remove most particles. Wipe
in a straight line from the inside to the outside of the disc. Small dust particles and light
stains will have absolutely no effect on reproduction quality.
Never use chemicals such as record sprays, antistatic sprays, benzine, or thinners to
clean) compact discs. These chemicals can irreparably damage the disc’s surface. Discs
should be returned to their cases after use. This avoids serious scratches that could
cause the Laser pickup to skip.
Do not expose discs to direct sunlight, high humidity, or high temperatures for extended
periods. Long exposure to high temperatures can warp the disc.
LOADING DISCS
LOADING AND UNLOADING CD OR CD+G
1. Push the CD door to open the disc compartment.
2. Once the CD door has opened, remove a disc from its case and locate the disc
silver side down on to the centre turntable. Push the disc down until it clicks firmly
in place.
3. Push the CD door to close the disc compartment.
CAUTION
1. Do not put anything except a compact disc into the compartment. Foreign objects
can damage the mechanism.
2. Keep the disc compartment closed when not in use to prevent dirt and dust from
entering the mechanism.
SINGING TO MUSIC
The microphone can operate together with the CD functions.
1. Insert the supplied microphone into either MIC input socket.
2. Move the ON / OFF switch on the microphone to the ON position and operate the
microphone.
3. Adjust MIC 1 or MIC 2 volume level and master Volume control as required.
4. To add ambience to your voice adjust the Echo control as required.
5. Use the AVC switch to cut and control the vocals from the music being played.
6. Putting Karaoke disc, switch MUSIC / VOCAL Control to Music side to adjust music
volume
and to Vocal side to adjust vocal volume.
Page 9

8
PLAYING CD OR CD+G DISCS
1. Push the CD door to open the disc compartment, and load a CD.
2. Close the door, the unit will search the track and the display will show the total number
of tracks.
3. Press the R / P button, disc play will begin from the start of the first track.
4. Press the Pb or fP button to select the track of your choice.
A particular track can be selected by pressing Pb or fP buttons. If this is done before
pressing the Pb or fP button, disc play will start with the selected track when the Pb
or fP button is pressed.
Notes:
1. If the disc is deeply scratched, or too dirty, disc may not play.
2. Please note that the SEARCH facility is disabled whilst playing CDG’ discs. This is
to prevent corrupted on screen graphics showing on the TV screen.
CONNECTING THE CD+G SYSTEM
The CD+G (CD music + Graphics) player will allow standard audio CD and CDG disc to
be played through the system. When special Karaoke CDG discs are used, such as the
one provided, words of the song will appear on your TV screen.
CONNECTING TO THE TV
Connect scart lead to TV and XB5 and select AV on your TV.
Connect one end of the supplied scart cable to your TV and the other end to the scart
socket on the rear of the XB5. Make sure you select AV channel on your TV.
Note: When a CD Graphic disc is loaded, the words of the song will appear on TV screen
when it is being played.
IMPORTANT INFORMATION
This compact disc player has built-in error compensation circuits to correct for minor defects in a disc. There are limits, however, to the amount of correction available. In some
cases, the CD player may skip some tracks on a disc during disc play. This problem may
be caused by defects (such as scratches) in the disc being, played, which are too large
for the error compensation circuits to handle, If you encounter this problem, check the CD
player operation as follows before having the unit serviced,
Play a new disc. If the CD player operates normally, the skipping problem is probably due
to a defective disc.
TO STOP A CD PART WAY THROUGH
1. Press the C button, disc play will stop, the Play indicator will go off and the display will
show the total number of tracks.
2. To temporarily stop display (pause mode), press the R / P button, disc play will pause
at the current play position.
3. To resume disc play, press the R / P button again. The player indicator will be displayed.
Page 10

9
TRACK SKIP
TO SKIP TO THE NEXT TRACK ON A DISC
1. For example to skip ahead to the beginning of track 5 while track 4 is playing,
2. Press the fP button once. Disc play will resume at the beginning of track 5. The CD
player will skip ahead to the next track each time the
fP button is pressed. Repeatedly
pressing the
fP button makes the CD player skip ahead through the disc track by track.
Once the beginning of the last track is reached the CD player will not advance any fur
-
ther.
TO SKIP BACK TO THE PREVIOUS TRACK ON A DISC
1. For example, to skip back to the beginning of track 3 while track 4 is playing.
2. Press the Pb button twice.Disc play will resume at the beginning of track 3. The CD
player will skip back one track each time the
Pb button is pressed. If this button is pressed
once in the middle of a track, the CD player will skip back to the beginning of that track. To
make it skip back to the previous track press the
Pb button twice. Repeatedly pressing
the
Pb button make the CD player skip back through the disc track by track. Once the
beginning of the first track is reached, the CD player will not go back any further.
Note:
The Pb or fP buttons can be used to select a desired track to play from before disc
play start. In this case the number of the selected track will be displayed until the
R / P button
is pressed.
REPEAT DISC
If the Repeat Button is pressed during normal disc play, the following repeat functions are
displayed in sequence in the CD Display,
Repeat Indicator flashing Repeats the currant track on the disc
Repeat Indicator on Repeats all the tracks on the disc
Repeat Indicator extinguished Cancel repeat mode
Page 11

IMPORTANT NOTES
Hearing is very important to you and to us so please take care when operating this equipment. It is strongly recommended that you follow the listed guidelines in order to prevent
possible damage or loss of hearing.
ESTABLISH A SAFE SOUND LEVEL
Over time your hearing will adapt to continuous loud sounds and will give the impression that the volume has In fact been reduced. What seems normal to you may in fact
be harmful. To guard against this BEFORE YOUR HEARING ADAPTS set the volume
at a low level.
Slowly increase the level until you can hear comfortably and clearly and without distortion, Damage to your hearing is accumulative and is irreversible.
Any ringing or discomfort in the ears indicates that the volume is too loud.
Remember listening for prolonged period of time at high volume levers will harm your
hearing.
Once you have established a comfortable listening level, DO NOT INCREASETHESOUNDLEVEL FURTHER.
The following list of typical sound levels may assist you in recognising just how loud you
have set the volume level.
DECIBEL
Lever (dB) Example
30dB Quiet library, soft whisper.
40 Living room, fridge, freezer, bedroom away from traffic.
50 Normal conversation, quiet office, light traffic.
60 Electric sewing machine.
70 Vacuum cleaner, hair dryer, noisy restaurant.
THE FOLLOWING NOISE CAN BE HARMFUL UNDER CONSTANT EXPOSURE
80dB Average city traffic, alarm clock buzzer at 2 feet, food mixer.
90dB Motorcycle, heavy goods vehicle, petrol lawn mower.
100 Pneumatic drill, chain saw, garbage truck, discotheque / night-club
120 Rock band concert, thunderclap, fast train passing by.
PERMANENT LOSS OF HEARING
40 THRESHOLD OF PAIN Gunshot 2 feet away, jet plane taking off.
180 Rocket Launching pad.
10
Page 12

SPECIFICATIONS
Power supply AC 230V~50Hz
CD section system
Frequency response 60Hz - 15KHz (+/- 3dB)
S/N ratio 50 dB
D/A converter 1 bit DAC with 8 times over sampling digital filter
CDG section system
System PAL I
ESD Remark:
In case of misfunction due to electrostatic discharge just reset the product (reconnect of
power source may be required) to resume normal operation.
The mark as shown here is in compliance with the Waste Electrical and Electronic Equip
ment Directive 2002/96/EC (WEEE).
The mark indicates the requirement NOT to dispose the equipment as unsorted municipal
waste, but to use the return and collection systems available.
Notes:
1. Only compact disc’s marked with the disc logo
-
are guaranteed to work on this player. Home recorded discs (CDR) recorded on home
PC’s may not play or operate correctly. This player cannot play CD- RW, DVD’s including PHOTO CDs. data sections in the CO-Extras, DVD-ROMs etc.
2. Should the player lock up during playing of a disc or certain CD function key does not
operate during playback. Switch off the power and wait for a moment then switch the
power on again. If the problem continues replace the disc.
11
 Loading...