

Page 1
CD+G KARAOKE
AND DISCO
LIGHT SYSTEM
MODEL: XB13CDG
USER MANUAL
Page 2

1 Welcome
2 Your CD+G Karaoke System
2.1 In The Box
2.2 Front View
2.3 Indicators
2.4 Rear View
3 Quick Setup
3.1 Making the Connections 3.7 Connecting the Power
3.2 Display Lyrics on a TV Screen 3.8 Standby & Auto Standby
3.3 TV Connection for Audio & Video 3.9 Adjusting the Volume
3.4 TV Connection with SCART Adaptor 3.10 Connecting an External Audio Source
3.5 Audio Connection to an External Amplifier 3.11 Fitting the Batteries
3.6 Connecting the Microphone(s)
4 Operation
4.1 Switching Modes 4.6 Programmed Playback
4.2 What is a CD+G disc? 4.7 Repeat Single/All Track(s)
4.3 Load a Disc 4.8 Echo Effect (Microphone Only)
4.4 Play a Song 4.9 A.V.C Control (AutoVoiceControl)
4.5 Skip Tracks 4.10 Light Effect Show
5 Troubleshooting
6 Technical Specifications
7 Customer Support
Page 3

1 Welcome
Thank you for choosing this Goodmans product. We’ve been
making electronics for the British people for 70 years. Each of
our projects has been carefully designed to be great at what it
does and this one is no exception. We hope you enjoy your
new Karaoke System.
2 Your Karaoke System
2.1 In The Box
Carefully remove your Karaoke System from the packaging.
Inside the box you will find:
• XB13CDG Karaoke Machine
• AV Cable
• Power Cable
• 1 x Microphone
• CD+G Demo Disc
• Quick Start Guide
• Guarantee Booklet
If any of these items are missing, contact customer support.
Visit : www.goodmans.co.uk/support
Main Power
Your XB13CDG requires a mains supply of 230-240VAC~50Hz.
Please ensure that your mains supply is compatible before use.
Disconnect the power cord from the mains when not in use.
Position of karaoke System
Place on a flat, stable surface that is not subject to vibrations.
Avoid the following locations:
• Where it is exposed to direct sunlight
• Where it is close to heat radiating sources
• Where the humidity is high and ventilation is poor
• Where it is dusty
XB13CDG
Page 4
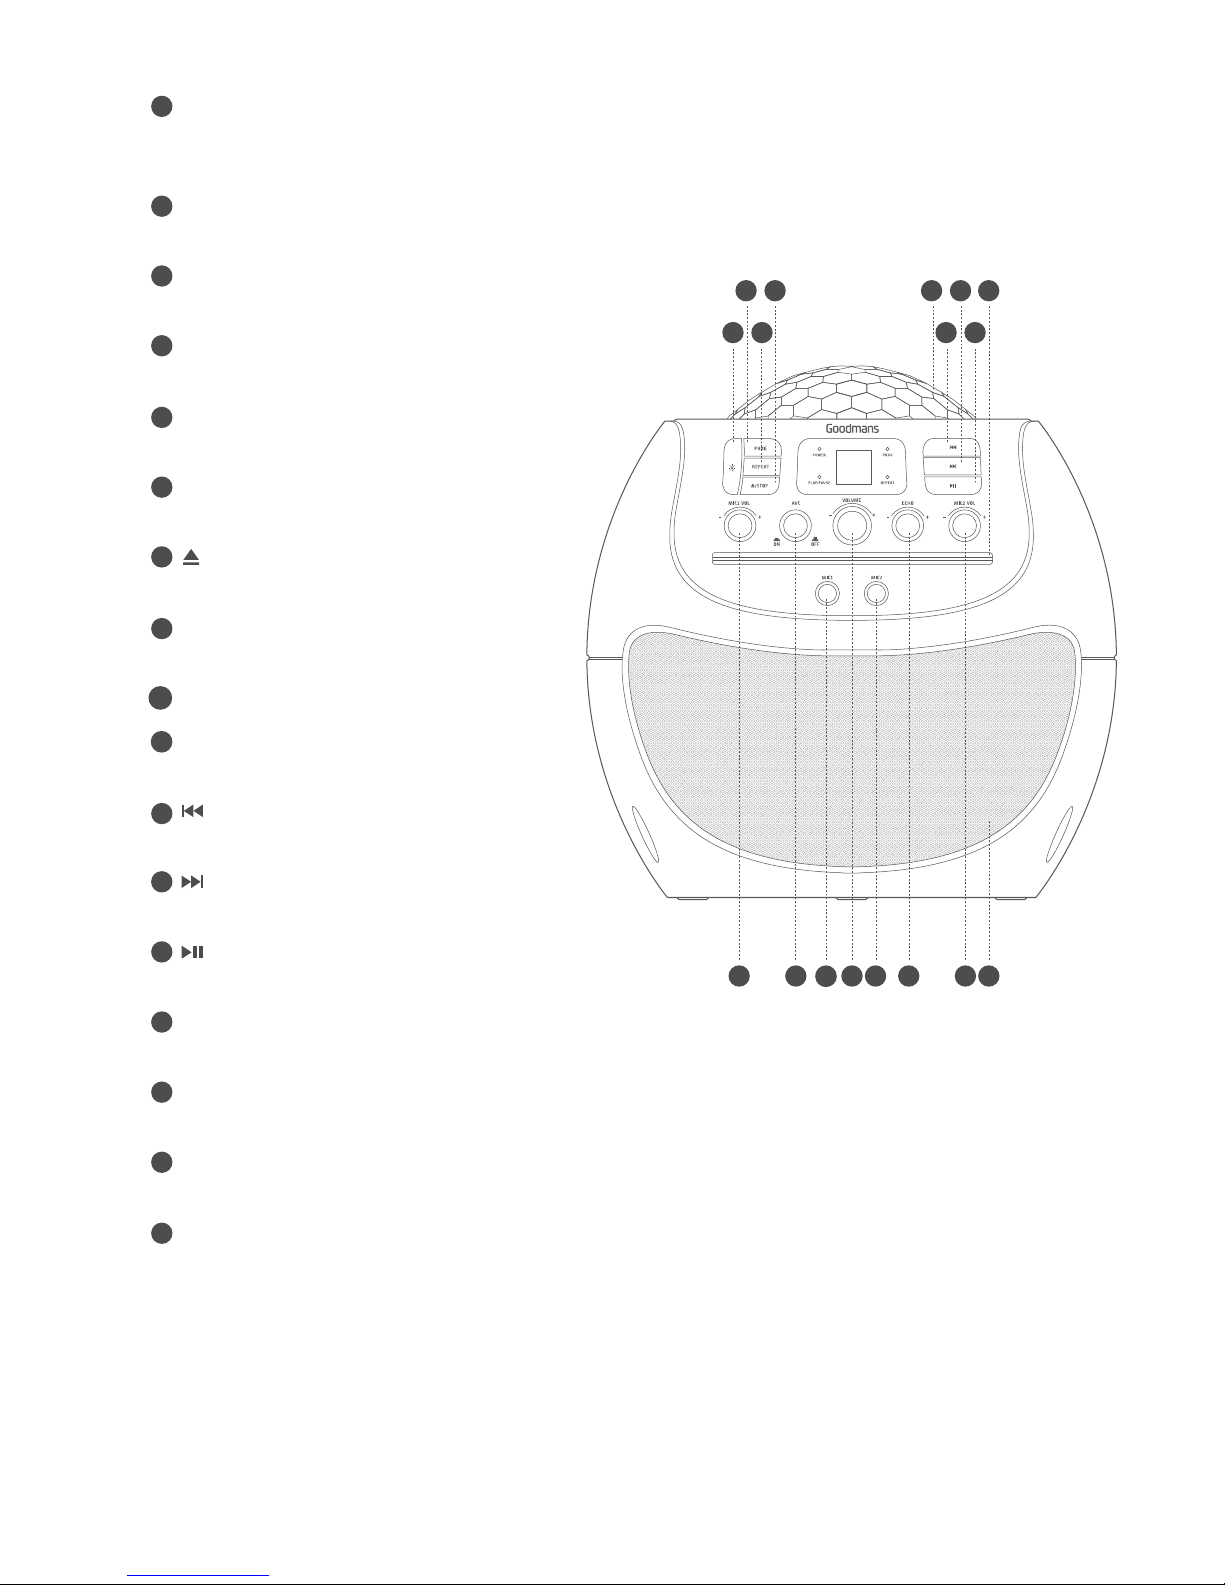
2.2 Front View
- ECHO control.
Adjusts the amount of echo for
the microphone output.
- LIGHT.
Illuminated light show
- AVC control.
Auto Voice Control
- PROG button .
Activates the program playlist function.
- REPEAT button.
Press to enable the repeat function
- LIGHT button.
the light effects/power saving mode.
- /STOP button.
CD disc open/close Stops playback.
- MIC 1 VOLUME button.
Adjusts the Microphone level.
- DISC compartment.
- MIC 1 input.
Microphone input.
- SKIP button.
Press to skip between tracks.
- SKIP button.
Press to skip between tracks.
- PLAY/PAUSE button.
Press to begin playback or pause playback.
- MIC 2 VOLUME button.
Adjusts the microphone level.
- VOLUME.
Adjusts the volume level of the internal speaker
- MIC 2 input.
Microphone input.
- SPEAKER
A
E
C
G
B
F
D
H
J
I
K
L
M
N
O
P
Q
F
H
CJOPANQ
DKBEG
M
L
I
XB13CDG
Page 5
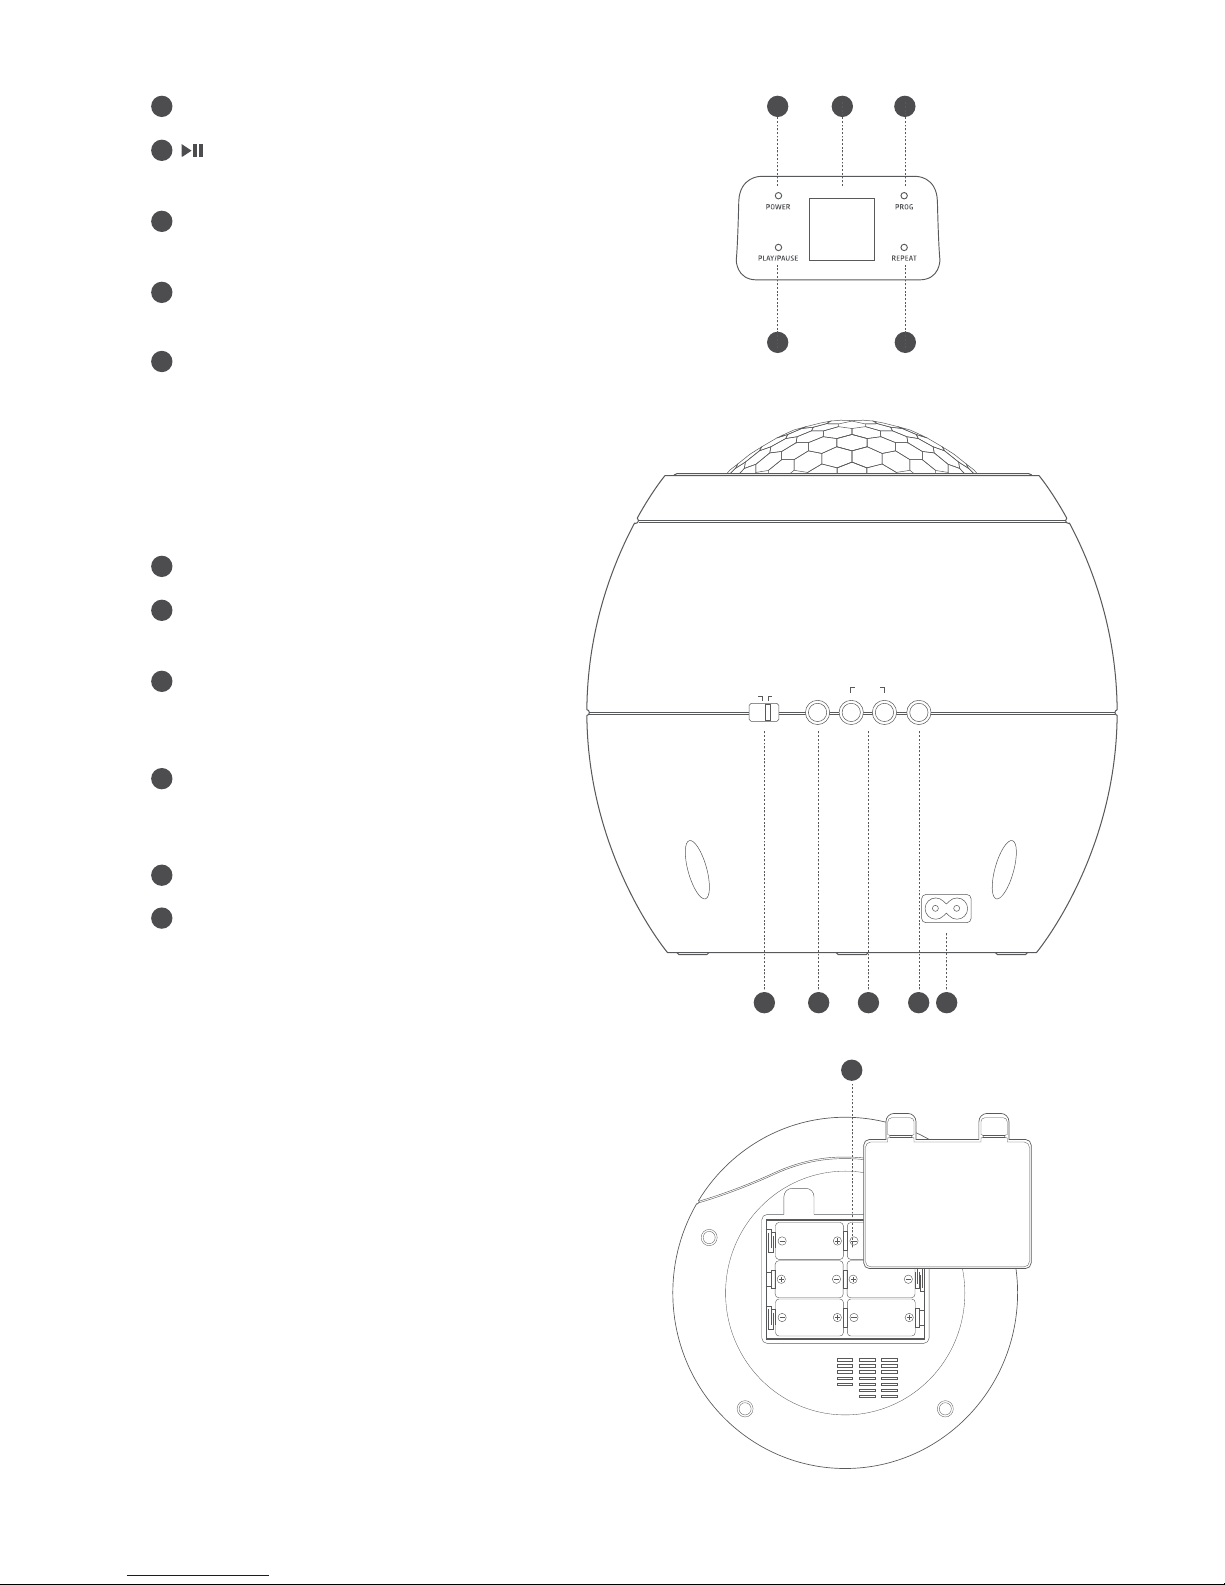
2.3 Indicators
- POWER indicator
- PLAY/PAUSE indicator
Indicates when in play or pause mode.
- PROG indicator
Indicates when in program mode.
- REPEAT indicator
Indicates when in repeat mode.
- DISPLAY
Displays the current track playing.
2.4 Rear View
- POWER switch
- COMPOSITE VIDEO output
Connect to a TV input.
- AUX IN input
Connect an external audio source
for playblack through the speakers.
- RCA STEREO AUDIO output
Connect to an RCA stereo input on
a TV or amplifier.
- AC MAINS input
- BATTERY compartment
A
A
A
E
E
E
E
C
C
C
C
B
B
B
B
D
D
D
D
F
F
VIDEO OUTOFFON
AUDIO OUTPOWER
AUX INR L
AC
A
XB13CDG
Page 6

3 Quick Setup
3.1 Making the Connections
An audio/video (AV) cable is supplied to give you the option of
connecting the unit to an external amplifier and/ or a TV to
display lyrics on-screen. The cable has three RCA jacks at
each end. White and Red are for left and right audio
connections and the Yellow is for connecting the video.
Some projection TV sets do not display the standard blue
background used on most CD+Gs properly. If the background
colour is inconsistent or flashing, please try connecting your
karaoke system to a standard television.
3.2 Display Lyrics on a TV Screen
1. Connect the YELLOW (video) jack of the supplied AV
cable to the ‘VIDEO OUT’ socket on the rear of the
karaoke machine.
2. Connect the other end of the cable to a ‘VIDEO INPUT’
on your TV.
3. Select the appropriate video channel on your TV to
view the lyrics on-screen.
This connection will send lyrics (CD+G) only to the TV
screen. All audio will be output from the karaoke machine.
3.3 TV Connection for Audio & Video
1. Connect the YELLOW (video) jack of the supplied AV
cable to the ‘VIDEO OUT’ socket on the rear of the
karaoke machine.
2. Connect the other end of the cable to a ‘VIDEO INPUT’
on your TV.
3. Connect the RED & WHITE jacks of the supplied AV
cable to the RED & WHITE ‘AUDIO OUT’ sockets on
the rear of the karaoke machine.
4. Connect the other end of the cables to the RED & WHITE
stereo inputs on your TV.
Take care to match the socket colours to the jack colours &
that the red, white & yellow sockets are all from the same TV
input.
5. Select the appropriate video channel on your TV to view the
lyrics on-screen and hear the sound from the TV speakers.
VIDEO OUT
AUDIO OUT
AUX INR L
VIDEO IN
AUDIO IN
R L
VIDEO OUT
AUDIO OUT
AUX INR L
VIDEO IN
AUDIO IN
R L
Rear of karaoke machine
Rear of karaoke machine
Rear of TV
Rear of TV
Video cable ( Yellow )
XB13CDG
Page 7

3.4 T V Connection with SCART Adaptor
If your TV does not have the same red, white & yellow
input sockets, but does have a SCART input socket,
you can purchase a SCART adaptor. Follow the next diagram.
1. Connect the YELLOW (video) jack of the supplied AV
cable to the ‘VIDEO OUT’ socket on the rear of the
karaoke machine.
2. Connect the RED & WHITE jacks of the supplied AV
cable to the RED & WHITE ‘AUDIO OUT’ sockets on
the rear of the karaoke machine.
Take care to match the socket colours to the jack colours.
3. Connect the other end of the cables to the matching
coloured sockets on the SCART adaptor.
4. Connect the SCART adaptor to the SCART input on your TV.
5. Select the appropriate video channel on your TV to view the
lyrics on-screen and hear the sound from the TV speakers.
3.5 Audio Connection to an External Amplifier
As an alternative to listening to the audio through your TV
or internal speakers, you can listen through your home
stereo system.
1. Connect the RED & WHITE jacks of the supplied AV
cable to the RED & WHITE ‘AUDIO OUT’ sockets on the
rear of the karaoke machine.
2. Connect the other ends of the RED & WHITE cables to
an RCA STEREO input on your amplifier.
3. Power on the amplifier and select the input you connected
the cables to.
In order to see the lyrics on your TV screen you also need to
connect the yellow cable to your TV (see section 3.1).
VIDEO OUT
AUDIO OUT
AUX INR L
AUDIO IN
R L
VIDEO OUT
AUDIO OUT
AUX INR L
Rear of karaoke machine
Rear of karaoke machine
TV Scart
Rear of AMP
XB13CDG
Page 8

3.6 Connecting the Microphone(s)
1. Insert the supplied microphone jack into the MIC 1socket
on the front of the karaoke machine.
2. Switch the microphone on using the ON/OFF switch found
on the side of the microphone.
An additional microphone can be connected to the MIC 2
socket for duets (only one microphone is supplied).
3.7 Connecting the Power
1. Connect the mains power cable jack into the AC power
input on the rear of the karaoke machine.
2. Insert the mains power cable into a power socket, and
switch the power on.
3. Press the ON/OFF button on the behind of the
karaoke machine.
AUDIO OUTPOWER
AUX INR L
AC
VIDEO OUTOFFON
AUDIO OUTPOWER
AUX INR L
XB13CDG
Page 9

3.8 Dance Disco Light & Auto Standby
1. Press the LIGHT button to on dance disco mode.
2. Press the LIGHT button to off dance disco mode.
Due to new ECO regulation requirement this product
incorporates a powersaving feature.
1. Once audio playback has ceased and the unit has stood
idle for approximately10 mins, it will switch into a ‘powerdown’
power saving mode.
2. To wake the unit up, press the LIGHT button.
3.9 Aujusting the Volume
1. Rotate the VOLUME control clockwise or anti-clockwise
to increase or decrease the volume output.
3.10 Connecting an External Audio Source
You can connect other audio sources to sing along to
using the AUX IN socket on the front of the unit.
1. Connect an audio device (such as an MP3 player)
using a 3.5mm audio cable (not supplied). Insert one
end into the MP3 players earphone output.
2. Connect the other end into the AUX IN socket on the
behind the karaoke machine.
3. Press PLAY on the audio device.
4. Adjust the volume to your desired level.
When connecting via the headphone output the volume
of the karaoke machine is affected by the volume control
on the player. Ensure that the audio source (such as an
MP3 player) is set to about 70-80% to avoid distortion.
VIDEO OUTOFFON
AUDIO OUTPOWER
AUX INR L
XB13CDG
Page 10

3.11 Fitting the Batteries
1. Remove the battery cover by pressing the battery cover
tabs downwards and out.
2. Insert 6 ‘C’ UM2 type batteries into the battery
compartment taking note of the engraved battery direction
diagrams on the inside.
3. Replace the battery cover.
XB13CDG
Page 11

4 Operation (CD+G Operation)
4.1 Switching Modes
1. Press ON/OFF Switch ON modes.
4.2 What is a CD+G disc?
A CD+G (CD + Graphics) is the standard format for most
karaoke discs. Each disc contains the audio track and words
that appear on your TV screen.
4.3 Load a Disc
Insert the disc into the CD slot (label side up).
Press PLAY button to play music.
VIDEO OUTOFFON
AUDIO OUTPOWER
AUX INR L
XB13CDG
Page 12

4.4 Play a Song
1. The player begins to read the disc/drive and displays the
total number of compatible tracks on the display.
2. If a TV is connected a menu displaying folders on the
left and tracks on the right.
3. Press the button once to begin playback from track 01.
The PLAY/PAUSE indicator to the left of the display will
illuminate and if playing a CDG disc file the CDG indicator
will illuminate also.
4. If a TV is connected, the lyrics to the current song will
appear on your TV.
5. To pause playback press the button once more. The
PLAY/PAUSE indicator and display will flash to indicate the
player is in pause mode; press the STOP button to cease music
playback.The display shows the total number of tracks
once more.
4.5 Skip Tracks
1. Press the button once during playback to skip to the
next track.To skip to a specific track, press this button
several times until you reach the track number required.
2. Press the button once during playback to return to the
beginning of the current track. Press the button twice
repeatedly to skip to the previous track. To skip back to a
specific track, press this button several times.
4.6 Programmed Playback
To programme an alternative playback order of tracks follow
the below steps.
1. Press the STOP button if a disc is playing. Then press the
PROG button to enter the programme setup function.The
PROG indicator to the right of the display will illuminate.
2. Use the / buttons to skip between the tracks.
3. Press the PROG button to store track ‘1’ of the playlist.
4. Repeat steps 2-3 to program up to 20 tracks.
5. When complete press the button to begin playback.
6. To cancel the program sequence press the STOP button
twice. The PROG indicator will go off.
XB13CDG
Page 13

4.7 Repeat Single/All Track(s)
1. During playback pressing the REPEAT button will flag the
current track to repeat indefinitely. You will see the REPEAT
indicator to the right of the display flash.
2. Pressing the REPEAT button again will repeat all tracks on
the disc.You will see the REPEAT indicator to the right of
the display stop flashing and remain solid.
3. To cancel the repeat function press the REPEAT button for
a third time.You will see the REPEAT indicator to the right of
the display go off.
XB13CDG
Page 14

4.8 Echo Effect (Microphone Only)
1. When using the microphone(s) you can apply echo to your
voice using the ECHO control.
2. Rotate clockwise from MIN to MAX to increase the echo
amount. Setting the control to ‘MIN’ means there will be no
echo on the microphone output.
4.9 A.V.C Control (Auto Voice Control)
Auto voice control works by lowering the vocals on a multiplex
recording when you sing. When you stop singing the vocals
will be restored.
1. Press the AVC button to the ON position. To increase the
amount the song vocals cut out when singing. Setting the
control to MAX will cut the vocals out almost completely
when singing.
4.10 Light Effect Show
LED ball can be rotated light patterns onto walls and ceilings.
1. Press the LIGHT button on the front of the karaoke
machine to enable the light show.
XB13CDG
Page 15

5 Troubleshooting
Problem
No Power
No sound from the TV or connected AMP.
No lyrics appear on the TV screen.
No sound from the microphone.
What to do
Check the mains plug is connected to the wall socket.
Switch the wall socket on.
Press the ON/OFF button to ON mode.
The volume level is too low. Increase using the volume
control.
Check the input you connected the karaoke machine
to on the TV or AMP and switch to that input.
Ensure the RED & WHITE audio cables are connected
correctly to the karaoke machine,TV or AMP.
Ensure the RED & WHITE audio cables are connected
to the same input as the YELLOW video cable on your
T V.
Check the YELLOW video cable connections on
both the karaoke machine and TV.
Check you are viewing the input you connected the
YELLOW cable to on your TV.
Check you have loaded a CD+G disc that contains
lyrics.
The MIC VOLUME control is set to MIN.
The microphone ON/OFF switch is set to the OFF
position.
The microphone is not connected properly.
The microphone is damaged; try another microphone.
XB13CDG
Page 16

6 Technical Specification
Model Number
Power Supply
Speaker Output Power
Video Output
Supported Disc Types
XB13CDG
AC 230-240V ~ 50 Hz
6 x ‘C’UM2 type batteries
2W(RMS)
PAL composite (RCA)
CD, CD+G,CD-R,CD-RW
7 Customer Support
Our customer service team is available for technical or
guarantee support. Visit www.goodmans.co.uk/support
www.goodmans.co.uk
XB13CDG
 Loading...