

Page 1
USER MANUAL
MODEL: MICRODAB16BT
DAB MICRO
SYSTEM
AUX IN
SOURCE
PLAY/PAUSE
ENTER
STOP PREV NEXT
V
O
L
U
M
E
EJECT
STANDBY
Page 2

Welcome1
Troubleshooting5
Technical Specifications6
Customer Support7
Your DAB Micro System
2.0 In The Box
2.1 Front View
2
Quick Setup
3.0 Fitting the Remote Battery
3.1 Connecting the Speakers
3.2 Connecting the Power
3.3 Standby & Auto Standby
3.4 Adjusting the Volume
3
Operation4
CD Operation
4.0 Load a Disc
4.01 Play a Disc
4.02 Skip Tracks And Search
4.03 Programmed Playback
4.04 Repeat Single/All Track(s)
4.05 Random playback
4.06 Numeric Buttons
DAB Radio Operation
4.10 Using DAB For the First Time
4.11 Positioning the Antenna
4.12 Full Scan
4.13 Manual Tuning
4.14 Storing a Station Preset
4.15 Recalling a Preset
4.16 DAB Display Modes
4.17 Secondary Services
4.18 Pruning
4.19 Dynamic Range Control
2.4 Rear View
2.5 Remote Control
3.5 Mute Function
3.6 Tone Adjustment
3.7 DSP Effects
3.8 Loudness Function
3.9 Switching Modes
FM Radio Operation
4.20 Tuning a Station
4.21 Scan Modes
4.22 Stereo/ Mono Mode
4.23 Storing a Station Preset
4.24 Recalling a Preset
4.25 FM Display Modes
4.26 Positioning the Antenna
AUX Input Operation
4.30 Aux In Mode
Bluetooth Operation
4.40 Connecting a Bluetooth Device
4.41 Controlling a Connected Device
General Operation
4.50 Factory Reset
Page 3

MICRODAB16BT
Welcome
Thank you for choosing this Goodmans product. We’ve been
making electronics for the British people for 70 years. Each of
our projects has been carefully designed to be great at what it
does and this one is no exception. We hope you enjoy your
new DAB Micro System.
1
Your DAB Micro System2
In The Box
Carefully remove your DAB Micro System from the packaging.
Inside the box you will find:
• MIC RODAB16BT
• 2 x Speakers
• Remote Control
• Quick Start Guide
• Guarantee Booklet
If any of these items are missing, contact customer support.
Visit: www.goodmans.co.uk/support
2.0
Mains Power
Your MICRODAB16BT requires a mains supply of
230-240V AC ~ 50Hz. Please ensure that your mains supply is
compatible before use. Disconnect the power cord from the
mains when not in use.
Position of DAB Micro System
Place on a flat, stable surface that is not subject to vibrations.
Avoid the following locations:
• Where it is exposed to direct sunlight
• Where it is close to heat radiating sources
• Where the humidity is high and ventilation is poor
• Where it is dusty
Adjusting the Antenna
Fully extend the antenna to ensure good reception in both DAB
and FM Radio modes. It may be necessary to alter the position
of the MICRODAB16BT and/or the antenna to achieve the best
signal.
Page 4
MICRODAB16BT
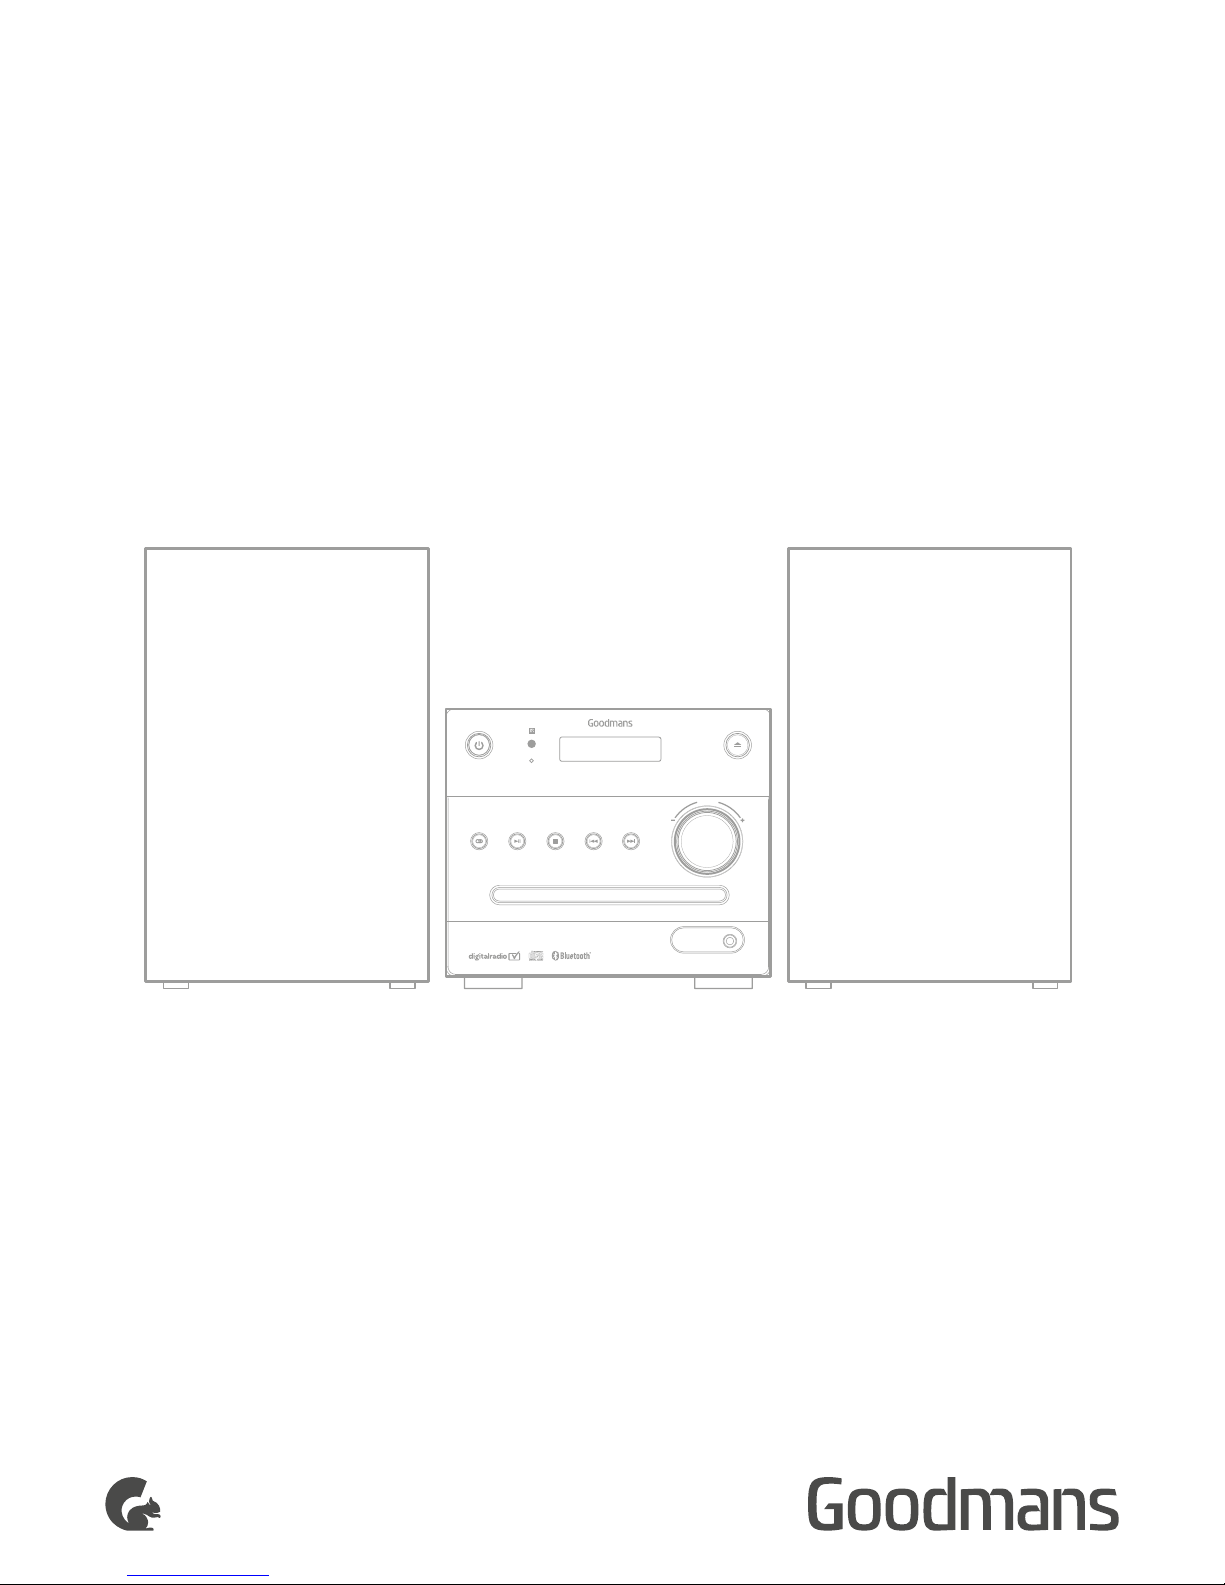
Front View2.1
A SPEAKERS.
B STANDBY button.
Press to wake or enter STANDBY
mode.
C STANDBY indicator. This will
illuminate when standby mode is on.
D
/ENTER button. In CD/BT mode
press to Play or Pause playback of a
CD.
E SOURCE button. Press to skip
between DAB, FM, CD, BT & AUX
modes.
F
button. Press to stop playback of a
CD.
G CD drawer. Place CD onto the
drawer when ejected.
H IR sensor. Remote control sensor.
TAKE CARE WITH
LIVE ELEMENTS
I LCD display. Displays information
required for operation.
J
EJECT button. Press to eject/close
the CD drawer.
K
button. Press to skip to previous
CD/BT tracks. Press and hold to fast
rewind CD/BT tracks.
L VOLUME control. Rotate clockwise to
increase the volume level and anticlockwise to decrease.
M
button. Press to skip to next CD/
BT track(s). Press and hold to fast
forward CD/BT tracks.
N AUX input. Connect external audio
sources with a 3.5mm audio cable (not
supplied)
AUX IN
SOURCE
PLAY/PAUSE
ENTER
STOP PREV NEXT
V
O
L
U
M
E
EJECT
STANDBY
H I J
L
A
N
M
K
B
A
E
G
D
F
C
Page 5
MICRODAB16BT
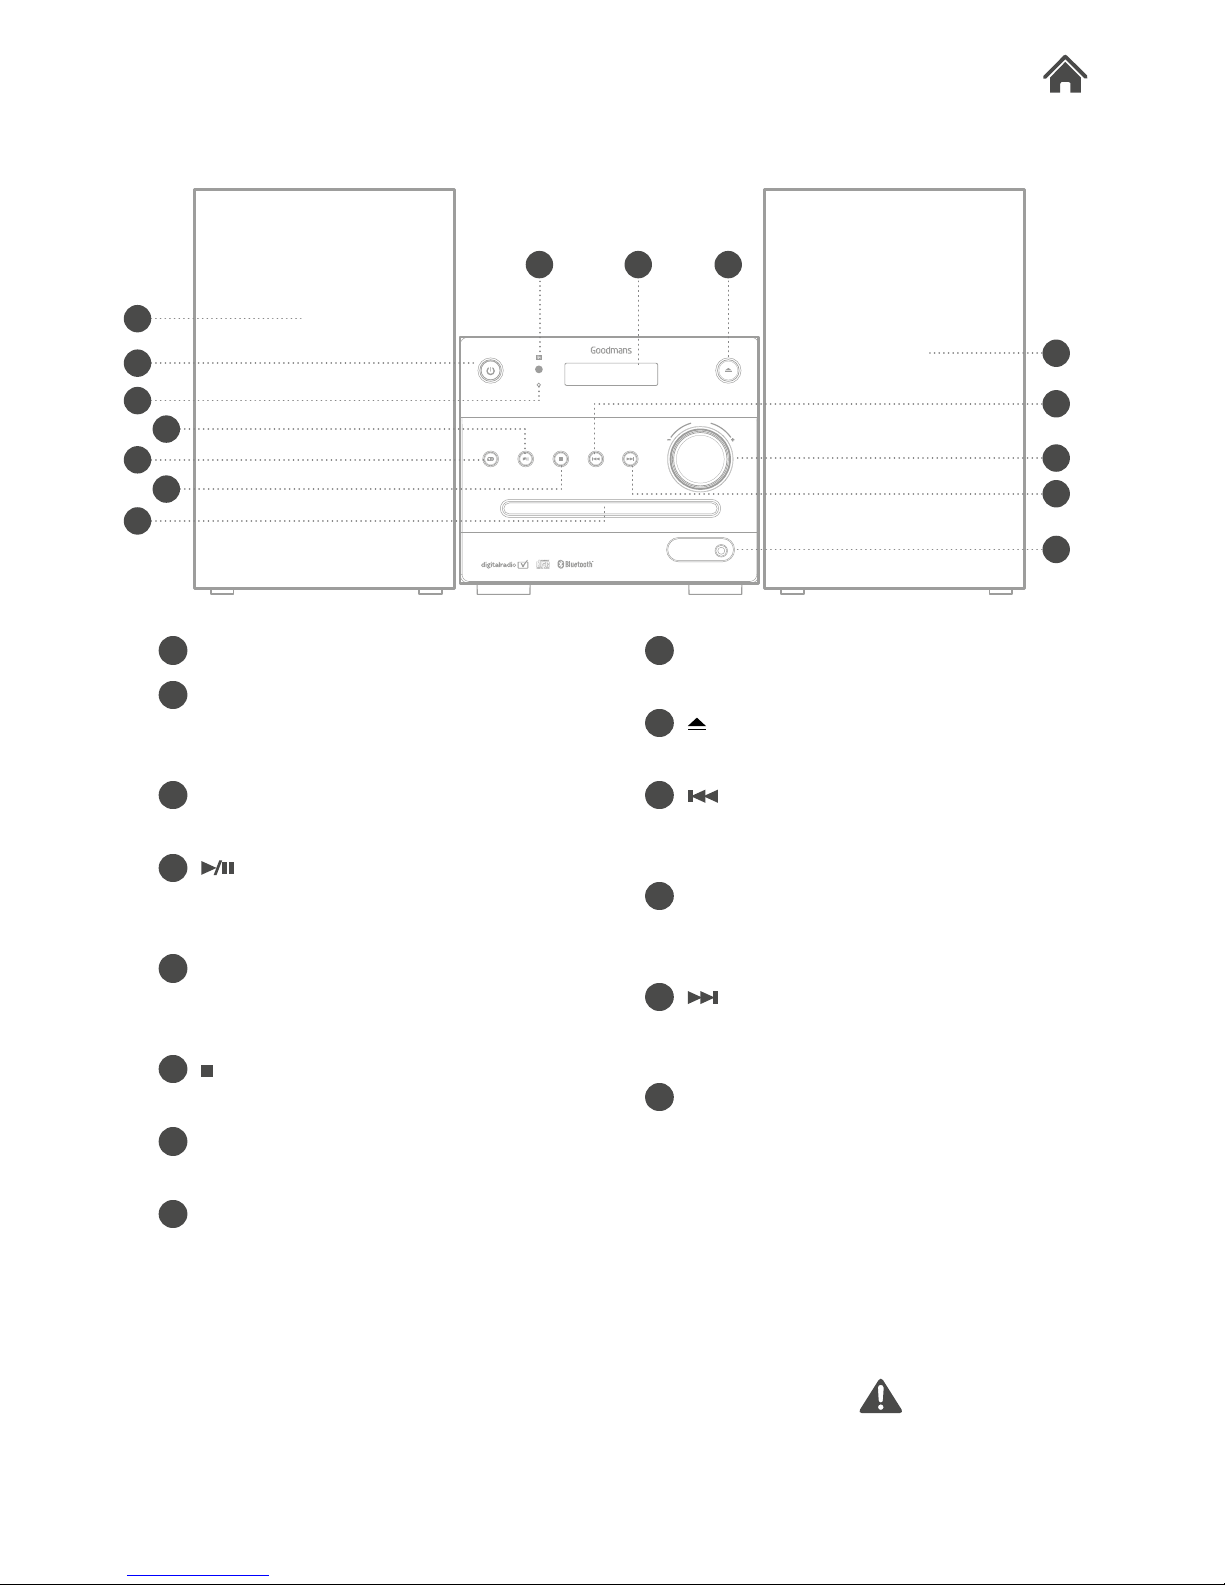
Rear View
Remote Control
2.2
2.3
O PIGTAIL antenna. Extend for best
radio reception.
P SPEAKER terminals. Insert the
speaker cables into the correct
terminals (see section 3.1).
Q MAINS cable. Connect to a mains
socket.
01 STANDBY button. Press to wake or
enter STANDBY mode.
02 NUMERIC buttons. Used to enter
digits or direct skip to track numbers.
03 button. Press to stop playback of a
CD.
04 MENU button. Press to enter the
DAB or FM menu options.
05 button. Press to skip to previous
CD/BT tracks. Press and hold to fast
rewind CD/BT tracks.
06 ENTER button. Press to select/
activate options.
07 ENTER button. Press to select/
activate menu options.
08 INFO button. Press to display
information about the current DAB or
FM station.
09 DSP. Press to cycle the DSP sound
effect modes.
10 LOUD button. Press to enable the
loudness option.
AUX IN
SOURCE
PLAY/PAUSE
ENTER
STOP PREV NEXT
V
O
L
U
M
E
EJECT
STANDBY
CAUTION
VISIBLE AND INVISIBLE LASER
RADIATION WHEN OPEN
AVOID EXPOSURE TO BEAM
SPEAKER(4)
ANTENNA
AC 220V-240V ~50Hz
CAUTION
RISK OF ELECTRIC SHOCK
DO NOT OPEN
WARNING: SHOCK HAZARD - DO NOT OPEN
AVIS: RISQUE DE CHOC ÉLECTRONIQUE - NE PAS OUVRIR
WARNUNG: ELEKTROSCHOCK GEFAHR - NICHT ÖFFNEN
LASERSCHUTZKLASSE 1 PRODUKT
CLASS 1 LASER PRODUCT
APPAREIL A LASER DE CLASSE 1
H I J
L
A
N
M
K
O P Q
VOLUME
RANDOM
01
02
03
05
07
09
11
12
04
06
08
10
23
22
20
18
16
15
14
17
19
21
13
Page 6
MICRODAB16BT
Remote Control2.3
VOLUME
RANDOM
01
02
03
05
07
09
11
12
04
06
08
10
23
22
20
18
16
15
14
17
19
21
13
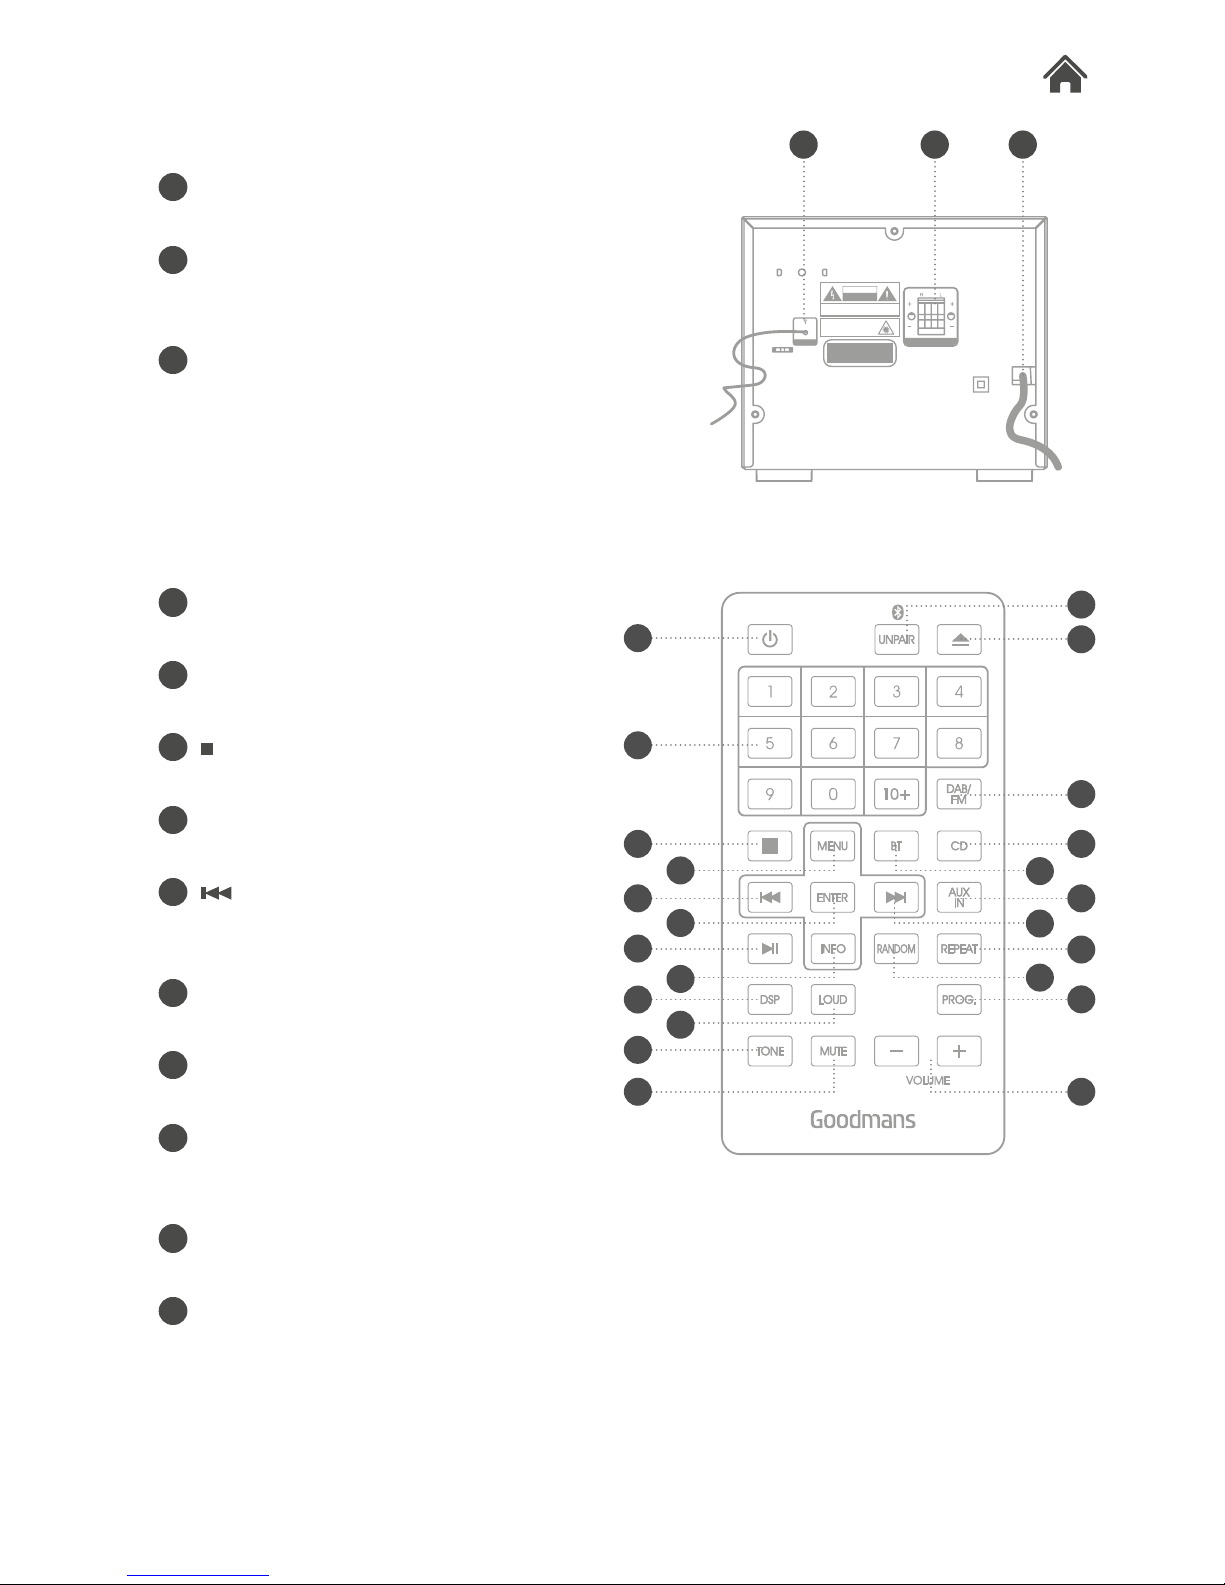
11 TONE button. Press to cyle
between bass & treble adjustment
modes.
12 MUTE button. Press to activate the
audio mute function.
13 UNPAIR button. Press to unpair a
connected Bluetooth device.
14 EJECT button. Press to eject or
close the CD drawer.
15 DAB/FM button. Press to switch to
DAB mode. Press again to switch to
FM mode.
16 CD button. Press to switch to CD
mode.
17 BT button. Press to switch to
Bluetooth mode.
18 AUX IN button. Press to switch to
AUX input mode.
19 button. Press to skip to next CD/
BT track(s). Press and hold to fast
forward CD/BT tracks.
20 R E PEAT but t o n. Press to cycle
between the repeat playback modes.
21 RANDOM button. Press to enable
the random playback mode.
22 PROG. button. Press to enable the
programmed playback function.
23 VOLUME +/- buttons. Press the ‘+’
button to increase the volume level.
Press the ‘-’ button to decrease the
volume level.
Page 7

MICRODAB16BT
3.0
3.1
Quick Setup3
Fitting the Remote Battery
1. Press the small tab to the left of the battery insert inwards.
Then slide the battery insert out of the main remote unit.
2. Insert 1 x CR2025 battery into the removable battery slot
taking note that the + polarity faces upwards.
3. Replace the battery insert by simply pushing back into the
space you removed it from.
Leaking batteries may damage the battery cabinet and the
remote as a whole. If you are not going to use the
MICRODAB16BT for an extended period, please remove the
battery to avoid damage.
Caution: Danger of explosion if battery is incorrectly replaced.
Replace only with the same or equivalent type.
Connecting the Speakers
1. Unwrap the speaker wires.
2. Place a speaker on either side of the main unit, preferably at
the same height, and with at least 150mm between each
speaker and the main unit.
3. Connect the speaker wires to the terminals on the rear of
the unit (P). Take care to match the speaker placed to the
LEFT to the LEFT output on the rear of the unit. Repeat for
the RIGHT speaker.
4. When connecting ensure the RED wire connects to the
RED terminal and the BLACK wire to the BLACK terminal.
RIGHT SPEAKER LEFT SPEAKER
REAR PANEL
Page 8

MICRODAB16BT
3.3
3.2
3.4
3.5
Connecting the Power
1. Insert the plug into a power socket, and switch the power on.
2. Press the STANDBY button on either the main unit or remote
control.
Standby & Auto Standby
1. Press the STANDBY button to wake from standby mode.
2. Press the STANDBY button again to enter Standby mode.
Due to new ECO regulation requirements this product
incorporates a power saving feature.
3. When in CD, BT or AUX mode, once audio playback has
ceased and the unit has stood idle for approximately 20
mins, it will switch into a ‘power-down’ power saving mode.
4. To wake the unit up, press the STANDBY button.
Adjusting the Volume
1. Rotate the volume control clockwise or anti-clockwise to
increase or decrease the volume output.
2. Press the VOLUME +/- buttons on the remote control.
Mute Function
1. Press the MUTE button at any time to silence the output.
2. Press again to resume audio output.
SOURCE
PLAY/PAUSE
ENTER
STOP PREV NEXT
V
O
L
U
M
E
EJECT
STANDBY
CAUTION
VISIBLE AND INVISIBLE LASER
RADIATION WHEN OPEN
AVOID EXPOSURE TO BEAM
SPEAKER(4)
ANTENNA
AC 220V-240V ~50Hz
CAUTION
RISK OF ELECTRIC SHOCK
DO NOT OPEN
WARNING: SHOCK HAZARD - DO NOT OPEN
AVIS: RISQUE DE CHOC ÉLECTRONIQUE - NE PAS OUVRIR
WARNUNG: ELEKTROSCHOCK GEFAHR - NICHT ÖFFNEN
LASERSCHUTZKLASSE 1 PRODUKT
CLASS 1 LASER PRODUCT
APPAREIL A LASER DE CLASSE 1
Page 9

MICRODAB16BT
Tone Adjustment
1. Press the TONE button on the remote control.
2. The first adjustment is Bass. Use the VOL+/- buttons to
adjust.
3. Press the TONE button again to edit the Treble using the
VOL+/- buttons to adjust.
DSP Effects
1. Pressing the DSP button repeatedly cycles through a set of
EQ presets to alter the sound field. Choose from: Flat,
Classic, Rock, Pop & Jazz.
Loudness Function
1. Press the LOUD button on the remote to enable.
2. Press again to disable the effect.
Switching Modes
To switch between the available modes: CD, DAB/FM & AUX
IN follow the below steps.
1. Press the SOURCE button on the main unit to cycle through
the options or press the relevant button on the remote
control from CD, DAB/FM (press repeatedly to cycle
between DAB & FM) & AUX IN.
V
O
L
U
M
E
BASS 0
V
O
L
U
M
E
CD Mode
DSP:FLAT
3.6
3.7
3.8
3.9
Page 10

MICRODAB16BT
CD Operation
Operation4
Load a Disc
1. Open the CD drawer by pressing the EJECT button.
2. Load a disc onto the disc tray with the label side facing up.
3. Press the
EJECT button once more to close the CD door.
Play a Disc
1. Follow the steps above to load a disc (if not already loaded).
2. The player begins to read the disc immediately.
3. When the disc is successfully read playback begins
automatically with the first track.
4. Press the
/ENTER button once to pause the music
playback. The track timer flashes to indicate the player is in
pause mode; press the button to cease music playback.
The LED shows the total number of tracks and the duration
of all the tracks together.
Skip Tracks and Search
1. Press the button once during playback to skip to the
next track. To skip to a specific track, press this button
several times until you reach the track number required.
2. Press the
button once during playback to return to the
beginning of the current track. Press the button twice
repeatedly to skip to the previous track. To skip back to a
specific track, press this button several times.
3. Hold the
button during playback to fast forward the
current track.
4. Hold the
button during playback to fast rewind the
current track.
4.0
4.01
V
O
L
U
M
E
DISC CD
Track 01 00:16
4.02
RANDOM
Page 11

MICRODAB16BT
Programmed Playback
To programme an alternative playback order of tracks follow
the below steps.
1. Press the
STOP button if a disc is playing. Then press the
PROG. button to enter the programme setup function.
2. Use the
/ buttons to skip between the tracks.
3. Press the PROG. button to store track ‘1’ of the playlist.
4. Repeat steps 2-3 to program up to 20 tracks.
5. When complete press the
button to begin playback.
6. To cancel the program sequence press the
STOP button
twice.
Repeat Single/All Track(s)
1. During playback pressing the REPEAT button will flag the
current track to repeat indefinitely. You will see ‘REP-1’ on
the display.
2. Pressing the REPEAT button again will repeat all tracks on
the disc. You will see ‘REP-ALL’ on the display.
3. To cancel the repeat function press the REPEAT button for
a third time. You will see ‘DISC’ on the display.
Random Playback
1. Press the RANDOM button on the remote control. The CD
contents will be played once in a random order. You will see
‘RANDOM’ on the display.
2. To cancel the random operation press the RANDOM button
again. You will see ‘DISC’ on the display.
Numeric Buttons
While listening to a CD a specific track number can be played
by pressing the relative digit on the number buttons.
4.03
MEMORY P-01
T-000
4.04
REP-ALL CD
Track 01 02:44
4.05
RANDOM CD
Track 01 02:44
4.06
CD Operation
Page 12

MICRODAB16BT
Using DAB For the First Time
1. After switching to DAB input mode for the first time a full
scan of DAB stations is performed automatically.
During the full scan mode, the LCD will display a slide bar that
indicates the progress of the scan, and the amount of radio
stations that have been found so far. Once the scan has
finished, the radio will select the first alphanumeric station.
NOTE: The station name will be shown on the top of the
display. Information about the DAB radio station will be
displayed on the bottom of the display.
2. To listen to the located DAB stations use the
/
buttons. When you reach the desired station press the
ENTER button to begin playback of that station.
NOTE: If no stations were found, or no DAB stations can be
received currently [No DAB station] will be displayed. In this
case you may need to perform another station scan.
Positioning the Antenna
Positioning of the aerial will influence the DAB signal quality.
1. To find the optimum position, select the display signal
strength indicator by cycling through the display modes
using the INFO button.
2. Once the indicator is displayed, move the aerial and
observe the signal level as shown by the bar graph. When
you are happy with the positioning, perform an auto-tune to
capture all of the available stations.
Full Scan
1. To activate the full scan press the MENU button.
2. When you see the <Full scan> option press the ENTER
button. The unit will search for all available DAB stations that
can be tuned.
4.10
Scanning... 14
4.11
Absolute 80s
4.12
DAB Radio Operation
Page 13

MICRODAB16BT
Manual Tuning
As well as an auto tune function, you can manually tune the
receiver.
1. Press the MENU button in DAB mode, and use the
/
buttons to find <Manual tune> Press the ENTER button to
activate the manual tune options.
2. Now use the
/ buttons to cycle through the DAB
ensembles/multiplexes, which are numbered from 5A to
13 F.
3. Press the ENTER button to view the ensemble/multiplex
details. Press the ENTER button then the MENU button to
return to the default display.
4. Any stations found during the manual tune operation will be
added to your station list.
Storing a Station Preset
It is possible to store up to 20 of your favourite stations.
This will enable you to access your favourite stations quickly &
easily.
1. To store a preset, you must first be listening to the station
that you would like to save.
2. Then press & hold one of the numeric buttons from 1-9 to
store the station under that number. To store to a station
above 9 you will need to press the ‘10+’ button and then
press and hold the second digit. You will see ‘Preset X
Stored’ appear on the display with X being the number you
stored the station under.
Recalling a Preset
1. To select a preset, just press the required numeric button
while in DAB mode to activate the station you stored.
2. To recall a preset above 9 press the ‘10+’ button and then
enter the second digit.
4.13
4.14
4.15
DAB Radio Operation
Page 14

MICRODAB16BT
DAB Display Modes
Every time you press the “INFO” button on the remote control,
the display will cycle through the following display modes.
• DLS (dynamic label segment): Dynamic label segment is a
scrolling message that the broadcaster may include with
their transmissions. This message usually includes
information, such as program detail etc.
• Signal strength: This option will display a bar indicating the
signal strength.
• Program type: This describes the “Style” or “genre” of
music that is being broadcast e.g. “Rock “or “Classical”.
• Ensemble/Multiplex (group name): A multiplex/ensemble is a
collection of radio stations that are bundled and transmitted
on one frequency. There are national and local multiplexes.
Local ones contain stations that are specific to that area
e.g. MXR West.
Unlike FM radio, DAB groups several radio stations together
& transmits on one frequency.
• Channel frequency: Displays the current DAB multiplex in
use.
• Signal error: Displays a bar graph denoting the amount of
errors present in the received signal.
• Mode: Displays the current mode.
• Time & date: The time & date is set automatically from the
DAB or FM broadcast.
Secondary Services
On some occasions you will see a “>>” symbol directly after
the name of the station. This indicates that there are
secondary services available to that station.
These secondary services contain extra services that relate to
the primary station, eg: a sports station may want to add extra
commentaries. The secondary services are inserted directly
after the primary station.
1. To activate a secondary service press the
button. You
will see that the >> has changed to a << to indicate you
have selected the secondary service.
2. Press the ENTER button to begin playback of the service.
3. To return to the original service press the
button and
then ENTER.
4.16
Programme Type
DLS (scrolling text)
Signal Strength
Ensemble Name
Channel Frequency
Time
Signal Error
Mode
Date
4.17
Station List
< BBC R5L >> >
DAB Radio Operation
Page 15

MICRODAB16BT
Pruning
When the radio has performed a Scan in several locations you
may find there are stored stations that you can no longer
receive. This function automatically removes them from the
stored station list.
1. Press the MENU button in DAB mode, and use the
/
buttons to find <Prune> Press the ENTER button.
2. Use the
/ buttons to select YES and press ENTER
button.
DRC (Dynamic Range Control)
This causes the radio to reduce the dynamic range of the
audio signal. The purpose of this is to adapt the dynamic
range of the audio signal to listening in a noisy environment.
This is not available on some DAB stations.
1. Press the MENU button in DAB mode, and use the
/
buttons to find <DRC> Press the ENTER button.
2. Choose between DRC off, DRC Low and DRC High using
the
/ buttons.
3. Press the ENTER button to save the setting.
4.18
4.19
DAB Radio Operation
Page 16

MICRODAB16BT
Tuning a Station
1. You can scan up or down the frequency range manually by
pressing the / buttons to increase or decrease the
frequency in 0.05 MHz increments. To scan through the
frequency range quickly press and hold either /
buttons.
2. Once a station has been found, the scanning will stop
automatically. If no station is found, then the tuning will stop
once it has cycled through the entire FM band (87.5108MHz).
Scan Modes
When performing an scan you can set the sensitivity level of
the stations to be found. EG: strong signals only or all stations.
1. In FM mode, press the MENU button, when <Scan Setting>
appears on the display press the ENTER button to view the
submenu.
2. Use either
/ buttons to select ALL STATIONS (which
will detect any station, even with a weak signal) or STRONG
STATION (which will only detect stations with a good signal
strength). Press the ENTER button to select the required
option.
3. When you perform a scan as described in ‘Tuning a station’,
only stations fitting the applied setting will be detected.
Stereo/ Mono Mode
Sometimes Stereo radio stations can suffer from interference
(static & crackles) to reduce this problem you can enable
MONO mode.
1. In FM mode, press the MENU button. When <Scan
Setting> appears on the display press either
/
buttons to locate ‘Audio setting’, then press the ENTER
button to view the submenu.
2. Use the
/ buttons to select between STEREO or
MONO.
3. Press the ENTER button to save the setting and MENU to
exit.
4.20
4.21
4.22
FM Radio Operation
Page 17

MICRODAB16BT
Storing a Station Preset
It is possible to store up to 20 of your favourite stations.
This will enable you to access your favourite stations quickly &
easily.
1. To store a preset, you must first be listening to the station
that you would like to save.
2. Then press & hold one of the numeric buttons from 1-9 to
store the station under that number. To store to a station
above 9 you will need to press the ‘10+’ button and then
press and hold the second digit. You will see ‘Preset X
Stored’ appear on the display with X being the number you
stored the station under.
Recalling a Preset
1. To select a preset, just press the required numeric button
while in FM mode to activate the station you stored.
2. To recall a preset above 9 press the ‘10+’ button and then
enter the second digit.
FM Display Modes
Every time you press the “INFO” button on the remote control,
the display will cycle through the following display modes.
• Radio text: Broadcasters can include a scrolling text that
displays information about the current program. If radio text
is not available then the display will show ‘NO TEXT’.
• Program type: This describes the “Style” or “genre” of
music that is being broadcast e.g. “Rock “or “Classical”.
• Program name: Displays the name of the current station.
• Audio mode: Displays the current FM mode of STEREO or
MONO.
• Time & date: The time & date is set automatically from the
DAB or FM broadcast.
Positioning the Antenna
Positioning of the aerial will influence the FM signal quality.
1. To find the optimum position, select the display signal
strength indicator by cycling through the display modes
using the INFO button.
2. Once the indicator is displayed, move the aerial and
observe the signal level as shown by the bar graph. When
you are happy with the positioning, perform an auto-tune to
capture all of the available stations.
4.23
4.24
4.25
Radio text
Program type
Time
Program name
Audio mode(stereo/mono)
Date
4.26
Planet Rock
FM Radio Operation
Page 18

MICRODAB16BT
Aux In Mode
It is possible to connect an external audio source like an MP3
player using a 3.5mm audio cable (not supplied).
1. Connect one end of the cable to the AUDIO devices
headphone /Line output and the other end to the AUX
INPUT input on the front of the MICRODAB16BT.
2. Press the SOURCE button until you reach the AUX MODE
option or press the AUX IN button on the remote control.
3. Adjust the volume to your desired level.
The volume output is affected by the volume level on the
source EG: MP3 player so make sure that is set to about
70-80% (not too loud to avoid distortion).
4.30
AUX IN
SOURCE
PLAY/PAUSE
ENTER
STOP PREV NEXT
V
O
L
U
M
E
EJECT
STANDBY
AUX Input Operation
Page 19

MICRODAB16BT
Bluetooth Operation
Connecting a Bluetooth Device
When using the Bluetooth connection, you can listen to audio
wirelessly from a Bluetooth audio device (For example an MP3
player) within 10 metres of the MICRODAB16BT unit.
1. When the Bluetooth mode is selected the words ‘NOT
CONNECTED’ will flash on the display. This means the unit
is in connection mode and will pair with any previously
connected devices.
2. If you have not connected a device you can now enable
‘discovery’ mode on your device and select the
MICRODAB16BT Bluetooth connection. If you are asked for
a pass code enter ‘0000’.
If you turn off either device before pairing is complete the
process will need to be repeated when powered ON again.
3. Once paired a beep will be heard and the display will
change to ‘CONNECTED’.
The volume output is effected by the volume level on the audio
source EG: Phone or laptop, so make sure that is set to about
70-80% (not too loud to avoid distortion).
4. To un-pair a device press the ‘UNPAIR’ button on the
remote control. You can now pair another bluetooth device
to the MICRODAB16BT.
Controlling a Connected Device
Once connected you can either use the controls on the audio
device to begin playback, skip tracks etc. Or you can use the
control buttons on the unit/remote control.
1. The
button when pressed will begin playback of the
selected track on the audio device. Press again to pause
playback.
2. To skip to the next track press the
button.
3. To skip to the previous track press the
button.
4.40
4.41
Page 20

MICRODAB16BT
4. All other general audio functions such as MUTE, TONE,
DSP & VOLUME work as described in this manual.
Factory Reset
There may be times when you need to reset the unit back to
its original factory setting.
The factory reset function can ONLY be activated from DAB or
FM mode.
1. Press the MENU button.
2. When the <Full scan> option appears (DAB mode) or <Scan
setting> (FM mode) press either
/ buttons and locate
<System>, press the ENTER button.
3. Use the
/ buttons to find <Factory reset> and press
the ENTER button.
4. Use the
/ buttons to select ‘Y’ (yes) and press the
ENTER button to perform the reset function.
4.50
General Operation
Page 21

MICRODAB16BT
Problem What to do
No Power
Check the mains plug is connected to the wall socket.
Switch the wall socket on.
Press the STANDBY button to wake from Standby
mode.
No sound from the CD
No sound from an AUX input
The volume level is too low. Increase using the
volume control.
The volume level is too low. Increase using the
volume control.
The external audio source volume is too low,
increase the volume level.
The sound is distorted
The sound is distorted from an AUX input
Reduce the MICRODAB16BT volume level using the
volume control.
The external audio source volume is too high,
decrease the volume level.
Unable to play a CD Check there is a disc present in the CD drawer.
Remove and re-insert the CD with the label side
facing upwards.
Clean the disc, it may be dirty. If scratched try
another disc.
Static interference/Burbling sound when
listening to the radio
This is caused by poor reception. Re-locate the
antenna or if that fails try moving the
MICRODAB16BT to a different location.
Bluetooth sound is interrupted or distorted The unit is close to a device that generates
electromagnetic radiation. Re-locate the
MICRODAB16BT away from the electromagnetic
radiation source
Obstacle(s) between the unit and the Bluetooth
audio source device. Remove the obstacle.
Remote control not working Battery is exhausted. Replace the battery.
There is an object blocking the path to the IR
sensor. Remove the object and try again.
Check the battery is installed correctly. Re-fit the
battery if not.
Troubleshooting5
Page 22

Model Number
MI CRODAB16 BT
Power Supply AC 230-240V ~ 50 Hz
Speaker Output Power 8W x 2 (RMS)
Speaker Impedance 4 Ohms
Frequency Range
DAB/DAB+: 174-240 MHz
FM: 87.5-108MHz
Supported Disc Types CD-DA.CD-R/CD-RW
Max Power Consumption AC 20W
Dimensions
Main unit: 170mm (L) x 215mm (W) x 150mm (H)
Speaker: 130mm (L) x 113mm (W) x 183mm (H)
Technical Specification6
www.goodmans.co.uk
Customer Support7
Our customer service team is available for technical or
guarantee support. Visit www.goodmans.co.uk/support
QSG- AP R16-M IC RODA B16 BT
 Loading...