


MICRO1530
INSTRUCTION MANUAL
Before operating this unit,
please read this Owers manual carefully.

Product Information Helpline
02392 391100
1
CONNECTIONS TO MAINS SUPPLY
This appliance may be fitted with a non-rewireable plug. If it is necessary to change the fuse in a non-rewireable plug the fuse
cover must be refitted. If the fuse cover is lost or damaged, the plug must not be used until a replacement available from the
appliance manufacturer is obtained. It is important that the colour of the replacement fuse cover corresponds with the colour
marking on the base of the plug.
If the plug has to be changed because it is not suitable for your socket, or becomes damaged, it should be cut off and an
appropriate plug fitted following the wiring instructions below. The plug removed must be disposed of safety as insertion into a
13A socket is likely to cause an electrical hazard.
For your own safety read the following instructions carefully before attempting to connect this unit to the mains.
Mains (AC) Operation
This unit is designed to operate on 230V, 50 Hz current only. Connecting it to other power sources may damage the unit. The
wires in this mains lead are coloured in accordance with the following code:
BLUE = NEUTRAL BROWN = LIVE
Important
As the colours of the wires in the mains lead of this appliance may not correspond with the coloured makrings identifying the
terminals in your plug, proceed as follows:-
The wire which is coloured blue must connected to the terminal which is marked with the
letter L or coloured red.
The wire which is clolured brown must be connected to the terminal which is marked
with the letter L or colored red.
No connection is to be made to the earth terminal of the plug.
If a 13 Amp (BS 1363) Plug is used, a 3 Amp Fuse must be fitted, or if any other type of
Plug is used a 5 Amp Fuse must be fitted, either in the Plug, or on the Distribution Board.
Caution
To prevent electric shock disconnect from the mains before removing cover. No user serviceable parts inside. Refer servicing to
qualified service personnel.
Safety Precaution
Do not allow this unit to be exposed to rain or moisture.
Mains Supply : 230 Volts 50 Hz AC only.
This symbols means that this unit is double insulated. An earth connection is not required.
CAUTION
CLASS I LASER PRODUCT
Use of Controls or adjustments or performance of procedures other than those specified herein may result hazardous radiation
exposure.
LASERSAFETY
This unit employs a laser, only qualify service personnel should attempt repair. DANGER : INVISIBLE LASER RADIATION WHEN OPEN AND INTERLOCK FAILED OR DEFEATED. AVOID
DIRECT EXPOSURE TO BEAM.
CAUTION : HAZARDOUS LASER RADIATION WHEN OPEN AND INTERLOCK DEFEATED.
CAUTION
CLEANING : Always disconnect unit from mains supply before attempting to clean it. Use soft cloth moistened with soapy water,
wipe gently. Do not use solvents or abrasive materials.

Product Information Helpline
02392 391100
2
TABLE OF CONTENTS
CONNECTIONS .................................................................................................................................................. 3
CONNECTIONS ..........................................................................................................................................................................................3
ADJUSTING THE FM AERIAL.................................................................................................................................................................... 3
CONNECT THE MW AERIAL .....................................................................................................................................................................3
SPEAKERS CONNECTION........................................................................................................................................................................3
POWER SOURCE ............................................................................................................................................... 4
AC POWER SUPPLY .................................................................................................................................................................................. 4
INSERTING BATTERIES INTO THE REMOTE CONTROL ....................................................................................................................... 4
DISPLAY INFORMATION .................................................................................................................................... 4
GENERAL CONTROLS ................................................................................................................................... 5-6
BASIC FUNCTION .............................................................................................................................................. 7
DEMONSTRATION MODE .........................................................................................................................................................................7
SWITCHING THE SYSTEM ON .................................................................................................................................................................7
SWITCHING THE SYSTEM TO STANDBY MODE ....................................................................................................................................7
VOLUME CONTROL .................................................................................................................................................................................. 7
SOUND CONTROL..................................................................................................................................................................................... 7
USING THE CD ................................................................................................................................................... 8
LOADING THE CD......................................................................................................................................................................................8
PLAYING A NORMAL DISC ........................................................................................................................................................................ 8
SELECTING A DESIRED TRACK/PASSAGE............................................................................................................................................. 8
PROGRAM TRACKS ..................................................................................................................................................................................8
RANDOM ....................................................................................................................................................................................................9
REPEAT ......................................................................................................................................................................................................9
USING THE RADIO ........................................................................................................................................... 10
TUNING IN RADIO STATIONS .................................................................................................................................................................10
TUNING TO AN RDS STATION ................................................................................................................................................................10
STORING PRESET STATIONS ................................................................................................................................................................ 10
TUNING TO PRESET RADIO STATION ...................................................................................................................................................10
USING THE CASSETTE ................................................................................................................................... 11
UNDERSTANDING THE BUTTONS ......................................................................................................................................................... 11
PLAYING A CASSETTE TAPE ................................................................................................................................................................. 11
AUTOMATIC STOP FEATURE ................................................................................................................................................................. 11
RECORDING ON CASSETTE TAPES ..................................................................................................................................................... 11
RECORDING FROM THE RADIO ............................................................................................................................................................11
RADIO RECORDING TIPS ....................................................................................................................................................................... 11
RECORDING FROM CD .......................................................................................................................................................................... 11
RECORDING FROM CD PROGRAM ....................................................................................................................................................... 11
CLOCK / TIMER OPERATION .......................................................................................................................... 12
VIEW CLOCK............................................................................................................................................................................................12
CLOCK SETTING .....................................................................................................................................................................................12
TIMER SETTING ...................................................................................................................................................................................... 12
GENERAL INFORMATION ............................................................................................................................... 14
MAINTENANCE ........................................................................................................................................................................................14
TROUBLE SHOOTING GUIDE................................................................................................................................................................. 14
IMPORTANT NOTES......................................................................................................................................... 15
Product Information Helpline
02392 391100
3
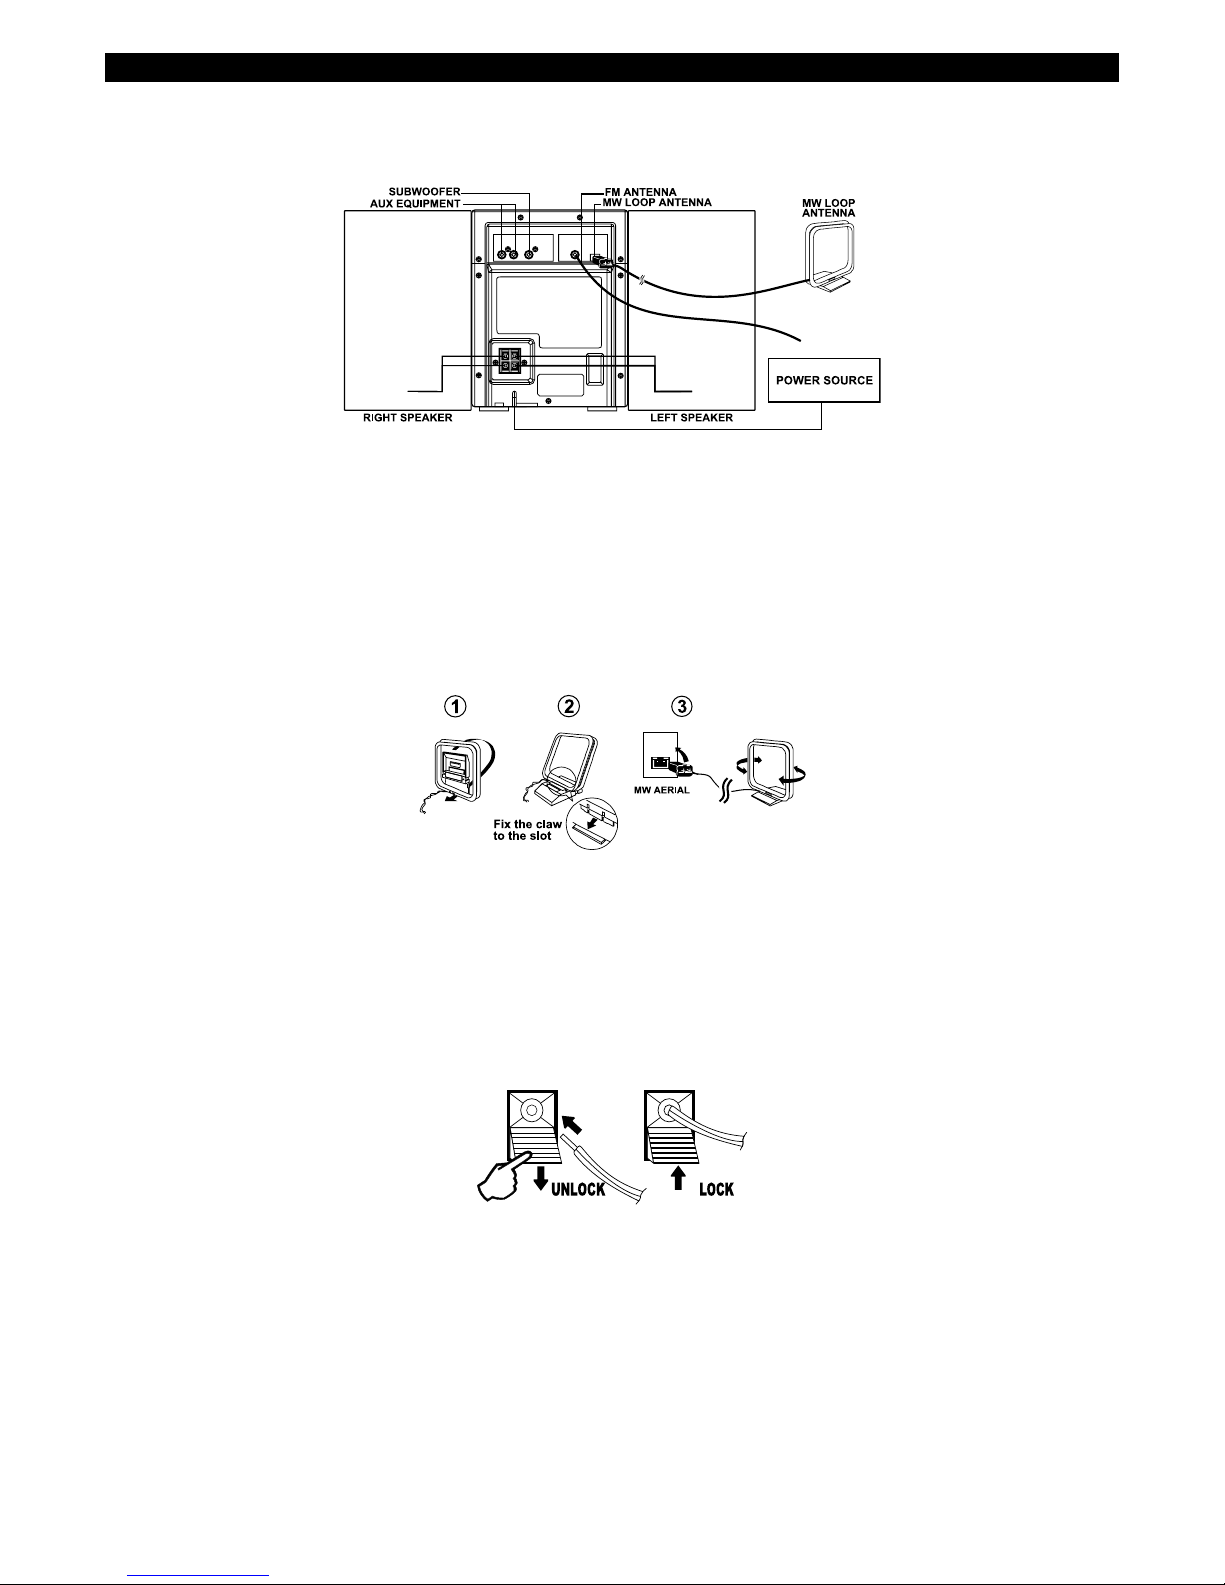
CONNECTIONS
CONNECTIONS
ADJUST THE FM AERIAL
Adjust the position of the FM aerial for the best reception.
CONNECT THE MW AERIAL
Connect the supplied MW loop aerial to the MW ANT input on back of the system. Adjust the position of the MW aerial for best
reception.
SPEAKERS CONNECTION
Connect the right speaker to terminal marked "R", with the red wire to + and the black wire to .
Connect the left speaker to terminal marked "L", with the red wire to + and the black wire to .
Clip the stripped portion of the speaker wire as shown.
Connect the subwoofer to terminal marked "SUBWOOFER OUT" jack. (Active Sub Woofer not included)
Connect the external equipment to AUX IN jacks if necessary. (external equipment not included).
Notes:
For optimal sound performance, it is recommended to use the supplied speakers.
Do not connect more than one speaker to any one pair of +/ speaker terminal.
Product Information Helpline
02392 391100
4
POWER SOURCE
IMPORTANT!
Before connecting the AC power cord of the system to the wall outlet, you must remove the CD TRANSIT BOLT on the left side
of the player.
AC POWER SUPPLY
After all other connections have been made. Connect the AC power cord of the system to the wall outlet. The system in standby
mode will show the demonstration function.
INSERTING BATTERIES INTO THE REMOTE CONTROL
Insert batteries (type LR03 or AAA) into the remote control as shown in the battery compartment.
CAUTION
Replace batteries if the remote control fails to work.
Remove batteries if they are exhausted or not to be used for a long time.
Batteries contain chemical substances, so they should be disposed of properly.
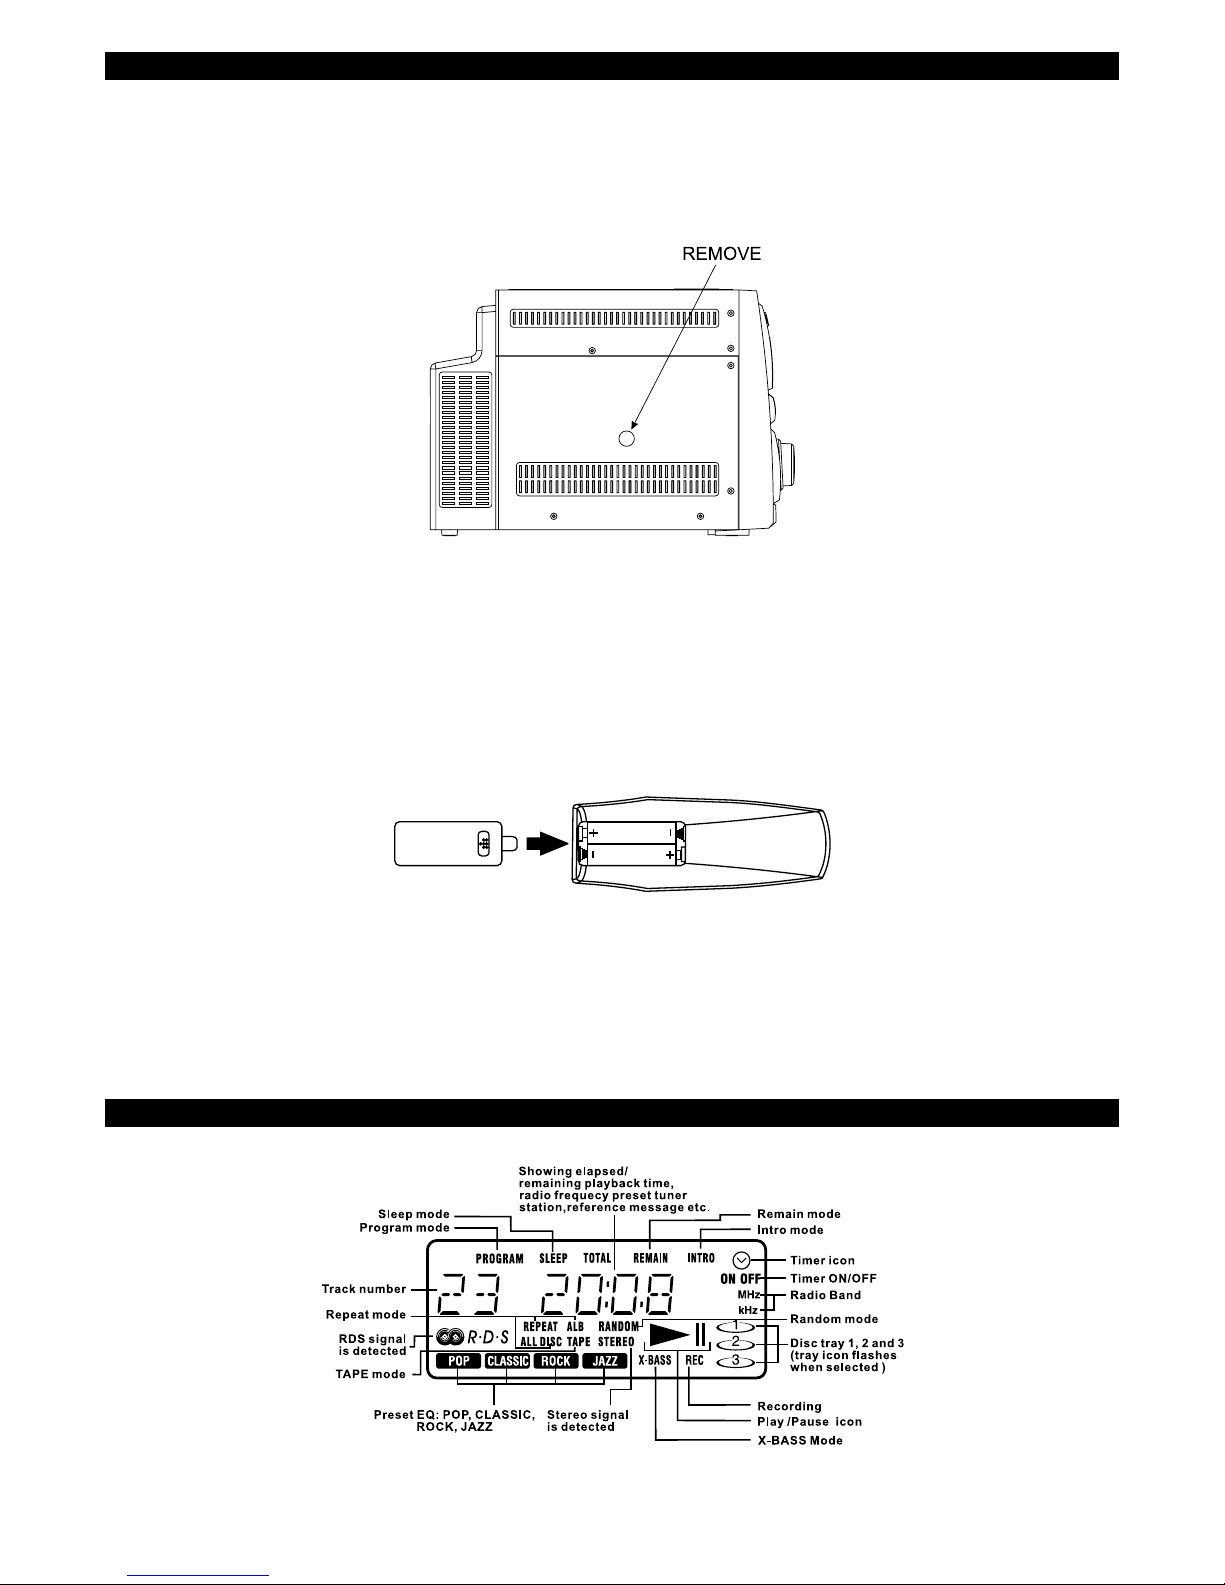
DISPLAY INFORMATION
 Loading...