

Page 1
MICRO1112DAB DAB MICRO
User Guide
IMPORTANT: Please read all instructions carefully before use and keep for future reference
Page 2

Introduction
Thank you for choosing this Goodmans DAB Micro System. You can listen to
your favourite radio stations and CD's.
It’s really simple to use; you can fully operate your DAB Micro system using the supplied Remote Control.
Throughout this User Guide the DAB Micro will be referred to as the Micro System.
Safety is important
Use of any electrical equipment should be undertaken with care. Please read the Safety instructions
on pages 19 & 20 before you operate this Micro System.
2
Page 3
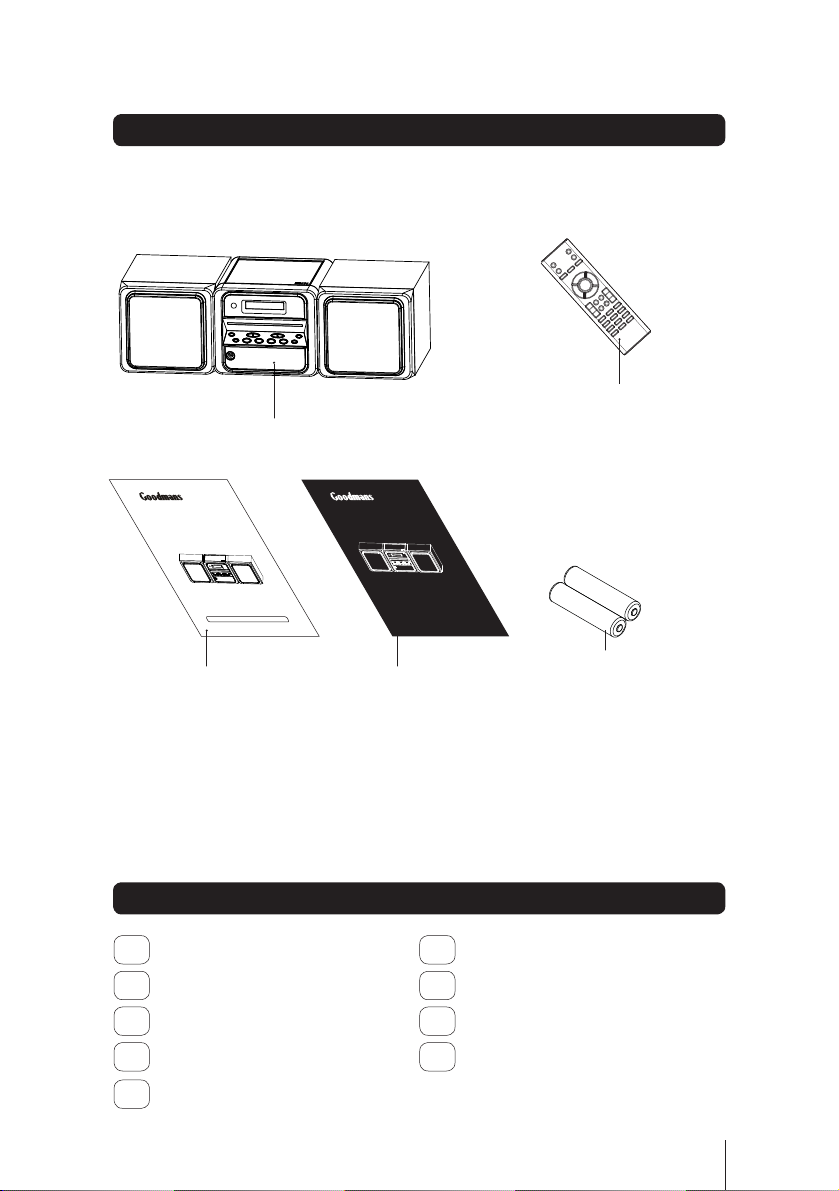
What’s in the box
DAB Micro
Remote Control
MICRO1112DAB DAB MICRO
User Guide
IMPORTANT: Please read all instructions carefully before use and keep for future reference
This User Guide
Contents
01
Your Micro System ........................4
Get going .....................................6
02
Using the DAB radio .....................7
03
04
Using the radio ...........................10
MICRO1112DAB DAB MICRO
Quick Start Guide
Start here
2 x AAA batteries for remote control
06
Using the Clock and Timer.............14
Other functions...........................16
07
Troubleshooting............................17
08
Specifications .............................18
09
Using the CD ..............................11
05
3
Page 4
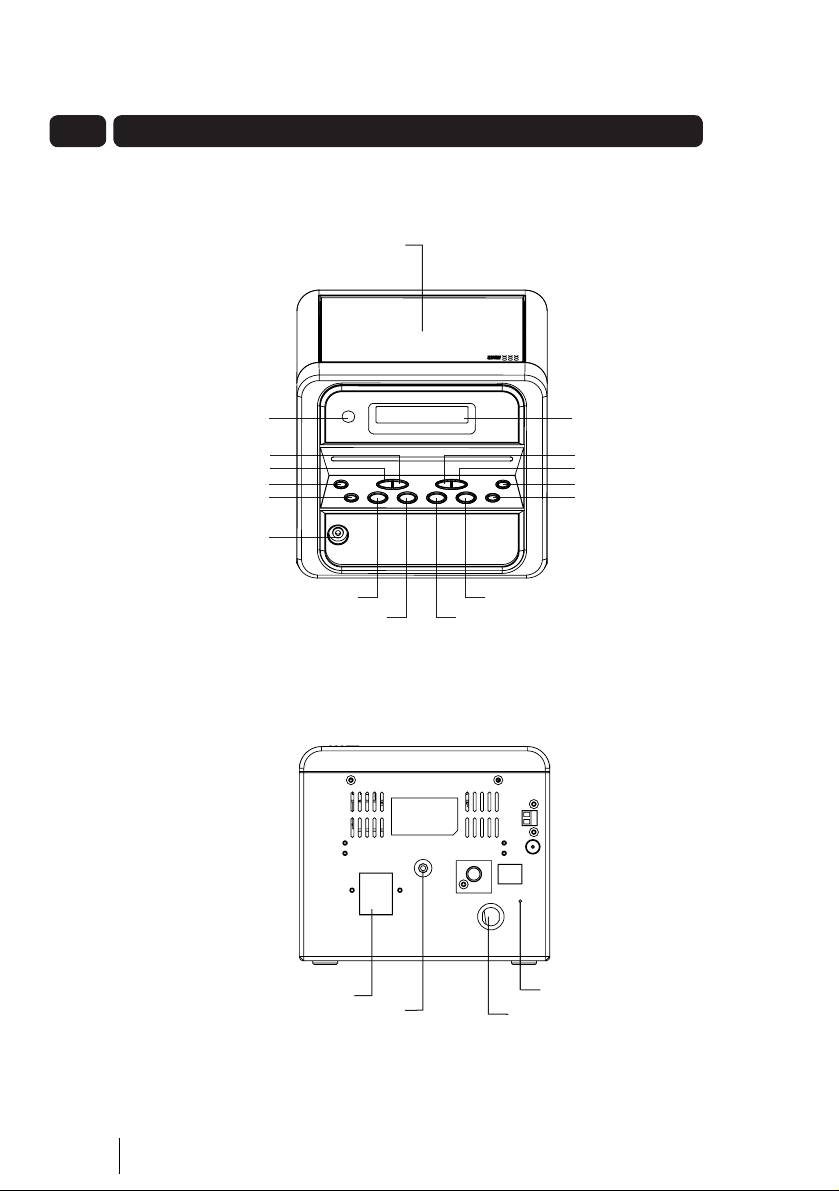
01 Your Micro System
on
Skip
n
S
STOP
Button
FUNCTIO
on
OL-
Button
n
ENTER
INFO
B
n
CD
Doo
S
on
REMO
sor
A
O
t
Mai
d
Ante
S
R
Terminal
Front
r
TE CONTROLSen
kip >> Forwards Button
<< Backwards Butto
TANDBY/ON Butt
UX IN socket
Rear
N Butt
PEAKE
PLAY/SCAN Butto
NE socke
HEADPH
Button
utto
LCD Display
MEMORY/CLOCK Button
PLAY MODE Butt
VOL+ Button
V
nna
ns Power Lea
4
Page 5
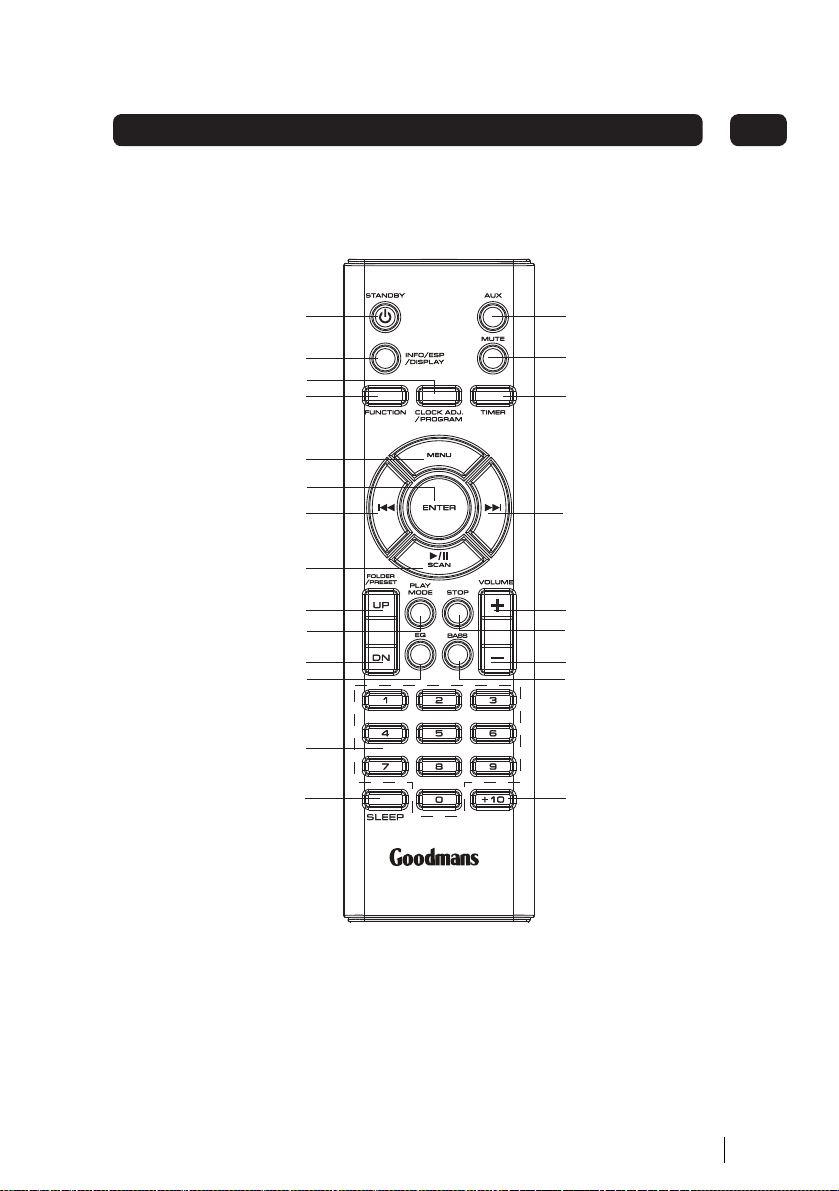
Remote Control
01Your Micro System
STANDBY Button
INFO/ESP/DISPLAY Button
CLOCK ADJ./PROGRAM Button
FUNCTION Button
MENU Button
ENTER Button
RWD Button
PLAY/SCAN Button
FOLDER UP Button
PLAY MODE Button
FOLDER DN Button
EQ Button
NUMBER Buttons
SLEEP Button
AUX Button
MUTE Button
TIMER Button
FWD Button
VOL+ Button
STOP Button
VOL- Button
BASS Button
File +10 Button
5
Page 6
02
Get going
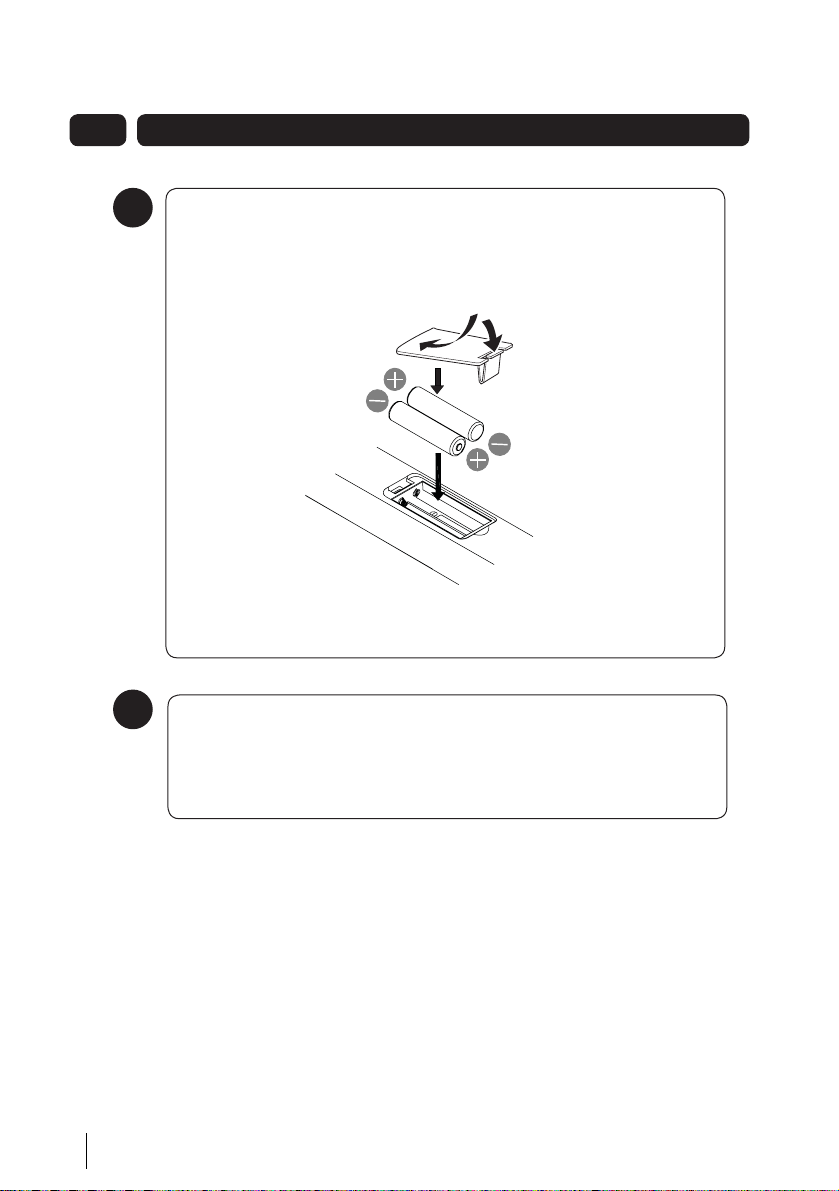
Using the Remote Control
1
Insert two AAA batteries into the remote control while observing the correct (+) and (-)
polarities as shown.
2
Using Headphones
A pair of headphones (not supplied) with a 3.5mm diameter stereo plug and 8-32 ohm
impedance is required. Plug the headphones into the Headphone Socket at the back of the
Micro System.
When headphones are connected, the speakers are automatically muted.
6
Page 7
Using the DAB radio
Introduction
■
Your DAB radio can automatically scan for radio
stations within your region. The radio stations found
are stored.
■
In addition to digital audio your DAB radio can
display information such as Program name, Program
type, Network provider, Signal strength, Current time
and date, and scrolling text information.
Turning on the DAB radio
Extend the wire aerial on the rear of the DAB radio.
Press the STANDBY/ON button to switch on your radio.
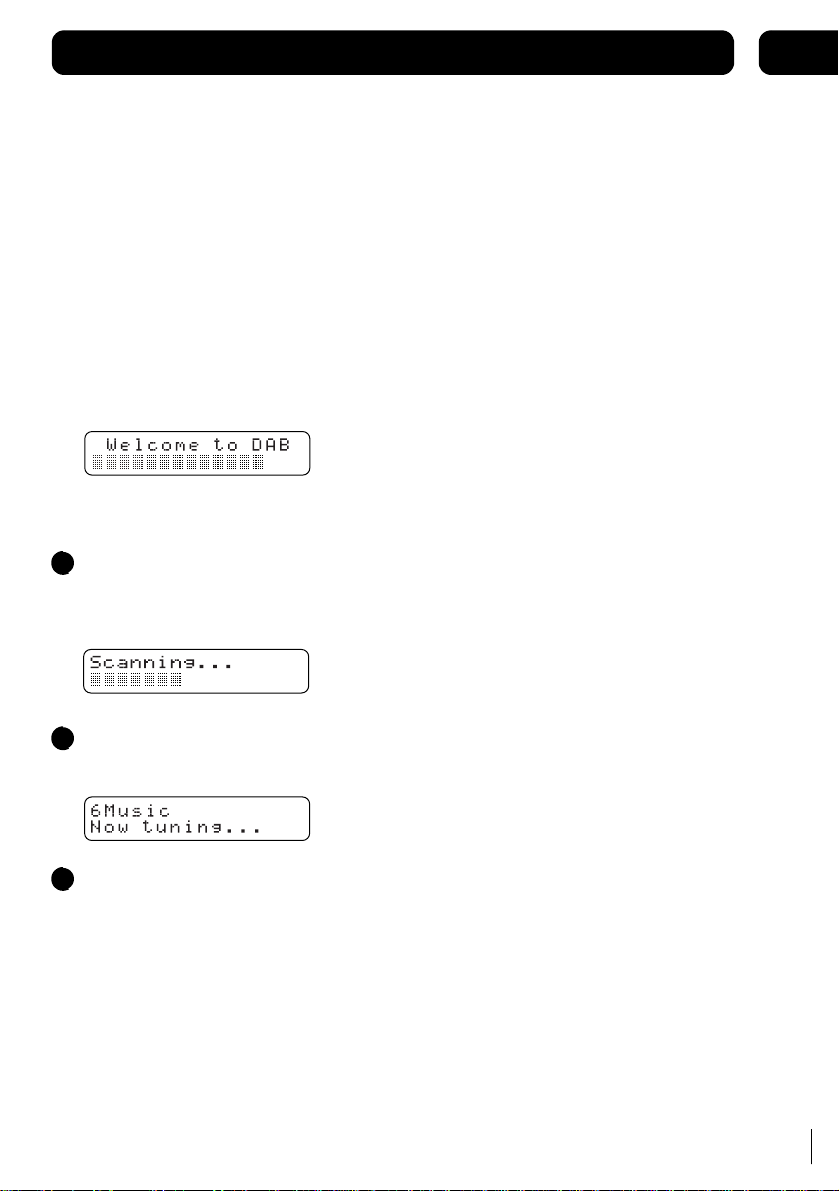
Scanning for Radio Stations
For initial use, press the PLAY/SCAN button.
1
The DAB radio will make a quick scan
and store the stations in memory.
03
When the scanning is completed, the DAB stations will
2
be displayed in alphanumeric order. The first station in
the list will be selected.
Press the <</>> button to cycle through available
3
stations. Press the ENTER button to select the
chosen station.
Note : For a full Scan, press and hold the PLAY/SCAN button
for a few seconds.
7
Page 8

03
Using the DAB radio
Manual Tune
Press the MENU button on remote control and press <</>>buttons until the name of the option is displayed.
This will display as follow
press ENTER
press >>
press ENTER
press >>
press ENTER
press >>
press ENTER
press >>
press >>
press >>
press >>
DRC (Dynamic Range Control) value
Normally the default setting 0 is best, but if you are listening in a noisy place then setting DRC to 1 will make quiet sounds,
like speech louder and easier to hear.
SW Version
Displays the software version of this DAB radio.
8
Page 9

Using the DAB radio
03
Displaying DAB information
To display DAB information:
1. Whilst listening to a station, repeatedly press
the INFO button to select the information
required, the display will show the information
in the bottom line of the LCD display.
The following screens show typical examples:
Program name
Scrolling text information
Program type
Multiplex name
Current time and date
Channel and frequency
Bit rate and mode
Signal error rate
Scrolling Text:
The text may show information on music titles or details of
the programme and is provided by the broadcaster.
Program Type
This is a description of the type of programme provided
by the broadcaster.
Network Name
This will show the network that is broadcasting the
programme you are listening to.
Time and Date
This displays the time and date information provided by
the broadcaster. In good signal conditions it will always
be accurate.
Channel and Frequency
This displays the channel number and the transmission
frequency.
Signal Information
This shows the digital bit-rate and the mode.
Signal Error Rate
If the transmission signal contains errors the system can
apply correction. The amount of signal correction can be
displayed as a numerical value between 0 and 99. As the
value increases, you will hear the signal degrade. To
improve reception, try adjusting the position of the aerial.
Signal Strength
You can also display the signal strength of a DAB station.
When tuned to the station press the ENTER button .
The LCD screen will show a bar graph indicating the
strength of the signal - the more squares the stronger the
signal.
The open square indicates the minimum signal strength
required for good reception.
Store and recall a preset station
There are 10 presets to store your favourite DAB stations.
To store a station to a preset button on your remote
control:
Whilst listening to a station press and hold the
number button that you wish to use to preset
this station until ‘Preset saved’ is displayed.
For example, to store a station in preset 4:
1
Whilst listening to a station press the 4 button
until the LCD shows ‘Preset 4 saved’.
To recall a station in preset 4:
2
Briefly press the 4 button on the remote control,
the LCD display will show the selected station. If
preset 4 had not been previously assigned to a
station the LCD display would show ‘Empty preset’.
To preset 10 press and hold the +10 button.
Manual Reset
To reset the DAB radio, press and hold the MEMORY/CLOCK
button for 5 seconds “Factory RESET” appears, then press
the PLAY/SCAN button to confirm.
Note: This will force the system to re-scan. Any previously
stored preset stations will be lost.
9
Page 10

04
Using the radio
Basic operation RDS
Press the STANDBY button on the main
1
unit to power on.
Press the
FUNCTION
2
3
4
to select Tuner mode.
Tune to the station you want by pressing
the >>/<< buttons.
To automatically scan to the next available
station, press the PLAY/SCAN button.
button on the unit
Preset stations
You can store up to a total of 20 radio stations
in the memory (10-FM)
Select TUNER mode.
1
Tune to the desired radio station by
2
pressing the PLAY/SCAN or the
<< / >> buttons.
Press and hold the desired number
3
button on the remote control to store
the radio station, for example button
number 4. After 2 seconds the display
will show "Preset 4 saved".
To recall a preset station in preset 4,
4
briefly press the 4 button on the
remote control.
The radio will switch to the desired
station. If no preset station has been
assigned to preset memory 4, the
display will show "Empty preset".
Antenna
Displaying data information
To display data information:
1. Whilst listening to a station repeatedly press
The following LCD display screens show typical examples
of data information which is shown in the bottom line of
each screen:
Program name
Scrolling text information
Program type
Current time and date
Frequency
Radio Text - Scrolling Text:
This is scrolling text information supplied by the FM station.
It may show information on music titles or details of the
programme and is provided by the broadcaster. “NO RT”
will be shown if FM station with RDS is not available.
Program Type
This is a description of the type of programme provided by
the FM station and is provided by the broadcaster.
“NO PTY” will be shown if an FM station with RDS is not
available.
Time and Date
DON’T FORGET!
There is a built-in antenna wire on the
back of the unit. Move the wire around to
get the best reception. For best DAB
reception stretch the wire vertically.
This displays the time and date and is provided by the
broadcaster, so will always be accurate. “NO CT” will be
shown if an FM station with RDS is not available.
Frequency
This displays the transmission frequency.
the INFO button to select the data information
required, the display will show the data
information in the bottom line of the LCD
display.
10
Page 11

Using the CD
05
/RDGLQJ DQG XQORDGLQJ &'V
3UHVV WKH 67$1'%< EXWWRQ WR WXUQ RQ WKH
XQLW
3UHVVWKH)81&7,21EXWWRQWR VHOHFW &'
PRGH
2SHQ WKH GLVF FRPSDUWPHQW E\SUHVVLQJ
WKHGRRUUHOHDVHFDWFK
:KHQ WKHGLVF FRPSDUWPHQW KDVRSHQHG
UHPRYH D GLVF IURP LWV FDVH DQG SODFHLW
FDUHIXOO\RQWR WKH WUD\ ZLWK WKHODEHO
VLGH IDFLQJ XSZDUGV
'21·7 )25*(7
DFRPSDFWGLVF LQWRWKH FRPSDUWPHQW 2WKHU
REMHFWV PD\ GDPDJHWKH XQLW
3UHVVGRZQRQWKH&'GRRUXQWLOLWODWFKHV
LQWRWKHFORVHGSRVLWLRQ
:KHQ WKH FRPSDUWPHQW LV IXOO\ FORVHG WKH
GLVF ZLOO EHUHDG DXWRPDWLFDOO\ 7KH WRWDO
QXPEHU RI WUDFNV RQ WKH &' ZLOO DSSHDU
RQWKH /&' GLVSOD\
'R QRW SXW DQ\WKLQJ H[FHSW
'21·7 )25*(7
FORVHG ZKHQ QRW LQ XVH WR SUHYHQW GLUW DQG GXVW
IURP HQWHULQJWKH PHFKDQLVP 1HYHU SODFH
PRUHWKDQ RQH GLVF LQWR WKH GLVFFRPSDUWPHQW
DW DQ\ WLPH
.HHSWKHGLVFFRPSDUWPHQW
3OD\LQJ &'V
3UHVV WKH
3/$<6&$1
EHJLQSOD\EDFNRI WKH&' IURP WKHILUVW
WUDFN
3/$<6&$1
3UHVV WKH
SDXVH SOD\EDFN RI WKH &' WKH´µLQGLFDWRU
ZLOO IODVK LQWKH GLVSOD\
7R VWRS SOD\EDFN SUHVV WKH
EXWWRQ RQFH WR
EXWWRQ RQFH WR
6723
EXWWRQ
6HOHFWLQJ D GLIIHUHQW &' WUDFN
3UHVV WKH
6.,3
IRUZDUGVRUEDFNZDUGV WKURXJK WKH WUDFNV
RQ WKH &'
3UHVV DQG KROG WKH
IDVW IRUZDUGV RU EDFNZDUGV WKURXJK WKH
FXUUHQW WUDFN
:KHQ WKH GHVLUHG SDUWRI WKH WUDFN LV
UHDFKHG UHOHDVHWKHEXWWRQDQG SOD\EDFN
ZLOOUHVXPH
EXWWRQV WR VNLS
6.,3
EXWWRQV WR
11
Page 12

05
Using the CD
Play Mode
To repeat the current track, press the
1
PLAY MODE
show in the display.
To repeat the entire disc, press the
2
PLAY MODE button twice. “ ”
will show in the display.
To cancel repeat play, press the
3
button or press the PLAY MODE button until
the repeat indicator disappears.
button once. “ ” will
STOP
Random CD playback
In play mode press the PLAY MODE button
1
on the remote control three times, “ r ”
will show in the display, and the tracks will
be played in a random order.
To cancel random play, press the
2
button or press the PLAY MODE button until
the random indicator disappears.
STOP
Playing MP3 and WMA CDs
When playing a CD encoded with MP3 or WMA files,
the functions available and operations are similar
to those when playing a standard CD.
Programmed CD/MP3 playback
Up to 64 tracks can be programmed to the internal
memory in any order. You may also store the same
track more than once.
In stop mode, press the MEMORY/CLOCK
1
2
3
4
5
6
P-O1 will show in the
button
Select the desired track or folder by pressing the
<< or >> buttons.
When the desired track is chosen, press the
MEMORY/CLOCK button
track.
P-O2 will show in the display. Repeat steps 2
and 3 to select and store up to 64 tracks.
To listen to stored tracks, press the
PLAY/PAUSE button. Use the << or >>
buttons to skip through the tracks.
To clear the memory, press the STOP button twice.
display.
store the
to
12
Page 13

Using the CD
Searching MP3/WMA tracks
press INFO
press INFO
Press PLAY/SCAN to confirm the selection.
05
press >>
press >>
13
Page 14

06
Using the Clock and Timer
Setting the clock
DON’T FORGET!
clock when in standby mode. The clock
displayed will be synchronized by the DAB
signal when the unit is in DAB mode.
To adjust the clock and set the timer, follow the
instructions below:(at STANDBY mode)
Press the
1
few seconds and select either 24 hour or
12 hour mode using the >>
buttons.
Press the
2
confirm.
The hour digits will begin to flash. Adjust
3
the hours by pressing the >>
buttons.
Press the
4
and the minute digits will begin to flash.
Adjust the minutes by pressing the
5
>>
MEMORY/CLOCK buttom to confirm
6
The clock of the unit is synchronized
when the unit is ON and at DAB mode.
This unit has its own digital
MEMORY/CLOCK
MEMORY/CLOCK
MEMORY/CLOCK
/ <<
buttons. Press the
button for a
/ <<
button to
/ <<
button again,
Setting the sleep timer
DON’T FORGET!
remote control to use this function.
The Sleep Timer is a countdown timer for
switching the system to standby mode after a
specified time. It enables you to listen to the
radio or CD. The Sleep Timer can be set from 90
to 10 minutes.
Switch on the system by pressing the
1
STANDBY
Select the desired source by pressing the
2
FUNCTION
Press the
3
time. - SLEEP and 90 are shown in the
display. The system will now play for 90
minutes.
To decrease the sleep time , continually
4
press the
desired sleep time is shown.
To cancel the sleep timer, press the
5
button until the display returns to the previous
mode.
To switch off the system before the sleep
6
time has elapsed, press the
You need to use the
button.
button.
SLEEP
button to set the sleep
SLEEP
button until
the
SLEEP
STANDBY
button.
DON’T FORGET!
if the power is disconnected.
Note: Pressing the SLEEP button at any time will show
the time remaining before the unit will switch off.
14
The clock setting will be lost
Page 15

Using the Clock and Timer
Setting the timer
06
DON’T FORGET!
control to use this function.
The timer is used to switch the system ON and OFF
at a specified time. It enables you to listen to the
DAB/FM radio, CD or AUX device.
In STANDBY mode press the TIMER button.”ON TIME”
1
will be shown and the hour digits will begin to flash.
Adjust the hour by pressing the >>
Press the TIMER button to confirm and the minute digits
2
will begin to flash. Adjust the minutes by pressing
the >>
Press the TIMER button to confirm and “OFF TIME” will
3
be shown. Follow the same procedure as in steps 1
and 2 to set the Timer OFF time, then press the TIMER
button to confirm.
The function mode will cycle as below :
4
Select the desired source by pressing the >>
buttons and press the TIMER button to confirm.
The volume level will be shown. Select the level
5
by pressing the >>
TIMER button to confirm.
You need to use the remote
/ << buttons.
/ << buttons.
DAB FM CD AUX
/ << buttons and press the
/ <<
15
Page 16

07
Other functions
ESP
Electronic Shock Protection
This feature helps to eliminate any break in the
playback of the disc due to errors or imperfections.
Mute
1
Press the
MUTE
button on the remote
control to turn off the sound. MUTE will flash
in the display.
2
Press the
MUTE
button again to restore
the sound to the previous level.
Preset Equaliser
Choose from: CLASSIC, ROCK, POP, JAZZ, and FLAT.
Press the EQ button to cycle through the settings.
Bass
Press BASS button on the remote control to turn
bass boost ON/OFF.
Resetting
If you experience any abnormal operation when using
the Micro System, follow the procedure below to
perform a system reset:
ID3 Tag (Title/Artist/Album) Function
ID3 tag information (Title/Artist/Album) can be displayed when
playing a MP3 or WMA CD by pressing the INFO button during
playback.
DON’T FORGET!
control to use this function.
Note: Only ID3 tag version 1 is supported.
You need to use the remote
Aux In Device
For music playback from an auxiliary device.
1
Press the FUNCTION button repeatedly to
select AUX mode.
Connect your device to the AUX IN socket on the
2
front of the unit.
Control your device as usual for audio playback.
3
1
Remove the mains power lead from the
wall socket.
2
Leave the unit disconnected from the
power supply for 1 minute, then reconnect
and power on the unit.
In DAB or FM mode, press the MEMORY/
3
CLOCK button (on the main unit) for 5
seconds. Factory RESET will show in the
display. Press the PLAY button to confirm the
reset. All preset memory stations will be
erased when the system is reset
DON’T FORGET!
if the power supply is disconnected.
16
The clock time will be lost
Page 17

08
Troubleshooting
Problem Possible cause What to do
DAB
Not functioning correctly
Microprocessor malfunction
Refer to reset procedure
Garbled sound
Poor signal
Move aerial wire
Radio
Noise or sound distorted
on FM
No sound in FM mode Unit not in radio mode
CD/MP3 Player
CD Player will not play Unit not in CD mode
CD skips while playing Disc is dirty or scratched Wipe the disc with a cloth or
MP3 disc not playing correctly
Title/Artist/Album (ID3 Tag)
not working correctly
MP3 on computer has correct
ID3 info but unit does not
display it
Aux In
Station not tuned properly for FM
The FM antenna wire is not
extended.
Volume is at the minimum position Adjust the volume level
CD is not installed or installed
correctly
Poor quality data, wrong type of file i.e. aac,
flac, ogg,m4a
Data not correct on the CD
Version of ID3 not supported
Fine tune FM broadcast station
Extend FM wire antenna
Press the function button to select
radio mode.
Select CD mode
Load a CD and check it is the
correct way round.
use another disc
try making new copy, check the file
type is .MP3 or .WMA
Re-record the disc, or try another.
Get ID3 data in ID3 version 1
Sound is quiet
Volume too low on connected device Increase the volume on connected
Need extra help?
Don’t worry we are just at the
other end of the phone. If you are
experiencing problems using your
new product, before returning it to
the retailer, just call 0871 230 1777.
device
Need a spare part?
In the unlikely event of you needing spare parts, please contact our
spares department on: 0871 230 0790
17
Page 18

8
09
o
)
n
Hz
t
2
S
Radio
e
FM
DAB
s
Uni
Sp
r
p
m
W
X
D
X
H
m
2
25W
IMPOR
This manual contains fo
-ref
c
e
c
.
Specifications
wer Supply (Input
Power Outpu
requency Coverag
Power consumptio
mension
t
eake
Remote control
hange without prior notice
230 - 240V ~ 50
x 2W RM
87.5-108 MHz,
70mm X205mm X45m
154mm
X 1.5Volt "AAA" batteries
165mm
eren
-only graphics and information that are subject to
174 - 224MHz
m
1
Page 19

Safety
Sound Levels
Your hearing is important to you and to us so
please take care when operating this equipment.
It is strongly recommended that you follow the
guidelines in order to prevent possible damage
to, or loss of hearing. Over time your hearing will
adapt to continuous lo
the impression that the volume has in fact been
reduced. What seems normal to you may in fact
be harmful. To guard against this, set the initial
volume of the equipment to a low level.
Follow the steps below to ensure that the
product can be enjoyed at a comfortable
listening level:
1
Slowly increase the level until you can
hear comfortably and clearly and without
distortion.
2
Damage to your hearing is accumulative
and irreversible. Any "ringing" or
discomfort in the ears indicates that the
volume is too loud.
3
Once you have established a comfortable
listening level, do not increase the volume
level.
ud sounds and will give
General Safety
This equipment has been designed and
manufactured to meet European safety
standards, butlike any electrical equipment, care
must be taken if youare to obtainthe best results
and safety is to be assured.
Do read these operating instructions before you
attempt to use the equipment.
Do ensure that all electrical connections
(including the mains plug, extension leads and
interconnections between pieces of equipment)
are properly made in accordance with the
manufacturer’s instructions.
Switch off and remove the mains plug when
making or changing any connections.
Do consult your dealer if you are ever in doubt
about the installation, operation or safety of your
equipment.
Don’t continue to operate the equipment if you
are ever in doubt about it working normally, or if it
is damaged in any way. Switch it off withdraw the
mains plug and consult your dealer.
Don’t remove any fixed covers as this may
expose you to dangerous voltages.
Don’t leave the equipment switched On when it
is unattended, unless it is specifically stated that
it is designed for unattended operation or has a
standby mode.
Switch off using the switch on the equipment and
make sure that other people in your household
are conversant with the equipment.
Special arrangements may need to be made for
infirm or handicapped people.
Don’t obstruct the ventilation vents on the
equipment, for example with curtains or soft
furnishings.
Overheating will cause damage and shorten the
life of the product.
Don’t allow electrical equipment to be exposed
to rain or moisture.
19
Page 20

Safety
Electrical Information
This Micro system is fitted with a BS1363/A 13 amp plug. If it is not suitable for your supply sockets it must be removed
and replaced with an appropriate plug. If the plug becomes damaged and/or needs to be replaced please follow the wiring
instructions below. The plug removed must be disposed of immediately. It must not be plugged into a supply socket as this
will be an electrical hazard. If the fuse needs to be replaced it must be of the same rating and ASTA approved to BS1362. If
the plug is changed, a fuse of the appropriate rating must be fitted in the plug, adapter or at the distribution board. If the fuse
in a moulded plug is replaced, the fuse cover must be refitted before the appliance can be used.
Wiring Instructions
The supply cable will be either 2-core or 3-core. Follow the appropriate wiring instructions given below. In both cases ensure
that the outer sheath of the cable is firmly held by the cable clamp.
2- Core plug
GNINRAW : Do not connect either wire
to the earth terminal.
This symbol indicates that this 2-core appliance is
Class II and does not require an earth connection.
The wire coloured blue must be connected to the terminal
marked with the letter N or coloured black.
The wire coloured brown must be connected to the terminal
marked with the letter L or coloured red
Fuse
Brown (Live)Blue
(Neutral)
WEEE
This appliance is labelled in accordance with European Directive 2002/96/EG concerning used
electrical and electronic appliances (Waste Electrical and Electronic Equipment - WEEE).
The guideline determines the framework for the return and recycling of used appliances.
3- Core plug
GNINRAW : This appliance must be earthed.
The wire coloured green and yellow must be connected to the
terminal marked with the letter E, or by the earth symbol
or coloured green or green and yellow.
The wire coloured blue must be connected to the terminal
marked with the letter N or coloured black.
The wire coloured brown must be connected to the terminal
marked with the letter L or coloured red.
Green & yellow
(Earth)
(Neutral)
Fuse
Brown (Live)Blue
20
Page 21

 Loading...