

Page 1

INTRODUCTION
This instruction manual is important to you. Please read it. In a short time it shows exactly how to connect, operate,
and adjust this unit for best performance.
It can save you money . It shows simple things to do and check before you call for help and save the cost of unnecessary
service or call out charge.
INTRODUCTION ......................................................................................................................................................................1
IMPORT ANT SAFEGUARDS..................................................................................................................................................2
WARNINGS AND CAUTIONS ................................................................................................................................................3
LOCA TION OF CONTROLS ................................................................................................................................................4-5
CONNECTIONS AND DISPLA Y.............................................................................................................................................5
REMOTE CONTROL AND POWER SOURCE......................................................................................................................6
BASIC FUNCTION...................................................................................................................................................................7
- Switching the system on ......................................................................................................................................................7
- Switching the system to standby mode.............................................................................................................................7
- Volume control.......................................................................................................................................................................7
- Sound control.........................................................................................................................................................................7
USING THE CD ........................................................................................................................................................................7
- Loading a CD .........................................................................................................................................................................7
- Playing a normal disc...........................................................................................................................................................7
- Selecting a desired Track / Passage .................................................................................................................................7
- Program Tracks .....................................................................................................................................................................7
- Random ..................................................................................................................................................................................7
- Repeat ....................................................................................................................................................................................7
USING THE DAB ................................................................................................................................................................ 8-10
CLOCK / TIMER OPERATION ............................................................................................................................................. 10
- View clock............................................................................................................................... ............................................. 10
- Clock setting........................................................................................................................................................................ 10
- Timer setting........................................................................................................................................................................ 11
- Timer ON .............................................................................................................................................................................. 11
- Timer OFF ............................................................................................................................................................................ 11
- To activate / Deactivate the timer ..................................................................................................................................... 11
- Sleep timer setting.............................................................................................................................................................. 11
GENERAL INFORMATION.................................................................................................................................................... 11
- Maintenance......................................................................................................................................................................... 11
- Trouble Shooting guide.......................................................................................................................................................11
Pack contents :
1 x main unit
1 x remote control
2 x loudspeakers
1 x owner’s manual
1 x glass stand
Please retain all packaging material for future transportation of the unit or in the unlikely event
that the unit needs to be returned for service.
HELPLINE PHONE NUMBER 0870 873 0080
- 1 -
Page 2
IMPORTANT SAFEGUARDS
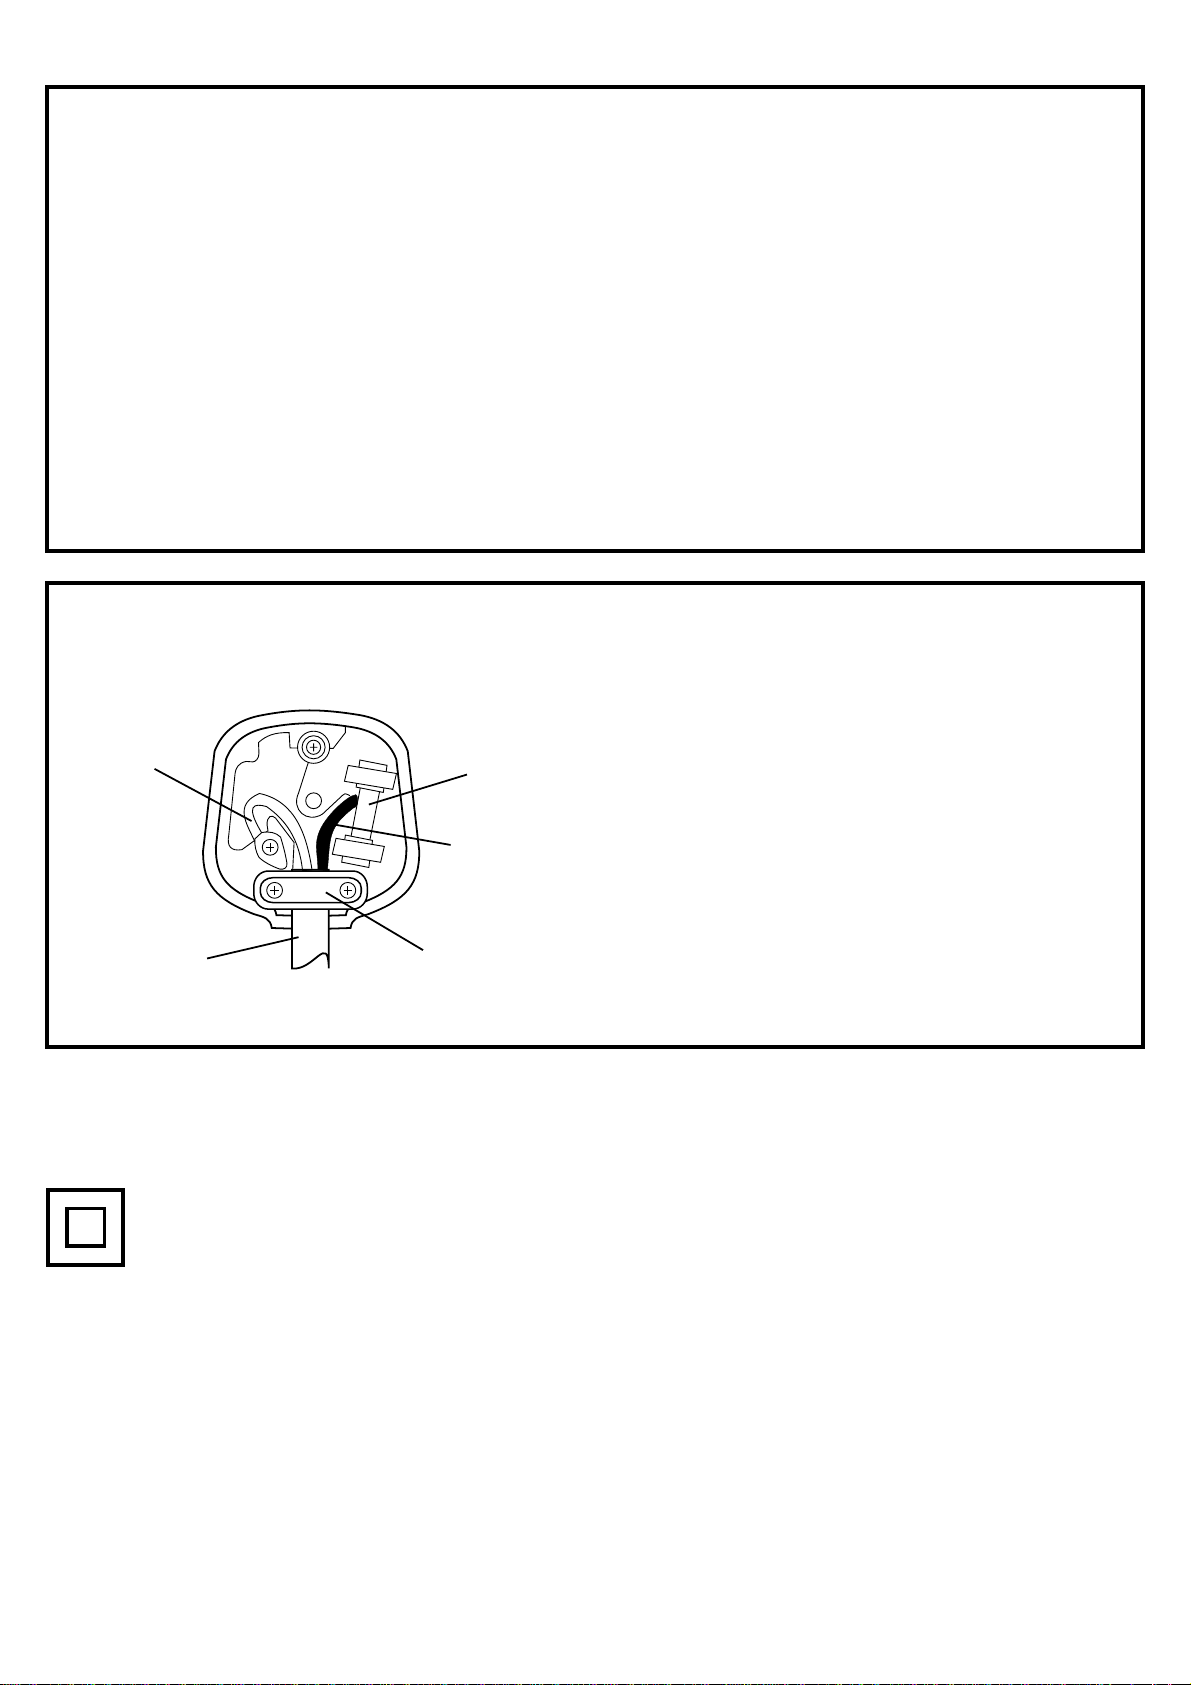
PRE FITTED MAINS PLUGS
For your convenience a mains plug has been fitted to this appliance. For your safety please observe the
following information.
1. Should the fuse in the plug fail remove the plug from the wall socket and replace the fuse with a 3 Amp
AST A approved to BS 1362 fuse.
2. Never use the plug without the fuse cover fitted. Replacement fuse covers are available from your dealer or
most electrical retail outlets.
3. If the mains plug is cut off the cable, rewire the replacement plug in accordance with instruction give in this
manual.
4. CAUTION: Under no circumstances should the discarded plug be inserted into the mains socket.T o prevent
a shock hazard carefully dispose of the discarded plug. Do not leave the plug lying around where
children might see it.
WARNING: To prevent fire or shock hazard do not expose this unit to rain or moisture.
CAUTION: DANGEROUS VOL TAGES EXIST INSIDE THIS UNIT. DO NOT REMOVE COVER (OR BACK).
NO USER SERVICEABLE P AR TS INSIDE REFER SERVICING T O QUALIFIED SERVICE
PERSONNEL. DISCONNECT FROM MAINS SUPPL Y WHEN NOT IN USE.
These wires in this mains lead are coloured in
BLUE
FUSE
BROWN
POWER
CORD
WARNING: UNDER NO CIRCUMST ANCES MUST THE LIVE OR NEUTRAL WIRES BE CONNECTED TO THE
EARTH TERMINAL IN A 3- PIN MAINS PLUG.
This symbol means that this unit is double insulated.
An earth connection is not required.
CORD
GRIP
accordance with the following wiring codes:
Blue..........................................................Neutral
Brown..................................................... ......Live
These wires in this mains lead must be connected to
the terminals in the plug as follows:
Blue Wire............................................N or Black
Brown Wire..........................................L or Red
Only a 3 Amp fuse should be fitted in the plug or a 5
Amp fuse at the distribution board.
HELPLINE PHONE NUMBER 08708 730080
- 2 -
Page 3
WARNINGS AND CAUTIONS
CAUTION:
1.To reduce the risk of electrical shocks, fire, etc.
2.Do not remove screws, covers or cabinet.
3.Do not expose this appliance to rain or moisture.
• Do not block the ventilation opening or holes.
(If the ventilation openings or holes are blocked by a newspaper or cloth, etc., the heat may not be able to get out.)
• Do not place any naked flame sources, such as lighted candles, on the apparatus.
• When discarding batteries, environmental problems must be considered and local rules or laws governing the
disposal of these batteries must be followed strictly.
• Do not use this apparatus in a bathroom or places with water. Also do not place any containers filled with water or
liquids (such as cosmetics or medicines, flower vases,potted plants, cups,etc.) on top of this apparatus.
• The mains plug is used as the disconnect device and it shall remain readily operable. To be completely disconnect
the power input, the mains plug of apparatus shall be disconnected from the mains as the disconnect devices is
the mains plug.
• When there is no display, the apparatus is completely disconnected from the mains.
Noted : See marking on Bottom / Rear Cabinet
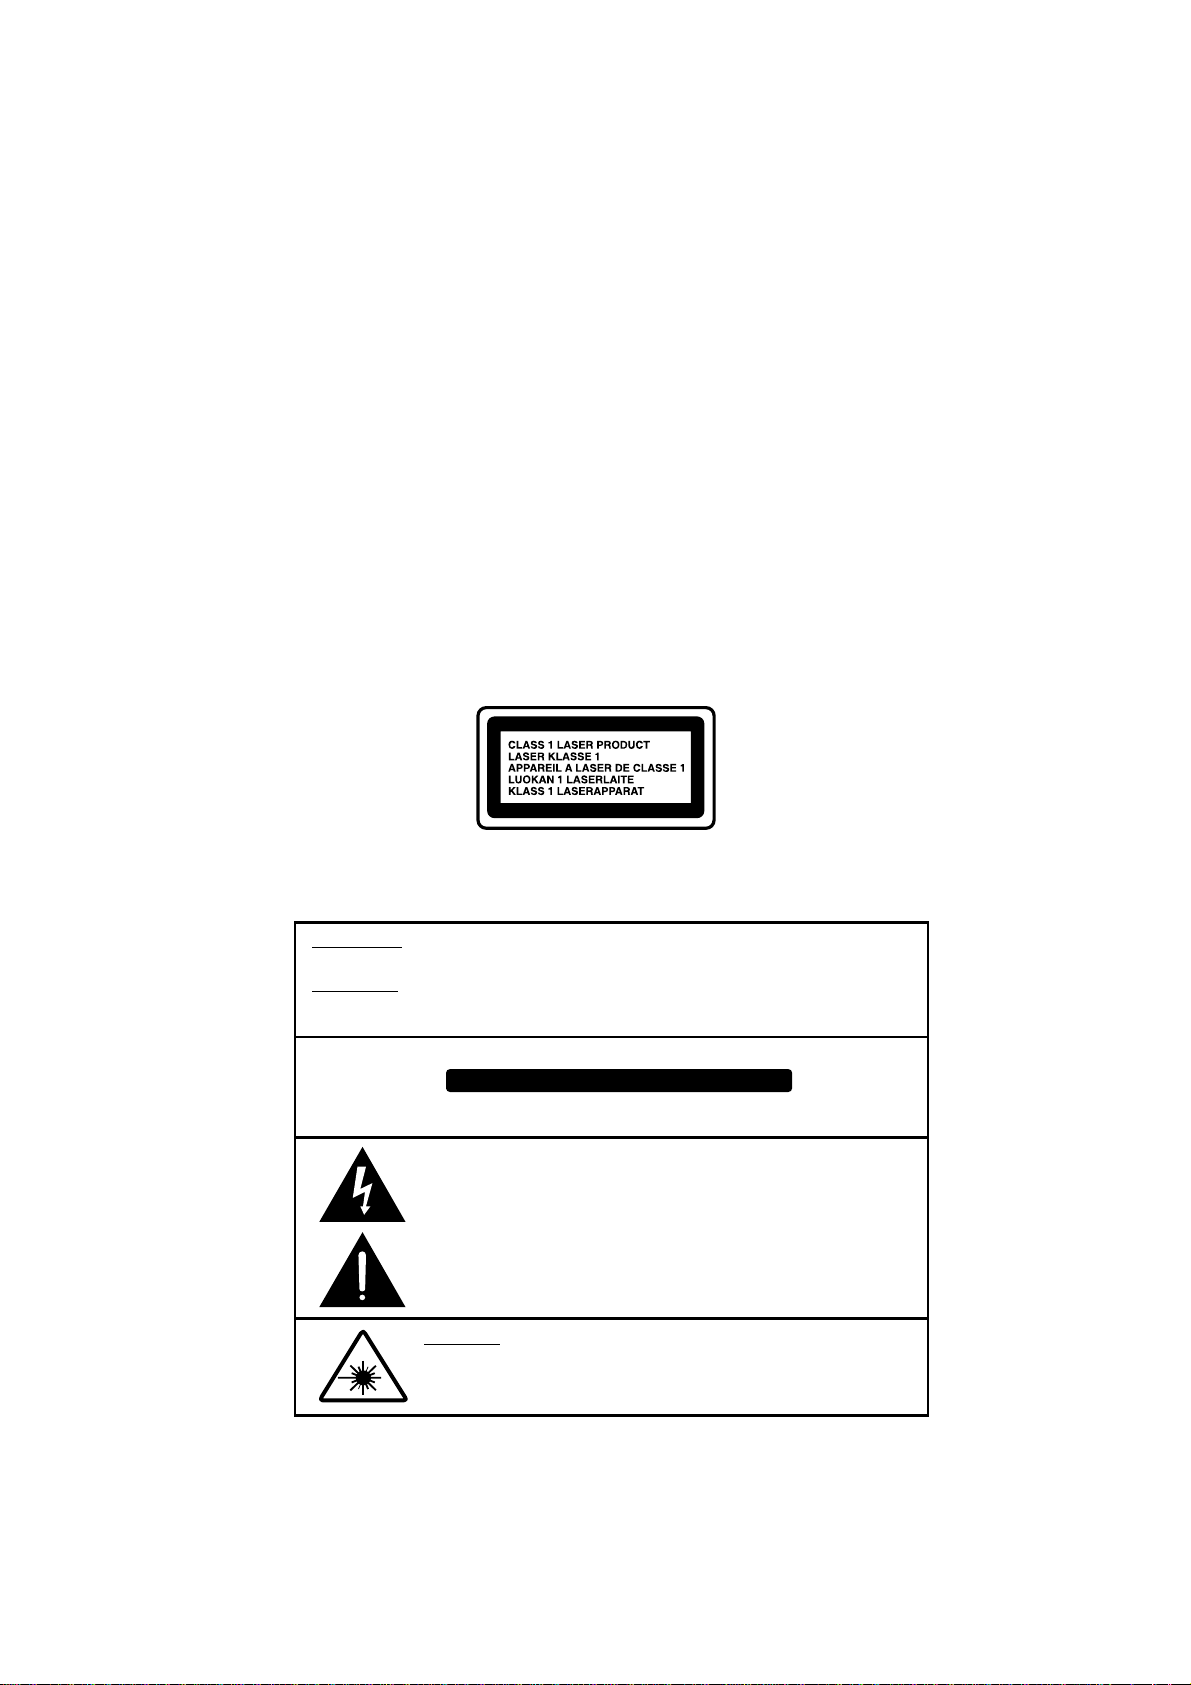
IMPORTANT FOR LASER PRODUCTS
1. CLASSIFICATION LABEL,
PLACED ON REAR OF THE UNIT .
2. WARNING LABEL, PLACED ON REAR OF THE UNIT.
WARNING :
To reduce the risk of fire or electric shock, do not expose this appliance to rain or moisture.
CAUTION :
Use of controls or adjustments or performance of procedures other than those specified
may result in hazardous radiation exposure.
RISK OF ELECTRIC SHOCK DO NOT OPEN
T
o reduce the risk of electric shock, do not remove cover ( or back ).
No user serviceable parts inside. Refer servicing to qualified service personnel.
The lightning flash witjh arrowhead symbol, with in an equilateral triangle,
is intended to alert user to the presence of uninsulated “ dangerous
voltage “ within the products enclosure that may be of sufficient
magnitude to constitute a risk of electric shock to persons.
The exclamation point within an equilateral triangle is intended to alert
the user to the pesence of important operating and maintenance
( servicing ) instruction in the literature accompanying the appliance.
CAUTION
INVISIBLE LASER RADIATION WHEN OPEN AND INTERLOCK
FAILED OR DEFEATED
AVOID DIRECT EXPOSURE TO LASER BEAM.
CAUTION
3. CAUTION: Do not open the unit. There are no user serviceable parts inside the unit; Leave all servicing to qualified
service personnel.
HELPLINE PHONE NUMBER 0870 873 0080
- 3 -
Page 4
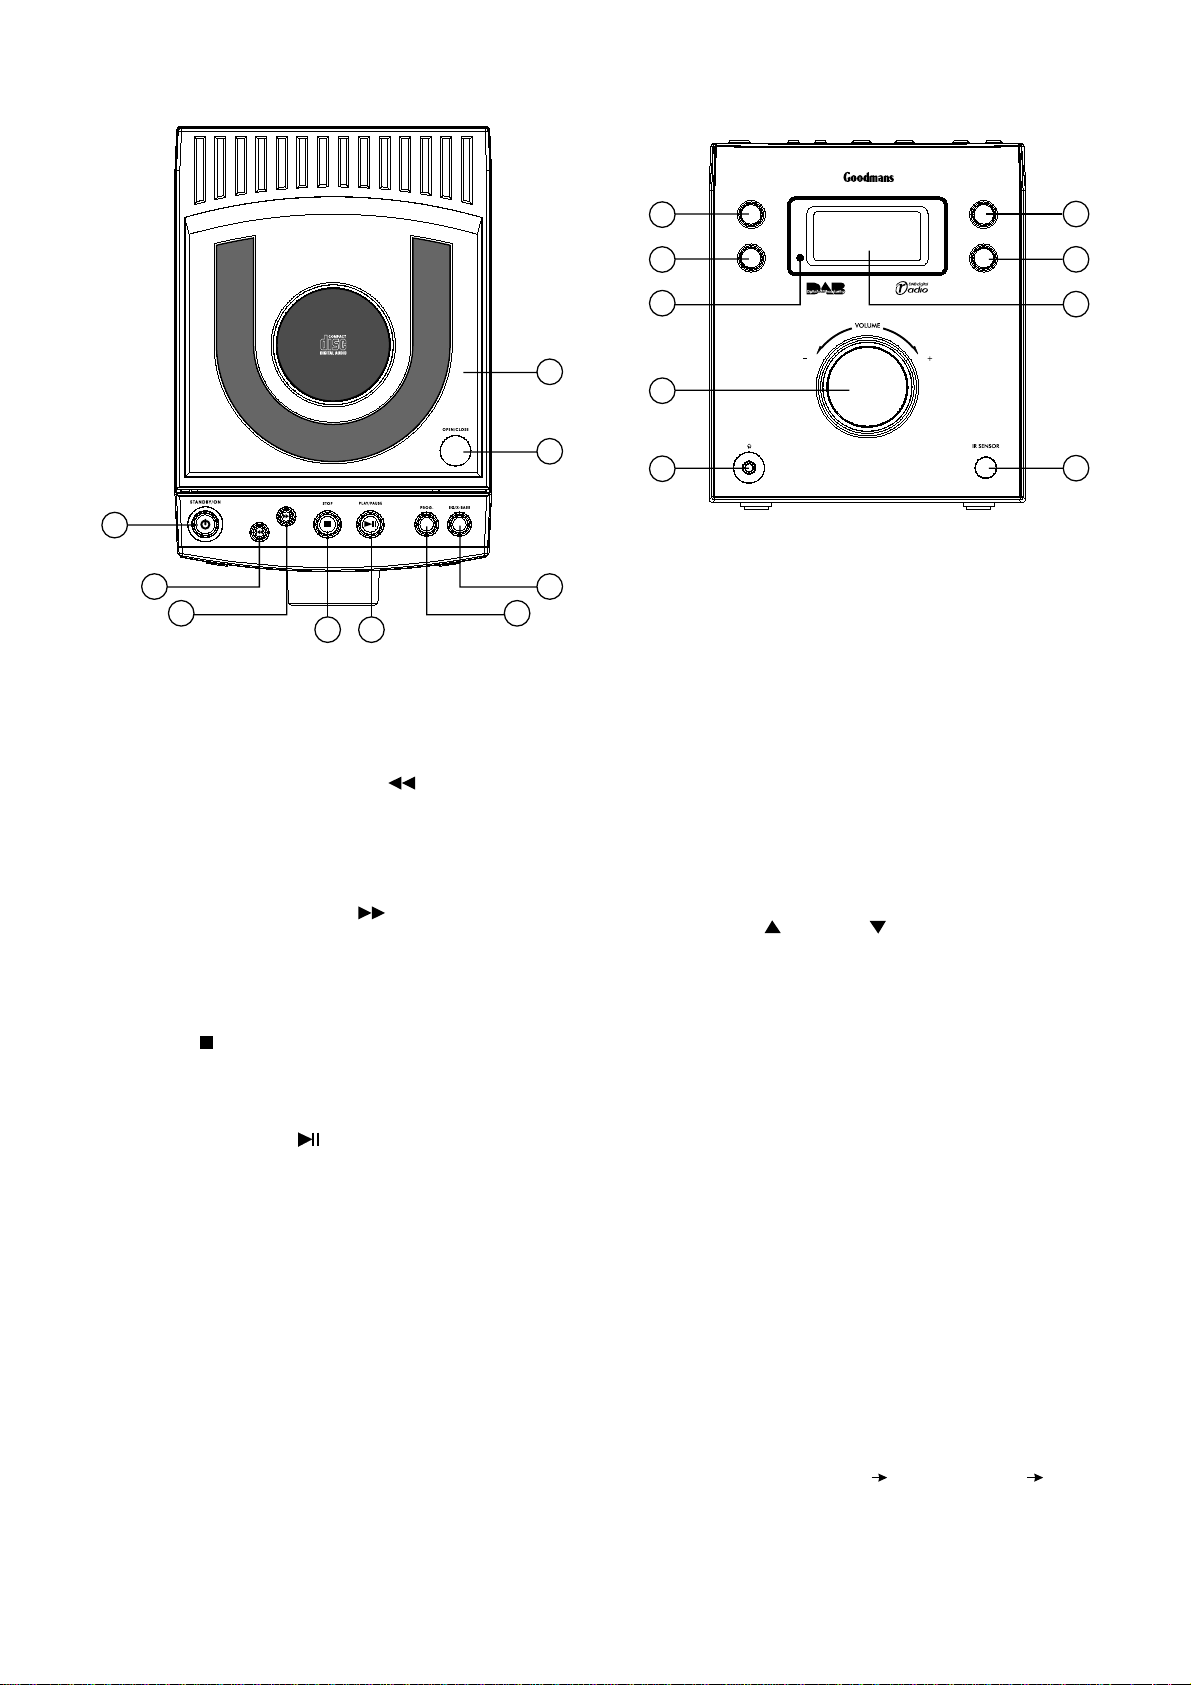
LOCATION OF CONTROLS
9
8
SCROLLUP
1
2
3
SCROLLDOWN
7
6
4 5
1. Standby / ON Button
• To toggle the system between Power on and Stand-by
status.
REPEAT/
MENU
RANDOM/
DISPLAY
18
17
16
10
11
12
DAB/ SCAN
REMAIN/
SELECT
STEREO MICROSYSTEM
13
14
15
10.DAB/Scan Button ( only on main unit )
• Switches unit to DAB mode and also starts autotune
scanning.
2. Search / Scroll Down Button
• CD: To search backward or skip to the previous track
in CD mode.
• DAB: Station selection and navigating services.
3. Search / Scroll Up Button
• CD: To search forward or skip to the next track in CD
mode.
• DAB: Station selection and navigating services.
4. Stop Button
• CD:To stop CD playback. In CD stop mode, clear the
programme memories during “Programme” function.
5. Play / Pause Button
• CD: To start or pause CD playback.
6. Program Button
• CD: When in stop mode to enter programme function
and entering tracks into programme memory.
• DAB: Enable preset storage.
7. EQ/X-BASS Button
• Cycles the EQ effect. Toggles the X-BASS ON and
OFF.
11. Remain / Select Button
• CD: To select Remain time or Total time.
• DAB: Select station during navigation;
12.Power / Standby LED Indicator
13.Volume UP / Down Control
• Increase the volume.
• Decrease the volume.
14. Headphone Socket
• To listen to the unit with headphones ( not included )
Note : When headphones are connected the sound to the
speakers is automatically muted.
15.IR Sensor
• To receive signals from the remote control.
16. Display
17.Random / Display Button
• CD: Starts Random play when in CD mode.
• DAB: Cycles the information displayed:
Scrolling DLS; Programme Type; Service T ype;
Time & date; Channel & Frequency; Bitrate
Mode; Signal Error Rate;
8. Open / Close Button
• To open or close the disc tray
9. CD Door
18.Repeat / Menu Button
• CD: Cycles Repeat 1 track Repeat all track Repeat off .
• DAB: To enter DAB setup menu;
HELPLINE PHONE NUMBER 08708 730080
- 4 -
Page 5

CONNECTING THE UNIT AND SPEAKERS
20
21
19
19. AC Power Cord
20. DAB. Antenna Socket
21. Speaker Sockets
CONNECTIONS
CONNECT THE DAB ANTENNA
Connect the supplied DAB antenna to the DAB ANT input on
back of the system. Adjust the position of the DAB antenna for
best reception and ensure the screw connection is fully tightened.
SPEAKERS CONNECTION
• Connect the right speaker to terminal marked “R”, with
the red wire to + and the black wire to –.
• Connect the left speaker to terminal marked “L”, with
the red wire to + and the black wire to –.
• Clip the stripped portion of the speaker wire as shown.
Notes:
For optimal sound performance, it is recommended to use
the supplied speakers.
Do not connect more than one speaker to any one pair of
+/– speaker terminal.
DISPLAY INFORMATION
HELPLINE PHONE NUMBER 0870 873 0080
- 5 -
Page 6

REMOTE CONTROL
11. Sleep
• To set a sleep time.
STANDBY/
1
2
3
4
5
6
ON
TIMER
ON/OFF
TIMER
PROGRAM
12
4
7
0
EQ/X-BASS
MUTE VOLUME
DAB
CD
REMAIN/ INTRO/
SELECT SCAN
RANDOM/ REPEAT/
DISPLAY MENU
SCROLL
DOWN UP
56
10 +
SLEEP
PLAY/
PAUSESTOP
3
98
+
17
15
13
12
11
10
18
16
14
9
7
19
12. Search / Scroll Down
• CD:To search backward or skip to the previous track
in CD mode.
• DAB: Station selection and navigating stations.
13.Search / Scroll Up
• CD:To search forward or skip to the next track in CD
mode.
• DAB: Station selection and navigating stations.
14. Repeat / Menu
• CD: Cycles Repeat 1 track Repeat all track Repeat off .
• DAB: To enter DAB setup menu.
15.Random / Display
• CD: Start Random play when in CD mode.
8
• DAB: Cycles the information displayed:
Scrolling DLS; ProgramType; Service T ype; T ime &
date; Channel & Frequency; Bitrate Mode; Signal
Error Rate;
16. Intro/Scan
• CD: To select Intro On or Off;
• DAB: To start autotune scanning.
1. Standby / ON
• To toggle the system between Power on and Stand-by
status.
2. Timer On/Off
• Switch timer ON or OFF.
3. Timer
• T o view or set the clock & timer .
4. Program
• CD: When in CD stop mode it enters programme mode
and stores tracks into the programme memory.
• DAB: Enable memory preset storage.
5. Digit 0-9,+10(A-Z)
• CD: To select track number in CD mode.
• DAB: To select/store the preset station.
6. EQ/X-BASS
• Cycles the EQ effect. Press and hold to toggle the
X-BASS effect ON or OFF.
7. Mute
• To mute the audio.
17. Remain/Select
• CD: To select Remain time or Total time.
• DAB: Select station during navigation.
18. DAB
• Selects DAB function.
19. CD
• Selects CD function.
POWER SOURCE
AC POWER SUPPL Y
After all other connections have been made. Connect the
AC power cord of the system to the wall outlet. The system
will be in standby mode.
INSERTING BATTERIES INTO THE REMOTE CONTROL
Insert batteries (type R-03 or UM-4 AAA) into the remote
control as shown in the battery compartment.
+ SiZE AAA -
- SiZE AAA +
8. Volume UP / Down
• Increase the volume.
• Decrease the volume.
9. Stop
• CD: To stop CD playback. In CD stop mode, clear the
programme memories during “Programme” function .
10.Play/Pause
• CD: To start or pause playback.
HELPLINE PHONE NUMBER 08708 730080
CAUTION:
• Replace batteries if the remote control fails to work.
• Remove batteries if they are exhausted or not to be
used for a long time.
• Batteries contain chemical substances, so they should
be disposed of properly .
- 6 -
Page 7

BASIC FUNCTIONS
SWITCHING THE SYSTEM ON
• Press STANDBY/ON button PLA Y or DAB button to turn
the system on.
SWITCHING THE SYSTEM TO STANDBY MODE
• Press STANDBY/ON button. The clock will show in the
display .
VOLUME CONTROL
Rotate / Press VOLUME UP knob/button on the unit or
remote control to increase or VOLUME DOWN knob/button
on the unit or remote control to decrease the volume level.
The volume ranges from the minimum of “0”(MIN VOL) to
the maximum of “39” (MAX VOL) and is indicated on the
display.
To mute the volume temporarily
Press MUTE button on the remote control.
Playback will continue without sound and MUTE will show
in the display . To restore the volume, press MUTE button
again or adjust the volume control.
SOUND CONTROL
EQ/X-BASS
Press EQ button
To select the desired sound effect: CLASSIC, POP, ROCK,
JAZZ or FLAT.
To switch the X-BASS ON/OFF.
Press and hold the EQ/X-BASS.
If X-BASS is switched on , X-BAS ON will briefly
appear in the display and then the icon X-BASS will
appear in the display. X- Bass is switched off, X-BAS OFF
will appear in the display and the ”X- BASS” icon will
disappear.
USING THE CD
LOADING A CD
1. Press CD or PLAY/PAUSE button to select CD mode.
2. Press OPEN/CLOSE to open the CD door.
3. Place a CD into the tray with the label facing up.
4. Close the CD door. The player will automatically read the
CD “TOTAL” and “READING” will appear in the display
and then the total playtime and total number of tracks will
be shown.
5. T o remove the CD, press the STOP button and then
OPEN / CLOSE, grasp the CD by its edges, and carefully
remove it from the player.
NORMAL DISC PLA YBACK
1. With a CD loaded , press PLAY/PAUSE button or
directly access the desired track using the numeric keys on
the remote control.
2. The track number and elapsed playing time of the current
track appear on the display .
3. To interrupt playback press PLAY/PAUSE button.
The playing time will flash in the display . This suspends CD
playback.
4. T o resume playback press PLAY/PAUSE again.
5. To stop playback, press STOP button.
SELECTING A DESIRED TRACK/P ASSAGE
To select a desired track
• Press or SKIP/SEARCH button repeatedly until
the desired track appears in the display.
If playback is stopped, press PLAY/PAUSE button to
start playback.
To search for a particular passage during playback
• Press and hold or SKIP/SEARCH button and
release it when the desired passage is located.
PROGRAMME TRACKS
Up to 60 tracks can be stored in the memory in any desired
order .
1. In stop mode, press PROG button on the unit or PROGRAM
button on the remote control to enter program setting.
PROGRAM icon will start flashing and “00 P--1” will show
in thedisplay .
2.Press or SKIP/SEARCH/TUNING button to
select the desired track.
3. Press PROG button on the unit or PROGRAM button on the
remote control to store the selected track. “PROGRAM” will
start flashing and “00 P--02” will show in the display.
4. Repeat steps 1 to 3 to select and store all desired tracks
in this way.
“PROG” and “Full” will start flashing in the display if you
attempt to programme more than 60 tracks.
5. Press PLAY/PAUSE button to play the programmed
tracks.
If you press REPEAT button during programmed playback,
the current track or all programmed tracks will be played
repeatedly.
“REPEAT ALL” or “REPEA T 1” and PROG will appear in the
display .
- Press PROG button on the unit or PROGRAM button on
the remote control in stop mode to view the CD programmed
tracks.
6.Press STOP button in stop mode to clear the
programming. “PROG” will disappear from the display.
Notes:
The programme is automatically cleared as soon as the CD
compartment is opened.
The function of programme setting is disabled in CD playback
mode.
RANDOM
To play all the tracks in random order.
1. During playback, pause or stop mode, press RANDOM
button on the unit or remote control to select random play
mode. “RAND” will appear on the display .
2. To exit RANDOM mode, press RANDOM button again
“RAND” will disappear from the display.
Note:
If the programme function is enabled, and the repeat one
function is set to on, random playback will be disabled.
REPEAT
1.To play the current track or the whole disc repeatedly .
Press REPEAT button on the unit or remote control to select
REPEA T ALL or REPEAT 1 mode.
REPEA T ALL - to repeat the whole disc.
REPEA T 1 - to repeat the current track.
The current track or whole disc will now be played repeatedly
until you press STOP button.
2.To exit the repeat mode, press REPEAT button until
“ REPEA T ALL ” or “REPEA T 1” disappears from the display.
HELPLINE PHONE NUMBER 0870 873 0080
- 7 -
Page 8

DAB - DIGITAL AUDIO BROADCASTS
Classic FM
<<BBCSprtX
Classic FM
elax It s Classi
This section provides information on using DAB including
tuning, selecting a service and changing the displayed
information.
Tuning
Tuning DAB is very simple. When first switched on the unit
it will start an automatic tuning process described below.
Tuning for the first time
When the DAB function is selected for the first time an
autotune process will be performed automatically. A
progress indicator on the display shows that autotune is
in progress. “Welcome to Digital Radio” will be displayed.
When stations are found during autotune
The stations will be stored in alphanumeric order and the
first station on the list will be selected and will be heard. To
listen to other stations, see Selecting a station.
If no stations are found during autotune
‘No stations available’ will be shown on the display for a
few seconds and then you see a menu of options. Use
the or buttons to scroll through the options and
press SELECT button to select an option.
No stations
available
Manual Tune - See Manual Tune details for using the
manual tuning option.
or Tune
Manual tune
Autotune local - See Retuning the radio below for details of
the local autotune option.
The display will indicate tuning is in progress. When finished,
the radio will return to the station you were listening to. All the
stations found are now stored in the radio and can be selected
as described in Selecting a station.
If no stations are found, the message ‘No stations
available’is shown and the display shows an option menu,
see If no stations are found during autotune for details of
this menu. Check you aerial is fully extended and try one
of the available tuning options.
Selecting a station
Once the DAB scan is completedly select the digital
radio station to listen to using the or buttons
then press select. If you have assigned stations to preset s you can also select them directly by pressing the relevant numbered button (1-10), see storing and recalling presets.
1.The top line of the display shows the name of the currently
selected station. Use the or buttons to see the names
of other stored stations on the bottom line of the display.
Stop when you find the station to which you want to listen.
2.Press the SELECT button to listen to the station selected.
The display will show ‘Now tuning’ briefly as it locates the
new station.
If a station has one or more secondary services available the
display will show ‘ ’ next to the station name on the station
list and they will appear after the primary service as the list is
scrolled through.
Classic FM
BBC5Live>>
A secondary service will display ‘ ’before the station
name on the station list indicating that it belongs to the
primary service before it in the list. See information on
primary and secondary services.
Autotune full - See retuning the radio below for details of
the full autotune option.
Retuning the radio
To retune the radio at any time using the autotune process.
For instance if a new multiplex is launched or the radio is
moved to another room. It is not necessary to perform an
autotune to pick up new stations within a multiplex already
stored in the radio as the DAB system monitors and
refreshes the list of available stations automatically . The
following two options are available:
Autotune local - scans all frequencies in the UK channel
allocation. This should only take a few seconds.
Autotune full - scans the full range of digital frequencies in
Band III. This may take a minute or more.
1.Ensure DAB is switched on and the aerial is connected and
fully extended.
2.Push and release the SCAN button once for local scan or
hold down for around two seconds for a full scan.
Autotune 8
Note:
To cancel Autotune push the SCAN button again during the
tuning process.
If the station has ‘?’ before its name the service is currently
inactive or invalid. If a station which has this symbol is
selected the radio tries to tune to that station. If still
unavailable ‘Service not avail’ or ‘Service off- air ’ will be
displayed and radio will attempt to tune to an alternative
station. A flashing cursor will indicate that this is in progress.
T o try to manually tune to this station you have five seconds
in which to press the button and the manual tuning bar will
be displayed enabling adjustment of the aerial.
Classic FM
?Virgin
Changing the display mode
The DAB function has six display modes which enable
different information to be shown on the bottom line of
the display. Press the DISPLAY button repeatedly to cycle
through the six different display modes.
Scrolling text:
The default mode, displays scrolling text messages which
accompany the audio, where available.
Service not
available
HELPLINE PHONE NUMBER 08708 730080
- 8 -
Page 9

Program Type:
Station order
Alphanumeric
Alphanumeric
Alphanumeric
Active station
Alphanumeric
Prune stations
Alphanumeric
Presets
A label describing the type of content being broadcast by
the service.
Classic FM
Serious Classics
Multiplex name:
Displays the name of the multiplex in which the current service
is found, see Guide to Digital Radio for more information on
multiplexes.
Classic FM
Digital1 Network
Date and time:
Displays the date and time obtained from the current
multiplex.
Classic FM
17:03 16-08-2003
Channel:
Displays the channel identifier and frequency for the tuned
station, see Guide Digital to Radio for more information.
Classic FM
11D 222.06 MHz
To recall a previously stored station
Press and release the numbered button where the station is
stored. For preset 10 press “0” button. If the selected
preset is empty the display shows ‘Preset empty’ for a
few seconds and the currently selected station will
continue to be heard.
Advanced setup options
DAB has a number of advanced features which enables the
order and number of stations on the station list to be changed,
perform manual tuning, apply Dynamic Range Control (DRC)
and view the software version.
Press the INFO button to enter the advanced setup menu,
use the or buttons to scroll through the following
menu options then press the SELECT button to select
that option.
Station Order
This option enables selection of the order in which stations
appear as the station list is scrolled.
When this option is selected the currently selected order appears
on the top line of the display and a scroll list on the bottom line.
Use the or buttons to scroll through the following options
and press the SELECT button to select one:
Mode:
Displays the mode of the current service Stereo or Mono and
the data rate at which the audio signal is being transmitted.
This rate is set by the broadcaster to suit the type and quality
of material being transmitted.
Classic FM
160kbps Stereo
Signal error rate:
Displays the signal error rate for tuned station. As a guide
values from 0 to 15 indicate good reception, 16 to 30
borderline reception and 31 or more poor reception. To
improve this error rate adjust the aerial position.
Classic FM
Signal error 1
Storing and recalling presets
The numbered buttons (1-10) enable radio stations to be
stored for one- touch access.
To store a station
To store a station to a preset while listening to it or when
the station name is in the bottom line of the display while
scrolling through the station list.
Alphanumeric
Displays all stations in alphanumeric order. This is the
default setting.
Fav station
Displays the ten most listened to stations at the front of
the station list in alphanumeric order and the rest below
in alphanumeric order. Favourite stations will be displayed
with a next to the station name.
Alphanumeric
Fav station
Note : Favourite stations are automatically assigned and
cannot be changed.
Active station
Displays active stations at the front of the service list in
alphanumeric order and inactive ones at the end in
alphanumeric order. See Selecting a station on page 9
for information on active sttions.
Press and hold down a numbered button for around two
seconds to store the station under that number. The
display shows e.g. ‘Preset 1 saved’ when the station has
been successfully saved. Once a station has been stored
to a preset, the station name has the preset number next
to it on the station list.
Classic FM
Preset 1 saved
To store preset 10 press and hold the “ 0 “ button.
Classic FM
Virgin 2
HELPLINE PHONE NUMBER 0870 873 0080
Prune stations
Removes inactive stations from the station list.
presets
Available only when Fav station order has been selected.
Transfers the top 10 stations of the 10 favourite stations
to the preset buttons.
- 9 -
Page 10

Manual Tune
This option provides a signal quality display which can
be used to find the best position for the radio and aerial.
Manual tune
When selected the bottom line of the display shows the
channel identifier and frequency.
11D 222.06MHz
1.Use the or buttons to scroll through different
channels and press the SELECT button to select one.
Note The list includes all channels, UK stations are in
the range 11B to 12D. Signal quality will be displayed.
The empty block indicates the minimum required level
for reception and the solid blocks indicate the current
received level.
11D 222.06MHz
2.Move the aerial or radio whilst observing the display to try to
raise the current level to the empty block or beyond. The
display will change to show the multiplex name on the
bottom line of the display once a good signal is received and
the multiplex will be added to the service list.
11D Digital1
3. Push the MENU button to exit manual tuning or use
this or buttons to select another frequency.
Note:
To display the signal quality for any station being listened to by
pressing the SELECT button.
DRC Value
DRC ( Dynamic Range Control ) enables the alteration of
the dynamic range of the received audio ( dependent on
broadcast material ) . The DRC level of a broadcast is set
by a broadcaster and transmitted with the service. Changing
this DRC value enables a scaling factor to be applied to
this level.
DRC value
When this option is selected the current DRC value is
shown on the top line of the display and a scroll list on
the bottom.Use the or buttons to scroll through the
following options and press the SELECT button to select
one:
DRC 1
DRC1/2
DRC 0 - DRC scaling is switched off.
DRC 1/2 - DRC scaling is set to 1/2 that sent with the
transmitted service.
DRC 1 - Applies the DRC scaling as sent with the trans
mitted service. This is the default setting.
SW version
This option enables you to view the version number of the
software installed. This may be needed if you contact
Technical Support for advice. This option can only be
viewed, no adjustment is available.
V1.7
Resetting your DAB
A reset option is provided to enable you to reset the unit.
This removes all presets, stored stations and favourite
station settings and resets all options to defaults.
Performing an autotune process will solve most problems
but this option may be used if moving house or
wanting to restore default values to options that have been
changed.
HELPLINE PHONE NUMBER 08708 730080
To select the reset option:
1.Press and hold the MENU button for more than two
seconds. The display will show “ Press Select to
confirm reset”.
2.Press the SELECT button to confirm the reset or press no
buttons for around seven seconds to cancel the reset.
CLOCK/TIMER OPERATION
Note : the default clock setting for this unit uses the 24 hour
clock system. If AM/PM 12 hour system is required, first
switch the unit to stand by then press and hold the STOP
button on the top panel and press the PROG button on the
top panel, the clock mode will toggle between 12 hour and
24 hour mode.
VIEW CLOCK
The clock will be shown in standby mode.
T o view the clock in any source mode (CD or DAB for example).
Press TIMER button. The clock will be displayed for 5
seconds.
If the clock has not been set, the clock will start from
“12:00” and will flash.
CLOCK SETTING
With the unit in DAB or CD mode.
1.Press TIMER button to display current time.
2.Press and hold PROG button on the unit or PROGRAM
button on the remote control to select clock setting
mode.
The hour indication will start flashing.
3.Press or SKIP/SEARCH button to set the correct hour.
4.Press PROG button on the unit or PROGRAM button
on the remote control to confirm the selection.
The minute indication will start flashing.
5.Press or SKIP/SEARCH button to set the minutes.
6.Press PROG button on the unit or PROGRAM button
on the remote control to store the setting.
The clock will start working.
To exit without storing the setting, turn the unit off.
TIMER SETTING
The system can be set to switch on to CD or DAB automatically
at a preset time, serving as a wake up alarm.
Important notes for the successful use of the alarm function
1. The clock time MUST be set correctly
2. When setting the unit to wake up to CD please note playback
will start from track 1 only.
3. Wake up volume setting - the default wake up volume
setting is 16 if the unit volume setting is less than this when
the unit is put into standby then on wake up the unit will
come on at volume level 16. If the volume level is higher than
16 when the unit is put into standby it will wake up from low
volume level and then increase gradually to the previous
volume level. To avoid a shock wake up it is recommended
when using this function to always reduce the volume before
switching the unit to standby.
4. Wake up to DAB - on wake up, the unit will switch to the
last tuned DAB service before being put into standby mode.
TIMER ON
With the unit in DAB or CD mode.
1.Press TIMER on/off button on the remote control.
“TIMER” will be shown in the display.
2.Press TIMER button twice on the remote control to select
timer setting mode. “TIMER ON” will show in the display.
3.Press PROG button on the unit or PROGRAM button
on the remote control to select clock setting mode.
The hour indication will start flashing.
4.Press or SKIP/SEARCH button to set the hours.
5.Press PROG button on the unit or PROGRAM button
on the remote control to confirm the selection.
The minute indication will start flashing.
- 10 -
Page 11

6. Press or SKIP/SEARCH button to set the minutes.
7. Press PROG button on the unit or PROGRAM button
on the remote control to store the setting.
TIMER OFF
8.Press TIMER button three times and repeat above 3-7
to set TIME OFF.
9.Press TIMER button four times and the last desired source
“CD” or “ DAB ” will be displayed. Press PROG button on the
unit or PROGRAM button on the remote control and the
source “DAB” or “CD” will start flashing.
10 . Press or SKIP/SEARCH button to select the
desired source.
1 1.Press PROG button on the unit or PROGRAM button on
the remote control to confirm the selection.
12.Switch the system to standby mode.
When the preset on time is reached, the selected source
will play. Until the OFF time is reached.
13.T o cancel the TIMER function press the TIMER ON/OFF
button until cancel shows in the display, then press
POWER/STANDBY button to switch the unit OFF.
TO ACTIV ATE/DEACTIVA TE THE TIMER
• Press TIMER ON/OFF button on the remote control. If
activated, TIMER icon will appear in the display.
Notes:
• The timer will not activate if the on and off time are the same.
If the selected source CD is not available when preset
time is reached, DAB will be selected automatically.
• If timer off time is not set after setting timer on time,
the unit will not switch off until the default off time is
reached.
SLEEP TIMER SETTING
If the sleep timer is activated, the system will switch to
standby mode after the preset time has expired.
1. Press SLEEP button and hold to select a sleep time.
The selections are as follows: 90-80-70-60-50-40-30-20-10-
Sleep off (deactivate the sleep timer) - 90-80…
TROUBLE SHOOTING GUIDE
Check the following guide for problem resolution.
Batteries are weak
2. When you reach the required length of time, release the
SLEEP button.
“SLEEP” will appear in the display.
Notes:
If timer off and sleep off are all activated, the system will
switch to standby mode by the earlier TIMER off.
GENERAL INFORMATION
MAINTENANCE
Cleaning the cabinet
• Use a soft cloth slightly moistened with a mild detergent solution.
Do not use a solution containing alcohol, spirits, ammonia or
abrasive.
Cleaning discs
• When a disc becomes dirty, clean it with a cleaning cloth,
wipe the disc from the center out. Do not wipe in circular
motion.
• Do not use solvents such as benzene, thinner commercially
available cleaners, or antistatic spray intended for analogue
records.
Cleaning the disc lens
• After prolonged use, dirt or dust may accumulate at the disc
lens. To ensure good playback quality, clean the disc lens
with CD lens cleaner or any commercially available cleaner:
Follow the instructions supplied with cleaner.
SPECIFICATIONS
Power Supply : AC 230V ~ 50Hz
Unit Dimensions : 205(L) x 145(W) x 165(H) /mm
Speaker Dimension : 160(L) x 135(W) x 208(H) /mm
N.W : 5.55Kg
CD Section
Standard : CD CD-R CD-RW
Frequency Response : 20Hz - 20KHz
DAB Section
Receiver Band : DAB Band III 174.928 MHz ( 5A ) -239.200MHz ( 13F )
Tuning Range - Local 11A to 12D
Full 5A to 13F
Aerials : external wire aerial for DAB reception
General
Power Output (at 10% THD): 2 x 5W RMS
Headphone Socket : 3.5mm diameter, 32 Ω
Specifications are subject to change and improvement
without notice.
HELPLINE PHONE NUMBER 0870 873 0080
- 11 -
 Loading...