

Page 1

LD1701
17” LCD TV
OPERATING INSTRUCTIONS
5385 LD1701 Goodmans UK.indd 15385 LD1701 Goodmans UK.indd 1 21/04/05 9:57:1621/04/05 9:57:16
Page 2

2
SAFETY INSTRUCTIONS ........................................................ 3
Additional Safety Instructions ............................................ 6
PHYSICAL INSTALLATION ..................................................... 8
CONNECTING WITH EXTERNAL EQUIPMENT ......................... 9
Connecting a Computer .................................................... 10
D-sub (VGA) connector pin assignments ...........................11
Resolution .........................................................................12
Selecting input source .......................................................12
CONTROLS AND FUNCTIONS ON THE TV ..............................14
REMOTE CONTROL ..............................................................16
TUNING YOUR LCD TV .........................................................18
ON-SCREEN MENU CONTROLS AND FUNCTIONS ................. 20
Input source ...................................................................... 20
Screen .............................................................................. 21
audio ................................................................................. 22
OSD (on-screen display) .................................................... 23
Colour (PC mode) ...............................................................24
Utility, ............................................................................... 25
TV channel tuning ............................................................ 26
Exit ................................................................................... 27
TROUBLESHOOTING GUIDE ................................................ 28
SPECIFICATIONS ................................................................. 30
SUPPLIED ACCESSORIES
1. POWER CORD
2. REMOTE CONTROL
3. USER’S INSTRUCTIONS
4. ANTENNA CABLE
CONTENTS
5385 LD1701 Goodmans UK.indd 25385 LD1701 Goodmans UK.indd 2 21/04/05 9:57:2121/04/05 9:57:21
Page 3
3
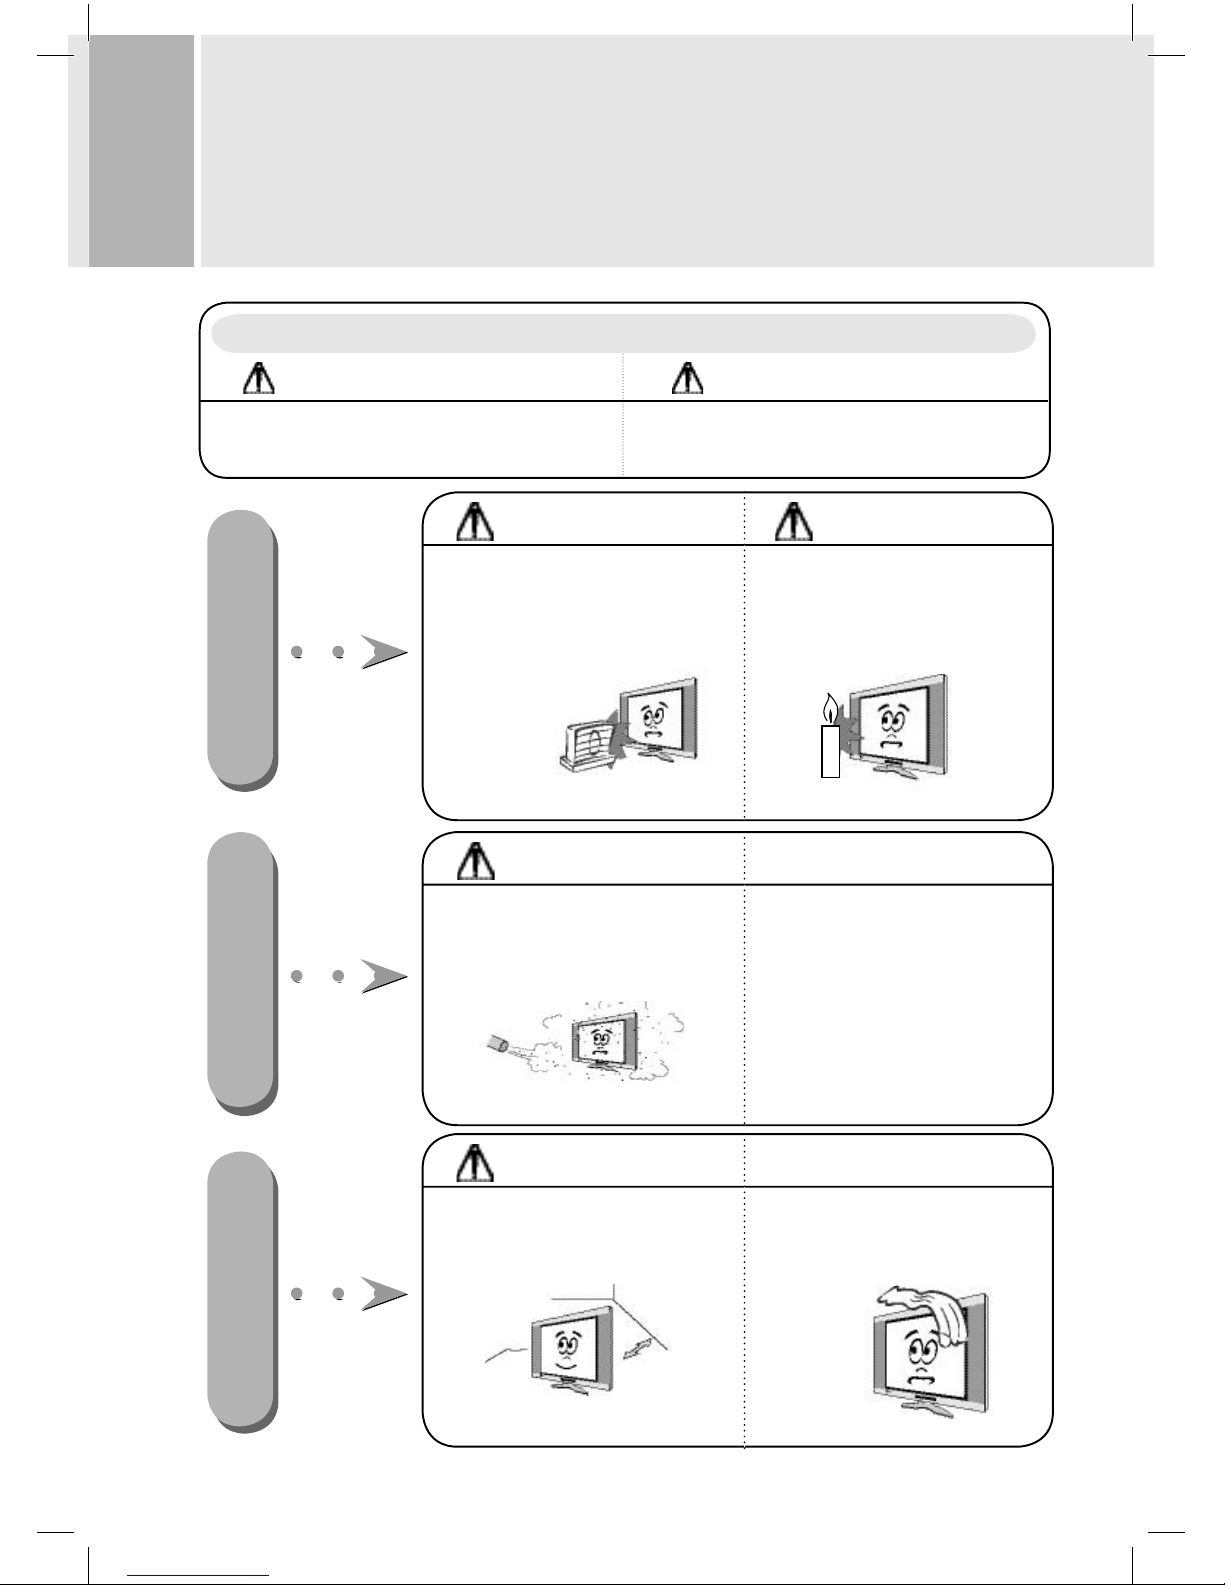
SAFETY INSTRUCTIONS
NOTES
Do not place a naked fl ame source beside
the TV.
• This may result in a fi re hazard !
Indoor Installation
Do not place the TV in direct sunlight or near
heat sources such as radiators, fi res and
stoves etc.
• Overheating and strong light will shorten
the life of the TV.
WARNING
* Safety instructions have two kinds of information as illustrated below.
WARNING
Failure to comply with this instruction may
cause serious injuries and even death.
NOTES
Failure to comply with this instruction may
cause light injuries or damage the product.
Indoor InstallationIndoor Installation
Do not place the TV where it might be exposed
to a lot of dust.
• Dust and frequent cleaning may
shorten the life of the LCD screen.
WARNING
NOTES
Ensure good ventilation around the TV. The
distance around the TV and the cabinet sides
should be about 10 cm in an enclosed cabinet.
Do not cover the TV ventilation slots.
• Overheating through poor ventilation will
shorten TV life and may be a fi re risk.
NOTES
5385 LD1701 Goodmans UK.indd 35385 LD1701 Goodmans UK.indd 3 21/04/05 9:57:2321/04/05 9:57:23
Page 4
4
SAFETY INSTRUCTIONS
NOTES
Disconnect the mains supply and other connections
before moving the TV.
WARNING
Do not place the TV close to sources of steam
or water such as in a bathroom or kitchen
• This may cause a fi re hazard or an electric shock hazard! !
WARNING
Only use the TV on a level and stable surface. Be careful not
to place it near the edge .
• The monitor could fall causing injur y to a child or adult and
serious damage to the monitor.
.
Only use T V stands or mounting devices especially designed
for LCD televisions. Check the stand or mounting specifi cations are adequate to support this television's weight (see
specifi cations at the back of this booklet).
5385 LD1701 Goodmans UK.indd 45385 LD1701 Goodmans UK.indd 4 21/04/05 9:57:2521/04/05 9:57:25
Page 5
5
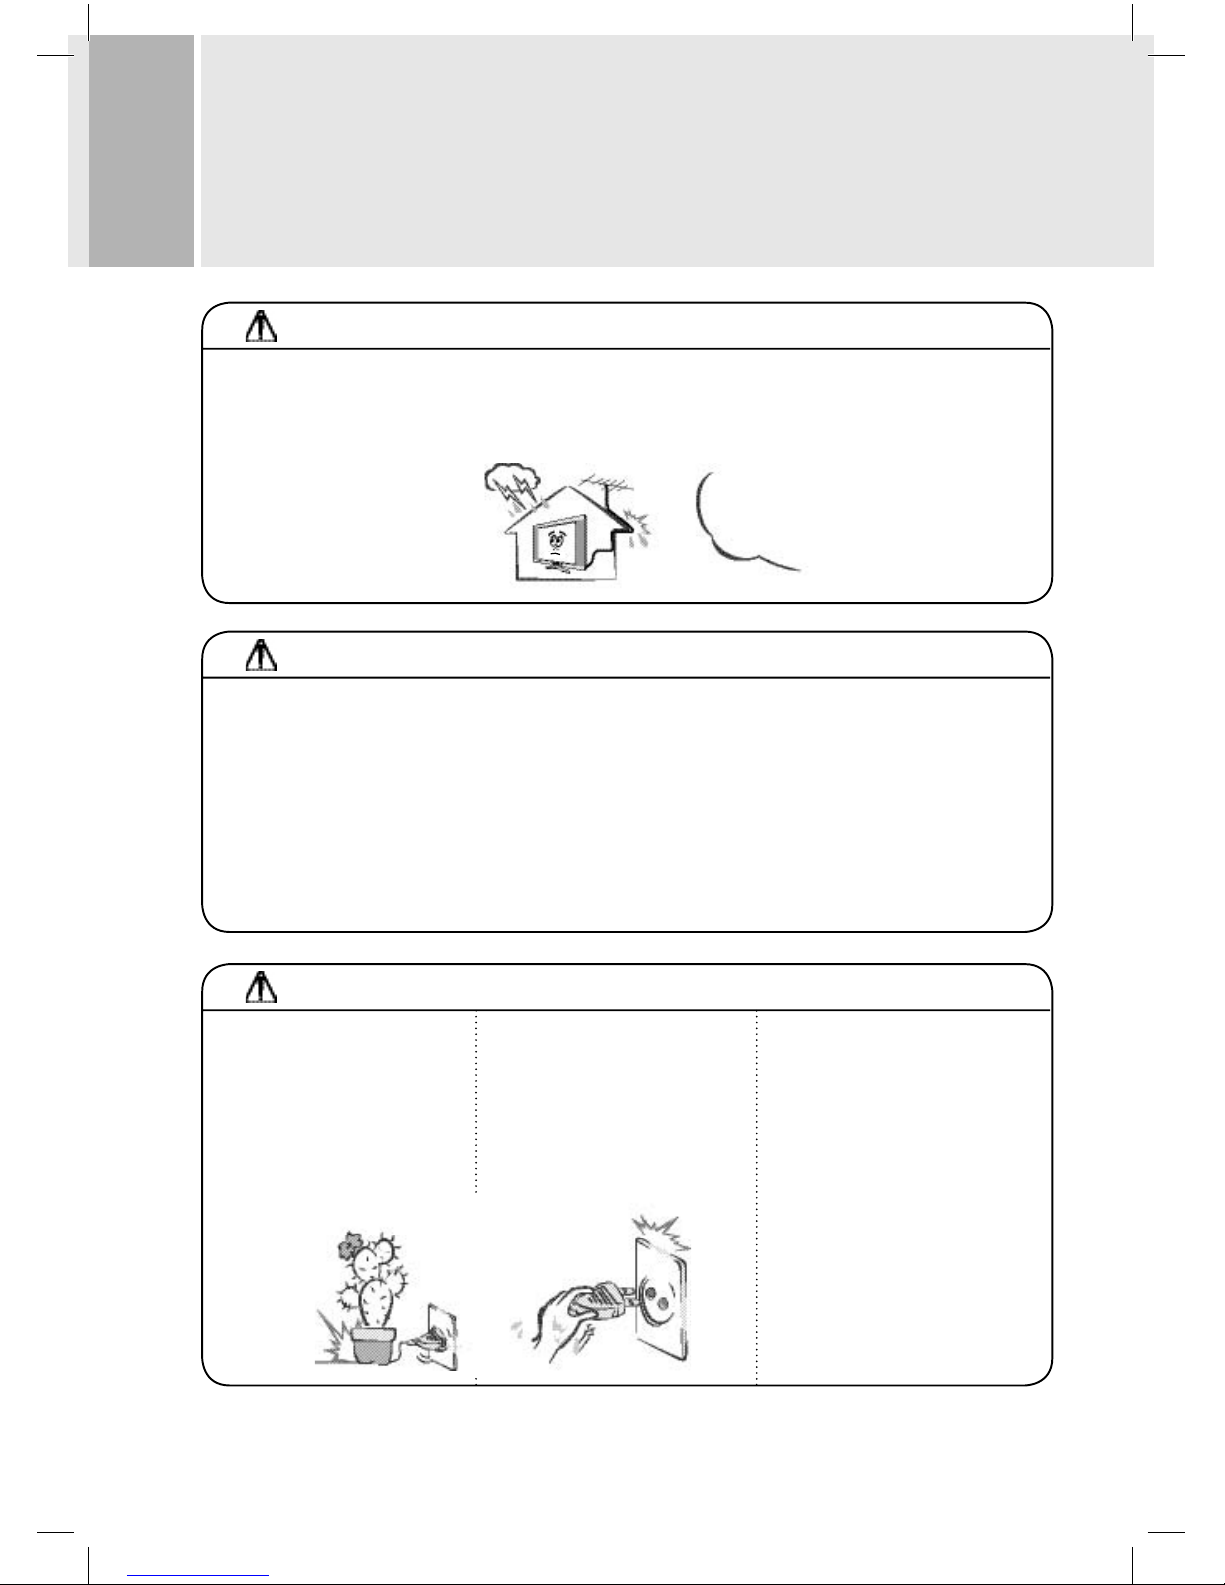
NOTES
Disconnect the aerial and mains supply during thunderstorms.
• This is to protect your TV from static electricity and power surges.
WARNING
• To prevent elec tric shock, do not remove any cover.
• If any thing goes wrong, don't try and fi x it yourself, get a qualifi ed service agent to look at it.
• Do not expose this television to dripping or splashing or place any objec ts fi lled with liquids, such as vases, on or above
the television.
WARNING
Make sure the mains lead cannot be
walked on, crushed, chafed, cut, and
so on. Don't place heavy objects on it.
• This may result in a fi re hazard !
Never touch the power plug using
wet hands
• This may cause an electric
shock hazard !
SAFETY INSTRUCTIONS
Appearance of power plug and socket
will var y according to the country
where this produc t is used.
5385 LD1701 Goodmans UK.indd 55385 LD1701 Goodmans UK.indd 5 21/04/05 9:57:2621/04/05 9:57:26
Page 6
6
ADDITIONAL SAFETY INSTRUCTIONS
Mains supply
This television is designed to operate from a 100 - 240 Volt, 50 - 60Hz AC mains supply. Other power source's may
damage it. Power is only completely disconnected by pulling out the main power plug or switching off at the AC
power point.
Mains plug
We have fi tted this television with a standard moulded mains plug. Use only approved connectors and extension
cables if the mains lead is not long enough.
• If for any reason you cut off the mains plug, please destroy the old plug as it would be dangerous if inserted
into a live power outlet. Remove the fuse from fused mains plugs before disposal.
• Carefully follow the wiring instructions supplied with a new mains plug.
Never use a fused mains plug without the fuse cover.
• If the mains power cord gets damaged it must be replaced with an approved power cord assembly of the
same type. In case of doubt consult a qualifi ed service technician.
Power cable colour code
The colours of the wires in the power cable of this unit are colour-coded as follows:
• The wire coloured brown is the live conductor which is connected to a supply terminal marked with the
letter L or coloured red.
• The wire coloured blue is the neutral conductor which is connected to a supply terminal marked with
the letter N or coloured black.
• Make sure the lead is fi rmly secured under the cord clamp.
• The wire coloured green and yellow is the earth conductor which is connected to the terminal marked “E” or
coloured green or green and yellow, or has the earth symbol:
Mains fuse
UK standard (BS1363) plugs must have a 3 amp (BS1362 type) fuse fi tted.
This mark is applied to show the equipment conforms to European safety and electro-magnetic
compatibility standards.
Eye fatigue
When using this product as a computer monitor, health and safety experts recommend short frequent breaks
rather than occasional, longer breaks, for example a 5-10 minute break after an hour of continuous screen work is
likely to be better than a 15 minute break every 2 hours.
Do not use the unit against a bright back ground and where sunlight or other light sources will shine directly on
the screen.
5385 LD1701 Goodmans UK.indd 65385 LD1701 Goodmans UK.indd 6 21/04/05 9:57:2821/04/05 9:57:28
Page 7

7
ADDITIONAL SAFETY INSTRUCTIONS
Cleaning
Unplug the television and use only a lightly dampened soft cloth. Do not use chemical solvents or strong
detergents as these may damage the cosmetic fi nish.
Protect the LCD screen as far as possible from fi ngerprints and moisture. Ensure no water droplets remain on
the screen as moisture can cause permanent discolouration!
If the LCD screen is badly soiled you will need to use a special LCD screen cleaner. Never use any other type of
chemical cleaner on the LCD screen.
Limitation of use
This television is only designed for household or similar general use as described in these instructions. Any other
use might invalidate the guarantee and be dangerous.
5385 LD1701 Goodmans UK.indd 75385 LD1701 Goodmans UK.indd 7 21/04/05 9:57:3221/04/05 9:57:32
Page 8
8
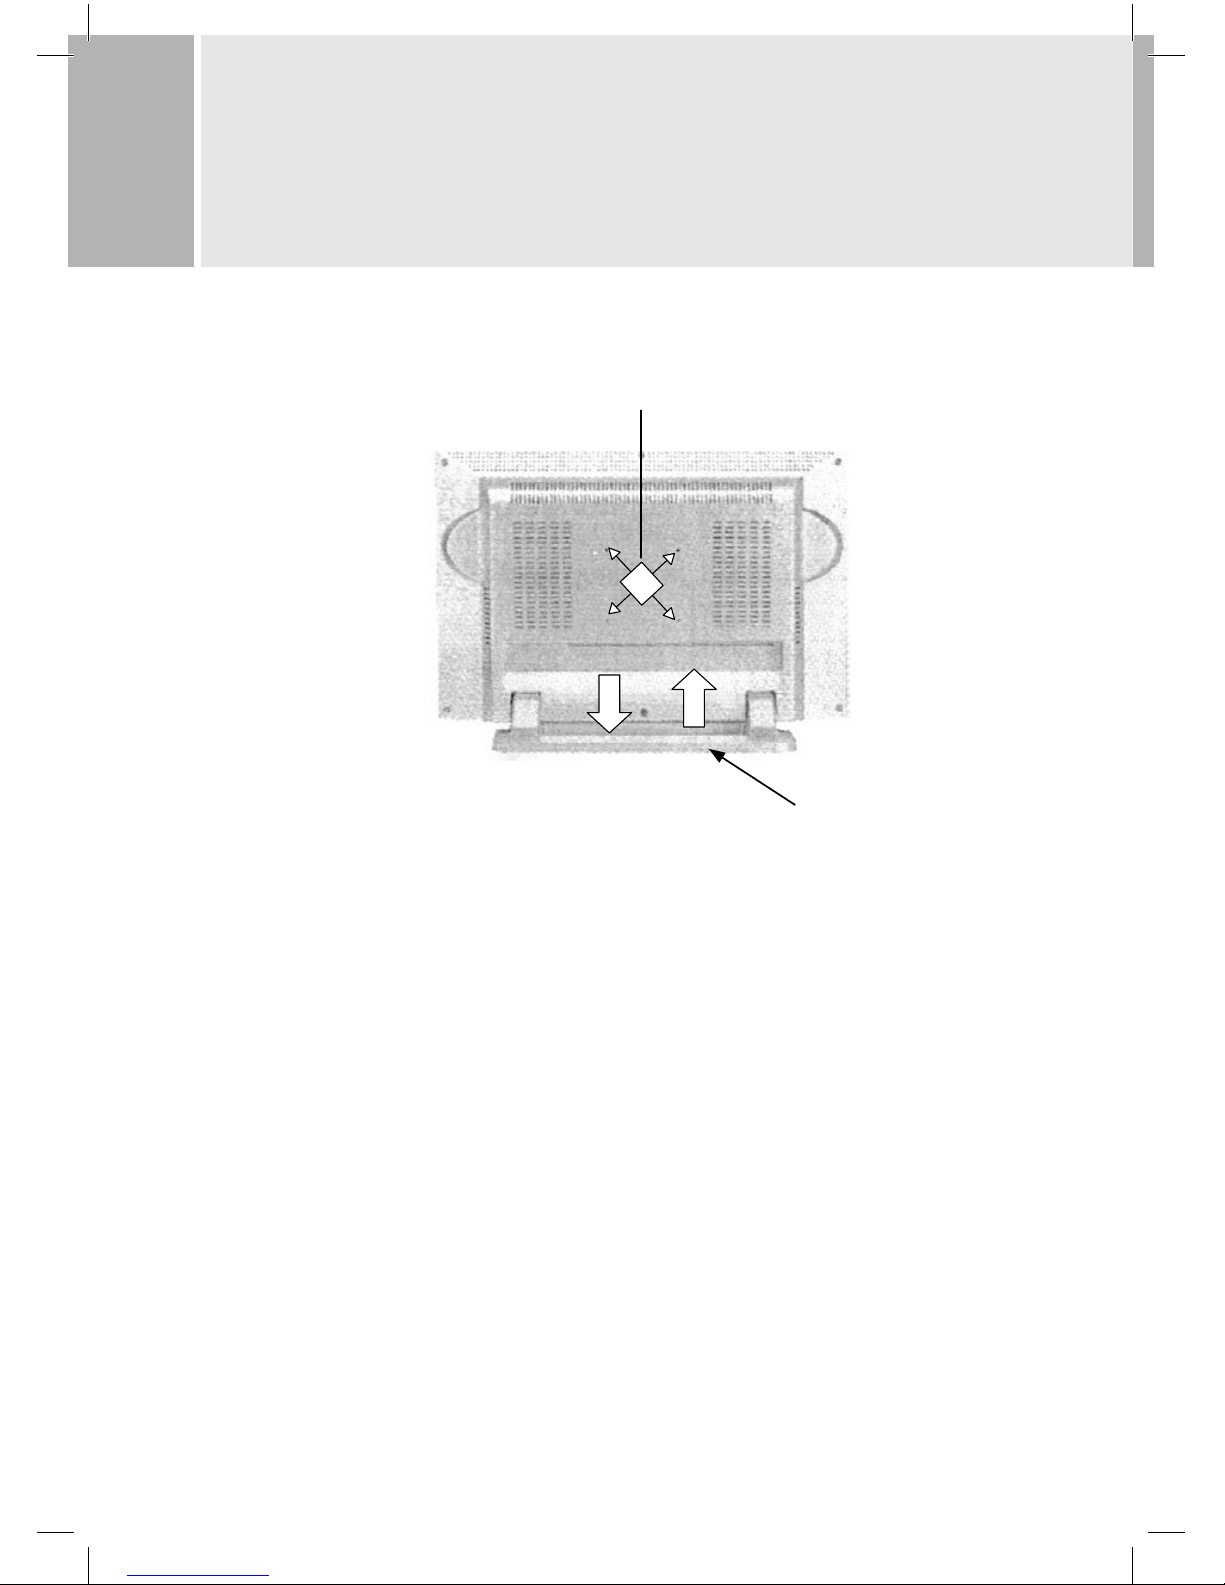
PHYSICAL INSTALLATION
Desk top position
Rotate the built-in stand out of its parking position and adjust the tilt as you require.
Wall mounting
Push the built-in stand into its parking position. Purchase and fi t a VESA standard 75mm wall mounting kit,
taking care that fragile walls and wall fi xings have adequate strength to support the monitor (approximate
weight 5.5kg).
Desk top stand
Holes for VESA
75mm wall mount kit
5385 LD1701 Goodmans UK.indd 85385 LD1701 Goodmans UK.indd 8 21/04/05 9:57:3321/04/05 9:57:33
Page 9
9
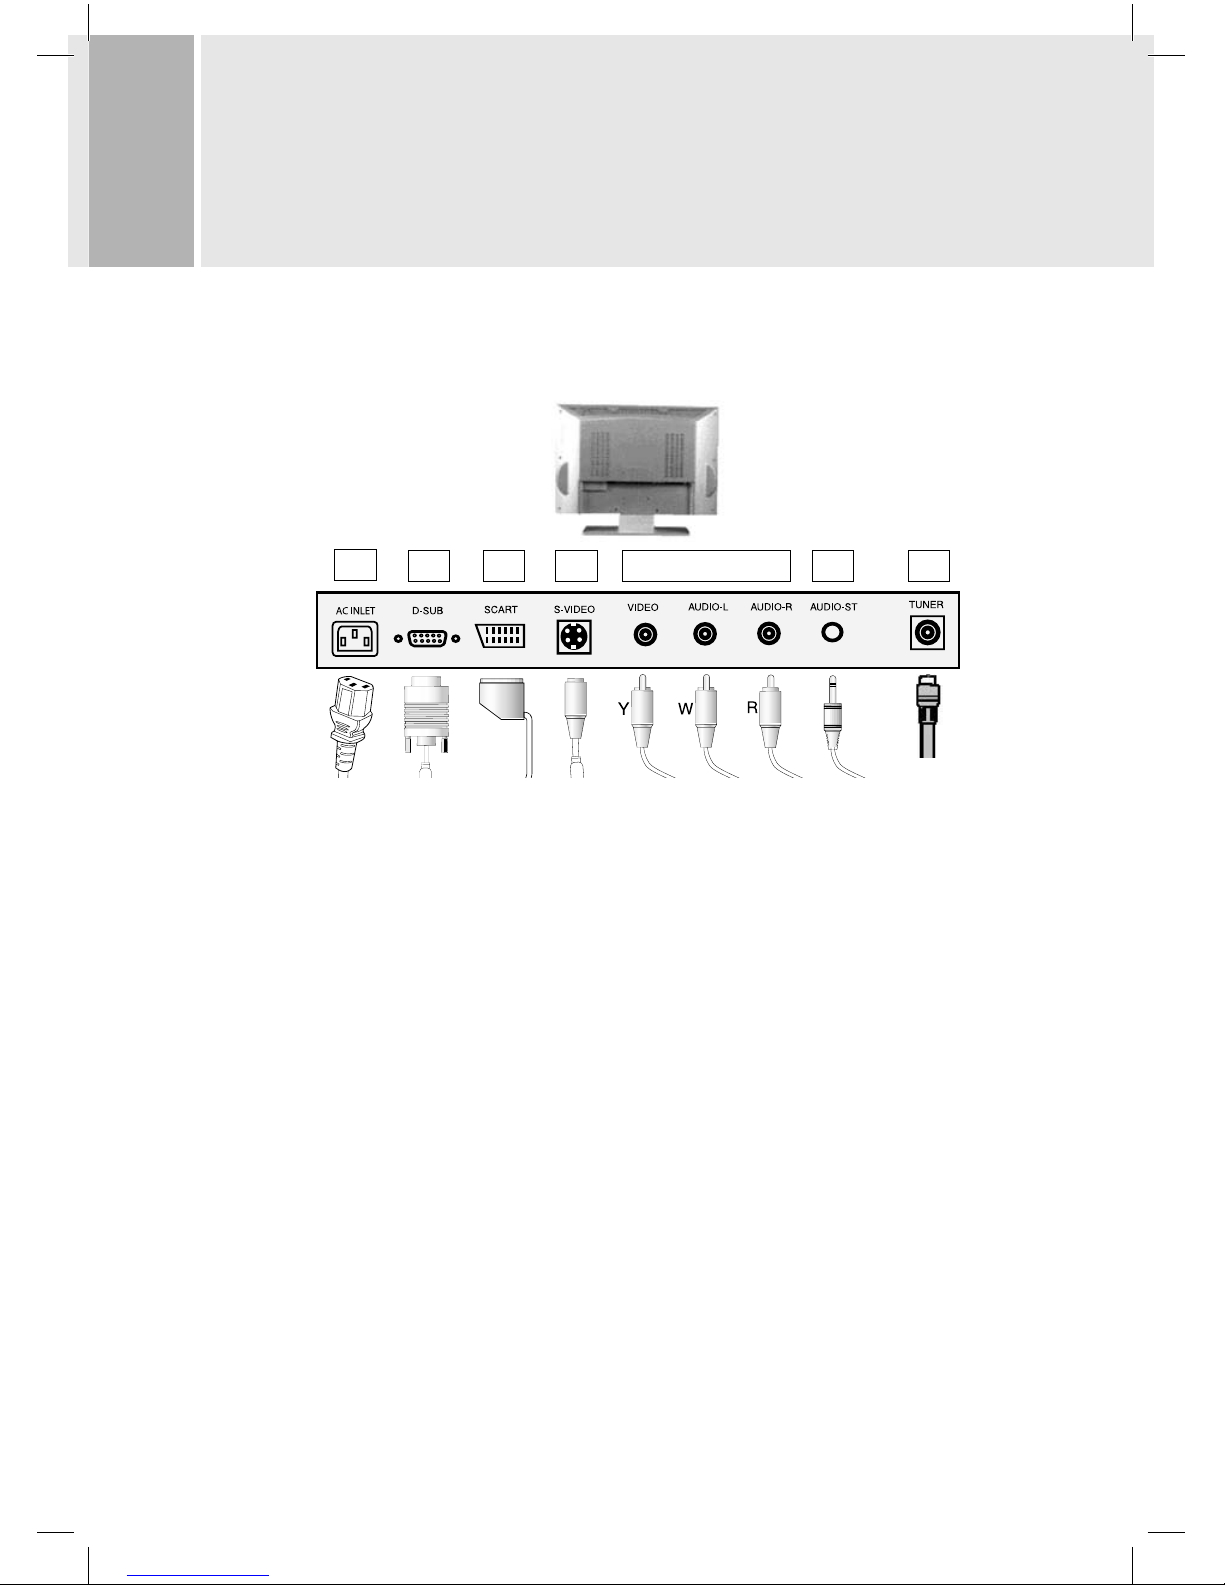
CAUTION:
Be sure to turn off computer and TV-monitor power before connecting.
2
13B3C 3A 1 4
1. CONNECT THE COMPUTER
You will need to obtain a VGA style graphics adapter (computer monitor) cable to connect the computer to
the “D-SUB” socket. The LCD TV requires a male connector at its end of the cable. Most computers require
a male VGA connector but please check before purchasing. If you want to hear sound from the computer
through the TV-monitor you will also need to connect the “AUDIO-ST” socket using a lead with a 3.5mm
stereo jack plug. Most computers use this kind of audio connector but please check: some sound cards have
extra connections and you can change outputs into inputs !
Please read “Connecting a computer” which follows.
2. CONNECT THE POWER CORD
Connect the female end of the power cord to the power input socket on the LCD Monitor.
Then, plug the male end of the power cord into an AC outlet. Don’t switch on until all connections are
completed.
CONNECTING WITH EXTERNAL
EQUIPMENT
5385 LD1701 Goodmans UK.indd 95385 LD1701 Goodmans UK.indd 9 21/04/05 9:57:3321/04/05 9:57:33
Page 10
10
CONNECTING WITH EXTERNAL
EQUIPMENT
3. CONNECT AVAILABLE AUDIO AND VIDEO SOURCES
A. Connect the RCA-phono cable for composite video (yellow), left audio (white) and right audio (red).
B. Connect SCART cable (not supplied) from AV equipment with a SCART socket. If possible set the equip-
ment to give RGB output for best picture quality, for example a DVD player or digital set-top box will usually
provide RGB (please check its instruction manual).
C. Connect an S-video (S-VHS) cable (not supplied) from AV equipment with S-video output. This is better
than composite video. With S-video input you also must connect the left audio (white) and right audio (red)
RCA-phono sockets to hear sound from the S-video source through the TV.
This model will not reproduce non-standard video signals such as NTSC 4.43 or PAL 60.
4. CONNECT THE TV AERIAL (ANTENNA)
Aerial lead should be fi tted with a coaxial 75 ohm standard aerial plug to fi t the TUNER socket.
CONNECTING A COMPUTER
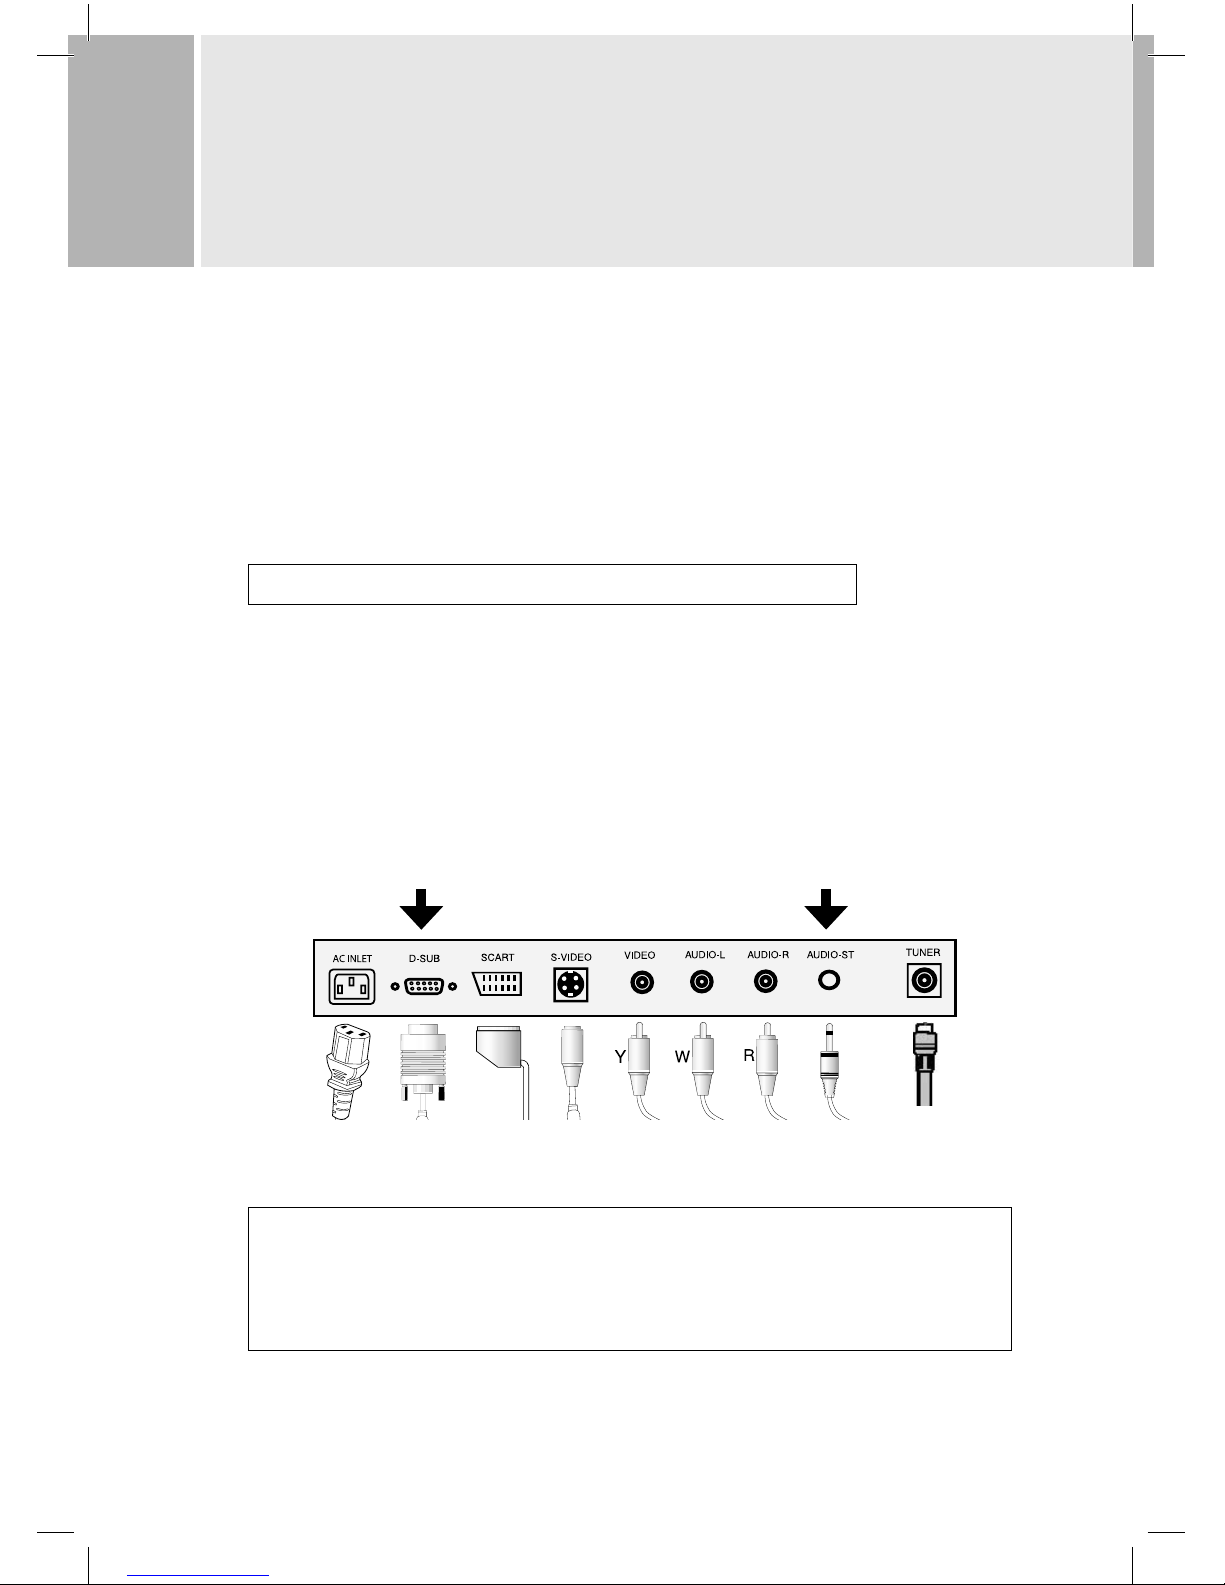
You can connect the LCD Display to your PC for outstanding images.
• Connect a VGA-style signal cable (not supplied) from the computer graphics adapter output to the ”D-SUB”
input on the TV. Secure the connection with the screws on the plugs.
• Connect the audio cable from the computer to the 3.5 mm stereo jack ”AUDIO ST” on the TV.
This monitor has a 15-pin high-density female D-type connector so you need a male connector at the monitor
end of the cable. Check the gender of your computer graphics card output before you buy a cable !
Please note:
Any VGA cable or accessory must connect DDC (data display channel) pins 12 and 15: see “D-SUB CONNECTOR PIN
ASSIGNMENTS “ on the following page for more details. Without these the computer operating system will not be
able to identify the monitor and incorrect display size or colours may result. We recommend you do not use cable end
adapters or gender changers as these sometimes miss out or cross over the DDC connections
5385 LD1701 Goodmans UK.indd 105385 LD1701 Goodmans UK.indd 10 21/04/05 9:57:3521/04/05 9:57:35
Page 11
11
CONNECTING WITH EXTERNAL
EQUIPMENT
Setting up the computer and monitor
• First, turn on the monitor by pressing the power button on the monitor or the power button
on the remote control.
Second, turn on the PC computer.
• Use the SOURCE button on the remote control to select the PC input source
(it changes in the order TV > SCART > PC > Video > S-video).
• Normally you should adjust the display resolution of the PC to 1280 x 1024 pixels at 60Hz, but lower resolutions are possible (see “Resolution” on the following pages).
• Press the AUTO button on the remote control to make the monitor automatically adjust the position and
clarity of the display. You can manually trim it if necessary using the monitor’s picture controls.
• Adjust the sound level on the computer.
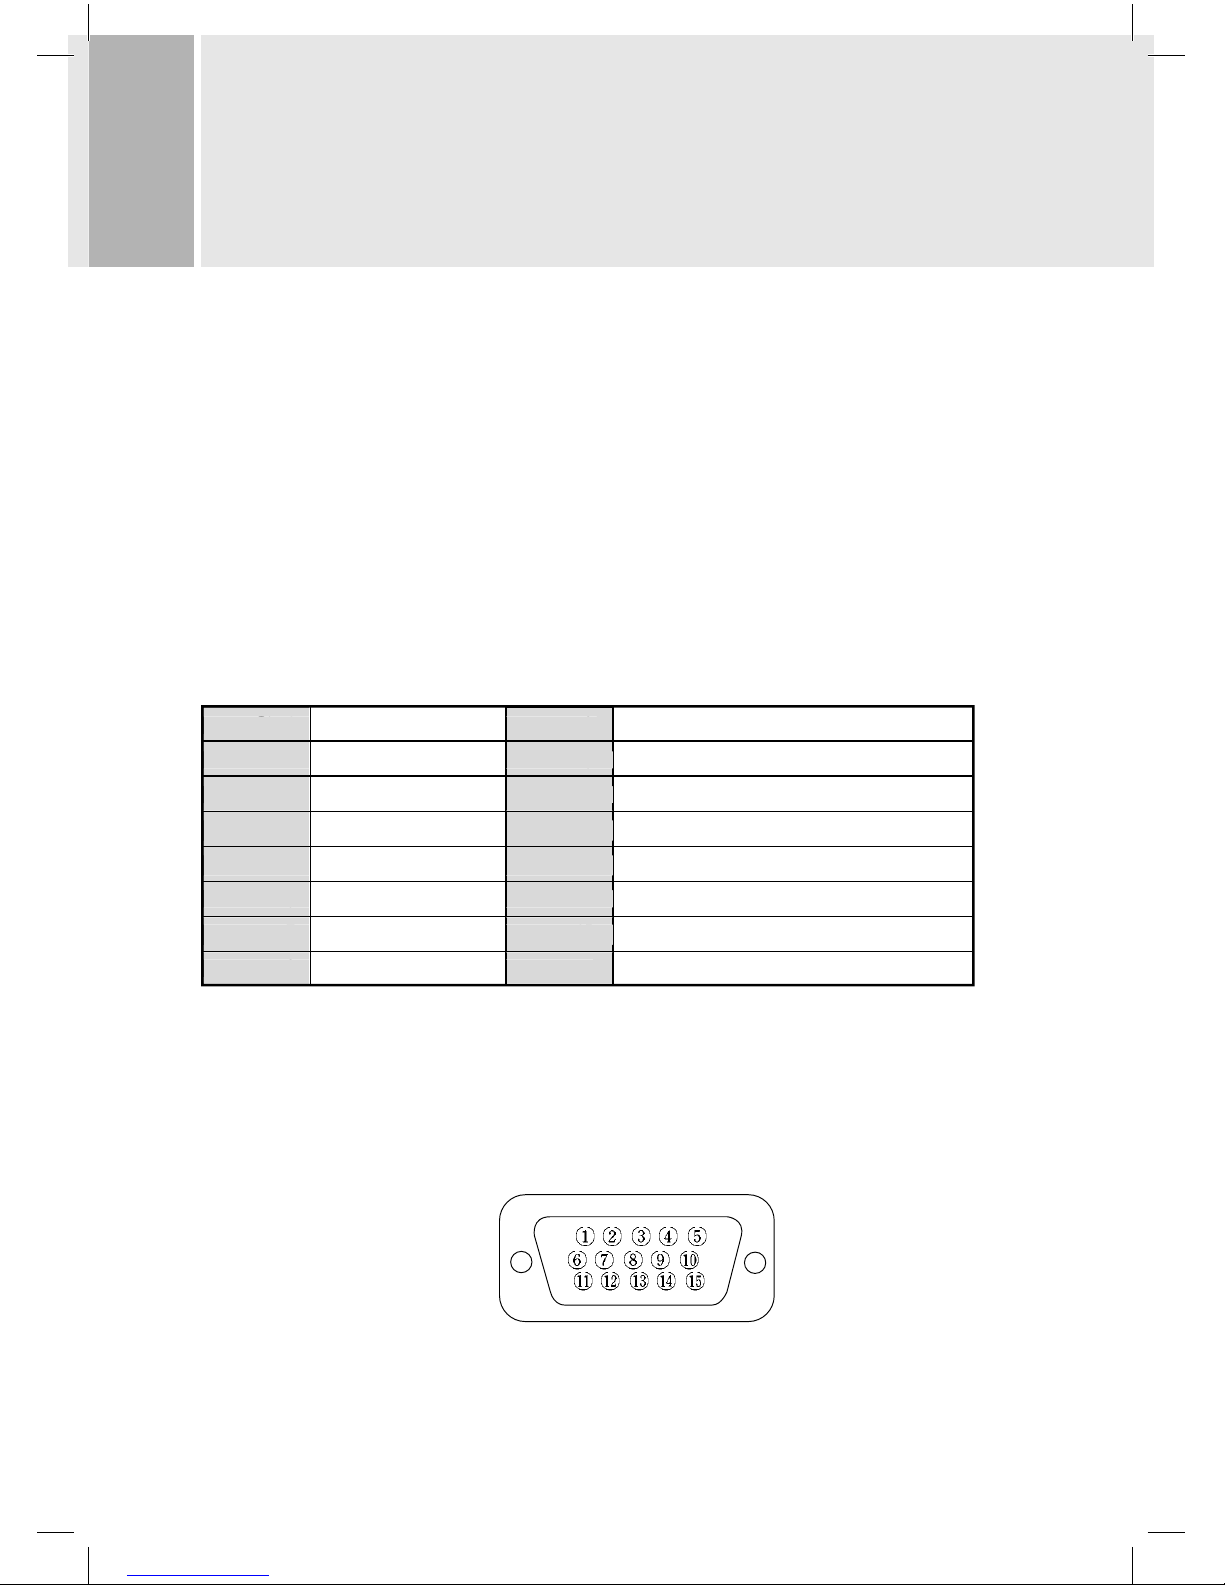
D-sub (VGA) connector pin assignments
Pin 1 RED VIDEO 9
2 GREEN VIDEO 10 SIGNAL CABLE DETECT
3 BLUE VIDEO 11 GROUND
4 GROUND 12 SDA (for DDC)
5 GROUND 13 H-SYNC (or H+V SYNC.)
6 RED GROUND 14 V-SYNC.
7 GREEN GROUND 15 SCL(for DDC)
8 BLUE GROUND 8
7
6
5
4
3
Pin 1
2
15
14
13
12
11
9
10
DDC stands for Data Display Channel. This makes Plug and Play work, so the computer matches the graphics
adapter settings to the monitor.
D-SUB
5385 LD1701 Goodmans UK.indd 115385 LD1701 Goodmans UK.indd 11 21/04/05 9:57:3721/04/05 9:57:37
Page 12

12
CONNECTING WITH EXTERNAL
EQUIPMENT
Resolution
This is a digitally-controlled multi-frequency computer monitor.
It operates at horizontal frequencies of 31 to 80 KHz and vertical frequencies of 56 to 75 Hz.
Because of its micro processor-based designs, it off ers auto-synchronization and autosizing capabilities with
11 programmed settings as listed in the table. It off ers best quality with an input of 1280 x 1024 pixels, 64kHz
horizontal and 60 Hz vertical scan rate. Inputs outside its range produce a message”
Below is a typical method of adjusting the computer to match the monitor. Details vary according to hardware
and operating system. Take care to use “test” mode on computer screen or temporary.
To enjoy the best quality, change the mode: Click the right mouse button anywhere on the desktop, select
“Properties”, Settings” and adjust the resolution to 1280x1024. Click the “Advanced” button, change “Refresh
rate” to 60Hz. You might fi nd it useful to click the “List all modes” button (location and label vary with graphics
driver and operating system).
The 11 preset modes cover most of the common video modes supported by popular graphic adaptors. However,
each adaptors implementation of these video modes may vary slightly. You may fi nd it necessary to make minor
adjustments to the display settings (such as horizontal position) using the on screen display. For further information and instructions on using the on screen display, please refer to “Controls and Functions”.
PRESET MODES RESOLUTION FREQUENCY
H(Pixels) V(Lines) H(KHz) V(KHz)
VGA 64 0 350 31.5 70
720 4 00 31.5 7 0
64 0 48 0 31.5 60
640 480 37.5 75
MAC 640 480 35.0 67
VESA 800 600 37.8 60
800 600 46.8 75
1024 768 48.3 60
1024 768 60. 0 75
1280 1024 63.9 60
1280 1024 80.0 75
For experts
If you still have trouble getting a correct display from your computer and you are familiar with graphics cards
and computers, graphics system tweak applications such as RivaTuner and ForceWare Coolbits 2.0 let you reveal
and tinker with things like horizontal frequency, but at your own risk! (We do not give advice on using these
applications, but there is plenty on the Internet).
5385 LD1701 Goodmans UK.indd 125385 LD1701 Goodmans UK.indd 12 21/04/05 9:57:4021/04/05 9:57:40
Page 13

13
CONNECTING WITH EXTERNAL
EQUIPMENT
Selecting input source
There are two methods:
1. After switching on the TV monitor, press the MENU button to display the Input source” screen.
Press CH down button to enter the source menu. Select source with the VOL right or left buttons.
2. Press the SOURCE button ( ) on the TV-monitor or the remote control repeatedly to select input signal
from TV tuner, scart socket, PC, composite video or s-video.
5385 LD1701 Goodmans UK.indd 135385 LD1701 Goodmans UK.indd 13 21/04/05 9:57:4221/04/05 9:57:42
Page 14

14
CONTROLS AND FUNCTIONS ON THE TV
A. POWER ON/OFF ( )
Turns the power ON or OFF. There will be a few seconds delay before the display appears.
The power LED (in the power button) lights with green when the power is turned ON.
The power is turned OFF by pressing the power switch again and the power LED goes red.
The power LED goes orange during computer energy saving mode or when there is no signal from the
computer.
When the signal from the computer goes off , the on-screen display below will appear for a
few seconds.
Check input Signal
B. SOURCE
Change input Source one by one. See “Selecting input source” on previous page.
(PC, VIDEO, S-VIDEO, TV, SCART)
C. MENU
Displays and exits the on-screen menus. Use with the volume and channel buttons according to the
on-screen menu descriptions on the following pages.
B. SOURCE BUTTON
C. MENU BUTTON
D. CHANNEL BUTTONS
(DOWN & UP)
E. VOLUME BUTTONS
(LEFT & RIGHT)
REMOCON SENSOR
POWER INDICATION LED
A. POWER SWITCH
5385 LD1701 Goodmans UK.indd 145385 LD1701 Goodmans UK.indd 14 21/04/05 9:57:4321/04/05 9:57:43
Page 15

15
CONTROLS AND FUNCTIONS ON THE TV
D. CHANNEL, UP and DOWN
Increases or decreases the channel number.
(In PC mode, down key operates as “Auto adjust”)
The channel (CH) buttons also work as “UP” and “DOWN” in the on-screen menus.
E. VOLUME, LEFT and RIGHT
Increases or decreases the sound level.
The volume (VOL) buttons also works as “LEFT” and “RIGHT” in the on-screen menus.
5385 LD1701 Goodmans UK.indd 155385 LD1701 Goodmans UK.indd 15 21/04/05 9:57:4521/04/05 9:57:45
Page 16

16
REMOTE FUNCTIONS
REMOTE CONTROL
1. POWER (
)
Turns the power ON or OFF. The power light goes green
for ON and red for OFF.
2. SOURCE
Press repeated;y to select input signal source from TV
tuner, PC, scart, s-video or scart socket.
3. MUTE
Mute the sound.
4. AUTOSCAN
Find available channels (programs). See “Tuning your
LCD TV” section.
5. MENU
Activates and exits the On Screen Display. See “On-screen
menu controls and functions” section.
6. VOL(
)
Increase or decrease sound volume. Work as LEFT and
RIGHT buttons in menus.
7. CH ( )
Work as UP and DOWN buttons in menus.
Increase or decrease the channel number.
Increase or decrease teletext page number in
teletext mode.
8. DISPLAY
Programme number display on TV picture.
9. TV
Show TV picture. Same as changing input source to “TV”.
10. AUTO
Automatic picture adjustment for PC source.
11. EXIT
Exit the On Screen menus.
Before you can watch programmes
received by the TV tuner you need
to follow “Tuning your LCD TV”.
If you need to connect external
sources of audio and video, please
read “Connecting with external
equipment”.
1
4
8
5
6
10
2
21
3
9
6
1219
20
7
7
11
5385 LD1701 Goodmans UK.indd 165385 LD1701 Goodmans UK.indd 16 21/04/05 9:57:4521/04/05 9:57:45
Page 17

17
REMOTE FUNCTIONS
12. TEXT ( )
Select Teletext display/Return to TV picture display.
Teletext only works for TV transmission or video input carrying
a teletext service. Main index page usually displays fi rst. Key in
a new three-digit main page number and if a matching page
number is received it will appear on-screen.
13. INDEX ( )
Return to index page in teletext mode.
14. CANCEL ( )
Display the TV picture on the screen while waiting for the new teletext page. When page number comes
on-screen press TEXT button twice to view the found page.
15. REVEAL ( )
Reveal hidden text, such as Solutions of riddles or puzzles in teletext mode.
16. HOLD ( )
Hold on and off . Some teletext pages consist of a sequence of sub-pages which change every time a new sub-
page is received. When symbol appears and the sub-page will not change. When you release hold you may
see any sub-page in sequence.
17. SIZE ( )
Page expand in teletext mode – top half, bottom half, normal.
18. SUBCODE ( )
Teletext pages may consist of a sequence of sub-pages, sometimes shown (for example) as 1/3, 2/3, 3/3
on the text page. If you know which sub-page you want press the subcode button then four digits (S****);
for example sub-page two, press 0 – 0 – 0 – 2. When it is received the page will stay on-screen without
changing. To change page, repeat sub-page sequence or key in a main page number.
19. I/II (Multi-Channel TV Sound)
Select fi rst or second language when a Nicam dual language sound TV signal is received.
20. RED/GREEN/YELLOW/BLUE
Red, green, yellow and blue subject headings are shown at the bottom of the screen if fast text is trans-
mitted by the station. Pres the corresponding colour button on the remote controller to display the subject
page.
21. 0, 1, 2, 3,...9 (Number Key)
Using the 0, 1, 2, 3...9 Keys, the required channel or Teletext page is selected
TELETEXT
Remote buttons 12 to
18, 20 and 21 operate
teletext, the on-screen
magazine service.
5385 LD1701 Goodmans UK.indd 175385 LD1701 Goodmans UK.indd 17 21/04/05 9:57:4821/04/05 9:57:48
Page 18

18
TUNING YOUR LCD TV
IMPORTANT !
• Make sure the TV aerial is connected.
• Input source must be set to “TV” before you can perform tuning operations , so
press “TV“ on the remote. •
• TV must be set to the correct country or region:
1. Press ‘MENU’ then the ‘VOL’ right button four times to display the ‘TV channel’ menu.
2. Press ‘CH’ up button to move the pointer to ‘Region’ then press the ‘VOL’ right button to move the
tick mark to region in which you live:
USA, Korea W.EU, Scand = West Europe, Scandinavia
UK, Ireland E.EU, CIS = East Europe and Commonwealth of Independent States (former USSR)
M.East France
Press MENU to confi rm the change and re-set the television system. No sound, no colour or distorted picture
means you have chosen a region incompatible with the TV broadcast you are receiving.
Region setting will only work if the hardware in the TV supports the TV system for the selected region.
AUTOSCAN
Autoscan stores broadcast signals to programme numbers in the order it fi nds them, If you want TV stations to be
on particular numbers you can change the numbers with the “Channel swap” function after “Autoscan”.
Press the AUTOSCAN button on the remote control.
The on-screen display asks “Are you sure ?”. You can exit by pressing
MENU or proceed by pressing CH down.
During autoscan the LCD TV will automatically search for broadcast
signals fed to the aerial socket and you will see the display below.
Please be patient, it will take a few minutes.
Sorting the channels
1. Change programme with the “CH” up and “CH” down buttons. Use TV guides or teletext (see “tips” note) to
identify the TV station.
2. Press ‘MENU’ then the ‘VOL’ right button four times to display the ‘TV channel’ menu.
3. Press ‘CH’ down button to move the pointer to ‘Channel swap’ then press the number button(s) to enter the
number to which you wish to move the station, for example BBC1, key in “1”; BBC2, key in “2”, and so on.
Press VOL right to complete.
4. Repeat above steps for the other stations.
Ch.Auto Searching.......
20%
5385 LD1701 Goodmans UK.indd 185385 LD1701 Goodmans UK.indd 18 21/04/05 9:57:5221/04/05 9:57:52
Page 19

19
Tips
• Start with the station you want to put on number one and work up. This is because the station list is like
a separate stack of labels next to the stack of programme numbers. Each time you “insert a station”, the
“stations” stack moves up one against the numbers stack.
• With a station that transmits teletext, press the teletext ( ) button. Wait about ten seconds for the
teletext index page to update then you will usually see some identifi cation on the teletext index page, such
as “BBC Ceefax 1” and “BBC Ceefax 2” for BBC1 and BBC2.
Press teletext (
) again to exit teletext.
TUNING YOUR LCD TV
5385 LD1701 Goodmans UK.indd 195385 LD1701 Goodmans UK.indd 19 21/04/05 9:57:5421/04/05 9:57:54
Page 20

20
ONSCREEN MENU
CONTROLS AND FUNCTIONS
Press the MENU button to see symbols for input source, picture (screen) adjustments, sound (audio)
adjustments, on-screen display (OSD) settings, TV channel tuning, utilities and exit menus. The fi fth symbol
changes to represent a colour adjustment menu when PC (computer) source is selected.
Press volume left or right to highlight a sub-menu and press channel down to enter it. Press MENU again to
step back.
Menus automatically go off after a short time if no button is pressed (you can adjust how long under “OSD”).
Press EXIT to turn the menus off immediately.
The television remembers what you set in the menus unless factory settings are restored with “Recall” under
“Utilities”.
( ): input source
Typical display after pressing MENU with PC input selected.
Press MENU then CH down. In this input menu press volume right or left to change input source then CH
down to activate it.
Input source is the only menu you can display if the television does not detect any input.
5385 LD1701 Goodmans UK.indd 205385 LD1701 Goodmans UK.indd 20 21/04/05 9:57:5521/04/05 9:57:55
Page 21

21
ONSCREEN MENU
CONTROLS AND FUNCTIONS
: Screen
Brightness
Increase or decrease the overall light level of the picture.
Contrast
Increase or decrease the intensity of the picture.
H. position (PC Mode Only)
Move image horizontally on screen right or left.
V. position (PC Mode Only)
Move image horizontally on screen right or left.
Clock (PC Mode Only)
Adjusts the width of the picture. Use only if necessary after AUTO button.
Phase (PC Mode Only)
Has an eff ect like adjusting the focus of the picture. Use only if necessary after AUTO button.
Hue (TV, NTSC Only)
Adjust to make the picture warmer (stronger reds) or cooler (stronger blues).
NTSC is the TV system used in countries like USA and Japan.
Saturation (TV Only)
Adjust the strength of colour. Same as “Colour” control on a conventional TV
Sharpness (AV Only)
Adjust the sharpness of the picture.
• Press MENU, VOL right then CH down to move
into this menu.
• Move the pointer with CH up and down.
• Change settings with VOL right and left.
• Press the EXIT but ton get out.
• The screen menu shown here applies to computer
monitor (PC) mode. Some features are only present
in PC mode or TV mode.
• Scart, AV and S-video sources are eff ectively same
as TV mode for this menu.
5385 LD1701 Goodmans UK.indd 215385 LD1701 Goodmans UK.indd 21 21/04/05 9:57:5621/04/05 9:57:56
Page 22

22
ONSCREEN MENU
CONTROLS AND FUNCTIONS
Audio
Volume
Adjust sound output with the VOL buttons.
Equaliser (Loudspeaker Only)
Boost / Cut specifi c freguency.
Press VOL right to enter equaliser graphic display. Press CH up or down to select one of fl at, music,
movie, speech or user. “User” is adjustable but the others are fi xed. To adjust the “user” settings,
press the channel right or left buttons to highlight a frequency band (it turns pink) and adjust with
the volume buttons. The television remembers your user settings.
Balance (Loudspeaker Only)
Adjust the balance of left and right speaker sound with the volume buttons.
Loudness (Loudspeaker Only)
Compensate the sound for reduced sensitivity of the human ear to bass and treble audio frequencies
at low volume. Turn on and off with the volume buttons.
• Press MENU, VOL right (twice) then CH
down to move into this menu.
• Move the pointer with CH up and down.
• Change settings with VOL right and left.
• Press the EXIT button get out.
5385 LD1701 Goodmans UK.indd 225385 LD1701 Goodmans UK.indd 22 21/04/05 9:58:0021/04/05 9:58:00
Page 23

23
ONSCREEN MENU
CONTROLS AND FUNCTIONS
OSD
H. Position
Move the OSD position to right () or left() with the VOL buttons.
V. Position
Move the OSD position up() or down() up or down with the VOL buttons.
Transparency
Change how much background shows through the display with the VOL buttons.
OSD Timer
Press volume buttons to adjust how long the menu display remains on-screen if you do not press any
more buttons. Bar graph indicates time in seconds. Automatic exit like this has the same eff ect as
pressing the EXIT button: the television remembers the settings.
Language
Press VOL right or left button to change on-screen display language. You will see a red tick mark to
show which language will be used for the on-screen menus. The language changes immediately you
move the tick mark.
• Press MENU, VOL right (three times) then
CH down to move into this menu.
• Move the pointer with CH up and down.
• Change settings with VOL right and left.
• Press the EXIT button get out.
5385 LD1701 Goodmans UK.indd 235385 LD1701 Goodmans UK.indd 23 21/04/05 9:58:0221/04/05 9:58:02
Page 24

24
ONSCREEN MENU
CONTROLS AND FUNCTIONS
Color (PC modus)
Color Temp
Press VOL right button to change colour temperature selection.
9300K gives a blue “colder” look to the picture and 6500K gives a “warmer” look. “User” allows
you to change the colour balance of the picture to your own preference. The television remembers
your settings.
Red
Press CH down to highlight “blue” and adjust blue colour intensity for “user” with the volume buttons.
Green
Press CH down to highlight “red” and adjust red colour intensity for “user” with the volume buttons.
Blue
Press CH down to highlight “green” and adjust green colour intensity for “user” with the volume
buttons.
A bar graph shows the relative colour intensity. Ex-fac tory settings are 50%
You can use the utility menu “auto” function to automatically balance the colour and other picture
settings for a computer video source.
• Press MENU, VOL left (three times) then CH
down to move into this menu.
• Move the pointer with CH up and down.
• Change settings with VOL right and left.
• Press the EXIT button get out.
5385 LD1701 Goodmans UK.indd 245385 LD1701 Goodmans UK.indd 24 21/04/05 9:58:0421/04/05 9:58:04
Page 25

25
ONSCREEN MENU
CONTROLS AND FUNCTIONS
Utility
Recall
Press volume right on this function to restore menu adjustments to ex-factory condition, but still keep the
TV channel tuning memory.
Full Auto (kun PC-modus)
Press volume right on this function to perform automatic picture size, position and colour adjustment.
• Press MENU, VOL left (twice) then CH down
to move into this menu.
• Move the pointer with CH up and down.
• Change settings with VOL right and left.
• Press the EXIT button get out.
5385 LD1701 Goodmans UK.indd 255385 LD1701 Goodmans UK.indd 25 21/04/05 9:58:0621/04/05 9:58:06
Page 26
26
ONSCREEN MENU
CONTROLS AND FUNCTIONS
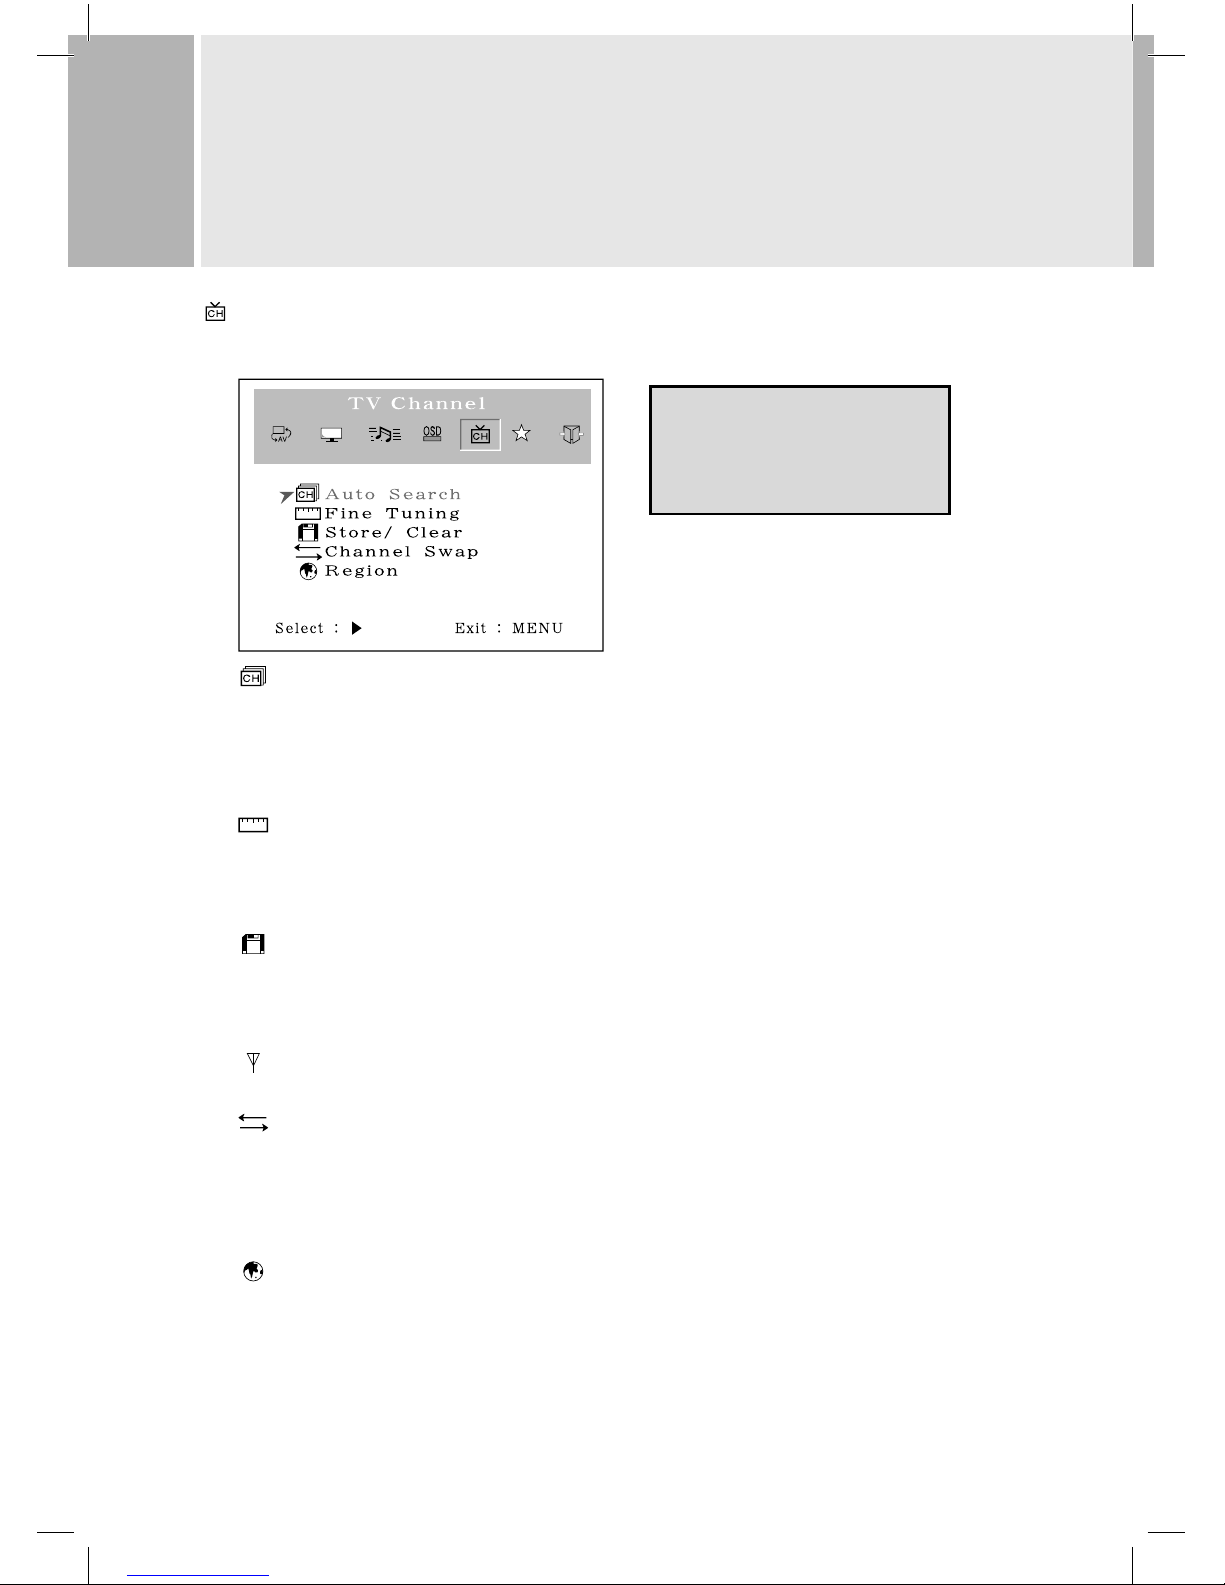
TV Channel Tuning
Input source must be set to “TV” before you can display this menu, so press the “TV” button.
Auto Search
Press VOL right on this function to make the television fi nd available broadcast channels and assign
them to programme numbers in the order it fi nds them. This will take several minutes.
AUTOSCAN button on the remote has same function as auto search, but asks you to confi rm go-ahead
in case you pressed it by accident.
Fine Tuning
If the picture or sound are not clear you can try to improve them with fi ne tuning. It is mainly for non-
standard signals. Press CH down to point at fi ne tuning the press VOL right to tune up or volume left to
tune down. Press MENU then EXIT.
Store / Clear
Store” allows the programme to be selected with the channel up and down buttons. “Clear” stops this
but the number buttons can still select it. Press CH down to point at “Store / Clear” and press VOL right to
tick the setting you want. Press MENU.
TV Type (only when region is set to USA / Korea)
Select Air or Cable TV channels. Will only have eff ect if appropriate hardware is fi tted.
Channel (Program) Swap (all region settings except USA / Korea)
You can move a station to a diff erent programme number here. With CH up or down select the station
you want to move before using this function. With the pointer at ‘Channel swap’ press the number
button(s) to enter the number to which you wish to move the station and press VOL right. There is
more detail under ‘Tuning your LCD TV”
Region
Move the tick mark with VOL+ to select a TV system that Is being used in your region.
• USA, Korea : NTSC(M) • W.EU, Scand : PAL B/G
• UK. Ireland : PAL I • E. EU, CIS : SECAM D/K
• M.Eas t : SECAM B/G • Fr ance : SEC AM L/L’
Region setting will only work if the hardware in the TV supports the TV system for the selected region. There is
more about region setting under ‘Tuning your LCD TV”.
• Press MENU, VOL left (twice) then CH down
to move into this menu.
• Move the pointer with CH up and down.
• Change settings with VOL right and left.
• Press the EXIT button get out.
5385 LD1701 Goodmans UK.indd 265385 LD1701 Goodmans UK.indd 26 21/04/05 9:58:0721/04/05 9:58:07
Page 27

27
ONSCREEN MENU
CONTROLS AND FUNCTIONS
Exit
Exit
Turn off OSD Menu.
• Press MENU, VOL left (once) then CH down
to highlight the exit icon just to see the H
and V data.
• From any sub-menu press MENU to move
up into the main menu icons then press VOL
right or left to highlight the exit icon.
• With the exit icon highlighted, press the
MENU button again to exit.
• All menus go off automatically after
the time set in the “OSD timer” in the
“OSD” menu.
5385 LD1701 Goodmans UK.indd 275385 LD1701 Goodmans UK.indd 27 21/04/05 9:58:1021/04/05 9:58:10
Page 28

28
TROUBLESHOOTING AND HELPLINE
SOUND
Symptoms Possible causes What to do
No sound The volume is set to minimum.
The mute is switc hed on.
Turn the volume up.
Press t he mute butto n to release ‘mut e’.
Crack ling noises o r distorte d sound. Inter ference from cars, fl uo rescent lights,vide o
recor der, a radio broad cast,per sonal compu ter
or othe r equipment.
Turn off one piece of eq uipment at a tim e to see
if the interference clears.
Stereo s witching to mo no. A weak signal or a mono broadcast . Ch eck streng th and your aeri al system.
No ste re o so un d f rom ex ter na l eq uip me nt A mono sc art lead i s being use d toconnec t the
scart socket.
The equ ipment has RF mo dulator and th e signal
is conne cted through the aer ial socket.
Check t hat the scar t lead is stere o.
Check t he externa l equipment is to the television through an AV (sc art) lead, the n switch the
television to AV mode.
PICTURE
Grainy (s nowy) picture Your vide o recorder cou ld be faulty.
Tra nsmitte r tro uble .
The out side aerial h as moved, or is damaged or
has bee n disconnec ted.
If you have a v ideo record er try plugg ing the
aerial direc tly into the tel evision.If t he fault
clear s, the video re corder is pro bably fault y.
Have your a erial syste m checked.
Ext ra outlines on objec ts in the pic ture
(ghost s).
The aer ial is receivi ng refl e cted signals from
hills or buildings.
Faulty ae rial sy stem
Try to tune in a bett er quality signal fro m the
same television station.
Have your a erial syste m checked.
Spots o r streaks on t he picture. Poor aer ial signal (T V mode)Inter ference fr om
electrical equipment.
Settings of di gital video equipment do not
match LCD d isplay VGA/DVI m ode specifi cation.
Try to tune in a bett er quality signal fro m the
same television station. Have your aerial
syst em checked.Move the int erfering e quipment fu rther away or, if p ossible, tur n it off .
Change r efresh rat e or resoluti on setting s on
digital equipment, if possible.
No pic ture. Brigh tness and cont rast levels ar e set to
minimum.
Increase the brightness and contrast settings.
Jumbled telete xt charac ters Poor qua lity signal As for ‘ Snowy pict ure’ and ‘Ghos ts’
Displa y image is not cent red, too small o r to
large on P C mode.
Press AU TO key on remote.
Read ”Con necting a co mputer” se ction on
page 3.
Please check through the guide below before you call a service department or the shop where you bought
your television. If there is something about your television which you do not understand, you can phone
our help line during normal offi ce hours on 0113 2793520 (UK customers only).If you need a service
engineer please phone the number on your sales receipt.Calls are charged at standard rates.
5385 LD1701 Goodmans UK.indd 285385 LD1701 Goodmans UK.indd 28 21/04/05 9:58:1021/04/05 9:58:10
Page 29

29
POWER
Symptoms Possible causes What to do
Televisi on seems ‘dead’ - n o lights come o n and
nothing works.
Mains su pply missing .
Main pow er switch is off .
Blown f use or circui t breaker.
Make sure it is not a gen eral power cut.
Check t he power switc h at the power
outlet.
Check t he fuse or cir cuit breaker at your main
fuse box. Look for a possible c ause of failu re
before youreplace or re-s et it.
Stuck on stand-by. Micro-controller confused by electrical
disturbance.
Switch o ff main power at th e wall outlet an d
wait 10minutes be fore tryi ng again.(Leav e the
TV unp lugged and call a serv iceenginee r if this
does no t work.)
TROUBLESHOOTING AND HELPLINE
5385 LD1701 Goodmans UK.indd 295385 LD1701 Goodmans UK.indd 29 21/04/05 9:58:1321/04/05 9:58:13
Page 30

30
SPECIFICATIONS
LCD type
17.0 Diagonal AM-TFT(Active-Matrix)
DOT PITCH: 0.264mm
BRIGHTNESS: 300cd/ (Typical)
CONTRAST RATIO: 450:1(Typical)
RESPONSE TIME: 12 msec(Typical)
RESOLUTION(H x V)
1280X1024@60Hz (SXGA)
FREQUENCY
HORIZONTAL: 31-60KHz
VERTICAL: 56-75Hz
INPUT SIGNAL
VIDEO(Analog 0.7Vp-p / 75 ) PAL, NTSC 3.57, SECAM
SYNC(Separate TTL Level)
SCART, S-VIDEO, AV(Sound L/R)
PC Stereo Sound
TV tuner (PAL-I, PAL-D/K, PAL-B/G, SECAM-L/L’ according to country).
ACTIVE DISPLAY AREA (W x H)
338mm X 270mm
DIMENSIONS (W x D x H)
416mm X 185mm X 430mm
WEIGHT
Net Weight : 4.9Kg
Gross Weight : 6.9Kg
ELECTRICAL RATINGS
INPUT : AC100 - 240V, 50/60Hz (auto switching)
NOTE :
Technical specifi cations are subject to change without notice.
Sometimes development and improvement of our product means the instructions contain some errors.
We apologise for any inconvenience so caused and assure you we make every eff ort to minimise
these errors.
5385 LD1701 Goodmans UK.indd 305385 LD1701 Goodmans UK.indd 30 21/04/05 9:58:1421/04/05 9:58:14
Page 31

31
5385 LD1701 Goodmans UK.indd 315385 LD1701 Goodmans UK.indd 31 21/04/05 9:58:1621/04/05 9:58:16
Page 32

ORN7910.0077
B2+5385/0405
5385 LD1701 Goodmans UK.indd 325385 LD1701 Goodmans UK.indd 32 21/04/05 9:58:1621/04/05 9:58:16
 Loading...