

Page 1
MICRO1468I.book Page 1
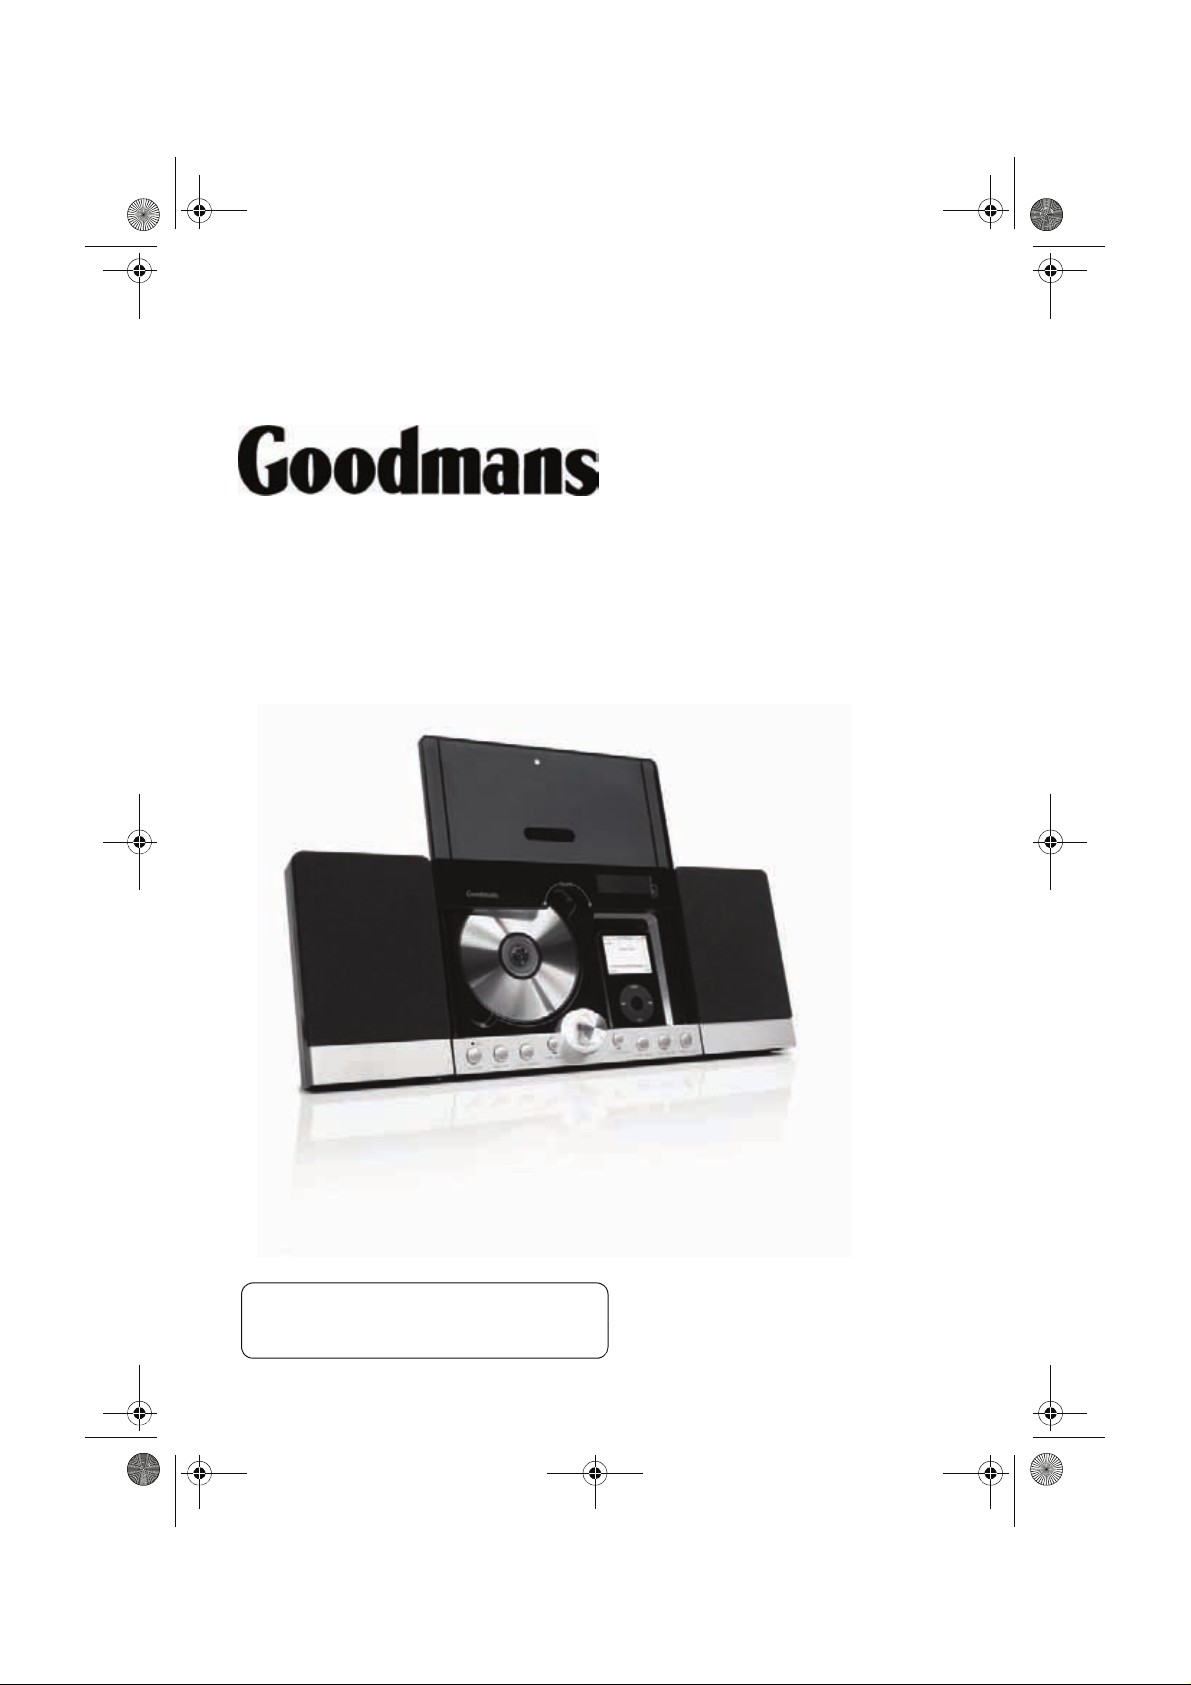
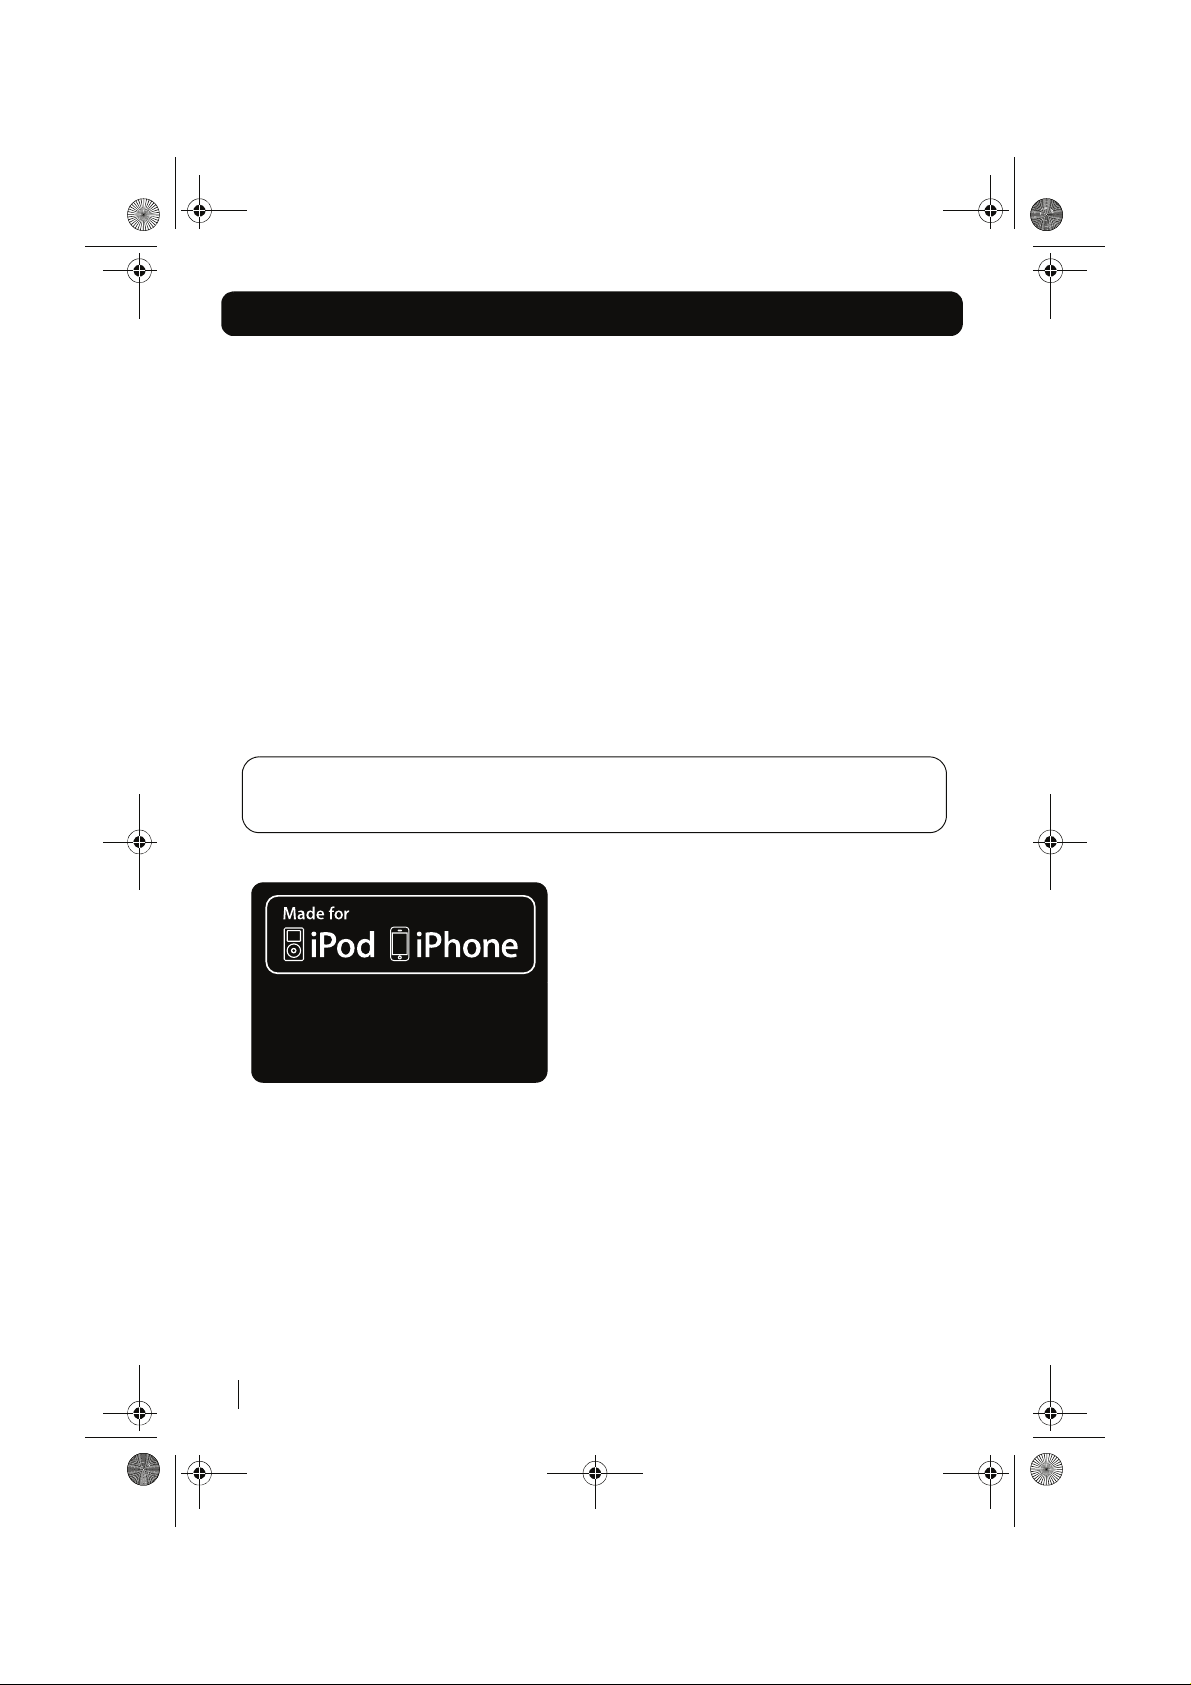
MICRO1468I CD Micro System for iPhone/iPod
Instruction Manual
IMPORTANT!
before use and keep for future reference.
Please read all instructions carefully
Page 2
MICRO1468I.book Page 2
Introduction
Thank you for choosing this Goodmans Micro System.
Not only does it play CD’s and receive radio stations, but you can also
listen to your favourite tracks on your iPhone/iPod whilst charging it.
It’s really easy to use; you can save your favourite radio stations to memory and program your CD
tracks in an order to suit you. You can also fully operate your iPhone/iPod from the remote control.
IMPORTANT!
safety section on page 17 before using your Micro System. This appliance is for household use
only.
An audio system that allows docking
of an iPhone / iPod and which fully
supports the iPhone / iPod menu system.
Use of any electrical equipment should be undertaken with care. Please read the
2
Page 3
MICRO1468I.book Page 3
What’s in the box
1 x Goodmans MICRO1468I unit
2 x External speakers
1 x Remote control (not shown)
6 x iPod dock adaptors (not shown)
1 x Mains adaptor - 10V DC (not shown)
(CD and iPod not included)
Contents
1
Getting started
2
Using the radio
3
Using the iPhone/iPod dock
4
Using the CD
5
Using the clock and timer
6
Other functions
7
Troubleshooting
Specifications
8
3
Page 4
MICRO1468I.book Page 4
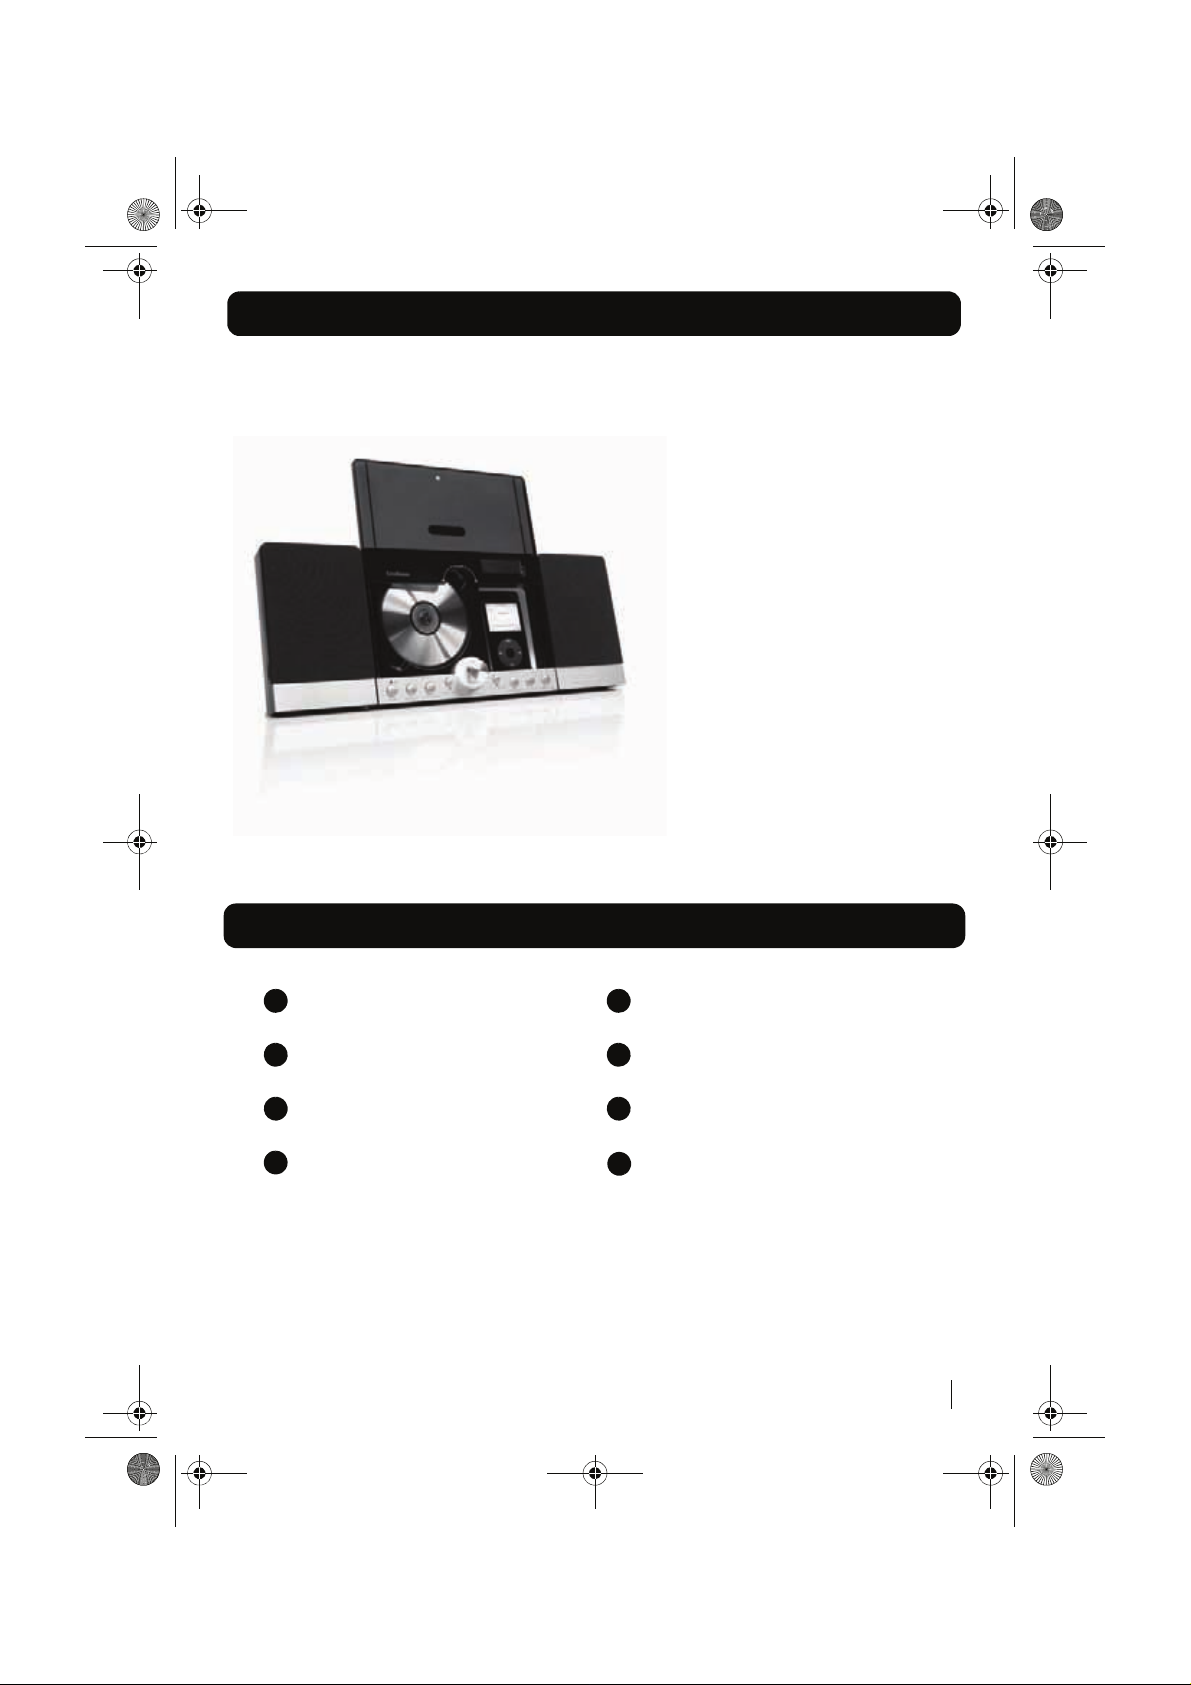
Your Micro System
Front view
12 13 14
11 1 2 3 4
5 6 7 8 9 10
1 STANDBY button 8 PLAY / PAUSE button
2 FUNCTION button 9 OPEN / CLOSE button
3 C.ADJ / MEMORY button 10 iPhone/iPod compartment
4 TUNER / SEARCH - Button 11 Speaker unit
5 Volume Control 12 CD door
6 TUNER / SEARCH + Button 13 IR sensor
7 STOP Button 14 LCD display
11
4
Page 5
MICRO1468I.book Page 5
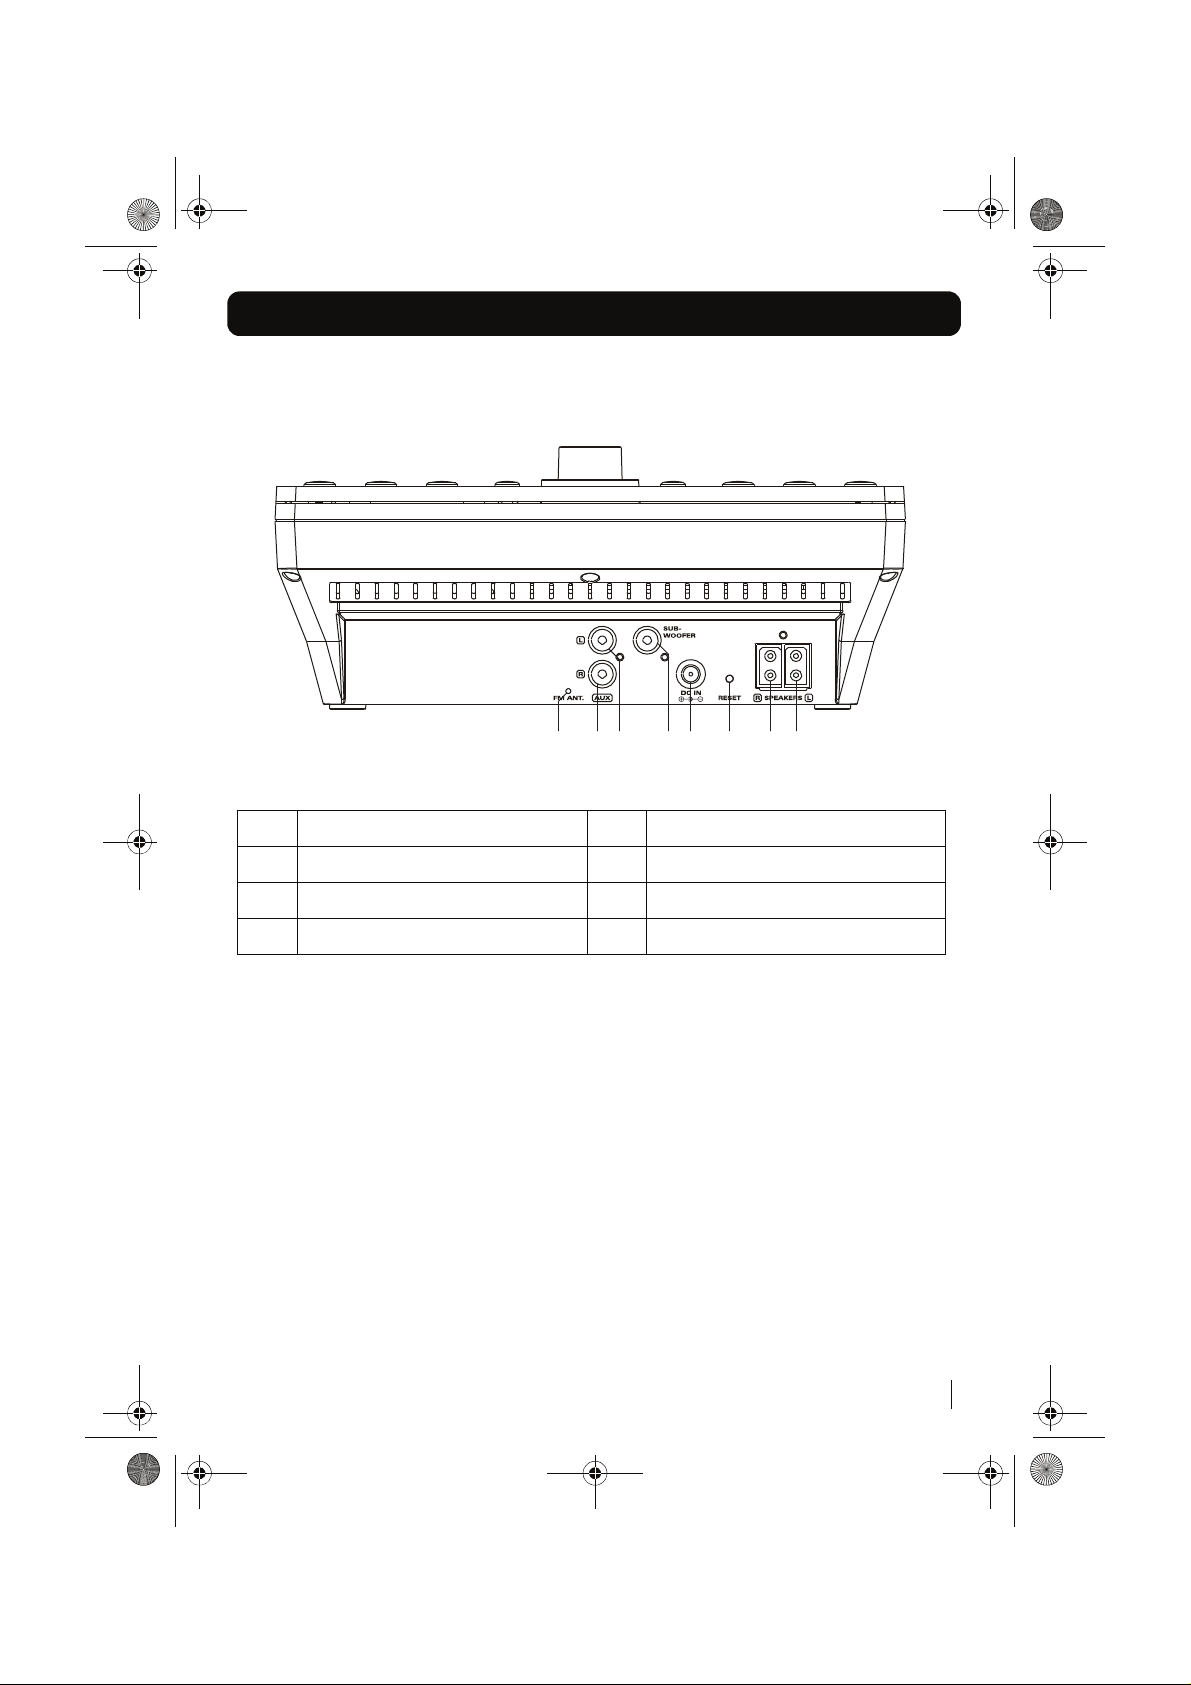
Your Micro System
Top Panel
21 20 15161819 1722
15
Speaker output left 19 Subwoofer output
16 Speaker output right 20 AUX input left
17 Reset button 21 AUX input right
18 DC input 10V 22 FM antenna
5
Page 6
MICRO1468I.book Page 6
Your Micro System
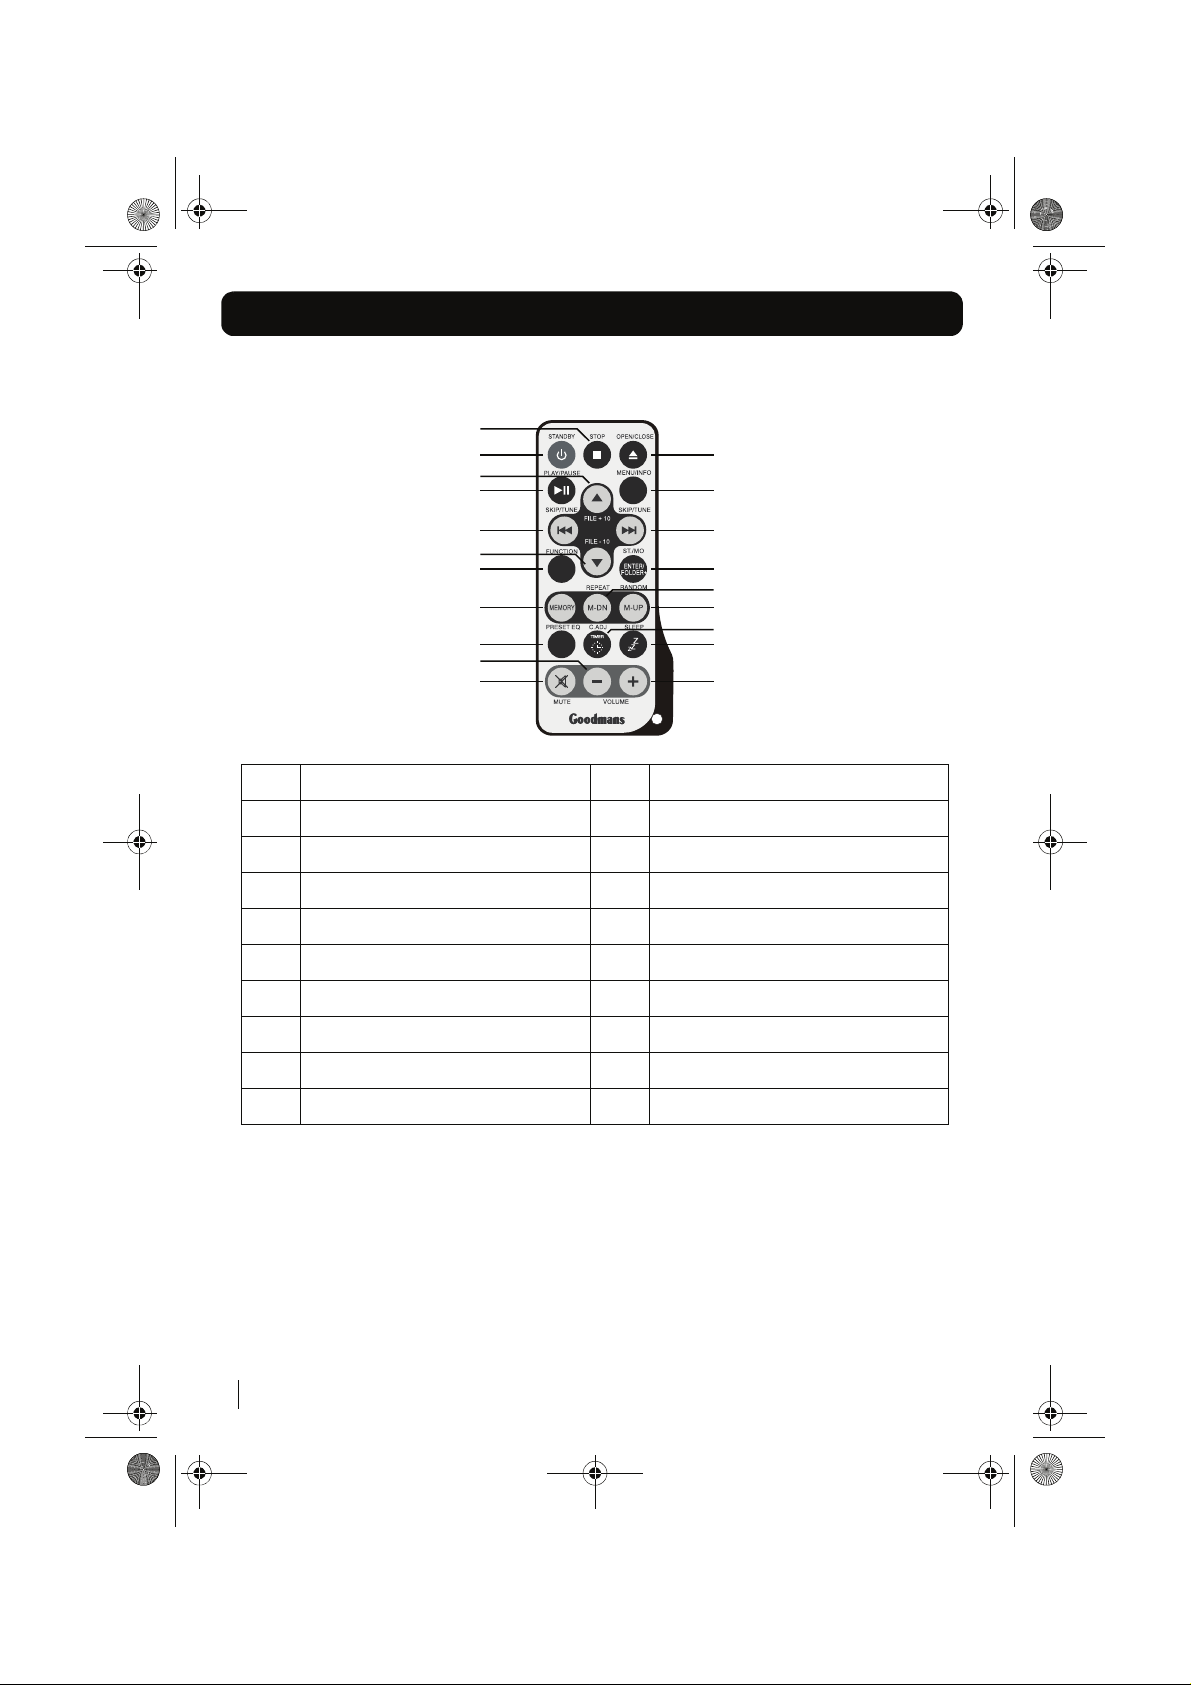
Remote Control
1
2
4
5
3
6
7
9
10
12
15
18
19
8
11
13
14
16
17
20
1 STOP button 11 ENTER / FOLDER + button
2 STANDBY button 12 MEMORY button
3 OPEN / CLOSE button 13 M-DOWN / REPEAT button
4 FILE +10 / IPOD UP button 14 M-UP / RANDOM button
5 PLAY / PAUSE button 15 PRESET EQ button
6 MENU / INFO button 16 TIMER / C.ADJ button
7 SKIP / TUNE - Button 17 SLEEP button
8 SKIP / TUNE + Button 18 VOLUME - button
9 FILE -10 / IPOD DOWN button 19 MUTE button
10 FUNCTION button 20 VOLUME + button
6
Page 7

MICRO1468I.book Page 7
Getting started
Using the support stand
If the unit is to be operated on a desk or table,
extend the support stand (located on the
underside of the unit). If the unit is to be wall
mounted, return the support stand to the closed
position.
The remote control battery
To preserve the battery life prior to first use,
there is a small plastic tab inserted between the
battery and the terminal inside the remote
control. Please remove this tab before using the
remote control. To remove the tab, pull it in the
direction of the arrow in the illustration below.
Connecting to power
Before switching on make sure that the voltage
of your electricity supply is the same as that
indicated on the rating plate. For your own safety
read the following instructions carefully before
attempting to connect this unit to the mains.
Mains (AC) operation
This unit is designed to operate on AC 100-240V
50/60Hz mains supply using the mains adaptor
supplied.
Connect the mains adaptor to the DC input
socket (18) on the rear of the unit
DON’T FORGET!
supplied with this Micro System. Using
adaptors not designed for this unit, or that
have a different specification to the one
supplied, may cause damage to the unit.
Use only the mains adaptor
01
If the operation of the remote control becomes
intermittent or unsatisfactory, replace the original
battery with a new 3-volt lithium battery.
DON’T FORGET!
always ensure the same size and type is used.
Make sure that the battery polarity is
observed. Inserting the battery incorrectly
could result in battery leakage or damage to
nit.
the u
When replacing the battery,
7
Page 8

MICRO1468I.book Page 8 Tues
02
Using the radio
Basic operation
1
Press the
unit or remote control to power on the unit.
2
Press the
on the remote control to select Tuner
mode.
3
Tune to the station you want by pressing
either of the
4
To turn off the unit, press the
button.
STANDBY
FUNCTION
SKIP / TUNE
button on the main
button on the unit or
Manual and automatic tuning
1
To manually tune in a station, briefly press
either of the
2
To start automatic tuning, press and hold
either of the
more than 2 seconds.
DON’T FORGET!
search for the first available station with a
strong signal.
SKIP / TUNE
SKIP / TUNE
The unit will automatically
Saving radio stations to memory
buttons.
STANDBY
buttons.
buttons for
2
Press the
control, “MEMORY” will flash in the display
and a preset number “1” will also show on
the display.
3
Press the
the remote control to select the preset
station number where you want to save
the station.
4
Press the
the station into the chosen preset number.
DON’T FORGET!
save all of your other stations.
MEMORY
M-UP
MEMORY
button on the remote
or
M-DOWN
button again to store
Repeat the above steps to
Selecting a saved station
M-UP
or
Press the
the remote control to choose the saved
station that you want to listen to.
M-DOWN
buttons on
Antenna
DON’T FORGET!
there is a built-in FM antenna wire on the back
of the unit. Move the wire around to get the
t reception.
bes
For optimum FM reception
buttons on
DON’T FORGET!
control to save radio stations to memory.
You can save up to 20 FM radio stations to the
memory.
1
Tune
pressing either of the
buttons on the remote control.
8
You need to use the remote
in to the station you want by
SKIP / TUNE
FM and FM Stereo reception
When the unit is tuned in to a stereo broadcast
with a good signal, "STEREO" will be shown in
the display.
If an FM station is received, but has interference,
it is recommended to switch to Mono mode using
ST/MO
the
button on the remote control.
Page 9

MICRO1468I.book Page 9
Using the iPhone/iPod Dock
Inserting and removing your iPhone/iPod
1
Press the Power / Standby Button.
2
Press the FUNCTION Button to select
iPhone/iPod mode.
3
Press the OPEN / CLOSE Button to open
the CD door.
4
Carefully push the iPod dock lever to the
right then forward. The dock connector will
tilt upwards to enable the iPod/iPhone to
be easily connected.
Insert your iPod/iPhone securely into the
5
dock. You can also use the correct dock
adaptor supplied with your iPod
6
Carefully push the lever to the right and then
back to the original position.
Press the OPEN/CLOSE button to close the CD
7
DON'T FORGET! The CD door will NOT close if
the lever is not returned to the original postion.
door.
Using the iPhone/iPod menu system
1
Select IPod mode using the FUNCTION button.
2
Carefully insert your iPhone/iPod unit into the
dock.
3
Press the
remote control to enter the iPod menu
system.
4
Press “
to navigate the various features of the iPod
menu system as you would when using the
iPod control buttons.
Press the ENTER button on the remote control
5
to confirm your selection.
DON'T FORGET! Menu navigation will not
work on iPhone or iPod Touch when they
are in LOCK mode.
MENU
button once on the
”, and “ ” on the remote control
03
Playback and charging your iPod
1
Select iPod mode using the
button.
2
Insert your iPod into the dock and press
PLAY/PAUSE
the
3
Press the
playback. Press this button again to
resume playback.
4
When your iPod is docked in the unit, the
internal battery will be charged.
button to start playback.
PLAY/PAUSE
button to pause
FUNCTION
9
Page 10

MICRO1468I.book Page 10
04
Using the CD
Handling CDs
To remove a disc from its storage case, press
down on the centre of the case and lift the disc
out, holding it carefully by the edges.
Fingerprints and dust should be carefully wiped
off the disc’s recorded surface with a soft cloth
before use.
DON’T FORGET!
as record sprays, antistatic sprays, benzene,
or thinners to clean compact discs. These
chemicals can damage the disc’s surface.
Never use chemicals such
Loading and unloading CD’s
1
Press the
unit.
2
Select CD mode.
3
Open the disc compartment by pressing
the
4
When the disc compartment has opened,
remove a disc from its case and place it
carefully onto the spindle with the label
side facing outwards.
DON’T FORGET!
a compact disc into the compartment. Other
ects may damage the unit.
obj
STANDBY
OPEN / CLOSE
Do not put anything except
Button to turn on the
button.
DON’T FORGET!
closed when not in use to prevent dirt and dust
from entering the mechanism. Never place
more than one disc into the disc compartment
at any time.
Keep the disc compartment
Playing CD’s
1
Select CD mode with the Function button.
2
Press the
begin playback of the CD from the first
track.
3
Press the
pause playback of the CD; the elapsed
time will flash in the display.
4
To resume playback, press the
PAUSE
5
To stop playback, press the
PLAY / PAUSE
PLAY / PAUSE
button again.
button once to
button once to
PLAY /
STOP
button.
Selecting a different CD track
1
Press the
forwards or backwards through the tracks
on the CD.
2
Press and hold the
fast forwards or backwards through the
cur
3
When the desired part of the track is
reached, release the button and playback
will resume.
SKIP / TUNE
rent track.
buttons to skip
SKIP/TUNE
buttons to
10
5
Press the
the disc compartment.
6
When the compartment is fully closed, the
disc will be read automatically.
OPEN / CLOSE
button to close
Page 11
MICRO1468I.book Page 11
Using the CD
Repeating CD’s
DON’T FORGET!
control to use this function.
1
To repeat the current track, press the
REPEAT
show in the display.
2
To repeat the entire disc, press the
REPEAT
show in the display.
3
To cancel repeat play, press the
button or press the
the repeat indicator disappears.
You need to use the remote
button once. "REPEAT" will
button twice. "REPEAT ALL" will
REPEAT
Random CD playback
DON’T FORGET!
control to use this function.
1
In play mode press the
on the remote control once, "RANDOM"
will show in the display, and the tracks will
be played in a random order.
2
To cancel random play, press the
button or press the
the random indicator disappears
You need to use the remote
RANDOM
RANDOM
Playing MP3 CD’s
1
Select CD mode with the FUNCTION
button, the total number of files and track
numbers of the disc will show in the
display.
2
Press the PLAY / PAUSE button once to
begin playback of the MP3 CD from the
first track.
3
Press the PLAY / PAUSE button once to
pause playback of the MP3 CD. The
elapsed time will flash in the display.
STOP
button until
button
STOP
button until
4
To resume playback, press the PLAY /
PAUSE button again.
5
To stop playback, press the STOP button.
Selecting a different MP3 track
DON’T FORGET!
control to use this function.
1
Press the
forward through the files in multiples of 10.
2
Press the
backwards through the files in multiples of
10.
3
To skip forwards through folders contained
on the CD, press the
button.
4
Press the
tracks within a folder.
You need to use the remote
/FILE +10
/FILE -10
SKIP / TUNE
button to skip
button to skip
ENTER/FOLDER +
Repeating MP3 CD’s
DON’T FORGET!
control to use this function.
1
To repeat the current file, press the
REPEAT
show in the display.
2
To repeat the current album, press the
REPEAT
ALBUM" will show in the display.
3
To repeat the entire disc, press the
REPEAT
"REPEAT ALL" will show in the display.
4
To cancel repeat play, press the
button or press the
the repeat indicator disappears.
You need to use the remote
button once. "REPEAT" will
button twice. "REPEAT
button three times.
REPEAT
buttons to select
STOP
button until
04
11
Page 12

MICRO1468I.book Page 12
04
Using the CD
Random MP3 playback
DON’T FORGET!
control to use this function.
1
In play mode press the
on the remote control once, "RANDOM"
will show in the display, and the tracks will
be played in a random order.
2
To cancel random play, press the
button or press the
the random indicator disappears
You need to use the remote
RANDOM
ID3 Tag function for MP3 CD’s
1
To view ID3 Tag information on an MP3
disc, press the
playback.
2
Press the
disable this function and return to normal
track information display.
MENU/INFO
MENU/INFO
Programmed CD playback
DON’T FORGET!
in stop mode.
1
Press the
button. The following information will show
in the display:
The CD disc must be
C-ADJ/ MEMORY
RANDOM
button again to
button
STOP
button until
button during
or
MEMORY
3
Press the
button. The first track selection is now
stored in program memory.
4
Select the next track to be programmed
using the
05).
5
Press the
button to store this track.
6
Continue entering tracks in this way until
all the desired tracks are stored (up to a
limit of 20).
When
button is pressed to store the 20th track,
the display will show “FUL”.
DON’T FORGET!
is pressed before the
button is pressed, that track will not be
programmed, and the disc will start playing
from the first programmed track. Any track can
be programmed to play more than once.
C-ADJ/ MEMORY
SKIP / TUNE
C-ADJ/ MEMORY
the
C-ADJ/ MEMORYor MEMORY
If the
buttons (i.e. track
PLAY/PAUSE
C-ADJ/ MEMORY
Listening to programmed tracks
or
MEMORY
or
MEMORY
button
12
2
Press the
the track to be stored in location “01” (i.e.
track 03).
SKIP / TUNE
buttons to select
1
Press the
2
Disc play will start at the beginning of the
fir
PLAY/PAUSE
st programmed track.
button.
To Clear the Program Memory
If the disc is playing, press the
twice, or Select
the program.
IPOD, AUX
or
STOP
TUNER
button
to clear
Page 13

MICRO1468I.book Page 13
Using the CD
Programmed MP3 playback
DON’T FORGET! The MP3 disc must be in
stop mode.
1
Press the C-ADJ/MEMORY or MEMORY
button. The following information will
show in the display.
Press the SKIP/TUNE buttons to select
2
the folder. Press the C-ADJ/MEMORY
or MEMORY button to confirm the folder.
To select the track, press the SKIP/TUNE
3
buttons.
Press the C-ADJ/MEMORY or MEMORY
4
button to confirm the track.
Listening to programmed MP3 tracks
1
Press the
2
Disc play will start at the beginning of the
first programmed track.
PLAY/PAUSE
button.
To Clear the Program Memory
If the disc is playing, press the
twice, or Select
the program.
IPOD, AUX
or
STOP
TUNER
button
to clear
04
5
Repeat the steps 2 to 4 to select the next
folder and track to be programmed.
6
Continue entering the tracks in this way
until all the desired track are stored (up to
a limit of 99).
When the C-ADJ/MEMORY or MEMORY
button is pressed to store the 99th track,
it will show “FUL” on the display.
DON’T FORGET! If the PLAY/PAUSE button
is pressed before the C-ADJ/MEMORY
button is pressed, that track will not be
programmed, and the disc will start playing
from the first programmed track. Any track
can be programmed to play more than once.
13
Page 14
MICRO1468I.book Page 14
05
Using the Clock and Timer
Adjusting the clock
DON’T FORGET!
clock when in standby mode.
To adjust the clock and set the timer, follow the
instructions below:
1
Press the
select either “24 hour” or “12 hour” mode
using the
2
Press the
confirm.
3
The Hour digits will begin to flash. Adjust
the hours by pressing the
buttons.
4
Press the
and the minute digits will begin to flash.
5
Adjust the minutes by pressing the
TUNE
This unit has its own digital
C-ADJ/ MEMORY
SKIP / TUNE
C-ADJ/ MEMORY
C-ADJ/ MEMORY
buttons.
buttons.
SKIP / TUNE
Setting the timer
1
Press the
“TIMER ON” will show in display.
2
Repeat the above procedure to set the
“TI
3
Press the
“TIMER OFF” will show in the display.
4
Repeat the above procedure to set the
“TIMER OFF” hours and minutes digits.
5
Press the
“TIMER OFF” will flash in the display.
6
Press the
"TIMER ON"
7
Press the
confirm the Timer settings. The display will
then return to the current time.
C-ADJ/ MEMORY
MER ON” hours and minutes digits.
C-ADJ/ MEMORY
C-ADJ/ MEMORY
SKIP / TUNE
C-ADJ/ MEMORY
buttons to select
button and
button to
button again,
SKIP /
button again,
button again,
button again,
button to
Switching off the timer function
1
Press the
“TIMER ON” flashes in the display.
2
Select “TIMER OFF” by pressing
TUNE
3
Press the
cancel the timer.
C-ADJ/ MEMORY
buttons.
C-ADJ/ MEMORY
button until
SKIP /
button to
Setting the sleep timer
DON’T FORGET!
control to use this function.
The Sleep Timer is a countdown timer for
switching the system to standby mode after a
specified time. It enables you to listen to the
radio, a CD or iPod. The Sleep Timer can be set
from 90 to 10 minutes in 10 minute steps.
1
Switch on the system by pressing the
STANDBY
2
Select the desired source by pressing the
FUNCTION
3
Press the
time. - "SLEEP" and "90" are shown in the
lay. The system will now play for 90
disp
minutes.
4
To decrease the sleep time in steps of 10
minutes, continually press the
button until
shown.
5
To cancel the sleep timer, press the
SLEEP
the previous mode.
6
To switch off the system before the sleep
time has elapsed, press the
button.
You need to use the remote
button.
button.
SLEEP
button to set the sleep
SLEEP
the
desired sleep time is
button until the display returns to
STANDBY
DON’T FORGET!
if the power is disconnected.
14
The clock setting will be lost
Page 15

MICRO1468I.book Page 15
Other Functions
Mute
DON’T FORGET!
control to use this function.
1
Press the
control to turn off the sound. The volume
indicator will flash.
2
Press the
the sound to the previous level.
You need to use the remote
MUTE
button on the remote
MUTE
button again to restore
Preset Equaliser
The Quality of the sound can be adjusted to suit
the type of music playing by using the Preset
Equaliser function.
There are 6 settings to choose from: CLASSIC,
ROCK, POP, JAZZ, X BASS and FLAT.
Press the
various equaliser settings until the desired sound
setting is found.
Preset EQ
button to cycle through the
AUXILIARY IN
Connect the audio output sockets of your
auxiliary sound source (TV, VCR, DVD Player,
Cassette Deck, Mini Disc player, etc.) to the
sockets on the back of the unit.
IN
DON’T FORGET!
only be used when there is a connection made
to the AUX IN sockets from another source.
The auxiliary function can
AUX
06
3
Turn your auxiliary source ‘On’ and
operate it as usual. The sound from the
auxiliary source can then be heard
through the speakers.
4
Adjust the volume level to the desired
listening level.
Subwoofer out
DON’T FORGET!
connecting cables are not supplied with this
product.
It is possible to use a powered "active"
subwoofer speaker with this unit. Connect an
external subwoofer into the SUBWOOFER OUT
socket on the rear panel of this unit.
Resetting
If this unit shows any abnormal operation, or
becomes unresponsive to button presses, it can
be reset.
Press the Reset button on the rear panel of the
unit with a thin non-metallic object.
DON’T FORGET!
as the clock will be lost if the
the power supply is disconnected.
if
The subwoofer and
Any preset settings such
unit is reset or
DON’T FORGET!
not included.
1
Press the STANDBY button to power On
the unit.
2
Press the
AUX function.
The connection cables are
FUNCTION
button to select the
15
Page 16

MICRO1468I.book Page 16
07
Troubleshooting
Radio
Noise or sound distorted
on FM
FM Stereo indicator
doesn’t light up
No sound in FM mode Unit not in tuner mode
Station not tuned properly
the antenna wire is not extended
Mono mode is selected
You have tuned in to a mono station
The signal is too weak
Volume is at the minimum position
CD/MP3 Player
od ot tahWesuac elbissoPmelborP
Fine tune broadcast station
Extend FM wire antenna
Reposition the unit until the
best reception is obtained.
Press ST/MO button
Retune to another FM station
Retune to another FM station
Press TUNER button
to select Tuner mode.
Adjust volume level
CD Player will not play Unit not in CD mode
CD is not installed or installed
correctly
CD skips while playing Disc is dirty or scratched Wipe the disc with a cloth or
16
Need extra help?
Don’t worry we are just the other end of the
phone. If you’re experiencing problems using
your new product, before returning it to the
retailer just call
www.thesupportsite.co.uk
0871 230 1777
or visit
Need a spare part?
In the unlikely event of requiring spare parts,
please contact our spare parts department on:
0871 230 0790
Press CD button
Load a CD and check it is the
correct way round.
use another disc
Page 17

MICRO1468I.book Page 17
Specifications
I8641ORCIMrebmun ledoM
DC adaptor output: 10V 2.7A
Power consumption 27W
Radio frequency coverage FM: 87.5 - 108MHz
Speaker system 4 Ohm
Power output Watts 4W x 2
Speaker: 120 (L) x 92 (W) x 190 (H)
IMPORTANT!
are subject to change without notice.
Due to continual revision and improvements to our products design, specifications
08
/60Hz 1.1A05 ~ V04100 - 2 :CAylppus rewoP
)H( 091 x )W( 011 x )L(062 :tinUsnoisnemiD
17
Page 18

MICRO1468I.book Page 18
Safety
Sound Levels
Your hearing is important to you and to us so
please take care when operating this equipment.
It is strongly recommended that you follow the
guidelines in order to prevent possible damage
to, or loss of hearing. Over time your hearing will
adapt to continuous load sounds and will give
the impression that the volume has in fact been
reduced. What seems normal to you may in fact
be harmful. To guard against this, set the initial
volume of the equipment to a low level.
Follow the steps below to ensure that the
product can be enjoyed at a comfortable
listening level:
1
Slowly increase the level until you can
hear comfortably and clearly and without
distortion.
2
Damage to your hearing is accumulative
and irreversible. Any "ringing" or
discomfort in the
ume is too loud.
vol
3
Once you have established a comfortable
listening level, do not increase the volume
level.
ears indicates that the
General Safety
This equipment has been designed and
manufactured to meet European safety
standards, but like any electrical equipment, care
must be taken if you are to obtain the best results
and safety is to be assured.
Do read these operating instructions before you
attempt to use the equipment.
Do ensure that all electrical connections
(including the mains plug, extension leads and
interconnections between pieces of equipment)
are properly made in accordance with the
manufacturer’s instructions.
Switch off and remove the mains plug when
making or changing any connections.
Do consult your dealer if you are ever in doubt
about the installation, operation or safety of your
equipment.
Don’t continue to operate the equipment if you
are ever in doubt about it working normally, or if it
is damaged in any way. Switch it off withdraw the
mains plug and consult your dealer.
Don’t remove any fixed covers as this may
expose you to dangerous voltages.
Don’t leave the equipment switched On when it
is unattended, unless it is specifically stated that
it is designed for unattended operation or has a
standby mode.
Switch off using the switch
mak
e sure that other people in your household
are conversant with the equipment.
Special arrangements may need to be made for
infirm or handicapped people.
Don’t obstruct the ventilation vents on the
equipment, for example with curtains or soft
furnishings.
Overheating will cause damage and shorten the
life of the product.
Don’t allow electrical equipment to be exposed
to rain or moisture.
on the equipment and
Page 19

MICRO1468I.book Page 19
Page 20

MICRO1468I.book Page 20
www.thesupportsite.co.uk
0871 230 1777
 Loading...