

Page 1
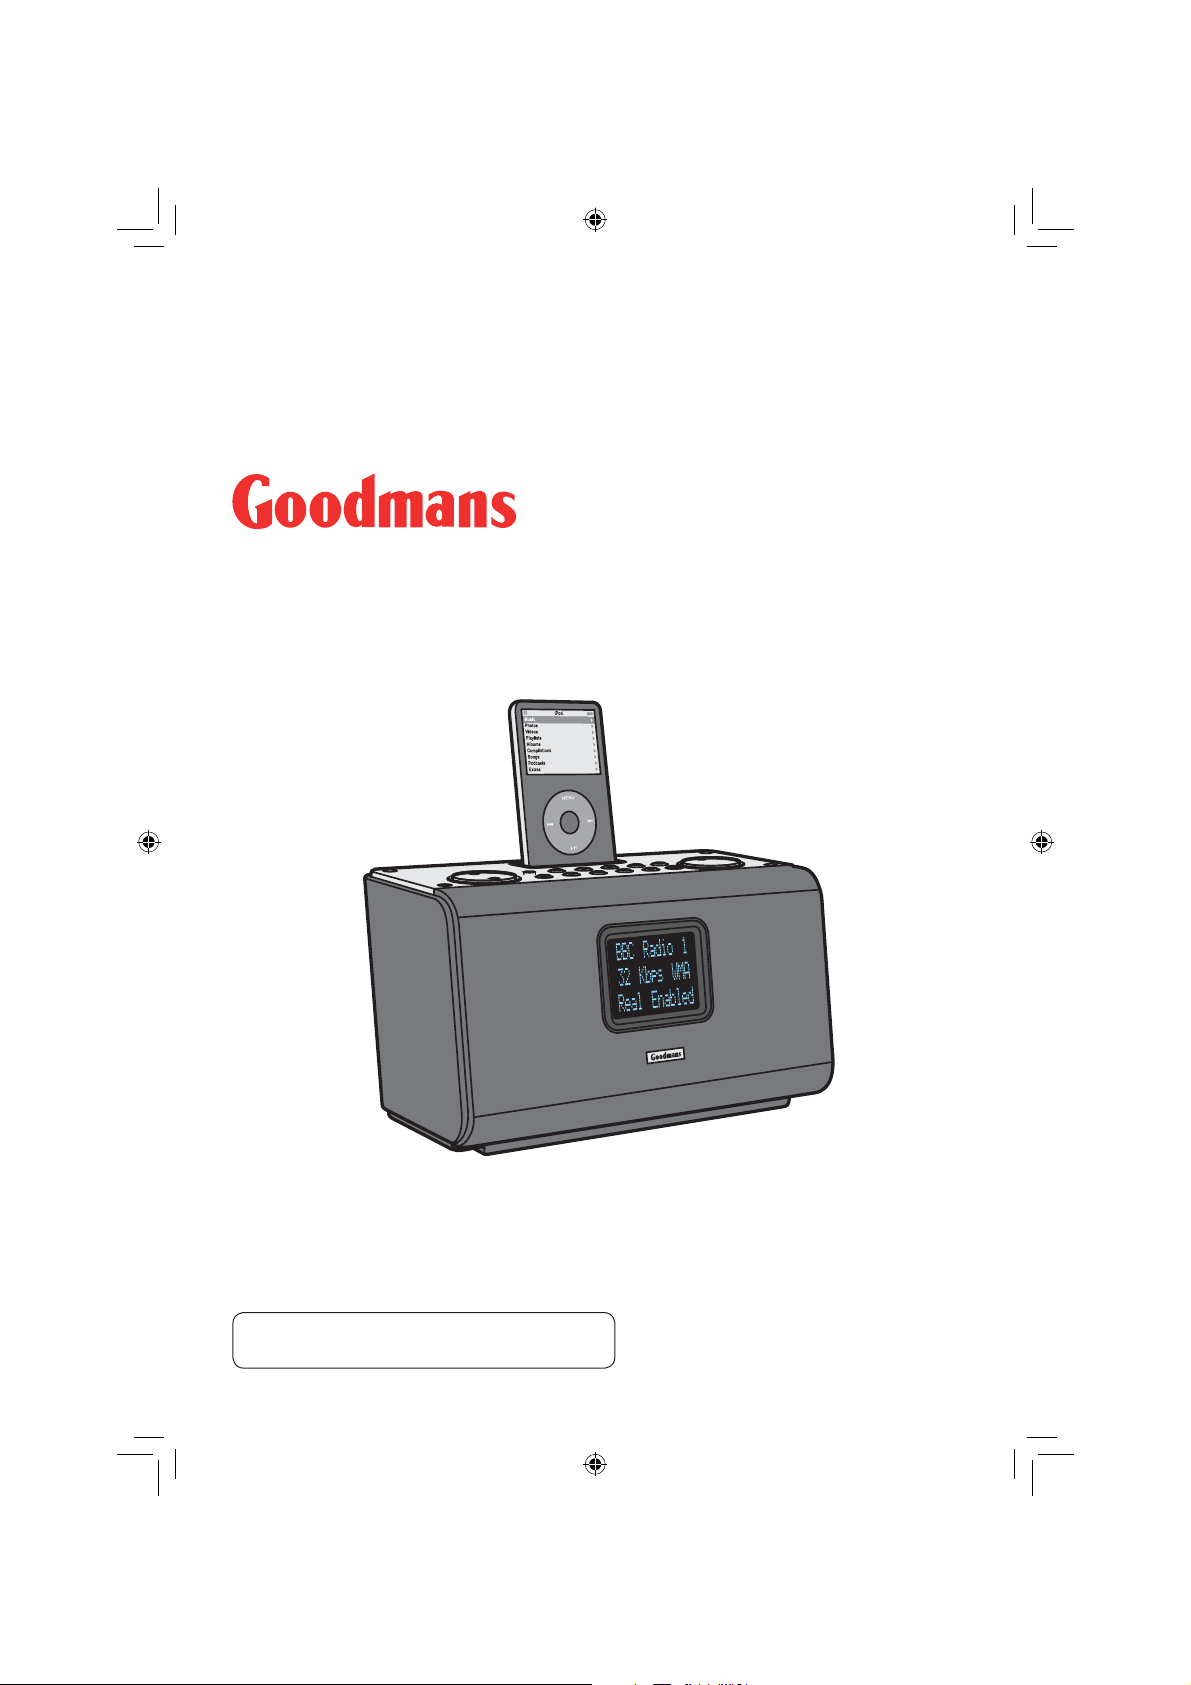
GWF101IP Internet Radio with iPod Dock
Instruction Manual
IMPORTANT: Please read all instructions
carefully before use and keep for future reference.
goodmans_GWF101IP.indd 1goodmans_GWF101IP.indd 1 19/02/2008 13:09:1919/02/2008 13:09:19
Page 2

2
goodmans_GWF101IP.indd 2goodmans_GWF101IP.indd 2 19/02/2008 13:13:2919/02/2008 13:13:29
Page 3
Before Starting
Before you are able to use your internet radio, you will need the following items:
• A broadband internet connection.
• A wired/wireless access point, or router connected to your broadband internet connection.
If your wireless network is configured to use Wired Equivalent Privacy (WEP) or Wi-Fi
Protected Access (WPA) data encryption, you will need to know the WEP or WPA code so that
you can setup your internet radio to communicate with your wireless network. Consult your
network administrator for your WEP or WPA codes.
Before continuing, make sure that your wired/wireless access point or router is powered
on, and connected to your broadband internet connection. Consult the manufacturer’s guide
supplied with your wired/wireless access point or router if your are unsure how to do this.
IMPORTANT: Use of any electrical equipment should be undertaken with care. Please read the
safety section on page 38 before using your internet radio. This appliance is for household use only.
An audio system that allows docking
of an iPod and which fully supports
the iPod menu system.
goodmans_GWF101IP.indd 3goodmans_GWF101IP.indd 3 19/02/2008 13:13:2919/02/2008 13:13:29
WiFi allows data transfer over short
distances (10-20 metres) using radio
frequencies, without the need for
cabling between the devices.
3
Page 4
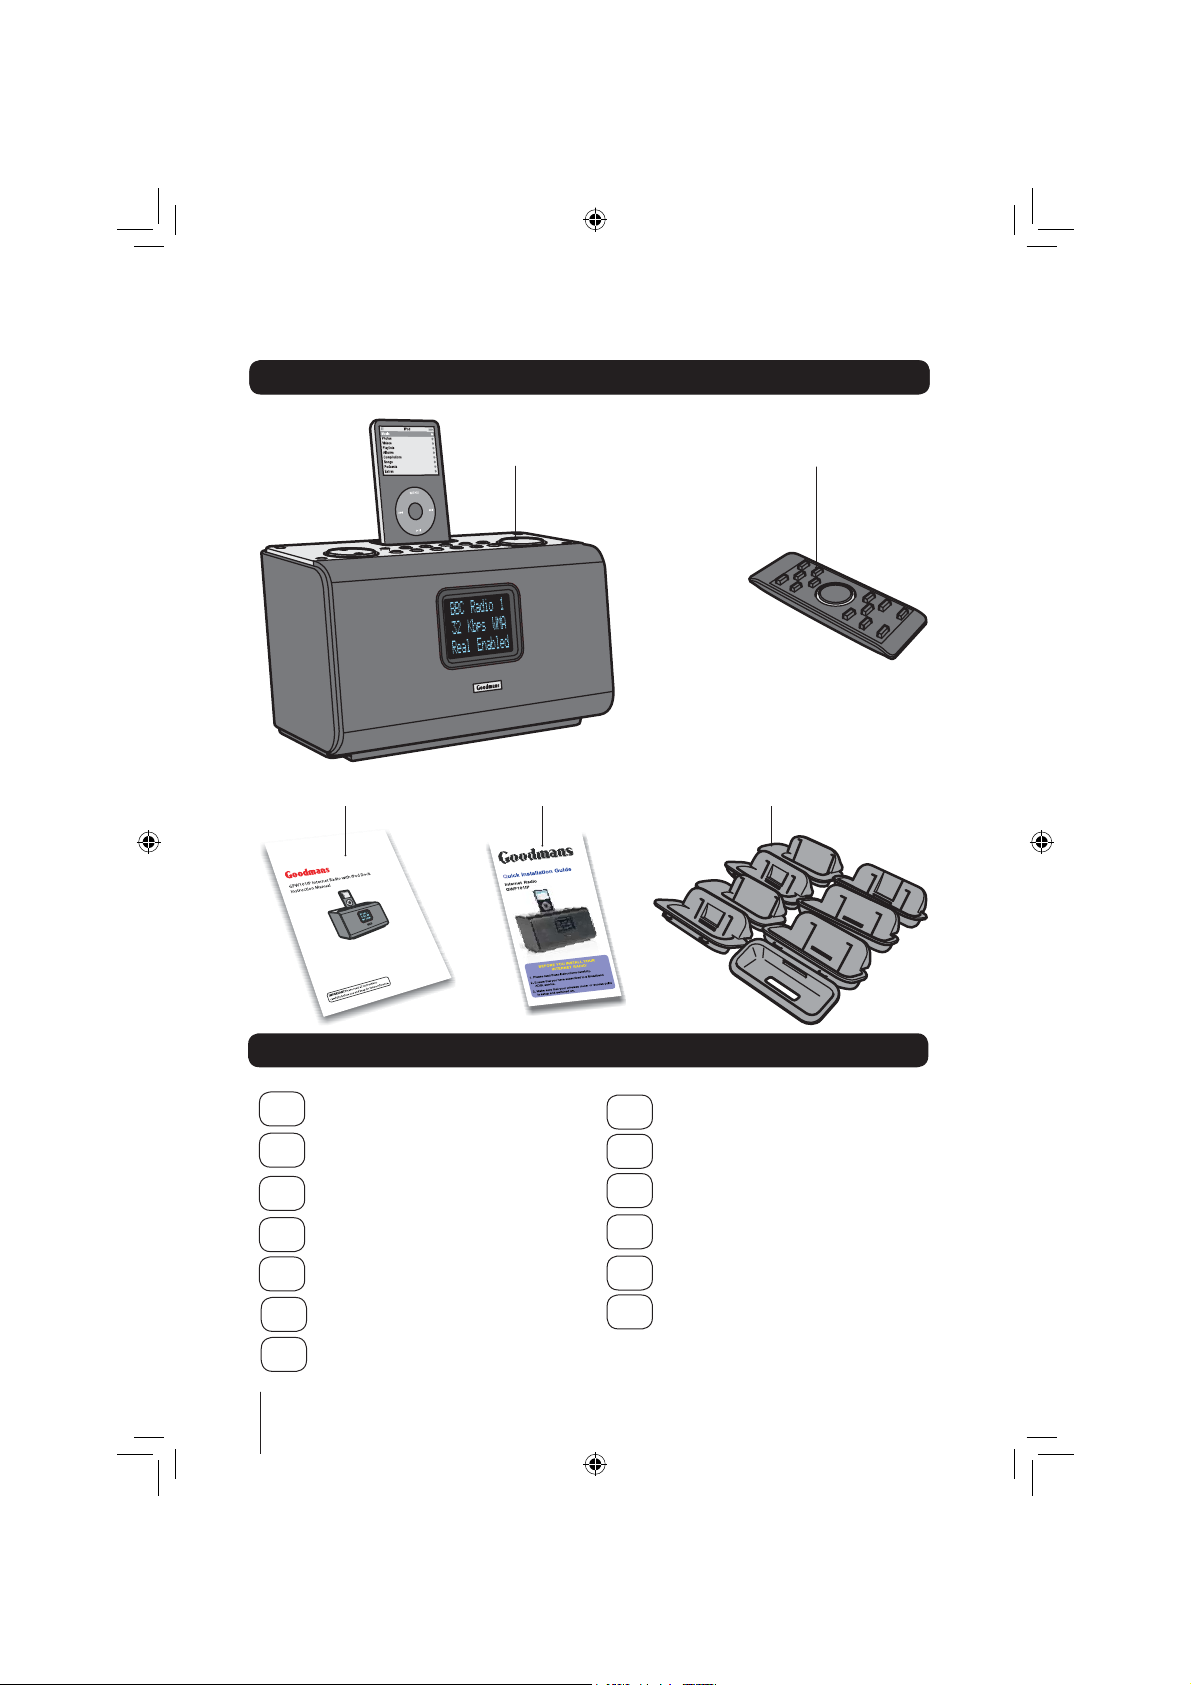
What’s in the box
User guide
Your new internet radio Recorder
Quick start guide
Remote control
8 iPod adaptors
Contents
01
Parts Identification ................. 4
02
Getting Started .................6-10
Using the Internet Radio .11-14
03
Using an iPod ....................... 15
04
Using the Media Player ...16-23
05
My Stuff ..........................24-25
06
07
Clock Functions ...............26-27
4
goodmans_GWF101IP.indd 4goodmans_GWF101IP.indd 4 19/02/2008 13:13:3019/02/2008 13:13:30
Configuration Settings ......... 28
08
09
Help and Advice ..............29-30
10
Error Messages .................... 31
11
Windows 2000 Users .....32-34
12
Specifications ...................... 35
13
Guarantee ............................36
Page 5
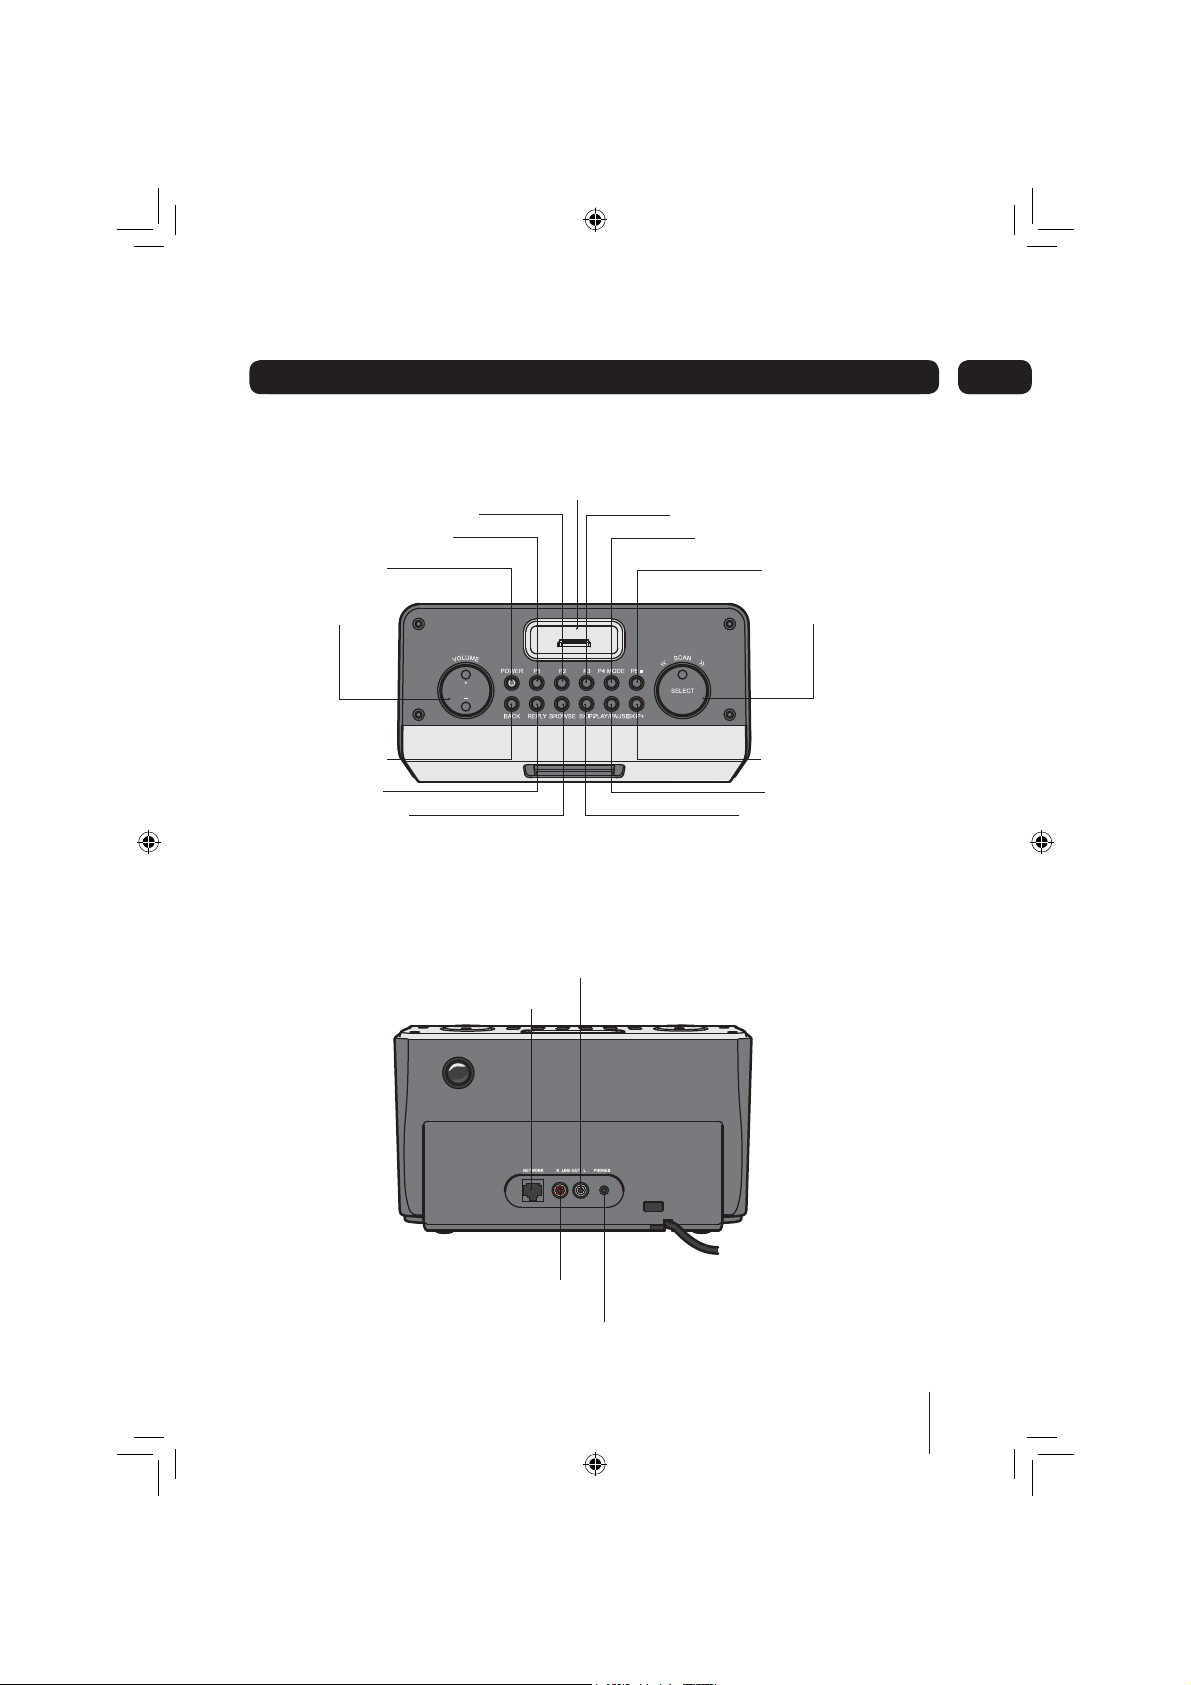
Parts Identification
Top view
iPod dock
Radio P2 button Radio P3 button
Radio P1 button
POWER button Radio P5 STOP button
Radio P4 MODE button
01
VOLUME +/- control
BACK button SKIP + button
REPLY button
BROWSE button
SKIP - button
Rear view
LINE OUT R socket
NETWORK port
SELECT/SCROLL control
PLAY/PAUSE button
LINE OUT
L socket
PHONES socket
5
goodmans_GWF101IP.indd 5goodmans_GWF101IP.indd 5 19/02/2008 13:13:3319/02/2008 13:13:33
Page 6

Getting Started02
Switching on
1
Plug the radio into the mains supply
and switch on.
2
After a brief pause the information
display will light up as displayed
elow.
b
Connecting to a wireless network
When switched on for the first time, you will
need to enter your wireless network details.
To setup your wireless network complete the
following procedure:
1
Press the POWER button and wait
until the following is displayed.
<Scan for netwo>
2
Press the SELECT button.
Scanning
When scanning is complete, the
3
name of a wireless network will be
shown.
• If your wireless network is not found,
check that your wireless access point or
router is switched on and connected to your
broadband internet connection.
< JimsRouter >
If the SSID (name of your wireless access point)
is not displayed, turn the SCROLL control to the
right until the correct one is shown.
When the correct wireless network is
4
shown, press the SELECT button.
• If your wireless network uses WEP or WPA
encryption, one of the following screens will
display.
Enter WEP Key
Enter WPA Key
• If your wireless network does not use WEP
or WPA goto step number 7 on the next page.
6
goodmans_GWF101IP.indd 6goodmans_GWF101IP.indd 6 19/02/2008 13:13:3319/02/2008 13:13:33
Page 7

Getting Started
02
When the following screen is
5 1
displayed, turn the SCROLL control
to enter your WEP/WPA key. Use
the SELECT button to confirm the
digit chosen.
<END 0 1234>
6
When the WEP/WPA key has been
entered, turn the SCROLL control so
that END is selected. Press the
SELECT button to confirm.
<END 0 1234>
7
The internet radio will now connect
to your wireless network.
<END 0 1234>
8
To listen to a station see “Connecting to a
station” on page 11.
Connecting to a wireless network when
the SSID is not broadcasted
To setup your wireless network when your router
does not broadcast the SSID (network name),
complete the following procedure:
Press the POWER button and wait until the
following is displayed.
<Scan for netwo>
2
Turn the SCROLL control until the following
screen is displayed. Press the SELECT
button to confirm.
<Enter Network >
When the following screen is displayed,
3
turn the SCROLL control to enter your SSID
(network name). Use the SELECT button
to confirm the digit chosen.
<END 0 1234>
When the SSID has been entered, turn the
4
SCROLL control so that END is selected.
Press the SELECT button to confirm.
<{}~ END 0>
JimsRouter
5
Your internet radio will now search the
network.
Finding networ
7
goodmans_GWF101IP.indd 7goodmans_GWF101IP.indd 7 19/02/2008 13:13:3419/02/2008 13:13:34
Page 8

02
Getting Started
• If your wireless network uses WEP or WPA
encryption, one of the following screens will
display. Press the SELECT button to confirm.
Enter WEP Key
Enter WPA Key
• If your wireless network does not use WEP
or WPA goto step number 9.
When the following screen is displayed,
6
turn the SCROLL control to enter your
WEP/WPA key. Use the SELECT button to
confirm the digit chosen.
<END 0 1234>
7
When the WEP/WPA key has been
entered, turn the SCROLL control so that
END is selected. Press the SELECT button
to confirm.
The internet radio will now connect to your
8
wireless network. The following screens
will display on the internet radio.
Connecting to
network
Network Ok
< Stations >
9
To listen to a station see “ Connecting to a
station” on page 11.
Should you need to enter a new network in the
future, these options can be edited in the Edit
Config sub menu. Please refer to the menu
structure diagram on page 10.
<{}~ END 0>
password
8
goodmans_GWF101IP.indd 8goodmans_GWF101IP.indd 8 19/02/2008 13:13:3519/02/2008 13:13:35
Page 9

Getting Started
Connecting to a wired network
Use the following procedure to connect the
internet radio to a wired router.
Connect an ethernet cable (not supplied)
1
between the network port on the rear of
the internet radio and a wired router.
2
Power On the internet radio.
3
The connection between the internet radio
and the router will be setup automatically.
The following screens will display on the
internet radio.
Initialising
Network
Connecting to
network
Network Ok
02
< Stations >
4
To listen to a station see “ Connecting to a
station” on page 11.
9
goodmans_GWF101IP.indd 9goodmans_GWF101IP.indd 9 19/02/2008 13:13:3519/02/2008 13:13:35
Page 10
02
Getting Started
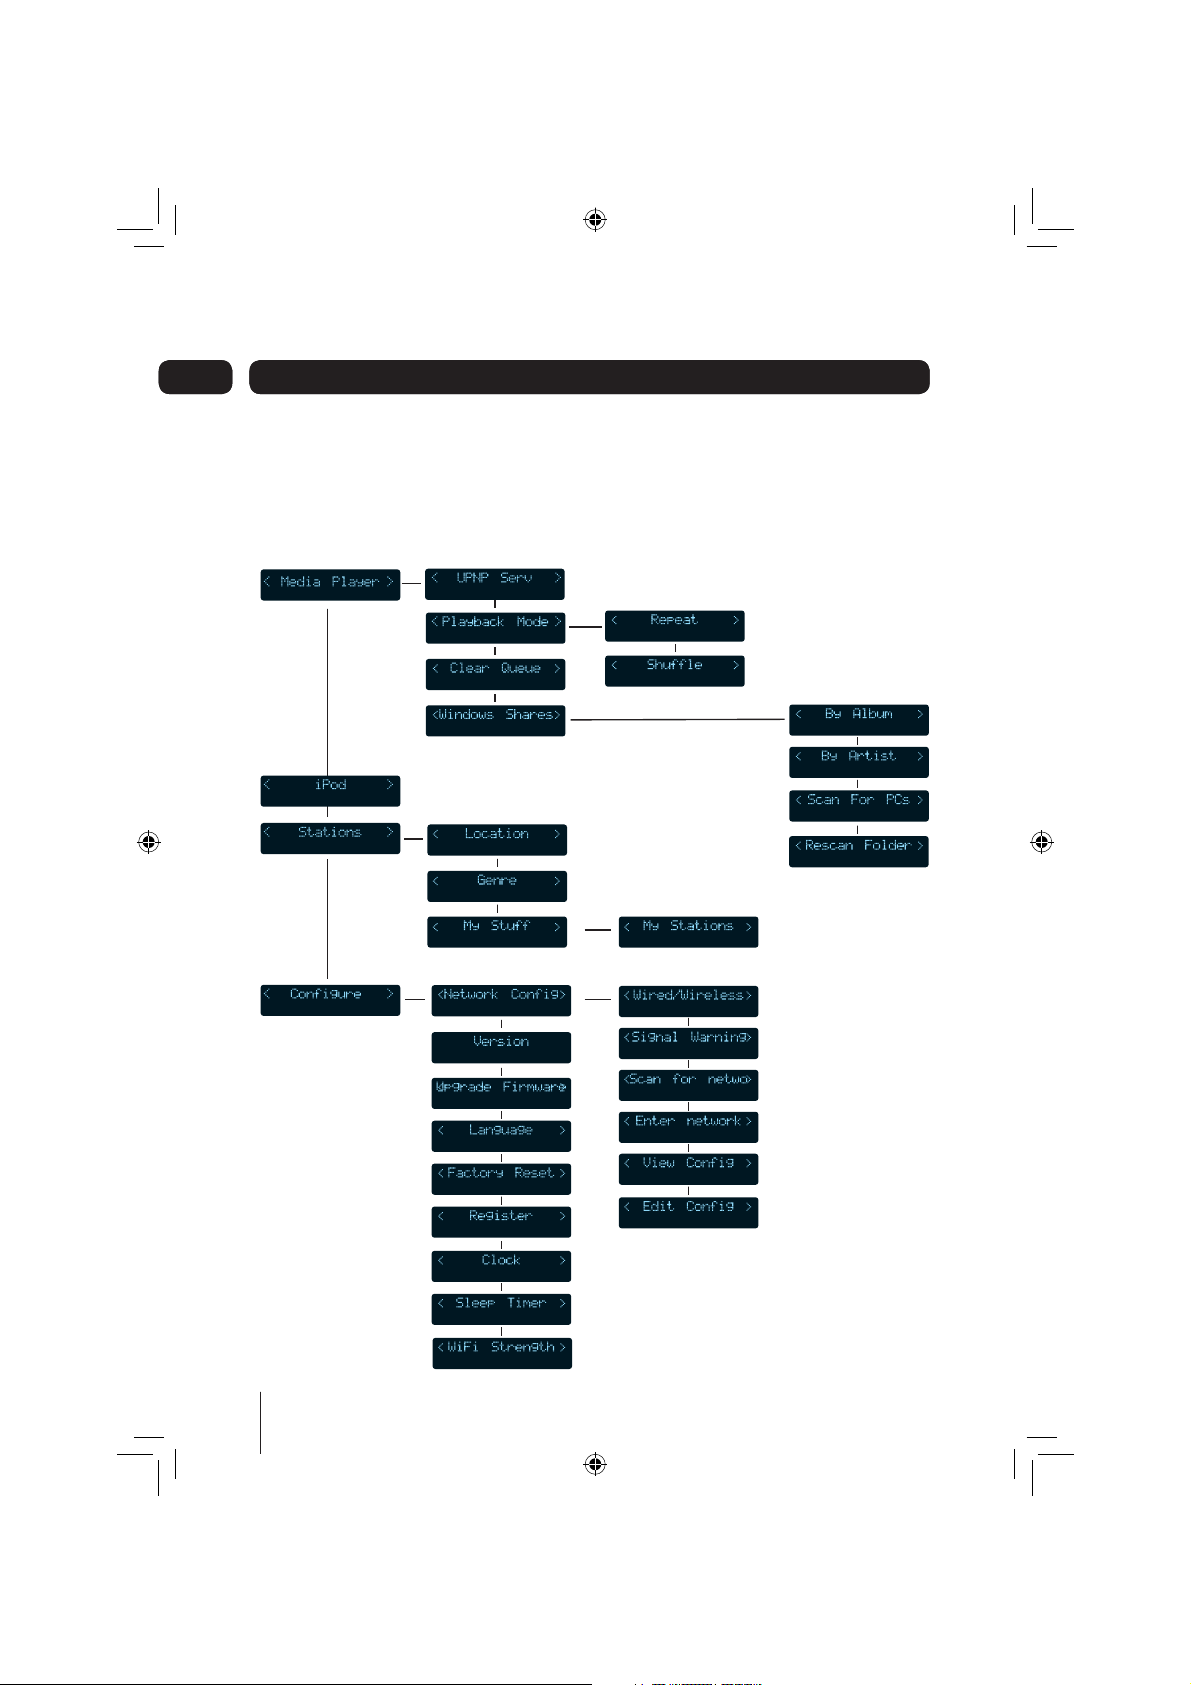
The menu structure
Navigate through the options using the SCROLL control, confirming each step using the SELECT
button.
10
goodmans_GWF101IP.indd 10goodmans_GWF101IP.indd 10 19/02/2008 13:13:3519/02/2008 13:13:35
Page 11
Using the Internet Radio
03
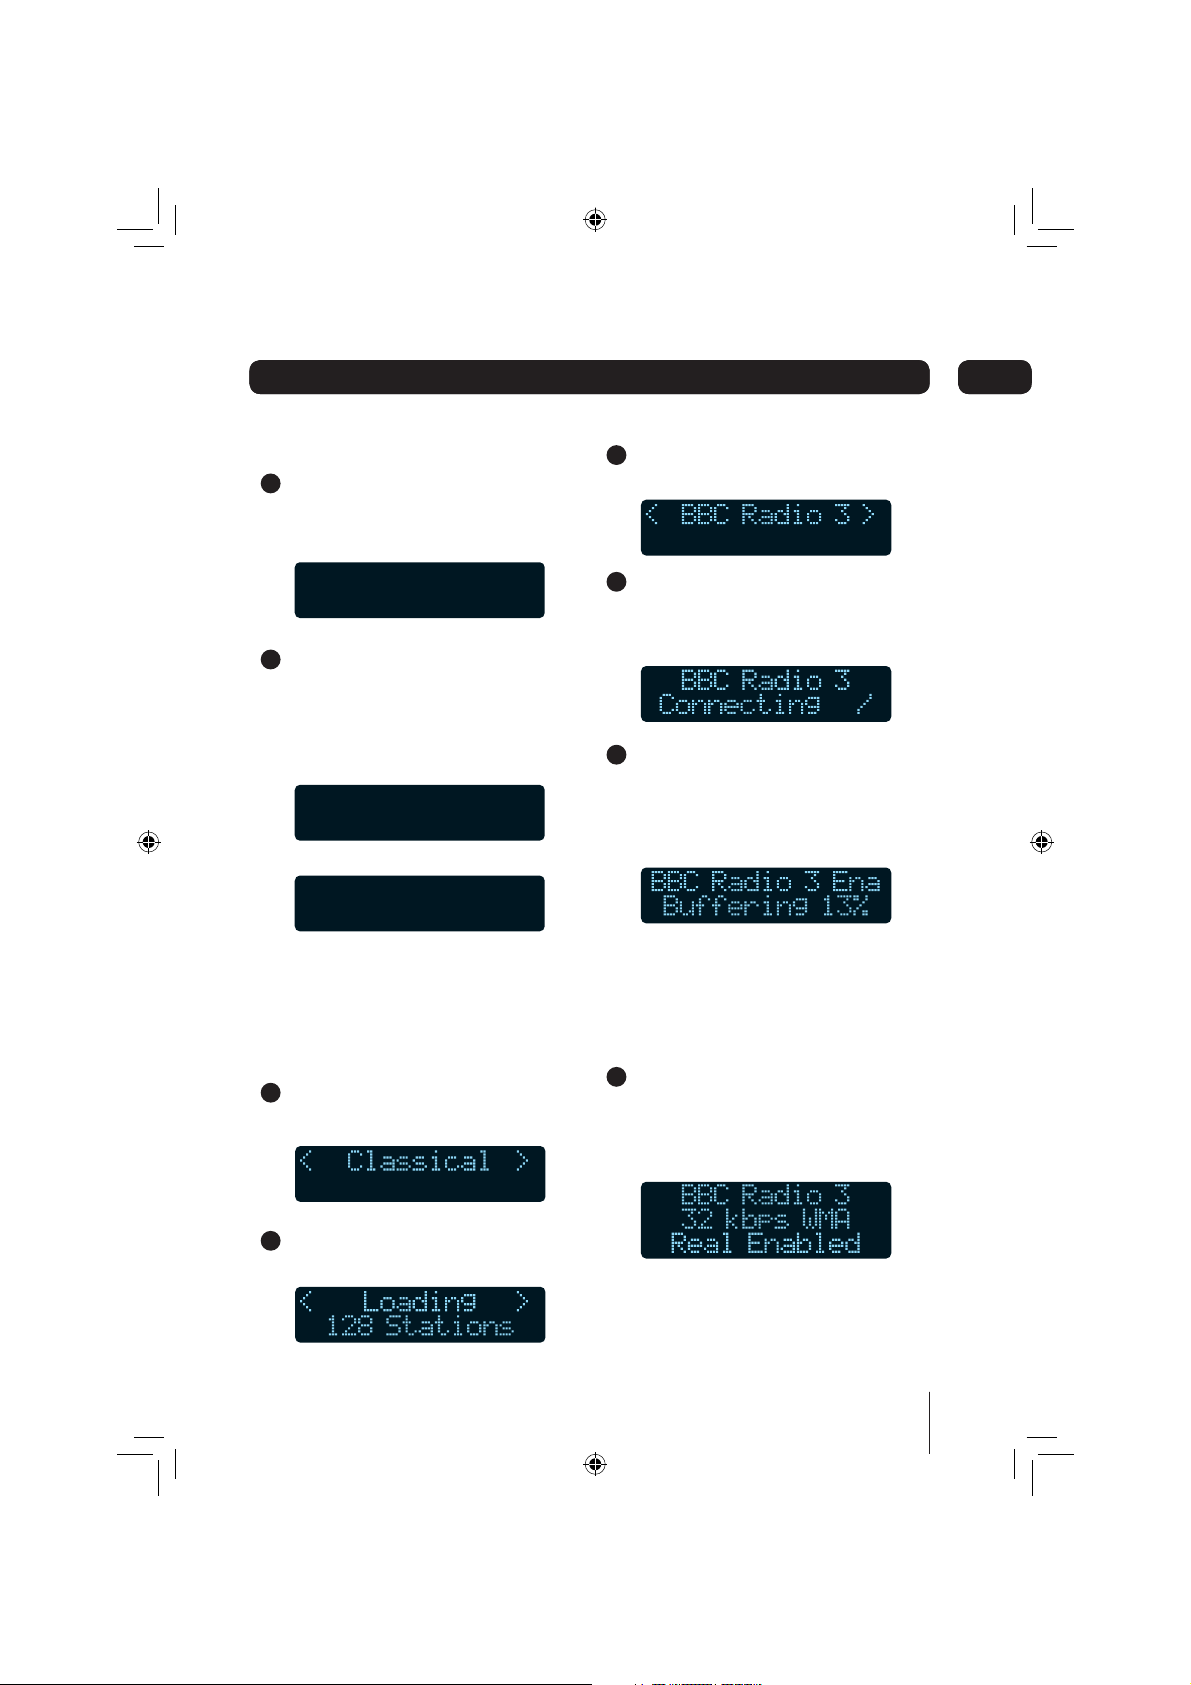
Connecting to a station
1
Turn the SCROLL control until the following
item is selected. Press the SELECT button
to confirm.
< Stations >
2
You can choose to select a station by
either location, genre or by using the My
Stuff feature, described on page 25. Use
the SCROLL control to choose, then press
SELECT to confirm.
< Location >
< Genre >
• Navigate through the options using the
SCROLL control, confirming each step using
the SELECT button. The following example
connects to a station using the Genre
method.
Select a Genre type. Press the SELECT
3
button to confirm.
5
Select the desired station. Press the
SELECT button to confirm.
6
When you connect to an internet radio
station, the blue menu control indicator will
flash and a connecting screen will display.
7
Before the station begins to play, the
wireless radio will start to buffer the
signal so that playback is not interrupted
when other devices are using the wireless
network.
However please note that there may be
cases when playback is interrupted when
the router is being used by other devices.
This does not indicate a fault with the
Internet radio.
8
When the station starts to play the blue
volume control indicator remains on,
and the station name, and bit rate are
displayed.
4
The screen will show the number of
stations available as it loads the list.
The bit rates are set by the radios stations and
will vary between stations. The higher the bit
rate, the better the sound quality.
11
goodmans_GWF101IP.indd 11goodmans_GWF101IP.indd 11 19/02/2008 13:13:3619/02/2008 13:13:36
Page 12
03
Using the Internet Radio
Changing the volume
When a station is playing, you can use the
volume control to change the volume.
• To turn the volume down, press ‘-’.
• To turn the volume up, press ‘+’.
The display will show the volume level as it is
changed.
Volume
Returning to station selection
To select another station press the BACK button.
You can now use the scroll control to select a
new station.
Connecting to an on demand radio
station
Some radio stations offer on demand services,
which can feature highlights, previous shows or
special events.
• When you connect to a station that offers
an on demand facility you will have three
options.
• Navigate through the options using the
SCROLL control, confirming each step using
the SELECT button. The following example
connects to ‘The best of Chris Moyles’ on
Radio 1.
1
Turn the SCROLL control until the following
screen is displayed.
< Stations >
2
Select the desired listing method.
12
goodmans_GWF101IP.indd 12goodmans_GWF101IP.indd 12 19/02/2008 13:13:3619/02/2008 13:13:36
Page 13

Using the Internet Radio
03
Select the desired country or genre.
3
4
Select the desired station.
< Radio 1 >
5
Select ON DEMAND.
< On Demand >
6
Select the desired on demand program.
<The Chris Moyl>
7
Select the day.
< MON >
On demand features
When listening to an on demand service, you
can use the following features.
Button Function
P5
PLAY/PAUSE
SKIP+ SKIP-
Press this button to
stop playback.
Press this button to
pause playback. To
continue listening to
the station press the
button again.
Press these buttons to
rewind or fast forward
by 30 seconds with
each press. Turn the
scroll control to set the
exact time.
This may not be an option depending on the on
demand service that you have chosen.
8
Choose the start time. If you want to play
from the beginning, press the SELECT
button to listen from that point.
Start Time
< 00:00:00 >
13
goodmans_GWF101IP.indd 13goodmans_GWF101IP.indd 13 19/02/2008 13:13:3719/02/2008 13:13:37
Page 14

03
Using the Internet Radio
Saving a station to a preset memory
Your internet radio can store a maximum of 5
stations. To store a station follow the procedure
below:
1
To store presets 1-5, listen to the station
that you wish to store, then press and
hold the relevant preset number button
to store the station. When the station is
stored successfully the following screen
will display.
Assigned To
Preset 1
14
goodmans_GWF101IP.indd 14goodmans_GWF101IP.indd 14 19/02/2008 13:13:3919/02/2008 13:13:39
Page 15

Using an iPod
04
Selecting an iPod adaptor
The internet radio is supplied with 8 iPod
adaptors. If the adaptor already in place does not
fit your iPod correctly, select a suitable one from
those supplied.
Each adaptor is identified on its underside to
show which model of iPod it is compatible with.
Playing music from your iPod
1
Ensure your iPod is set firmly in the iPod
adaptor.
The iPod will only fit in the adaptor one
way. Do not force it.
2
Turn the SCROLL control until ‘iPod’ is
displayed.
3
Press the SELECT button. The iPod will
automatically start playing.
Your iPod will charge while it is placed in
the adaptor.
iPod controls
Button Function
P5
PLAY/PAUSE
SKIP+ SKIP-
Press this button to stop
playback.
Press this button to
pause playback. To
continue listening press
the button again.
Press these buttons to
skip tracks
15
goodmans_GWF101IP.indd 15goodmans_GWF101IP.indd 15 19/02/2008 13:13:3919/02/2008 13:13:39
Page 16

05
Using the Media Player
Supported file types
The media player allows you to play audio
files that are stored on a networked PC, using
Windows 2000, Win XP and
Windows Vista.
The following file formats are supported:
• .MP3
• .WMA
• .RM
• .OGG
• .AAC
• .M3U
DRM encrypted files can not be played back
using the built in media player. If you try to play
an encrypted file ‘Protected’ will be displayed.
Most tracks purchased from online music stores
are encrypted and therefore cannot be played
using your internet radio.
16
goodmans_GWF101IP.indd 16goodmans_GWF101IP.indd 16 19/02/2008 13:13:3919/02/2008 13:13:39
Page 17

Setting up your PC
Windows XP Pro and Windows Vista users
should select the simple file sharing option from
Windows Explorer. (For further information
refer to the help system supplied with Windows
XP Pro and Windows Vista). If your PC is not
configured to use simple file sharing or you are
using Windows 2000, please refer to “Windows
2000 Users” on page 32.
To enable your internet radio to playback your
audio files, you need to share the folder in which
they are stored.
To setup your shared folders complete the
following procedure on your computer.
1
Open ‘My Computer’ from the ‘Start’
menu.
2
Browse to the folder where your audio files
are stored.
Using the mouse, right click on the folder
3
and select ‘Sharing and Security’.
4
In the ‘Network sharing and security’
section, select the ‘Share this folder on
the network’ button and enter a share
name. An example is shown below using
Windows XP.
‘Allow network users to change my files’
must also be selected.
5
Click the Apply button.
6
Click the OK button to close the window.
05Using the Media Player
7
The folder icon will change, to visually
show you that the folder is shared.
17
goodmans_GWF101IP.indd 17goodmans_GWF101IP.indd 17 19/02/2008 13:13:3919/02/2008 13:13:39
Page 18

05
Using the Media Player
Connecting the internet radio to your
PC’s shared folder
1
Log-on to your PC, using the user account
where the media files are stored.
2
Turn the SCROLL control until the following
screen is displayed. Press the SELECT
button to confirm.
< Media Player >
Select the option for ‘Windows Shares’.
3
Press the SELECT button to confirm.
<Windows Shares>
Select the option for ‘Scan for PCs’. Press
4
the SELECT button to confirm.
< Scan for PCs >
Your internet radio will now search your
5
wireless network for PCs that are sharing
music files.
Finding PCs
The name of the PC will be shown in the
6
display. If there is more than one PC found,
use the SCROLL control to select the
required PC. Press the SELECT button to
confirm.
\\JIMS-XPW-01
7
Your internet radio will now search for
shared folders on the specified PC.
Finding
Folders /
8
The shared folder name will be displayed.
If there is more than one shared folder use
the SCROLL control to select the required
folder. Press the SELECT button to confirm.
< Shared Music >
9
Your internet radio will now scan the folder
for available files.
File Scan ...
Loading 0%
10
To play your files, see “Playing your media
files” on page 21.
18
goodmans_GWF101IP.indd 18goodmans_GWF101IP.indd 18 19/02/2008 13:13:4019/02/2008 13:13:40
Page 19

Using the Media Player
05
Connecting the internet radio to your
PC using UPnP mode
To use Universal Plug and Play (UPnP) mode,
you will need to have previously setup the
following:
• Make sure that your router is UPnP
compatible and that UPnP mode has been
enabled.
• You have installed on your PC Microsoft
Media Player 11, Microsoft Media Connect
(for PCs with Microsoft Windows Media
Player 10 or earlier) or a third party UPnP
client on the PC that hosts your media
library.
You may need to consult the manufacturer’s
user guide that was supplied with your router
or UPnP client software if you are not sure how
to enable these features.
1
Make sure that the PC where the media
files are stored is switched on, and the
above requirements have been installed
and enabled.
2
Turn the SCROLL control until the following
screen is displayed.
Select the option for UPNP Servers. Press
3
the SELECT button to confirm.
< UPNP Servers >
4
Your internet radio will now search your
wireless network for UPnP servers/clients
that are sharing music files.
\\JIMS-XPW-01-Admi
5
Select the UPnP server that you want to
connect to. Press the SELECT button to
confirm.
6
Your internet radio will now search for
shared media on the UPnP server.
Loading...
< Media Player >
Press the SELECT button to confirm.
19
goodmans_GWF101IP.indd 19goodmans_GWF101IP.indd 19 19/02/2008 13:13:4019/02/2008 13:13:40
Page 20

05
Using the Media Player
You can select either to play the files by
7
music category or by using a predefined
playlist. The categories are as follows:
• Windows Media
• Windows Media Player Playlist
• My Shared Folders
Use the SCROLL control to select the
required option. Press the SELECT button
to confirm.
To play your files, see “Playing your media
8
files” on page 21.
20
goodmans_GWF101IP.indd 20goodmans_GWF101IP.indd 20 19/02/2008 13:13:4119/02/2008 13:13:41
Page 21

Using the Media Player
05
Playing your media files
DRM encrypted files can not be played back
using the built in media player. If you try
to play an encrypted file ‘Protected’ will be
displayed
• After you have scanned your shared folder,
or connected to a UPnP server you can
play your media files. If you have not yet
scanned your folder, or connected to a
UPnP server refer to the procedures on the
previous pages.
You can choose to playback your files by
1
using one of the following options;
• by Artist
• by Album
• by Genre
• All Music
Select the relevant option from the list
2
above, then press the SELECT button to
confirm.
Choose the relevant sub category using the
3
SCROLL control, then press the SELECT
button to confirm.
Your selection will now be added to the
4
queue, and the first track will begin to play.
Media player controls
When listening to your media files, you can
use the following features.
Button Function
P5
PLAY/PAUSE
SKIP+ SKIP-
BROWSE
Press this button to stop
playback.
Press this button to
pause playback. To
continue listening to
the media file press the
button again.
Press these buttons to
skip backwards or skip
forwards to a different
media file.
If you are listening to
a series of media files,
press the browse button
to view the list that is to
be played. If you want to
skip to a different track,
use the SCROLL control,
then press SELECT to
confirm.
21
goodmans_GWF101IP.indd 21goodmans_GWF101IP.indd 21 19/02/2008 13:13:4119/02/2008 13:13:41
Page 22

05
Using the Media Player
Removing tracks from the queue
1
Press the BROWSE button.
Turn the SCROLL control to select the
2
track that you want to remove.
Press and hold the STOP button for 2
3
seconds.
Turn the SCROLL control so that YES is
4
highlighted then press the SELECT button
to confirm.
Delete Track?
YES NO
The following screen will display to
5
confirm.
Removed From
Queue
Playing tracks in a random order
1
Press the BACK button repeatedly until the
main menu is reached. Turn the SCROLL
control until the following screen is
displayed.
Press the SELECT button to confirm.
Select the option for Playback Mode using
2
the SCROLL control.
Press the SELECT button to confirm.
<Playback Mode>
Turn the SCROLL control until Shuffle is
3
displayed. Press the SELECT button to
confirm.
< Shuffle >
Turn the SCROLL control so that YES is
4
highlighted then press the SELECT button
to confirm.
Enable
YES NO
5
Your tracks will now be played back in a
random order.
To remove random playback, follow the
same procedure, but select YES when the
display shows DISABLE.
< Media Player >
22
goodmans_GWF101IP.indd 22goodmans_GWF101IP.indd 22 19/02/2008 13:13:4119/02/2008 13:13:41
Page 23

Using the Media Player
Repeating all tracks
Press back repeatedly until the main menu
1
is reached. Turn the SCROLL control until
the following screen is displayed. Press the
SELECT button to confirm.
< Media Player >
Select the option for Playback Mode using
2
the SCROLL control. Press the SELECT
button to confirm.
<Playback Mode>
Turn the SCROLL control until Repeat is
3
displayed. Press the SELECT
button to confirm.
< Repeat >
05
Turn the SCROLL control so that YES is
4
highlighted then press the SELECT button
to confirm.
Enable
YES NO
All tracks will now be played repeatedly
5
until the function is turned off.
To remove repeated playback, follow the
same procedure, but select YES when the
display shows DISABLE.
23
goodmans_GWF101IP.indd 23goodmans_GWF101IP.indd 23 19/02/2008 13:13:4219/02/2008 13:13:42
Page 24

06
My Stuff
This option allows you to create a list, containing
your favourite streams, stations and podcasts.
This list can be accessed on your internet radio
or your PC and acts as an extension to the five
Preset buttons.
You must first create an account on the Reciva
website and register your internet radio to that
account.
How to register on the Reciva website
1
Go to the Reciva website at
www.reciva.com
2
Click on Register in the top right hand
corner.
Register your Goodmans internet radio
to your Reciva account
On the Reciva website, click on My Radios
1
on the left hand side of the screen.
2
Follow the on-screen instructions to
complete registration.
Add items to My Stuff
The Reciva website allows you to add streams,
stations and podcasts to My Stuff.
The Reciva website will guide you through the
steps to do this.
3
Follow the on-screen instructions to
complete registration.
24
goodmans_GWF101IP.indd 24goodmans_GWF101IP.indd 24 19/02/2008 13:13:4219/02/2008 13:13:42
Page 25

My Stuff
Listening to My Stuff
Navigate through the options using the SCROLL
control, confirming each stage using the SELECT
button.
Turn the SCROLL control until the following
1
screen is displayed.
2
Select My Stuff.
3
Select My Stations.
06
4
Select the desired stream, radio station or
podcast.
25
goodmans_GWF101IP.indd 25goodmans_GWF101IP.indd 25 19/02/2008 13:13:4219/02/2008 13:13:42
Page 26

07
Clock Functions
Setting the clock
The clock on the internet radio will set
automatically once connected to the internet,
however should you need to adjust this setting,
proceed as follows;
1
Select Configure from the main menu, and
press SELECT to confirm.
< Configure >
2
Turn the SCROLL control until Clock is
displayed. Press SELECT to confirm.
< Clock >
3
Turn the SCROLL control until Set Time is
displayed. Press SELECT to confirm.
< Set Time >
The set time will be displayed.
6
Time Set:
10:46
Setting the alarm
Before setting the alarm, make sure that
the clock is correct.
To set the alarm, proceed as follows;
Select Configure from the main menu, and
1
press SELECT to confirm.
< Configure >
2
Turn the SCROLL control until Clock is
displayed. Press SELECT to confirm.
3
Turn the SCROLL control until Set Alarm is
displayed. Press SELECT to confirm.
< Set Alarm >
4
Turn the SCROLL control to set the hour.
Press SELECT to confirm.
Ensure that YES is highlighted, then press
4
SELECT to confirm.
Set Time
02:21
Turn the SCROLL control to set the
5
minutes. Press SELECT to confirm.
5
Enable Alarm
YES NO
Turn the SCROLL control to set the hour.
Press SELECT to confirm.
Set Time
10:21
Set Alarm
11:21
26
goodmans_GWF101IP.indd 26goodmans_GWF101IP.indd 26 19/02/2008 13:13:4219/02/2008 13:13:42
Page 27

Clock Functions
07
Turn the SCROLL control to set the
6
minutes. Press SELECT to confirm.
Set Alarm
11:35
7
The alarm time will be displayed.
Alarm Set:
11:35
8
Press the POWER button. The display will
show two times.
The time on the left is the current time and
9
the time on the right is the alarm time.
When the time on the right is reached,
your internet radio will turn on and play the
station or track that you were last listening
to.
Setting the sleep timer
The sleep timer is used to turn off the internet
radio after a specified amount of time.
To set the sleep timer, proceed as follows;
1
Select Configure from the main menu, and
press SELECT to confirm.
< Configure >
2
Turn the SCROLL control until Sleep Timer
is displayed. Press SELECT to confirm.
< Sleep Timer >
Turn the SCROLL control to set the amount
3
of time before your internet radio will turn
off. Press SELECT to confirm.
Sleep Timeout
< 02:45:00 >
Alarm Set will be displayed to confirm that
4
the timer has been set. In the example
above the internet radio will turn off after 2
hours and 45 minutes.
27
goodmans_GWF101IP.indd 27goodmans_GWF101IP.indd 27 19/02/2008 13:13:4319/02/2008 13:13:43
Page 28

08
Configuration Settings
The following settings can all be accessed form
the configuration menu. Use the SCROLL control
to navigate through the menu system, and
change settings. Press the SELECT button to
confirm.
Network Config
This menu enables you to setup and view your
network configuration settings. These settings
are used when setting up your network and are
explained in “Switching on” on page 6
Version
This menu shows you the version numbers of
the built-in firmware in your internet radio. These
version numbers are helpful when calling the
customer helpline.
Upgrade firmware
This menu enables you to upgrade the firmware
in your internet radio. When you press the
SELECT button your internet radio will search for
available upgrades.
Language
This menu enables you to change the menu
language used in your internet radio.
Factory Reset
This menu enables you to reset your internet
radio. When your internet radio is reset you will
lose your stored radio stations, clock settings and
network settings.
Refer to “Switching on” on page 6 for help with
re-setting up your internet radio.
Register
The 7 digit key is device specific and is required
when you subscribe to premium content services
and when setting up your ‘My Stuff’ account on
the Reciva website.
Clock
See “Setting the clock” on page 26.
Sleep Timer
See “Setting the sleep timer” on page 27.
WiFi Strength
This shows you the strength of the WiFi signal
being received.
28
goodmans_GWF101IP.indd 28goodmans_GWF101IP.indd 28 19/02/2008 13:13:4419/02/2008 13:13:44
Page 29

Help and Advice
09
If the following help and advice do not solve your
problems, please refer to
www.goodmans.co.uk and www.reciva.com
for further information.
• If you have problems connecting your
internet radio to your wireless network,
these steps may help you solve the
problem;
1
Is your wireless access point or router
connected to your broadband connection
and switched on?
2
Can you connect your PC to your wireless
network using a wireless link?
3
Has the WEP or WPA passwords been
entered into the internet radio correctly?
4
Does your router use a DHCP server?
Check that DHCP server is enabled on your
internet radio.
Goto Configure > Network Config > View
Config. The following should be displayed.
< Mode >
Auto / DHCP
Check that your firewall is not blocking the
5
following UDP and TCP ports.
• 80
• 554
• 1755
• 5000
• 7070
6
Check that your access point or router is
not restricting the MAC address of the
internet radio. Your MAC address can be
found by going to: Configure > Network
Config > View Config > Mac Address.
• If your internet radio can connect to your
wireless network successfully, but can not
play a radio station it may be due to one of
the following causes;
The station is not broadcasting at this time
1
of the day.
The station has reached the maximum
2
allowed number of simultaneous
connections.
3
The station is not broadcasting any more.
29
goodmans_GWF101IP.indd 29goodmans_GWF101IP.indd 29 19/02/2008 13:13:4419/02/2008 13:13:44
Page 30

09
Help and Advice
• The media files being played on my
internet radio have broken audio.
Please ensure that your network
1
connection is reliable and that there is not
any interference from any neighbouring
networks. If you think that this could be
possible, then you may find it helpful to
change the router’s channel number.
• The internet radio is unable to find any
PC’s sharing media on the local network.
1
Check that there are PCs sharing media on
the local network.
2
If the PCs have a firewall installed,
check that a) the firewall is allowing all
connections from the local network and b)
the firewall is allowing Netbios traffic. (You
may need to consult the documentation
that was supplied with your router if you
are unsure how to do this).
Check that other PCs are able to see the
3
server from which you are trying to share
your files.
4
Check that ‘File and Printer Sharing For
Microsoft Networks’ is installed and bound
to the local network interface.
Make sure that the ‘Server’ service that
5
provides file and print sharing support is
enabled and currently running. See Control
Panel > Administrative Tools > Services.
30
goodmans_GWF101IP.indd 30goodmans_GWF101IP.indd 30 19/02/2008 13:13:4419/02/2008 13:13:44
Page 31

Error Messages
Error Message Solution
Protected The user has selected to play a media file that is encrypted.
Encrypted tracks can not be played back using the media player.
See “Connecting the internet radio to your PC using UPnP mode”
on page 19.
Queue Full The user has selected to play a media file that is encrypted.
Encrypted tracks can not be played back using the media player.
See “Connecting the internet radio to your PC using UPnP mode”
on page 19.
Connection Failed The internet radio could not connect to the Shared Folder selected
by the user. Setup the shared folder again. See See “Connecting
the internet radio to your PCs shared folder” on page 18.
DHCP DNS Data Invalid The internet radio can not connect to a valid DNS server. Check
that the internet radio is DHCP enabled. See item 4 on page 29.
DHCP Failure or Wrong Key The internet radio has not been allocated a valid IP address. Check
that your wireless router or access point is configured as a DHCP
server. Refer to the manufacturer’s documentation supplied with
your wireless router or access point.
No Valid PC Selected The user has attempted to access shared files on a PC. See
“Connecting the internet radio to your PCs shared folder” on
page 18.
No Stations List Available The internet radio does not have a copy of the station list in
memory. The internet radio will automatically update the station
list if this occurs.
10
31
goodmans_GWF101IP.indd 31goodmans_GWF101IP.indd 31 19/02/2008 13:13:4419/02/2008 13:13:44
Page 32

11
Windows 2000 Users
If your PC is running Windows 2000, it is
recommended that you set up a new user
that shares the contents of it’s folder with
all users of the PC. Music files stored by this
user can then be saved and accessed by all
users and the internet radio.
Logon to Windows 2000 as the
1
administrator.
2
Open the control panel.
3
When the control panel has opened,
double click the users and passwords
icon.
Select Add.
4
5
Enter a name for the new user, then select
Next.
Enter a password and confirm, then select
6
Next. If you do not require a password for
this user select Next.
32
goodmans_GWF101IP.indd 32goodmans_GWF101IP.indd 32 19/02/2008 13:13:4419/02/2008 13:13:44
Page 33

Windows 2000 Users
11
Select Others and make sure that
7 10
administrators is selected. Select Finish.
8
Your new user account will now be listed.
Select OK to close the window.
Browse to where the folder is located on
9
your hard drive. You may need to create a
new folder for your media files if one does
not exist.
Right click on the folder that you wish to
share and select Sharing.
Select Share this folder and enter a share
11
name. Set the user limit to Maximum
allowed, then select Apply.
12
At the next screen, select OK.
33
goodmans_GWF101IP.indd 33goodmans_GWF101IP.indd 33 19/02/2008 13:13:4519/02/2008 13:13:45
Page 34

11
Windows 2000 Users
The folder icon will change to visually
13
show you that the folder is shared.
You will now need to copy your media
files into your shared folder so that they
can be accessed by other users on the
PC and the internet radio. For further
information on setting up users on your
PC refer to the help system supplied with
Windows 2000.
34
goodmans_GWF101IP.indd 34goodmans_GWF101IP.indd 34 19/02/2008 13:13:4619/02/2008 13:13:46
Page 35

Specifications
Power Supply 230-240V AC at 50Hz
Standby Power Consumption 7.8 W
Power Consumption 8.0 W
Wireless Network Protocol 802.11b/g
Compatible Media Formats .mp3
.wma
.rm
.ogg
.aac
Preset Stations 5
12
IMPORTANT: Due to continual revision and improvements to our products design, specifications are
subject to change without notice.
35
goodmans_GWF101IP.indd 35goodmans_GWF101IP.indd 35 19/02/2008 13:13:4719/02/2008 13:13:47
Page 36

13
Guarantee
The product is guaranteed for 12 months from the date you bought it.
If any problem arises due to faulty materials or workmanship, the dealer you bought it from will give you
a replacement, or will repair it free of charge (where possible).
The following conditions apply to this guarantee.
• It is valid only in the country you bought the product in.
• The product must be correctly installed and used in line with the instructions in this user
guide.
• The product must be used only for domestic purposes.
• It does not cover accidental damage or misuse.
• It will no longer be valid if the product is resold or has been damaged by inexpert repair.
• The manufacturer has no liability for incidental or resulting damage.
This guarantee is in addition to your legal rights.
36
goodmans_GWF101IP.indd 36goodmans_GWF101IP.indd 36 19/02/2008 13:13:4719/02/2008 13:13:47
Page 37

Electrical information
This internet radio is fitted with a BS1363/A 13 amp plug. If it is not suitable for your supply sockets it must be removed and replaced
with an appropriate plug. If the plug becomes damaged and/or needs to be replaced please follow the wiring instructions below.
The plug removed must be disposed of immediately. It must not be plugged into a supply socket as this will be an electrical hazard.
If the fuse needs to be replaced it must be of the same rating and ASTA approved to BS1362. If the plug is changed, a fuse of the
appropriate rating must be fitted in the plug, adapter or at the distribution board. If the fuse in a moulded plug is replaced, the fuse
cover must be refitted before the appliance can be used.
Wiring Instructions
The supply cable will be either 2-core or 3-core. Follow the appropriate wiring instructions given below. In both cases ensure that the
outer sheath of the cable is firmly held by the cable clamp.
2- Core plug
WARNING: Do not connect either wire
to the earth terminal.
This symbol indicates that this 2-core appliance is Class
II and does not require an earth connection.
The wire coloured blue must be connected to the terminal
marked with the letter N or coloured black.
The wire coloured brown must be connected to the terminal
marked with the letter L or coloured red.
Fuse
(Neutral)
Brown (Live)Blue
3- Core plug
WARNING: This appliance must be earthed.
The wire coloured green and yellow must be connected to the
terminal marked with the letter E, or by the earth symbol
or coloured green or green and yellow.
The wire coloured blue must be connected to the terminal
marked with the letter N or coloured black.
The wire coloured brown must be connected to the terminal
marked with the letter L or coloured red.
Green & yellow
(Earth)
(Neutral)
Fuse
Brown (Live)Blue
,
37
goodmans_GWF101IP.indd 37goodmans_GWF101IP.indd 37 19/02/2008 13:13:4719/02/2008 13:13:47
Page 38

Safety Information
Power source
• This product requires a 230-240V AC, 50Hz mains supply. Do
not use any other supply.
• Only use the power adapter supplied with the product.
General
• Position the mains cable so that it cannot be walked on or
pinched by other items placed on or against them.
• Do not use this product in humid or damp conditions.
• Do not allow this product to get wet.
• Do not expose this product to dripping or splashing.
• Do not place water filled objects such as vases on top of this
product.
• Do not place naked flame sources, such as candles on top of
this product.
Cleaning
• Always unplug this product from the mains supply before
you clean it.
• Do not use liquid or aerosol cleaners.
• This product should be cleaned with a soft, barely damp
cloth.
Ventilation
• The slots and openings on this product are for ventilation
purposes. Do not cover or block them as this could cause
overheating.
• Never let children push anything into the slots or openings in
the case.
Servicing
• There are no user-serviceable parts in this product.
• If servicing is required, always refer to qualified service
personnel.
• Always consult the dealer if you are ever in doubt about the
installation, operation or safety of this product.
WEEE
This appliance is labelled in accordance with
European Directive 2002/96/EG concerning used
electrical and electronic appliances (waste electrical
and electronic equipment - WEEE). The guideline
determines the framework for the return and
recycling of used appliances as applicable throughout
the EU.
How should I dispose of this product?
When your product has reached the end of its life; Contact your
local council regarding available recycling or disposal options.
Do not dispose of electrical products with fitted batteries, in
with general waste.
Sound levels
Your hearing is very important to you and to us, so please take
care when using this product. It is strongly recommended that
you follow the listed guidelines in order to prevent possible
damage or loss of hearing.
Establish a safe sound level
1. Over time your hearing will adapt to continuous loud sounds
and will give the impression that the volume has in fact been
reduced. What seems normal to you may in fact be harmful.
To guard against this before your hearing adapts, set the
volume to a low level.
2. Slowly increase the level until you can hear comfortably and
clearly and without distortion.
3. Damage to your hearing is accumulative and is irreversible.
Any ringing or discomfort in the ears indicates that the
volume is too loud.
4. Once you have established a comfortable listening level, do
not increase the sound level.
38
goodmans_GWF101IP.indd 38goodmans_GWF101IP.indd 38 19/02/2008 13:13:4719/02/2008 13:13:47
Page 39

39
goodmans_GWF101IP.indd 39goodmans_GWF101IP.indd 39 19/02/2008 13:13:4719/02/2008 13:13:47
Page 40

www.goodmans.co.uk
0844 477 6404
goodmans_GWF101IP.indd 40goodmans_GWF101IP.indd 40 19/02/2008 13:13:4719/02/2008 13:13:47
 Loading...