

Page 1
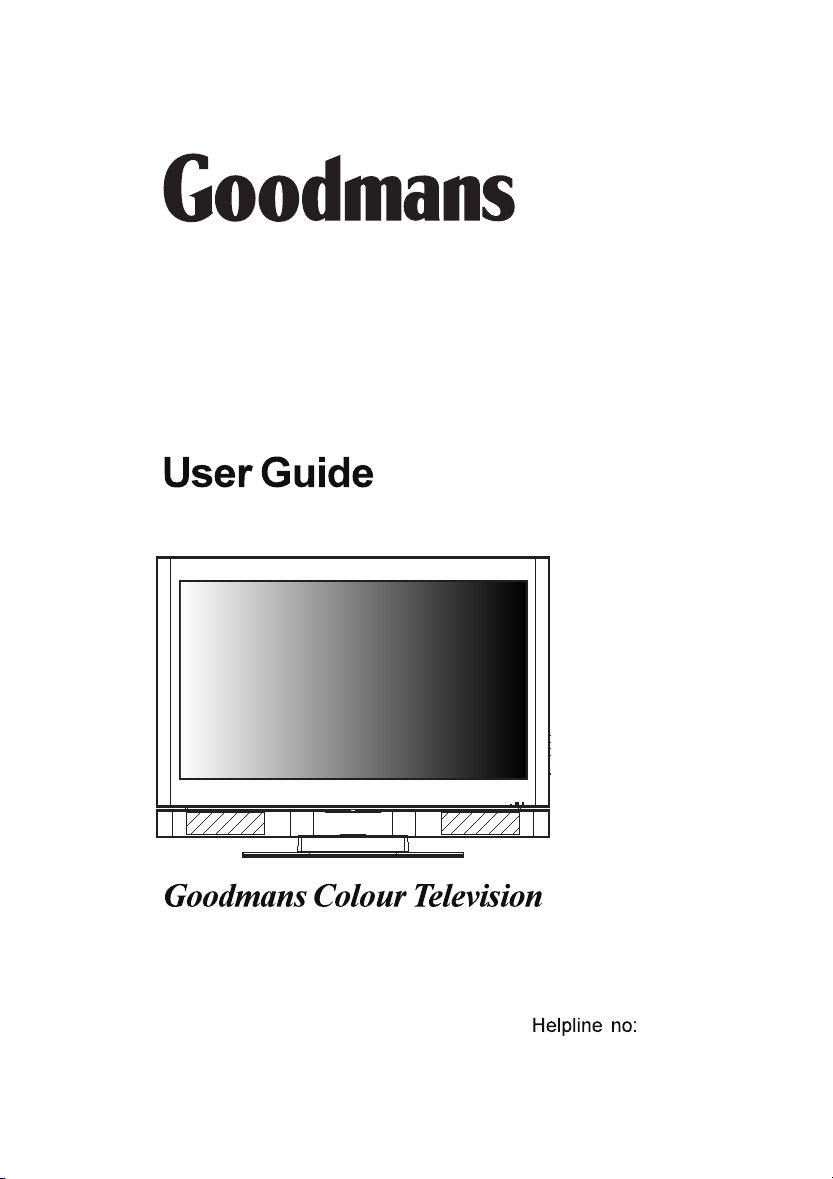
Model GTVL42W15HD
HD READY
0870 873 0080
www.goodmans.co.uk
Page 2
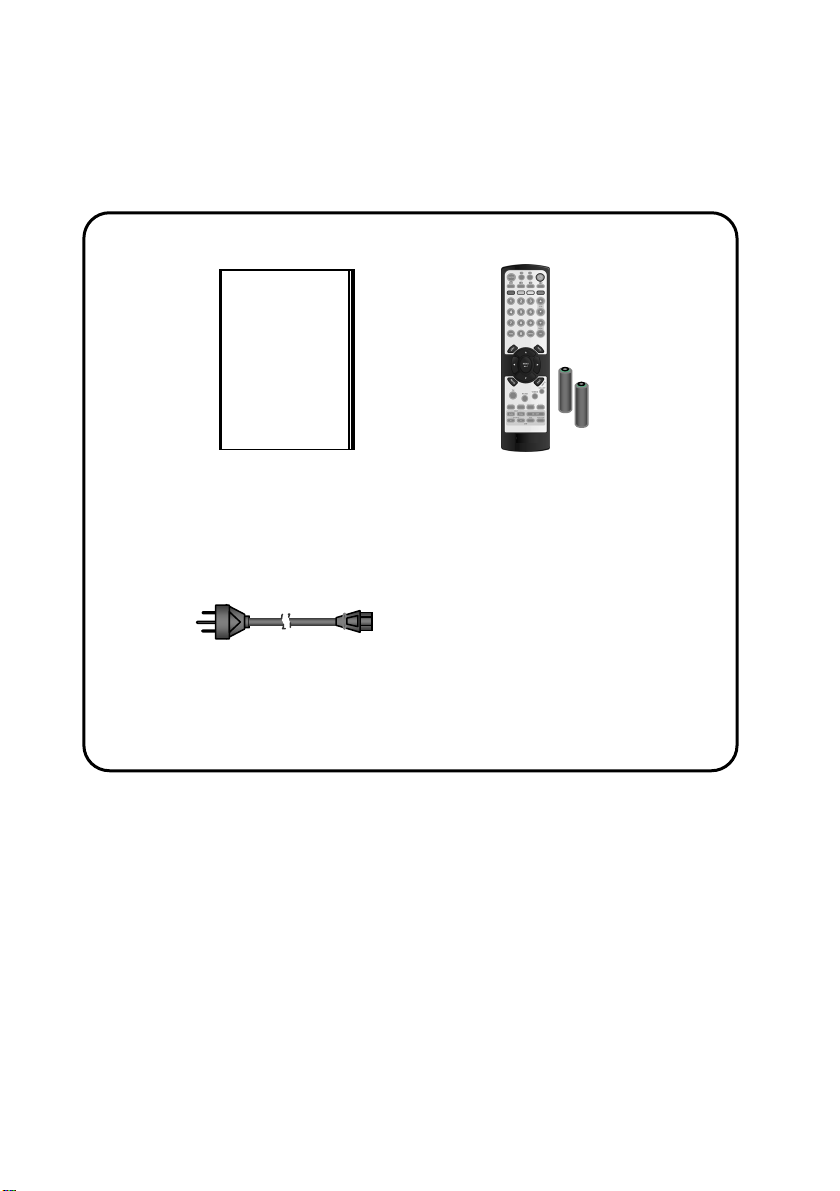
ACCESSORIES
Please check that you have received the following items with your TV.
LCD-TV
USER’S MANUAL
User’s Manual
( You are reading it )
Remote Control &
Batteries(AAA X2)
Note: All Connection cables shown throughout this manual are not supplied. These
may be obtained from a local TV / HiFi retail outlet.
Power Cord
Page 3

42
Page 4

TABLE OF CONTENTS
INTRODUCTION
This instruction manual is important to you. Please read it. In a short time it shows exactly
how to connect, operate, and adjust this unit for best performance. It can save you money. It
shows simple things to do and check before you call for help and save the cost of
unnecessary service or call out charge.
Table of contents……………………………………………………………………………………
Important Safeguards………………………………………...……………………………………
Controls and location………………………………………...……………………………………
Remote Control………………………...……………………...……………………………………
Summary Of Remote Control Buttons…………………...……………………………..………
General Controls & Adjustment………………..……...……………………………..………….
Connecting External Devices………………..……...……………………………..……………..
Connections & Applications………………………..………….………………………………….
Teletext……………………..………….……………………………………………………………..
Other Function…………….…………………………………………………………………………
Troubleshooting………….…………………………………………………………………………
PC Input Preset Timing Tables……………………………………………………………………
Specifications………………………………………………………………………………………..
Save the carton and packing material:they will be useful if you ever have to transport the unit.
1
2
4
5
6
7
13
14
38
40
41
43
44
1
Page 5

IMPORTANT SAFEGUARDS
For your own safety read following instructions carefully before attempting to connect thisTV
to the mains.
Mains Supply: 230V ~ 50Hz - AC only
This unit is designed to operate on a 230V~50Hz supply only. Connecting it to other power
sources may damage it. Ensure that the supply corresponds to the information on the rating
label on the bottom of the unit.
This component system may be fitted with a non-rewireable plug. If it is necessary to change the fuse
in a non-rewireable plug the fuse cover must be refitted. If the fuse cover becomes
lost or damaged, the plug must not be used until a replacement, available from the
manufacturer, is obtained. It is important that the colour of the replacement fuse cover
corresponds with the colour marking on the base of the plug.
If the plug needs to be changed because it is not suitable for your socket, or becomes damaged,
it should be cut off and an appropriate plug fitted following the wiring instructions below. The
plug must then be disposed of safely, as insertion into a 13A socket is likely to cause an
electrical hazard.
IMPORTANT
The wires in the mains plug should be connected as shown in the diagram.
The colours of the wires in the mains lead of the unit may not correspond with the coloured markings
identifying the terminals in your plug. Connect them as follows:-
The wire which is coloured blue must be connected to the terminal which is marked with the letter 'N'
or coloured black.
The wire which is coloured brown must be connected to the terminal which is marked with the letter
' L' or coloured red.
The wire which is coloured yellow and green must be connected to the terminal marked EARTH.
If a 13 Amp (BS 1363) Plug is used, a 3 Amp Fuse must be fitted, or if any other type of Plug
is used a 3 Amp or 5 Amp Fuse must be fitted, either in the Plug or Adaptor, or on the Distribution
Board.
GREEN &
YELLOW
(Earth)
BLUE
(Neutral)
FUSE
BROWN
(Live)
CAUTION
To prevent electric shock, disconnect from the mains before removing cover.No user
serviceable parts inside. Refer servicing to qualified service personnel.
2
Page 6

To achieve the utmost in enjoyment and performance, please read this manually carefully before
attempting to operate the unit in order to became familiar with its features, and assure you years of
faithful, trouble free performance.
Important Notes
Keep instructions the safety and operating instructions should be retained for future reference.
Avoid installing the unit in locations described below:
Exposed to direct sunlight or close to heat radiating appliances such as electric heaters.
On top of other stereo equipment that radiate too much heat.
Places lacking ventilation or dusty places.
Places subject to constant vibration.
Humid or moist places.
Make sure not to obstruct the ventilation opening.
Operate turning controls and switches as instructed in the manual.
Before turning on the power for the first time, make certain the power cord is properly installed.
For safety reasons, do not remove any covers or attempt to gain access to the inside of the product.
Refer any servicing to qualified personal.
Do not attempt to remove any screws, or open the casing of the unit; there are no user serviceable
parts inside, refer all servicing to qualified service personal.
CAUTIONCAUTION
RISK OF ELECTRIC SHOCK
RISK OF ELECTRIC SHOCK
DO NOT OPEN
DO NOT OPEN
CAUTION : TO REDUCE THE RISK OF ELECTRIC SHOCK DO NOT REMOVE COVER(OR
BACK), NO USER SERVICEABLE PARTS INSIDE, REFER SERVICING TO QUALIFIED
SERVICE PERSONAL.
DANGEROUS VOLTAGE
Conductor dangerous voltage, that may be of sufficient magnitude to constitute a risk
of electric shock to persons is present within this product's enclosure.
The owner's manual contains important operating and maintenance instructions, for
ATTENTION
your safety, it is necessary to refer to the manual.
WARNING :TO PREVENT FIRE OR SHOCK HAZARD, DO NOT EXPOSE THIS APPLIANCE TO
DRIPPING OR SPLASHING.
Note:
This unit will become warm when used for a long period of time. This is normal and does not indicate
a problem with the unit.
3
Page 7
C
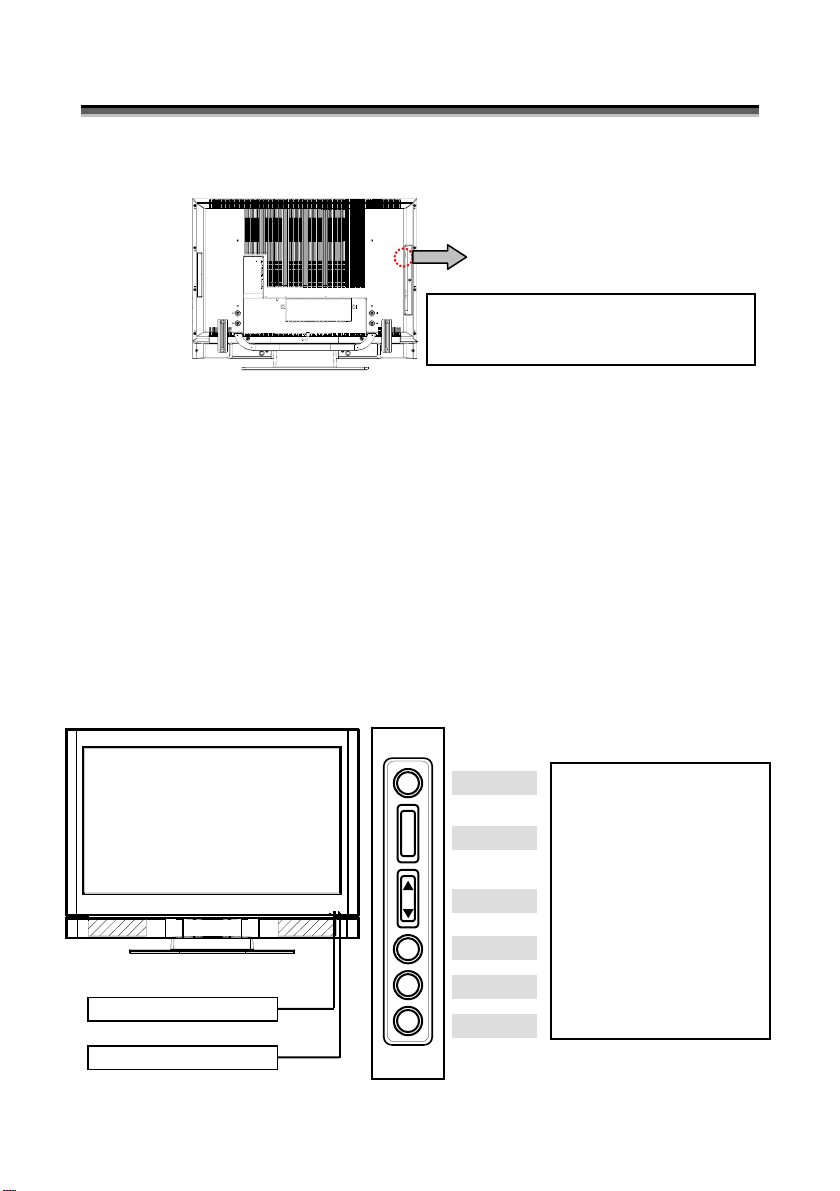
OONNTTRROOLLSS AANNDD LLOOCCAATTIIOON
C
N
Main Power Switch
The MAIN POWER switch is located at the left back of the LCD unit.
Main Power Switch
Note: Power switch is factory set to ON
position. If no lights shows on the front panel
try pressing this power button."
Function Key
These buttons control your LCD unit’s basic features, including the
on-screen menu. To use the more advanced features, you must use the
remote control.
POWER : turn on or turn off the LCD unit.
SOURCE : select input source (PC, HDMI, DVI, TV, AV, SV, YPbPr,
SCART 1, SCART 2, SCART 2S).
MENU : display the main menu.
CHANNEL (down/up) : change channels.
VOLUME (-/+) : turn up or turn down the volume.
EXIT / WIDE : select the aspect ratio of display (TV/Video source:
Panorama, Normal, Full, Zoom1, Zoom2, Auto ; PC source:
Full, Normal) or as exit function on if OSD menu appear.
Note:Auto mode only for TV/AV/SV/Scart 1/Scart 2/Scart 2S source.
Remote Control Sensor
Power Indicator
+
_
EXIT / WIDE
VOLUME
CHANNEL
MENU
SOURCE
POWER
Power indicator:
A green indicator lights
when the power is on and
an amber indicator lights
when in the standby
mode. A red indicator
lights when the power is
off.
Remote sensor window:
Remote control sensor
that receives the remote
control signals.
4
Page 8
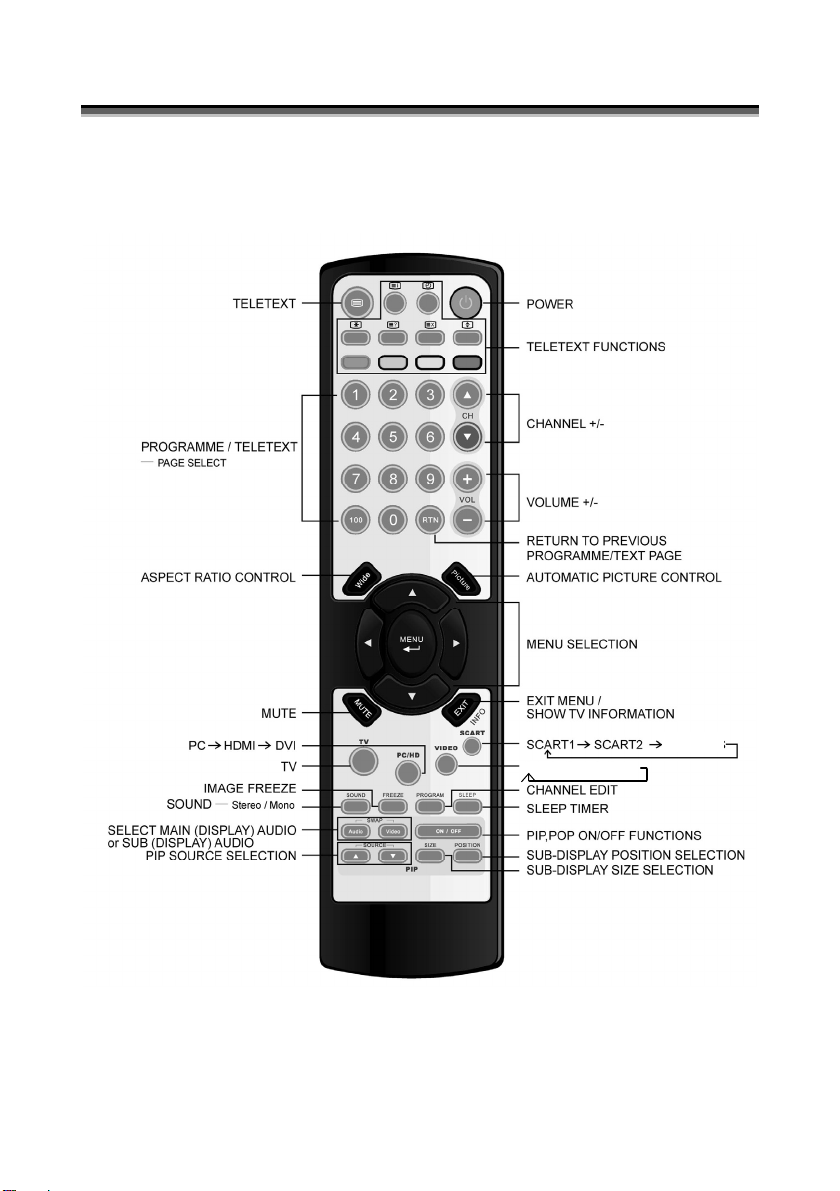
R
EEMMOOTTEE
R
C
OONNTTRROOL
C
L
5
SCART 2S
AV → SV → YPbPr
Page 9

S
UUMMMMAARRYY
S
OOF
F
R
R
EEMMOOTTEE
C
OONNTTRROOLL
C
B
UUTTTTOONNS
B
S
PPoowweerr ccoonnttrrooll
POWER button Turn the TV on or off
Selecting the primary signal source
TV button Switch to TV mode
PC/HD button Switch to PC , HDMI and DVI mode
VIDEO button Switch to AV /S-Video and YPBPR mode
SCART Switch to SCART1/ SCART2 and SCART 2S mode
Menu Settings
MENU button Display the on-screen menu
EXIT Exit a menu or sub-menu
△ / ▽ / ◁ / ▷
TV Changing Channels
CH △/▽ button
0~9 ; +100 button To manually select channels
RTN button Return to the previous viewed channel
Sound Control
VOL△/▽ button
MUTE button Temporarily turn off audio
SOUND button Press to choose Stereo, Dual and Mono broadcasts.
PIP Control
PIP ON/OFF button Enable/Disable PIP viewing window
△/▽ button
SIZE button Toggle PIP window size: Small / Middle / Large
Audio/Video button
POSITION button Move the PIP window position
Other Function
INFO button Display current channel/Input source/signal format..
WIDE button (Aspect Ratio Control)
PICTURE button
SLEEP button Select a pre-set time for automatic power down.
FREEZE button Temporary pause current image
Teletext Control
TELETEXT button
Access menu items
Press Up/DOWN to change the channel
Increase/ Decrease volume level
Toggle PIPmode : PIP → POP → OFF
Select PIP input source: PC→HDMI→DVI→AV→SV→SCART 1→
SCART 2→SCART 2S→YPbPr→PC
Toggle audio/video source between the primary display and the
PIP window
In PC mode:Set the picture mode to Full, Fill aspect, One to one.
In Video mode:Toggle the picture mode between Normal →
(Automatic Picture Control) Toggle screen luminosity between Standard, Movie, Bright, Manual
INDEX Press "INDEX" button to show the list of teletext contents.
HOLD Press "HOLD" button to stop the automatic page change
INTERRUPT
REVEAL
EXPAND
SUB-PAGE/TIME
Panoramic →Full→Zoom1→Zoom2→Auto
Press to show the Teletext Service. Press again to return to TV
Viewing
Press "INTERRUPT" button to switch to TV while waiting for the
next text page.
Press "REVEAL" button to display concealed information, such as
solutions of riddles or a quiz.
Press "EXPAND" button to enlarge the top half or bottom half of the
Teletext page.
Press "SUB-PAGE/TIME" button to access to the sub-page you
required
6
Page 10

G
EENNEERRAALL
G
C
OONNTTRROOLLSS
C
&
A
DDJJUUSSTTMMEENNT
&
A
T
TURNING THE LCD DISPLAY ON AND OFF
1. Press the POWER button on the Remote Control.
2. You can also use the POWER button at the bottom of the panel.
VOLUME CONTROL
Using Volume Control
Press VOL▲ / VOL▼ button to turn up or turn down the sound volume.
Using Mute
At any time, users can temporarily turn off the sound
by pressing the MUTE button.
1. Press the MUTE button and the sound cuts off.
2. Press the MUTE again or VOL▲ / VOL▼ button to turn the sound back to
the previous level.
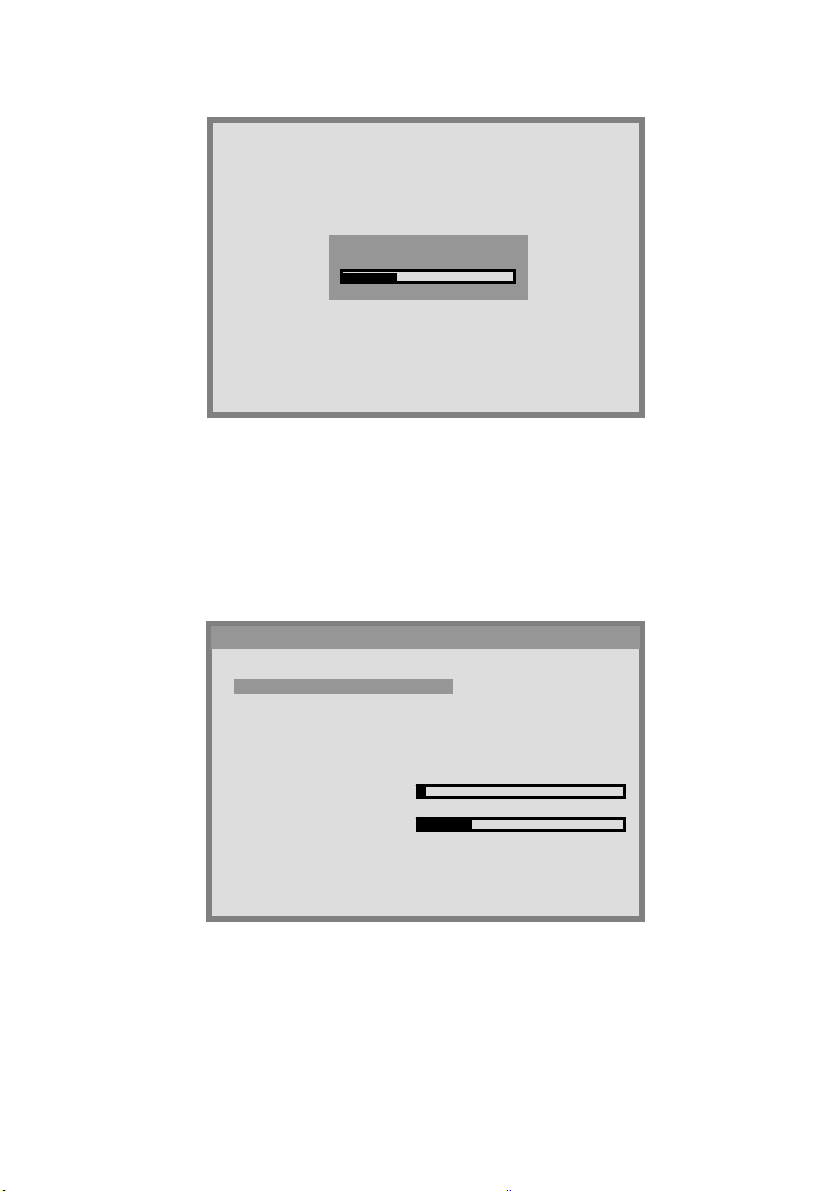
SETTING THE SLEEP TIMER
You can set the Sleep Timer to turn off the TV automatically. The time can
be set from OFF to 120 minutes.
1. Press the SLEEP button to set the Sleep Timer screen.
2. Press the SLEEP button repeatedly to change the sleep time
(in 10 minutes intervals).
7
Page 11

K
TUNING TV CHANNELS
1. Press the MENU button to display TV CHANNEL from the main menu.
2. Press the S / T button to move one of the sub-menu options.
3. Press the W / X button to select the settings.
4. Press the EXIT/INFO button to return to the previous screen.
COUNTRY U
A. P. S
MANUAL
PROGRAM
CHILD LOCK OFF
MAIN:TV SUB:OFF
MOVE SELECT
COUNTRY:[UK],[IRELAND],[DENMARK],[FINLAND],[ITALY],[NORWAY],
[SPAIN],[SWEDEN],[LUXEMBURG],[FRANCE],[CZECH],
[POLAND],[HUNGARY],[AUSTRIA],[GERMANY],
[SWITZERLAND],[BELGIUM], [NETHERLANDS]
A.P.S:
1. Press the S / T button to select A.P.S option and then press
the X button to enter A.P.S (Automatic Programming Search).
2. When the sub menu appears on the screen, press MENU again to start
scanning.
3. After APS has completed, the Program List will appear on the screen. You
can select, rename, delete or insert programs within the Program List.
TV CHANNEL
8
Page 12
A
Manual Tuning Method
88
MANUAL:
1.
Press S / T button to select MANUAL option, and then press number or
W / X button to select the program that the user wants the tuned channels
to store .
2. Press S / T button to select the items, and then press W / X button to
select the setting.
MANUAL
CHANNEL 1
COLOUR SYSTEM AUTO
SOUND SYSTEM
SEARCH
FINE TUNING
STORE
UTO
55
250
CHANNEL: choose channels by pressing W / X.
COLOUR SYSTEM: choose [AUTO], [PAL], [SECAM] by pressing W /
X.
Note: UK = PAL
9
Page 13

SOUND SYSTEM: choose [AUTO], [B/G], [D/K], [L], [I], [L’] by pressing
W / X.
Note: UK = I
SEARCH: press X to search receivable channels by pressing W / X.
FINE TUNING: indicate searching programs by pressing W / X.
STORE: store the found channel by pressing W / X.
3. After searching, press S / T button to select Store, and then press
MENU button to store the searched channel.
4. Press EXIT/INFO button to exit from the menu.
PROGRAM:
Program List is used to display the Program numbers and names. You can
use this list to edit the name, delete, or insert programs.
1. Select channel by pressing the S / T or W / X buttons. Selecting the
program list will display the stored program on the screen.
2. A highlighted grey bar appears on the chosen program. Press the red
button (NAME).
3. Press the S / T buttons to edit name of channel and W / X to move to
next letter.
4. Press the red button (STORE) when you have completed editing. This will
store the program name..
Note: When the channel number changes, the TV channel shown on screen stores the
program.
5. Choose a program and press the green button (INSERT), the program is
highlighted by red bar.
6. Press S / T to select a program you would like to switch with the
highlighted program.
7. Press the green button to store.
10
Page 14
K
8. Choose a program, then press the yellow button (DELETE).
The program is highlighted by a red bar, and then press yellow button
again to erase. To cancel, press blue button.
PROGRAM
00 _ _ _ _ _
01 _ _ _ _ _
02 _ _ _ _ _
03 _ _ _ _ _
04 _ _ _ _ _
05 _ _ _ _ _
06 _ _ _ _ _
07 _ _ _ _ _
08 _ _ _ _ _
09 _ _ _ _ _
NAME
DELETE
10 _ _ _ _ _
11 _ _ _ _ _
12 _ _ _ _ _
13 _ _ _ _ _
14 _ _ _ _ _
15 _ _ _ _ _
16 _ _ _ _ _
17 _ _ _ _ _
18 _ _ _ _ _
19 _ _ _ _ _
20 _ _ _ _ _
21 _ _ _ _ _
22 _ _ _ _ _
23 _ _ _ _ _
24 _ _ _ _ _
25 _ _ _ _ _
26 _ _ _ _ _
27 _ _ _ _ _
28 _ _ _ _ _
29 _ _ _ _ _
INSERT
CHILD LOCK:
1. Press the MENU button to display TV CHANNEL from the main menu.
2. Press the S / T buttons to select CHILD LOCK option.
3. Press the W / X buttons to enable / disable the function key of front cover.
[ON]: Function key is locked.
[OFF]: Function key is active.
11
COUNTRY U
A. P. S
MANUAL
PROGRAM
CHILD LOCK OFF
MAIN:TV SUB:OFF
MOVE SELECT
TV CHANNEL
Page 15
LANGUAGE:
1. Press the T button to select MULTI MODE option.
2. Choose a language. [ENGLISH], [DEUTSCH], [NEDERLANDS],
[ITALIANO], [CASTELLANO], [FRANCAIS], [DANSK], [NORSK],
[SVENSKA], [SUOMI]
MULTI MODE OFF
PIP FUNCTION
LANGUAGE ENGLISH
SCART2 OUTPUT TV
RECALL
FUNCTION
MAIN:TV SUB:OFF
MOVE SELECT
SCART 2 OUTPUT: choose the output. [SCART 1] or [TV].
RECALL: reset to factory settings.
12
Page 16

A
C
OONNNNEECCTTIINNGG
C
Interface I
HDMI
DVI
D-SUB
AUDIO IN
TV AERIAL
INPUT
Note: Audio out L/R and Sub output
The level of audio output cannot be changed using the volume control on your display.
SCART 1 SCART 2 L1 R1 L2 R2
SV
This connector should be used with an external audio amplifier that can be used to
control the volume.
E
XXTTEERRNNAALL
E
Interface II VIDEO BOX
SCART IN VIDEO IN Video & Audio OUT
D
EEVVIICCEESS
D
AUDIO IN
AV Y Pb Pr AV L R
C POWER SOCKET
Subwoofer output is
line source only for
connection to another
amplifier.
S/PDIF
POWER SWITCH
Subwoofer
13
Page 17

V
C
OONNNNEECCTTIIOONNSS
C
Connect a VCR / Set Top box or DVD player/recorder using a standard
Scart to Scart connection cable (not supplied) to SCART 1 socket located at
the rear of the TV. If the Set top box has alternative connections then
connect as shown below:
(ex. DVD Player or Set-top Box…)
VIDEO L R HDMI
IDEO DEVICE
Y Pb Pr L R
PC
&
A
PPPPLLIICCAATTIIOONNS
&
A
HDMI to HDMI Cable
S
Interface I
HDMI
DVI
D-SUB
AUDIO
IN
14
Page 18

V
* How do I connect a Video device via HDMI - HDMI ?
This can be applied only if there is the HDMI Output connector on the
external device.
(ex. DVD Player or Set-top Box…)
VIDEO L R HDMI
1. HDMI support S/P DIF out (Digital Audio Output).
2. No sound connector is needed for a HDMI to HDMI connection.
IDEO DEVICE
HDMI to HDMI Cable
Y Pb Pr L R
HDMI
DVI
D-SUB
15
Page 19

V
* How do I connect a Video device via DVI - DVI ?
This can be done only if there is the DVI Output connector on the
external device.
(ex. DVD Player or Set-top Box…)
1. Connect a DVI cable between the DVI connector on the TV and the DVI
2. Connect an audio cable between the PC AUDIO IN Socket on the TV and
IDEO DEVICE
Interface I
1
DVI to DVI Cable
VIDEO L R DVI / HDCP
Y Pb Pr L R
2
connector on the DVD player/ Set-top box.
AUDIO OUT Socket on the DVD player/ Set-top box.
HDMI
DVI
D-SUB
AUDIO
IN
16
Page 20

* How do I connect a PC via DVI - DVI ?
DVI to DVI Cable
PC
1. Connect a DVI cable between the DVI connector on the TV and the DVI
connector on PC.
2. Connect an audio cable between the PC AUDIO IN Socket on the TV and
AUDIO OUT Socket on PC.
TV Set
HDMI
DVI
D-SUB
AUDIO
IN
17
Page 21

* How do I connect a PC via D-SUB ?
VGA Cable
PC
1. Connect a VGA cable between the D-SUB connector on the TV and the
D-SUB connector on PC.
2. Connect an audio cable between the PC AUDIO IN Socket on the TV and
AUDIO OUT Socket on PC.
TV Set
HDMI
DVI
D-SUB
AUDIO
IN
18
Page 22

* How do I connect a Video device via general cables ?
EXTERNAL / EXISTING TV AERIAL VIDEO
TV AERIAL
SCART 1 SCART 2 L1 R1 L2 R2
SV
This TV will accept different Video Inputs, if video This TV accept different Video Input, if
video device has a connector with better quality, please connect the better one. The
sequence of video quality is Component, Scart, S-video, Video from the best quality to the
normal one.
AV Y Pb Pr AV L R
S/P DIF
( For HDMI Only)
Subwoofer
19
Page 23

SWITCHING PC / HDMI / DVI / VIDEO / TV / SCART
MODES
1. Turn on the power.
2. Select an input source as described below:
TV button
PC/HD button
VIDEO button
SCART button
switch to TV mode.
switch to PC , HDMI and DVI mode (Analog or Digital)
switch to AV / SV / YPbPr mode
(Composite, Y/C and Component signal)
switch to SCART1, SCART2, SCART2S
These are source
buttons
20
Page 24

PC MENU
1. Press the MENU button to display PC from the main menu.
2. Press the S / T button to move to one of the sub-menu options.
3. Press the W / X button to select the settings.
4. Press the EXIT/INFO button to return to the previous screen.
CONTRAST
BRIGHTNESS
BACKLIGHT
H-POSITION
V-POSITION
CLOCK
PHASE
COLOUR MODE
MAIN:PC SUB:OFF
SELECT MOVE
PC
CONTRAST: Increase and decrease picture contrast
BRIGHTNESS: Darker and brighter picture brightness
BACKLIGHT: Adjust the back light level of screen
H POSITION: Adjust picture horizontal position.
Note:Not available in HDMI / DVI source.
V POSITION: Adjust picture vertical position.
Note: Not available in HDMI / DVI source.
CLOCK: Adjust picture width.
Note: Not available in HDMI / DVI source.
PHASE: Adjust picture focus quality.
Note: Not available in HDMI / DVI source.
21
Page 25

COLOUR MODE :
1. Press the S / T buttons to select COLOUR MODE option, and then press
the X button to enter the COLOUR TEMP. sub-menu.
CONTRAST
BRIGHTNESS
BACKLIGHT
H-POSITION
V-POSITION
CLOCK
PHASE
COLOUR MODE
MAIN:PC SUB:OFF
MOVE SELECT
PC
2. Press the X button to choose the colour of picture mode. [NORMAL],
[WARM], [COOL], [MANUAL].
COLOUR TEMP. MANUAL
USER – R
USER – G
USER – B
PC
MAIN:PC SUB:OFF
MOVE SELECT
3. Press S / T buttons to move USER-R/G/B and then press the X button
to enter the desired setting.
USER-R: adjust colour of red rate.
USER-G: adjust colour of green rate.
USER-B: adjust colour of blue rate.
22
Page 26

COLOUR TEMP. MANUAL
USER – R
USER – G
USER – B
PC
MAIN:PC SUB:OFF
MOVE SELECT
AUTO: Automatically adjust picture. Press the X button to adjust picture
position automatically. Screen will disappear until it has completed
adjustment.
CONTRAST
BRIGHTNESS
BACKLIGHT
H-POSITION
V-POSITION
CLOCK
PHASE
COLOUR MODE
AUTO
MAIN:PC SUB:OFF
MOVE SELECT
PC
23
Page 27

NICAM/IGR BROADCAST SELECTION
Depending on the particular program being broadcast, you can
press the SOUND button to listen to different language
sources.
Under different systems, broadcast function will show differently.
Ⅰ: sends the primary broadcast language to the loudspeakers.
Ⅱ: sends the secondary broadcast language to the loudspeakers.
: sends mono sound
: sends stereo sound
Note: secondary language channels are not normally broadcast in UK.
NICAM System
Digital
Stereo
Dual
Mono
Two Carrier System
Stereo
O
O
Ⅰ
Ⅱ
O
Ⅰ
O
Analog
Dual
Mono O
24
O
Ⅰ
Ⅱ
Page 28

FUNCTION
1. Press the MENU button to display FUNCTION from the main menu.
2. Press the S / T button to move to one of the sub-menu options.
3. Press the W / X button to select the settings.
4. Press the EXIT/INFO button to return to the previous screen.
MULTI MODE OFF
PIP FUNCTION
LANGUAGE ENGLISH
SCART2 OUTPUT TV
RECALL
FUNCTION
MAIN:TV SUB:OFF
SELECT MOVE
MULTI MODE:
Note: PIP (picture In Picture) function will show a TV channel and another
external device video picture.
1. Press the T button to select MULTI MODE option.
2. Press the W / X button to select the [OFF], [PIP], [POP] mode.
MULTI MODE OFF
PIP FUNCTION
LANGUAGE ENGLISH
SCART2 OUTPUT TV
RECALL
FUNCTION
MAIN:TV SUB:OFF
MOVE SELECT
25
Page 29

[OFF]:Only show the primary source.(No PIP/POP)
[PIP] :Show PIP in a window.
[POP] :Show PIP side by side with the main source.
3. Press the EXIT/INFO button to return to the previous screen.
26
Page 30

PIP FUNCTION:
1. Press the T button to select PIP FUNCTION option.
MULTI MODE PIP
PIP FUNCTION
LANGUAGE ENGLISH
SCART2 OUTPUT TV
RECALL
FUNCTION
MAIN:TV SUB:OFF
MOVE SELECT
2. Press the X button to enter PIP FUNCTION sub-menu.
SUB SOURCE HDMI
SIZE SMALL
H - POSITION
V - POSITION
SWAP
MAIN:TV SUB:HDMI
MOVE SELECT
FUNCTION
3. Press the S / T button to move to one of the sub-menu items.
4. Press the W / X button to select the settings.
27
Page 31

SUB SOURCE: You can select a second source [HDMI],[DVI],[AV],[SV],
[SCART 1], [SCART 2], [SCART 2S], [YPbPr], [PC], as sub-window.
SIZE: Three different PIP sizes. [SMALL], [MIDDLE], [LARGE].
H-POSITION / V-POSITION: Pressing the W / X button can make PIP
window move from corner to corner on the TV screen.
SWAP: To exchange the display of main source and sub-source.
Sub
Main
PC X X X X O O O O O O
HDMI X X X X O O O O O O
DVI X X X X O O O O O O
PC HDMI DVI YPbPr SV AV TV SCART 1 SCART 2 SCART 2S
YPbPr X X X X O O O O O O
SV O O O O X O O O O O
AV O O O O O X O O O O
TV O O O O O O X O O O
SCART 1 O O O O O O O X O O
SCART 2 O O O O O O O O X O
SCART 2S O O O O O O O O O X
28
Page 32

VIEWING THE MENUS AND ON-SCREEN DISPLAYS
1. With the power on, press the MENU button. The main menu appears on
the screen.
PICTURE MODE STANDARD
CONTRAST
BRIGHTNESS
BACKLIGHT
HUE
COLOUR
SHARPNESS
COLOUR MODE
MAIN:TV SUB:OFF
EXIT
2. Use the W / X button to select one of the menu options, and then press
the S / T button to access the sub-menu.
3. Press the W / X button to make adjustments.
4. Press EXIT/INFO button to exit from the menu.
Note: The menu varies according to which input source is selected.
PICTURE
29
Page 33

PICTURE SETTING
You may need to perform separate adjustments for brightness and contrast
for the different video modes. Typically, PC mode will be best viewed with
lower brightness and contrast settings than are appropriate for the other
modes.
1. Press the MENU button to display PICTURE from the main menu.
2. Press the S / T button to select the desired item.
3. Press the W / X button to adjust ranges from minimum to
maximum.
4. Press the EXIT/INFO button to return to the previous screen.
PICTURE MODE MANUAL
CONTRAST
BRIGHTNESS
BACKLIGHT
HUE
COLOUR
SHARPNESS
COLOUR MODE
MAIN:TV SUB:OFF
SELECT MOVE
PICTURE MODES:
[MANUAL]:select this mode if you want to manually adjust each
setting. Adjustments are only available under this mode.
[STANDARD]: standardizes picture adjustment
[MOVIE]: heightens contrast and sharpness
[BRIGHT]: displays a clear and bright picture.
PICTURE
30
Page 34

PICTURE SETTINGS:
CONTRAST: Increase and decrease picture contrast
BRIGHTNESS: Darker and brighter picture brightness
BACKLIGHT: Adjust the back light level of screen
COLOUR: Deeper and lighter picture colour
SHARPNESS: Softer and sharper image
COLOUR MODE:
1. Press the S / T buttons to select COLOUR MODE option, and then
press the X button to enter the COLOUR TEMP. sub-menu.
PICTURE MODE MANUAL
CONTRAST
BRIGHTNESS
BACKLIGHT
HUE
COLOUR
SHARPNESS
COLOUR MODE
MAIN:TV SUB:OFF
SELECT MOVE
PICTURE
2. Press the X button to choose the colour of picture mode. [NORMAL],
[WARM], [COOL], [MANUAL].
COLOUR TEMP. MANUAL
USER – R
USER – G
USER – B
PICTURE
MAIN:TV SUB:OFF
MOVE SELECT
31
Page 35

3. Press S / T buttons to move USER-R/G/B and then press the X
button to enter the desired setting.
USER-R: adjust colour of red rate.
USER-G: adjust colour of green rate.
USER-B: adjust colour of blue rate.
RECALL:User can reset the picture settings to the original /
normal settings.
32
Page 36

SOUND ADJUSTMENT
1. Press the MENU button to display SOUND from the main menu.
2. Press the S / T button to move to one of the sub-menu options.
3. Press the W / X button to select the settings.
4. Press the EXIT/INFO button to return to the previous screen.
SOURCE MAIN
AVC ON
MODE OFF
EQUALIZER
BASS
TREBLE
BALANCE
MAIN:TV SUB:OFF
SELECT MOVE
SOUND
SOURCE: Choose the sound source from the [MAIN] or [SUB] display.
AVC: You can set AVC(Auto Volume Control ) options to ON or OFF.
[ON]: For general use, like commercial advertisment,AVC can avoid the
loud sounds that can occur when adverts start.
[OFF]: For special sound effect, like opera or symphony, volume can be
performed in accordance with the orginal sound level.
MODE: select the audio mode to [OFF],[EQ].
BASS: Adjust low tone of sound.
TREBLE: Adjust high tone of sound.
BALANCE: Adjust the volume balance between the left and right
speakers.
33
Page 37

EQUALIZER:
1. Press the S / T button to enter the EQUALIZER menu.
SOURCE MAIN
AVC ON
MODE EQ
EQUALIZER
BASS
TREBLE
BALANCE
SOUND
MAIN:TV SUB:OFF
MOVE SELECT
2. Press the X button to select the EQUALIZER options.
EQUALIZER MANUAL
120 HZ
500 HZ
1.5 KHZ
5 KHZ
10 KHZ
SOUND
MAIN:TV SUB:OFF
MOVE SELECT
3. There are 6 Equalizer modes available: [MANUAL] , [VOICE] , [POP],
[ROCK] , [JAZZ] , [CLASSIC].
4. Settings for VOICE , POP, ROCK , JAZZ and CLASSICAL are
pre-configured. You cannot change these settings. The frequency
responses are as below:
34
Page 38

K
VOICE:
EQUALIZER VOICE
120 HZ
500 HZ
1.5 KHZ
5 KHZ
10 KHZ
MAIN:TV SUB:OFF
MOVE SELECT
POP:
EQUALIZER POP
120 HZ
500 HZ
1.5 KHZ
5 KHZ
10 KHZ
MAIN:TV SUB:OFF
MOVE SELECT
ROCK:
EQUALIZER ROC
120 HZ
500 HZ
1.5 KHZ
5 KHZ
10 KHZ
MAIN:TV SUB:OFF
MOVE SELECT
SOUND
SOUND
SOUND
35
Page 39

JAZZ:
CLASSICAL:
SOUND
EQUALIZER JAZZ
120 HZ
500 HZ
1.5 KHZ
5 KHZ
10 KHZ
MAIN:TV SUB:OFF
MOVE SELECT
SOUND
EQUALIZER CLASSIC
120 HZ
500 HZ
1.5 KHZ
5 KHZ
10 KHZ
MAIN:TV SUB:OFF
MOVE SELECT
36
Page 40

5. In MANUAL mode, use S / T buttons to move a band and W / X
buttons to select the desired frequency settings.
MANUAL:
EQUALIZER MANUAL
120 HZ
500 HZ
1.5 KHZ
5 KHZ
10 KHZ
SOUND
MAIN:TV SUB:OFF
MOVE SELECT
Note:
When using the PIP feature in PC mode, you are able to
listen to the sound of the [SUB] screen instead of the
[MAIN] screen by selecting the AUDIO SWAP button.
AUDIO SWAP
Button
37
Page 41

TTEELLEETTEEXXTT
Teletext is a free service broadcast by TV stations which gives
up-to-the-minute information, news, weather, television programs, share
prices, subtitles, and many other topics.
Note : No OSD adjustment apart from volume control will be available in
teletext mode .
In teletext mode, NUMBER buttons, W / X and RTN buttons are
used for Teletext function.
To operate TELETEXT
* Select a TV station on which Teletext is being transmitted.
* Press the
-Two page numbers, TV station name, date, and time are displayed on the
screen headline. The first page number indicates your selection, while the second
shows the current page being displayed.
* Press the
program will reappear.
TELETEXT button once to make the Teletext screen appear
TELETEXT button again to switch off Teletext. The previous
Teletext Page Selection
1. Enter the required Teletext page as a three digit number.
-The selected page number is displayed at the top left corner of the screen. The
Teletext page counter searches until the selected page number is located, so that
the desired page is displayed on the screen.
S / T button can be used to select the preceding or following
2. The
page.
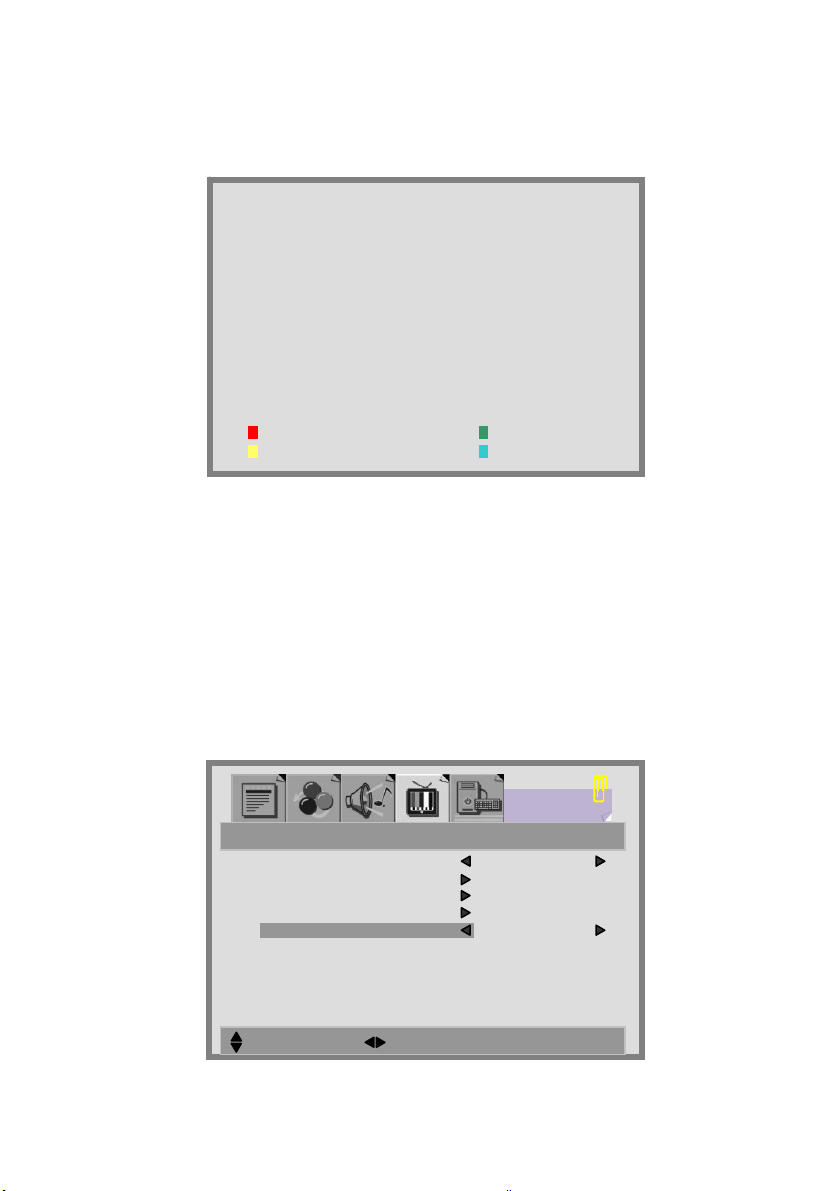
3. Fastext movement by the 4 coloured buttons.
-Four subject-heading pages can be selected quickly by pressing the
corresponding coloured button Red, Green, Yellow, or Blue on the remote
control handset.
38
Page 42

Useful features for Teletext
INDEX
* Press this button to select the index page that displays the list of Teletext contents.
HOLD
The teletext page you have selected may contain more information than what is on
the screen ; the rest of the information will be displayed after a period of time on a
sub-page.
* Press HOLD button to stop the automatic page change.
-The HOLD symbol will be displayed at the top left-hand corner on the screen and
the automatic page change will be stopped.
* Press HOLD button again to continue.
In the Teletext mode, pressing UPDATE button will switch the screen to the TV mode
while waiting for the next text page.
* Select required page number in Teletext mode.
* Press UPDATE button to switch to TV mode while waiting for the text page. A small
blue box in which “---“ shows appears in the upper left corner .
* When the required text page is found, the required page number appears in the
blue box.
* Press UPDATE button again to revert to Teletext mode.
* Press this button once to display concealed information, such as solutions of riddles,
puzzles, or a quiz.
* Press this button again to conceal the revealed answers.
Select double height text.
* Press this button to enlarge the top half of the page.
* Press this button again to enlarge the bottom half of the page.
* Press this button once more to return to the normal display.
* While watching a TV program with Teletext transmission press TIME button. The
current time information will be displayed on the upper right corner of the screen.
UPDATE
REVEAL
EXPAND
TIME
* The time information will disappear after pressing TIME button again.
39
Page 43

O
TTHHEERR
O
1. - WIDE - Modes available are dependant upon the current source
*
*
*
*
*
*
(In PC mode , only has FULL and NORMAL)
2. –
* Movie: the contrast is around 0.51 times of standard mode.
* Manual: default brightness is around 0.91 times that of standard mode, and
* Standard: the standard settings for the best picture.
* Bright: the contrast is around 1.37 times that of standard mode.
F
UUNNCCTTIIOONNS
F
This mode expands the width of 4:3 video sources evenly to fill the 16:9
FULL:
screen. There will be distortion at the centre of the screen as well as the edges.
NORMAL:
will be black bars at either side of the screen.
PANORAMIC:
the image at the edges of the screen. This creates less distortion at the
centre of the screen.
ZOOM 1:
The 14:9 zoom function extends the height to fill the screen.
ZOOM 2 :
little for the subtitle purpose.
AUTO :
PICTURE -
Press PICTURE button on the remote control repeatedly to cycle through the
PICTURE settings. This is to adjust the brightness and contrast of screen.
adjustment is available.
This sets the aspect ratio to 4:3 for traditional TV programs. There
Expands 4:3 video sources to fit the 16:9 screen by expanding
Some DVD movies may not fill the top and bottom of the screen.
Same as”16:9 ZOOM”, but the button edge of the screen pulls up a
This changes any ARC automatically regarding to video sources.
S
40
Page 44

T
RROOUUBBLLEESSHHOOOOTTIINNG
T
Many times, problems have simple causes. We would like to give you some
tips to solve some common problems. Should these tips not help, please
contact our helpline on 0870 873 0080.
G
There is no picture and sound.
z Make sure the power cord is properly connected.
z Make sure the input mode is set correctly.
z Make sure the main power switch of the main unit is on.
There is no picture.
z Make sure the Contrast/Brightness is properly adjusted.
z Make sure all external devices are connected properly.
There is no sound.
z Make sure the volume is not set to minimum .
z Make sure the sound is not set to mute.
There is no picture or sound, just noise.
z The reception may be weak.
z Make sure the aerial is not disconnected.
Picture is not clear.
z The reception may be weak.
z Make sure the aerial is not disconnected.
Picture is too bright.
z Check the PICTURE function setting.
z Check Contrast/Brightness adjustment.
The picture is too dark.
z Check the PICTURE function setting.
z Check Contrast/Brightness adjustment.
41
Page 45

Remote control does not work.
z Check the batteries in the remote control are not flat.
z Make sure the sensor window of TV set is not under strong lighting.
The picture is not sharp.
z Check the colour adjustment.
z Check the Sharpness adjustment.
The picture is jittery.
z Make sure the TV set isn’t near Microwave Oven or other equipment.
The picture has double or triple image.
z Make sure the aerial is facing the right direction.
z There may be reflected signals from mountains or buildings.
The picture is spotty.
z There may be interference from automobiles,trains, high voltage lines, neon light, etc.
There are stripes on the screen or colours fade.
z Is the unit receiving interference from other devices?
Transmission of radio broadcasting station and transmission of amateur radio and cellular
phones may also cause interference.
z Place the unit as far apart as possible from devices that may cause possible interference.
42
Page 46

C
I
PPC
NNPPUUTT
I
Mode
No.
Name
1 VGA 640 * 480 31.469 59.940 - - 25.175
2 VGA 640 * 480 37.500 75.000 - - 31.500
US
3
TEXT
4 STB 768 * 576 31.250 50.000 - - 29.750
5 SVGA 800 * 600 37.879 60.300 + + 40.000
6 SVGA 800 * 600 46.875 75.000 + + 49.500
7 XGA 1024 * 768 48.363 60.000 - - 65.000
P
RREESSEETT
P
H-Resolution
V-Resolution
720 * 400 31.472 70.100 - + 28.325
T
IIMMIINNGG
T
Analog Input
H.Freq.
(KHz)
T
AABBLLE
T
V.Freq.
(Hz)
E
H.
Polarity
V.
Polarity
Pixel CLK
(MHz)
8 XGA 1024 * 768 56.476 70.000 - - 75.000
9 WSGA 1280 * 768 47.708 60.000 + - 80.150
10 WXGA 1366 * 768 48.54 59.93 + + 80
11 UXGA 1920 * 1080 67.4325 60.00 + + 148.500
*The resolution and frequencies displayed on the screen may not exactly
match this list.
43
Page 47

S
PPEECCIIFFIICCAATTIIOONNS
S
S
ITEMS SPECIFICATION
Screen Size 42″ TFT-LCD Panel
Aspect Ratio 16:9
Resolution 1920 x 1080
Display Area (Opening) 930.24(H) x 523.26 (V)
Panel
TV Function
Video Input
Display colors 16,7M colors (8 bits)
Contrast Ratio 1000 : 1 (typ.)
Brightness (center) 500 cd / m2 (typ.)
Viewing Angle (CR>10) 176o (Hor.) / 176
Response Time (GTG) 6.5 ms (typ.)
Broadcasting System PAL / SECAM
Receiving Channel B / G, D / K, I and L / L’ (Multi-Europe)
Sound System NICAM / A2 (IGR)
Data Broadcasting
Video Colour System PAL / SECAM / NTSC
AV1 (scart)
AV2 (composite)
AV3 (component) Y Pb Pr (720p / 1080i / 1080p, HDTV ready) x 1
Teletext 255 pages
Auto Program Searching (APS)
SCART 1 21-pin (RGB / CVBS ) x 1
SCART 2 21-pin (RGB / CVBS / SVHS) x 1
Composite (RCA Socket) x 1
S-Video x 1
o
( Ver.)
Digital Input
PC Input
(analog)
HDMI HDMI 1.0/HDCP 1.1
DVI DVI 1.0 / HDCP 1.1
Signal Connection D-Sub 15 pin
Scanning Frequency f
= 31.5 ~ 60KHz / fV = 56 ~ 75Hz
H
44
Page 48

ITEMS SPECIFICATION
Audio 1 Scart x 2
Composite x 1
S – Video x 1
15W+15W (rms) @ THD < 10%
(10W+10W THD < 1%)
Audio Input
Video Output
Audio Output
Audio 2
Audio 3 Component x 1
Audio 4 PC x 1
SCART 1 TV x 1
SCART 2 TV / CVBS (SCART 1) x 1
Composite(RCA Socket) TV x 1
Speaker ( build-in)
Line Out Left / Right / Subwoofer
S/P DIF HDMI x 1
OSD Language
Function Keys
Feature
Power
Dimension W x H x D 1067 mm *815 mm * 270 mm
Weight (net) Without Accessories 36.1kg
Video Performance
Audio Performance
Other Control Sleep Timer, Auto Power Off
Power Supply AC 100V ~ 240V , 50 / 60Hz
Power Consumption < 300 W
English, French, German, Spanish, Italian,
Finnish, Swedish, Dutch, Danish, Norwegian
Power, Source, Menu, Up/Down(Channel),
+/-(Volume), EXIT / WIDE
3D Comb-filter, 3D De-interlace , Canal Plus,
Teletext, Aspect Ratio Control (WIDE) ,Auto
Picture Control (PICTURE), Video
Enhance,Noise Reduction, Picture in Picture
(PIP), Picture on Picture (POP)
Equalizer, Subwoofer, Auto Volume Control
(AVC)
45
Page 49

46
 Loading...