

Page 1

ATV/DTV
1
2
5
4
7 8 9
GUIDE
0
/TEXT
I-II P.MODE
P.SIZE
EXIT
INFO/i
FAST TEXT
3
6
SLEEP
CH. LIST SUBTITLE
CH.
VOL.
MENU
SOURCE
Page 2
1
LCD TV User Guide
Safety Instructions
IMPORTANT SAFETY INSTRUCTIONS
To reduce the risk of fire or electric shock, do not expose this
equipment to rain or moisture.
This symbol is intended to alert the user to avoid the risk of
electric shock, do not disassemble this equipment by anyone
except a qualified service personnel.
This symbol is intended to alert the user to the presence
of important operating and maintenance instructions
in the literature accompanying the appliance.
RISK OF ELECTRIC SHOCK
DO NOT OPEN
CAUTION
CAUTION: TO AVOID THE RISK OF ELECTRIC SHOCK,
DO NOT REMOVE COVER (OR BACK).
NO USER-SERVICEABLE PARTS INSIDE.
REFER SERVICING TO QUALIFIED SERVICE PERSONNEL.
Use of c ontrols or adj ustments or pe rformance of procedures o ther than thos e
specifie d herein may r esult in hazar dous radiation exposure.
WARNING
CAUTION
Page 3
2
LCD TV User Guide
Safety Instructions
MAINS PLUG WIRING
Electrical Information
This appliance is fitted with a BS1363/A 13 amp plug. If it is not suitable for your
supply sockets it must be removed and replaced with an appropriate plug. If the p lug
becomes damaged and/or needs to be replaced please follow the wiring instructions
below. The plug removed must be disposed of immediately. It must not be plugged
into a supply socket as this will be an electrical hazard. If the fuse needs to be
replaced it must be of the same rating and ASTA approved to BS1362. If the plug is
changed, a fuse of the appropriate rating must be fitted in the plug, adapter or at the
distribution board. If the fuse in a moulded plug is replaced, the fuse cover must be
refitted before the appliance can be used.
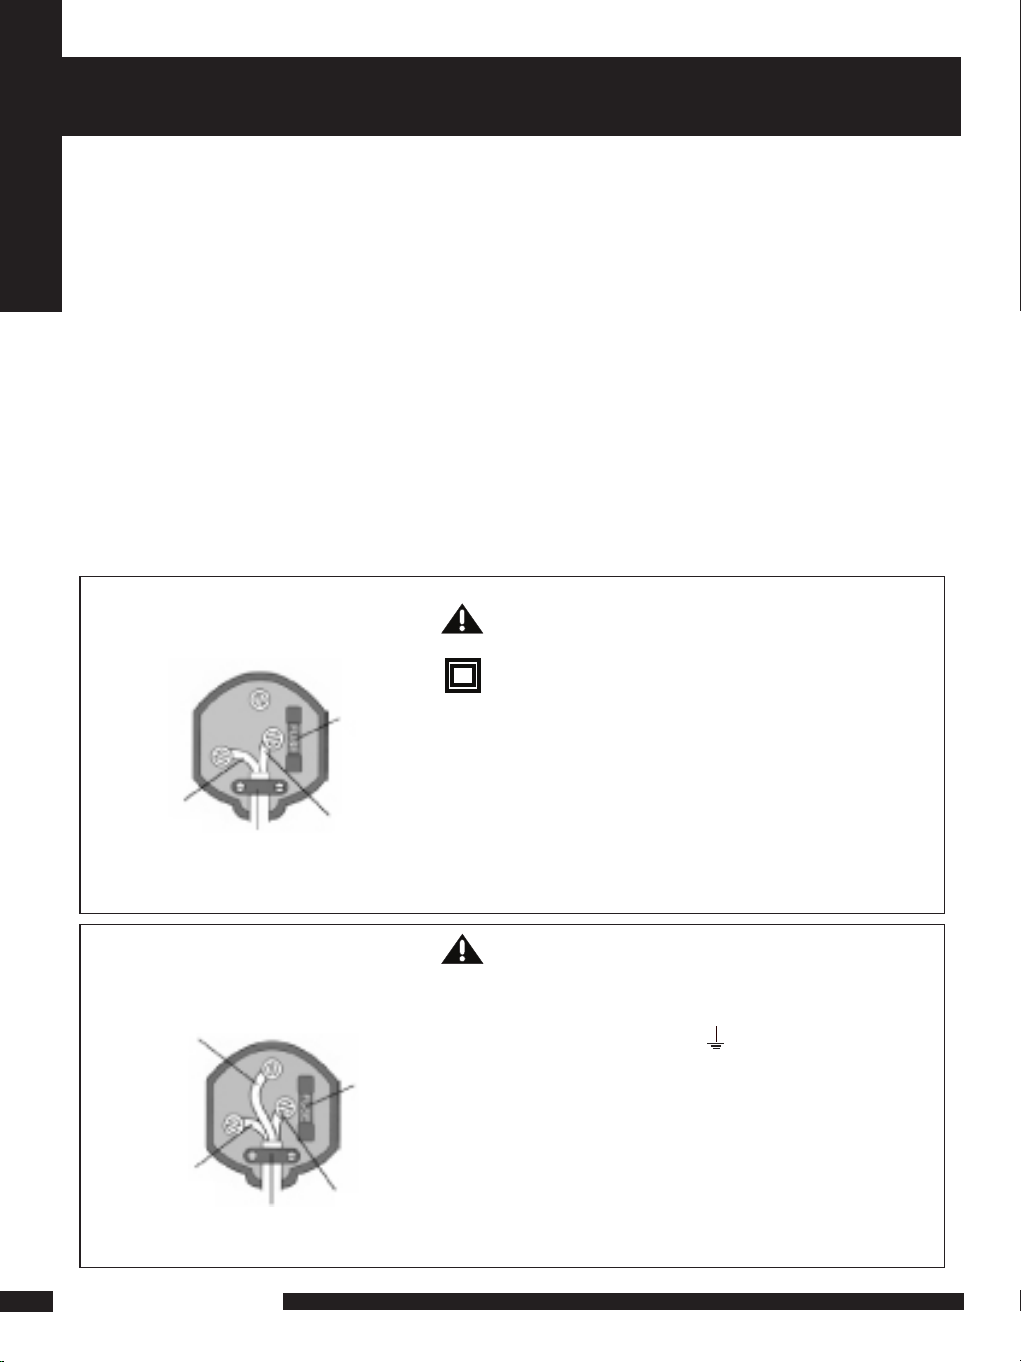
Wiring Instructions
The supply cable will be either 2-core or 3-core. Follow the appropriate wiring
instructions given below. In both cases ensure that the outer sheath of the cable is
firmly held by the cable clamp.
WARNING! Do not connect either wire to
the earth terminal.
This symbol indicates that this 2-core appliance
is Class II and does not require an earth
connection.
2- CORE
BLUE
(Neutral)
Cable
clamp
BROWN
(Live)
Fuse
The wire coloured blue must be connected to
the terminal marked with the letter N or
coloured black.
The wire coloured brown must be connected to
the terminal marked with the letter L or
coloured red.
WARNING! This appliance must be earthed.
The wire coloured green and yellow must be
connected to the terminal marked with the letter
E, or b y the earth symbol, , or coloured green or
green and yellow.
The wire coloured blue must be connected to the
terminal marked with the letter N or coloured
black.
The wire coloured brown must be connected to
the terminal marked with the letter L or coloured
red.
3- CORE
BLUE
(Neutral)
Cable
clamp
BROWN
(Live)
Fuse
GREEN and
YELLOW
(Earth)
Page 4
3
LCD TV User Guide
Safety Instructions
IMPORTANT SAFETY INSTRUCTIONS
Do not attempt to service the equipment yourself.
Opening and removing the covers may expose you to dangerous
voltage or any other hazards and may void your warranty.
Refer service from qualified personnel.
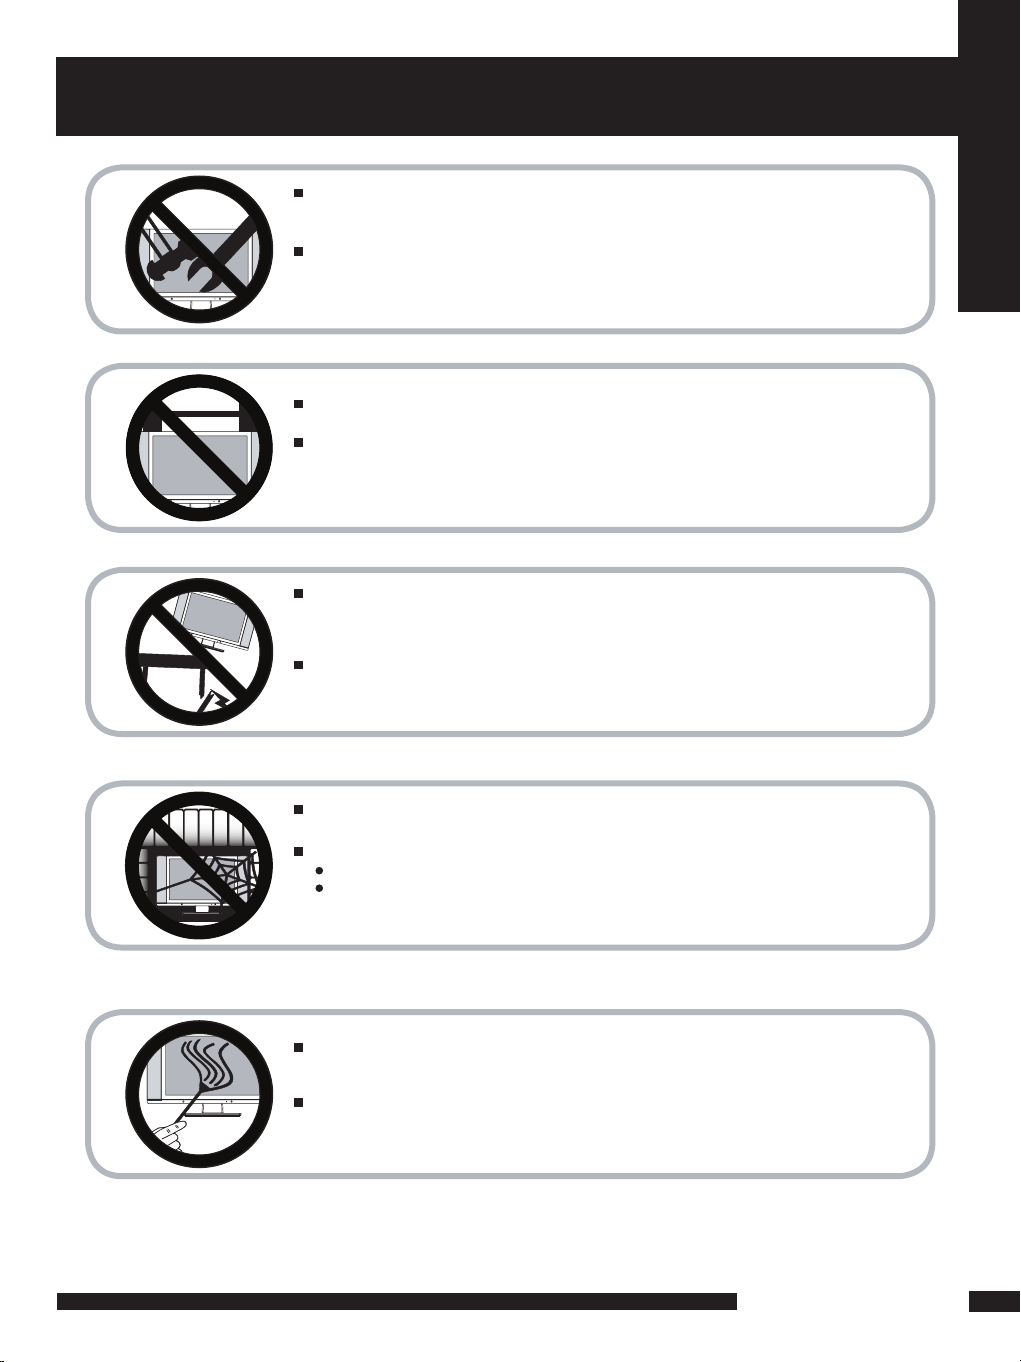
Do not place or drop any other objects on top.
Do not insert anything into the ventilation holes of your
equipment.Inserting any metal or flammable objects may result in
fire or electric shock.
Do not place the equipment on uneven or unstable, stands,tables, shelves etc..
The equipment may fall, causing serious injuries to children or adults and serious
damages to the equipment itself.
Always place the equipment on the floor or on a surface that
is sturdy, level, stable and strong enough to support
the weight of the equipment.
Do not block any ventilating openings, leave an open space around the equipment.
Never place the equipment :
on a bed, sofa, rug, or any other similar surfaces;
too close to drapes/curtains/walls, in a bookcase,built-in cabinet,
or any other similar places that may cause poor ventilation.
Always remove the cord from the outlet before cleaning the equipment.
Never use cleaners, harsh or abrasive chemicals or solvents on the
equipment. Clean only with a dry, soft, lint-free cloth.
Page 5

4
LCD TV User Guide
Safety Instructions
WARNINGS
WEEE:
This appliance is labelled in accordance with European Directive 2002/96/EG
concerning used electrical and electronic appliances(waste electrical and electronic
equipment - WEEE). The guideline determines the framework for the return and
recycling of used appliances as applicable throughout the EU.
● Unqualified attempts to repair this TV are not allowed. Refer repairs to this unit
to a qualified technician only.
● Do not disassemble this unit. There are dangerous-voltage parts inside that may
cause electric shock even after power is disconnected.
● Store your unit in a clean, dry environment, Unplug the unit immediately it gets
wet, and consult your servicing technician.
● Always unplug the unit before cleaning it. Wipe dust off the cabinet of the unit
with clean & dry & soft cloth. Apply non-ammonia cleansing lotion onto the cloth,
not directly onto the screen.
● Do not place heavy objects on top of the unit.
● Avoid exposing your unit directly to sunlight or other heat sources.
● Put your unit in a well-ventilated area away from high hum idity.
● Do not expose this TV to rain or moisture, dripping or splashing.
Safety Tips
● If smoke, abnormal noise or odour comes out of your unit, unplug from the
mains supply immediately and call your dealer.
● Never try to repair the your unit on your own. Always call your dealer
for repairs.
Note
This user’s manual contains for-reference- only graphics and information that are
subject to change without notice.
Page 6

5
LCD TV User Guide
CONTENT
CONTENT
PREPARATION .............................................................................................................. 6
Features ............................................................................................................................................................... 6
Package Contents ............................................................................................................................................... 7
LCD TV .................................................................................................................................................................. 8
Front View ............................................................................................................................................................. 8
Rear View .............................................................................................................................................................. 9
Remote Control ....................................................................................................................................................... 10
Setting up your LCD TV........................................................................................................................................... 13
Using your LCD T V............................................................................................................................................... 14
INSTALLATION ........................................................................................................... 15
Connecting a TV Cable or Aerial......................................................................................................................... 15
Connecting a DVD Player .................................................................................................................................. 16
Connecting a VCR & a Video Camera .............................................................................................................. 17
Connecting a TV Box and Satellite Receiver ..................................................................................................... 18
Connecting an Audio Receiver.......................................................................................................................... 19
HD MI............. .. .. .. .. .. .. .. .. .. ............... .. .. .. .. .. .. .. .. ............... .. .. .. .. .. .. .. .. .. ............... .. .. .. .. .. .. .. .. .2 0
USING THE FEATURES................................................................................................. 21
Basic Operation................................................................................................................................................. 21
OSD Menu Operation .......................................................................................................................................... 22
Video .................................................................................................................................................................. 22
Audio.................................................................................................................................................................... 23
Setup................................................................................................................................................................ 24
Preferences........................................................................................................................................................... 25
Screen................................................................................................................................................................... 25
USING THE DTV FEATURES............................................................................................ 26
TROUBLESHOOTING...................................................................................................... 34
SPECIFICATIONS............................................................................................................. 35
Page 7

6
PREPARATION
PREPARATION
Features
PREPARATION
VGA Support:
Multimedia socket
VIDEO in socket
S-VIDEO in socket
SCART socket (RGB, CVBS ,CVBS+RGB,Y/C input)
Y Pb Pr in socket
VGA in socket
HDMI in socket
Features
High Brightness / Contrast Image
Brightness: 450 cd/m
2
Contrast Ratio: 500:1
640x480/60Hz~1024x768/75Hz
NICAM/ FM-Stereo Function
Auto Programme Sort (APS)
Manual search
Sleep-Timer
User selectable colour temperature settings
Built-in ATV and DTV Tuners
WSS (Wide Screen Scale ) Function
This function can automatically convert and display any aspect ration (4:3 / Wide) TV
broadcast signal.
Teletext Function
The built-in DTV tuner allows the reception of DVB-T broadcasting without
the addition of a set-top box.
Page 8
7
PREPARATION
PREPARATION
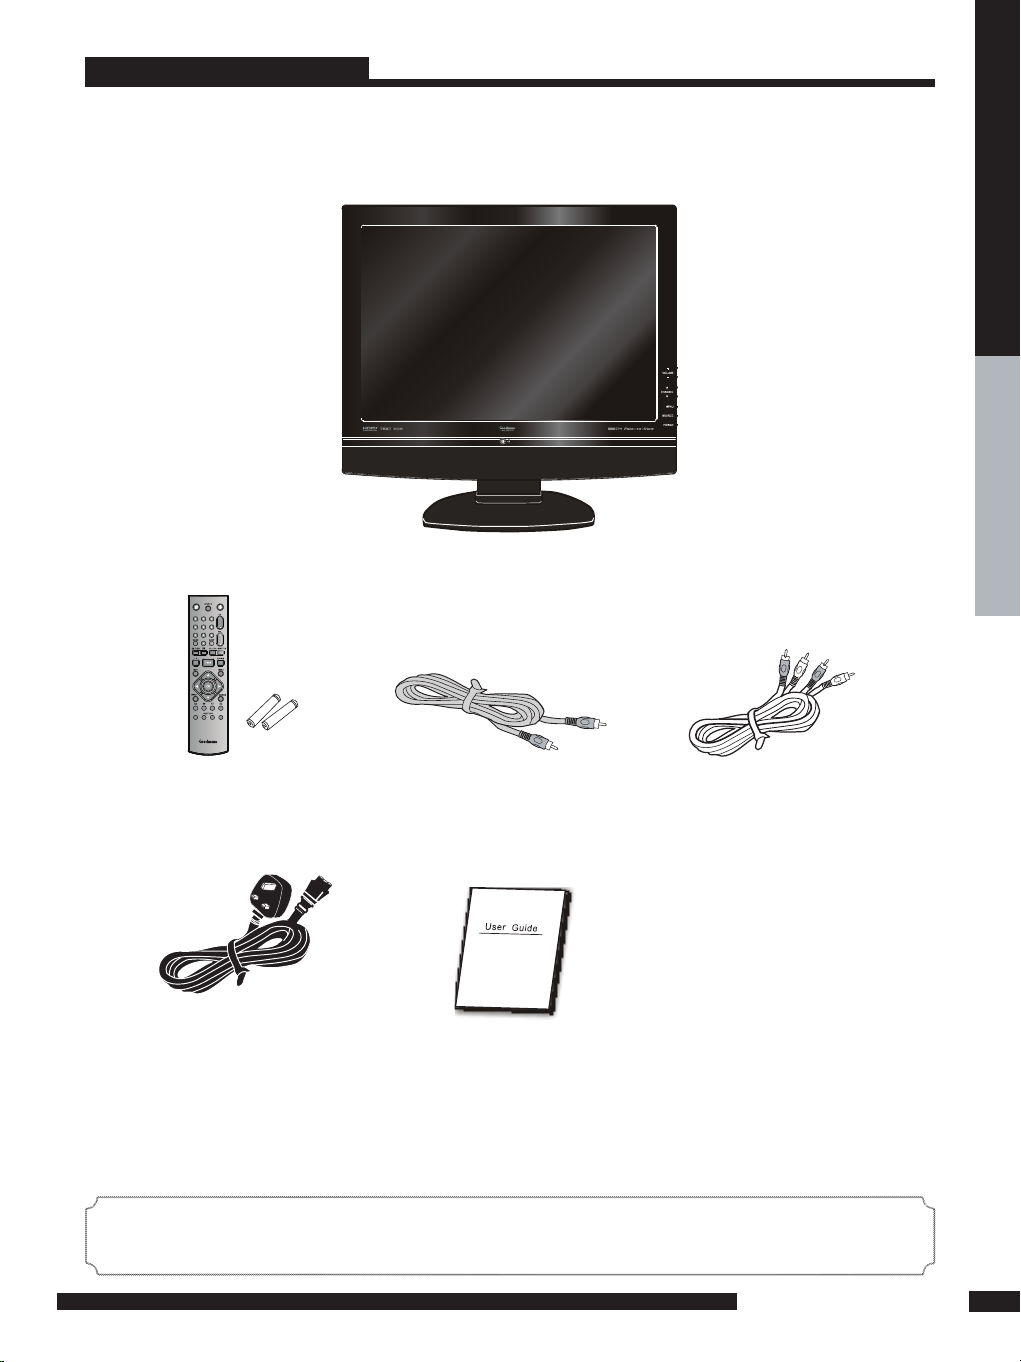
*Most de vices (VCRs, DVD player, etc.) come wit h the necessar y
cable fo r connection. If you want to set up a complex system, you may need to buy
extra ca ble, connector, etc.
Package Contents
Once you open the box, make sure all of the following contents a re
included.If you’re missing any ite ms, please contact your dealer.
These items are all you need to set up and operate the LCD TV
in its basic configuration.
LCD TV
Audio Cable
User Guide
(you are reading it)
Power Cord
Remote control/
AAA batteries
Video Cable
Page 9
PREPARATION
LCD TV
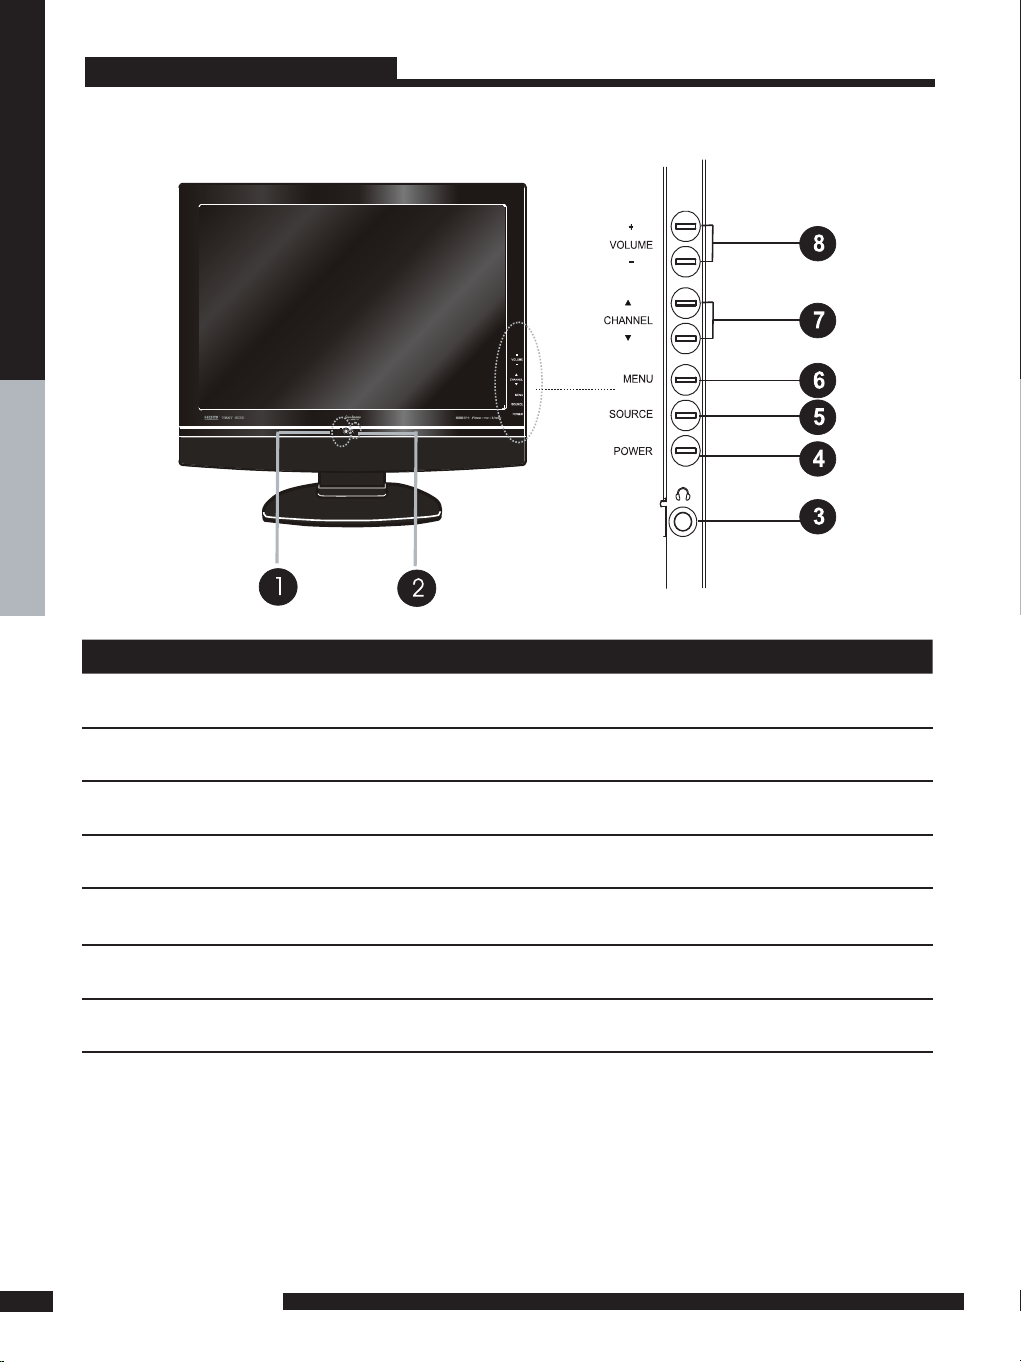
Front View
ITEM DESCRIPTION
1 IR Infrared Receiver (IR)
2 LED The LED light indicates when the LCD TV is activated (Red = standby, Green On).
3 HEADPHONE
4 POWER
5 SOURCE Press to select different input signal sources.
6 MENU Press once to display the OSD (on screen display), press again to turn the OSD off.
7 CHANNEL Changes TV channels. Selects menu item when in the OSD mode.
8 VOLUME Adjusts the volume up and down. Change values for items when in the OSD mode.
Note:
Source button on the TV, has the same function of OK button on the remote control,
can be used as confirm button.
Connects to the external headphone for private listening.
Power Button
Turns the LCD TV on and off.
PREPARATION
8
Page 10
9
PREPARATION
PREPARATION
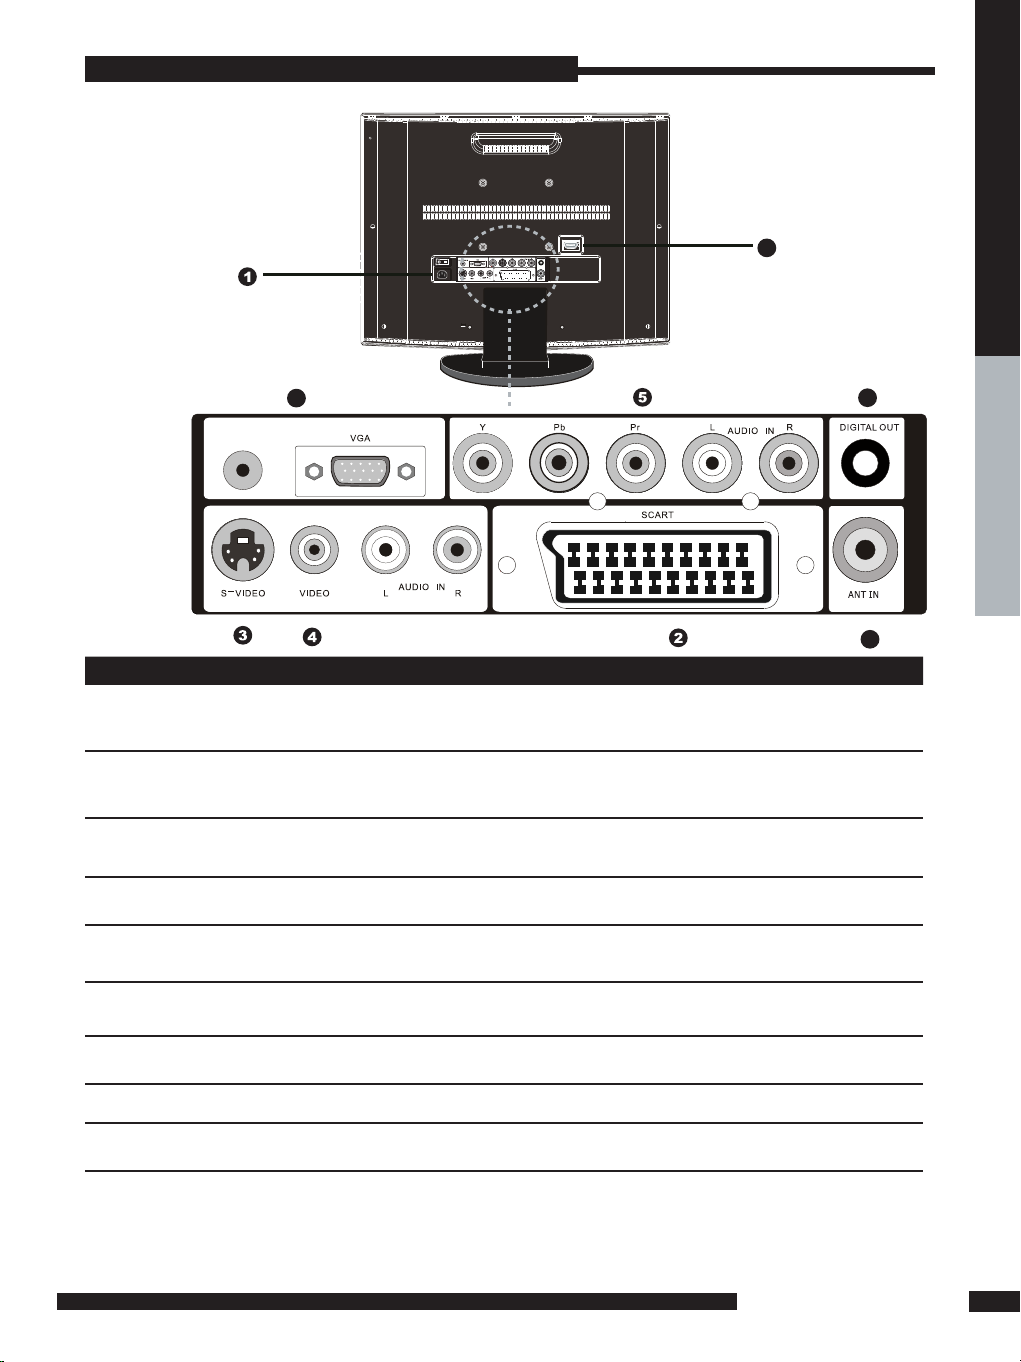
Rear View
LCD TV
ITEM DESCRIPTION
1 AC IN / Power Switch
Connects the AC power cor d t o t his socket ./ Make sure tha t t his switch
is in the ON po sition (Re d L ED light will show on the bottom centre o f
the TV).
2 AV1
SCART
Co nn ec t t o e xt er nal e quipmen t w it h sca rt socket . T hi s s ca rt in pu t
al lows audio and CVBS/YC/ RG B+C VB S. RGB,S -VIDEO fr om an ex te rn al
de vi se to be sh own o n y our T V.
3 AV2
S-VIDEO/AUDIO(L/R)
Co nn ec ts to th e S - VI DEO output sock ets a nd Audio output
so ckets on your vide o equip me nt.
4 AV3
VIDEO/AUDIO(L/R)
Connects to the composite A/V outp ut sockets on yo ur video
equipment.
5 AV4
Y, Pb, Pr /AUDIO(L/R)
Connects to the component (Y, Pb, Pr) vid eo soc kets and
audio (L/R) soc kets of yo ur DVD player, HDTV, o r video equipment.
6 AV5
VGA IN/PC AUDIO IN
Connects to a P C or other devices wit h a VGA interface.
7 AV6
HDMI IN
Connects to devices with a HDMI interface.
8 DIGITAL OUT
Connects to digital out socket on external digital audio equipment.
9 ANT IN
Connects RF inp ut from VHF/UHF ant enn a or cable to recei ve high/
standard def ini tion television.
PC AUDIO IN
Power Swit ch.
AC IN
6
9
7
Note:
S-VIDEO and Video have a common audio input, If both devices are being used at the same
time audio from both will be heard at same time. Only switch on the required device to stop
the mixing of audio.
8
Page 11
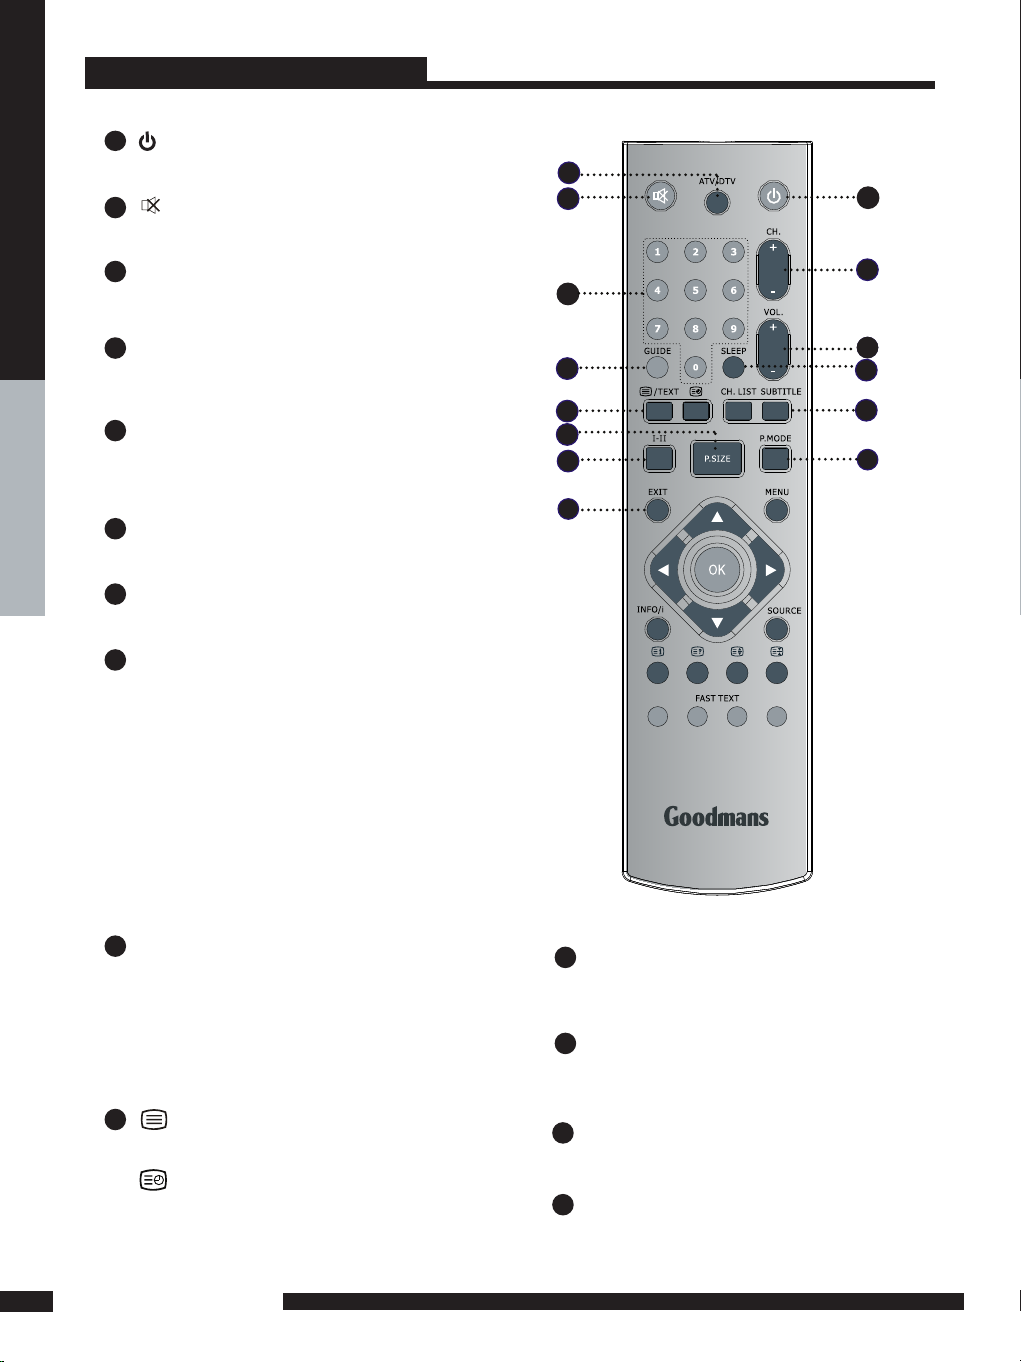
Remote Control
1
POWER
Turns the LCD TV on and into standby mode .
2
Mutes and restores your LCD TV sound.
3
2
1
PREPARATION
3
ATV/DTV
Pressing enter ATV (analogue) or Digital (DTV)
Mode.
0-9
4
Select and switch to a channel by
using 0 -9 buttons.
GUIDE
5
In DTV mode,pressing GUIDE key displays
the electronic program guide on the screen.
CH. +/-
6
Changes the channels up and down .
VOL. +/-
7
Increases and decreases volume.
SLEEP
8
Sets the LCD TV sleep time.
- Press the SLEEP button to select the number of
minutes. followed by 15, 30, 60minutes and off.
The timer begins to count down from the number
of minutes selected.
a.To check the remaining sleep time, press the
SLEEP button once.
b.To cancel the sleep time, repeatedly press the
SLEEP button until the display off appears.
c. If you turn the set off after setting the sleep
timer, the setting will be erased.
4
5
10
11
12
14
6
7
8
9
13
PREPARATION
10
CH. LIST
9
Display all channel list & name.
SUBTITLE
Press the SUBTITLE key to display the subtitle
which is broadcast with the program on the
screen.
10
/TEXT
Turns on and off the Teletext function.
Display the Time which broadcast with the
teletext on the screen.
11
P.SIZE
Selects from the following modes
settings: Wide, 4:3, Zoom, Original.
12
I-II
Cycles through the TV Sound options:
MONO/DUAL/STEREO.
13
P.MODE
Selects picture mode: Custom, Vivid,
Standard, Mild.
14
EXIT
Exits the OSD menu (on-screen display).
Page 12
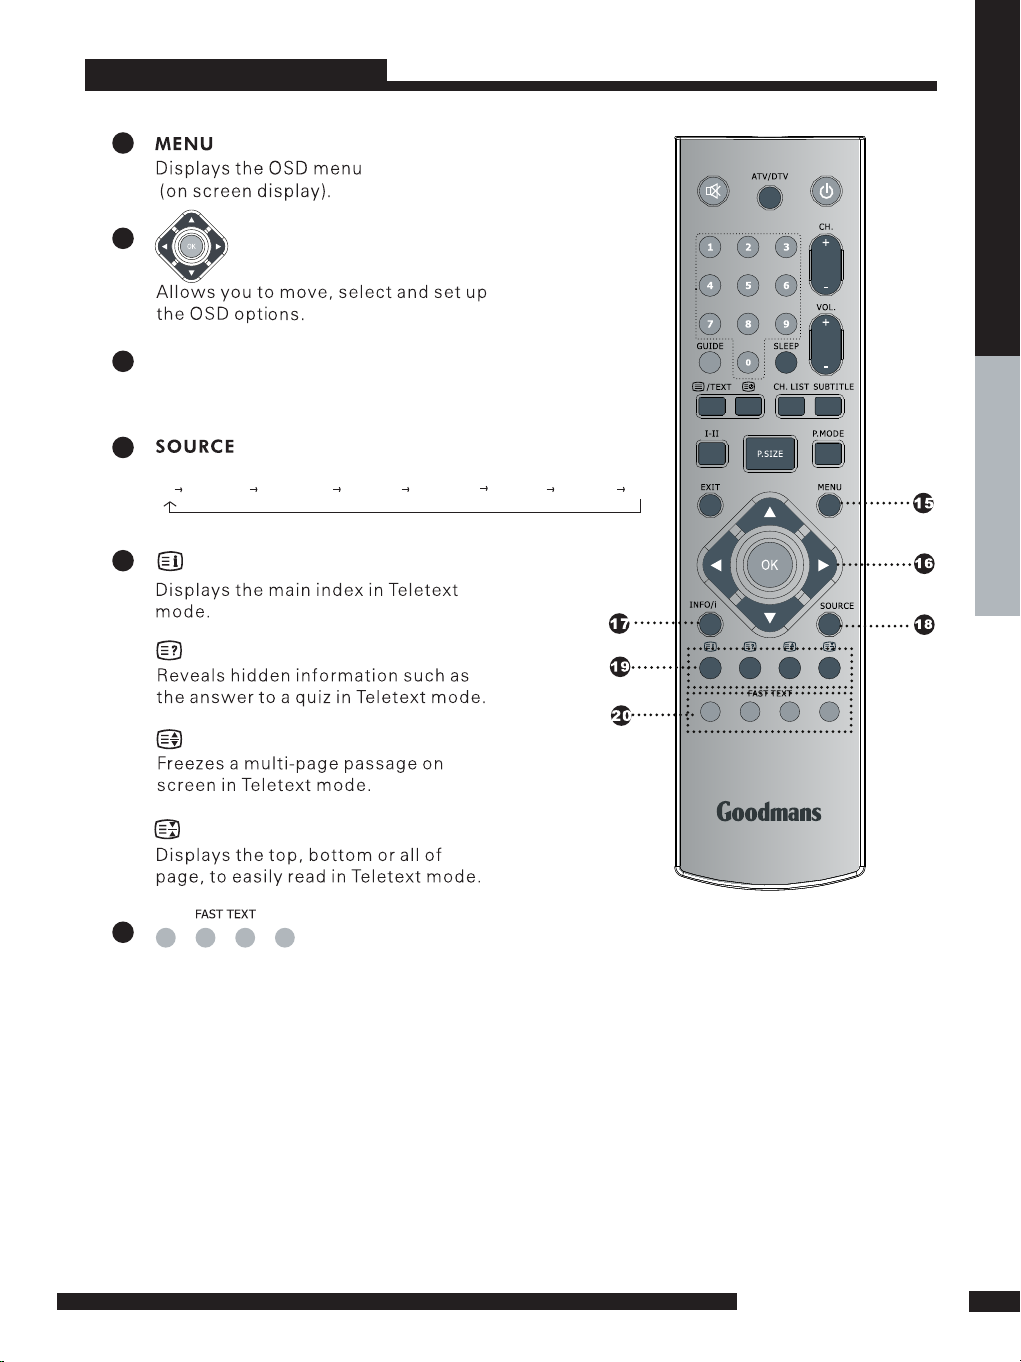
Remote Control
15
16
INFO/i
17
Pressing once displays a variety of information such
as the current channel and the input source.
18
Cycles among the different input signal sources:
TV AV1(SCART) AV2(S-VIDEO) AV3(CVBS) AV4(Y Pb Pr) AV5(VGA) AV6(HDMI) DTV
19
PREPARATION
20
Accesses the TELETEXT items or
corresponding pages.
The coloured buttons are used to access
interactive modes when using Digital /
Freeview TV channels.
PREPARATION
11
Page 13

PREPARATION
5M
30
O
30
O
Remote Control
Installing the batteries in your remote control
Pu ll the tab of the back cover and p ull u p on
th e cov er to open the ba tter y compar tm ent
1
of the remot e con trol.
In se rt t wo A AA size b at te ri es .
2
Ma ke sure to ma tc h the (+) and (-) en ds of
th e batteries w ith t he (+) and (-) en ds in di cated
in the batter y compartment.
Alig n the lowe r tabs of th e back cover to the
3
re mote control and squeeze the cover into
pl ac e.
Note :
Effective range
PREPARATION
12
Do not use caustic cleaners( porcelain, stainless steel, toilet, or oven cleaner, etc...).
You may cause damage to your remote control.
Your remote control can be activated from up to the LCD T V 5m away,
if points directly in front of the device.
Page 14

Setting Up Your LCD TV
How to install the TV Stand
Follow the instructions below to install the TV stand:
1
Open the box, and make sure all necessary parts are in the box.
LCD TV Stand
Cover an even stable surface with a soft cloth. Place the LCD TV unit face-down on the cloth.
2
Fit the stand onto the bottom of the LCD TV unit as shown:
PREPARATION
Then push until stand clicks into the LCD TV’s stand socket.
3
PREPARATION
13
Page 15

Using your LCD TV
RPOWE
The Power button on the front panel and also on the remote control is only use d
1
for power ing up and switching the TV to standby mode,it do es not disconnect
th e device from the mains s upply.
To completel y disconn ect the main voltage, please switch off the power switch
on the re ar of the T V, or re move the power plug f rom the socket.
PREPARATION
Make su re the power s witch
is swit ched of f.
U
nplug f ro
a wall ou tle
m
t
PREPARATION
14
Page 16

15
INSTALLATION
INSTALLATION
INSTALLATION
Refer to the owner’s manual of the external equipment to be connected.When connecting
external equipment, do not connect any AC power cords to wall outlets until you have completed
all the connections.
Connecting a TV aerial
Basic Connection: Connecting an aerial .
Connect your existing TV aerial to the Aerial input socket on the TV.
The Aerial input socket can be connected with the ATV/DTV Aerial.
Connect all AC power sources before turning on the
power switch at the back of the TV.
Press the POWER button on your remote to turn on your LCD TV.
a. After connecting an aerial to your LCD TV and connecting the mains cable to the
TV and 230VAC mains socket, turn the POWER SWITCH of rear TV on, a red light
will show on the front centre panel of the TV.
b. Press the POWER button, the red light will change to green and the First Time
Installation screen will show:
1. Make sure an aerial is fitted then press OK button on the remote to start
the Auto Programme Scan (APS).
2. In a short while you will see the TV programmes briefly as each channel is
received and stored in the memory. When APS is completed BBC1 will show,
press CH+/- buttons to view the other channels stored.
c. To power off press the POWER button, the green light will change to red.
Press the SOURCE button and choose TV or DTV mode then press OK to select.
1
2
3
5
Insert the supplied mains cable to the mains socket located on the rear of
the TV. Connect the other end of this cable to a 3 pin mains socket.
4
Make s ure the power s witch
is swit ched of f.
Unplu g from
a wall ou tle
t
TV Aerial
Aerial/75-ohm
coaxial input
connect the supplied
mains cable to this socket.
Page 17

16
INSTALLATION
INSTALLATION
Connecting a DVD Player
For best picture quality, if your DVD player has (Y Pb Pr) video output, Please use component
cable instead of a standard video or S-video cable (cables not supplied). Otherwise connect
using a standard Scart cable (not supplied).
Use a Component cable to connect the (Y Pb Pr ) sockets on the DVD player to your LCD
TV. Use an audio cable to connect the DVD’s audio sockets to your LCD TV.
Connect all power sources before turning on the power switch
of the LCD TV or other connected equipments.
Press the POWER button to turn on your LCD TV.
To watch DVD, press the SOURCE button to select AV1,AV2, AV3,AV4.
Use an Audio cable to connect the DVD’s audio output sockets to your LCD TV.
Use a S-Video cable to connect your LCD TV and DVD player.
Use an A/V cable to connect the DVD’s composite output sockets to your LCD TV.
Use a SCART cable to connect the DVD’s SCART socket to the LCD T V’s SCART socket.
1
METHOD A (AV4 )
METHOD B (AV2)
METHOD C (AV3)
METHOD D (AV1)
2
3
4
PC AUDIO IN
DV D PL AYER
Audio
( R)
Video/AudioCable
ideo
Audi
(L )
A
Pb
Pr
D
V
o
Page 18

17
INSTALLATION
INSTALLATION
Use an Audio cable to connect the VCR’s/ the VIDEO CAMERA’s audio output
sockets to your LCD T V.
Use a S-Video cable to connect your LCD TV and VCR player/ VIDEO CAMERA.
Use an A/V cable to connect the VCR’s/ VIDEO CAMERA’s composite output sockets
to your LCD TV.
Use a SCART cable to connect the VCR’s SCART socket to the LCD T V ‘s SCART socket.
Connect all power sources before turning on the power switch of the LCD TV
or other connected equipments.
Press the POWER button to turn on your LCD TV.
Connecting a VCR & a Video Camera
1
METHOD A (AV2)
METHOD B (AV3)
METHOD C (AV1)
2
3
5
To watch VCR, press the SOURCE button to select AV1, AV2 or AV3 .
Note:
Not all cameras have the ability to connect to a TV. Please check your video camera
user guide for compatibility.
4
To watch VIDEO CAMERA, press the SOURCE button to select AV2 or AV3.
PC AUDIO IN
Audio
(R)
Video/AudioCable
ideo
Audi
(L )
V
o
Page 19

18
INSTALLATION
INSTALLATION
Connecting a TV Box and Satellite Receiver
Method A(AV4) :
Use a Component cable to connect the Y/Pb/Pr sockets on the TV Cable Box to
your LCD TV. Use an Audio cable to connect TV cable box’s audio output sockets to LCD TV.
Method B(AV2) :
Use an Audio cable to connect the TV Cable Box’s audio output sockets to your LCD TV.
Use a S-Video cable to connect your LCD TV and TV Cable Box.
Method C(AV3) :
Use an AV cable to connect the T V Cable Box’s composite output sockets to your LCD TV.
Method D(AV5) :
Use a VGA 15 pins cable to connect the TV Cable Box’s RGB output sockets to your LCD TV.
Use a 3.5mm socket to RCA adapter cable for connecting audio.
Method E(AV1) :
Use a SCART cable to connect the TV Cable Box’s SCART
socket to the LCD TV’s SCART socket.
1
Connect all power sources before turning on the power switch of the LCD TV or
other connected equipments.
3
PC AUDIO IN
Audio
(R)
Video/Audio Cable
ideo
Audi
(L )
A
Pb
Pr
E
V
GA CABLE
D
HDMI CABLE
F
V
o
PC AUDIO IN
Press the POWER button to turn on your LCD TV.
To watch programs satellite receiver, press the SOURCE button repeatedly to select AV6 .
To watch TV cable box, press the SOURCE button to select AV1, AV2, AV3, AV4 ,AV5.
4
5
6
Method F(AV6) :
Use a HDMI cable to connect the Satellite Receiver HDMI connector to your LCD TV.
2
Freeview / Sky boxes will usually have scart cables supplied with them. Connect
the scart cable to the scart socket on the rear of the TV.
cables not supplied
Page 20

19
INSTALLATION
INSTALLATION
Connecting an Audio Receiver
Use an audio cable to connect the audio receiver’s audio LINE IN sockets to LCD TV ‘s
DIGITAL OUT sockets.
1
3
Press the POWER button to turn on your LCD T V.
2
Connect all power sources before turning on the power switch of the LCD TV
or other connected equipments.
PC AUDIO IN
For best Sound quality, you may want to play the LCD TV audio through your Dolby
digtal surround system system.
Dolby digital
amplifier
Page 21

20
INSTALLATION
INSTALLATION
In This Mode, the Supported TV SET Resolution
Specification
- 1920 x 1080 I @ 59.94 Hz/60 Hz, 16:9 - 1920 x 1080 I @ 50 Hz 16:9
- 1280 x 720 P @ 59.94 Hz/60 Hz, 16:9 (preferred format) - 1280 x 720 P @ 50 Hz 16:9
- 720 x 576 P @ 50 Hz 16:9 - 720 x 480 P @ 60 Hz 16:9
- 640 x 480 @ 60 Hz 4:3
How to connect
1. If Source Devices have HDMI Output , connect to the HDMI socket located at the rear of the TV
using the HDMI Cable supplied with your external devise. (HDMI sends Digital Video and Audio with
one cable.)
2. If Source Devices have DVI Output Connector, an HDMI to DVI cable must be used (not supplied) in
addition a separate audio cable (not supplied) must be connected to the audio out socket on the
external device and the audio input socket (L/R audio Input) on the rear of the TV.
HDMI
HDMI
-This TV can accept High-Definition Multimedia Interface(HDMI) or Input of Digital Visual
Interface(DVI).
-This TV SET supports HDCP(High-bandwidth Digital Content Protection) Protocol for TV SET
(480p, 720p, 1080i) modes.
-When you connect to the output of an HD ready player (DVD Player, Set Top Box or PC) switch to the
AV6(HDMI) function and the TV will automatically detect the resolution used by the HDMI source.
- To get the best picture quality, adjust the DVD Player or Set Top Box output resolution to 1280 x 720p.
- To get the best picture quality, adjust the PC graphics card to 1024 x 768, 60Hz.
- When Source Devices have DVI Output Connector, you must also connect the audio output to the L/R
audio input sockets on the rear of the TV (Audio cable not supplied).
Page 22

USING THE FEATURES
Basic Operation
Tuning in the TV channels
1
After connecting an aerial to your LCD TV and connecting the mains cable to the TV and
230VAC mains socket, turn the POWER SWITCH of rear TV on, a red light will show on the
front centre panel of the TV.
2 Press the POWER button, the red light will change to green and the First Time Installation
screen will show:
1. Make sure an aerial is fitted then press OK button on the remote to start
the Auto Programme Scan (APS).
2. In a short while you will see the TV programmes briefly as each channel is received and
stored in the memory. When APS is completed BBC1 digital TV will show, press CH+/ buttons to view the other channels stored. To view analogue TV press Source button and
use the up / down arrow buttons to select TV and then Press the OK button.
Change channels by pressing the CH +/- buttons.
3 To power off press the POWER button, the green light will change to red.
Selecting a source
Press the SOURCE button to display the function required (TV/AV).
Using the arrow buttons on the remote highlight the function required and press the OK button
to select the function.
Select TV Channel
1 Press the CH.+/- button on the remote control and the CH. ▲/▼ button on the LCD
TV to change the TV channels.
2 You can directly select the TV channel required by pressing 1,2 or 3 etc on the remote button pad.
3 Press the BACK button on the remote control to swap the channel between the current
channel No. and the previous channel No.
Adjusting the Volume
Press the VOL. +/– button on the remote control or the VOL. +/- button on the LCD TV to adjust
the volume.
To Mute the Sound
1 Press MUTE and the sound cuts off.
2 To turn mute off, press the MUTE button again, or simply press the VOL +/- button.
Sleep Timer
Press the SLEEP button continuously to select the sleep timer or turn the sleep timer from the
OFF,15,30,60minutes; when the LCD TV has reached the set time, it will automatically turn off.
If the TV has no input signal, it will automatically power down to standby after 15 minutes.
USING THE FEATURES
USING THE FEATURES
21
Page 23

22
USING THE FEATURES
USING THE FEATURES
Use this Video setting menu to adjust the picture quality which best corresponds to your
viewing requirements.The Video Menu includes the following options:
1 The main menu provides access to the following menus:
Video
Adjust picture setting such as picture
mode, contrast, brightness,sharpness
colour and advanced.
Audio
Adjust sound option and effects.
Setup
Adjust colour standard, sound standard,
APS, Manual search, Channel setup.
Preferences
Adjust preferences such as OSD, blue
screen, childlock, sleep timer, OSD
timer, OSD reset.
Screen
Adjust screen such as horizontal size,
horizontal position, vertical position,
phase, clock, auto sync.
DTV (Digital
TV)
The DTV menu provide four submenus
as follow:edit channel list,configuration,
parental control, EPG (Electronic
Programme Guide),with which you can
set the DTV as you wish.
2 Press the MENU button on the remote control. The main menu will appear on the screen.
3 Use ◄/► to highlight your main menu option, then press OK to enter your selected option.
Use ▲/▼ to highlight an option of the sub-menu. Use ◄/► to change the value of the
item.Press the EXIT button to exit MENU.
OSD Menu Operation
Video
OPTION DESCRIPTION
Picture Mode
Custom:Select for user’s settings.
The items of video can be adjusted when
the picture mode is for user’s settings
except advanced item.
Vivid:Select for enhanced picture contrast
and sharpness.
Standard:Select for standard picture
settings.Recommended for home
entertainment.
Mild:Select for mild picture settings.
Contrast
Adjust the difference between the
brightness and darkness regions of the
picture.
Brightness
Adjust to increase or decrease the
brightness.
Colour
Allows to adjust the colour from 0 to 100.
Tint(NTSC)
Allows you to adjust the color tint of the
picture.(Only for NTSC)
Sharpness
Adjust to sharpen or soften the picture.
Page 24

23
USING THE FEATURES
USING THE FEATURES
OPTION DESCRIPTION
Advanced
Display Mode Allows you to select the
display mode to be Wide,
4:3, Original, Zoom.
DCE Allows you to adjust the
(Dynamic Contrast
Enhancemen) to be off, low,
mid, high.
Blue
Stretch
Allows you to adjust the blue
stretch.
Green
Stretch
Allows you to adjust the
green
stretch.
Color
Temp.
Allows you to adjust the color
temp. to be cool, warm ,
standard.
Video
Audio
OPTION DESCRIPTION
Volume
presets the volume to a given setting.
Balance
Adjust to emphasize left or right speaker
balance.
Use this AUDIO setting menu to adjust the sound and balance and volume to your
listening requirements.
Page 25

24
USING THE FEATURES
USING THE FEATURES
Setup (Analogue TV only)
OPTION
DESCRIPTION
Colour
Standard
Allows you to select the colour
standard : AUTO,PAL, SECAM.
UK = PAL
Sound
Standard
Allows you to select the sound standard :
DK, BG, I, L/L’.
DK
PAL D/K, SECAM D/K (East
Europe / China )
BG
PAL B/G, SECAM B/G (Europe
/ East Europe / Asia / New
Zealand / M.East / Africa /
Australia)
I
PAL I (U.K. / Ireland / Hong
Kong / South Africa)
L/L’
SECAM L/L’
APS
Start APS
Press OK to start Auto Search and auto
sort process. Note: Auto Sort will only
operate in UK.
Country
Allows you select the country :Austria,
Belgium, Switzerland, Czech Rep.,
Germany, Denmark, Spain, France, Finland,
UK, Greece, Hungary, Italy, Norway,
Netherlands, Portugal, Poland, Sweden,
Slovenia, Slovakia, Turkey, Others.
Manual
Search
Allows you to adjust the manual
search by hand if signal is too weak
or picture is blurry.
Channel Setup
Press the ► button to select Sort,
Delete, Skip, Finetune, Save.
Sort
Allows you to manually sort
the stored programme.
Delete
Allows you to delete the
stored programme.
Skip
Allows you to skip the
stored programme.
Finetune
Allows you to finetune the
stored programme.
Save
Allows you to save the setup.
Setup menu is only available when viewing Analogue TV.
Use this Setup menu to select Colour Standard, Sound
Standard, APS, Manual Search, Channel Setup.Use the Up/
Down arrow buttons to highlight the required setting.
Press the Press OK button to select the function. Use left /
right arrow buttons to adjust the settings. Press OK to save
the adjustment.
Manual Search
APS
Setup
Channel Setup
Setup
Channel Setup
Finetune
Save
Page 26

25
USING THE FEATURES
USING THE FEATURES
OPTION DESCRIPTION
OSD
Language : Allows you to select the
OSD to be English, German,
French, Spanish, Italian,
Dutch, Portugese, Polish or
Russian.
Transparency: Allows you to adjust
transparency from 0 to
15.
Blue Screen
Allows you to select the blue screen to
be off or on.
Childlock
Allows you to select the childlock to be
yes or no. (Default password is 0000.
golden password is 3796.)
Change Pin: Allows you to change the
4 -digit password.
Sleep Timer Allows you to select the sleep timer
to be off, 15min, 30min, 60min.
OSD Timer
Allows selection of the display time of
the on-screen menu:5 s,10 s,15 s,
20 s, 25 s.
OSD Reset
Allows you to restore the factory
settings.
Preferences
Use this Preferences setting menu to set up some features: OSD, Blue Screen, Childlock,
Sleep Timer, OSD Timer, OSD Reset.
Screen(Only for VGA)
OPTION DESCRIPTION
Horizontal
Size
Allows you to adjust the Horizontal Size
from 0 to 100.
Horizontal
Position
Allows you to adjust the Horizontal
Position of the picture.
Vertical
Position
Allows you to adjust the Vertical Position
of the picture.
Phase
Allows you to improve focus clarity and
image stability.
Auto Sync. Allows to auto synchronize VGA
signal.
Auto Sync.
Page 27

26
USING THE FEATURES
USING THE FEATURES
USING THE DTV FEATURES
OPTION DESCRIPTION
Edit Channel
List
Lock some channels that are not
suited for younger members of the
family, skip/add the channel list as
you wish.
Configuration
Add new channel, set audio language,
subtitle language, as you wish. Upgrade
the system. View the signal information.
Parental
Control
Enable or Disable the menu
protection system and allows the
PIN code to be changed.
EPG Electronic Program Guide
DTV OSD Menu Operation
Edit Channel List
You can select the channel by using ▲/▼, then the selected channel which highlighted
in yellow is displayed in the quarter-screen image windows.
You can lock or unlock the selected channel by pressing the ‘RED’ button, pressing the
‘OK’ button to skip or add the selected channel. A channel selected as a locked appears
in the channel list with a lock icon (red button) against the channel name, a channel
selected as a added appears in the channel list with a add icon (tick) against the channel
name.
Page 28

27
USING THE FEATURES
USING THE FEATURES
When you complete the edit, press the EXIT button to quit the favourite channel list
menu. The next menu will ask if you want to save the changes you have made, using
◄/► to highlight the YES option, and press the OK button to save the changes.
Once you lock a channel, you must enter the PIN Code that is set in the parental control
menu at first before the channel is displayed.
If you skip a channel, it can’t be shown in the list menu (Press OK button will popup the
favorite channel list menu when you watch the digital terrestrial television) no longer
unless you add it again. (In the channel list menu,the skipped channel name is not
shown.)
Page 29

28
USING THE FEATURES
USING THE FEATURES
Configuration
Highlight the Configuration option, then press OK button to enter the selected option.
The configuration menu is displayed on the screen now.
Channel Installation
Use these options If you have moved location or want to rescan for new channels. Press
OK button to display the channel installation menu.
If you want TV to auto search the channels, press OK button to continue. Then you
should choose the installation type by using the ◄/► buttons and press the OK button
to start the installation process. If you choose ‘add’, the new channels will be added in
the channel list. If you choose ‘new’, the new channels will replace the previous channels
in the channel list.
Page 30

29
USING THE FEATURES
USING THE FEATURES
If you want to install the channels by yourself, using the▲/▼buttons to highlight the
channel installation (manual) option, and press ok to install manually. First you should
choose the installation type, then you can see the following menu. Using ◄/►to cycle
the channel option, then the bar graphs of signal level and signal quality will indicate
whether any channels are likely to be found. You should choose the channel of which the
signal quality bar is high as well, then press OK button to scan the channels.
New Detected Channels
The New Detected Channels menu shows the channels that you add in the channel list
recently. The type icon of the program is displayed against the channel name.
Page 31

30
USING THE FEATURES
USING THE FEATURES
User Settings
Using the ▲/▼buttons to highlight the user settings item in the configuration menu,
then press OK button to display the user settings menu.
Audio Language
This function select which language soundtrack you will hear when switching to a
channel broadcasting with multiple soundtracks. Highlight the audio language line in the
user settings menu and use ◄/►buttons to cycle through the language options.
Subtitle language
This function selects the desired subtitle language whenever subtitle information is
broadcast. Highlight the subtitle language line in the user settings menu and use
◄/►buttons to cycle through the language option.
System parameters
Using the ▲/▼buttons to highlight the system parameters item in the configuration
menu, then press OK button to display the system parameters menu.
System Upgrade
Highlight the System Upgrade item in the system parameter menu, pressing OK button
to display the System Upgrade menu. press OK button to upgrade system. If there is a
new software, the unit will upgrade itself.
Page 32

31
USING THE FEATURES
USING THE FEATURES
System Information
Highlight the system information item in the system parameter menu, pressing OK
button to display the system information menu. You can view the system information in
this menu, however, you can modify nothing in this menu, Pressing OK button to quit.
Signal information
Highlight the Signal information item in the configuration menu, pressing OK button to
display the Signal information menu. Cycle through the channel option by using the
◄/►buttons on the remote control. The signal level and signal quality of the channel that
offers the upgrade software can be observed on the two bar graphs. The bar graphs of
signal quality and signal level give a good indication of whether the selected channel is
likely to be found. If the signal quality bar is high as well then it is a digital frequency and
digital channels will probably be found.
Page 33

32
USING THE FEATURES
USING THE FEATURES
Parental Control
Highlight the parental control line in the parental control menu and use ◄/►buttons to
cycle through the enable and disable option. Toggle this option to enable, then the
following items can be altered.
Configuration menu
If you toggle this option to YES, you will enter the PIN CODE before enter the
configuration menu.
Channel lock
If you toggle this option to YES, the channels you locked in the edit channel list menu
can’t be displayed before you enter the PIN CODE.
Maturity level
There are 18 levels total. If you toggle this option to a number (1-18), for example, you
toggle it to 15, that’s to say, if the channels broadcast material is not suitable for the
family members who are under 15 years old , you must enter the PIN CODE before you
can view them. (The maturity level information should be broadcast with these
programs.)
Receiver lock
You should enter the PIN CODE before you can see the DTV program while you power on
the TV and select the DTV source.
Page 34

33
USING THE FEATURES
USING THE FEATURES
EPG
EPG (Electronic Programme Guide) menu is reached by pressing GUIDE button, quit by
pressing GUIDE button again. Current program is highlighted. Use Channel Up/Down
▲/▼ buttons to change channels and view the other programmes on the selected
channel. Press the Arrow up / Arrow down navigation buttons to scroll through and show
programme content. There are 7day EPG, you can see the other days channel list by
using Left / right navigation arrow ◄/►buttons.
The short description of the highlighted channel is shown under the image window, and
you can see the extended description by pressing the INFO or OK button and by
pressing this button again you can close this window.
PIN Code change
Pressing the ‘RED’ button will popup the PIN code change menu, enter the previous
code by using the 0-9 buttons on the remote control, then enter the new code twice to
confirm and this menu will disappear (The PIN is factory set to 0000). Pressing EXIT to
quit without saving the new code.
Pressing OK button to quit the parental control menu with saving these alteration. Pressing
EXIT button to quit the parental control menu without saving these alteration.
Page 35

TROUBLESHOOTING
34
TROUBLESHOOTING
TROUBLESHOOTING
Before contacting Goodmans Helpline, check the following chart for a possible cause
of the trouble you are experiencing and for a solution.
PROBLEM
SOLUTION
TV will not turn on
□ Make sure the power cord is plugged in.
□ The batteries in the remote control may be exhausted. Replace the
batteries.
No picture, no
sound
□ Check the interface cable between TV and antenna/cable TV.
□ Press the POWER button on the remote.
□ Press the TV button on the remote, then press the SOURCE
button repeatedly to select the connected video sources.
□ Make sure that the main power switch on the back panel is
switched on.
Poor picture, sound
OK
□ Check the interface cable between TV and antenna/cable TV.
□ Try another channel, the station may have broadcast
difficulties.
□ Adjust the Brightness/Contrast options in the VIDEO Menu.
Picture OK, Poor
sound
□ Sound may be muted. Press the MUTE button on the remote.
□ Press the TV button on the remote, then press the VOL.+
button to increase the volume.
Audio noise
□ Move any infrared equipment away from the TV.
Page 36

SPECIFICATION
35
SPECIFICATION
SPECIFICATIONS
Model
GTVL19W17HDF
Panel System
19 inch LCD panel
Display Resolution
1440 pixels (horizontal) x 900 pixels (vertical)
Television System
PAL- I
Brightness
450 cd/m
2
Contrast Ratio
500:1
Inputs/Output
SCART
1
HDMI
1
VGA
1
PC Audio In
1
Video In
1
S-video In
1
Phones
1
Y Pb Pr
1
Digital Out
1
ANT In
1
Speaker Power
3 W+3 W
Power Source(MAX)
AC230 V~, 50Hz, 60 W
Dimension( W x D x H)
470 x 170 x 414.3mm
Weight(Net)
5.0 Kg
Page 37

SPECIFICATION
36
SPECIFICATION
For the display modes listed below, the screen image has been optimized during
manufacture.
Display Mode
VGA TIMING
Dot X Line Horizontal Frequency(kHz) Vertical Frequency(Hz)
640 x 480 31.46 59.94
640 x 480 37.86 72.80
640 x 480 37.50 75.00
800 x 600 37.87 60.31
800 x 600 48.07 72.18
800 x 600 46.87 75.00
1024 x 768 48.36 60.00
1024 x 768 56.47 70.06
1024 x 768 60.02 75.02
 Loading...