

Page 1

INSTRUCTION MANUAL
TFT LCD TV & DVD PLAYER
MODEL:GTVL15N5DVD
POWER
EJECT
DISPLAY
TIMER
3
12
TV/AV
5
6
4
A-B
NICAM/A2
7
89
SYSMENU
REPEAT
1/ALL
-/--
0
PLAY STOP
SELECT
TV/
ENTER
PAUSE/STEP SLOW
CLEAR
F.FWDF.BWD PREV NEXT
SUBTITLE ANGLE AUDIO
TELETEXT CANCEL INDEX
MENU/PBC TITLE/RET. VOLUME
PROGRAM
SIZE
REVEAL
HOLD
MUTE
SEARCH ZOOM SETUP
Read these instructions thoroughly before attempting to connect, operate or adjust this player.
Retain the book for future reference.
Goodmans Helpline 0870 8730080
Page 2
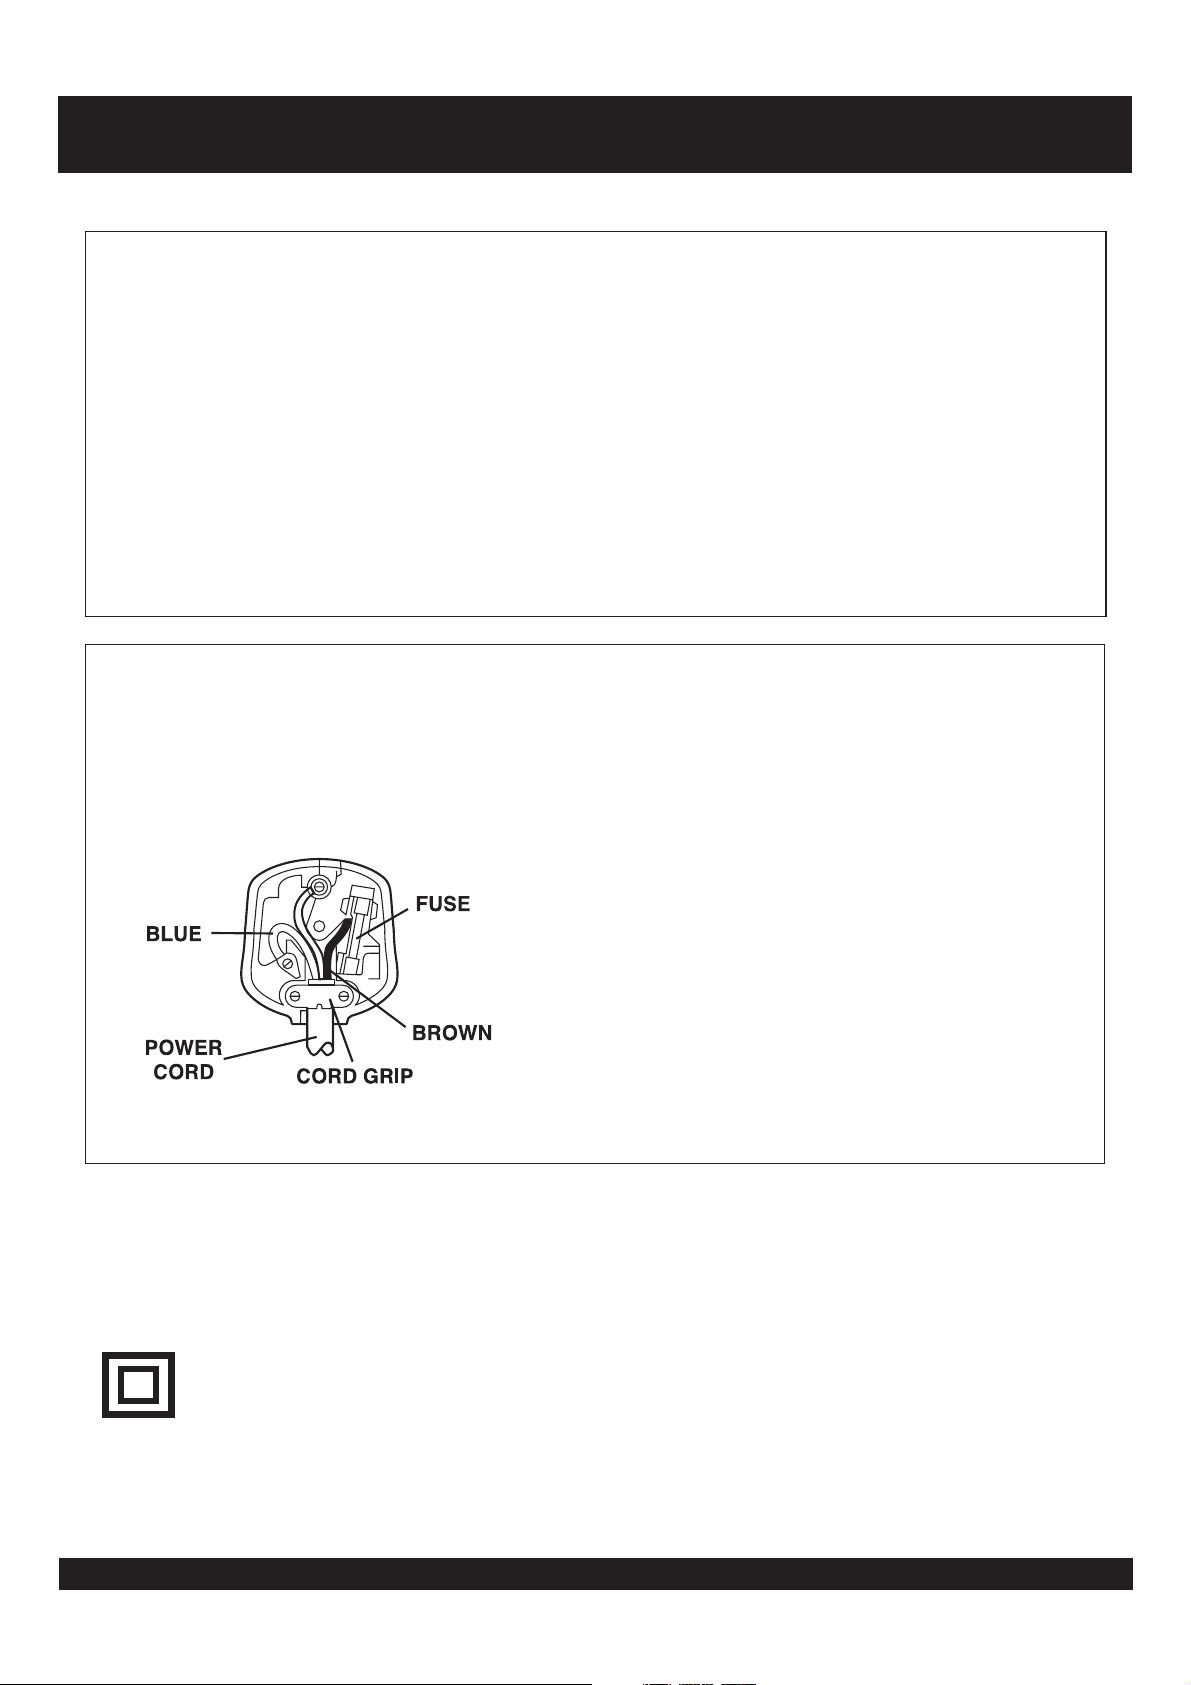
MAINS PLUG WIRING FITTED TO YOUR AC ADAPTOR
PREFITTED MAINS PLUGS
For you convenience a mains plug has ben fitted to this appliance. For your safety
please observe the following information.
1. Should the fuse in the plug fall remove the plug from the wall socket and replace the
fuse with a 3 Amp ASTA approved to BS 1362 fuse.
2. Never use the plug without the fuse cover fitted. Replacement fuse covers are
anailable from your dealer or most electrical retail outlets.
3. If the mains plug is cut off the cable, rewire the replacement plug in accordance with
instruction give in this manusl.
4. CAUTION: Under no circumstances should the discarded plug be inserted into the
mains socket. To prevent a shock hazard carefully dispose of the descarded plug.
Do not leave the plug lying around where children might see it.
WARNING: To prevent fire or shock hazerd do not expose this unit to rain or moisture.
CAUTION: DANGEROUS VOLTAGES EXIST INSIDE THIS UNIT. DO NOT REMOVE
COVER (OR BACK).
NO USER SERVICEABLE PARTS INSEDE REFER SERVICING TO
QUALIFIED SERVICE PERSONNEL. DISCONNECT FROM MAINS
SUPPLY WHEN NOT IN USE.
This wires in this mains lead are coloured in
accordance with the following wiring codes:
Blue...............................................Neutral
Brown.................................................Live
This wires in this mains lead must be
Connceted to the terminals in the plug as
Follows:
Blue Wire ...................................N or Black
Brown Wire....................................L or Red
Only a 3 Amp fuse should be fitted in the
Plug or a 5 Amp fuse at the destribution
board.
WARNING: UNDER NO CIRCUMSTANCES MUST THE LIVE OR NEUTRAL WIRES BE
CONNECTED TO THE EARTH TERMINAL IN A 3-PIN MAINS PLUG.
This symbol means that this unit is double insulated.
An earth connection is not required.
Goodmans Helpline 0870 8730080
1
Page 3

WARNINGS
Use the adapter supplied only to supply power for your unit.
Unqualified attempts to repair this TV are not allowed. Refer repairs to this unit to a qualified technician only.
Do not disassemble this unit. There are dangerous-voltage parts inside that may cause electric shock even after power
is disconnected.
Store your unit only in a clean, dry environment. Unplug the unit immediately it gets wet, and consult your servicing
technician.
Always unplug the unit before cleaning it. Wipe dust off the cabinet of the unit with clean&dry&soft cloth. Apply nonammonia cleansing lotion onto the cloth, not directly onto the screen.
Keep your unit away from magnetic objects, motors, TV sets, and transformers.
Do not place heavy objects on top of the unit.
Avoid exposing your unit directly to sunlight or other heat sources.
Put your unit in a well-ventilated area away from high humidity.
The apparatus and AC/DC adaptor shall not be exposed to dripping or splashing and that no objects filled with liquids,
such as vases, shall be placed on apparatus.
Safety Tips
If smoke, abnormal noise or odour comes out of your unit, power it off immediately and call your local service centre.
Never try to repair the your unit on your own. Always call your local service center for repairs.
Watching TV while driving is illegal and dangerous!
Note
This user's manual contains for-reference-only graphics and information that are subject to change without notice.
Goodmans Helpline 0870 8730080
2
Page 4

TABLE OF CONTENTS
MAINS PLUG WIRING
FITTED TO YOUR AC ADAPTOR....................1
WARNINGS......................................................................2
TABLE OF CONTENTS....................................................3
CONTROL REFERENCE GUIDE - MAIN UNIT................4
CONTROL REFERENCE GUIDE -
REMOTE CONTROL
REMOTE CONTROL PREPARATION..............................6
BASIC CONNECTION
TV OPERATIONS........................................................8-11
GET STARTED
SEARCH A PROGRAM
ADJUST THE VOLUME
AUDIO EFFECT OPTIONS
TV SETTING MENU
TV IMAGE SETTING
TV SOUND SETTING
TV CONFIG SETTING
TV CHANNEL SETTING
VGA SETTING UP.....................................................11-13
GET STARTED
VGA SET UP
VGA IMAGE SETTING
VGA SOUND SETTING
VGA CONFIG SETTING
VIDEO OPERATION.......................................................13
S-VIDEO OPERATION...................................................13
SCART/DVD/CVBS/S-VIDEO MENU SETTING.......13-15
SCART/DVD/CVBS/S-VIDEO IMAGE SETTING
SCART/DVD/CVBS/S-VIDEO SOUND SETTING
SCART/DVD/CVBS/S-VIDEO CONFIG SETTING
DVD INITIAL SETTINGS...........................................15-17
COMMON PROCEDURE FOR INITIAL SETTINGS
GENERAL SETUP
AUDIO SETUP
VIDEO SETUP
PREFERENCE SETUP
PASSWORD SETUP
...............................................5
......................................................7
BEFORE ENJOYING DVD/VIDEO CD/CD.....................17
PREPARATIONS............................................................17
BASIC PLAY....................................................................17
STOPPING PLAY............................................................17
SKIPPING AHEAD OR BACK.........................................17
PAUSE OR STEP PLAY..................................................18
SLOW-MOTION PLAY (DVD/VCD) ...............................18
MP3 PLAYBACK.............................................................18
BASIC PLAY
PLAY MODE
KODAK PICTURE CD / JPEG CD.............................18-19
PLAY MODE
SKIP TO NEXT/PREVIOUS PICTURE
ROTATING PICTURES
FLIPPING PICTURES
PICTURE SHRINK/ZOOM
PICTURE CD..................................................................19
SLIDE SHOW EFFECTS
ENJOYING VIDEO CDS WITH PLAYBACK
CONTROL...........................................................19
ON SCREEN DISPLAY INFORMATION.........................20
PROGRAM PLAY............................................................20
REPEAT PLAY................................................................20
CHANGING SUBTITLE LANGUAGE (DVD ONLY)........21
ZOOM PLAY....................................................................21
CHANGING AUDIO SOUNDTRACK LANGUAGE
(DVD/VCD DISC)...................................................21
VIEWING FROM ANOTHER ANGLE (DVD ONLY)........21
SEARCH FOR PREFERRED SCENE............................21
MONITOR MAINTENANCE............................................22
CLEANSING
OTHERS
TROUBLE SHOOTING...................................................23
Goodmans Helpline 0870 8730080
3
Page 5
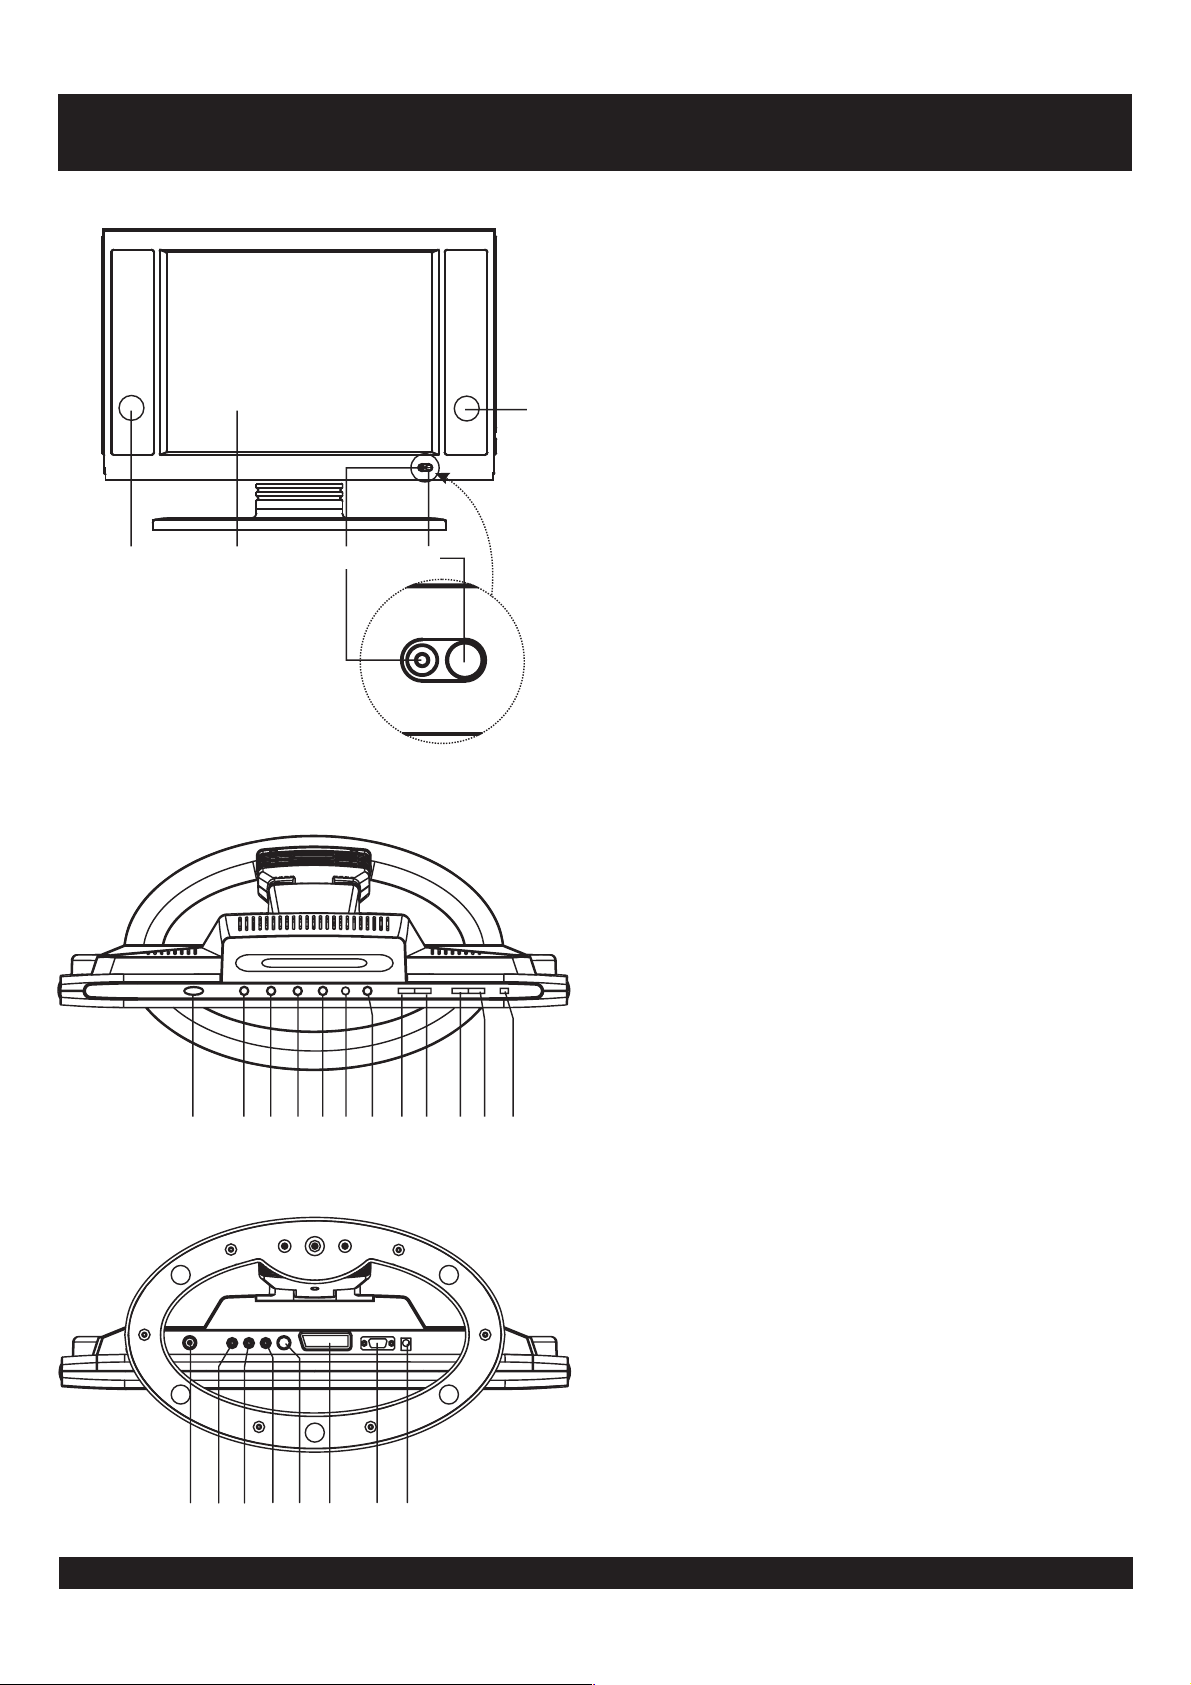
FRONT VIEW
12 34
CONTROL REFERENCE GUIDE - MAIN UNIT
1. SPEAKERS
2. TFT SCREEN
3. POWER ON/OFF INDICATOR
4. REMOTE SENSOR
1
TOP VIEW
5678910111213141516
BACK VIEW
5. POWER ON/OFF BUTTON
6. CHANNEL DOWN BUTTON
7. CHANNEL UP BUTTON
8. VOLUME DOWN BUTTON
9. VOLUME UP BUTTON
10. TV/AV BUTTON
11. MENU BUTTON
12. BACKWARD SKIP/SEARCH BUTTON
13. FORWARD SKIP/SEARCH BUTTON
14. STOP BUTTON
15. PLAY/PAUSE BUTTON
16. EJECT BUTTON
17. IN SOCKET
18. AV IN (RIGHT)
19. AV IN (LEFT)
20. AV VIDEO IN
21. S-VIDEO
22. SCART IN
23. VGA IN
24. DC 12V IN
SOCKET
SOCKET
SOCKET
SOCKET
SOCKET
SOCKET
SOCKET
17 18 19 20 21 22 23 24
Goodmans Helpline 0870 8730080
4
Page 6
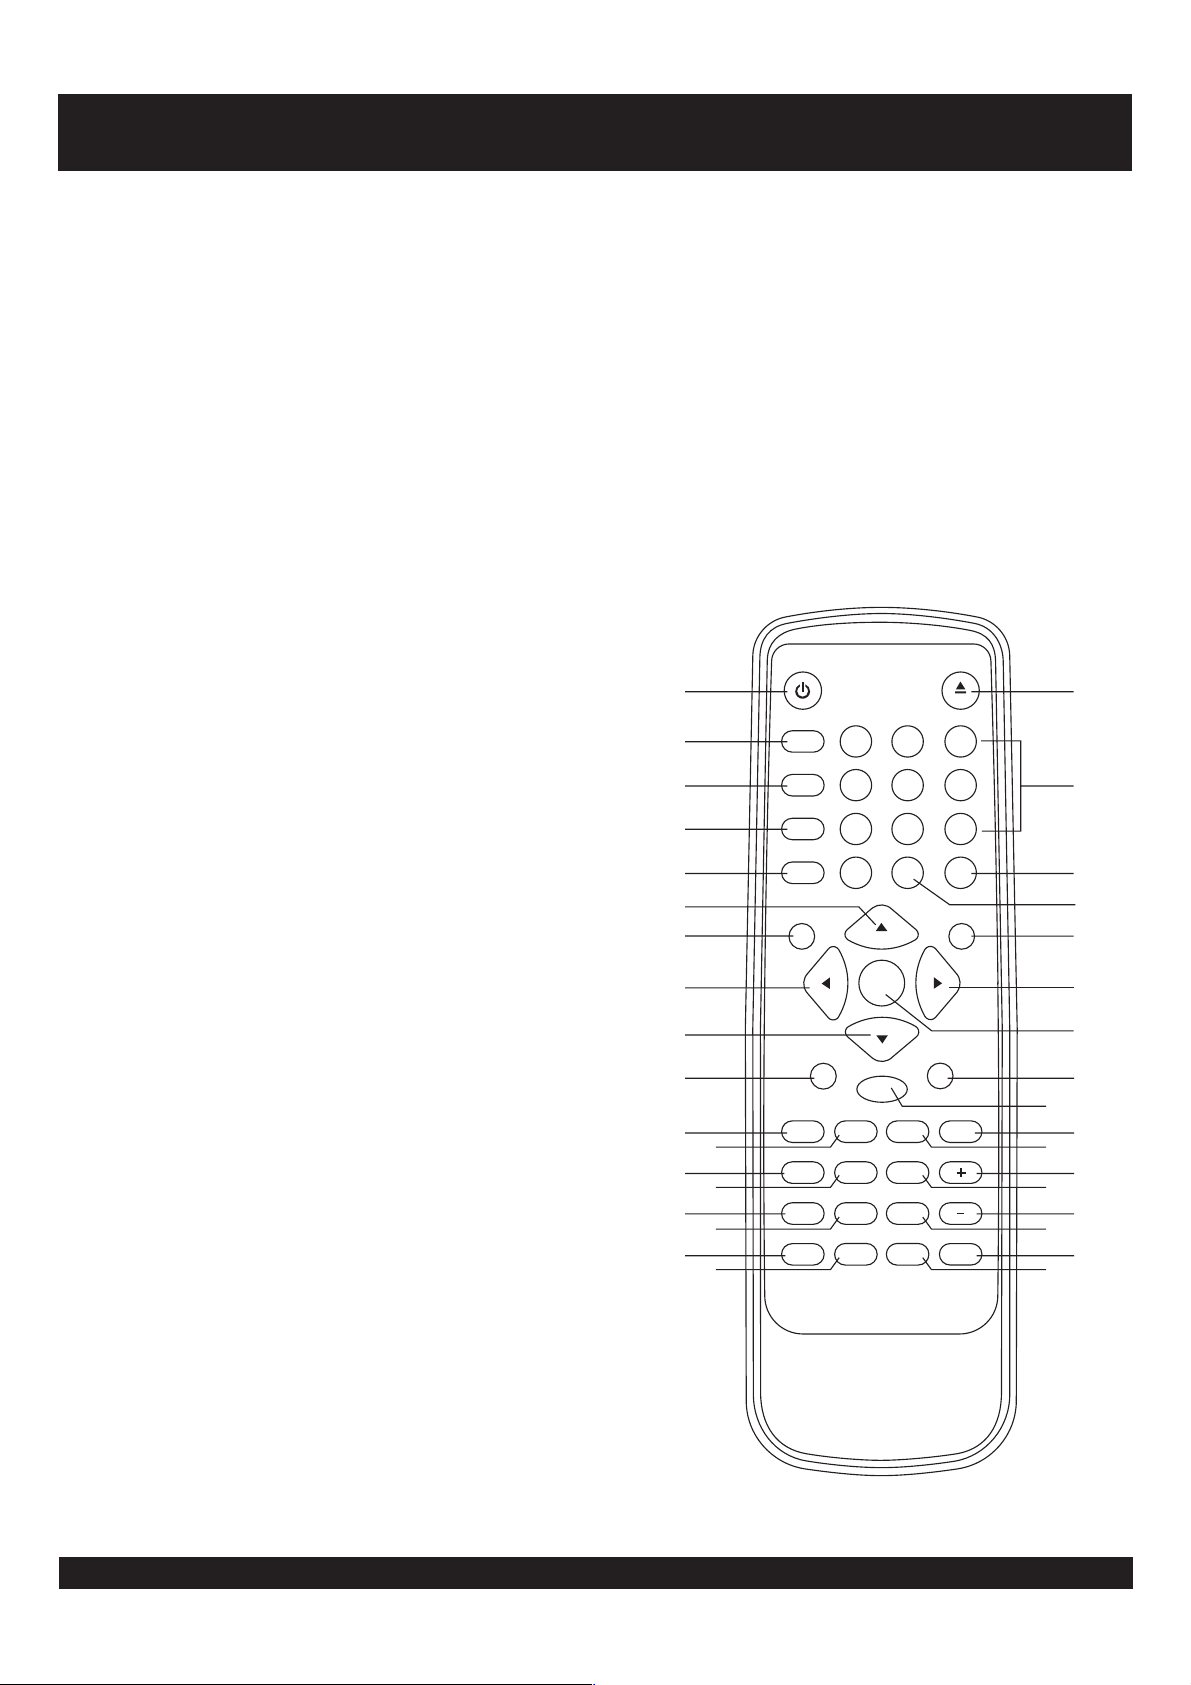
CONTROL REFERENCE GUIDE - REMOTE CONTROL
POWER button
1.
- Press this button to set the player to
standby on or off state (if the main power of the set is on).
TIMER button
2. - Select the sleep time.
DISPLAY button
- Press Display button continuously during
the playback, the screen will display the elapsed time and
remaining time (DVD function key).
3. - Select the desired signal input mode.
TV/AV button
4. - Select Nicam function.
NICAM/A2 button
REPEAT A-B button
- Press this button, the player will
repeat sections between two specific points (A-B)(DVD
function key).
REPEAT 1/ALL button
5.
- Press this button, the player will
repeat play one chapter or one title (for DVD), or repeat play
the current track or the whole tracks (for VCD/CD) (DVD
function key).
PLAY button
6.
- Press this button, the player will start to play
the disc (DVD function key).
LEFT/RIGHT navigation buttons
7.
PAUSE/STEP button
8.
- Press this button will halt or show the
movie one picture each time (DVD function key).
F.BWD ( ) button
9.
10.
11.
RED
F.FWD ( ) button
SUBTITLE button
GREEN
-This button will display the different
language on the screen (DVD function key).
TELETEXT button
ANGLE button
12.
- Press to access TELETEXT function.
- Press this button will display the angle
number and change to different angles (DVD function key).
CANCEL button
PROGRAM button
13.
- Press to exit TELETEXT function.
- Press this button can setup the
memory order of chapter or title (for DVD) or tracks (for CD)
(DVD function key).
REVEAL button
- Press this button once, the screen will
display the hidden text; press this button twice, the screen
will hide the hidden text.
MENU/PBC button
14.
- Select Playback Control for VCD if
PBC is on, when you press return button, the player will stat
at the VCD root (DVD function key).
SIZE button
- Adjust the size of text under TELETEXT
interface (Press the button once, the enlarged screen will
display the top half text of the TELETEXT interface; press
the button twice, the enlarged screen will display the bottom
half text of the TELETEXT interface; press the button three
times, the screen will display the normal size of text under
TELETEXT interface).
SEARCH button
15.
- Press this button during play then press
NUMERIC button to choose number corresponding to the
desired point (DVD function key).
ZOOM button - Press ZOOM button to enlarge picture size
16.
(DVD function key)
EJECT button
17.
.
- The tray in and tray out switch button (DVD
function key).
NUMERIC buttons
18.
SYS MENU button
19. - Press to enter operation interface.
STOP button
20.
SELECT button
21.
- Use these buttons to select the track.
- Press this button, the player will stop playing.
- Press this button to confirm what you
select.
SLOW button
22.
- Press this button during playback the play
speed will be reduced (DVD function key).
NEXT button
23.
- Press this button, the scene will skip to the
next chapter or the next track (DVD function key) .
24.
YELLOW
PREV ( )button
- Press this button, the scene will
skip to the PREVIOUS chapter or the track (DVD function
key).
25.
VOLUME + button
- Press this button, the volume will
increase.
26.
AUDIO button
INDEX button
27.
VOLUME - button
- Select the sound track (DVD function key)
- Display the index of TELETEXT.
- Press this button, the volume will
reduce.
28.
TITLE/RET. button
- Play the title (DVD) or return menu (
VCD) (DVD function key).
HOLD button
29.
MUTE button
30.
SETUP button
- To hold the TELETEXT playback.
- shut off by pressing this button.
- Press this button will enter initial settings
menu (DVD function key).
31.
-/-- button
32.
CLEAR button
- Clear the input information (DVD function
key).
33. - Select the options under
UP/DOWN navigation buttons
OSD setting interface.
33
33
11
13
15
POWER
1
DISPLAY
2
3
4
5
TIMER
TV/AV
NICAM/A2
REPEAT
1/ALL
PLAY STOP
12
4
A-B
789
0
6
7
PAUSE/STEP SLOW
8
9
10
12
14
SUBTITLE ANGLE AUDIO
TELETEXT CANCEL INDEX
PROGRAM
REVEAL
SEARCH ZOOM SETUP
SELECT
CLEAR
F.FWDF.BWD PREV NEXT
MENU/PBC TITLE/RET. VOLUME
SIZE
16
-/--
HOLD
EJECT
17
3
5
6
SYS MENU
18
19
31
20
TV/
ENTER
7
21
22
32
23
24
25
26
27
MUTE
28
30
29
Goodmans Helpline 0870 8730080
5
Page 7

REMOTE CONTROL PREPARATION
Battery Installation
Insert two batteries observing the correct (+) and (-)
polarities engraved beside the battery compartment.
Service life of batteries
The batteries normally last for about one year. And
battery life time may vary with the frequency the
remote control unit is used.
Batteries need replacing If the remote control unit fails
to work even near the player's remote sensor. Do not
mix new battery with used one or batteries of two
different types.
Use 2 batteries of size AAA.
Notes:
Do not attempt to recharge, short-circuit,
disassemble, heat or throw the batteries into the fire.
Do not drop, step on the remote control unit. This
may irremediable damage.
If the remote control unit is not going to be used for a
long time, remove the batteries. Otherwise,
electrolyte may leak which may lead not only to
malfunction but to burns if contact is made with the
electrolyte.
Wipe away any electrolyte leaking inside the remote
control, and install new batteries.
If any electrolyte should come into contact with parts
of your body, wash it off thoroughly with water.
Remote Sensor
Remote Control Operation Range
Point the remote control unit from no further than 7m from
and within the scope of 60 in relation to the remote
o
*
sensor of the player.
The distance may vary according to the brightness of
the room.
Notes:
Do not point bright lights at the remote control sensor.
Do not place objects between the remote control unit
and the remote control sensor.
Do not use this remote control unit while
simultaneously operating the remote control unit of any
other equipment.
30 30
POWER
DISPLAY
TIMER
12
TV/AV
5
4
A-B
NICAM/A2
7
89
REPEAT
1/ALL
-/--
0
PLAY STOP
SELECT
PAUSE/STEP SLOW
CLEAR
F.FWDF.BWD PREV NEXT
SUBTITLE ANGLE AUDIO
TELETEXT CANCEL INDEX
PROGRAM
MENU/PBC TITLE/RET. VOLUME
SIZE
REVEAL
HOLD
SEARCH ZOOM SETUP
7m
EJECT
3
6
SYSMENU
TV/
ENTER
MUTE
Goodmans Helpline 0870 8730080
6
Page 8
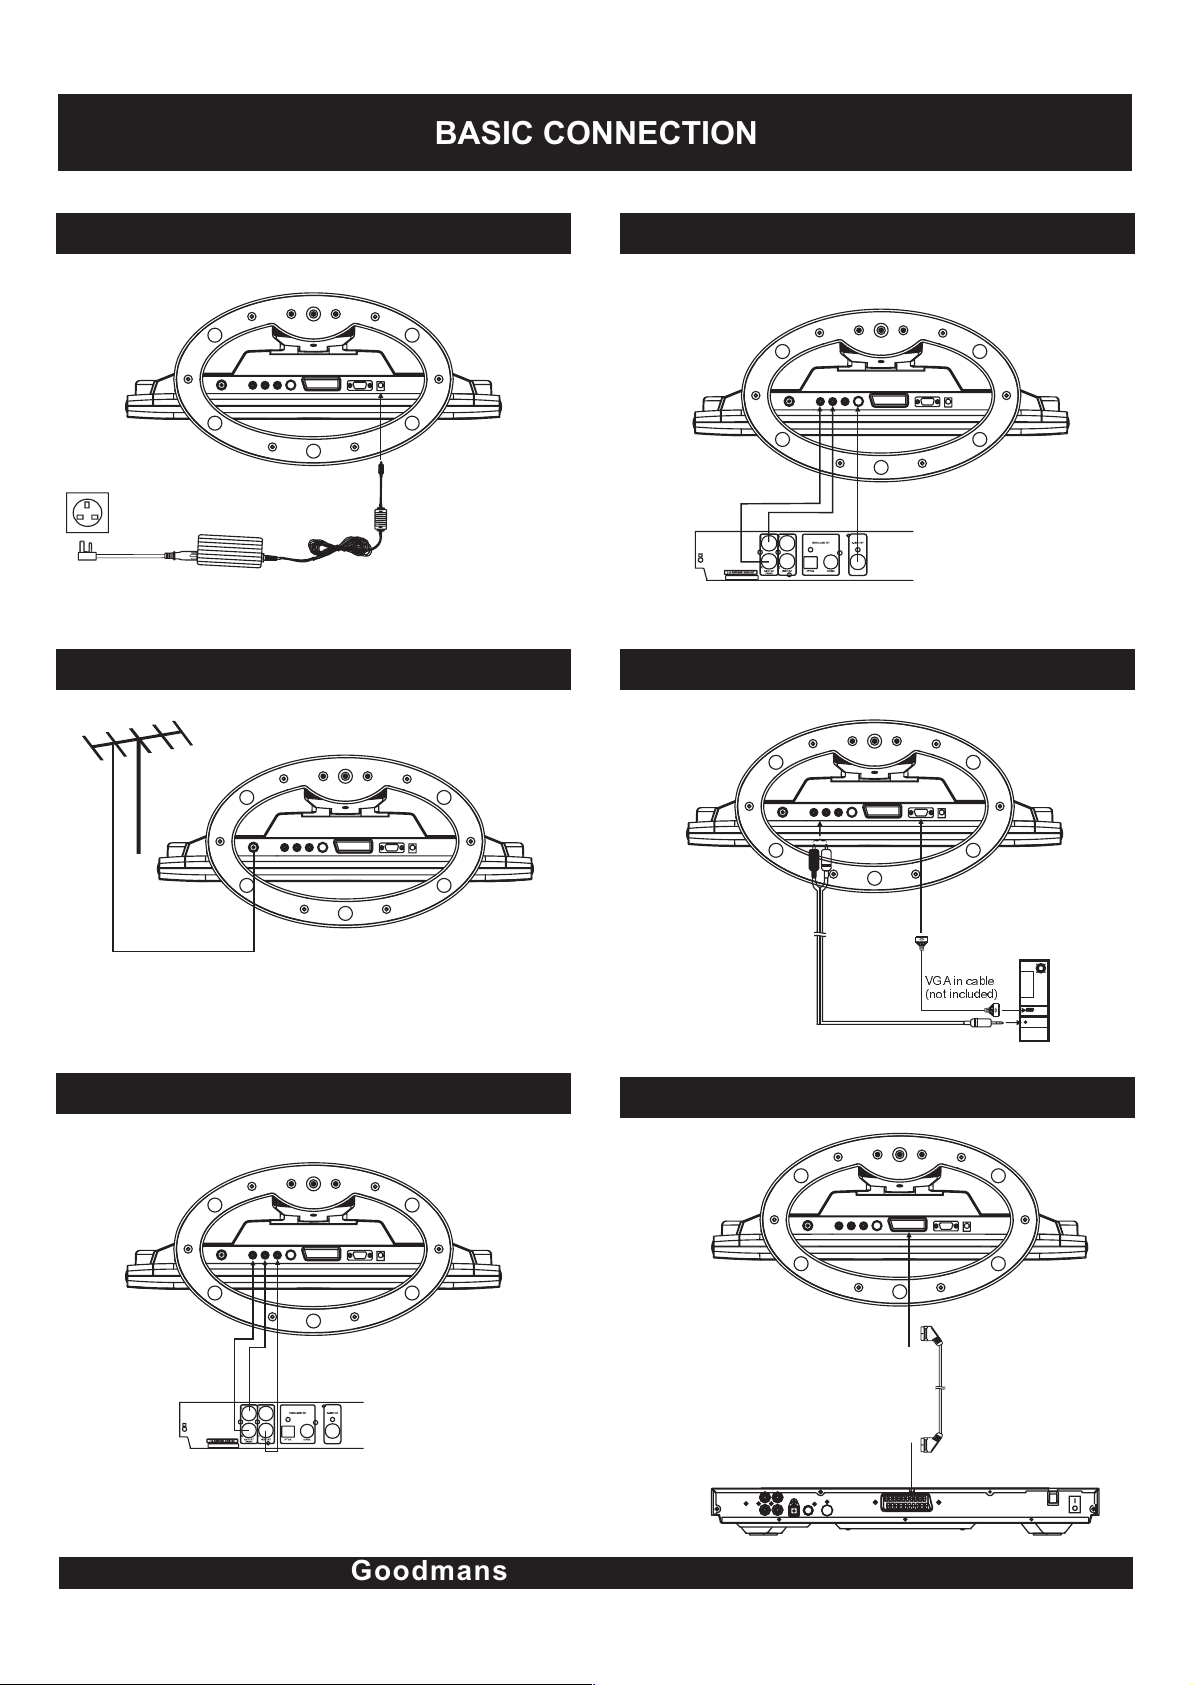
BASIC CONNECTION
Connecting to the AC outlet
To power outlet
AC cable
AC adaptor
Connecting to the TV
Connecting to DVD/VCD S-Video Terminals
Audio IN cable(L/R)
S-Video cable
Connecting to PC
Connecting to DVD/VCD AV Terminals
AV Video/Audio cable
VGA in cable
(not included)
Connecting to DVD with SCART video output connectors
Scart Cable
Goodmans Helpline 0870 8730080
7
Page 9

TV OPERATIONS
GET STARTED
Be sure your TV set is connected to the TV properly;
When the AC adaptor is connected, the power
indicator turns red and the TV set turns to standby
mode automatically.
Press POWER button on top of the TV set or on the
remote control once to turn on the TV.
Press the TV/AV button on top of the TV set or on
the remote control to switch to TV Mode(TV icon
appears at the right top corner of the screen).
Adjust the monitor according to the angle you would
like to watch TV by the TV set.
SEARCH A PROGRAM
Press CH UP/DOWN button on top of the TV set
once, the channel number changes. A desired channel
can be reached using these two keys.
-/-- button on the remote can facilitate you to locate a
specific channel. Press this button once, the icon of ""appears on the screen, input the channel number of
0-9 using numeric buttons; press this button twice, the
icon of "--" appears on the screen, input the channel
number that exceeds CH 9 using numeric buttons. Do
as follows:
To select CH 34
Press -/-- button until an icon of -- appears on the
screen,
Press 3 and then 4.
The channel 34 is selected.
Once the input is done, it will start broadcasting the
selected channel immediately.
TV SETTING MENU
Press once the MENU button on top of the unit or on the
remote control, the screen will pop up a setting menu;
Use the MENU button on the remote control to confirm
the item to be set; use the Arrow up/down buttons on top
of the TV set or on the remote control to select among the
setting options and then press MENU button again to
confirm. Use arrow left/right buttons to adjust the value.
Press again MENU button to confirm and return the
previous menu.
Use the Arrow up/down buttons to scroll to the next
setting item
Use the MENU button to return to the previous menu.
Press the MENU button continuously to exit the setting
menu. Or scroll to the Item EXIT. Or leave the unit idle for
some seconds, the unit will exit Setting MENU
automatically.
1.TV IMAGE SETTING
1) Set the mode
Image
Mode
Bright
Contrast
Colour
Sharpness
Hue
Standard
30
30
30
30
30
ADJUST THE VOLUME
adjust the volume, use the VOLUME UP/DOWN
TO
buttons on the top unit or on the remote control.
Adjust the mode by using the Arrow left/right buttons to
scroll among the options: Standard, Dynamic, Mild, Custom.
2) Set the brightness
Image
Mode
Bright
Contrast
Colour
Sharpness
Hue
Adjust the by using the Arrow left/right buttons
until the desired effect is reached.
Standard
30
30
30
30
30
Goodmans Helpline 0870 8730080
8
Page 10

3) Set the Contrast
Image
Mode
Bright
Contrast
Colour
Sharpness
Hue
Standard
30
30
30
30
30
Adjust the Contrast by using the Arrow left/right buttons until
the desired effect is reached.
4) Set the Colour
2. TV SOUND SETTING
1) Set the mode
Sound
Mode
Mode
Volume
Treble
Bass
Balance
Adjust the mode by using the arrow left/right buttons to
scroll among the options: Standard, Movie, Custom, Speech.
Standard
30
30
30
30
Image
Mode
Mode
Bright
Contrast
Colour
Sharpness
Hue
Standard
30
30
30
30
30
Adjust the Colour by using the Arrow buttons until the desired
effect is reached.
5) Set the Sharpness
Image
Mode
Mode
Bright
Contrast
Colour
Sharpness
Hue
Standard
30
30
30
30
30
2) Set the Volume
Sound
Mode
Volume
Treble
Bass
Balance
Standard
30
30
30
30
Adjust the Volume until the desired effect is reached.
3) Set the Treble
Sound
Mode
Volume
Treble
Bass
Balance
Standard
30
30
30
30
Adjust the Sharpness by using the Arrow left/right buttons
until the desired effect is reached.
6) Set the Hue
Image
Mode
Bright
Contrast
Colour
Sharpness
Hue
Standard
30
30
30
30
30
Adjust the Hue by using the Arrow buttons until the desired
effect is reached
Note: Hue adjustment is only available when receiving NTSC TV.
Goodmans Helpline 0870 8730080
Adjust the Treble until the desired effect is reached.
4) Set the Bass
Sound
Mode
Mode
Volume
Treble
Bass
Balance
Standard
Adjust the Bass until the desired effect is reached.
9
30
30
30
30
Page 11

5) Set the Balance
Sound
4) Set the Reset
Config
Mode
Mode
Volume
Treble
Bass
Balance
LR
Standard
30
30
30
0
Adjust the Balance between the left speaker and right speaker
by using Arrow buttons until the desired effect is reached.
3. TV CONFIG SETTING
1) Set the Port Select
Config
Port Select
Blue Screen
Language
Reset
TV
ON
ENGLISH
Port Select
Blue Screen
Language
Reset
TV
ON
ENGLISH
Scroll to Reset , When Reset is done, the settings are
cleared and return to default settings.
4. TV CHANNEL SETTING
1) Auto Tune
Channel
Add
I
Select the Port Select by using the Arrow left/right buttons to
scroll among the options: TV, SCART, DVD, CVBS, SVIDEO, PC.
2) Set the Blue Screen
Config
Port Select
Mode
Blue Screen
Language
Reset
TV
ON
ENGLISH
Use the Arrow left/right buttons to select the two options to
set the color of the screen: ON/OFF.
3) Set the Language
Config
Port Select
Blue Screen
Language
Reset
TV
ON
ENGLISH
Scroll to Auto Tune and press Arrow right button to begin
searching for and store channels automatically that are found;
press MENU button to exit the Auto Tune mode.
2) Manual Tune
Channel
Add
I
Scroll to Manual Search and press Arrow buttons to scroll the
Channel 1. You have to select which program channel you will
store the memory before start tuning channel by pressing CH
UP or DOWN. After complete channel tuning, press TV/AV
button to exit setup menu, and press the MENU button to save
the channels.
Use the Arrow buttons to select the desired language.
Goodmans Helpline 0870 8730080
10
Page 12

3) Fine tune
Channel
Add
I
Scroll to Tuning and Use Volume UP or DOWN button to fine
tune the current channel to a desired effect.
4) Sort setting
Channel
Add
I
Select the Sort item and press the Arrow right button to confirm,
the screen will appear a dialog box, select a channel by
inputting digits on the remote control under the source, then
select the destination channel by inputting the digits under the
destination; then press the MENU button to exchange and
TV/AV button to cancel the setting.
5) Add/Skip setting
Channel
VGA SETTING UP
GET STARTED
This unit supports VGA input, allowing you to use it as a
PC monitor for more clear picture with a resolution of up
to 1024X768; it features multi-media sound effects with
its built-in audio amplifier.
Make sure this unit is connected to PC correctly:
Power the unit on; press the POWER button on top of the
monitor or on the remote control to turn on the TV; use
the TV/AV button to switch to PC mode; the icon "PC" is
shown at the right top corner of the screen.
Turn on your PC and now you can use this player as a
monitor.
NOTE:
1. The default resolution of your PC should not exceed
1024X768.
2. The frame upgrade frequency should not exceed 75Hz,
otherwise, this unit will not work in a normal way. -- in
case of such failures, the message "signal out of
range" appears on the screen.
VGA SET UP
Press once the MENU button on top of the unit or on the
remote control, the screen will pop up a setting menu;
use the Arrow up/down buttons on the remote control to
select among the setting options and then press MENU
button again to confirm. Use LEFT/RIGHT navigation
buttons to adjust the value. Press again MENU button to
confirm and return the previous menu.
Use the Arrow up/down buttons on the remote control to
scroll to the next setting item.
Use the MENU button to return to the previous menu.
Press the MENU button continuously to exit the setting
menu. Or leave the unit idle for some seconds, the unit
will exit Setting MENU automatically.
Add
I
Select the Add/Skip item, then press the Arrow left/right buttons
to select between the two options: Add or Skip; when selecting
the Skip option, you can skip the channel that you don't like to
watch, if you want to resume the skipped channel, you can
select the Add option.
6) Sound System Setting
Channel
Add
I
Scroll to Sound System item , and press the Arrow left/right
buttons to select among the options: I, D/K, L, B/G
Note: UK sound is PAL I
Goodmans Helpline 0870 8730080
1. VGA IMAGE SETTING
1) Adjust the brightness
Image
Bright
Contrast
H Pos
V Pos
Adjust the brightness until the desired effect is reached.
30
30
30
30
11
Page 13

2) Adjust the contrast
Adjust the until the desired effect is reached.
2.VGA SOUND SETTING
1) Adjust the volume
3) Select the H Pos setting
Image
Bright
Contrast
H Pos
V Pos
Scroll to H.Position .
Use Arrow left/right buttons to adjust the value.
The screen will move horizontally .
4) Set the V Pos setting
Image
Bright
Contrast
H Pos
V Pos
Sound
Volume
Treble
30
30
30
30
Bass
Balance
30
30
30
30
Adjust the Volume until the desired effect is reached.
2) Adjust the treble
Adjust the Treble until the desired effect is reached.
3) Adjust the bass
Adjust the Bass until the desired effect is reached.
4) Adjust the Balance
Sound
30
30
30
30
Volume
Treble
Bass
Balance
30
30
30
30
Scroll to V.Position .
Use Arrow left/right buttons to adjust the value.
The screen will move vertically.
Goodmans Helpline 0870 8730080
Adjust the Balance until the desired effect is reached.
3. VGA CONFIG SETTING
1) Port select setting
Config
Port select
Autosync
Clock
Phase
Language
Reset
Select the Port Select by using the Arrow left/right buttons to
scroll among the options: TV, SCART, DVD, CVBS, SVIDEO, PC.
TV
30
30
ENGLISH
12
Page 14

2) Autosync setting
Config
6) Reset setting
Config
Port select
Autosync
Clock
Phase
Language
Reset
TV
30
30
ENGLISH
Scroll to Auto Adjust .
The Screen will do a self-adjustment immediately.
It will vibrates for some seconds and returns to normal.
After a self-adjustment process, the default optimum
status is reached.
3) Select the clock setting
Config
Port select
Autosync
Clock
Phase
Language
Reset
TV
30
30
ENGLISH
Port select
Autosync
Clock
Phase
Language
Reset
TV
30
30
ENGLISH
Scroll to Reset , When Reset is done, the settings are
cleared and return to default settings.
VIDEO OPERATION
This unit features a group of AV input terminals, allowing
you to connect it to external video devices. Make sure
the connection is done correctly(refer to the basic
connection section.)
Power this unit on and set the working mode to VIDEO by
means of the TV/AV button.
Power on the external video device.
S-VIDEO OPERATION
Scroll to Clock .
Use Arrow left/right buttons to adjust the value.
The screen will move either to the right or the left taking either
the left edge or the right edge as bench-mark.
4) Select the phase
Config
Port select
Autosync
Clock
Phase
Language
Reset
TV
30
30
ENGLISH
Scroll to Phase .
Use the Arrow left/right buttons to adjust the phase when the
characters or pictures appear fuzzy throughout the entire screen.
5) Select the language
Config
Port select
Autosync
Clock
Phase
Language
Reset
Scroll to Language .
Use Arrow buttons to select among the six languages:
English, German, French, Italian, Spanish and Portuguese.
TV
30
30
ENGLISH
This unit features an S-video input terminal, allowing you
to connect it to external video devices. Make sure the
connection is done correctly(refer to the basic connection
section.)
Power this unit on and set the working mode to S-VIDEO
by means of the TV/AV button.
Power on the external video device.
NOTES:
This unit provides auto-protection against situations of no
signal for the three external signal input
modes(VIDEO/S-VIDEO/VGA): the screen turns blue in
both cases of signal loss and abnormal signal. In this
case, "No Signal" shows on he screen; when signal
source returns to normal, the screen turns to natural
display.
SCART/DVD/CVBS/S-VIDEO
MENU SETTING
Press the MENU button on the top unit or on the remote
control once, the screen will pop up the setting menu;
use the Arrow up/down buttons on the remote control to
select among the setting options and then press MENU
button again to confirm. Use the LEFT/RIGHT navigation
buttons to adjust the value.
Use the UP/DOWN navigation buttons to scroll to the
next setting item
Use the MENU button to return to the previous menu.
Press the MENU button continuously to exit the setting
menu. Or leave the TV set idle for some seconds, the TV
will exit Setting MENU automatically.
Goodmans Helpline 0870 8730080
13
Page 15

1. SCART/DVD/CVBS/S-VIDEO IMAGE SETTING
5) Set the Sharpness
Image
1) Set the mode
Image
Mode
Bright
Contrast
Colour
Sharpness
Hue
Standard
30
30
30
30
30
Adjust the mode by using the Volume up/down buttons to
scroll among the options: Standard, Dynamic, Mild, Custom.
2) Set the brightness
Image
Mode
Bright
Contrast
Colour
Sharpness
Hue
Standard
30
30
30
30
30
Mode
Mode
Bright
Contrast
Colour
Sharpness
Hue
Standard
30
30
30
30
30
Adjust the Sharpness until the desired effect is reached.
6) Set the Hue
Image
Mode
Bright
Contrast
Colour
Sharpness
Hue
Adjust the Hue until the desired effect is reached(Not for DVD).
Standard
30
30
30
30
30
Adjust the brightness until the desired effect is reached.
3) Set the Contrast
Image
Mode
Bright
Contrast
Colour
Sharpness
Hue
Standard
30
30
30
30
30
Adjust the Contrast until the desired effect is reached.
4) Set the Colour
Image
Mode
Mode
Bright
Contrast
Colour
Sharpness
Hue
Standard
30
30
30
30
30
2. SCART/DVD/CVBS/S-VIDEO SOUND SETTING
1) Set the mode
Sound
Mode
Mode
Volume
Treble
Bass
Balance
Standard
30
30
30
30
Adjust the mode by using the Volume up/down buttons to
scroll among the options: Standard, Movie, Custom, Speech.
2) Set the Volume
Sound
Mode
Volume
Treble
Bass
Balance
Standard
30
30
30
30
Adjust the Colour until the desired effect is reached.
Goodmans Helpline 0870 8730080
Adjust the Volume until the desired effect is reached.
14
Page 16

3. SCART/DVD/CVBS/S-VIDEO CONFIG SETTING
1) Set the Port Select
Config
Port Select
Language
Reset
Select the Port Select by using the Arrow left/right buttons to
scroll among the options: TV, SCART,DVD, CVBS, SVIDEO, PC.
TV
ENGLISH
2) Set the Language Setting
Scroll to Language
Use Arrow buttons to select among the six languages:
English, German, French, Italian, Spanish and Portuguese.
3) Set the Reset
DVD INITIAL SETTINGS
Once the initial programming is entered it is retained in
memory until changed, the player can always be
operated under the same conditions.
The settings will be retained in the memory until the
settings are changed even after setting the player to
the standby mode.
Common procedure for initial settings
1. Press SETUP button.
2. Use the navigation buttons to select preferred item,
then press SELECT button, each screen for setting the
value is displayed.
3. Press SETUP button to close setup menu in any mode.
4. Use left navigation button to switch to another main
setup items.
1. General setup
Scroll to Reset , When Reset is done, the settings are cleared
and return to default settings.
General Setup Page
TV DISPLAY
ANGLE MARK
OSD LANG
CAPTIONS
SCREEN SAVER
1.1 TV DISPLAY
- it is used to select the TV output mode.
Options: NORMAL /PS: Pan & scan mode
NORMAL/ L/B: Letter box mode
WIDE : 16:9 wide screen mode
1.2 ANGLE MARK
- it is used to select whether or not the
multi- angle icon is display on the screen when a
multi-angle DVD disc is playing.
Options: On: Icon will be displayed
Off: Icon will be turned off
1.3 OSD. LANG
- it is used to select different On Screen
Display language for different user.
Options: English
1.4 CAPTIONS
- It is used to select the captions on or off.
Options: On: Captions is enabled
Off: Captions is disabled
1.5 SCREEN SAVER
- when the player is not in used for
2 minutes, a running DVD logo will move across the
TV screen to protect the TV CRT.
Options: On: Screen saver is enabled
Off: Screen saver is disabled
Goodmans Helpline 0870 8730080
15
Page 17

2. Audio setup
Audio Setup Page
Speaker Setup
Equalizer
2.1 SPEAKER SETUP
- it is used to set the speaker
outputs levels.
DOWNMIX mode
Options: LT/RT - Left/Right mix mode
STEREO - Select this option if you don't
have a 5.1 channels amplifier.
4. Preference setup
Power on this set by pressing power button without
placing any disc, press setup button, then you can
the Preference Page
by pressing navigate button .
Preference Page
TV TYPE
Audio
Subtitle
Disc Menu
Parental
Default
4.1 TV TYPE
Options: PAL
4.2 AUDIO
- select preferred audio language.
(DVD only - need disc software support)
enter
2.2 Equalizer
Eq type
SOUND MODE: OFF/ROCK/POP/LIVE/DANCE/
TECHNO/CLASSIC/SOFT
BASS BOOST: ON/OFF
SUPER BASS: ON/OFF
TREBLE BOOST: ON/OFF
3. Video setup
Video Setup Page
SHARPNESS
GAMMA
HUE
SATURATION
LUMA DELAY
3.1 SHARPNESS - to set the sharpness for the display.
Options: HIGH MEDIUM LOW
3.2 GAMMA
Options:
3.3 HUE
- to set the gamma effect for display.
HIGH MEDIUM LOW NONE
- to set the colour impression for display.
4.3 SUBTITLE - select preferred subtitle language.
(DVD only - need disc software support)
4.4 DISC MENU
- select preferred disc menu language.
(DVD only - need disc software support)
4.5 PARENTAL
- select rating levels. You must set
PASSWORD MODE OFF to enable this selection.
(DVD only - need disc software support)
4.6 DEFAULT
- Reset to factory settings
5. Password Setup
Password Setup
Password Mode
Password
5.1 PASSWORD MODE
Options: ON/OFF
5.2 PASSWORD
Option: Change
Select to change password
5.2.1 OLD PASSWORD
5.2.2 NEW PASSWORD
5.2.3 CONFIRM PWD
3.4 SATURATION
3.5 LUMA DELAY
Options: 0T 1T
- to set the saturation level for display.
Goodmans Helpline 0870 8730080
Procedure to change password:
1) Enter old password in the OLD PASSWORD row.
2) Enter new password in the NEW PASSWORD row.
3) Enter the new password again in the CONFIRM PWD
row.
You may reset the password if you forget the old
password by using the supervisor password: 1389
16
Page 18

Before enjoying DVD/Video CD/CD
Stopping play
The On-Screen menu language of your player has been
factory pre-set to English.
If you would like to change the menu language to other
language, please refer to "Selecting language of OnScreen Display menu".
In the explanation given below it is assumed that English
has been selected as the menu language.
Preparations
Switch the TV ON and select "Video" as the TV input.
Switch on the stereo system's power if the player has been
connected to a stereo system.
Basic play
1. Press POWER to switch on the power.
2. Insert a disc into the disc slot, the player will start to
read the disc immediately.
OPEN
Press STOP
For your convenience:
When player is stopped, the player records the point
where STOP was pressed (RESUME function). Press
PLAY again, playback will resume from this point. When
the tray is opened or STOP is pressed again, the
RESUME function will be cleared.
Skipping ahead or back
Skipping ahead
Press NEXT SKIP button during play
A chapter(DVD) or a track (Video CD/CD) is skipped each
time the button is pressed.
Skipping back
Press PREV SKIP button during play
A chapter (DVD) or a track (Video CD/CD) is skipped
each time the button is pressed.
LOADING
DVD-VIDEO
3. When a menu screen appears on the TV, move the
navigation buttons or press the numeric buttons to
select preferred track number, then press SELECT
button to confirm.
1 WHAT WILL I DO
2 HEAR ME CRY
3 WIT OUT YOU
H
4 MOVE CLOSER
WITHOUT YOU
4. When the menu continues onto another screen, press
NEXT SKIPbutton to view the next screen, or press
PREV SKIPbutton to skip to previous screen.
NOTE: Due to the different design of some software
titles, NEXT button may not always work.
5. To stop play and return to the menu screen, press
TITLE button, or MENU button(which button is pressed
differs depending on the disc used)DVD, PRESS
TITLE, MENU or RETURN. Video CD, press RETURN.
Rapid advance(Rapid reverse)
During playback, press F.FWD button or F. BWD
button to fast forward/rewind.
Press PLAY button to resume normal play.
F.FWD F.FWD F.FWD
2X 32X
F.BWD F.BWD
2X 32X
Fast forward
Fast backward
F.BWD
Goodmans Helpline 0870 8730080
17
Page 19

Pause or step play
During playback, press PAUSE/STEP button, the play will be
paused, and in this mode, each time the PAUSE/STEP button
is pressed, the player will only play one picture, to resume
normal play, press PLAY button.
Slow-motion play (DVD/VCD)
On the remote control unit
Press SLOW button during playback.
Plays the disc at a 1/2 of normal speed at first. Each time
the button is pressed, the play speed becomes slow(1/2,
1/4, 1/8, 1/16)
Press PLAY button, normal play will resume.
1/2
MP3 PLAYBACK
Basic play
1. Insert the disc containing the files in MP3 format to be
played and after a few seconds, the TV screen will
show all folders on the disc.
00:00 00:00
001/002
\
MUSIC
SONG
KODAK PICTURE CD / JPEG CD
If Kodak Picture CD is inserted, slide show is begins
automatically.
For JPEG picture CD, select the folder you want to
play by the navigation buttons and press SELECT
button to confirm.
The files in this folder are displayed and select your
favourable pictures by using the up/down navigation
buttons and press SELECT button to start playback.
Thumbnail of picture will be displayed while you
scrolling across the file name.
00:00 00:00
002/006
\FOLDER1\
BOAT
CAR
DOG
FLOWER
SHUTTLE
Resolution 640 x 480
Play mode:
FOLDER - all the files in the folder will be played.
RANDOM - randomly select any file to play.
SINGLE - play one file only.
REPEAT ONE - repeat one file.
REPEAT FOLDER - all the files in the folder will be played
repeatedly.
Once a folder and file is selected, the picture is load onto
the TV screen.
Folder
2. Select the folder you want to play by the navigation buttons
and press SELECT button to confirm.
3. The files in this folder are displayed and select your
favourable song by using the up/down navigation buttons and
press SELECT button to start playback.
MP3 bit rate indicator
Play time
Current song/Total songs
Current folder
Note:
Maximum 11 characters including space can be
Totaltime
01:51 03:47 192
002/006
\MUSIC\
MP3
ALAN
MP3
BUZZ
MP3
CANDY
MP3
DIANA
MP3
MANDY
MP3
SIMPSON
Folder
Play mode
displayed for the filename. Non-English file name will not be
displayed correctly.
4. Press NEXT button to see the next page or PREV button to
see the previous page.
5. Press REPEAT 1/all button change play mode.
Play mode:
FOLDER - all the files in the folder will be played.
RANDOM - randomly select any file to play.
SINGLE - play one file only.
REPEAT ONE - repeat one file.
REPEAT FOLDER - all the files in the folder will be played
repeatedly.
Note: The time to load and display picture depends on
the file size of the pictures.
During playback, press MENU button to return to folder
selection or STOP button to enter preview mode.
Skip to next/previous picture
Press NEXT button to skip to the next picture or PREV
button to skip to the previous picture.
If no key is pressed for 5 seconds, it will skip to next
picture automatically.
Rotating pictures
Press RIGHT navigation button to rotate the picture
clockwise.
Press LEFT navigation button to rotate the picture
counter-clockwise.
ROTATINGROTATING
Goodmans Helpline 0870 8730080
18
Page 20

Flipping pictures
Press UP navigation button to flip the picture vertically.
Press DOWN navigation button to flip the picture
horizontally.
PICTURE CD
Slide show effects
Press PROGRAM button to select one of the effects
when changing from one picture to another:
1 WIPE TOP
2 WIPE BOTTOM
3 WIPE LEFT
4 WIPE RIGHT
5 DIAGONAL WIPE LEFT TOP
6 DIAGONAL WIPE RIGHT TOP
7 DIAGONAL WIPE LEFT BOTTOM
8 DIAGONAL WIPE RIGHT BOTTOM
9 EXTEND FROM CENTRE H
10 EXTEND FROM CENTRE V
11 COMPRESS TO CENTRE H
12 COMPRESS TO CENTRE V
13 WINDOW H
14 WINDOW V
15 WIPE FROM EDGE TO CENTRE
16 MOVE IN FROM TOP
17 NONE
ENJOYING VIDEO CDS WITH
Picture Shrink/Zoom
Press ZOOM button to enter the zoom mode.
Press F. FWD button to enlarge picture to 100%, 125%,
150% and 200%.
Press F. BWD button to shrink enlarge pictures to 50%,
75%, and 100%.
If the picture is enlarged, you may press navigation
buttons to see other portions of the picture.
PLAYBACK CONTROL
When playing VCD 2.0/3.0 with PBC, the player will
show the VCD on the screen.
VCD
After a few seconds, a menu will appear on the screen.
1 WHAT WILL I DO
2 HEAR ME CRY
3 WITHOUT YOU
4 MOVE CLOSER
Press numeric buttons to select corresponding track, if
the track number is under 10, choose one of the
numeric buttons0~9.
If the track number is exceed 10, press +10 button
firstly,
then press numeric buttons0~9.
During playback, press RETURN button to return to
main menu.
Press NEXT SKIP button or PREV SKIP button ,
the player will play in the scheduled sequence on the
disc.
Goodmans Helpline 0870 8730080
19
Page 21

ON SCREEN DISPLAY INFORMATION
REPEAT PLAY
When the player is under operation, press DISPLAY button
continuously on the remote control, the screen will
display sequently parts of information, all information and clear
information.
TITLE ELAPSED
T: 02/03 C: 07/28 0:19:20
CHAPTER REMAIN
T: 02/03 C: 07/28 0:01:34
DISPLAY OFF
TITLE REMAIN
T: 02/03 C: 07/28 1:17:00
CHAPTER ELAPSED
T: 02/03 C: 07/28 0:01:53
Press "DISPLAY" button again, the screen display will be cleared.
Press REPEAT 1/ALL button during play, it will repeat play one
chapter or one title (for DVD disc), or repeat play track (for
VCD/CD).
DVD DISC
Repeat chapter
Repeat title
Repeat all
VCD/CD DISC (In the PBC OFF mode)
PROGRAM PLAY
The player plays the tracks inthe disc in an order you desired.
1. Press PROGRAM button and the screen will display the
program menu.
!
"
#
2. Press navigation buttons to choose memory index and then
press SELECT button to start input. Enter desired
Titles/Chapters numbers by using the numeric buttons. The
selected Titles/Chapters are stored into the memory. Select
NEXT on the menu to see the next page. Up to 20 memories
can be stored.
Note: Leading zero is not necessary. If the track number is
more than 10, press the 10 key first and then the unit digit.
Example: Track 3, press "3"
Track 12, press"+10" and then "2"
Track 21, press"+10" twice and then "1"
$
%
&
'
Repeat track
Repeat disc
A-B repeat play
Repeating sections between two specific points (A-B
repeat)
1. PressA-B REPEAT button during play at the point where
repeat play is to be started(A).
2. PressA-B REPEAT button at the point where repeat play
is to be ended (B). Repeat play of the selection between
pointsA and B starts.
3. Press A-B REPEAT button to return to normal play.
3. To start program play, select START on the menu or select EXIT
on the menu to exit withoutprogram play.
4. To clear programmed items, scroll the navigation button to the
item to be cleared and press CLEAR button on the remote
control, the selected Item will bedeleted.
Goodmans Helpline 0870 8730080
20
Page 22

CHANGING SUBTITLE LANGUAGE
(DVD ONLY)
VIEWING FROM ANOTHER ANGLE
(DVD ONLY)
It is possible to change the subtitle language to a different
language from the one selected at the initial settings. ( This
operation works only with discs on which multiple subtitle
languages are recorded)
1. Press SUBTITLE button during play, the screen will display
the current language.
2. Press SUBTITLE button again to change language or turn off.
NOTE: When no subtitles are recorded, press this button
will not work.
CHANGING SUBTITLE LANGUAGE
SUBTITLE01/04 CHINESE SUBTITLE02/04 ENGLISH
ZOOM PLAY
This function allow you to enjoy a motion or motionless
picture.
Press ZOOM button when playing, the screen shows:
3x2x 4x
Some DVDs may contain scenes which have been shot
simultaneously from a number of different angles. For
these discs, the same scene can be views from each of
these different angles using the ANGLE button.
Press ANGLE during play, number of angle being
playback will be displayed in the screen, press the
button will change to different angles.
SEARCH FOR PREFERRED SCENE
1. Press SEARCH button during play, then pressup or down
navigation button to select Title, Chapter, Title time or
Chapter time to play.
2. Press SELECT button to confirm selection.
3. Enter the Title, Chapter, Title time or Chapter time to play
by using the numeric buttons.
4. Press SEARCH button again to exit search mode.
Select title or chapter number
Bitrate 52 |||||
Menu
Title 1/2
Chapter 2/29
Audio
Subtitle Off
Title Elapsed 0:06:38
1/31/4 1/2
Press NAVIGATION button to scroll across the
enlarged picture.
CHANGING AUDIO SOUNDTRACK
LANGUAGE(DVD/VCD DISC)
It is possible to change the audio soundtrack language to
a different language from the one selected at the initial
settings(This operation works only with discs on which
multiple audio soundtrack languages are recorded).
Press AUDIO button during playing DVD disc, the
screen will display the number of current soundtrack
language, press the button again will change the
language.
Pressing AUDIO button during playing VCD disc will
change audio output mode: L audio soundtrack, R
audio soundtrack and stereo (VCD disc only).
NOTE:
press this button will not work.
NOTE:
removed, the language heard is the one selected at the
initial settings.
When no soundtrack languages are recorded,
When the power is turned on or the disc is
Menu
Audio
Subtitle Off
ANGLE 1/1
Bitrate 52 |||||
Note: TT Time = Title time
TT Time 0:06:38
Title Elapsed 0:06:38
CH Time = Chapter time
Select title or chapter time
Goodmans Helpline 0870 8730080
21
Page 23

Cleansing
MONITOR MAINTENANCE
Do not spray non-standard cleansing lotions directly on to the screen; this may damage the
screen.
Others
Wipe the monitor with soft smooth cloth moistened with the cleansing lotion
this can provide sufficient protection for the screen.
Place the unit so it is way away from items such as a vase or chemicals: this may cause
unwanted harm, electric shock or fire.
SO2
Cleansing this housing with volatiliser, thinner or any corroding chemicals is prohibited as
this unit contains.plastic parts that are susceptible to corrosion or flammability when in
contact with them
Unplug the unit immediately it does not function correctly (for example, abnormal sound or
blank screen or smoke
This could save you from the occurrence of a fire.
).
recommended;
Do not open the housing( through back cabinet) -- no serviceable parts are included; you
could risk exposing yourself to live components.
It may cause electric shock or fire.
Avoid exposing the monitor to locations;
Avoid direct sunlight or other heating sources.
This may lead to malfunction of the monitor.
Do not insert metal object of any kind into the openings of the monitor.
This may result in electric shock, fire or injury.
moist dusty or smoky
Goodmans Helpline 0870 8730080
22
Page 24

TROUBLE SHOOTING
Before requesting service for this unit, please check the chart below for a possible cause of the problem you are
experiencing.
Some simple check or adjustment on your own may eliminate the problem and restore proper operation.
Symptoms Possible causes /Remedy
No picture or sound
No picture
No sound
Dark Picture
Unstable Picture
Double image Angle is not correctly set.
Snowy display
No color
No subtitles.
Angle cannot be changed.
When in VGA input mode, the
message "signal out of range"
appears on the screen.
Check to see if the AC power cable is plugged properly;
Make sure the monitor is in play mode.
Make sure the channel is correctly selected;
External TV antenna may be readjusted;.
Check if the external video sources are connected.input
Check whether the volume is set to low level or muted?
Earphones is inserted into the earphones jack.
Check the brightness and contrast settings
Adjust the direction
ON/OFF interference
Make sure the system settings are correct.
Subtitles appear only with discs which contain them.
Subtitles are cleared from the TV monitor, Perform the steps to display
the subtitles.
This function is dependent on software availability. Even if a disc has a number
of angles recorded, these angles may be recorded for specific scenes only.
1. The default resolution of your PC should not exceed 1024X768.
2. The frame upgrade frequency should not exceed 75Hz, otherwise, this unit
will not work in a normal way.
of the aerial.
Goodmans Helpline 0870 8730080
23
 Loading...