

Page 1
GSR90DABI
IPOD DOCKING DAB RADIO
1
Page 2
.
1 2 3 4 5 6
SLEEP ALARM MODE
VOLUME
STANDBY
PRESET STATIONS
2
1
}
7
/MMC
TM
TUNE
INFO
/MENU
AUTO TUNE
MENU
/EXIT
/PLAY MODE
/SELECT
43
5
SNOOZE
FEATURES AND CONTROLS
10 11 8 12 9
ANT.
15 14
2
13
R
L
LINE OUT
161718
DC 9V
3
Page 3
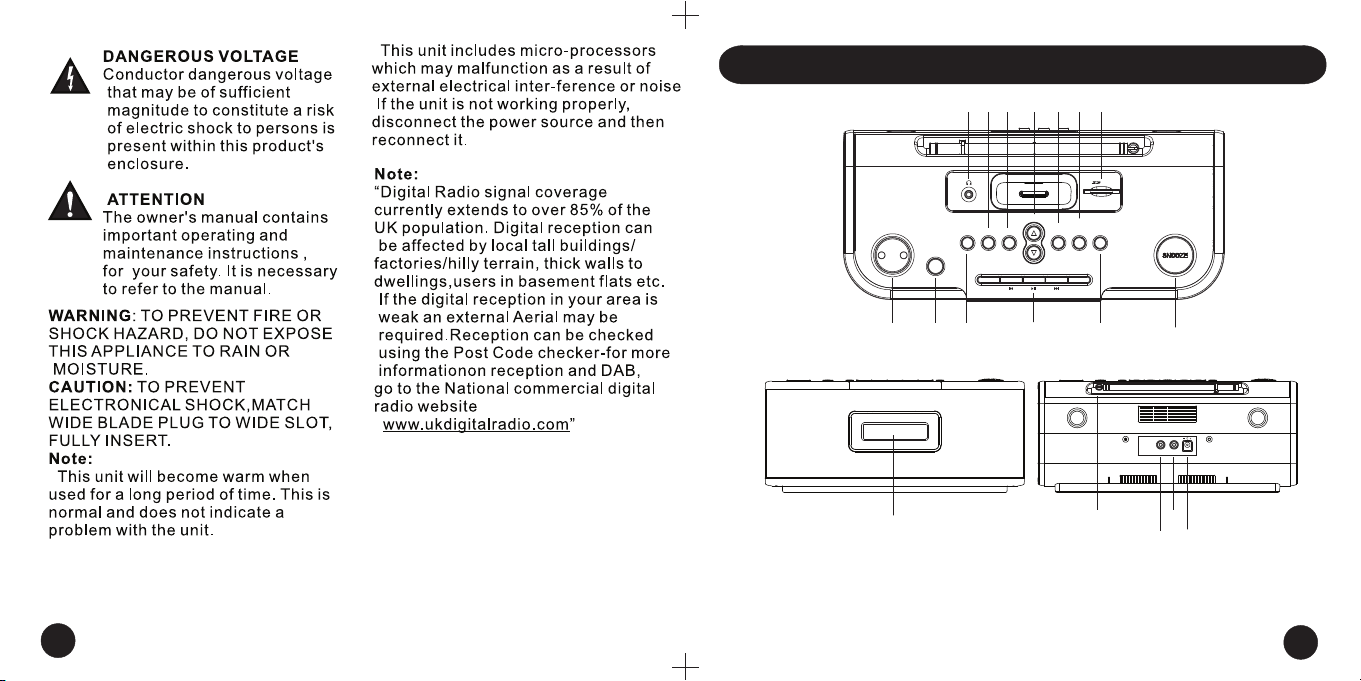
FEATURES AND CONTROLS
1. HE ADPHO NE
2. ALARM BUTTON
3. MO DE BUTTON
4. TU NE BUTTON
5. ME NU/SE LECT BUTTON
6. INFO /MENU /EXIT BUTTON
7. SD/M MC CARD SLOT
8. SL EEP BUTTON
9. AUTO TUNE/PLAY MODE BUTTON
10.V OLUME B UTTON
11. STANDB Y BUT TON
12. PRE SET BUT TON S
13. SNO OZE BUT TON
14.F M TEL ESCOP IC ANTEN NA
15.L CD DISP LAY
16.A UDIO OU T LEF T
17.A UDIO OU T RIG HT
18.D C SOCKE T
SWITCHING ON YOUR
RADIO FOR THE FIRST TIME
1. Connect the p ower cord to the
radio via the DC s ocket at the
back pa nel.
2. Connect the power supply to your
AC mains outlet.
3. Pull up the aerial.
4. After p ower up , your display will light
up and th e display will show the
following:
G o o d m a n s
D A B R a d i o
5. Then t he disp lay wil l switc h to
standby mode and display the clock.
The tim e will be a utoma tical ly set
after t uning i n the rad io.
*
H H : M M : S S
6. Now press the “STANDY ” butto n on
the top p anel to t urn the r adio on .
7. The re ceive r will bo ot into D AB mode .
LISTENING TO THE RADIO
DAB MOD E
1. To selec t DAB mod e, pres s the
“MODE ” butto n, the re ceive r will
display the fo llowing
Switching to...
DAB
2. Then t he rece iver wi ll
autom atica lly quick scan just the
7 band II I frequ encie s 11B,11C,
11D,12 A,12B ,12C, a nd 12D. The
displ ay will show the following:
Autotune
Quick scan
3. If you hold the “AU TO TU NE/PL AY
MO DE” b utton f or a few se conds ,
the receiver will automatically fully
scan all 41 band III ensemble
frequencies. The di splay w ill sho w
the fol lowing:
Autotune
Full scan
4. During scanning, the receiver will
initi ally display the following, where
“N” is the number of services cur rently
in the database, and “FFF” is the name
of the fr equen cy(“11B”, “L2 0” etc. )
□□□□□□□□□□□□ N
Searching... FFF
5. The to p line of t he disp lay wil l be
updated to pro vide a bar graph
ind icating progress th rough the scan:
■■■■□□□□□□□□ N
Seaching... FFF
6. If the s ervic e database is still empty
after a s can, th e recei ver will display
the fol lowing, If this happens try moving
the unit and press the auto tune button
again.
No signal DAB
4
5
Page 4

LISTENING TO THE RADIO
LISTENING TO THE RADIO
MANUAL TUNE
1. Hold “ME NU/ SE LEC T” butt on,
the receiver will display Manual
tune
Manual tune
2. After t his tim e, the re ceive r will
displ ay the cu rrent DAB chan nel
and fre quency:
12B 225.648MHz
Tuning...
3. If a DAB e nsemb le is ava ilabl e
the ensemble name will be
displ ayed:
12B 225.648MHz
Ensemble~name~16
4. Press the ▲or▼ button to sele ct
the s tation between the avai lab le
DAB s tations. Th en press
“ME NU /SE LEC T” bu tto n to se lect
6
you r desired station, o n thi s one
fre quency, there will be several
sta tions, Press the ▲or▼ but ton
to se lect. Press “SELECT” bu tto n
aga in for exiting manua l tun e.
INFORMATION
Press the “INF O” butt on when
your listening to the radio. The bott om
line will change in the following
sequence:Scrolling text - Music type Channel group name - Signal bar Tim e/Dat e - Scrol ling te xt.
Please Note: If the radio station is not
transmitti ng extr a infor mation then eg
<RadioText> will be displayed
BASS AND TREBLE
To adjust the sound hold the "INFO"
butto n down, Bass will be displayed.
use the up/down buttons to adjust,
press select to change to treble.
Press INF O aga in to exi t.
STORE PRESET
1. You can store upto 5 of your
favorite sta tions to the pre set key s.
This wi ll enab le you to g et quic k
access to your f avorite stat ion.
2. Ther e are 5 pre sets in F M and 5
presets in DAB.
Service8 XXX
Preset 1-5
DAB
3. To store a p reset , you mus t first
tune to y our des ired station .
4. To store t he stat ion, ho ld butt on
“1”-“5” unti l the rec eiver d isplay
preset N store d. (whe re “N” is t he
preset number and XXX is either
“DAB” or “FM”) :
Service8 XXX
Preset N stored
5. If the D AB serv ice being stored is
a ‘hidden’ (see Sec ondar y and
Data Se rvice s in DAB) service,
it will n ot be sto red, an d the
following will be displayed for
2 seconds:
Cannot Store
After t his tim e, the re ceive r will re turn
to its id le stat e.
Recalling a stored station
1. Once you have s aved a station t o
one of th e presets, you can reca ll it
by pres sing and releasing the
corre spond ing preset key.
2. If you s aved ra dio 1 to Pr eset 1,
then ju st pres s the but ton “1” .
3. If the re is no se rvice a ssociated
with th e prese t, when y ou pres s the
butto n 1-5, th e receiver will display
the fol lowin g (where “N” is th e
preset number and XXX is either
“DAB” o r “FM”) f or 2 seco nds:
Service8 XXX
Preset N empty
7
Page 5

LISTENING TO THE RADIO
LISTENING TO THE RADIO
FM MODE
1. To select FM, press the “M ODE”
butto n, the re ceiver will switch
to FM mod e. It wil l autom atica lly
tune to t he near est sta tion. T he
display will show the frequency.
Switching to...
FM
Station8 FM
Information
2. For ma nual search, press the
▲or▼ bu ttons r epeat edly. To
activ ate aut o searc h up, pre ss or
hold th e ▲ butto n, To activ ate
auto se arch do wn, pre ss or hol d
the ▼ but ton.
8
3. For Auto tune, p ress th e “AUTO
TUNE/ PLAY MO DE” but ton, th e
recei ver will enter the ‘auto tune’
state a nd carr y out an up ward
scan an d stop on ce a stat ion has
been fo und. Ho ld the “AUTO
TUNE/ PLAY MO DE” but ton, th e
recei ver will enter the ‘auto tune’
state a nd carr y out a dow nward
scan an d stop on ce a stat ion has
been fo und.
INFORMATION
Press the “INFO” button when you are
liste ning to t he FM rad io. The b ottom
line will change in the following
sequence: Programme Type ->
Signal Strength -> Date>Fr equency
->Audio Mode->Radio Text>
Programme ty pe
Please Note: If the radio station is
not transmitting extra information
then eg <RadioText> will be
displayed.
Station8 FM
<Radio Text>
FM Audio Mode
The FM Aud io mode can be set to
either "Auto " or "Mon o".
If the FM s ignal i s poor au to mode w ill
select "auto (mono)". Sometimes a
medium stren gth sig nal will cause
the auto mode to k eep switching from
stereo to mono . If this h appens then
select mono mode.
Press the INFO b utton u ntil "A uto
(Ster eo)" is displayed then press
select to change.
SD MODE (SD mode is the
mode after iPod mode)
1. In sert SD c ard int o the SD/ MMC
card sl ot at top p anel of main unit.
Press t he “MOD E” butt on to swi tch
the mode to SD mod e. If the re is a
SD card d etect ed, the r eceiv er
enter s the SD mo de. If th ere is no
SD card d etect ed, the r eceiv er will
displ ay the fo llowing:
Switching to...
Mp3
Card not
inserted
9
Page 6

LISTENING TO SD
2. MP 3 is the on ly form at support ed
in th is mo del, so al l files with a n
exten sion other than ‘mp3’ ar e
hidden.
\Folder1 SD
File.mp3
3. If t here ar e no MP3 fi les on th e SD
card, the display will show
\ MP3
<Empty Folder>
4. Pr ess the ▲ b utton t o revie w the
last fi le or fol der in th e curre nt
folder.
5. Press the ▼ button to re view the
next file or fold er in th e current
folder.
6. Press the “MENU/SELE CT” button
once on a fold er to enter the folder.
7. Press the “MENU/SELE CT”
button on ce again or press the
button on ce on a file to start play of
the so ng. Press the button once
again to pause th e play.
10
8. During playback, press the
button to select previous or
next song ,hold or button to
forward and reverse tra ck.
9. Pr ess the “IN FO/ MEN U/E XIT ”
button on ce to ex it the curr ent level
of fol der to the previous le vel .
10.Press the INFO/MENU /EX IT button
once again to stop the current play
and return to the idle state.
11.Press the “AU TO TUNE/P LAY MODE ”
butt on toggle thro ugh the pla yba ck
mode s “Rep One” ,“R ep All” and
“Ran dom ” in a circular man ner.
LISTENING TO IPOD
IPOD MODE (iPod is the
mode after FM mode)
Install the universal dock
adapter
1. Select the iPod universal dock
adaptor fitt ing to your iPod mo del .
The adapter num ber is on the back
of the adapter.
2. Install the adapter with two tabs
facing th e front, by pushing it down
in the universal doc k at the main
unit top.
3. To remove the adapter, pre ss at
the back of the adapter and pull it up.
Universal
dock
adapter
3
4
5
6
7
8
9
10
IPod description
iPod mini
4G iPod &U2 iPod
4G iPod
iPod photo& Color U2 iPod
iPod with color display
iPod photo
iPod with color display
iPod nano
5G iPod & U2 iPod with video
5G iPod with video
Note: 1. Only the universal dock
adapter Nos.3-10 are supplier with
this model.
2. Ensure that you use the uni versal
dock adapter corresponding to your
iPod in order to ensure tha t it is
installed in a stab le way and that
the electrical contact is good.
Capacity
4GB & 6GB
20GB
40GB
20GB & 30GB
40GB & 60GB
2GB &4GB
30GB
60GB
Supplied in
this unit
(yes/no)
yes
yes
yes
yes
yes
yes
yes
yes
11
Page 7

LISTENING TO iPOD
1.With correct ipod universal dock
adapter install ed, gently doc k the
ipod into the unit universal dock.
2.Press the “MODE” button to switch
the mode to Ipod. If there is no Ip od
detected, th e receiver will go into
the DAB mode. When the receiver
is in idle state, it will disp lay
“Connected”.
iPod
Connected
3.When docked, the Ipod battery will
be charged until it is fully char ged.
4.Press the “INFO/MENU / EXI T”
button to access the Ipod menu.
5.Press ▲/▼button to select the
function.
6.Press the “INFO/MENU / EXI T”
button once to confirm the function.
7.You can press the “ME NU/SELECT ”
button to return to previous menu.
8.When a song is selected, pres s
once or press the
“IN FO/ MEN U/E XIT ” butt on once
again to playback the music. Press
once again to pause the play.
9.During playback, press or to
select next or previous song. Hold
or butt on for fast forward or rewind
play.
10.You can also pr ess I NFO/MENU/EXIT
button to display the menu to select
other functions.
11.Alternately, you ca n control your ipod
directly for play.
PLEASE NOTE: The hold switch on
your iPod will not effe ct controls fr om
the unit.
HOW TO RESET
1. Disconnect the power lead,
hold th e MENU/ SELEC T butto n
while reconnecting the power unit
this sc reen is d isplayed
System Reset
12
13
Page 8

SETTING THE ALARM
1. To set the alarm, press the
“AL ARM ” button once, th e display
will be shown:
Alarm Type:
OFF/radio/beep
2. Press ▲or▼ bu tton to mov e
between the options.
3. Press the “AL ARM” button once
again, th e display will be show n:
Alarm Time:
>HH:MM
4. Press ▲or▼ bu tton to adj ust the
alarm tim e HH.
5. Press the “ALARM” button a third
time, to enter th e alarm tim e set
state in minutes, sh own below;
Alarm Time:
HH:MM<
6. Press ▲or▼ bu tton to adj ust the
alarm tim e MM.
7. If there is an Alarm set, the display
will show n a * in the top right:
*
HH:MM:SS
8. If there is no Alarm set, the display
will show n:
HH:MM:SS
9. Press the “AL ARM ” butt on the fort h
time to exit the alarm time set stat e
and return to previous state which
the first ALA RM button was pressed.
Or after 5 seconds time out condition
will automatically return to previous
state which the first A LAR M button
was pressed.
TO TURN OFF THE ALARM
1. When the alarm is trig gered , the
selected Al arm typ e will be o n. To
stop th e Alarm, press th e
“S TAND Y” butt on. This wil l stop th e
current function but will not cancel
the program of the alarm and it will
activ ate at th e
pre-programmed time.
2. Press the “SN OO ZE” b utton . This
will delay sounding for 8 minutes.
3.The Alarm fun ction will deactivate
if an ala rm has be en sounding for
1 hour without being cancelled or
put int o a snooz e routi ne.
SETTING THE SLEEP
1.During normal radio operation,
when th e alarm is not ringing,
pressing the “ SL EEP ” butto n once,
will switch to s leep ti me stat e menu.
2.Press ▲or▼ button to turn the sleep
function on or off.
3.Press the SLEEP button once again
to set the sleep time, the display will
be shown:
S l e e p T i m e :
M M m i n u t e s
4.Press ▲or▼ button to increase or
decrease the time.
5.Count down starts immediately upon
setting the Sleep Tim er State to ON.
6.When the alarm is ringing or in
STAND Y mode, pre ss the SLEE P
mode will have no effect.
AUDIO OUTPUT
You ca n conne ct this u nit to an
amplifier using an RCA lead
(not supplied).
The output is vo lume adjustable,
audio from the u nit can be cut by
pluging in earphones.
14
15
Page 9

SPECIFICATION
Power Adaptor
Inp ut Voltage:
AC 10 0V-240V~50/60Hz 0.7 A
Output Voltage:
DC9.0V=1.89A
OUTPUT POWER: 2.5W
FREQUENCY RANGE:
DAB:174-240MHz
FM: 87. 5-1 08M Hz
SPECIFICATION SUBJECT TO
CHANGE WITHOUT FURTHER
NOTICE Dipping warning:
The product shall not be ex pos ed
dripping or splashing and that no
objects filled with liquids, such as
vases, shall be pla ced on the product
Ventilation warning:
The normal ventilation of the pro duct
shall not be imp ede d for in ten ded use
Disposal and the
Environment
This product is cov ere d by the waste
Electrical and Electronic Equipment
(WEEE) regulations. It should not be
discarded with normal household
waste, but taken to your lo cal collection
center for recycling. For further
information, Please contact the local
authority or approved disposal agency.
Caution: “Excessive sound pressure
from earphones and headphones can
cause hearing loss.”
GUARANTEE
This product is guaranteed for 12
months from th e date of o rigin al
purchase. If any defect arises due to
faulty mater ials or w orkma nship,the
unit will either be replaced, a refund
given or repaired free of charge
(where possible) during this period by
the dealer from whom you purchased
the unit.The g uarantee is su bject to
the fol lowing provisions:
• The gua rante e is only v alid wi thin
the boundaries of the country of
purch ase.
• The pro duct mu st be cor rectl y
assem bled and operated in
accor dance w ith the i nstru ction s
conta ined in this booklet.
• The gua rante e does no t cover
accid ental d amage, misuse, or
consu mable items.
• The gua rante e will be r ender ed
invalid if the product is reso ld or has
been damaged by inexpert repair.
• The man ufact urer di sclai ms any
liability for incidental or
consequential damages.
• This gu arant ee is in ad ditio n to and
does not diminish your statutory, or
legal rights.
Goodm ans industries Ltd.
helpline number: 0871 230 1777
www.goodmans.co.uk
16
17
Page 10

Issue 1-November 2007
 Loading...