

Page 1

GSR85DAB
Portable DAB/FM Radio
User Guide
Page 2
GSR85DAB
Introduction
Thank you for purchasing this Portable DAB/FM Radio which has been
designed and manufactured to give you many years of trouble-free
service.
You may already be familiar with using a similar product but please take
time to read these instructions which have been written to ensure you
get the very best from your purchase.
Safety is Important
To ensure your safety and the safety of others, please read the Safety
precautions before
Keep this information in a safe place for future reference.
NOTE: In the case of malfunction due to electrostatic
discharge, reset the product to resume normal operation.
Reconnection of the power source may be required.
you operate this product.
Page 3

Portable DAB/FM Radio
Introduction.............................................................................................2
Safety is Important..................................................................................2
Safety Information...................................................................................4
Electrical Information.............................................................................5
Important.....................................................................................................5
Location of the Controls.........................................................................6
Front and Control Panel .............................................................................6
What is DAB? ...... .....................................................................................8
Getting Started........................................................................................9
In the Box....................................................................................................9
Positioning your DAB Radio........................................................................9
Adjusting the Aerial.....................................................................................9
Using Headphones......................................................................................9
Battery Operation......................................................................................10
Mains Operation........................................................................................10
Using your DAB Radio..........................................................................11
Switching On for the first time...................................................................11
Changing DAB Stations............................................................................11
Adjusting the Volume................................................................................11
Scanning for DAB Stations........................................................................12
Station Display Symbols...........................................................................12
Storing DAB Presets.................................................................................12
Selecting a Preset Station.........................................................................13
Reset.........................................................................................................13
Changing the DAB Station Information.....................................................14
Using the MENU Control...........................................................................15
Using the MENU Control - continued........................................................16
Using the FM Radio...............................................................................19
Automatic Tuning......................................................................................19
Manual Tuning..........................................................................................20
Storing FM Presets...................................................................................20
Selecting a Preset FM Station...................................................................21
Aux In Socket ........................................................................................22
Charging Batteries ........ ........................................................................22
Troubleshooting....................................................................................23
Technical Specification ........................................................................24
Guarantee..............................................................................................25
Page 4

GSR85DAB
Safety Information
WARNING! Ensure that you read all of the safety instructions
before using this unit.
Safety Considerations
•Position the power cable and other connected cables so that they
are not likely to be walked on, pinched or where items can be
placed on or against them.
•Do not use the unit in humid or damp conditions.
•Do not allow the unit to get wet.
•Do not expose the until to dripping or splashing.
•Do not cover any of the ventilation slots on the unit, as this may
cause overheating.
•Do not place the unit in closed bookcases or racks without proper
ventilation.
•Never allow children to insert foreign objects into holes or slots on
the unit.
•No naked flame sources, such as lighted candles, should be placed
on the unit.
Cleaning
•Disconnect the unit from the mains supply before cleaning.
•Do not use any liquids or aerosol cleaners, as this may damage the
unit. Use a soft, dust free cloth.
Battery Disposal
•Please ensure that used batteries (not included) are disposed of
safely.
•Do not dispose of batteries (not included) in fire.
•Contact local authorities for means of disposal.
Servicing
•There are no user serviceable parts in the unit. When servicing,
refer to qualified service personnel.
•Consult your dealer if you are ever in doubt about the installation,
operation, or safety of the Portable DAB/FM Radio.
Page 5
Portable DAB/FM Radio
Electrical Information
Make sure that the voltage of your electricity supply is the same as that
indicated on the rating plate of the power supply unit supplied with your
Portable DAB/FM Radio. It requires a 230V AC, 50Hz mains supply. Do
not use any other supply.
The mains lead supplied may be fitted with a non-rewireable plug. If you
need to change the fuse in a non-rewireable plug, the fuse cover must
be refitted. If the fuse cover is lost or damaged, the plug must not be
used until a replacement is obtained.
If the plug has to be changed because it is not suitable for your socket,
or becomes damaged, it should be removed and an appropriate plug
fitted following the wiring diagram below. The plug removed must be
disposed of safely, as insertion into a mains socket could be an
electrical hazard.
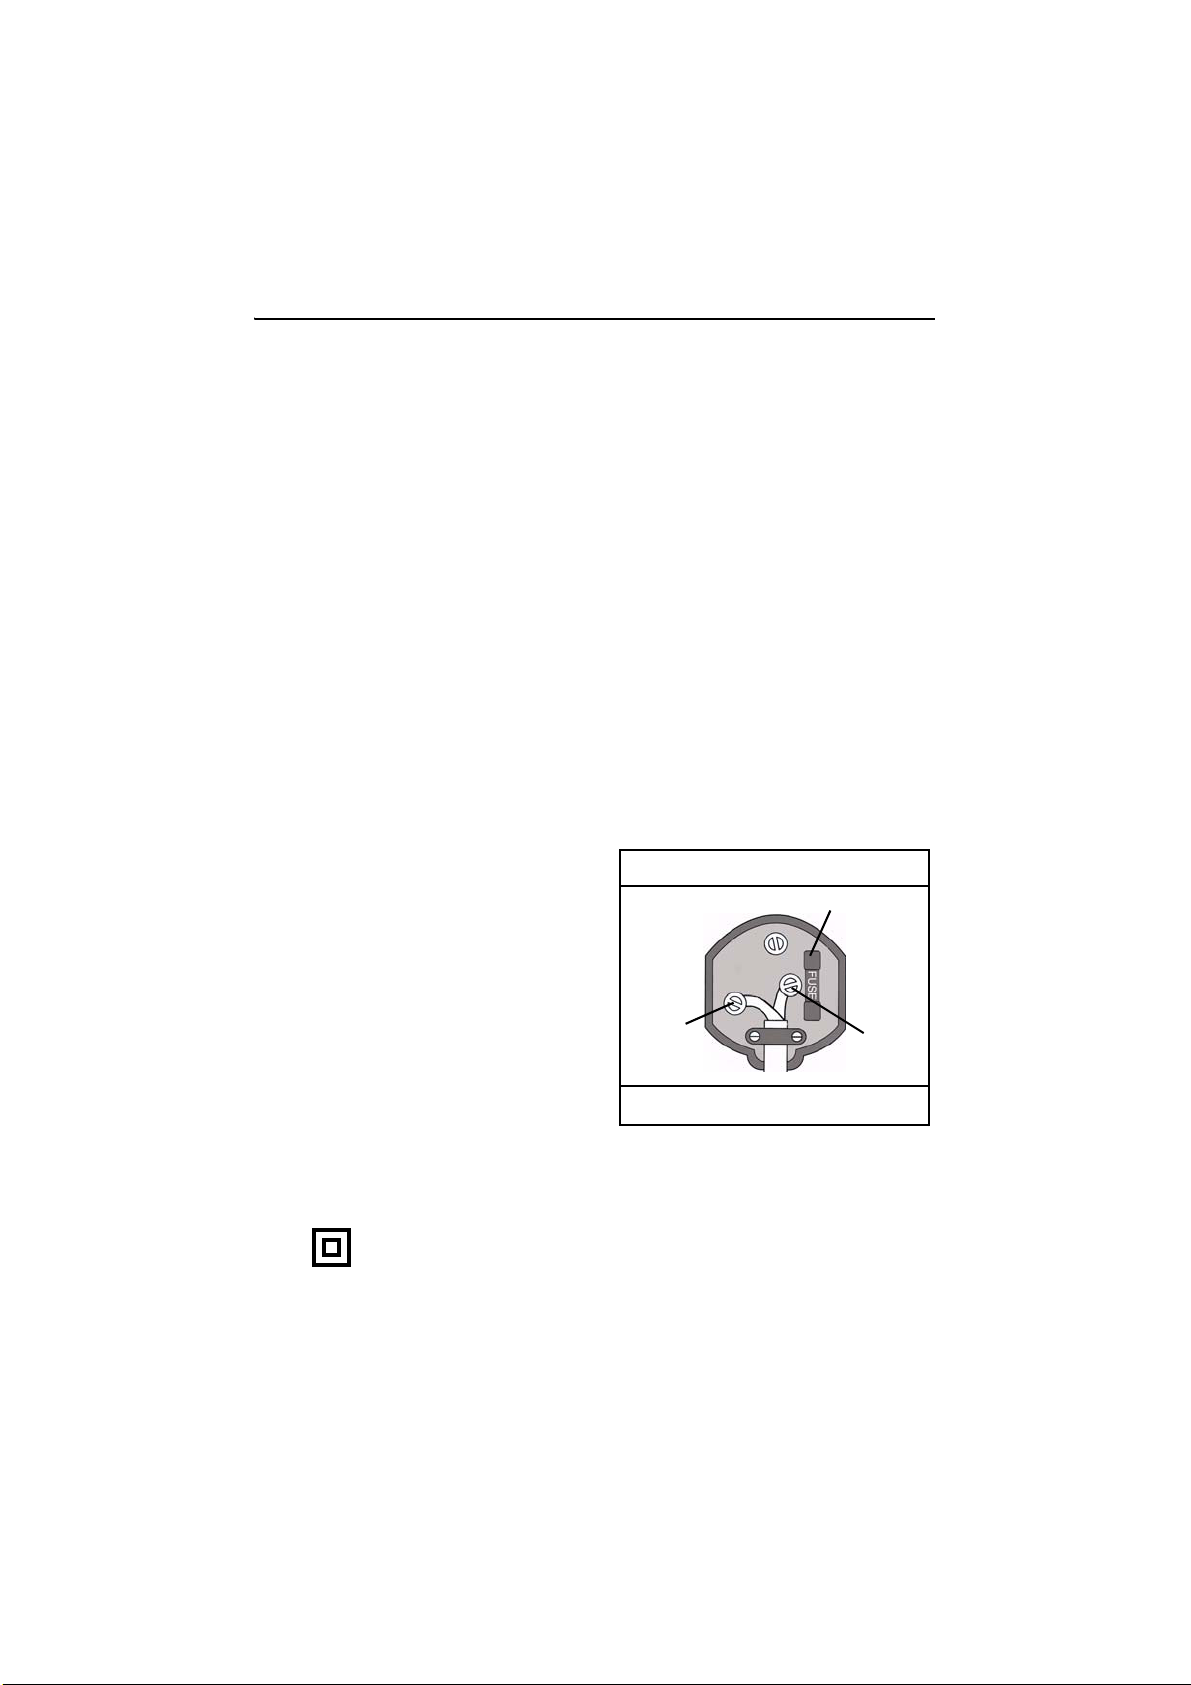
Important
As the colours of the wires in the mains lead of this appliance may not
correspond with the coloured markings identifying the terminals in your
plug, proceed as follows:
•The blue wire must be
connected to the terminal
marked with the letter N or
The Plug must be BS1362/A approved
Fit a 3 Amp fuse
coloured black.
•The brown wire must be
connected to the terminal
marked with the letter L or
coloured red.
NEUTRAL
(Blue)
LIVE
(Brown)
•No connection is to be made
to the earth terminal of the
plug.
The outer sheath of the cable must be
held firmly by the clamp
If a 13 Amp (BS1363/A) plug is used, a 3 Amp fuse (BS1362) must be
fitted, or if any other type of plug is used a 3 Amp fuse must be fitted,
either in the plug, adapter or in the distribution board.
This symbol indicates that this unit is a Class II double insulated
appliance and therefore an earth connection is not required.
Page 6
GSR85DAB
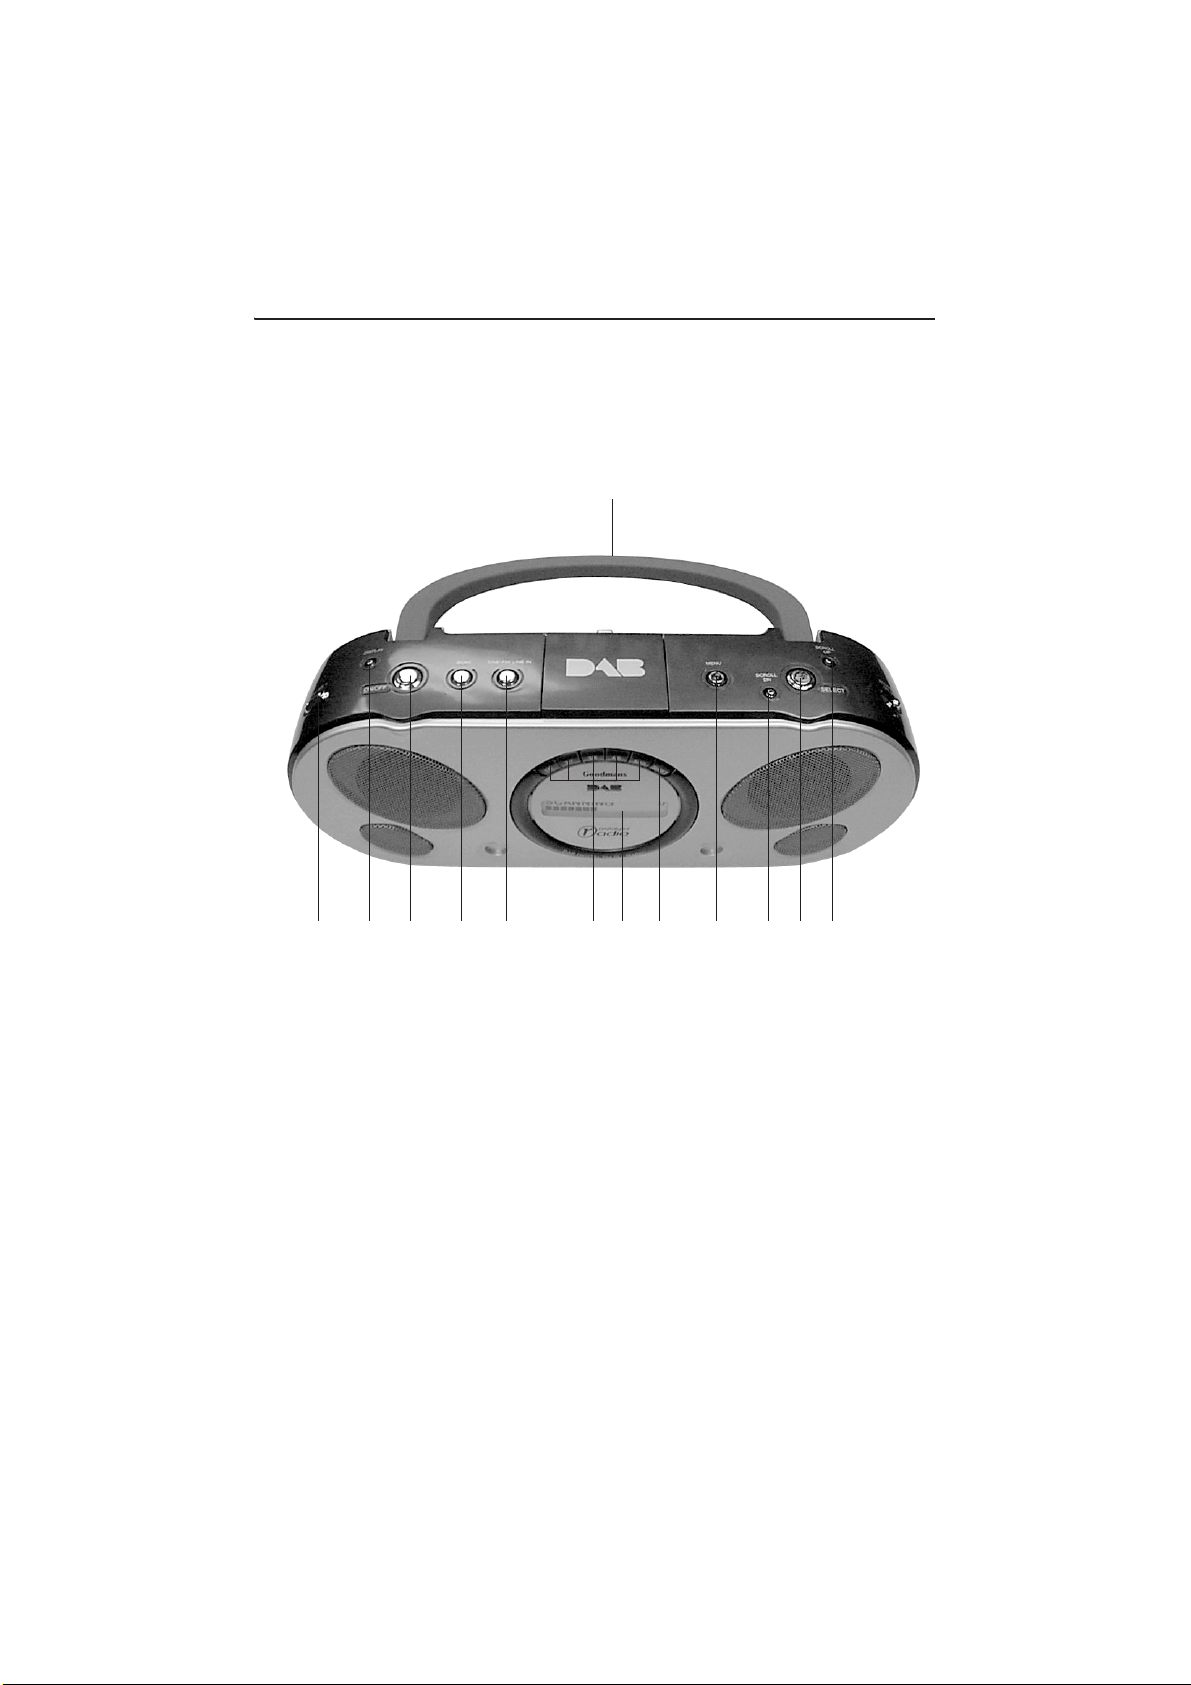
Location of the Controls
Front and Control Panel
1
1Carry handle
2Preset buttons
3Shift button
4DAB/FM button
5Volume +/–
6Scan button
7Display button
8Menu button
9Scroll down button
10Scroll up button
11Select button
12Power On/Off button
13Display
2 13 3 8 9 10115 6127 4
Page 7
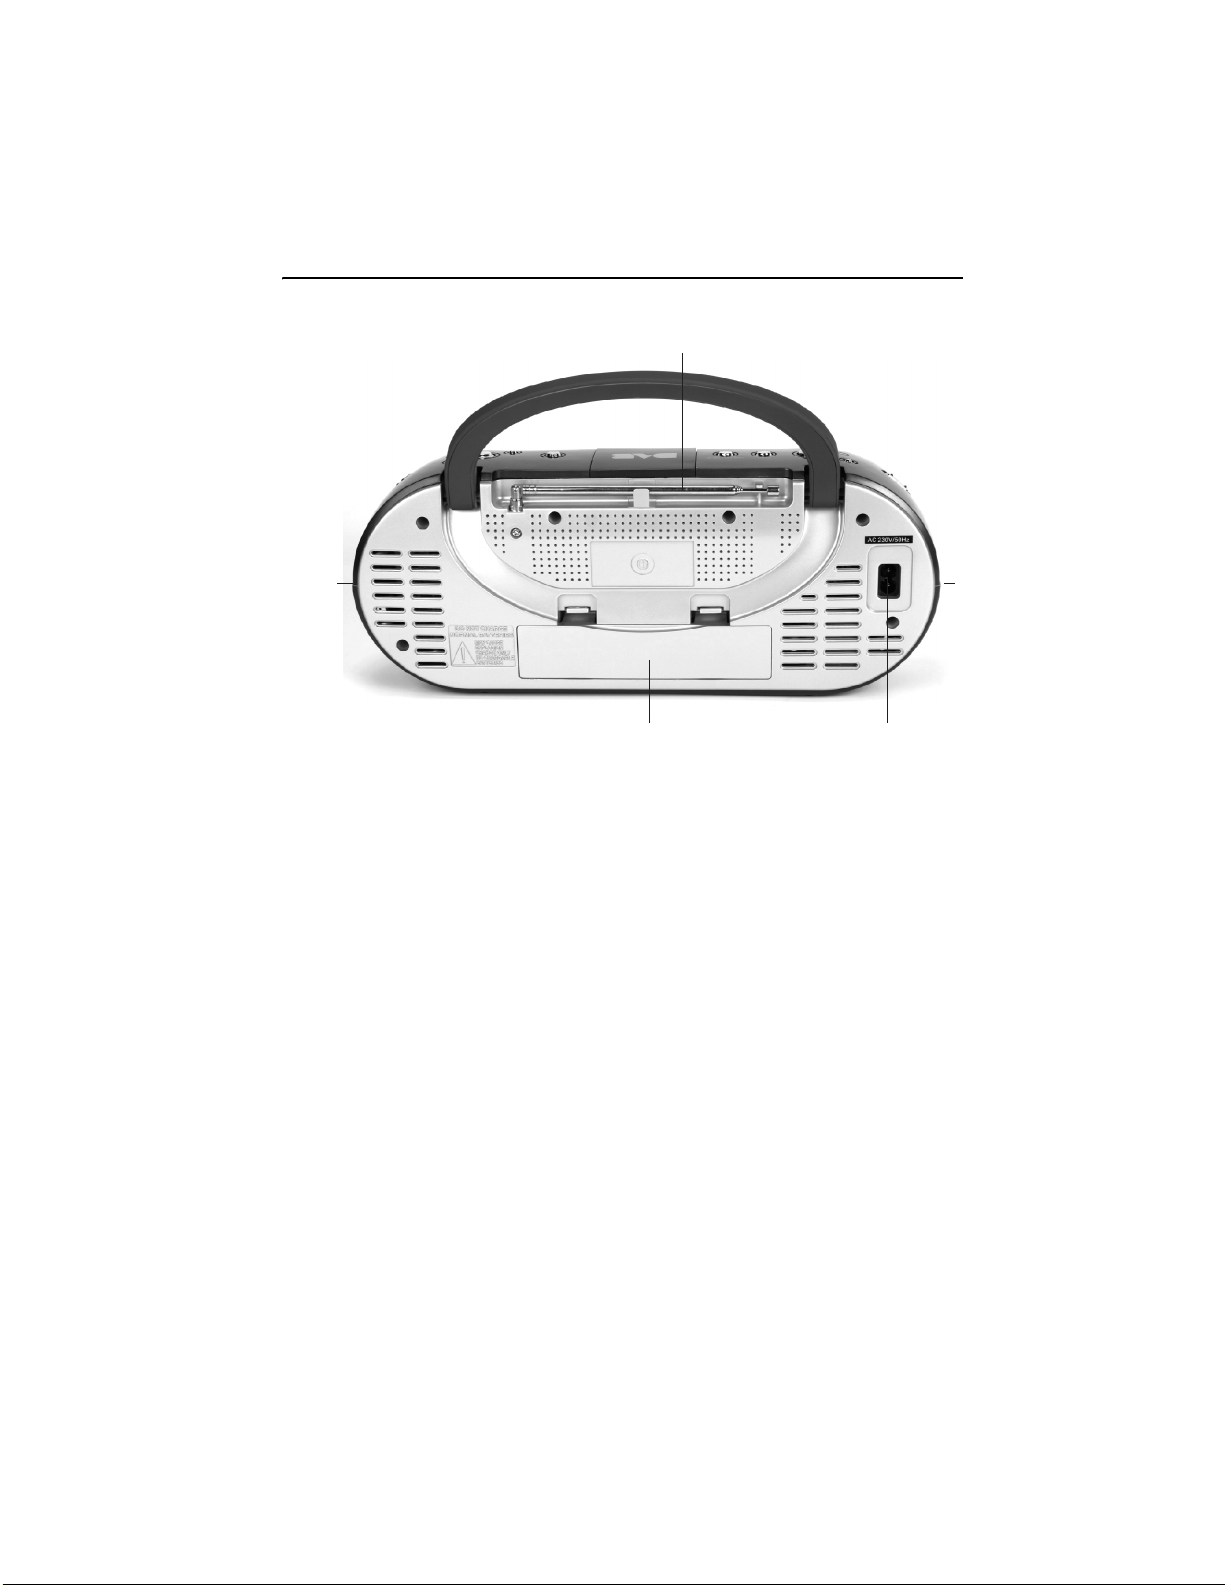
Portable DAB/FM Radio
14
17 18
1516
14Aerial
15Power socket
16Battery compartment
17Aux In Socket
18Headphone socket
Page 8

GSR85DAB
What is DAB?
DAB was developed in Europe by a consortium of broadcasters and
manufacturers.
DAB uses digital compression techniques to transform the source
material, i.e. music and speech, into digital code before it is transmitted.
The code consists of electronic ‘ones and zeros’ called binary digits or
bits. The binary code is then multiplexed or grouped together to create
a superior signal, when compared with the older analogue system, with
the following key benefits:
• Interference free reception.
Analogue systems suffer from an effect called ‘multipath distortion’.
This is caused because waves do not behave in an orderly fashion,
but bounce and reflect off buildings etc. DAB sees this as an
advantage and uses the direct and reflected signals to actually
reinforce the end result.
•No need to re-tune.
A single DAB frequency can be used to cover the whole of the UK,
so solving many of the problems experienced with the earlier
analogue system. DAB s can automatically tune-in all of the
available stations in your area.
Page 9

Portable DAB/FM Radio
Getting Started
Carefully remove your Portable DAB/FM Radio from the box. You may
wish to store the packaging for future use.
In the Box
Inside the box you will find:
•Portable DAB/FM Radio
•Mains Cable
•User Guide
If any of these items are missing please contact Product Support on:
Telephone:0870 873 0080
Internet:www.goodmans.co.uk
Positioning your DAB Radio
Place your Portable DAB/FM Radio on a flat, stable surface that is not
subject to vibrations.
Avoid the following locations:
•Where it is exposed to direct sunlight.
•Where it is close to heat radiating sources.
•Where the humidity is high and ventilation is poor.
•Where it is dusty.
Adjusting the Aerial
The aerial should be extended to ensure good reception in both DAB
and FM radio modes. It may be necessary to alter the position of the
Portable DAB/FM Radio and/or aerial to achieve the best signal.
Using Headphones
You will require headphones fitted with a 3.5mm diameter stereo plug
and an impedance of 8-32 ohms. The Headphone socket is located on
the side of this unit (page 7).
Headphones are not supplied with this Portable DAB/FM Radio.
Page 10

GSR85DAB
Battery Operation
Before installing batteries (not included), ensure that the Portable DAB/
FM Radio is disconnected from the mains supply.
Remove the battery compartment cover on the back of the Radio by
carefully pushing the two lugs down. The battery cover can then be lifted
away.
Fit 6 x 1.5v LR14 Batteries (C-size or equivalent, not included),
referring to the polarity markings inside the battery compartment.
Never mix old and new batteries.
Finally, replace the cover.
For battery operation, switch off the mains supply and remove the cable
from the power socket. Battery operation will be selected automatically.
We recommend the use of Ever Ready
Energizer batteries.
CAUTION! DANGER OF EXPLOSION IF BATTERIES ARE
INCORRECTLY REPLACED. REPLACE ONLY WITH THE SAME
OR EQUIVALENT TYPE.
If you are not going to use the Portable DAB/FM Radio for an extended
period, please remove the batteries to avoid damage.
Mains Operation
Your Portable DAB/FM Radio requires a mains supply of 230V AC ~ 50
Hz. Please ensure that your mains supply is compatible before use.
Insert the mains cable into the power socket at the rear of the Radio,
then plug in and switch on the supply.
Page 11
Portable DAB/FM Radio
Using your DAB Radio
Switching On for the first time
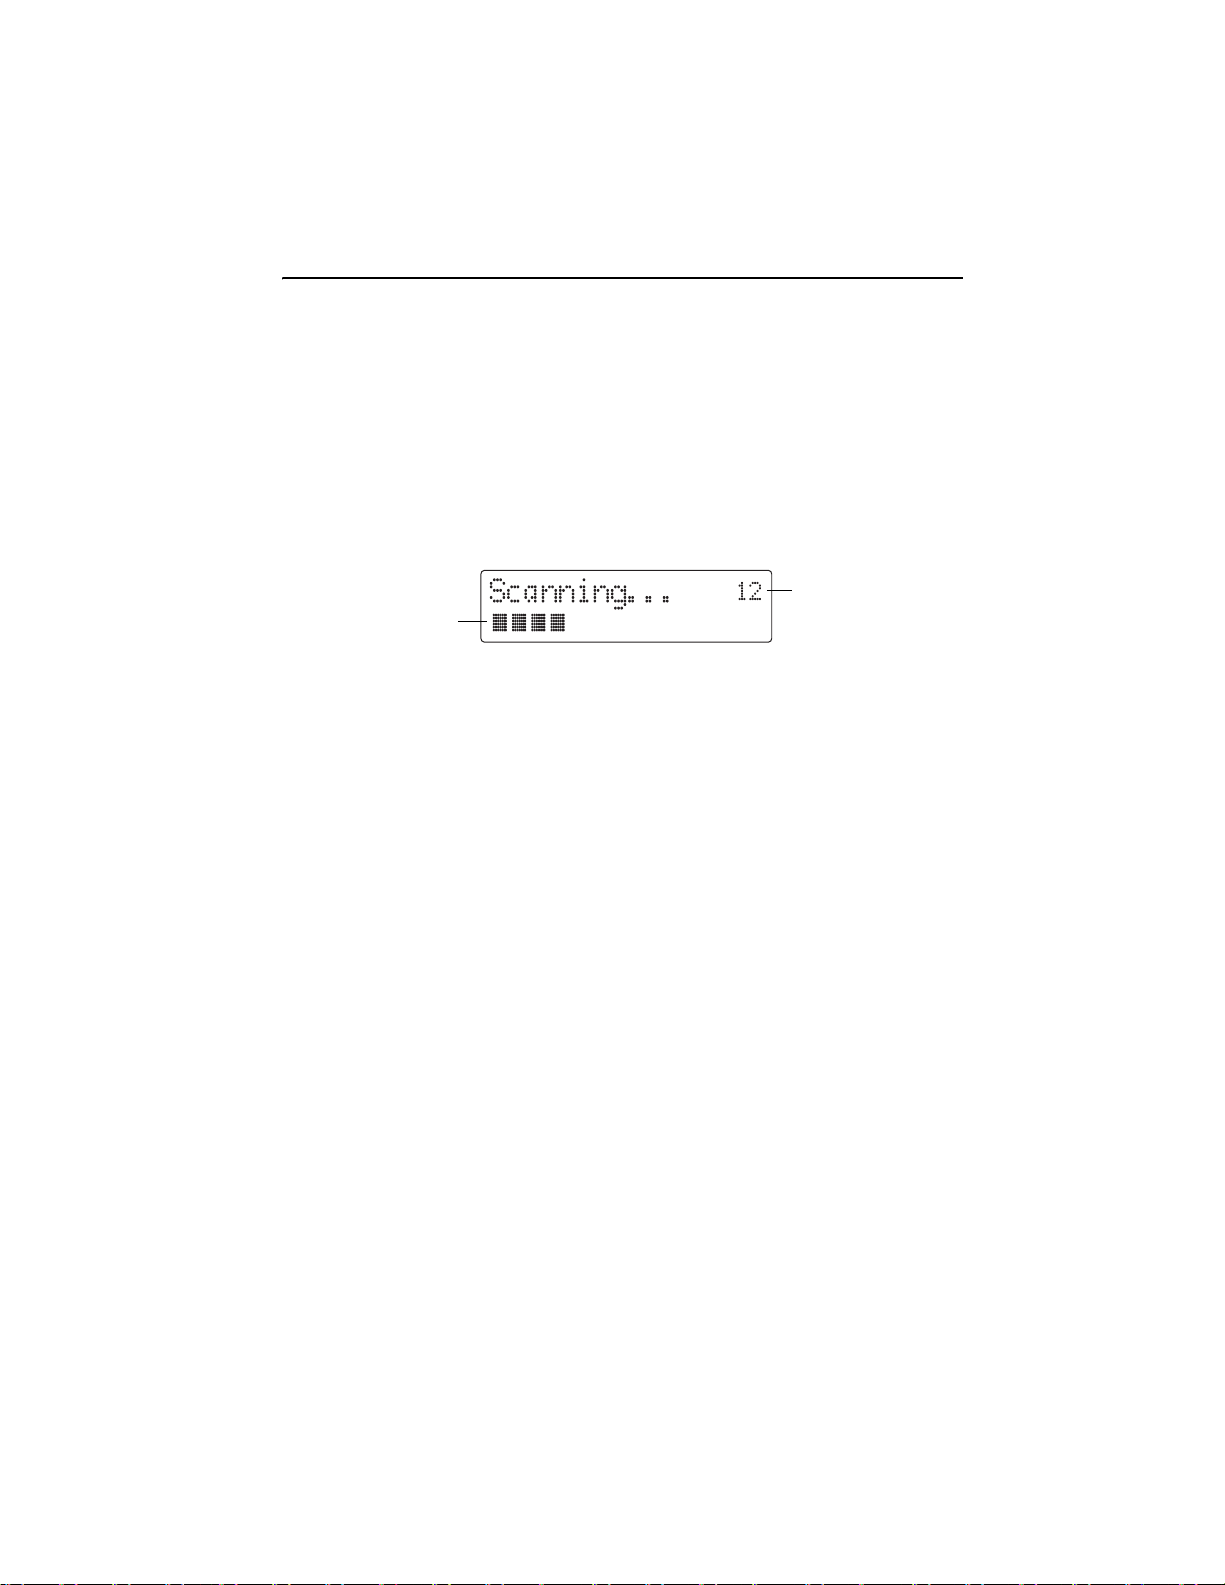
When you switch your Portable DAB/FM Radio on for the first time, DAB
mode is selected automatically. The DISPLAY will illuminate and
‘Welcome to digital radio’ will be displayed.
The following screen will be displayed. A bar graph indicates the
progress of the search - the number of stations found increases as the
scan progresses.
Number of stations found
Progress bar
When the scan is complete, the Portable DAB/FM Radio will then select
the first available station - stations are listed in numerical then
alphabetic order.
The station list is retained in memory so the next time you switch the
Portable DAB/FM Radio on, the station search does not take place.
If there are no stations found, check that adequate DAB coverage exists
in your area.
It is possible to perform a manual scan for stations, see page17.
Changing DAB Stations
1Press the SCROLL UP or SCROLL DOWN button to scroll up and
down through the available stations. The station names will appear
on the second line of the DISPLAY.
2When the desired station is displayed press SELECT. The Portable
DAB/FM Radio will immediately tune to that station.
Adjusting the Volume
1To increase the volume by pressing the VOLUME + button.
2To decrease the volume by pressing the VOLUME – button.
Page 12

GSR85DAB
Scanning for DAB Stations
Due to the nature of DAB radio, additional stations and services
regularly become available. If you wish to see if there have been any
new DAB stations introduced in your area you can initiate a search.
Press the SCAN button to activate a local search for stations. This will
take approximately 10 seconds. If you are using your Portable DAB/FM
Radio outside of the UK then a wider search can be initiated by pressing
and holding down the SCAN button for approximately two seconds. In
this case a full scan is performed which will take approximately 20
seconds.
Station Display Symbols
You may see some symbols displayed alongside the station names.
These are defined as follows:
This indicates that the station is one of your ten favourite stations
and can be used when selecting the station order, see page16.
This is displayed before the station name if the station is not
available or not active.
Chevrons displayed after the station name indicate that this is a
primary station with secondary services.
Chevrons displayed before the station name indicate that this is
a secondary station.
Storing DAB Presets
Note: Each preset button holds two presets. For example, the 1/6 preset
button, on the Portable DAB/FM Radio, holds preset positions one and
six.
You can preset up to 10 DAB stations for easy access as follows:
1Tune to the station you wish to preset (see ‘Changing DAB Stations’
on page11).
2Press and hold
top of the Portable DAB/FM Radio. ‘Preset # saved’ will appear on
the second line of the DISPLAY, where # is the number of the preset
position.
3To save to preset positions 6-10, hold down the SHIFT button then
press and hold
saved a DAB station in that preset location, it will be over-written with
the new station.
one of the PRESET buttons (e.g. 1/6), located on the
the desired PRESET button. If you have already
Page 13

Portable DAB/FM Radio
Selecting a Preset Station
To select presets 1-5, press the relevant PRESET button.
To select presets 6-10, hold down the SHIFT button and then press the
relevant PRESET button.
If you have not already stored a DAB station in one of the presets,
‘Empty preset’ will be displayed. The DISPLAY will revert to the
previously selected station after a few seconds.
Reset
You can delete all of the preset stations and return the Portable DAB/
FM Radio to its factory settings as follows:
1Press and hold
2The DISPLAY will show ‘Press SELECT to confirm delete...’
3Press the SELECT button
The DISPLAY will show ‘Welcome to Digital Radio’ before
performing a new scan for stations.
The Portable DAB/FM Radio will be returned to its factory condition.
the MENU button.
If you do not
seconds without pressing any buttons and the Portable DAB/FM Radio
will revert to its previous operating condition.
wish to reset the Portable DAB/FM Radio, wait a few
Page 14

GSR85DAB
Changing the DAB Station Information
It is possible to change the information that is displayed on the second
line of the DISPLAY when listening to a DAB station. Note that this
information is not available when listening to conventional FM
stations.There are seven types of information available as listed below
with examples to the right. To change the information displayed press
the DISPLAY button repeatedly.
•Dynamic Label Segment (DLS)
This is scrolling text information supplied by
the DAB station. It may comprise information
on music titles or details of the programme
and is provided by the broadcaster.
•Program Type (PTY)
This is a description of the type of
programme provided by the DAB station and
is provided by the broadcaster.
•Multiplex Name
This will show the multiplex that is
broadcasting the programme you are
listening to.
•Time and Date
This displays the time and date and is
provided by the broadcaster, so will be
accurate.
•Channel and Frequency
This displays the channel number and the
transmission frequency.
•Audio Information
This shows the digital bit-rate and the audio
mode.
•Signal Error Rate
If the transmission signal contains errors the system can apply
correction. The amount of signal correction can be displayed as a
numerical value between 0 and 99. As the value increases, you will
hear the signal degrade. To improve reception, try adjusting the
position of the antenna. Please note a signal error rate of 30 or
more will make the station un-listenable.
Page 15
Portable DAB/FM Radio
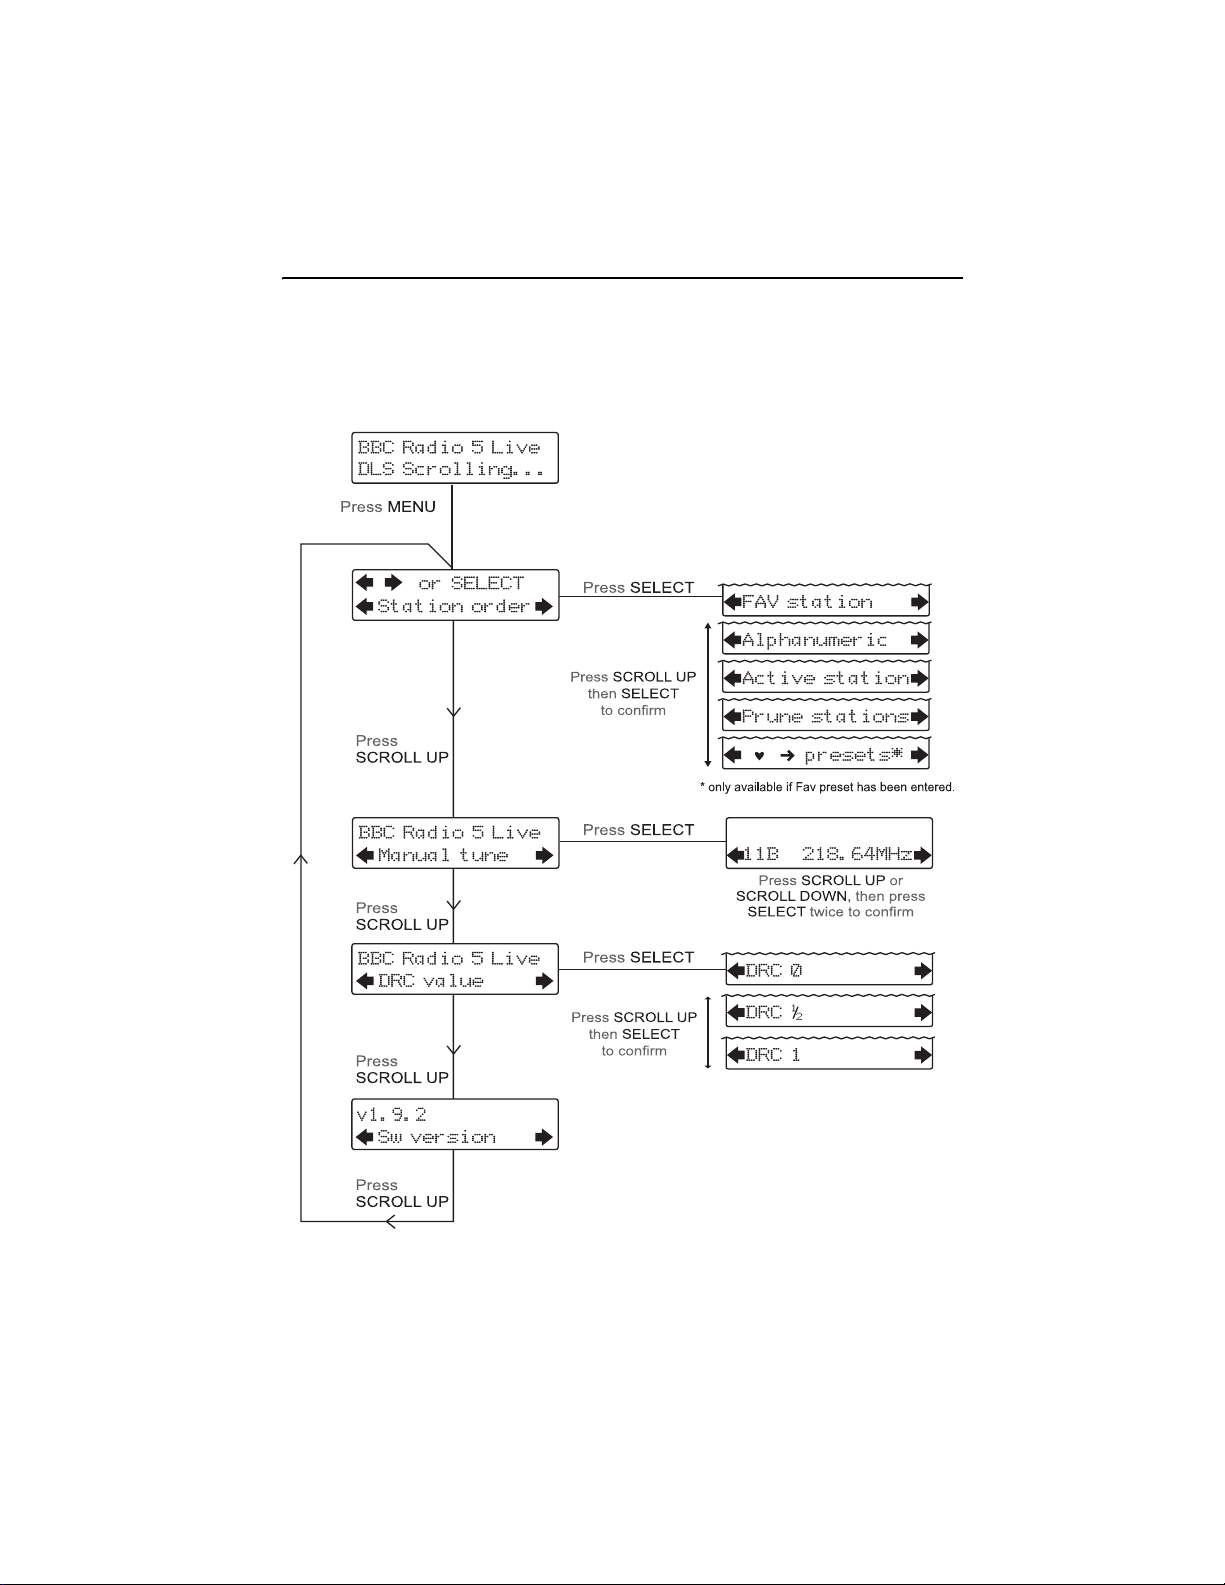
Using the MENU Control
The MENU function allows you to change some of the system options
on your Portable DAB/FM Radio. These options are arranged in a menu
structure as shown below.
Page 16

GSR85DAB
Using the MENU Control - continued
Pressing the MENU button will enter the menu control. The options are
described below.
Station Order
This function enables you to define how the stations are arranged when
scrolling the stations list.
1.Press the MENU button to access the menu control.
2.Press either the SCROLL UP or SCROLL DOWN buttons until
‘Station order’ is displayed.
3.Press the SELECT button to access ‘Station order’.
4.Use either the SCROLL UP or SCROLL DOWN to display the
desired option.
There are four options available as described below.
• Favourite Station (Fav station)
The DAB tuner monitors the stations that you listen to and will build
a list of the ten most listened to stations. When this option is
selected the station list is re-ordered so that these stations appear
at the top of the list. When you scroll through the list you will see
that your ten favourite stations will have a heart shaped symbol.
•Alphanumeric
This is the default setting. The stations are arranged in numerical
then alphabetical order.
•Active Station
This option will re-order the list with those stations that can be
received in your area at the top of the list and those that cannot at
the bottom of the list.
•Prune Stations
This option will remove from the list any stations that have no
service in your area (i.e.: the stations that were preceded by ‘?’).
5.Press SELECT to confirm.
Page 17
Portable DAB/FM Radio
Manual Tune
It is possible to manually tune to a specific channel/frequency and add
this to the station list.
This function can be used to obtain the optimum reception for a specific
channel/frequency, taking into account the position of the aerial.
1.Press the MENU button to access the menu control.
2.Press either the SCROLL UP or SCROLL DOWN buttons until
‘Manual tune’ is displayed.
3.Press the SELECT button to access ‘Manual tune’.
4.Use either the SCROLL UP or SCROLL DOWN buttons to select
the desired channel/frequency.
5.Press SELECT.
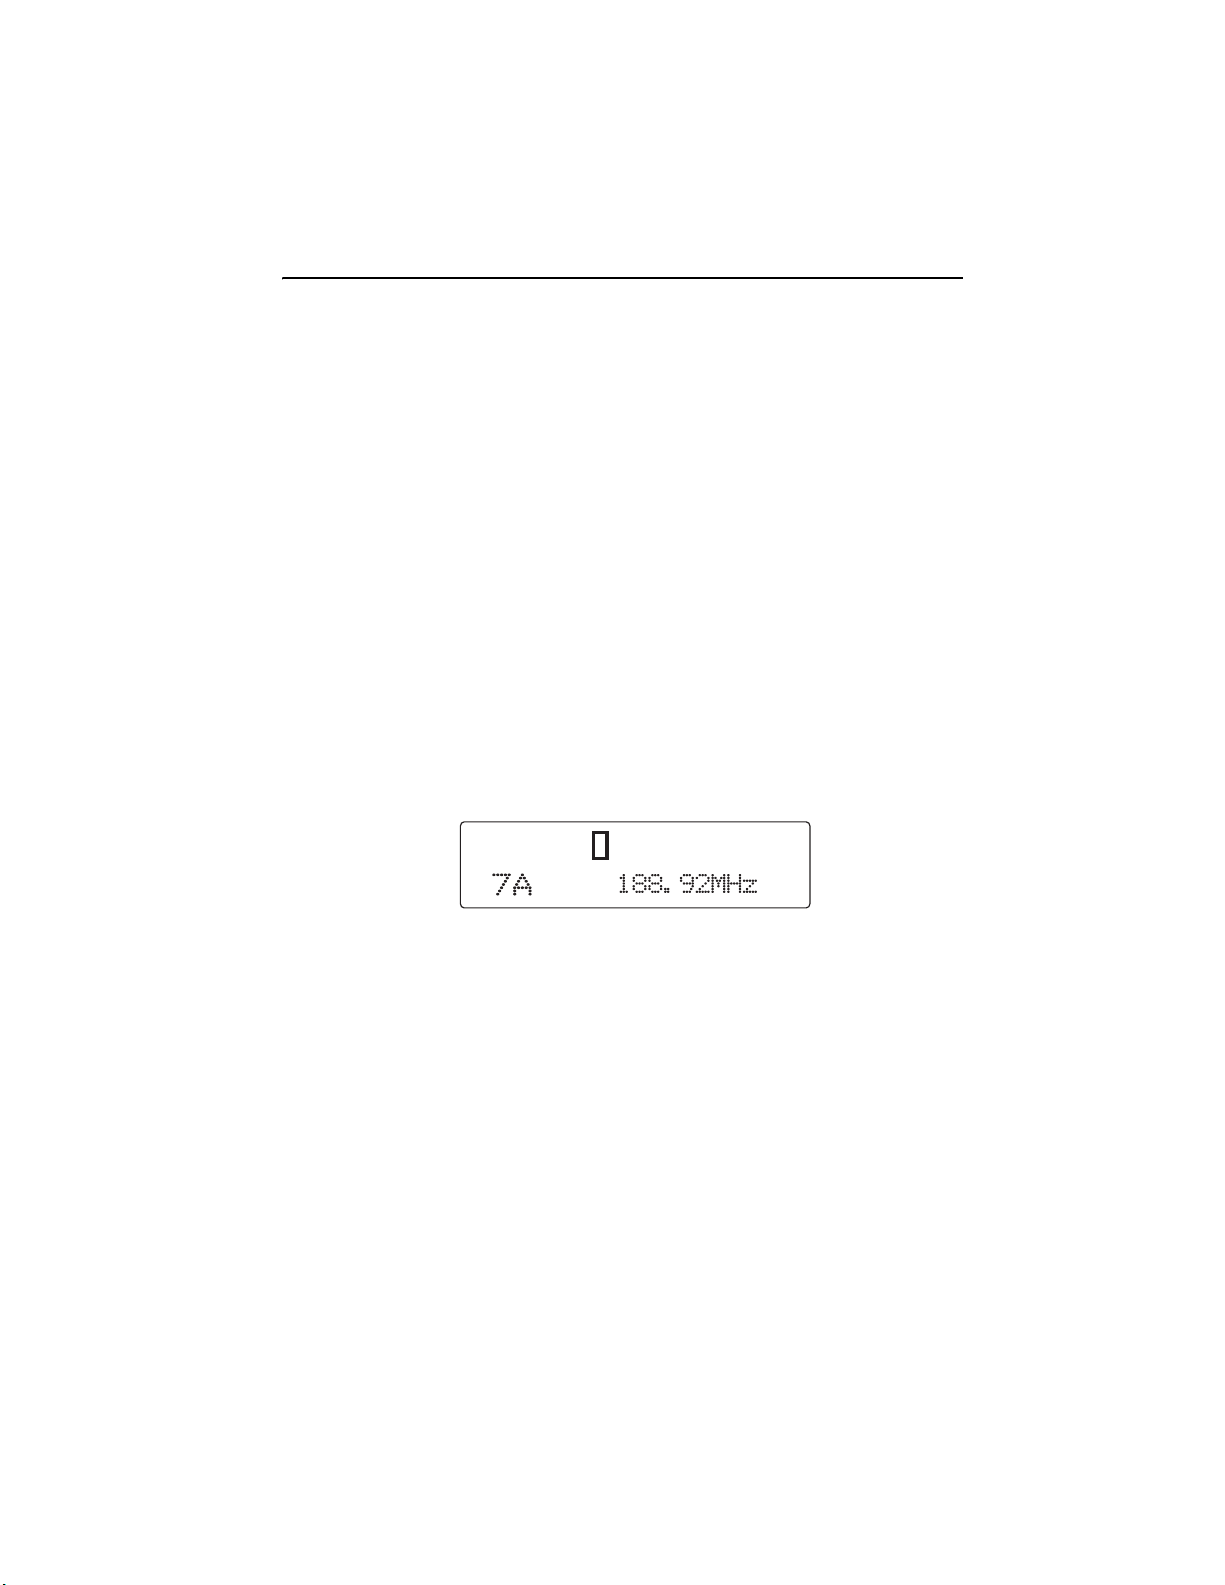
A rectangle will be displayed on first line of the DISPLAY. The position
of this rectangle indicates the minimum signal strength to achieve
satisfactory reception.
6.Adjust the position of the antenna to obtain the optimum signal
strength.
7.Press the SELECT to confirm.
Page 18

GSR85DAB
Dynamic Range Control
DRC adds or removes a degree of compression to compensate for the
differences in the dynamic range between radio stations. For example,
a station broadcasting popular music may have a high level of
compression applied since the emphasis is on a constant high listening
level, whereas a station broadcasting classical music will have little or
no compression as the listener requires all of the highs and lows in the
music to define the detail.
There are three levels of compression:
•DRC 0 No compression applied.
•DRC 1 Maximum compression applied (this is the default).
•DRC 1/2 Medium compression applied.
The best way to determine which of these settings suits you best is to
experiment with them on a variety of source material.
1.Press the MENU button to access the menu control.
2.Press either the SCROLL UP or SCROLL DOWN buttons until
‘DRC value’ is displayed.
3.Press the SELECT button to access ‘DRC value’.
The current DRC level will be displayed on line 1 of the DISPLAY.
4.Press the SCROLL UP button to select between the three DRC
values. The available options appear on line 2 of the DISPLAY.
When the required DRC value is displayed press SELECT to
confirm.
•You should be able to hear the difference in compression
immediately.
Software Version
This is only provided as an engineers reference in the unlikely event that
servicing should ever be necessary.
1.Press the MENU button to access the menu control.
2.Press either the SCROLL UP or SCROLL DOWN buttons until ‘Sw
version’ is displayed.
•The version number will appear on line 1.
Page 19

Portable DAB/FM Radio
Using the FM Radio
If the Portable DAB/FM Radio is in DAB mode, press the DAB/FM
button to select FM mode. You may hear background noise as no
station has been tuned in. The DISPLAY will look something like this:
NOTE: If the Radio is switched off in FM mode it will always
resume in DAB mode, in last selected station, when
switched back on.
Automatic Tuning
1.Press and release the SCAN button to automatically search for the
next available station.
‘Searching...’ will appear on the DISPLAY as the Radio scans up
the frequencies (see below).
2.If the reception is poor, briefly press the SCROLL UP or SCROLL
DOWN button to fine tune the station.
•If the reception does not improve, try altering the position of the
aerial.
•If the reception is still poor, scan again to determine whether a
stronger signal exists for the desired frequency.
3.When you have tuned into the desired frequency/station, you can
save it in one of the ten preset locations, as described on page20.
NOTE: When you scan through conventional FM
frequencies, the stations are detected based upon the
strength of the signal. Automatic FM scans may detect very
noisy or distorted stations - it may be necessary to re-scan,
adjust the aerial/radio position or fine-tune the signal to
achieve the best results.
Page 20

GSR85DAB
Manual Tuning
1.Press and hold the SCROLL DOWN or SCROLL UP button to
manually scan up or down through the frequency band.
When the desired frequency appears on the DISPLAY release the
SCROLL DOWN or SCROLL UP button.
2.If the reception is poor, briefly press either the SCROLL UP or
SCROLL DOWN button to fine tune the station.
•If the reception does not improve, try altering the position of the
aerial.
•If the reception is still poor, scan again to determine whether a
stronger signal exists for the desired frequency.
3.When you have tuned into the desired frequency/station, you can
save it in one of the ten preset locations, see below.
Storing FM Presets
You can preset up to 10 FM stations for easy access as follows:
1.Tune to the station you wish to preset, as described on the previous
page.
2Press and hold one of the PRESET buttons (1-5) until the DISPLAY
shows:
In this case, ‘Preset 1 saved’ is displayed to indicate that the station
has been saved into first preset position.
•To save presets 6-10, hold down the SHIFT button then press and
hold
the desired PRESET button.
•If you have already saved an FM station in that preset location, it
will be over-written with the new station.
NOTE: When you store DAB stations, these do not overwrite your FM presets.
Page 21

Portable DAB/FM Radio
Selecting a Preset FM Station
1.To select a preset station, press the relevant PRESET button.
•The station frequency assigned to selected preset will be displayed.
•To select presets 6-10, hold down the SHIFT button then press the
relevant PRESET button.
NOTE: The DISPLAY and MENU buttons do not have any
function in FM radio mode.
Page 22

GSR85DAB
Aux In Socket
Connect the Aux in socket with the line output socket of the external
audio device.
Please ensure the volume control on the external unit and the volume
control on the GSR85DAB are both set to minimum, then after
connection adjust the volume on the GSR85DAB until the desired level
is reached.
Re-Charging Batteries
WARNING: Do not charge non rechargeable batteries in this player.
Danger of explosion is possible.
The preferred rechargeable battery type to use are NIMH C size.
They do not suffer from poor charge memory problems after being
in use for some time.
1.
A fully charged battery depending on its capacity will take
approximately 15 hours for a full charge.
2.
Charging of the batteries is possible with the radio powered on or
off as long as it is connected to the mains supply.
3.
Insert 6 x C-size rechargeable batteries into the battery
compartment observing the correct polarity as indicated inside
the battery compartment.
4.
With the radio connected to a mains supply move the charge
switch to its ON position. The Charge green LED indicator will
illuminate and remain illuminated when this switch is in the ON
position.
5.
After approximately 15 hours move the charge switch to its OFF
position. The charge indicator will extinguish and charging of the
batteries will no longer take place.
6.
Remove the mains cable from the side of the radio to operate the
radio from the batteries. Reconnecting of the mains cable to the
radio will bypass the batteries.
Note: The charge current in this player has been optimised for over
night charging of NI-MH rechargeable batteries. Nicad batteries can
be used but the charge time will need to be reduced.
Page 23

Portable DAB/FM Radio
Troubleshooting
If you believe that something is wrong with your Portable DAB/FM
Radio, first check the points listed below.
There is no sound from my radio
•Check that either the radio is connected to the mains supply and
is switched power on, or that the batteries have sufficient power.
•Make sure that the radio has been able to locate DAB/FM stations.
The DISPLAY shows ‘NO SERVICES AVAILABLE’ (DAB mode)
•Make sure that DAB coverage exists in your area.
•Try adjusting the position of the aerial or location of the radio.
Poor reception
•As with any radio service, there will be areas of weak signal that
may cause poor reception. Follow the instructions for Manual
Tuning on page17 and adjust the aerial while monitoring the signal
strength until the optimum signal is obtained. If reception is still poor
try re-locating the radio to another part of the room.
I cannot access secondary services
•At the time of publishing this manual not many secondary services
are available in the UK. This will increase as more DAB stations
start broadcasting. If a secondary service station is available, the
secondary indicator ‘>>’ will be displayed next to the station name.
The DISPLAY has gone blank or says ‘SERVICE OFF AIR’
•This may occur if a broadcaster changes the label of a service or
removes a label whilst you are listening to the station. The radio will
try to re-tune to the station. Alternatively, perform a scan by
pressing the SCAN button.
I cannot hear the station I have selected
•The station you are listening to is displayed on line 1. Line 2 shows
the selected option, but you have to press the SELECT button to
tune to the selected station.
I here is distortion on some stations
•This is due to a weak signal. Try re-positioning the aerial to gain
maximum signal strength.
If the trouble persists, consult your dealer or contact Product Support:
Telephone:0870 873 0080
Internet: www.goodmans.co.uk
Page 24

GSR85DAB
Technical Specification
Power
Power supply230V AC ~ 50 Hz
Battery operation6 x LR14 (C-size) batteries or equivalent
(not included)
DAB Specifications
RF section Band lll, 174 MHz to 240 MHz
Input 50R, nominal
FM Specifications
Frequency range: 87.50 MHz to 108.00 MHz (in 50 KHz steps)
Aux Input Stereo sockets: 3.5 mm diameter
Headphone Stereo sockets: 3.5 mm diameter
Dimensions
Maximum dimensions:
320mm (W) x 120mm (H) x 75mm (D)
Page 25

Portable DAB/FM Radio
Guarantee
This product is guaranteed for 12 months from the date of original
purchase. If any defect arises due to faulty materials or workmanship,
the unit will either be replaced, a refund given or repaired free of charge
(where possible) during this period by the dealer from whom you
purchased the unit.
The guarantee is subject to the following provisions:
•The guarantee is only valid within the boundaries of the country of
purchase.
•The product must be correctly assembled and operated in
accordance with the instructions contained in this booklet.
•The guarantee does not cover accidental damage, misuse, or
consumable items.
•The guarantee will be rendered invalid if the product is resold or has
been damaged by inexpert repair.
•The manufacturer disclaims any liability for incidental or
consequential damages.
This guarantee is in addition to and does not diminish your statutory, or
legal rights.
Page 26

 Loading...