

Page 1

DAB/FM Portable Radio
GSR80DAB
Instruction Manual
Before operating this unit,
Please read this instruction manual carefully
Goodmans Product Inform ati on Helpline 0870 873 0080
Page 2

Congratulations on you purchase of this latest “state of the art “ Digital A udio Broadcast Radio. P lease read through the
following pages to get the m ost out of this GSR80DAB.
Introduction
What’s in the box
On unpacking t he unit the following should be located withi n the packaging
1 x GSR80DAB M ain unit
1 x Detachable mains lead c omplete with 3 pin fitted plug
1 x Instruction Manual
1 x Qui c k star t Guide
Please retain all packagi ng materi als for use in the event of the product needing transportation or in the unlikely event of
the product requiring repair .
Table of contents
Introduction
Page No.
2
Important Notes 3
Getting Started 6
Location Of Controls 7
General Operation 8
DAB Oper ation – (Including Menu) 10
Using The FM Tuner 21
Troubleshooting guide & Specifications 24
Goodmans Product Information Helpline 0870 873 0080
15/09/2003 Page 2 of 25 Pages 10:29
Page 3

Your hearing i s very important to you and to us so please take care when operating this equipment. It i s strongly
recommended that you follow the l isted guidelines in order to prevent possible damage or loss of hearing:
ESTABLISH A SAFE SOUND LEVEL
• Ov er time your hear ing will adapt to continuous loud sounds and will give the impression that the volume has in fact
been reduced. What seems norm al to you m ay in fact be har mful. To guard against this
ADAPTS
• Slowly increase the level until you can hear comfor tably and clear ly and without di stor tion.
• Damage to your hear ing is accumulative and is irr eversible.
• Any ringi ng or discomf or t in the ears indicates that the volume is too loud.
Once you have established a comfortable listening level, DO NOT INCREASE THE SOUND LEVEL FURTHER.
The following li st of typical sound levels may assist you in recognising just how loud you hav e set the volume level.
set the volume at a low level.
IMPORTANT NOTES
BEFORE YO UR HE ARING
DECIBEL
Level dB Example
30dB Quiet library, soft whisper.
40 Living room, fridge freezer bedr oom away from traffic.
50 Normal c onversati on, quiet offi c e, light traffic.
60 Electric sewing machine,
70 Vacuum cleaner, hair dry er , noisy restaurant
THE FOLLOWING NOISE CAN BE HARMFUL UNDER CONSTANT EXPOSURE
80dB Av er age c ity traffic, alarm clock buz z er at 2 feet, food mixer.
90dB Motorcycle, heavy goods vehi cle, petrol lawn mower.
100 Pneumatic drill, chain saw, garbage truck, discotec / nightclub.
120 Rock band concert, thunderclap.
PERMANENT LOSS OF HEARING
140
180 Rocket Launching pad.
THRESHOLD OF PAIN
Goodmans Product Information Helpline 0870 873 0080
15/09/2003 Page 3 of 25 Pages 10:29
Gunshot 2 feet away.
Page 4
IMPORTANT NOTES (Contd.)
IMPORTANT SAFEGUARDS
PRE FITTED MAINS PLUGS
For your convenience a mains plug has been fitted to this appliance. For your safety please
observe the following information
1. Should the fuse in the plug remove the plug from the wall socket and replace the fuse with a
3 Amp ASTA approved to BS 1362 fuse.
2. Never use the plug without the fuse cover fitted. Replacement fuse covers are available
from your dealer or most electrical retail outlets.
3. If the cable of the mains plug is cut off the cable, rewire the replacement plug in accordance
with instruction given in this manual.
4. CAUTION: Under no circumstances should the discarded plug be inserted mains socket. To
prevent a shock hazard carefully dispose of the di scarded plug. Do not leave the plug lyi ng
around where children might see it.
WARNING:
CAUTION:
To prevent fire or shock hazard do not expose this unit to rain or moisture.
DANGEROUS VOLTAGES EXIST INSIDE THIS UNIT, DO NOT REMOVE COVER
(OR BACK). NO USER SERVICEABLE PARTS INSIDE. REFER SERVICI NG TO
QUALIFIED SERVICE PERSONNEL. DISCONNECT FROM MAINS SUPPLY
WHEN NOT IN USE.
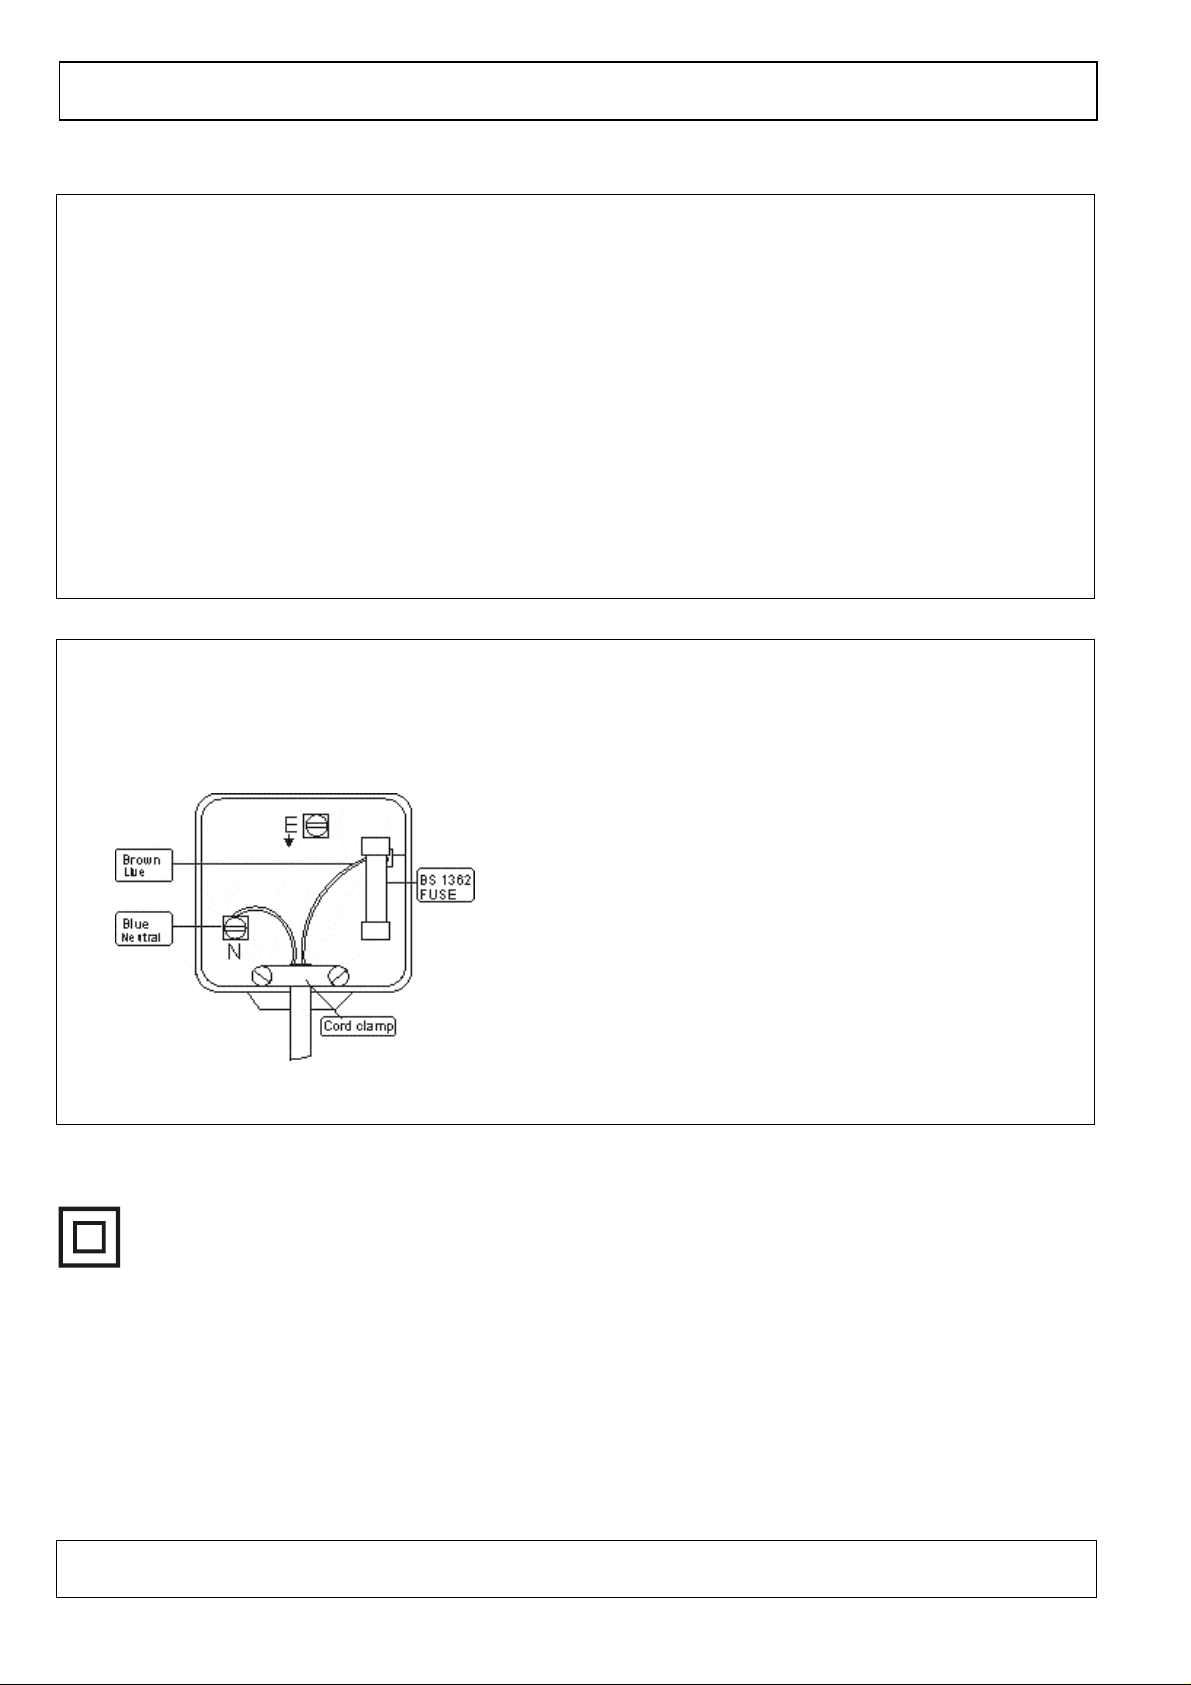
PLUG WIRING DETAILS
WARNING:
UNDER NO CIRCUMSTANCES MUST THE LIVE OR NEUTRAL WIRES BE
CONNECTED TO T H E EARTH TERMINAL IN A 3-PIN MAINS PLUG.
This symbol means that this unit is double insulated.
An earth connection is not required.
The wires in this mains lead are coloured in
accordance with the following wiring codes:
Blue ………………………………………….. Neutral
Brown …………………..…………………………Live
The wires in this mains lead must be connected to
the terminals in the plugs as follows:
Blue Wire……………………………………N or Black
Brown Wire …………………………………. L or Red
Only a 3 Amp fuse should be fitted in the plug or a
5 Amp fuse at the distribution board.
Goodmans Product Information Helpline 0870 873 0080
15/09/2003 Page 4 of 25 Pages 10:29
Page 5

SOME DO'S AND DONT'S ON THE SAFE USE OF EQUIPMENT
WARNING:
This equipment has been designed and manufactured to meet European safety standards but lik e any electric al
equipment , care must be tak en if you ar e to obtain the best resul ts and safety is to be assured.
Do read the operati ng instructions before you attempt to use the equi pment.
Do ensure that all electric al connecti ons (I nc luding the mains plug, extension leads and
interconnections between pieces of equipment) ar e pr oper ly made i n ac c or danc e with the
manuf ac turer's instructions. Switch off and withdr aw the mains plug when making or changing
connections.
Do consult your deal er if you are ever in doubt of t he installat ion, operati ng, or safety of your
equipment .
Don't conti nue to operate the equipment if you are in any doubt about it worki ng nor mally , or if it is
damaged in any way- switch off, withdraw the mains plug and consult your dealer.
Don't remove any fix ed c overs as this m ay expose dangerous vol tages.
Don't leave equipment switched on when it i s unattended unless it is specifical ly stated that it is
IMPORTANT NOTES (Contd.)
designed for unat tended operation or has a standby mode. Switch off using the switch on the
equipment and make sure that your family knows how to do this. Special arrangem ents may need
to be made for infirm or handicapped people.
Don't li sten to headphones at high volume, as such use can permanently damage your hearing.
Don't obstruct t he ventilati on of the equipment, for example with curt ains or soft furnishings.
Ov er heating will cause damage and shorten the life of the equipment .
Don't all ow elec trical equipment to be exposed to rain or moisture.
Above all
Never let anyone, especially children, push anything into holes, sl ots or any other opening as
this could resul t in a fatal electric shock.
Never guess or take c hanc es with electric al equipm ent of any kind.
It is better to be safe than sorry!
TO REDUCE THE RISK OF FIRE OR ELECTRIC SHOCK, DO NOT EXPOSE THIS
APPLIANCE TO RAIN OR MOISTURE, DANGEROUS HIGH VOLTAGES ARE
PRESENT INSIDE THE ENCLOSURE, DO NOT OPEN THE CABINET, REFER
SERVICING TO QUALIFIED PERSONNEL ONLY.
Goodmans Product Information Helpline 0870 873 0080
15/09/2003 Page 5 of 25 Pages 10:29
Page 6
Power Sources
Getting Started
The GSR80DAB can be powered either directly from the household 230V AC mains Supply via the
supplied lead or from 4 D size batteries (not Supplied)
AC MAINS
Insert the small end of the AC mains lead to the socket on the si de of the GSR80DAB and
the 3 pin plug into a switched household AC supply socket, ensure the wall outlet socket is
switched ON. The display will now illuminate indicating power is reaching the
unit. Press the standby button to switch the unit on.
Note: Whilst using the AC supply the battery supply is disconnected automatically.
_
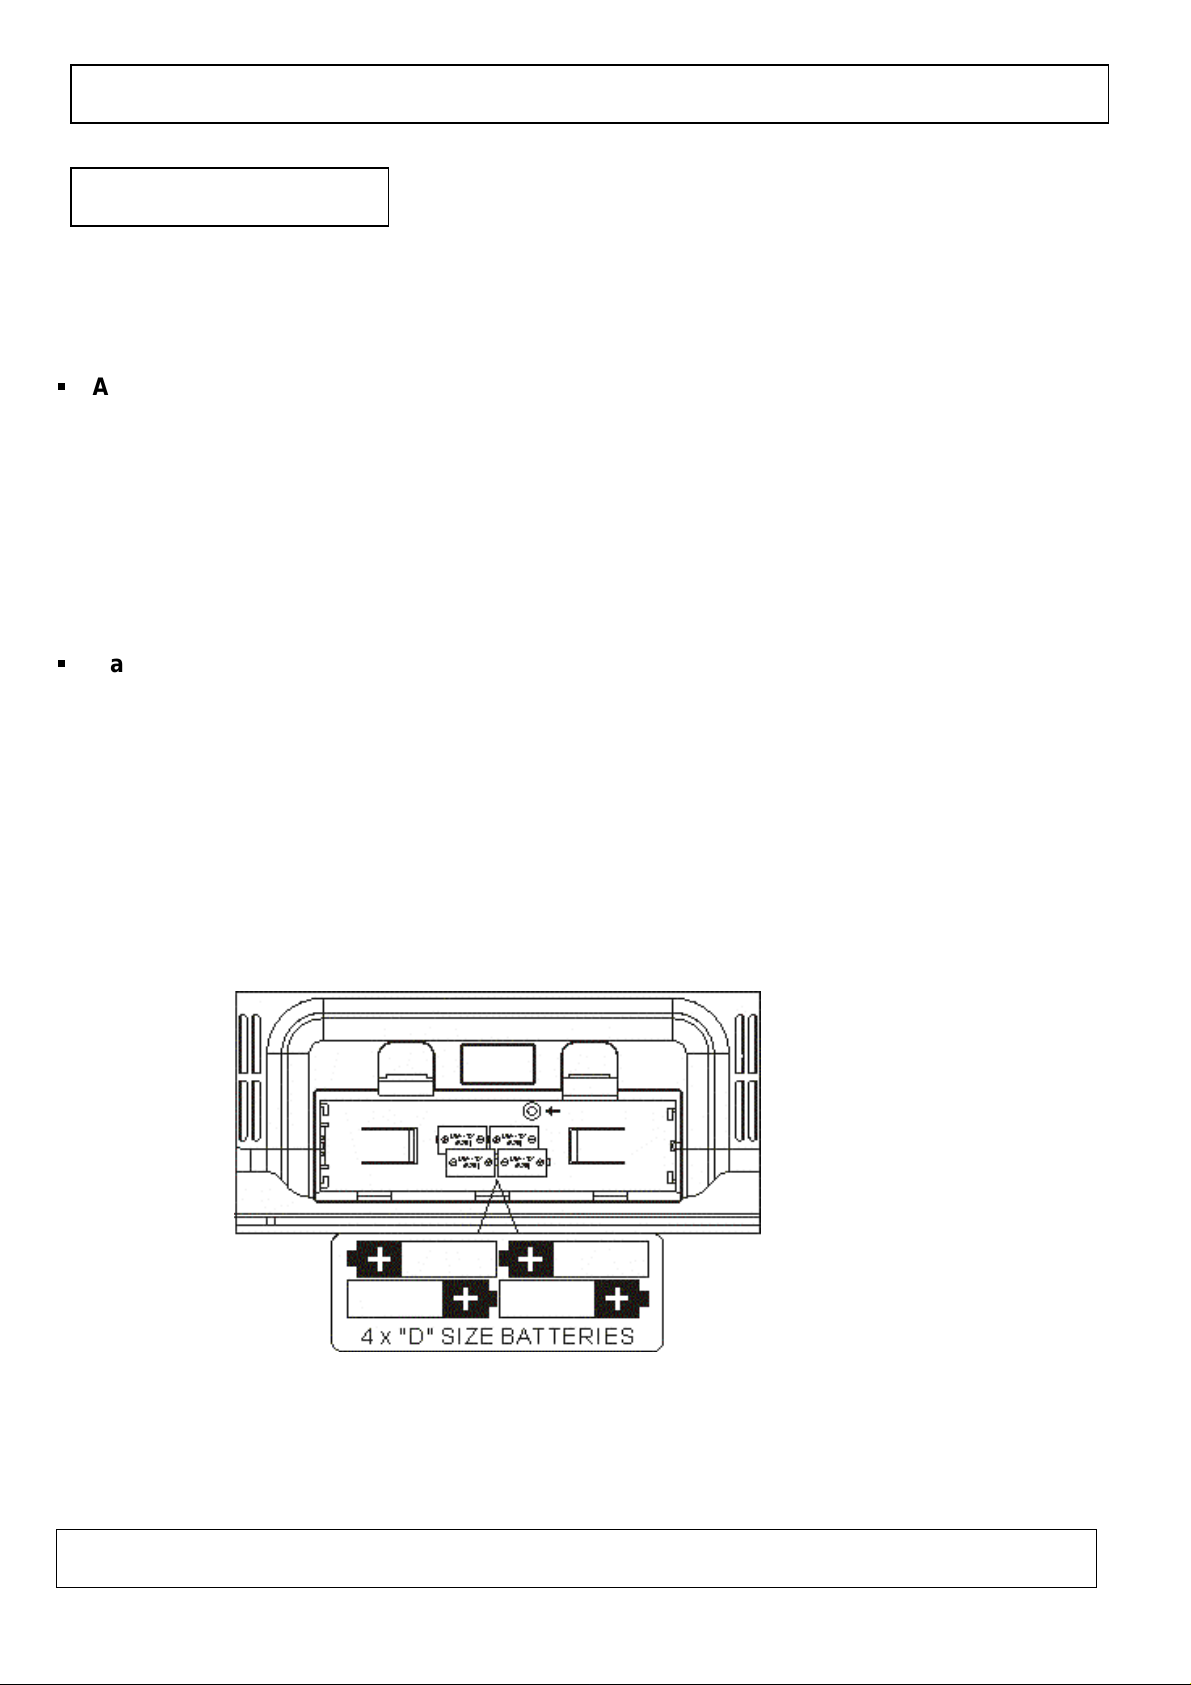
Battery Operation
Remove the Battery Compartment cover and insert 4 x LR20 (D Size Alkaline batteries), observing
the correct polarity replace the cover.
NOTE: BE SURE TO MATCH THE POL ARITIES AS SHOWN BELOW.
NOTE: Old batteries may swell and leak. To avoid damage to the unit, remove the batteries
when the unit is to be stored for long periods of time, or if the batteries become exhausted
(the display will fade and the power/standby LED will flash if the batteries are becoming exhausted).
And if radio sound is low or distorted, the batteries probably need replacing.
Goodmans Product Information Helpline 0870 873 0080
15/09/2003 Page 6 of 25 Pages 10:29
Page 7
101717
11
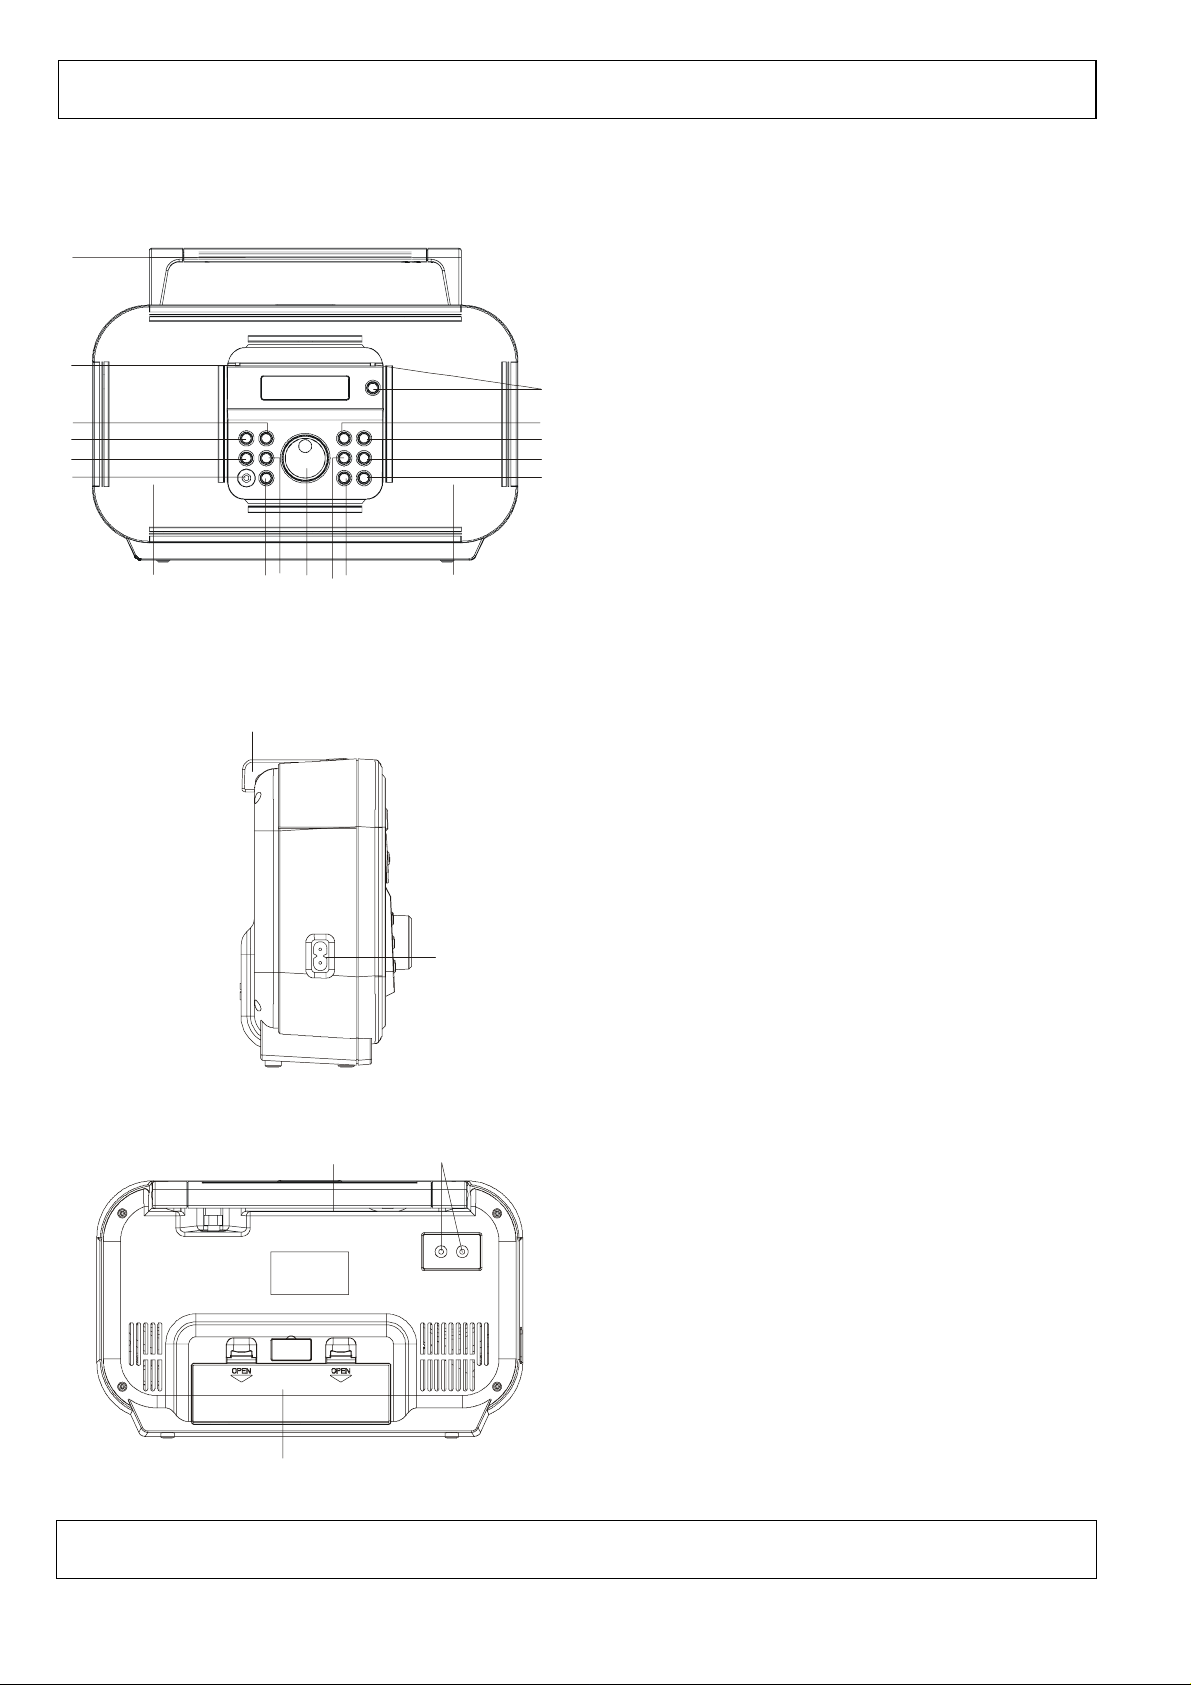
Location of controls
Front
16
8
Side
16
5
96
1 Power button and indicator LED
2 Menu Button
3 Select button
1
4 Autotune button
712
213
5 Display Button
314
415
6 Down button
7 Up Button
8 Secondary DAB service indicator
9 Rotary Volume control
10 Secondary /Stereo/Mono Button
Rear
21
18
19
11 Preset button
12 Next
13 Previous
14 DAB/FM Function Selector
15 3.5mm Headphone socket
16 Folding Handle
17 Left and Right Speakers
18 AC input socket
19 Stereo RCA output sockets
20 Battery Compartment
20
Goodmans Product Information Helpline 0870 873 0080
15/09/2003 Page 7 of 25 Pages 10:29
21 FM/DAB telescopic rod aerial
Page 8
o
DAB or Digital Audio Broadcasting represents a new age in broadcasting technology and as with all
new technologies it is significantly different to traditional Analogue FM/AM broadcast methods. The
new system no longer relies on tuning to a given frequency but instead allows the DAB receiver to
provide an active Station List of all available radio programmes/stations at the touch of one button.
Station Lists are described in more detail in the DAB Operation section of this manual.
Before selecting the DAB function for the first time please ensure the telescopic rod aerial is fully
extended and upright.
1. Connect the unit to the household mains supply or insert 4 D size batteries(not Supplied)
2. Press the Power button on the front panel
3. The unit will automatically start a scan of the DAB services and after 15 to 20 seconds the first
station in the Station List will begin to playback
General operation
NOTE:
This may be due to :-
4. Assuming there is now a Station List available the other stations on the list can be located
At this stage it is possibl e that the display may show “No DAB service” on the first line of the
display and “Check Aerial?” on the second line of the display. Thi s indicates the unit has
been unable to locate any available DAB stations during the search process.
a. No DAB stations in the local area Check with the DRDB at
call the reception Helpline on 08707 747474
b. The radio needs relocating to a better location in order to get adequate reception.
The signal strength indication (See Display button operation) can be used to
assist this process.
c. In the event that the available signal is still not sufficient it may be necessary to
remove the telescopic rod aerial and connect an external aerial to the threaded
(F Type)socket
a. Directly - use the Next /Previous buttons or
b. Indirectly (i.e. listen to the current station until the required next station is
shown on the bottom line of the 2 line display) use the Up/down buttons then
press the select button (pressing and holding the up or down button will scroll
the list at a faster rate)
ZZZ'5'%RUJ
or
5. Use the Volume control to increase or decrease the sound output level as required.
Important Reminder for DAB Reception
Please be reminded that this unit is
specifically designed for reception
of UK only DAB stations restricted
to Band 3 (11B to 12D) only it will
therefore NOT receive DAB stations
in European areas that broadcast
n L band
Goodmans Product Information Helpline 0870 873 0080
15/09/2003 Page 8 of 25 Pages 10:29
Page 9

General operation (contd.)
Selecting FM Radio
Should the radio be used in a broadcast area where DAB is not available it can still be used as a
traditional Analogue FM PLL radio
To switch to an FM station press the “DAB/FM” mode button “FM” will show in the display followed by
an FM frequency e.g. 87.5 MHz
To locate a receivable FM broadcast Press the “Next” button the unit will then seek the next
receivable FM station
Note :
During the FM seek process some background noise may be heard this is normal and not a
fault.
Power Off
To switch the radio OFF press the “Power” button
Note: in this state the radio will still show the clock in the display and draw a small amount of power
from either the batteries or the AC mains supply.
Connecting to an External Amplifier
The audio output from this unit can be played back through an external amplifier. Connect the two
RCA line output sockets on the rear of the unit to suitable line input sockets on an external amplifier
or Audio equipment with a Twin RCA Phono lead (not supplied).
EXTERNAL AMPLIFIER DAB RA D IO
AUDIO INPUT SOCKET (R) RCA LINE OUT SOCKET (L)
AUDIO INPUT SOCKET (L) RCA LINE OUT SOCKET (R)
WHITE
RED
Headphones
A stereo headphone socket is provided for private listening. Connect a pair of low impedance (8-16
ohm) headphones or earphones(not supplied) with a 3.5mm stereo jack plug. When headphones are
connected the main speakers are automatically disconnected.
Backlight
Your receiver includes an advanced display, with a backlight to aid viewing in all conditions. This
backlight has two levels of brightness: “Hi” and “Lo”. In normal operation (on AC Mains Supply,) the
backlight is switched to Lo, when any button is pressed the illumination will increase to Hi for 10
seconds after which it returns to Lo. When using batteries, the backlight is normally off (in order to
preserve battery life) unless any button is pressed when it changes to Hi for 10 seconds then back to
off.
Goodmans Product Information Helpline 0870 873 0080
15/09/2003 Page 9 of 25 Pages 10:29
Page 10

DAB operation
DAB Overview
DAB Radio tuning is very different to traditi onal analogue radio tuning. In DAB mode the user is not
required to know anything about station frequencies.
Instead an organised list of the DAB radio stations receivable in the current location is created by the
radio. This list is initially organised into alphabetical order (by the first letter of the station name only).
The “Autotune” function is the system that the DAB radio uses to create this list of available stations.
This list would be organised in the following way :-
A-Example Station>B-Example Station>C-Example Station>D-Example Station>
TOP
E-Example Station>F-Example Station>G-Example Station>H-Example Station
Bottom
After Autotune has completed the radio will automatically tune to the top station in the Station List. In
the fictional Station List above this would be “A-Example Station”.
This radio provides two different ways of selecting stations from the list it has created.
Using the “Up”, “Down”, and “Select” buttons – as described later in this manual
Using the “Prev” and “Next” buttons – as described later in this manual.
When using these buttons to select stations the list is cyclic. Using the above list as an example this
means that if the selection continues down past “H-Example Station” the next station presented will
be “A-Example Station”.
If the same thing is done in the opposite direction i.e. the selection continues up past “A-Example
Station” the next station presented will be “H-Example Station”
NOTE
There is one condition where the Station List is not sorted into alphabetical order.
This is when the “Sort by Favourites” option is switched ON using the “Menu” button as described
later in this manual. However the default setting for the unit at initial Power up is as described above
Goodmans Product Information Helpline 0870 873 0080
15/09/2003 Page 10 of 25 Pages 10:29
Page 11

DAB operation [contd.]
Button functions
Button Name Description
Power
Previous (Prev)
Next (Next)
DAB/FM
Press to switch ON or switch OFF.
Basic Controls
DAB Mode :Go directly to the previous station in the DAB Stat ion
List
FM Mode : Searc h down the band for the nex t receivable FM
station.
DAB Mode :Go directly to the next station in the DA B S tation
List
FM Mode : Searc h up the band for the next receivable FM
station.
To select between DAB or FM Functi on
Presets
Mono/Stereo/ Secondary
Menu
Up
Down
Select/Timer
Display
Select t he P r eset list instead of the full l ist of avail able stations
Advanced Controls
DAB Mode : This is the Secondary service selection button.
Secondary services are sometimes availabl e
embedded withi n the main DAB station current ly
being li stened to. This will be indicated by the
Secondary LED on the F r ont Panel. When the LED is
illuminated, press this button repeatedly to cycle
through the available secondary serv ices and then
back to the original (primary) service.
FM Mode : This allows an FM station to be switched between
stereo and mono m ode whic h c an sometim es hel p
audio clarity in poor si gnal conditions
Selects the Menu functi on
Used in FM and DAB tuning and the navigati on of the Menu
Used in FM and DAB tuning and the navigati on of the Menu
Used to Select a menu item or radio station displayed on l ine 2 of
the display. A lso used to set or cancel the reminder t imer function
Each press Cycles the second li ne of the displ ay to present
different i nform ation. This can include > scrolling text > signal
strength >multiplex and station infor mation>broadcast bit
rate>audi o mode>cloc k time>battery l evel ( only when batteries are
being used) >scrolling text etc. T he functi onality differs between
DAB and FM m odes of operation.
AutoTune
Goodmans Product Information Helpline 0870 873 0080
15/09/2003 Page 11 of 25 Pages 10:29
If t his button is pressed for more than 5 seconds a scan of the DAB
band is performed. Thi s button has No operation in FM mode.
Page 12

operatio
DAB
n
The Display
In DAB mode, the name of the station being listened to appears on Line 1 of the di splay, and the
“dynamic text” (sometimes known as “DLS Text”) will appear on Line 2 of the displa y unless the
“Display” , “Up”, “Down”, “Menu”, or “Select/Timer” buttons have been pressed which change the
information shown on line 2 of the display.
Display Button (DAB Mode)
The “Display” button changes the information displayed on line 2 of
the display by cycling through the following settings:
Normal (dynamic text for DAB) > Signal Strength > Multiplex and station information (3 items) >
broadcast Bit rate>audio mode>Clock time > Battery Level (only if batteries are being used) >
Normal (dynamic text for DAB) etc
Each time the “Display” button is pressed, the information displayed on line 2 of the display is
changed to one of the above. Continue to press the “Display” button until the required information is
displayed.
it starts to scroll across the display – this is normal.
: Sometimes when listening to DAB, the dynamic text may take a few seconds before
Note
Normal (DLS Text)
This is the normal display for DAB mode. The DLS text is almost always
longer than the display so it will “scroll” across the display such that all the
content can be read.
Signal Strength
The signal strength is shown as a bar on line 2 of the display – the longer
the bar, the stronger the signal. This di splay can be used when first setting
up your receiver to help you position the aerial for best reception
Multiplex and Station information
Use these options to find out more technical information about the station
being listened to.
BBC National DAB
(the name of the multiplex on which the station is being
transmitted)
160kbits/S
- the bitrate of the audio being recei ved (in the range 64 to
384kbit/s)
Audio Mode
(the broadcast mode – can be Mono, Stereo, or Joint Stereo)
Clock
The clock is automatically updated when listening to DAB, and is kept up to
date by the receiver when listening to FM or when the receiver is switched
off. The clock can be displayed in 12-hour (AM/PM) or 24-hour (default)
format.
Goodmans Product Information Helpline 0870 873 0080
15/09/2003 Page 12 of 25 Pages 10:29
Page 13

DAB operation (contd.)
Battery Level
If the receiver is operating on batteries, the battery level will be displayed,
as a bar. The longer the bar, the more life is left in the batteries.
If the receiver is operating on mains power, this message will be dis p la y ed :
Note
If the battery level is getting low, then the Power LED will start to flash. switch off the receiver
:
and replace the batteries as soon as possible
Changing between DAB and FM mode will automatically change the display information to the first
item on the list for the selected mode. E.g. Moving from FM operation to DAB operation will
automatically select the Normal (DLS Text) information for display on Line 2.
Autotune
When “No Dab Service” is shown in the display, Press the
Autotune
button
perform a scan of the DAB Band 3 UK spectrum and create a new Station
List of all available DAB stations currently broadcasting. Thi s process
usually takes around 15-20 seconds searching the range (11B-12D) used in
the UK During this process, the display will show how many stations have
been found, and on what “channel” they were found: The number of
stations found varies greatly dependant on the area in which the receiver is
located not all stations are available in all areas
Once the autotune function has completed the receiver will tune to the first
station in the Station List.
A required station can then be selected using either the “Prev” /”Next” or the
“Up”, “Down”, “Select” buttons as described later in this manual.
If the radio has been moved, or should additional stations need to be added to the station list, the
“Autotune” function can be used at any time.
If taking the unit outside try another Autotune once
Tip:
clear of buildings, this may add further receivable stations to the station list.
Important Note:
During the scan process you may find the unit indicates it has found more stations
than the number that appear in the station list , the additional stations that are picked up could be
either
a. Secondary stations that are accessed via the secondary button (see later notes) or
b. Data services provided on DAB which cannot be used on this unit
Goodmans Product Information Helpline 0870 873 0080
15/09/2003 Page 13 of 25 Pages 10:29
Page 14

Station List
The Station List is the heart of the DAB Tuning system and is the key fundamental difference
between digital and analogue radio. An example of a fictional Station List is provided at the beginning
of the DAB Operation section of this manual.
A Station List can only be created using the Autotune function
Note:
message will be displayed. In such a case the receiver will allow the use
of the “Display” button to select the “Signal” option on line 2 of the display.
This can then be used this to optimise the aerial position for best signal strength. When this has been
done perform “Autotune” as normal. After 15-20 seconds, the radio will have checked for all available
DAB stations, and will have created a new Station List. If the same message reappears then please
refer to the General Operation section of this manual.
Special Functions of Digital Radio and Station Lists
All broadcasters are permitted to change the content of their digital radio transmissions at any time by
adding and removing stations.
DAB operation (contd.)
If for some reason no DAB stations can be received, then this
Many broadcasters take advantage of this facility for catering for special audiences. An example of
this would be adding a special station for children during the day and then replacing it with a more
adult oriented station programming at night.
With DAB stations it is also possible to split an existing station into two or more separate stations for
a period. This is often done on “speech only” stations where the broadcaster may wish to deliver
coverage of different sporting events at the same time. The new stations are “underneath” the
existing (primary) stations and the new stations are known as “Secondary” stations.
These two special functions, are only available on the DAB Network, and can mean that the content
of the Station List changes over time.
Information about these facilities and changes are made available by the following means.
Stations that have been removed or are no longer transmitting
If a station has been removed or has stopped transmitting the Station List will display t his with a s mall
“x” at the end of the Station Name to indicate that this station did exist but has now been removed.
This station will not be available for listening to. It is possible that this station will “reappear” at some
time, when and if it does the small “x” will not be present adjacent to the station name and it will then
be available to listen to again.
Secondary Stations
If the DAB station selected has been “split” and there are one or more other stations hidden
underneath it, the radio will indica t e t h is b y illu minat in g t he “ S e c ondary” LE D w hich is on the left-hand
side above the display .
Pressing the “Secondary” button will allow the selection of the first “Secondary Station”. Pressing the
“secondary” button again will sele c t t h e n e xt se c ondary station and so on until it returns to the original
(primary) station.
Goodmans Product Information Helpline 0870 873 0080
15/09/2003 Page 14 of 25 Pages 10:29
Page 15

DAB operation (contd.)
Selecting Stations to listen to in the Station List
There are two methods available for selecting a station to listen to from the Station List.
These methods are called ” Direct Mode” and “Indirect Mode“
Please note that stations can be removed from transmission by the broadcaster and this will be
indicated in the Station List as described in the previous section of this manual
Direct Mode
This mode uses the “Prev” and “Next” buttons to select the required station from the Station List.
This mode works as follows.
Using the fictional Stati on List at the beginning of the DAB Operation section of this manual as an
example.
When listening to “C-Example Station” and the “Next” button is pressed, the receiver will immediately
tune the next station in the Station List “D-Example Station”.
When listening to “C-Example Station” and the “Prev” button is pressed the receiver will immediately
tune to the previous station in the list “B-Example Station”.
NOTE : Don’t forget the Station List is cyclic so continuing the selection down past the bottom of the
list will jump to the top of the list and vice versa. Pressing and holding PREV or NEXT
Buttons will scroll quickly through the station list, releasing the button at the required station
will cause immediate retuning to the selected station.
Indirect Mode
The Indirect Mode of selecting stations from the Station List uses the “Up”, “Down”, and “Select”
buttons to choose a station to listen to,
This mode works as follows
Press the “Up” or “Down” button and the second line of the display will change to show the
station above or below the one currently being listened to in the list The top line of the
displa y will con t inue to show the name of the station currently being listened to and the audio
from this station will continue to be heard. (pressing and holding the up or down button will
scroll the list at a faster rate)
When the required station is shown on line 2 press the “Select” button to confirm selection. The
name of the station will then move to line1 of the display and after a bri e f pause, the audio for the
station will be heard.
Line 2 of the display will return to the information that was selected prior to the “Up” or “Down” button
being pressed.
With the exception of the “Select” button the only other button that can be used to exit this mode is
the “Power” button.
15/09/2003 Page 15 of 25 Pages 10:29
Goodmans Product Information Helpline 0870 873 0080
Page 16

Selecting Stations from the Station List (contd.)
DAB operation (contd.)
Storing and Recalling Presets in DAB
To make the selection of the most listened to stations faster, up to 10 DAB stations can be stored into
preset memories.
The preset memories are in the form of a list of Preset Locations numbered 0 to 9.
Storing a Station as a Preset
To store a station into a Preset locati on
1) Tune the radio to the required station.
2)
Press and hold
Preset Locations will appear with “
the “Preset” button for more than 3 seconds and the first preset in the list of
” on line 2 of the display.
S-00
The name of the current station stored in that Preset location will be shown
Note
or “empty”will be displayed if nothing is currently stored there
3) Use the “Up” and “Down” buttons to select the location in which to store the station. The
preset list is cyclic therefore scrolling down past location 9 will jump to location 0 and scrolling
up past location 0 will jump to location 9.
4) Press the “Select” button to store the station into the chosen preset location.
5) The station is now stored in that location. Note: any previous station stored in the selected
location will be overwritten.
6) To confirm the store operation was successful, “Stored” will show in line 1 of the display” for a
few seconds, then line 2 will revert to the display mode that was selected before the preset
storage processed commenced.
Recalling a Preset Station
To recall a station from a Preset location.
1)
Briefly press
the “Preset” button and the first Preset Location “
” will appear on line 2 of
P-00
the display.
The name of the current station stored in the selected Preset location will be shown
Note
or it will show “empty” if nothing is currently stored there
2) Using the “Up” and “Down” buttons to locate the required preset. This l ist is cyclic therefore
scrolling down past location 9 will jump to location 0 and scrolling up past location 0 will jump
to location 9.
3) Press the “Select” button to recall and tune to the selected preset.
Goodmans Product Information Helpline 0870 873 0080
15/09/2003 Page 16 of 25 Pages 10:29
Page 17

DAB operation (contd.)
Timer Function
The timer function allows the radio to sound a buzzer once a preset time period has elapsed.
Setting the Timer
Press and hold the “Select” button for more than 2 seconds. The display
will sho w “00: 20 ” if t he t imer ha s n o t pr e v iou s ly been set, or whatever value
the timer is currently set to.
Press the “up” or “down” buttons to adjust the time between 00:01 (one
minute) and 4:16 (4 hours and 16 minutes). If one of the buttons is pressed
briefly, the time will increase or decrease by one minute. Pressing and
holding one of the buttons causes the time to increase or decrease rapidl y,
release the button once the required time is reached.
Once the required time is reached, press the “Select” button. The display will revert to the normal
radio display, and an ani mated “hourglass” icon will show in the bottom right hand corner of the
display.
This will show until the preset time is reached and the buzzer sounds
Reviewing the Remaining time
To view the remaining time prior to the buzzer sounding, press and hold the “Select” button for more
than 2 seconds.
The remaining time will be shown in the display.
Briefly press the “Select” button again to revert to the previous display.
Cancelling the Timer
To cancel the timer before the buzzer sounds press the “Select” button for more than 2 seconds the
current timer value will appear. Using the “Down” button set the displayed value to “00.00” and press
“Select”. This will cancel the timer and remove the hourglass symbol from the display.
Stopping the Buzzer
Press the “Select” button briefly to cancel the timer (once it has activated) and stop the buzzer from
sounding. If the buzzer is not cancelled it will stop automatically after about five minutes.
: The Timer function can only be set when the unit is switched on, but will continue to operate
Note
when the unit is put into standby mode (the hourglass symbol will d is appear from the display in
standby mode). If the Radio is being listened to when the buzzer sounds the radio will not be
muted but the buzzer will be superimposed over the radio output, this is normal.
Goodmans Product Information Helpline 0870 873 0080
15/09/2003 Page 17 of 25 Pages 10:29
Page 18

DAB operation (contd.)
Menu Function
The menu function allows the configuration of some functions of the radio.
The menu options available are:
Favourites
•
Clock 12/24
•
Factory Defaults
•
Accessing the Menu
To access the menu, press the “Menu” button while listening to any DAB or FM radio station.
: If no action is taken within a few seconds of pressing the menu button the unit will revert to the
Note
normal display.
The display will show this message.
The >< arrow icons indicate that other menu items are available
This list is cyclic.
Use the “Up” and “Down” buttons to select the required menu option
When the required option is shown on line 2 of the display press “Sel ect” to enter the feature.
Pressing the “Menu” button at any time will revert to the previous menu item or display.
If the unit is at the top-level menu, pressing the “Menu” button will exit the menu mode and return the
unit to normal radio mode.
The radio will only respond to “Up”, “Down”,“Select”, “Menu” or “Power” buttons whilst in the “menu”
mode.
Sort station list by Favourites
Selec t in g this fu n c t ion w ill move the F av o u r it e Stat ion s t o t he t o p of t h e c u rr e nt Stat ion L is t in or d er o f
“most frequently listened to”.
What is a “Favourite Station”
A station will become a favourite in two ways, using a scoring system. The station that has the
highest score becomes the “most favourite”, the station with the second highest score becomes the
“second favourite” and so on up to a maximum number of five stations.
The first part of the scoring system relates to the number of times a station is tuned to. The more
times it is tuned to the higher the score becomes.
The second part of the scoring system relates to the length of time a station is listened to. The longer
a station is li stened to the higher the score becomes.
NOTE
15/09/2003 Page 18 of 25 Pages 10:29
All favourite station scores are set to zero when an Autotune operation is performed.
Goodmans Product Information Helpline 0870 873 0080
Page 19

DAB operation (contd.)
Turning the Sort By Favourites option On and Off
Press the “Menu” button use the “Up” and “Down” buttons to move to the Favourites option
The display will then show.
Press the “Select” button to enter the Favourites option
The display will then show
Press the “Up” or “Down” buttons to toggle the selection between ON and
OFF.
Then press the “Select” button to confirm the selection the display will revert to it’s previous state.
Turning this option on and off does not affect the “scores” of the stati ons, which are only cleared by
performing an Autotune.
The Factory Default is Favourites turned OFF.
Clock Option
In DAB Mode, the clock is set automatically, and will be automatically updated for daylight saving.
The broadcaster of the DAB station being listened to transmits the updated clock information, it is
therefore always accurate and no manual setting of the clock is not possible nor is it required.
When the radio is switched off, or in FM mode the time is kept updated by the radio’s own internal
clock.
If no power source is available to the unit, either AC supply, or batteries then the time setting will be
lost. It will however be recovered as soon as the radio is powered on and tuned to a DAB Station.
There are two display modes for clock display
12/24 hour mode
This feature allows either 12-hour mode (e.g. 02:45PM) or 24-hour mode (e.g. 14:45). The default
setting is “24-hour mode”.
Switching between 12 and 24 hour clock mode
Press the “Menu” button and use the “Up” and “Down” buttons to move to
the Clock option in the menu. Press the “Select” button
Pressing the “Up” and “Down” buttons will then toggle the selection
between “12 Hour” and “24 Hour”. Press the “Select” button to confirm the
required mode, the display will revert to it’s previous state
Goodmans Product Information Helpline 0870 873 0080
15/09/2003 Page 19 of 25 Pages 10:29
Page 20

operation (contd.)
Factory Defaults
This feature allows the unit to be reset to the state it was when it was first manufactured. It clears all
memories, includi ng all presets and the Station List.
Selecting Factory Defaults
Press the “Menu” button and then use the “Up” and “Down” buttons to
move to the Set Defaults function. Press the “Select” button to enter the
Set Default function.
To proceed with set defaults, press the “Select” button briefly.
This message confirms that all presets are being cleared, and all “service”
lists are being erased.
DAB
AFTER ABOUT 10 SECONDS
an Autotune operation will then start automatically.
Goodmans Product Information Helpline 0870 873 0080
15/09/2003 Page 20 of 25 Pages 10:29
Page 21

FM operation
Selecting the FM Function
Press the DAB/FM Mode button the display will show “FM”.
When in FM mode, the frequency of the station being listened to appears on Line 1 of the display,
and Line 2 displays whether the unit is in “stereo” or “mono” mode unless the “display” setting has
been changed
Selecting FM Stations
To change stations in FM, two methods are available: ” Seek” and “manual”. “Seek” is intended as a
very simple way to move from one station to the next. “Manual” tuning allows the selection of an
exact frequency, useful in marginal reception areas where the seek function will not lock onto a
required station. Both “seek” and “manual” methods are available at any time whilst in FM mode.
Using the Seek tuning method
To use the “Seek” method, briefly press the “Next” or “Prev” buttons.
The radio will immediately retune to the next receivable FM station up or down the FM band.
The frequency of that station will be on the top line of the display
Note:
During the Seek process background noise will be heard this is normal and not a fault
Using the Manual Tuning method
For manual tuning briefly press the “Up” or “Down” buttons.
The frequency display will change in 50KHz steps up or down the FM Band. Pressing and holding
the “Up” or “Down” buttons will advance or decrease the selected frequency rapidly in 50KHz steps
until the required frequency i s reached and the button is released.
In this mode the receiver tunes immediately to the newly selected frequency as soon as the button is
released .
Mono/Stereo selection
In some situations such as poor Stereo FM reception, switching to “mono” can reduce background
hiss. Press the “Mono/Stereo” button to change the FM sound output from Stereo to Mono.
When “stereo” is selected (default), “Stereo” will appear in line 2 of the display. When “mono” is
selected, “Mono” will appear in line 2 of the display indicating the broadcast is now being listened to
in Mono.
If the Mono Stereo indication has not been selected as the display option for line 2 then the “Mono” or
“Stereo” indication will disappear after a couple of seconds and line 2 of the display will return to it’s
selected indication.
Note
this function does not operate in DAB mode
Goodmans Product Information Helpline 0870 873 0080
15/09/2003 Page 21 of 25 Pages 10:29
Page 22

FM operation [contd.]
Storing and Recalling Preset Frequencies in FM
To make selecting most listened to stations easier, up to 10 FM frequencies can be stored into preset
memories.
The preset memories are in the form of a list of Preset Locations numbered 0 to 9.
Storing a Frequency as a Preset
To store a frequency into a Preset location
1) Tune the radio to the required frequency
2) Press and hold the “Preset” button for more than 3 seconds and the first Preset Location will
appear with “
Note
The frequency currently stored in the Preset location will be shown on line 2
” on line 2 of the display.
S-00
or “empty” will be displayed if nothing is currently stored in that location
3) Use the “Up” and “Down” buttons to select a location in which to store the current frequency.
The preset list is cyclic therefore scrolling down past location 9 will jump to location 0 and vice
versa.
4) Press the “Select” button to store the current frequency into the selected location.
5) The frequency is now stored in that location. If another frequency was previously stored in that
location, the new frequency will replace it.
6) As confirmation that the store operation has taken place, line 1 of the display will show
“Stored” for a few seconds and then return to the display mode that was selected prior to the
preset operation starting.
Recalling a Preset frequency
To recall a preset frequency
1)
Briefly Press
the “Preset” button and the first preset and “
” will appear on line 2 of the
P-00
display.
The current frequency stored in the Preset location will be shown
Note
or “empty” will be displayed if nothing is currently stored in that location
2) Use the “Up” and “Down” buttons to locate the required preset. The preset list is cyclic
therefore scrolling down past location 9 will jump to location 0 and vice versa
3) Press the “Select” button to recall and tune to the preset frequency.
Goodmans Product Information Helpline 0870 873 0080
15/09/2003 Page 22 of 25 Pages 10:29
Page 23

FM operation [contd.]
Display Button (FM Mode)
The “Display” button changes the display on the second line of the
receiver by cycling through the fol lowing settings:
Time > Battery Level (if batteries are being used) > FM Signal Strength > Stereo/Mono > Time etc
Each press of the “Display” button changes the information displayed on line 2 of the display. Keep
pressing the “Display” button until the required information. is selected.
Clock
The clock is automatically updated when listening to DAB, and is kept up
to date by the receiver when listening to FM or when the receiver is
switched off. The clock can be displayed i n 12-hour (AM/PM) or 24-hour
format (default)
Battery Level
If you are operating the receiver on batteries, the battery level can be
displayed, as a bar. The longer the bar, the more battery power is left
If you are running the receiver using mains power, the following message
will be displayed instead of battery level:
Note
If the battery level is getting low, then the Power LED will start to flash, switch off the receiver
:
and replace the batteries as soon as possible
Signal Strength
The signal strength is shown as a bar on line 2 of the display – the longer
the bar, the stronger the signal. This di splay can be used when first setting
up your receiver to help you position the aerial for best reception
Mono/Stereo
This displays the audio status of the FM station being listened to.
When changing between DAB and FM mode the display function will automatically move to the first
item on the display list for that mode. E.g. Moving from DAB operation to FM operation will
automatically select audio mode on line 2 of the display, changing back to DAB will result in the
display changing to the Normal (scrolling DLS text Mode)
Goodmans Product Information Helpline 0870 873 0080
15/09/2003 Page 23 of 25 Pages 10:29
Page 24

Every effort has been made to ensure this product provides optimum performance in all
conditions ,however we appreciate that sometimes difficulties may arise and the following table
summarises some common problems.
Problem Possible cause Remedy
General
No Sound
Troubleshooting guide
No power to unit
Volume control at Minimum
Headphones connected to
headphone socket
Check AC supply is
connected and switched on
If batteries are being used
check they are not
exhausted
Check the unit is switched
on
Rotate volume control
clockwise
Remove headphones
No DAB stations found
Erroneous information in the
display
Noisy reception on FM
Aerial not extended
Outside broadcast area
Temporary memory problem
Aerial Not extended
Weak reception
Check Aerial and unit
position
Use the signal meter on the
unit to check for signal
Connect an external aerial
to the radio to try and
improve
Check location reception
details at
call 08707 74 74 74
Switch the unit off then
back ON this will clear the
problem
Check Aerial and unit
position
Use the signal meter on the
unit to check for signal
Switch unit to Mono mode
ZZZGUGERUJ
or
If the problem experienced is not listed above or if after checking the remedies the problem still
exists , please call our product information helpline on
0870 873 0080
For further assistance
Goodmans Product Information Helpline 0870 873 0080
15/09/2003 Page 24 of 25 Pages 10:29
Page 25

AC Supply Voltage: 230VAC, 50Hz
DC Supply Vol tage: 6V via 4 x LR20 “ D” si z e batteries (Not Supplied)
Battery Life: up t o 20 hour s ON with 4 long life alk aline batter ies upto 4 Months in standby mode
Receiver Bands: DAB Band III: 174.928 MHz (5A) – 239. 200M Hz ( 13F)
DAB Modes I, II, III and IV
FM: 87.5MHz – 108M Hz , 50kHz steps for tuning
Tuning Range - 11B t o 12D
DAB sensitivity : -98dBm or better
DAB Adjacent Channel Rejection: -30dB or better
DAB audio decode: 64k bps - 384kbps
Aerials: Buil t-in tel escopic rod aerial for DAB and FM reception
External aerial socket: F-type
Power Output (at 10% THD): 2 x 0. 5W RMS
+HDGSKRQHV 6RFNHW PP GLDPHWHU
FRQQHFWRU
Specifications
Speakers: 2 x 3”
Audio Line O utput: via 2 x RCA sockets
Specifications ar e s ubjec t to change and improvement at any time w ithout notice.
Goodmans Product Information Helpline 0870 873 0080
15/09/2003 Page 25 of 25 Pages 10:29
 Loading...