

Page 1

DVD / CD PLAYER
GDVD200CDGM
OPERATION MANUAL
HELPLINE PHONE NUMBER 08708 730080
Page 2

TABLE OF CONTENTS
INTRODUCTION
This instruction manual is important to you. Plese read it. In a short time it shows exactly
how to connect, operate, and adjust this unit for best performance. It can save you money.
It shows simple things to do and check before you call for help and save the cost of
unnecessary service or call out charge.
TABLE OF CONTENTS ......................................................................................................... 2
IMPORTANT SAFEGUARDS ................................................................................................ 3
CAUTION AND IMPORTANT NOTE ..................................................................................... 4
INTRODUCTION .................................................................................................................... 6
SAFETY PRECAUTIONS ...................................................................................................... 8
LOCATION OF CONTROLS ................................................................................................. 9
LOCATION OF REMOTE CONTROL UNIT ........................................................................ 10
CONNECTION ..................................................................................................................... 11
DVD OPERATION ................................................................................................................ 13
PICTURE CD OPERATION .................................................................................................. 20
TROUBLE SHOOTING ......................................................................................................... 21
SPECIFICATION ................................................................................................................. . 22
Save the carton and packing material; they will be useful if you ever have to transport the unit.
Pack contents:
1 x CDG Karaoke disc
1x Scart Cable
2x Microphones
1x Remote Control
2 x AAA batteries
1x Owner’s Manual
Please retain all packaging material for future transportation of the unit or in the unlikely event
that the unit needs to be returned fo service.
2
Page 3

IMPORTANT SAFEGUARDS
CORD GRIP
FUSE
BROWN
(LIVE)
OUTER
SLEEVE
BLUE
(NEUTRAL)
For your own safety read following instructions carefully before attempting to connect this
DVD Player to the mains.
Mains Supply 230V~ 50Hz - AC only
This unit is designed to operate on a 230V~ 50Hz supply only. Connecting it to other
power sources may damage it. Ensure that the supply corresponds to the information on
the rating label on the rear panel of the unit.
This component system may be fitted with a non-rewireable plug. If it is necessary to
change the fuse in a non-rewireable plug the fuse over must be refitted. If the fuse cover
becomes lost or damaged, the plug must not be used until a replacement, available from
the manufacturer, is obtained. It is important that the colour of the replacement fuse cover
corresponds with the colour marking on the base of the plug.
If the plug needs to be changed because it is not suitable for your socket, or becomes
damaged, it should be cut off and an appropriate plug fitted following the wiring instructions
below. The plug must then be disposed of safely, as insertion into a 13A socket is likely to
cause an electrical hazard.
IMPORTANT
The wires in the mains plug should be connected as
shown in the diagram.
The colours of the wires in the mains lead of the unit
may not correspond with the coloured markings identifying the terminals in your plug. Connect them as
follows:The wire which is coloured blue must be connected to
the terminal which is marked with the letter ‘N’ or coloured
black.
The wire which is coloured brown must be connected to the terminal which is marked with
the letter ‘L’ or coloured red.
There should be no connectin to the earth terminal of your plug.
If a 13 Amp (BS1363) Plug is used, a 3 Amp Fuse must be fitted, or if any other type of Plug
is used a 3 Amp or 5 Amp Fuse must be fitted, either in the Plug or Adaptor, or on the
Distribution Board.
This symbol means that this unit is double insulated. An earth connection is not required.
DANGER
LASER SAFETY
CAUTION : USE OF CONTROLS OR ADUSTMENTS OR PERFORMANCE OF PROCEDURES OTHER THAN SPECIFIED HERIN
MAY RESULT IN HAZARDOUS RADIATION EXPOSURE.
INVISIBLE LASER RADIATION WHEN OPEN AND INTERLOCK
FAILED OR DEFEATED. AVOID DIRECT EXPOSRUE TO BEAM.
This unit employs a laser. Only a qualified service person shuold
remove the cover or attempt to service.
CAUTION
To prevent electric shock, disconnect from the mains before removing cover. No user
serviceable parts inside. Refer servicing to qualified service personnel.
3
Page 4

To achieve the utmost in enjoyment and performance, please read this manually carefully
before attempting to operate the unit in order to became familiar with its features, and assure
you years of faithful, trouble free performance and listening pleasure.
Important Notes
• Keep instructions the safety and operating instructions should be retained for future
reference.
•Avoid installing the unit in locations described below:
Exposed to direct sunlight or close to heat radiating appliances such as electric heaters.
On top of other stereo equipment that radiate too much heat.
Places lacking ventilation or dusty places.
Places subject to constant vibration.
Humid or moist places.
• Make sure not to obstruct the ventilation opening.
• Operate turning controls and switches as instructed in the manual.
• Before turning on the power for the first time, make certain the power cord is properly
installed.
For safety reasons, do not remove any covers or attempt to gain access to the inside of the
product. Refer any servicing to qualified personal.
Do not attempt to remove any screws, or open the casing of the unit; there are no user
serviceable parts inside, refer all servicing to qualified service personal.
CAUTION: TO REDUCE THE RISK OF ELECTRIC SHOCK DO NOT REMOVE COVER (OR
WARNING:To prevent fire or shock hazard, do not expose this appliance to rain or moisture.
Note:
This unit will become warm when used for a long period of time. This is normal and does not
indicate a problem with the unit.
BACK), NO USER SERVICEABLE PARTS INSIDE, REFER SERVICING TO
QUALIFIED SERVICE PERSONAL.
DANGEROUS VOLTAGE
Conductor dangerous voltage, that mayt be of sufficient magnitude to constitute a
risk of electric shock to persons is persent within this product’s enclosure.
ATTENTION
The owner’s manual contains important operating and maintenance instructions,
for your safety, it is necessary to refer to the manual.
The apparatus should not be exposed to dripping or splashing and that no objects
filled with liquids, such as vases, shall be placed on the apparatus.
No naked flame sources, such as lighted candles, should be placed on the
apparatus.
4
Page 5

IMPORTANT NOTES
Hearing is very important to you and to us so please take care when operation this equipment.
It is strongly recommended that you follow the listed guidelines in order to prevent possible
damage or loss of hearing.
ESTABLISH A SAFE SOUND LEVEL
• Over time your hearing will adaptto continuous loud sounds and will give the impession
that the volume has in fact been reduced. What seems normal to you may in fact that be
harmful. to guard against this BEFORE YOUR HEARING ADAPTS set the volume at a
low level.
• Slowly increase the level until ou can hear comfortably and clearly and without distortion.
• Damage to your hearing is a accumulative and is irreversible.
• Any ringing or discomfort in the ears indicates that the vlume is maybe too loud.
Once your have established a comfortable listening level, DO NOT INCREASE THE SOUND
LEVEL FURTHER.
The following list of typical sound levels may assist you in recognising just how loud you have
set the volume level.
DECIBEL
Level (dB) Example
30dB Quiet library, soft whisper.
40dB Living room, fridge freezer bedroom away from traffic.
50dB Normal conservation, quiet office, light traffic.
60dB Electric sewing machine.
70dB Vacuum cleaner, hair dryer, noisy restaurant.
THE FOLLOWING NOISE CAN BE HARMFUL UNDER CONSTANT EXPOSURE
80dB Average city traffic, alarm clock buzzer at 2 feet, food mixer.
90dB Motocycle, heavy goods vehicle, petrol lawn mower.
100dB Pneumatic drill, chair saw, garbage truck, discotheque/night-club.
120dB Rock band concert, thunderclap fast train passing by.
PERMANENT LOSS OF HEARING
140dB THRESHOLD OF PAIN GUNSHOT 2 feet away, let plant taking off.
5
Page 6

Getting Started
Before attempting to connect, operate or adjust this product, please read these instruction
completely and keep this manual for future reference.
Dear customers :
May we take this opportunity to thank you for purchasing this DVD Player.
We strongly recommend that you carefully study the operating instructions before operating
the unit.
Main Features
• Front loading DVD / CD-G / CD player.
• Built-in Dolby Digital.
Standards
Video : NTSC or PAL
Audio : PCM (48 or 96 kHz), MPEG layer 2, Dolby AC-3 & dts line out
Features of audio specifications
- DTS for Digital (Coaxial & Optical) output
- Linear PCM output
6
Page 7

Getting Started
Disc types
Audio & Video
Disc size 12cm
single side, single layer / single side, double layer
PAL and NTSC DVD disc
Playback time 135min / 240min max.
Audio
Disc size 12cm / 8cm
CD disc
Playback time 74min/20min max.
* Player is CD-R, CD-RW compatible.
Note: CD-R, CD-RW Discs recorded with writing device can only be used when they are
correctly treated.
Region Management Information
This DVD Player is designed and manufactured to respond to the Region Management Information that is recorded on a DVD disc. If the Region number described on the DVD disc does
not correspond to the Region number of this DVD Player, this DVD player cannot play that
disc.
This Region number of this DVD player is .
Disc maintenance
– Before playback, wipe the disc from the center hole toward the outer edge with a clean
cloth.
– Never use bezine, thinner, cleaning fluid, static electricity prevention liquids or any other
solvent.
Note : Dirty disc may cause bad picture.
Correct
From the center to the edge
Incorrect
7
Page 8

Safety precautions
Warning
To avoid electrical shock, do not open the
cabinet, refer servicing to qualified personnel only.
Warning
Keep the unit away from flower vases, tubs,
sinks, etc. If liquids are spilt into the unit,
serious damage could occur.
Warning
Do not expose this equipment to rain or
moisture.
Warning
Do not block ventilation holes of the unit so
that air can circulate freely.
Attention
If smoke, malodor or unrelated noise are
emitted from the unit, turn off the power and
disconnect the AC power cord.
Attention
Touching the unit is dangerous especially if
during thunder.
Attention
When left unused for a long period of time,
the unit should be unplugged from the household AC outlet.
Attention
Be sure to turn the unit off and disconnect the AC
power cord before cleaning the unit surface. If the
surface is dirty, wipe clean with a cloth which has
been dipped in a weak soap and water solution and
wrung out thoroughly, and then wipe again with a
dry cloth.
Note: This unit is a class 1 laser product and uses a visible laser beam which could
cause hazardous radiation exposure if directed. Be sure to operate it correctly as
instructed.
8
Page 9
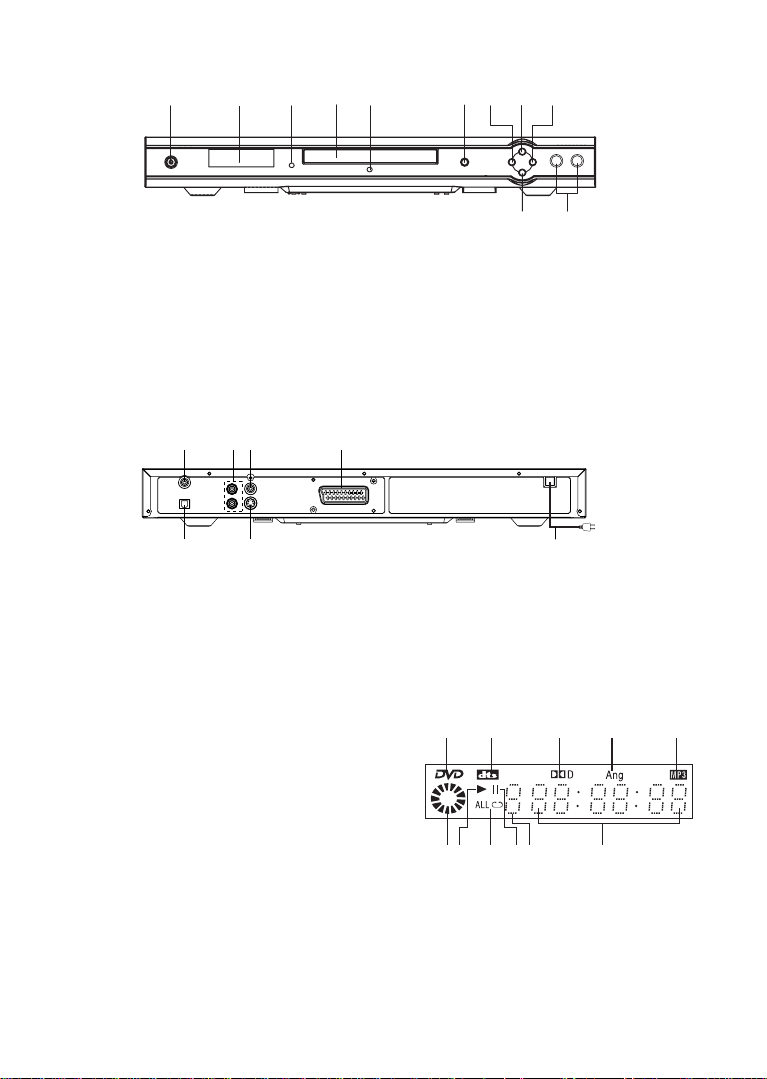
Front Panel Control
12345 6789
1. Power On/Off
2. Display
3. Remote Sensor
4. Disc Tray
5. Standby Indicator
6. Open/Close Button
Rear Panel Control
1
34 6
11
10
7. Skip Backward Button
8. Play/Enter Button
9. Skip Forward Button
10. Stop Button
11. MIC 1, 2 Jacks
25
1. Digital Audio Output (Coaxial)
2. Digital Audio Output (Optical)
3. Analog Audio Output
4. Video Output (Composite)
Display
1. DVD Indicator
2. Dts Indicator
3. Dolby Digital Indicator
4. Multi-angle view Indicator
5. MP3 Indicator
6. Disc loading Indicator
7. PLAY Indicator
8. REPEAT Indicator
9. PAUSE Indicator
10. Track (CD) / Chapter (DVD) number
11. Play Time Display
7
5. S-Video Output
6. Component Video Output (Scart)
7 AC Power Cord
1
2 3 4 5
67 8 9 1110
9
Page 10

Getting Started
Battery installation (remote control unit)
1. Remove the battery cover.
2. Insert two batteries (AAA) making sure the polarity (+/-) matches the marks inside the unit.
3. Replace the cover.
– Do not attempt to recharge, short-circuit, disassemble,
heat or throw the batteries into the fire.
– Do not mix old and new batteries
Note : Weak batteries can leak and severely damage the re-
mote control unit.
Remote Control Unit
1. Power On/Off
2. Numeric Buttons
3. PAL/MULTI/NTSC Button
4. Audio Button
5. Angle Button
6. DVD Menu Button
7. Subtitle Button
8. Direction Buttons
( Up / Down/ Left/ Right)
9. Previous Button
10. Step/Pause Button
11. Play Button
12. Repeat Button
13. Stop Button
14. Slow Button
15. Function “-” Button (Karaoke)
16. AVC Button (Karaoke)
17. Mute Button
18. Eject Button
19. Zoom Button
20. Setup Button
21. Display Button
22. Mark Button
23. Volume + Button
24. Volume – Button
25. Enter Button
26. Next Button
27. Fast Backward Button
28. Fast Forward Button
29. Search Button
30. Program Button
31. Repeat A-B Button
32. Cancel Button
33. Function Button (Karaoke)
34. Function “+” Button (Karaoke)
10
Page 11

Connect To TV
Caution : Turn off all the equipment before any installation.
This unit provides several types of video and audio signals output. They are :
• Scart Output
• RCA Output
•S-Video Output
User can choose a suitable connection type to connect the player to TV.
1. SCART Version
SCART (RGB)
2. Connection via Composite (RCA) Cable
In this type of connection, we have to connect the Left/Right Audio Cables (Red and White)
and a Video signal (Yellow).
Video in
Audio in L
Audio in R
Note : Go to part 4.
3. Connection via S-Video Cable
11
S-Video in
Audio in L
Audio in R
Page 12

4. Configure the TV System
The DVD Player supports PAL, NTSC and Multi-system TV type. In case there is no
picture output on the screen, please switch your player TV mode in the Setup menu for
proper TV System configuration.
1. Press SETUP on the remote control.
2. Choose SCREEN SETUP and press ENTER.
3. Choose TV SYSTEM.
4. Select the correct TV mode.
Connection to Amplifier
There are four different types of connection between the DVD player and an amplifier.
1
2
3
4
• Digital output via Optical Fiber (Connection 1).
• Digital output via Coaxial Cable (Connection 2).
•2 Channels (Left/Right) Audio Output (Connection 3 - 4)
NOTE: 1. The Digital/Optical output cut off, when Analog output was selected.
2. The Analog output cut off, when Digital/Optical output was selected.
12
Page 13

OPERATION
TV Selection
Turn on the TV, the DVD player and the Audio Amplifier System (if any).
1. Press the “TV/VIDEO” button on the TV.
2. Select the Video Mode (TV).
Note: If there are more than 1 AV channel for the TV, select the channel you have connected to the DVD player.
3. Select the Correct Audio Input on the AV Amplifier (if any).
Play Discs
1. Press the OPEN/CLOSE button on the front panel and load the Disc on the tray. The label
side should be facing upwards. For a Double-sided DVD Disc, put the disc with label A/1
up.
2. Press the OPEN/CLOSE button again to close the tray and the disc will be loaded.
3. The Disc will be loaded automatically.
• If it is a DVD disc, it will show the Menu / Title Page on the screen.
• If it is a CD, it will play the first track directly.
4. Press the STOP button if you want to stop the Disc playback. You can resume playback by
pressing the PLAY button and it will start at the location where you have pressed stopped
(Resume Play).
5. Press the STOP button twice to have the Disc really stopped.
II (PAUSE) STEP
This function is applicable for DVD and CD audio.
• For DVD, the picture will freeze.
• For CD audio, it will become muted.
1. Press the PAUSE button ( ) to pause play.
2. Press the PLAY button again to resume play.
DVD Setup Mode
• Setup Mode provides the menu for the configuration of SYSTEM SETUP, LANGUAGE
SETUP, KARAOKE SETUP, VIDEO SETUP, SPEAKER SETUP and DIGITAL SETUP.
• Item selection in the Setup Menu is done by using the direction buttons and the ENTER
button.
•To exit the Setup Menu, press the SETUP button again or select the EXIT and press EN-
TER button.
13
Page 14

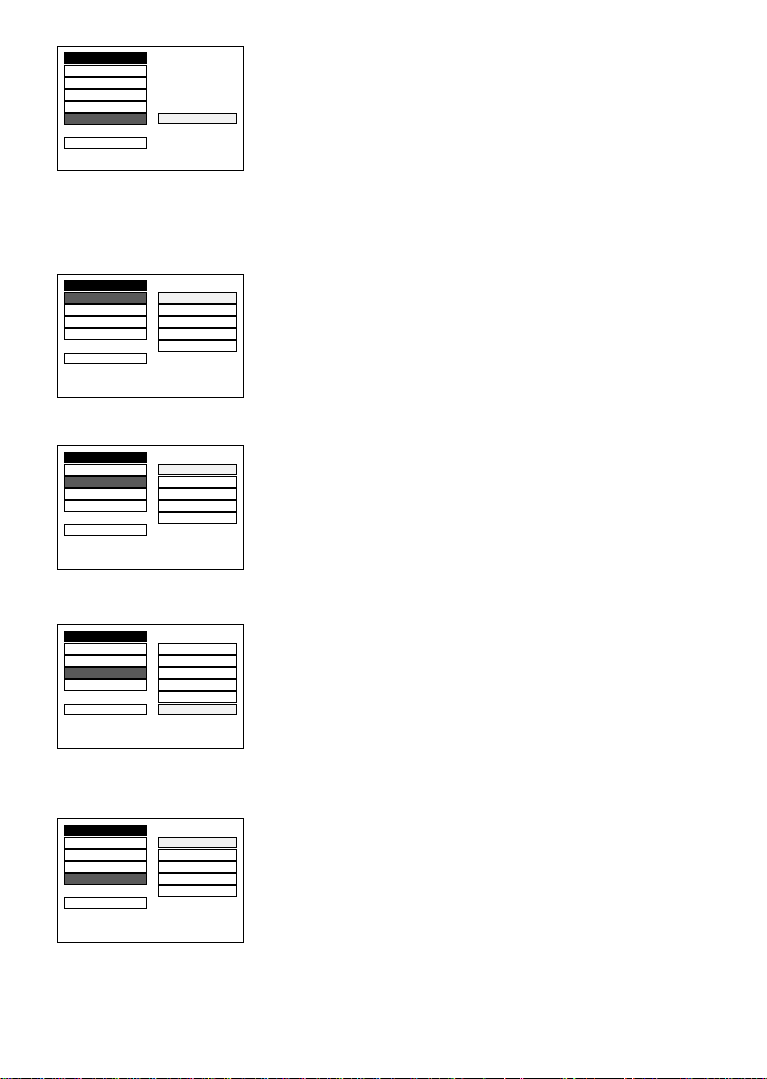
SYSTEM SETUP
In stop mode, press SETUP button and highlight SYSTEM setup then press ENTER button to
confirm.
To select the desired item by using the direction buttons ( /,/ ), then press ENTER
button to confirm the selected item.
SYSTEM SETUP
TV SYSTEM
SCREEN SAVER PAL
TV TYPE AUTO
PASSWORD
RATING
DEFAULT
EXIT SETUP
SYSTEM SETUP
SCREEN SAVER ON
TV TYPE OFF
PASSWORD
RATING
DEFAULT
EXIT SETUP
SYSTEM SETUP
SCREEN SAVER
TV TYPE
PASSWORD 4:3 LB
RATING 16:9
DEFAULT
EXIT SETUP
SYSTEM SETUP
SCREEN SAVER
TV TYPE
PASSWORD
RATING
DEFAULT
EXIT SETUP
SYSTEM SETUP
SCREEN SAVER
TV TYPE
PASSWORD
RATING
DEFAULT KID SAFE
EXIT SETUP
NTSC
4:3 PS
– – – –
NO ADULT
VIEW ALL
• TV SYSTEM
- NTSC
-PAL(default)
- AUTO
• SCREEN SAVER
- ON (default)
- OFF
• TV TYPE
- 4:3 PS (Pan Scan)
- 4:3 LB (Letter Box)
- 16:9 (Wide screen) (default)
•PASSWORD:_ _ _ _
The password option is initalized lockec, and you cannot set
the ratings limit or change the password. In order for the Rating feature work, the password mode must be turned on. If
you want to set the rating limit, you will need to enter the default password, which is 0000, then press ENTER to confirm.
To change the password, you will be prompted for the old
password, then be prompted for a new. Enter a 4-digit number (this is your password).
•RATING
- NO ADULT
- KID. SAFE
- VIEW ALL (default)
The Rating feature is a rating limit system, like movie ratings.
It works with DVD discs that have been assigned a rating.
This helps you control the types of DVDs that your family
watches.
- There are two rating options : NO ADULT and KID. SAFE
- Select the VIEW ALL option to cancel the rating limit.
The default setting is VIEW ALL.
Note: If the password option is locked, you cannot set the
rating limit; the rating limit does not work when the password
option unlocked.
14
Page 15
SYSTEM SETUP
SCREEN SAVER
TV TYPE
PASSWORD
RATING
DEFAULT
EXIT SETUP
RESTORE
• DEFAULT : RESTORE
Choose this option to resume all the setup options to default
settings.
LANGUAGE SETUP
In stop mode, press SETUP button and press direction / buttons to highlight LANGUAGE
setup then press ENTER button to confirm.
LANGUAGE SETUP
OSD LANGUAGE
AUDIO LANG GERMAN
SUBTITLE LANG SPANISH
MENU LANG FRENCH
EXIT SETUP
LANGUAGE SETUP
OSD LANGUAGE ENGLISH
AUDIO LANG
SUBTITLE LANG SPANISH
MENU LANG PORTUGUESE
EXIT SETUP
LANGUAGE SETUP
OSD LANGUAGE ENGLISH
AUDIO LANG
SUBTITLE LANG SPANISH
MENU LANG PORTUGUESE
EXIT SETUP OFF
LANGUAGE SETUP
OSD LANGUAGE ENGLISH
AUDIO LANG
SUBTITLE LANG SPANISH
MENU LANG PORTUGUESE
EXIT SETUP
ENGLISH
PORTUGUESE
FRENCH
GERMAN
FRENCH
GERMAN
FRENCH
GERMAN
• OSD LANGUAGE
Press direction / button to highlight the OSD LANGUAGE
and press ENTER button, then press direction / button to
select the desired OSD language.
- ENGLISH (default)
- GERMAN
-SPANISH
- FRENCH
- PORTUGUESE
• AUDIO LANGUAGE
Press direction / button to highlight the AUDIO LANG and
press ENTER button, then press direction / button to select the desired AUDIO language.
- ENGLISH (default)
- FRENCH
-SPANISH
- PORTUGUESE
- GERMAN
• SUBTITLE LANGUAGE
Press direction / button to highlight the SUBTITLE LANG
and press ENTER button, then press direction / button to
select the desired SUBTITLE language.
- ENGLISH
- FRENCH
-SPANISH
- PORTUGUESE
- GERMAN
- OFF (default)
• MENU LANGUAGE
Press direction / button to highlight the MENU LANG and
press ENTER button, then press direction / button to select the desired MENU language.
- ENGLISH (default)
- FRENCH
-SPANISH
- PORTUGUESE
- GERMAN
15
Page 16
VIDEO SETUP
In stop mode, press SETUP button and press direction / buttons to highlight VIDEO setup
then press ENTER button to confirm.
VIDEO SETUP
BRIGHTNESS
CONTRAST – – 10
HUE – – 8
SATURATION – – 6
EXIT SETUP – – 2
VIDEO SETUP
BRIGHTNESS – – 12
CONTRAST
HUE – – 8
SATURATION – – 6
EXIT SETUP – – 2
VIDEO SETUP
BRIGHTNESS – – + 6
CONTRAST – – + 4
HUE
SATURATION – – 0
EXIT SETUP – – - 4
VIDEO SETUP
BRIGHTNESS – – 12
CONTRAST – – 10
HUE – – 8
SATURATION
EXIT SETUP – – 2
––12
–– 4
–– 0
––10
–– 4
–– 0
––+ 2
–– - 2
–– - 6
–– 6
–– 4
–– 0
• BRIGHTNESS
Using direction / button to move the scroll and adjust the
brightness.
• CONTRAST
Using direction / button to move the scroll and adjust the
contrast.
• HUE
Using direction / button to move the scroll and adjust the
hue.
•SATURATION
Using direction / button to move the scroll and adjust the
sauration.
KARAOKE SETUP
In stop mode, press SETUP button and highlight KARAOKE setup then press ENTER button to
confirm.
KARAOKE SETUP
ECHO
MIC VOL – – 6
KEY – – 4
EXIT SETUP – – OFF
–– 8
–– 2
• ECHO
Using direction / button to move the scroll and adjust the
echo.
-8
-6
-4 (default)
-2
- OFF
16
Page 17
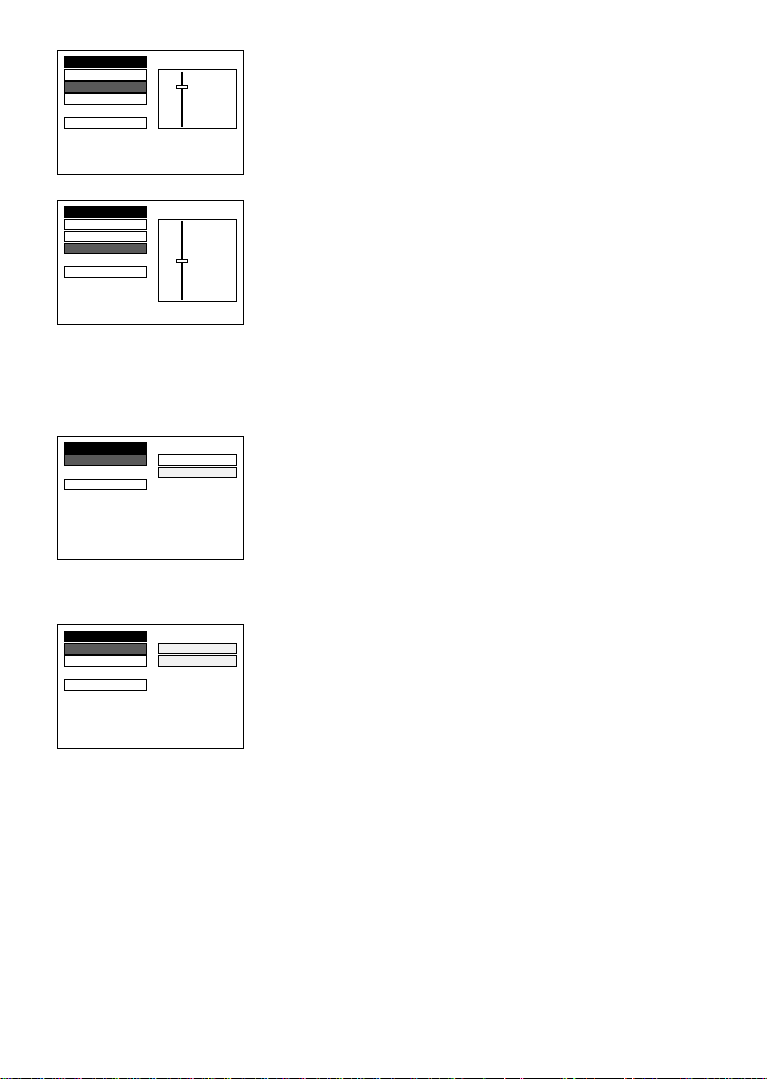
KARAOKE SETUP
ECHO – – 8
MIC VOL
KEY – – 4
EXIT SETUP – – OFF
–– 6
–– 2
• MIC VOL
Using direction / button to move the scroll and adjust the
microphone volume.
-8
-6
-4 (default)
-2
- OFF
KARAOKE SETUP
ECHO – #
MIC VOL – – + 4
KEY
EXIT SETUP – – - 2
––+ 2
–– 0
––- 4
–b
• KEY
Using direction / button to move the scroll and adjust the
key.
-+4
-+2
-0 (default)
--2
--4
SPEAKER SETUP
In stop mode, press SETUP button and highlight SPEAKER setup then press ENTER button to
confirm.
SPEAKER SETUP
DOWNMIX
EXIT SETUP
LT / RT
STEREO
• DOWN MIX :
-LT / RT
- STEREO (default)
•LT/RT
Choose this setting, it will be sound like in a movie theatre
if the original movie was recorded from encoded in the
ProLogic Dolby Digital format.
DIGITAL SETUP
DIGITAL SETUP
AUDIO OUT
DYNAMIC RANGE SPDIF / PCM
EXIT SETUP
SPDIF / RAW
• AUDIO OUT
- SPDIF / RAW (default)
- SPIF / PCM
• SPDIF / RAW
Choose this setting, if your DVD player is connected to a
power amplifier with a coaxial cable or an optical cable.
When playing a disc recorded with Dolby Digital, DTS and
MPEG audio formats, the corresponding digital signals will
be output from the Coaxial Output jack. this player’s digital
output jacks are designed for a connection to a Dolby Digital,
DTS, or MPEG receiver or decoder.
• SPDIF / PCM
Choose this setting, if your DVD player is connected to a 2channel digital stereo amplifier. When playing a disc recorded with Dolby Digital and MPEG audio formats, audio
signals will be modulated into a 2-channel PCM signal and
it will be output from the Coaxial Output jack or Optical
Output jack.
17
Page 18

• DYNAMIC RANGE
DIGITAL SETUP
AUDIO OUT
DYNAMIC RANGE – – 6 / 8
EXIT SETUP – – 2 / 8
––FULL
––4 / 8
––OFF
- FULL
- 6/8
- 4/8 (default)
- 2/8
- OFF
When LINE OUT is selected, choose this setting to adjust the
line out ratio and get different effect. If adjusting to FULL, the
audio signal peak value will be the minimum; while adjusting
to OFF, value will be the maximum.
Note :
This option will be validated when the DOWNMIX is off.
DVD Menu Play
The DVD Menu Play function is only applicable for DVD movie. User can access the Casting
information, Production History, Movie Introduction etc. directly through this function.
1. Press the DVD MENU key on the remote control to enter the Root Menu.
2. Use the direction button (///) or input the item index through the Number keys (0-9)
to do the selection.
3. Press ENTER to confirm the selection.
Audio
This function is applicable for DVD and CD audio but with different effects.
- Pressing the AUDIO key will change the Audio channel.
Note :
• When AVC is ON, this key is no function.
Scan
This function is applicable for DVD and CD audio but with different effects. The FAST FORWARD and FAST BACKWARD keys are used to achieve fast play function.
• For DVD, there are 4 different levels of speed (x2, x4, x8, x20) available. Pres the FAST
button to cycle speed.
• For CD audio, the FORWARD / BACKWARD keys will play at high speed.
Note :
• Press PLAY key at any stage will resume to normal speed.
• This function is not available when playing CD-G discs.
PREV. / Next
During playback, press PREV or NEXT key :
• When the PREV. key is pressed once, playback returns to the beginning of the PREVIOUS
playing chapter or track.
• When the NEXT key is pressed once, playback starts at the beginning of next chapter or
track.
Slow Play
The Slow Forward is only available for DVD. There are 6 steps of slow motion speed:
1/2, 1/3, 1/4, 1/5, 1/6, 1/7. Press SLOW key to cycle playback speeds.
Note :
• Press PLAY key to resume normal playback speed.
•This function is not available for CD-G.
18
Page 19

Repeat Mode
This function is applicable for DVD and CD audio but with different effects.
•For DVD disc playback, user can choose to repeat the current chapter, current title and disc.
Subsequent button press of the REPEAT button can change between these three options.
• For CD, user can choose to repeat the current track or the whole disc (Repeat All). Subsequent button press of the REPEAT button can change between these two options.
Repeat AB
User can specify the repeating interval by marking the starting point and the end point.
1. Press the REPEAT AB button to mark the starting point (Playback will continue).
2. Press the REPEAT AB button to mark the end point (The marked part will be repeated
automatically.)
Note :
• Press the REPEAT AB button during repetition will disable the Repeat mode.
•This function is not available for CD-G.
Subtitle
This function is only applicable for DVD disc. It can change the subtitle language shown on the
screen.
Note :
• Number of subtitle available depends on the DVD disc.
•This function is not available for CD-G.
Angle
Some discs may have multiple viewing angles during production. The ANGLE button is to select
the viewing angle shown on the screen.
Note : The number of Angle of View depends on the disc.
Search
The user can access a specific location or a specific track by keying in the targent time or the
track number.
1. Press the SEARCH button to enter to search mode.
2. Input the target time to the number button (0-9) and press the ENTER button. The player will
jump to the target location immediately.
Display
This funciton is to show the time and status information on the screen.
Resume Play
This function is in playback mode. When the STOP button is pressed once, the player will enter
the Resume Play mode. At this time, if the PLAY button is pressed, the player will resume
playback at the location when the STOP button is pressed. If the STOP button is pressed a
second time, resume mode cancels.
Zoom
This function is enlarge or reduce a still picture or a moving picture by pressing the ZOOM button
to select the levels of zooming (2, 3, 4, 1/2, 1/3, 1/4)
Note :
• Use the direction buttons (///) to navigate within the image.
•This function is not available for CD-G.
19
Page 20

AVC (Auto vocal cut)
When AVC is selected to ON, the original singer sound will be cut automatically while the user
is singing.
Note:
The AVC function may not action for some CD-G disc or some song, in this case to set the AVC
to “OFF” then press the AUDIO button to change the audio channel which without the singer
sound.
Function
Press FUNCTION button to select the MIC VOL, ECHO, KEY functions and press the +/–
button to adjust the desired level.
Picture CD
Load a picture CD into the tray, the disc can be identified. The player will start showing the
picture (JPG) one by one (slide show).
Operation
During Slide Show Mode:
• Press the STOP button, it will shift to the Digest Mode in which 6 pictures will be shown on
the screen each time.
• Press the PAUSE button, it will freeze the screen so that the current picture can be held for
a long time. To resume the slide show mode, press PLAY button.
• Press the NEXT button on the remote control to skip to the next picture.
• Press the PREVIOUS button on the remote control to repeat the current picture.
20
Page 21
TROUBLE SHOOTING
Check the following guide for the possible cause of a problem before contacting service.
Symptom
No Power
The power is on, but DVD
player does not work
No Picture
No Sound
The playback picture is poor
The DVD player does
not start playback
The Remote Control
does not work properly
Cause
• The power cord is disconnected.
• No disc is inserted.
• The TV is not set to receive DVD
signal output.
• The video cable is not connected
securely.
The connected TV power is turned off.
•
• The equipment connected with the
audio cable is not set to receive
DVD signal output.
• The audio cable is not connected
securely.
•
The power of the equipment connected
with the audio cable is turned off.
• The Digital Audio Output is set to
the wrong position.
• The disc is dirty.
• No disc is inserted.
• An unplayable disc is inserted.
• The disc is placed upside down.
• The disc is not placed with the
guide.
• The disc is dirty.
•A menu is on the TV screen.
• The Rating level is set.
The remote control is not pointed at
•
the remote sensor of the DVD player.
• The remote control is too far from
the DVD player.
There is an obstacle in the path of the
•
remote control and the DVD player.
• The batteries in the remote control are exhausted.
Correction
• Plug the power cord into the wall
outlet and unit securely.
Insert a disc. (Check that the DVD or au-
•
dio CD indicator in the DVD display is lit.)
•
Select the appropriate video input mode
on the TV so the picture from the DVD
player appears on the TV screen.
• Connect the video cable into the
jacks securely.
•Turn on the TV.
• Select the correct input mode of the
audio receiver so you can listen to the
sound from the DVD player.
• Connect the audio cable into the
jacks securely.
•Turn on the equipment connected with
the audio cable.
•
Set the Digital audio Output to the correct
position, then turn on the DVD player
again by pressing the POWER button.
• Clean the disc.
• Insert a disc
•
Insert a playable disc. (Check the disc
type, colour system and Regional code.)
•
Place the disc with the playback side down.
• Place the disc on the disc tray correctly inside the guide.
• Clean the disc.
• Press the SET UP button to turn off
the menu screen.
• Cancel the Rating function or change
the rating level.
• Point the remote control at the remote
sensor of the DVD player.
• Operate the remote control within
about 23ft (7m).
• Remove the obstacle.
• Replace the batteries with new ones.
21
Page 22

SPECIFICATION
GENERAL
Power source AC 230V 50Hz
Power consumption 10W
Mass 2.5 Kg
External dimensions (WxHxD) 430 X 48 x 253 mm
Operating conditions Temperature: 5°C to 35°C
Operation status Horizontal
Operating humidity 5% to 90%
CD/DVD
Laser Semiconductor laser, wavelength 650nm
Signal system PAL 625/50, NTSC 525/60
Frequency response (audio) 4Hz to 20 KHz
Signal to noise ratio (audio) More than 90dB (1KHz, NOP, 20KHz LPF/A-Filter)
Dynamic range (audio) More than 95dB
Harmonic distortion (audio) 0.2% (1KHz)
VIDEO
Video output 1.0V (p-p), 75 ohm, negative sync., RCA jack
S-Video output (Y) 1.0V (p-p), negative sync., Mini DIN 4-pin x 1
(C) 0.3V (p-p), 75 ohm
* The default secret code is 0000
* Design and specification are subject to change without notice.
22
0211-11773-00A
 Loading...