

Page 1

Page 2

INTRODUCTION
This instruction manual is important to you. Please read it. In a short time it shows
exactly how to connect operate, and adjust this unit for best performance.
It can save you money. It shows simple things to do and check before you call for help
and save the cost of unnecessary service or call out charge.
TABLE OF CONTENTS . . . . . . . . . . . . . . . . . . . . . . . . . . . . . . . . . . . . . . . . . . . . . . . . . . . . 1
CONNECTING TO MAINS SUPPLY . . . . . . . . . . . . . . . . . . . . . . . . . . . . . . . . . . . . . . . . . . . . 2
LOCATION OF CONTROLS . . . . . . . . . . . . . . . . . . . . . . . . . . . . . . . . . . . . . . . . . . . . . . . . . 3
GETTING START . . . . . . . . . . . . . . . . . . . . . . . . . . . . . . . . . . . . . . . . . . . . . . . . . . . . . . . . . 4
USING THE RADIO . . . . . . . . . . . . . . . . . . . . . . . . . . . . . . . . . . . . . . . . . . . . . . . . . . . . . . . 5
USING THE CD . . . . . . . . . . . . . . . . . . . . . . . . . . . . . . . . . . . . . . . . . . . . . . . . . . . . . . . 6 - 8
USING THE CASSETTE PLAYER . . . . . . . . . . . . . . . . . . . . . . . . . . . . . . . . . . . . . . . . . . . . 9 - 10
CARE AND MAINTENANCE . . . . . . . . . . . . . . . . . . . . . . . . . . . . . . . . . . . . . . . . . . . . . . . 11
SPECIFICATION . . . . . . . . . . . . . . . . . . . . . . . . . . . . . . . . . . . . . . . . . . . . . . . . . . . . . . . . . . . 12
Save the carton and packing material; they will be useful if you ever have to transport the
unit.
Pack contents:
1 x main unit
1 x instruction manual
1 x warranty card
1 x remote control
2 x speakers
Please retain all packing material for future transportation of the unit or in the unlikely event
that the unit needs to be returned for service.
- 1 -
Page 3
CONNECTING TO MAINS SUPPLY
This appliance may be fitted with a non-rewireable plug. If it is necessary to change
the fuse in a non-rewireable plug the fuse cover must be refitted. If the fuse cover
is lost or damaged, the plug must not be used until a replacement available from the
appliance manufacturer is obtained. It is important that the colour of the replacement
fuse cover corresponds with the colour marking on the base of the plug.
If the plug has to be changed because it is not suitable for your socket, or becomes
damaged, it should be cut off and an appropriate plug fitted following the wiring
instructions below. The plug removed must be disposed of safely as insertion into a
13A socket is likely to cause an electrical hazard.
For your own safety read the following instructions carefully before attempting to
connect this unit to the mains.
MAINS (AC) OPERATION
This unit is designed to operate on 230 V, 50 Hz current only. Connecting it to
other power sources may damage the unit
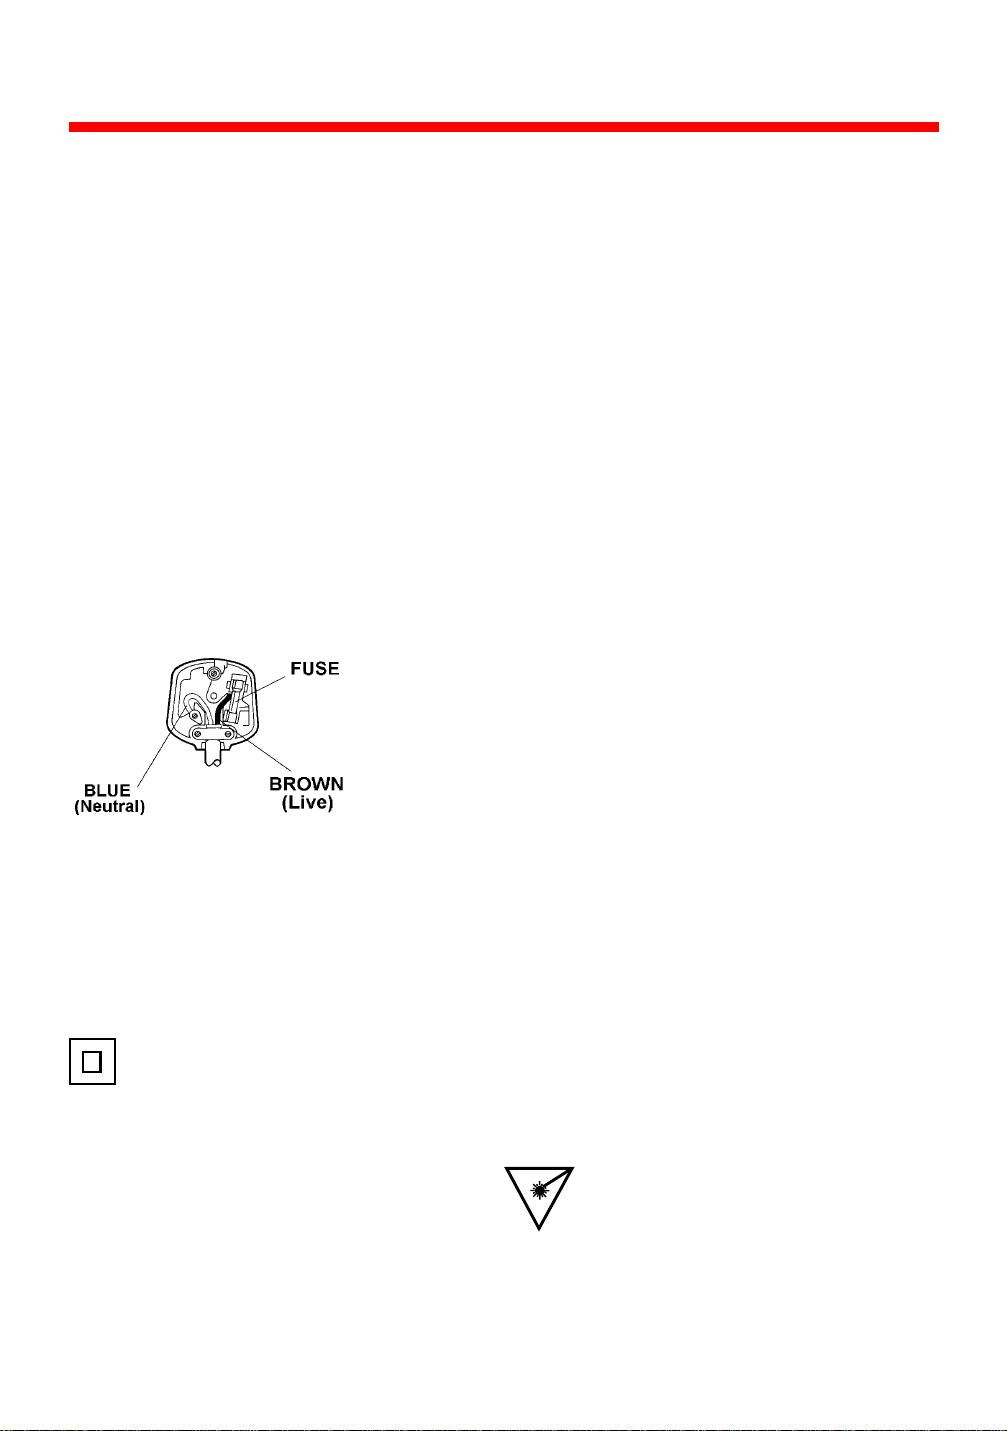
The wires in this mains lead are coloured in accordance with the following code :
BLUE = NEUTRAL BROWN = LIVE
IMPORTANT
As the colours of the wires in the mains lead of this appliance may not correspond
with the coloured markings identifying the terminals in your plug, proceed as
follows:The wire which is coloured blue must be connected to the
terminal which is marked with the letter N or coloured black.
The wire which is coloured brown must be connected to the
terminal which is marked with the letter L or coloured red.
No connection is to be made to the earth terminal of the
plug.
If a 13 Amp (BS 1363) Plug is used, a 3 Amp Fuse must be fitted, or if any other type of
Plug is used a 3 Amp Fuse must be fitted, either in the Plug , or on the Distribution Board.
CAUTION
To prevent electric shock disconnect from the mains before removing cover. No
user serviceable parts inside. Refer servicing to qualified service personnel.
SAFETY P RECAUTION
Do not allow this unit to be exposed to rain or moisture.
Mains Supply: 230 Volts 50 Hz - AC only.
This symbol means that this unit is double insulated. An earth connection is not
required.
CAUTION
CLASS 1 LASER PRODUCT
Use of Controls or adjustments or performance of
procedures other than those specified herein may
result hazardous radiation exposure.
CAUTION
CLEANING: Always disconnect unit from mains supply before attempting to clean it. Use soft cloth
moistened with soapy water, wipe gently. Do not use solvents or abrasive materials.
LASER SAFETY
This unit employs a laser, only qualified service
personnel should attempt repair.
DANGER: INVISIBLE LASER RADIATION
WHEN OPEN AND INTERLOCK FAILED
OR DEFEATED. AVOID DIRECT
EXPOSURE TO BEAM.
CAUTION: HAZARDOUS LASER
RADIATION WHEN OPEN AND
INTERLOCK DEFEATED.
- 2 -
Page 4
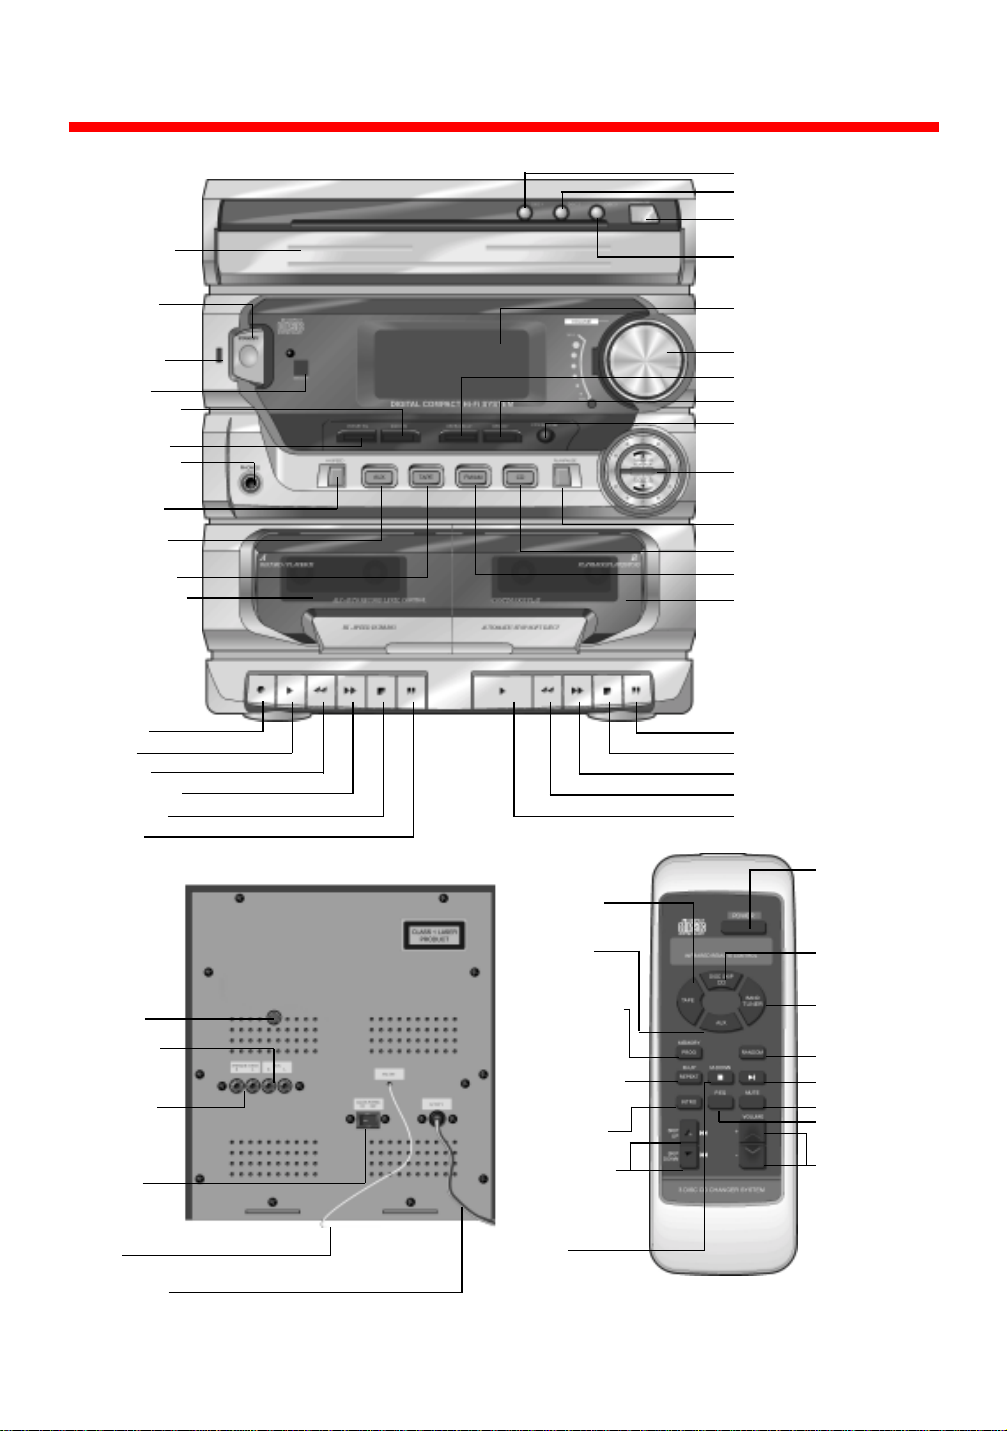
LOCATION OF CONTROLS
CD Drawer
Disc 1 button
Disc 2 button
CD Drawer Open/Close
button
Disc 3 button
Standby
Standby
indicator
Remote
sensor
CD random
play
Preset EQ
Headphone
socket
Hi-speed
dubbing
Auxiliary
select
Tape select
Tape deck A
Record
Play
Rewind
Fast forward
Stop/Eject
Pause
Reset
button
Auxilliary
input
sockets
Speaker
output
sockets
Mains
power
On/Off
switch
FM
Wire Aerial
AC Supply
cord
Tape select
(white)
Auxilliary
select
(white)
Tuner memory
(blue)
CD Program
(white)
Repeat (white)
Memory Up
(blue)
Intro (white)
Radio tuning
(blue)
CD track skip
(white)
Radio
memory
down (blue)
CD Stop
(white)
Display
Volume control
Repeat/Memory up
Memory
Stop/Memory down
Radio Tuning/Cd
skip
CD Play/Pause
CD select
Radio select
Tape deck B
Pause
Stop/Eject
Fast forward
Rewind
Play
Power
Cd Select/
disc skip
(white)
Tuner/Band
(blue)
Cd Random
(white)
Cd Play/Pause
(white)
Mute (grey)
Preset EQ
(grey)
Volume
(grey)
- 3 -
Page 5

GETTING STARTED
CONNECTIONS
m Connect the speakers to the sockets on the back of the unit.
m Connect the right speaker to the right socket and the left speaker to the left socket.
m Check that your mains supply is 230V AC ~ 50Hz and plug into an AC outlet.
m Fully unravel the FM wire aerial.
SPEAKERS
Speaker should be placed away from the main unit by unwinding the speaker cable
AC POWER OPERATION
m Switch on the mains supply. Press the mains Power switch on the rear of the unit
to switch the unit on. The Standby indicator will illuminate.
m Press the Standby button to switch the unit on or back to standby.
REMOTE CONTROL
m Insert 2 AAA Ever Ready Energizer Batteries (not supplied) into the compartment on
the rear, ensure you follow the polarity diagram inside the compartment.
m Some of the buttons on the remote control have dual usage. When the Tuner is
selected, the blue labels on the buttons are valid. When CD is selected, the white
labels are valid. The grey labelled buttons are for use in all functions.
ADJUSTING THE SOUND
Turn the Volume control clockwise or counterclockwise to adjust the volume. The display
will show [VOL\ and a number between 0 and 40. 0 being the lowest volume and 40 the
highest.
MUTE
Press the Mute button on the remote control to switch off the sound. The display will
show [ MUTE\.
Press Mute again to restore the sound to the previous level. The MUTE indication will
disappear.
PRESET EQ
This button allows you to select the sound style to match the type of music you are
listening to. You can select rock, classic, pop or flat. Flat is recommended for
programmes with high speech content.
- 4 -
Page 6

HEADPHONES
m Headphones can be connected via the headphones socket on the front of the unit.
m Headphones should have a 3.5mm diameter stereo plug and a impedance of 8-32
ohms.
m When headphones are connected, the speakers are automatically disconnected.
USING THE RADIO
Press the Standby button to turn the unit on.
TUNING
m Press the TUNER/BAND button on the front of the unit or on the remote control.
m Press the TUNER/BAND button again to select the frequency band. The band
selected will be displayed on the digital display (FM or MW).
m Push the Tuning CD button up or down to change the frequency. The frequency is
shown in the display. If you push and release the Tuning CD button the frequency
will change by one step. If you push and hold the button for 2 seconds the tuner
will search for the next radio station. Press the Tuning CD button in the opposite
direction to stop the search.
m You can also search through the radio frequencies using the Skip Up and Skip
Down buttons on the remote control.
Please Note:
When an FM stereo signal is tuned in, the STEREO icon will illuminate in the display.
TO TURN THE RADIO OFF
Press the Standby button to switch the unit into the standby mode.
STORING A RADIO STATION
Up to 40 radio station frequencies, 20 FM, 10 MW and 10 LW can be preset into memory.
TO STORE A RADIO STATION INTO MEMORY
m To tune in your required station, press Memory on the front panel or Memory button
on the remote control.
m 00 will appear in the display. Using the Memory up button or Memory down button
select a memory location (1 - 20 or 1 - 10). Press the Memory button to confirm your
entry. The radio station is then stored.
AERIAL
For FM reception there is a built-in one-metre FM wire aerial at the rear of the unit. Unravel
the wire and move it around to obtain the best reception. For MW and LW reception the
signals are picked up through the built-in ferrite aerial. Move the unit to obtain the best
reception.
Please Note:
Should the unit fail to operate as described above, please carry out the following
instructions.
- 5 -
Page 7

m Unplug the unit from the mains power supply.
m Press the reset button (located on the rear of the unit) for a few seconds.
m Plug the unit back into the mains power supply.
m Press the Standby button on the front of the unit.
USING THE CD PLAYER
IMPORTANT
Since movement of the CD mechanism and the sensitive circuitry may cause interference
to a radio tuner nearby, switch this unit off while operating other radio devices.
This product utilises a laser.
Avoid direct exposure to the beam.
Caution - Use of controls, adjustments, or procedures not listed in this manual may result
in hazardous radiation exposure.
LOADING AND UNLOADING CD DISCS
m Press the Standby button to turn the unit ON.
m Press the CD button on the front of the unit or the Disc skip CD on the remote control.
m Press the Open/close button to open the CD drawer.
m When the disc drawer has opened, remove a CD from its case and place it carefully
in one of the indentations in the tray in the drawer with the label side uppermost.
m To load more discs press the Disc skip button on the remote control to rotate the
tray. The tray will hold up to 3 CDs.
m Press Open/close to close the drawer.
m The unit will go through a check of the tray contents. This may take up to 30 seconds.
Please note:
• Do not put anything except a compact disc into the compartment. Foreign objects
can damage the mechanism.
• Keep the disc compartment closed when not in use to prevent dirt and dust from
entering the mechanism.
• If the disc is correctly loaded, the total number of tracks on the disc will be displayed.
• After the disc compartment is fully closed, the disc information may not appear on
the display. This means that the disc is improperly loaded (most likely it is upside
down). To check, open the disc compartment again and reload the disc.
• If the disc is inserted incorrectly, or the disc is damaged the display will show ]No disc^.
PLAYING CDS
Insert one or more CD discs. The display will show the number of the disc in play with a
circle round it and the total number of tracks and total play time. Press the Play/Pause
button on front panel or Play/pause on the remote control. Disc play will begin from the
start of the first track of the disc. The number of the disc that is playing will flash. The
track number and playing time will be displayed.
- 6 -
Page 8

To select a particular track use the Tuning CD UP/DOWN buttons or either of the Skip
buttons on the remote control. If you do this before pressing the Play/Pause button, the
disc will start with the selected track when the Play/Pause button is pressed.
O STOP A CD PART WAY THROUGH
T
Press the Stop button. The disc will stop, and the display will show the total number of
tracks and total play time.
T
O SKIP FORWARD OR BACK THROUGH TRACKS
m To select the next track when the CD is playing, press Tuning CD up on the unit or
on the remote control. If you are on the last track of the disc, the player will
move to track 1.
m To go back to the beginning of the current track press Tuning CD down or
m To go back to the previous track press Tuning CD down or
twice.
m To play a particular track, load the disc in the CD player and press Tuning CD up or
until the track number you want is shown in the display.
PAUSE
m To stop a track temporarily, press the Play/Pause button on the front panel or remote
control. The disc will pause at the current play position. The display will flash.
m To resume play, press the Play/Pause button again.
once.
RANDOM PLAY
m When you select Random the CD player will select and play tracks, at random, from
all the discs in the drawer.
m To select random, press Random on the front of the unit or remote control. To
cancel random press the Random button again.
PROGRAMMED TRACK SELECTION
m You can set your CD player to play a selection of tracks from your disc.
m Programming disc play can only be carried out in the CD stop mode.
TO ENTER A PROGRAMME
m Press the PROG button on the remote control.
m The [Track\; and [Memory \ icons flash and [P-0-0\ is displayed.
m Using buttons Disc 1, Disc 2 or Disc 3 and or select the first track you want
to play.
m The track number is shown on the display.
m Press PROG to confirm your entry.
m Repeat the previous steps to enter additional tracks. Up to 39 tracks can be
programmed and any track can be programmed to play more than once.
- 7 -
Page 9

TO PLAY YOUR PROGRAMMED TRACKS
m Press Play/Pause on the unit or the remote control.
m Please Note:
m If play/pause is pressed before the prog button is pressed to store a track, the track
will not be stored into the memory, and the disc will start playing from the first
programmed track.
C
LEARING A PROGRAMMED MEMORY
During play, press Stop twice.
Please Note:
Selecting a different playing mode, turning the power OFF or pressing STOP during a
programmed play mode erases the programmed order of tracks.
REPEAT DISC PLAY
m To repeat all 3 discs.
m Press the Repeat button once. The display will show Repeat All Disc. Press the
Play/Pause button.
m The discs will play continuously until Stop is pressed or the Repeat button is
pressed until "Repeat All Disc" disappears from the display.
m To repeat one disc, press the Repeat button until the display shows Repeat One
Disc.
m Press Play/pause The entire disc will play continuously until you press Stop or
press the Repeat button until "Repeat One Disc" disappears from the display.
m To play a single track, press the Repeat button until the display shows Repeat
One. Select the track you want. Press Play and the track will play continuously
until you press Stop or press the Repeat button until "Repeat One" disappears from
the display.
T
O REPEAT A PROGRAMMED SELECTION
m Select your tracks as shown on page 7.
m Press the Repeat button once.
m Press Play. The programmed tracks will play continuously until the Stop button is
pressed or the repeat function is cancelled.
INTRO
m To select, press the Intro button on the remote control. Intro will play 10 seconds of
each track on the CD.
m If you want to listen to a track all the way through press the Intro button again
before the end of the 10 seconds and the track will continue to play.
Please Note:
- Intro can be selected at anytime when the CD player is in use.
- Should the unit fail to operate as described above, please carry out the following
instructions.
- Unplug the unit from the mains power supply.
- Press the reset button (located on the rear of the unit) for a few seconds.
Plug the unit back into the mains power supply.
Press the Standby button on the front of the unit.
- 8 -
Page 10

USING THE CASSETTE PLAYER
INSERTING/REMOVING CASSETTES
m Select tape by pressing the Tape button on the front of the unit or on the remote
control. Press the Stop/Eject key of the tape deck you wish to use.
m Slide A cassette tape into the door with the exposed section of tape facing
downward and full spool to the left.
m Push the cassette door closed.
m To remove a cassette, press the Stop/Eject key to open the door and lift out the tape.
PLAYING CASSETTES
m Press the Standby button to switch the unit on.
m Select Tape.
m Once a pre-recorded tape has been inserted, press the Play key.
m Press the Pause key to stop playback temporarily. Press again to resume play.
m Press the Fast Forward key to fast forward through the tape.
m Press the Rewind key to go backwards through the tape.
m Press the Stop/Eject key when you have finished playing the tape.
CONTINUOUS PLAY
Insert a pre-recorded cassette into each tape deck. Press Play on Deck B and then Play
and Pause on Deck A. When the cassette in Deck B has finished playing it will stop
automatically. The pause key on Deck A will release and the cassette will start to play.
RECORDING
Two cassette deck has [Automatic Level Control\ which automatically sets the recording
level for optimum performance. The volume control will not affect the recording level.
TO RECORD FROM THE RADIO
m Press the FM/MW/LW button on the unit or Tuner button on the remote control and
tune in the FM/MW/LW station you want.
m Insert a blank cassette tape in Deck A with full spool to the left.
m To start recording, press the Record and Play keys at the same time. The recording
level is set automatically.
m To stop recording, press the Stop/Eject key.
TO RECORD FROM A CD
m Press the CD button on the front of the unit or CD Disc Skip on the remote control.
m Insert a blank cassette tape in Deck A with full spool to the left.
m Press Play/Pause key on the unit or the remote control. The recording level is set
automatically.
m To stop recording, press the cassette Stop/Eject key.
- 9 -
Page 11

RECORDING FROM TAPE TO TAPE
m You can record tape to tape at two speeds, normal and high speed dubbing.
m Insert the cassette you wish to record in Deck B.
m Insert a blank cassette in Deck A.
m Select Tape.
m Press the Hi-Speed button to ON for Hi-speed dubbing. It will illuminate red. Leave it
OFF for normal speed recording.
m Press Play and Record and Pause on Deck A. Press Play on Deck B. Pause on
Deck A will release automatically and recording will start. The recording level is set
automatically.
m To top recording press the Stop/Eject key on both tape decks.
Note: Do not adjust recording speed during dubbing mode as this will ruin the
recording.
COPYRIGHT NOTICE WARNING
Most records, compact discs, audio and video cassettes, radio and television broadcasts
contain material which is the subject of copyright. It is unlawful to record such material in
any form whatsoever, whether on disc or tape, without the permission of the copyright
owner concerned. Any person who makes a recording of such material without the
consent of the copyright owner infringes copyright and may be liable, to pay substantial
damages to the copyright owner, and in some cases to criminal prosecution.
USING AUXILIARY SOCKETS
There are two phono sockets on the back of the unit to enable you to connect an external
source such as a turntable or mini disc. Select Aux on the unit (the button will illuminate
green) or remote control to play the external source through your system.
Please Note:
- Should the unit fail to operate as described above, please carry out the following
instructions.
- Unplug the unit from the mains power supply.
- Press the reset button (located on the rear of the unit) for a few seconds.
- Plug the unit back into the mains power supply.
- Press the Standby button on the front of the unit.
- 10 -
Page 12

CARE & MAINTENANCE
CLEANING TAPE HEADS
The tape heads, roller and capstan require occasional cleaning to remove particles of
metal oxide coating that wear off the tape. It is recommended to use a good tape head
cleaner available from most HIFI stores.
CLEANING CDS
Use a soft cloth to wipe off any fingerprints and dust from the disc surface. Wipe in a
straight line from the centre to the outside of the disc. Small dust particles and light stains
will not affect reproduction quality.
Never use chemicals such as record sprays, antistatic sprays, benzine or thinners to
clean your CDs.
To reduce the risk of scratches, always put CDs back in their cases after use.
Do not expose CDs to direct sunlight, high humidity or high temperatures for long periods.
Do not stick paper or write anything on either side of the CD.
Only discs displaying this symbol can be played on this unit.
CASSETTE CARE
You can help avoid two of the most common problems of cassette usage.
These are:
• jamming - which causes uneven playback speed.
• tangling - where the tape wraps itself around the playing mechanism.
Check that there are no loose layers of tape visible through the window in the cassette.
Use a pencil or hexagonal shaped ballpoint pen to wind along any loose layers before
inserting the cassette into your machine.
- 11 -
Page 13

If the cassette feels [tight\ when winding the tape with a pencil or pen, the tape may be
jamming due to ridges formed in the winding of the tape. You can see these through the
cassette window. In most cases, you can remove these ridges by fast forwarding the
tape from one end to the other in your cassette player.
Use only well know brands of tape.
Avoid C-120 cassettes, as the tape material deteriorates much quicker.
Always avoid exposing cassettes to direct sunlight, dust or oil. Do not touch the surface
of the tape.
GUARANTEE
This product is guaranteed for twelve months from the date of original purchase. If any
defect arises due to faulty materials or workmanship, the unit will either be replaced, a
refund given or the unit will be repaired free of charge (where possible) during this period
by the dealer from whom you purchased the unit.
The guarantee is subject to the following provisions:
• The guarantee is only valid within the boundaries of the country of purchase.
• The product must be correctly installed and operated in accordance with the
instructions contained in this manual.
• It must be used soley for domestic purposes.
• The guarantee will be rendered invalid if the product is re-sold or has been damaged
by inexpert repair.
• The manufacturer disclaims any liability for incidental or consequential damages.
• The guarantee is in addition to, and does not diminish, your statutory or legal rights.
TECHNICAL SPECIFICATIONS
Power Supply
AC: 230V ~ 50Hz
Radio Frequency Coverage
FM 87.5 - 108 MHz
MW 522 – 1620kHz
Radio Memory capacity FM 20 stations
MW 10 stations
CD Player
CD Memory capacity 39 tracks
General
Headphones: 3.5mm stereo jack plug, 8-32 W
Speakers 4 Ohms, 2 way
- 12 -
 Loading...