

Page 1

Instruction manual
Mini sound system
4160AV
Goodmans Product Information Helphone
0870 873 0080
Page 2

2
Contents
WORTH
knowing
WORTH
knowing
1
Precautions
Please keep the sound system's guarantee card and receipt safe for warranty
purposes.
Before use, please read the chapter "Installation/connections"
10
10
10
10
10
10
10
10
10
10
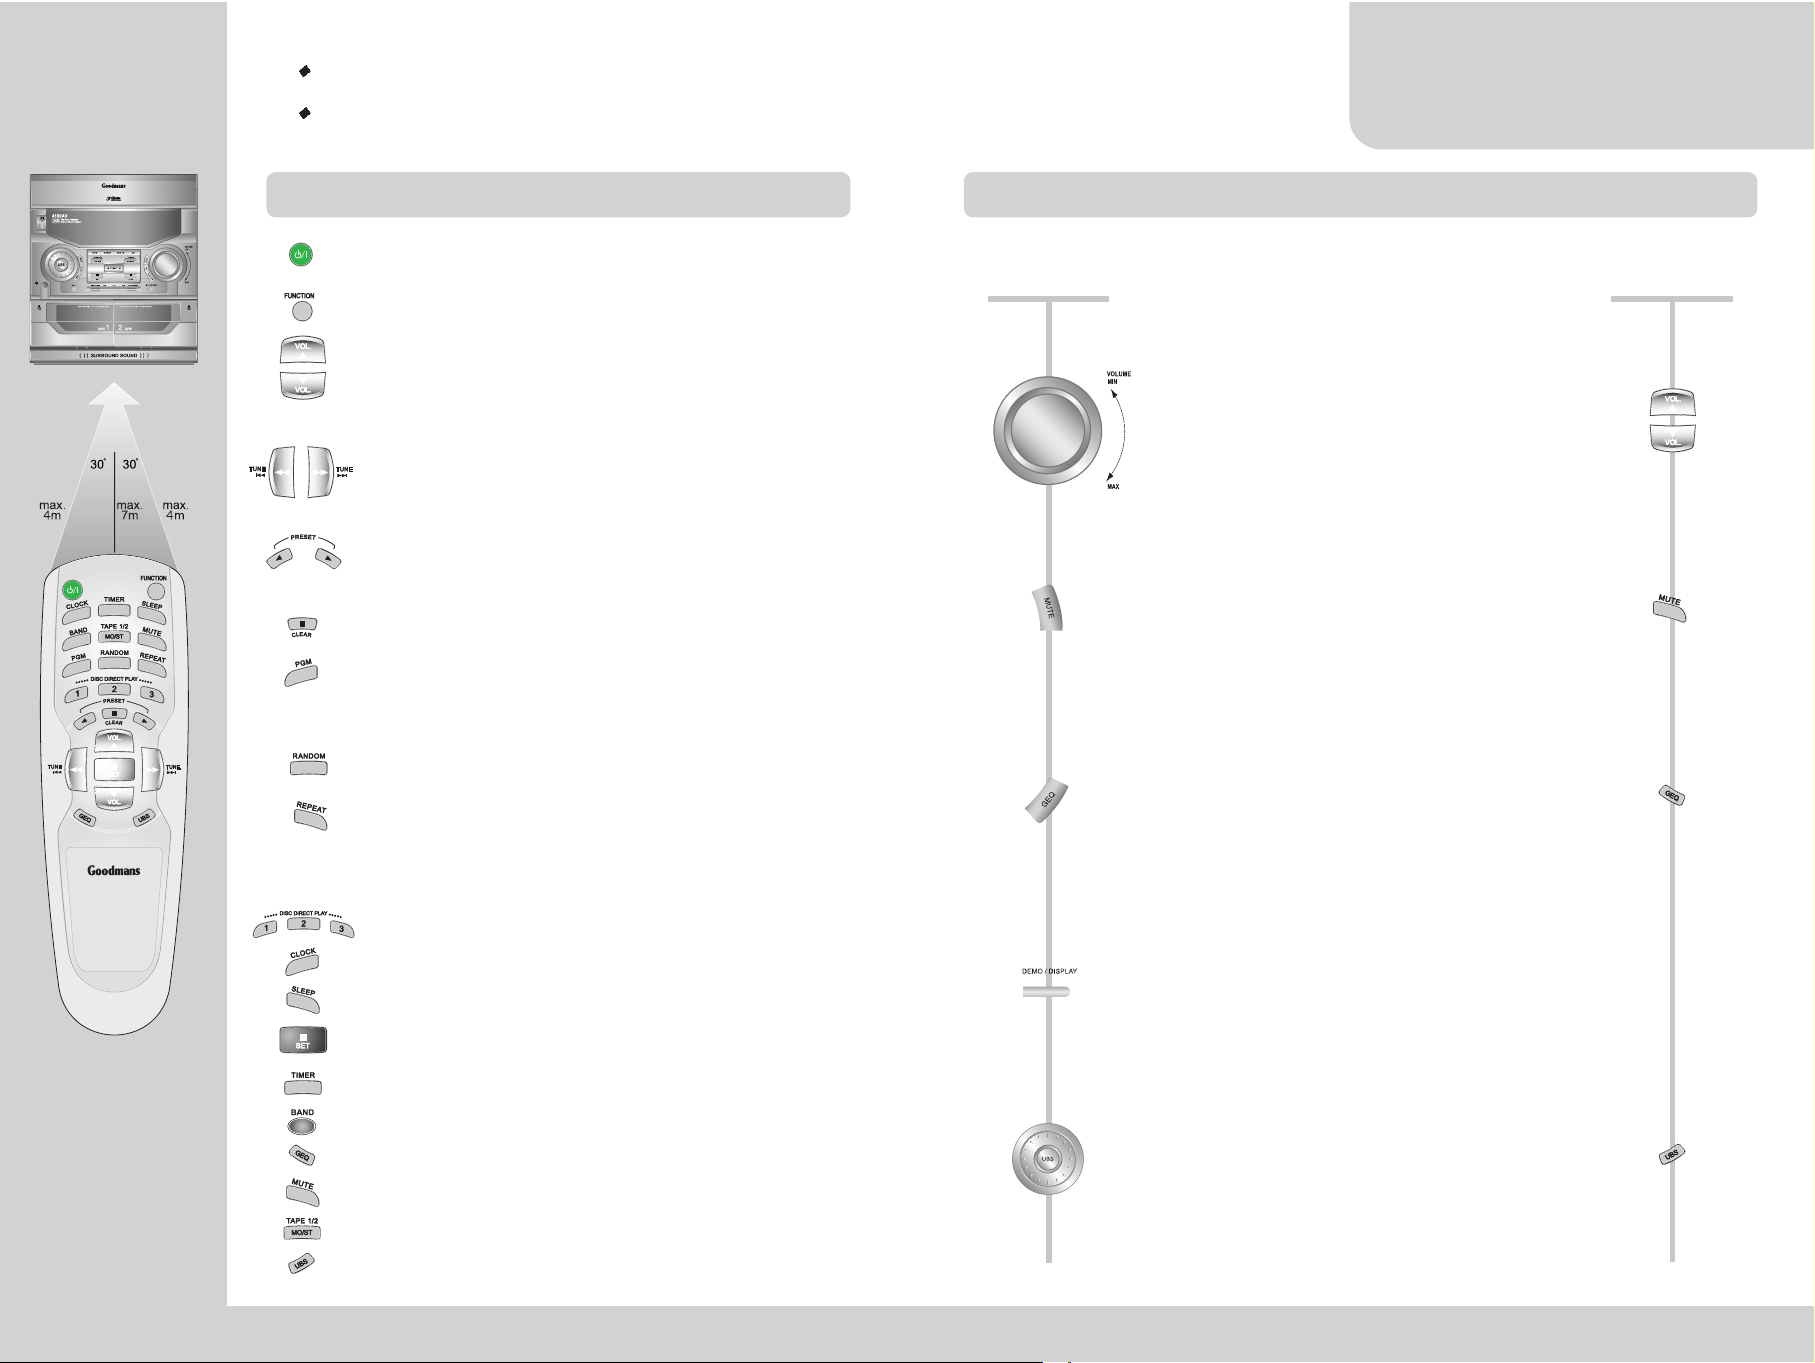
Controls
The remote control unit..................................................................................................3
The sound......................................................................................................................4
The machine...............................................................................................................5/6
Installation / Connections
Placing your sound system components, Remote control and batteries.......................7
Installation..................................................................................................................... 8
Radio Operation
Tuning station, Programming station presets, Selecting station presets.......................9
CD Playback
Playing CDs, Searching, Skipping.......................................................................... .....10
Skipping, Programmed CD tracks playback, Repeat play, Random playback.............11
Cassette Tape Playback
Playing tapes, Winding, Skipping a piece, Continuous playback.................................12
Tape Recording
Recording stations, Recording from a connected device.............................................13
Recording CDs with synchro start, Recording from another tape (dubbing)............... 14
Timer and clock
Setting the clock, Displaying the time, Setting the sleep timer.................................... 15
Setting the timer, Timer(record) stand-by on/off, Checking the timer......................... 16
Appendix
Before you ask a specialist, Cleaning the audio heads of the tape deck.................... 17
Compact discs, Technical data....................................................................................18
Before use read through this manual carefully.
Make sure the rating of the household electricity supply matches that shown
on the back of the sound system.
Refer to this chapter and the "Installation / connections" chapter (page 7/8)
to help with the installation and adjustments of this sound system.
Do not ....
...expose the sound system to high levels of humidity and heat, to avoid the risk
of fire and electric shock.
...connect the sound system to the power supply if it has just been moved from a
cold to a warm environment. This can result in condensation inside the system
and cause the system to malfunction.
Wait around two hours to allow it to reach room temperature.
...put in any substance through the gaps in the back cover.
Make sure....
...the system is placed on a stable, flat surface.
...the system is placed where there is good ventilation all around.
...the system is only cleaned with a soft, line-free cloth, do not use aggressive or
alcohol-based cleaning agents.
...the power supply is disconnected if the system appears to be working
incorrectly, is making an unusual sound, has a strange smell, has smoke
emitting from it or liquids has got inside it.
Have a qualified technician check the system.
...the power supply and aerial are disconnected if you will not be using
the system for a long period or during a thunderstorm.
...this apparatus shall not be exposed to dripping or splashing water and that no
objects filled with liquids, such as vases shall be placed on the apparatus.
For your own safety!
There are no components in this sound system that can be serviced
or repaired.
Do not open the case of the sound system.
Only allow qualified personnel to repair or service this set.
"Class 1 Laser Product" : Do not override the safety locks around
the laser unit of the CD player : Laser beams can damage eyes!
This sound system is designed for continuous operation.
Switching it off does not disconnect it from the mains (stand-by).
To disconnect it from the mains, unplug at the mains socket.
3
4
5/6
7
8
9
10
11
12
13
14
15
16
17
18
Page 3
4
Sound Control
CONTROLS
CONTROLS
3
The Remote Control
Volume control
Rotate the volume control or press the volume buttons on
the remote to adjust the volume.
(MAX, VOL 28 ~ VOL 1, MIN).
Mute
Press the mute button on the remote control or main unit
to mute the sound. Press again to return the sound to the
previous level.
GEQ
Press this button on the remote control to add sound
effects to the audio output.
Demo/Display
Press this button on the main unit to switch between
normal display mode and a demonstration shown on
display.
Ultra Bass Sound
Press this button on the remote control or main unit to
enhance the low frequency (Bass) sounds.
On the
remote control
On the
Stereo
Please note, the instructions given in this instruction manual refer mainly to the remote
but the main functions buttons are also available on the front of the machine.
Press the POWER button or FUNCTION buttons (TAPE, TUNER, AUX1/2, CD ) to
turn on the power.
Start CD playback or select station presets.
Select random playback.
Select repeat playback.
Power on (stand-by).
Press repeatedly to select tape, tuner, AUX, or CD player.
To set the volume level.
To tune in stations, to set values in programming, to fast reverse or advance
tape and CD.
Stop or cancel values and functions.
Direct access to each of the CDs loaded.
Display the current time.
Set the period after which the unit will turn off.
Pause playback/recording of CD or tape.
Set the time for the unit to turn on also turn timer on/off.
Select FM or MW radio.
Add sound effects to the sound output.
Mute (on / off) the volume for a while, e.g. during a telephone call.
Select FM mono for weak stereo reception, or TAPE 1/2.
Bass enhancement (on / off), see page 4.
Set a programm for CD playback.
Page 4

6
CONTROLS
5
Place this sound system
horizontally on a flat, steady base and in a position so
that air can circulate around it for ventilation.
away from humidity and heat, magnetic fields, such as
those from loudspeakers etc., and with no heavy objects
placed on top.
Remote control
buttons see page 3.
On the main unit
Turn system power ON(stand-by).
Press this button to turn the unit on from standby.
UBS(Ultra Bass Sound)
Press this button to enhance the low frequency
(Bass) sounds.
Mute the audio output.
Press again to restore audio output.
To show the current time in the unit's display.
GEQ.
Press this button to add sound effects to the audio
output.
Headphone socket.
When inserting a set of headphones the sound from
the speakers will be turned off.
Direct function buttons
Press tape to select tape 1, press again to select tape 2.
Press tuner to select tuner, press again to change the band.
Press AUX 1/2 to listen to sound from external equipment.
Press CD to listen to an inserted CD.
Tune in stations, to set values in
programming, to fast reverse or advance
tape and CD.
Stop playback and recording or clear
values and functions.
Start playback or to select station presets.
Press to pause playback/recording of Tape
/CD or to set/enter a value when
programming a CD or setting clock/timer.
On the main unit
CONTROLS
Direct access to one of the three discs that can be loaded
into the CD tray.
Open or close the disc compartment to
load / unload CDs.
Select the next disc in the CD tray.
Tape compartment 2 for playing tapes in both directions
(see page10 PLAY MODE) and recording tapes.
Tape compartment 1
for playing tapes.
To set the volume level.
DISPLAY / DEMO : to switch between the
system's display and a display demonstration.
To view the demonstration of this system press the
DEMO/DISPLAY button shortly. To change graphic
equalizer display, press and hold the DEMO/DISPLAY button
for more then 1 sec and you can select your favorite display
sequentially.
To dub a tape at high or normal speed with synchronised start of both,
playing and recording tapes.
To dub a CD with synchronised start of disc and tape.
To start tape recording.
To select timer setting and to activate / deactivate timer stand-by.
Select the TAPE 2 playback mode
" " will be shown in the display for single side playback only,
" " will be shown in the display for playback of both sides once only, or
" " will be shown in the display for repeated playback of both sides.
Page 5

SURROUND
Installation
INSTALLATION/
CONNECTIONS
INSTALLATION/
CONNECTIONS
Placing your sound system components
Remote control and batteries
7 8
Right speaker
Left speaker
Optimal Listening Position
Fit the batteries while observing
the
and symbols in the
compartment.
Batteries for remote control unit are not provided.
Please protect your environment! As batteries contain certain
toxic substances they pollute the environment if not properly
disposed of. Your specialized dealer will accept used batteries.
Make sure the batteries are always of the same type and age, and
remove them from the remote control if it is not going to be used for a long period.
4. Connect the
surround
speakers to this
main unit.
2. Plug the provided MW
aerial here.
3. Connect the speaker cables.
Connect the wires correctly
(wire with the black marking to
the black terminals other wire
to the red terminal)
5. Plug a device like a video
recorder, TV set, or minidisc,
etc. here.
Ensure that plugs are
connected to sockets of the
same colour.
Make sure the rating of your household electricity supply matches that shown
on the back of the sound system.
Do not stack objects on top of the sound system.
Do not block the ventilation holes of the sound system.
Place the system so that air can circulate freely.
Switch devices off when connecting or disconnecting.
Do not expose the sound system to high levels of humidity and heat, to avoid the risk of fire
and electric shock.
Be sure the power supply and aerial are disconnected if the system is not going to be used for a
long period or during a thunderstorm.
Be sure to read the precautions on page 1.
Push here
Surround
speaker
Surround
speaker
1. FM aerial
Page 6

10
RADIO
listening
9
Tuning stations
Programming station presets
Selecting station presets
Select the tuner.
Select the band the station is on.
Press repeatedly to manually
tune.
Press and hold until turing starts
automatically tuning.
If there is to much background
noise when listening to a station
in FM stereo, press this button to
listen in mono "
(OO)
" will
disappear from the display.
Tune to the required station as
shown above.
Store.
The system assigns the station to
a number beginning with 1, and
then stores each station one after
another.
Select previous or next preset
stations.
If you try to store a 31st FM / 16th MW station, the display will show "FULL".
To clear a preset station, select it, press , then for 3 seconds.
Press the button of the remote control to switch back to stereo.
Up to 30 FM / 15 AM stations can be stored.
CD
playback
CD playback
Searching
Skipping
Select the CD function.
Open the disc compartment to load a disc.
Insert disc with the label facing upwards.
To insert 3 discs, place 2 discs into the slots on the disc tray
and turn the tray for the third slot, using DISC CHANGE
button.
Commence playback with the first track of the selected disc.
Use these buttons to select a specific track.
Start playback.
The currently played disc is the disc to the left when the CD
compartment is opened.
Pause playback.
Stop playback.
Press and hold these buttons to search for a particular
section of the disc.
Skip to next/previous track.
on the main unit
on the main unit
When the disc stops the machine shows its total time.
During playback the machine shows the current disc number, the current
track number, and the track's elapsed time.
Page 7

To cancel repeat playback, press the button until "REPEAT"
disappears from the display .
A programme or a track can be repeated during
programme playback.
Press repeatedly...
to repeat the current track,
to repeat the current disc,
to repeat all discs.
CD
playback
1211
Select the random function, press
repeatedly ...
to play tracks of the current
disc in a random order.
to play tracks from disc 1, 2,
and 3 in a random order
Programmed CD tracks playback
Repeat playback
Random playback
1. Stop the disc.
2. Select the programme function.
3. Choose a disc.
4. Select a track number to be
programmed.
5. Store this number in the
programme.
Play your programme.
Search and skip function as normal
during CD programme playback.
Stop Playback.
To cancel the CD programm, press the
button twice.
Discs recorded by personal computer or high speed recording may not be played (or cause
noise) according to the recordings format.
It is recommended to use and play discs recorded at as low speed as possible.
Up to 30 tracks can be programmed by repeating steps 3 to 5.
DISC CHANGE button has no effect during programming.
TAPE 1: Will only playback prerecorded tapes.
TAPE 2: To play back prerecorded tapes
and to record tapes.
Tape playback
Winding
Skipping a piece (Fast forward/rewind during playback)
Continuous play back
TAPE
playback
Select TAPE 1 or TAPE 2 function.
Open either tape compartment to load the tape.
Be sure to have the open part of the cassette downward and the left
hand spool fully wound.
Close the compartment door again, pushing it gently.
Start playback.
Tape 2 : Press
/ according to the direction to playback
the tape.
Stop playback.
Stop playback.
Fast rewind or forward the tape.
During playback.
Fast rewind to beginning of the current piece of music or
advance to the next piece.
Press to resume playback.
Select the TAPE 2 function.
Load tapes into both compartments.
on the main unit
Press until is shown in display.
Play TAPE 2.
After playing both sides of TAPE 2, then the unit will
commence with TAPE 1 (one side).
PLAY MODE : Select if the machine is to play TAPE 2 in one direction" ", both directions " ",
or repeatedly " " using MODE button on the machine.
The tape counter resets to "0000" when a tape compartment is opened ("0000" is not necessarily the
beginning of the tape).
on the main unit
To cancel random playback, press the button until "RANDOM " disappears
from the display .
Page 8

Recording CDs with synchro start
Recording from another tape(dubbing)
RECORDING
RECORDING
Recording stations
Recording from a connected device
Select the TUNER function.
Select the band.
Tune to the required the station
or select a stored preset.
(see also page 9).
Start the recording.
Press to pause recording, press
again to resume.
Stop the recording.
Select the AUX1/2 function.
Make sure the audio output of the
device is properly connected (TV
set, video recorder, minidisc, etc.)
to the AUX1/2 input sockets on the
back of the machine
(see also page 8).
Start the recording.
Press to pause recording, press
again to resume.
Stop the recording.
on the main unit
on the main unit
on the main unit
on the main unit
Select the CD function.
Open the disc compartment to load a disc.
Press again to close the disc compartment.
Select the disc to be recorded.
Stop CD playback before the recording is started.
Select the a track to be recorded.
Start the recording. CD will start in sync with the tape.
Stop the recording.
Select the TAPE function.
Load a tape with enough free space into TAPE 2.
Load the prerecorded tape into TAPE 1.
Start your dubbing by selecting dubbing speed:
"Hi-DUB" copys at double speed = half the time,
"DUB" copys at normal tape speed.
Stop the recording.
1413
The synchro start function is an easy way of copying (tracks of) CDs to a tape: One
press of a button starts both CD playing and tape recording at the right time.
insert the tape with the open part of the cassette downward and the left hand spool
fully wound on the left.
Close the compartment door again, pushing it gently.
If you want to start at the current position of a CD, press REC button.
Use only good quality tape cassettes.
- Keep cassettes away from excessive moisture or dust, magnetic and electrical fields
(loudspeakers and computer monitors, for example)
- Always wind the tape to the beginning when you have finished.
Store with the full spool at the bottom and with the cassette in its cover.
You can protect your precious recordings from being wiped by breaking
out the safety tab on the side of the cassette.
Should you wish to re-use the tape after removing the tab, cover the hole with adhesive tape.
Page 9

Setting the timer
Timer (record) stand-by on / off
TIMER
and clock
TIMER
and clock
Setting the clock
Displaying the time
Setting the sleep timer
Switch off the stereo system.
Enter clock-set mode, the hour
digits flash.
Set the current hour
Store the hour digits and switch to
the minute digits.
Set the current minutes.
Start the clock and exit clockset
mode.
Set the machine to automatically
switch off after a specified time
Select the SLEEP function.
Every time the sleep button is
pressed the time is reduced from
90 minutes to 10 minutes and
then off.
The machine will show the time
for approx. 4 seconds.
16
15
Select the TIMER function.
(Timer display disappears after about 9 seconds.)
Select, if the radio, tape, CD, or a connected device should
be heard when the system is turned on.
Press repeatedly.
Enter 'on' time.
Set the hour the unit is to switch on.
Switch to the minute digits.
Set the minutes the unit is to switch on.
Switch to volume setting.
Set the volume when the unit turns on between (MIN.) 1 and
(MAX.) 28,
Switch to the time the machine is to switch off again.
Set the number of minutes the unit is to play for before
turning off.
Exit the timer setting.
Press the button repeatedly to switch below :
timer
timer record
timer deactivated
If you want to cancel the SLEEP function, press the button repeatedly
until "SLEEP" disappears from the display.
The unit can be set the machine to automatically switch
on and off and even to record at a specified time.
Be sure the clock is set accurately.
Power save mode is activated by power button after clock setting.
Page 10

Compact discs
Technical data
APPENDIX
APPENDIX
Troubleshooting
No sound
No Display
Noise with radio sound
Bad sound with tapes
No recording
No CD playing
Remote control does
not work
- No mains supply?
- Volume at minimum?
- Are headphones plugged in the headphone socket?
- Did someone press the MUTE button?
- The power save mode ?
- Replug the AC Cord.
- Station not tuned accurately? Tune again.
- Weak FM station? Switch to mono using MODE button.
- Weak AM stations? Move the AM aerial slowly for
better reception.
- Aerial accurately fitted?
- Be sure playing / recording heads and tape guiding
parts are clean.
- Try another cassette.
- Cover the safety hole of the cassette with adhesive
tape.
- Correct source CD, tape, tuner, AUX1/2 selected?
- Safety lock not removed yet?
- Load a CD with the label facing upwards.
- CD scratched, broken, deformed,... Try with another.
- Condensation e. g. after a transport? Wait for a
while (20-30 minutes).
- CD dirty? Wipe with a soft cloth from the center to the
outside.
- Batteries fitted the wrong way? See page 18.
- Batteries run down? Try new ones.
- An object is blocking the direct line between remote
control and the system. Max distance to the system is
4~7 m pointing to its front.
Due to the constant improval of our products these specifications are subject to change without notice.
17
18
Always...
handle your discs with care. Hold a disc
with the fingers touching the edge or the
hole.
place the disc with the label facing up.
place the disc properly into the tray using
the proper guide area for 12 cm or 8 cm
discs.
replace a disc in its case after playing and
store it in a vertical position.
use a soft cloth to clean a disc if
necessary and wipe from the centre to the
outside.
Never ...
play a deformed, cracked, or chipped disc.
try to repair a disc with adhesive tape or
glue.
close the tray with a disc slipping out of
the guide area, or two disc inside.
scratch a disc or store it in direct sunlight,
high humidity or high temperature.
use record cleaning sprays, benzine, static
electricity liquids or any other solvent, if the
disc surface is soiled. Wipe gently with a
soft,damp (water only) cloth.
wipe the disc in a circular motion, since
circular scratches are likely to occur, which
will cause noise
write on the disc.
move the system during playback.
Dimensions (W x D x H)
Set : 275 x 377 x 317.5mm
Speaker : 225 x 242 x 317mm
Weight : 6.4kg + 3.3kgx2 + 0.3kgx2
Power supply
Voltage AC 110V or 120V or 127V or
220V or 230V or 240V (50/60Hz)
( Option )
Power consumption
Operating 75Watt
Power save mode of Stand-by(Only for PSM option) :
Less than 1Watt
Reception range
FM : 87.5MHz-108MHz
AM(MW) : 530-1710kHz
(522-1620kHz)
3 x CD changer
Converter 1 bit D/A,
Oversampling 4x
Tape
Synchro recording, 1x auto reverse,
High speed dubbing, Automatic level control
Amplifier
Total Power 30 watt + 30 watt
Front speakers (2 Way)
Impedance 6 Ohm
Surround speakers
Impedance 16 Ohm
 Loading...