

Page 1
KARAOKE MACHINE
LINE IN
PAIRING
MODEL:339562
USER MANUAL
Page 2

Welcome
1
Your Karaoke Machine
2
2.1
In The Box
2.2
Mains Power
2.3
Front View
2.4
Indicator
2.5 Rear View
2.6 Top View
Quick Setup
3
3.1
Connecting Your Karaoke Machine to a TV
3.2
Display Lyrics on a TV Screen
3.3
TV Connection for Audio & Video
3.4
TV Connection with SCART Adapter
3.5 Audio Connection to an External Amplifier
3.6 Connecting the Microphone(s)
3.7
Fitting the Microphone Holders
3.8
Connecting the Power
3.9
Power ON/OFF & Auto Standby
3.10
Adjusting the Volume
3.11 Connecting an External Audio Source
4
Operation
CD+G/ MP3+G Operation
4.1
Switching Modes
4.2
What is a CD+G Disc?
4.3
What is a MP3+G File?
4.4
Load a Disc
4.5
Load a USB Flash Drive
4.6
Play a Song
4.7
Skip Tracks
4.8
Programmed Playback
4.9 Repeat Single/All Track(s)
Page 3

4.10 Echo Effect (Microphone Only)
4.11 Balance Control
4.12
A.V.C Control (Auto Voice Control)
4.13
LED Light & Water Display
4.14 Bluetooth Audio
5
Troubleshooting
6
Technical Specifications
7
Customer Support
Page 4

Welcome1
Thank you for choosing this Goodmans product. We have been making
electrical products for the British people for over 90 years. Each of our
products have been carefully designed to be great at what they do and
this one is no exception. We hope you enjoy your new Karaoke machine.
Your Karaoke Machine
2
2.1 In The Box
Carefully remove your Karaoke machine from the packaging.
Inside the box you will find:
• Karaoke Machine
• Power Adapter
• RCA Cable
• Line in Cable
• 1 x Microphone
• Quick Start Guide
• Guarantee and Safety Book
• User Manual
If any of these items are missing, please email:
Goodmans@bmstores.co.uk
2.2 Mains Power
Your Karaoke Machine uses a 9V 2A power adapter. Please ensure that your
mains supply is compatible before use. Disconnect the power cord from the
mains when not in use.
Page 5

2.3 Front View
Water Effect
Power ON/OFF Button
Press to switch between.
Power ON and standby mode.
Master Volume
Adjusts the volume
level of the speaker.
Microphone Holder
Balance Button
Adjust the left & right audio
balance.
USB Port
Connect a USB flash drive for
MP3 playback.
LINE IN Input
Light Show Switch
Enables or disables the light on the
rear of the karaoke machine.
Prog Button
Activates the program playlist function.
Repeat Button
Backward Skip Button
LED
Speaker
Forward Skip Button
Stop/Pairing Button
Press to stop playback/ hold to
disconnect your Bluetooth device.
Page 6
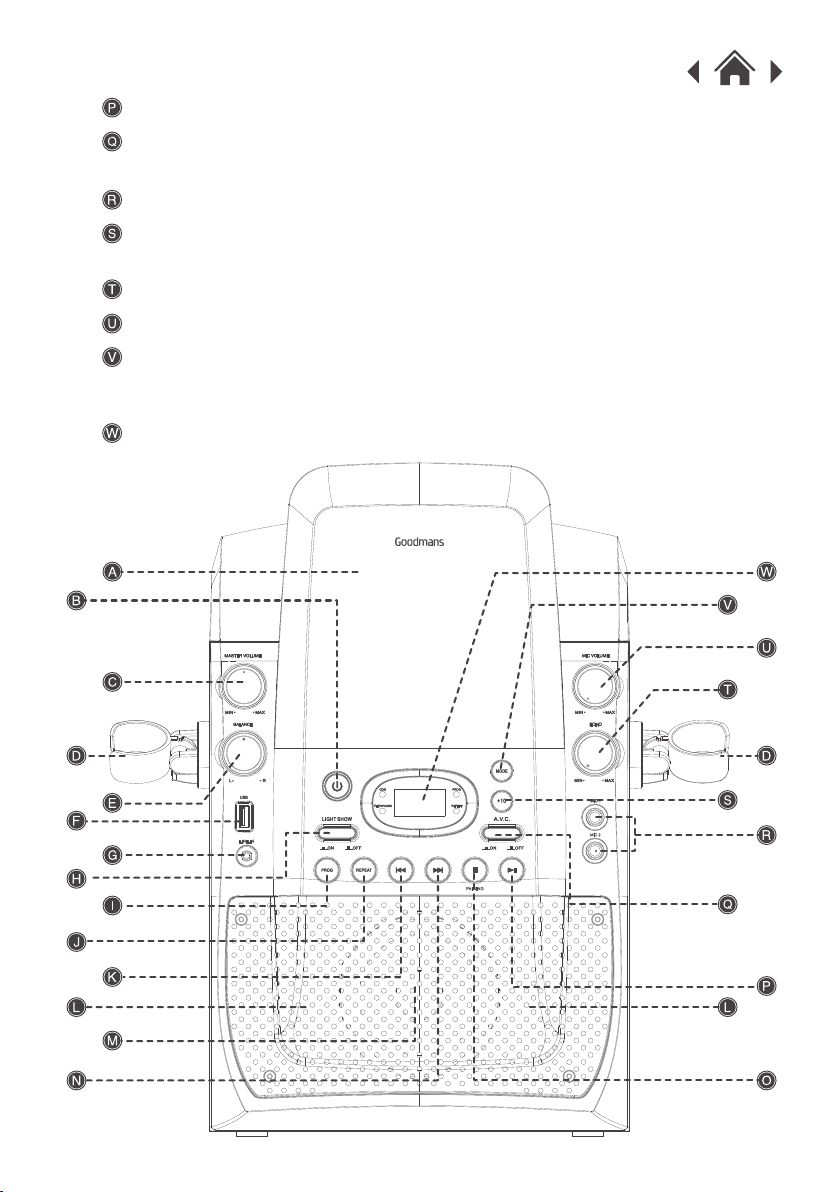
Play/Pause Button
AVC Switch
Controls the music volume level when singing.
MIC Input
+10 Button
The number of the track is increased by ten.
ECHO Control
MIC Volume Button
Mode Button
Press mode to switch between CD/Bluetooth/
USD mode.
Indicators
LINE IN
PAIRING
Page 7
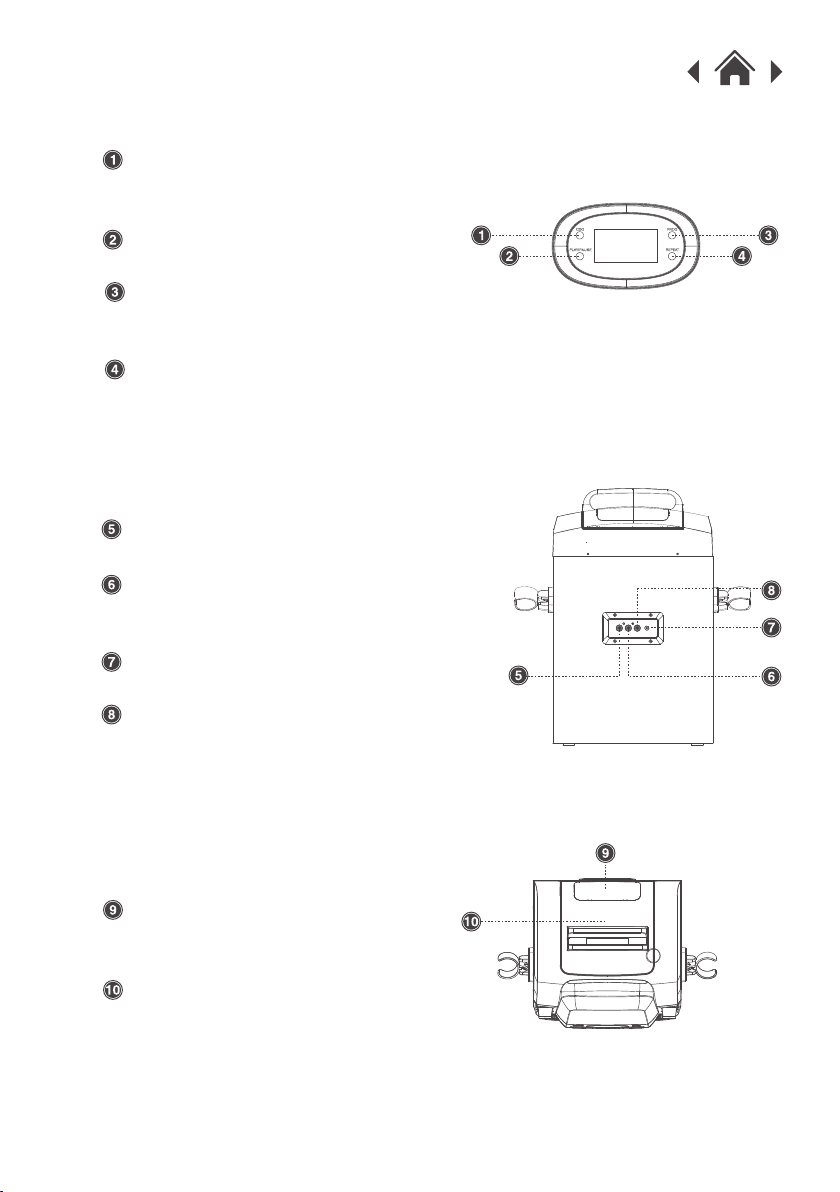
2.4 Indicator
CDG Indicator
Indicates when a CD+G track
is being played.
Play/Pause Indicator
Indicates when in play or pause mode.
Prog Indicator
Indicates when the program function
is active.
Repeat Indicator
Indicates when the repeat mode is active.
2.5 Rear View
Composite Video Output
Connect to a TV video input.
RCA Stereo Right Audio Outputs
Connect to an RCA stereo input or a
TV or amplifier.
DC MAINS input
Indicates when the repeat mode is active.
RCA Stereo Left Audio Outputs
Connect to an RCA stereo input on a
TV or amplifier
2.6 Top View
LED Light
Indicates when a CD+G track
is being played.
DISC Compartment
Page 8

Quick Setup3
3.1 Connecting Your Karaoke Machine to a TV
An audio/video (AV) cable is supplied to give you the option of connecting
the unit to an external amplifier and/ or a TV to display lyrics on-screen. The
cable has three RCA jacks at each end. White and Red are for left and right
audio connections and the Yellow is for connecting the video. Some
projection TV sets do not display the standard blue background used on
most CD+Gs properly. If the background colour is inconsistent or flashing,
please try connecting your Karaoke Machine to a standard television.
3.2 Display Lyrics on a TV Screen
Connect the YELLOW (video) jack of the supplied AV cable to the 'VIDEO
1.
OUT' socket on the rear of the karaoke machine.
Connect the other end of the cable to a 'VIDEO INPUT' on your TV.2.
Select the appropriate video channel on your TV to view the lyrics
3.
on-screen. This connection will send lyrics (CD+G) only to the TV screen.
All audio will be output from the karaoke machine.
AUDIO IN VIDEO IN
3.3 TV Connection for Audio & Video
Connect the YELLOW (video) jack of the supplied AV cable to the 'VIDEO
1.
OUT' socket on the rear of the Karaoke Machine.
Connect the other end of the cable to a 'VIDEO INPUT' on your TV.2.
Select the appropriate video channel on your TV to view the lyrics
3.
on-screen. This connection will send lyrics (CD+G) only to the TV screen.
Connect the other end of the cables to the RED & WHITE stereo inputs on
4.
your TV. Take care to match the socket colours to the jack colours & that
the red, white & yellow sockets are all from the same TV input.
Page 9

Select the appropriate video channel on your TV to view the lyrics
5.
on-screen and hear the sound from the TV speakers.
AUDIO IN
VIDEO IN
3.4 TV Connection with SCART Adapter
If your TV does not have the same red, white & yellow input sockets, you can
use a RCA to SCART adapter (not supplied).
Connect the YELLOW (video) jack of the supplied AV cable to the 'VIDEO
1.
OUT' socket on the rear of the karaoke machine.
Connect the RED & WHITE jacks of the supplied AV cable to the 'AUDIO
2.
OUT' sockets on the rear of the karaoke machine. Take care to match the
socket colours to the jack colours.
Connect the other end of the cables to the matching coloured sockets on
3.
the SCART adapter.
Connect the SCART adapter to the SCART input on your TV.4.
Select the appropriate video channel on your TV to view the lyrics
5.
on-screen and hear the sound from the TV speakers.
Page 10

3.5 Audio Connection to an External Amplifier
As an alternative to listening to the audio through your TV or internal
speakers, you can listen through your home stereo system.
Connect the RED & WHITE jacks of the supplied AV cable to the 'AUDIO
1.
OUT' sockets on the rear of the karaoke machine.
Connect the other ends of the RED & WHITE cables to an RCA STEREO
2.
input on your amplifier.
Power on the amplifier and select the input you connected the cables to.
3.
In order to see the lyrics on your TV screen you also need to connect the
yellow cable to your TV (see section 3.1).
3.6 Connecting the Microphone(s)
Insert the supplied microphone jack into the MIC 1 socket on the front of
1.
the karaoke machine.
Switch the microphone on using the ON/OFF switch found on the side of
2.
the microphone.
An additional microphone can be connected to the MIC 2 socket for duets
(only one microphone is supplied).
Page 11

3.7 Fitting the Microphone Holders
Two microphone holders are supplied to store the microphones when not
1.
in use. Locate the left MIC holder and insert into the recess marked 'L'
until you hear a click and the holder is secure. Repeat the process for the
right holder.
Place a microphone into each holder for storage.2.
3.8 Connecting the Power
Connect the mains adapter jack into the DC power input on the rear of the
1.
Karaoke Machine.
Insert the mains adapter into a power socket.2.
Press the POWER ON/OFF button on the front of the Karaoke Machine.3.
LINE IN
PAIRING
Page 12

3.9 Power ON/OFF & Auto Standby
Press the POWER ON/OFF button to wake from Standby mode.1.
Press the POWER ON/OFF button again to enter Standby mode. Due to
2.
new ECO regulation requirements this product incorporates a power
saving feature.
Once audio playback has ceased and the unit has stood idle for
3.
approximately 15 mins, it will switch into standby mode.
To turn the unit on, press the POWER ON/OFF button.4.
3.10 Adjusting the Volume
Rotate the MASTER VOLUME control clockwise or anti-clockwise to
increase or decrease the volume output.
3.11 Connecting an External Audio Source
You can connect other audio sources to sing along to using the Line IN
socket on the front of the unit.
Connect an audio device (such as an MP3 player) using a 3.5mm Line
1.
IN cable (supplied). Insert one end into the MP3 players earphone
output.
Connect the other end into the Line IN socket on the front of the karaoke
2.
machine.
Page 13

Press PLAY on the audio device. Adjust the volume to your desired level.3.
When connecting via the headphone output the volume of the karaoke
4.
machine is affected by the volume control on the player. Ensure that the
audio source (such as an MP3 player) is set to about 70-80% to avoid
distortion.
LINE IN
PAIRING
Operation4
CD+G/ MP3+G Operation
4.1 Switching Modes
Press Mode button to switch between CD/Bluetooth/USB mode.
4.2 What is a CD+G Disc?
A CD+G (CD + graphics) is the standard format for most karaoke discs.
Each disc contains the audio track and words that appear on your TV
Screen.
4.3 What is a MP3+G File?
This format can be downloaded from on-line karaoke music suppliers and
burnt to CD or copied to USB flash drives for playback on the karaoke
machine. There are two files per song, so do not rename the files and copy
both to the CD or flash drive.
4.4 Load a Disc
Lift the CD door open and place a disc onto the spindle with the label facing
upwards. Close the CD door.
Page 14

4.5 Load a USB Flash Drive
Insert a USB flash drive into the USB port on the front of the karaoke machine.
4.6 Play a Song
Follow the steps above to load a disc or USB flash drive (if not already
1.
loaded).
The player begins to read the disc/ drive and displays the total number
2.
of compatible tracks on the display.
If a TV is connected a menu displaying folders on the left (MP3+G files in
3.
folders only), and tracks on the right.
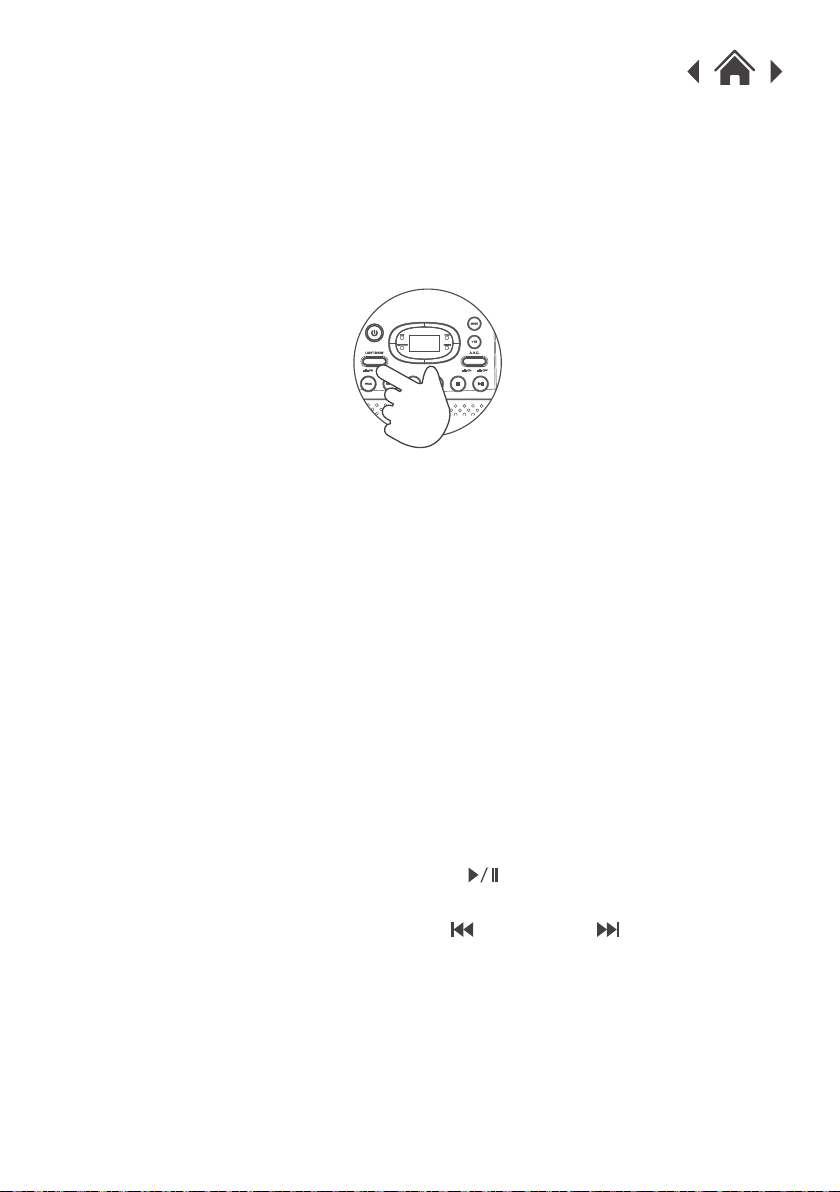
4.
Press the “ ” button once to begin playback from track 01. The
PLAY/PAUSE indicator to the left of the display will illuminate and if playing
a CDG disc /MP3+G file the CDG indicator will illuminate also.
If a TV is connected, the lyrics to the current song will appear on your TV.5.
To pause playback press the “ ” button once more. The PLAY/PAUSE
6.
indicator and display will flash to indicate the player is in pause mode;
press the “ ” button to stop music playback. The display shows the
total number of tracks once more.
Page 15

4.7 Skip Tracks
1.2.Press the “ ” button once during playback to skip to the next track.
To skip to a specific track, press this button several times until you reach
the track number required.
Press the “ ” button once during playback to return to the beginning
of the current track. Press the “ ” button twice repeatedly to skip to
the previous track. To skip back to a specific track, press this button
several times.
4.8 Programed Playback
To programe an alternative playback order of tracks follow the below
steps.
1. Press the “ ” STOP button if a disc is playing. Then press the PROG
button to enter the programe setup function. The PROG indicator to the
right of the display will illuminate.
Use the “ ”buttons to skip between the tracks.
2.
3. Press the PROG button to store track ‘1’ of the playlist.
4. Repeat steps 2-3 to program up to 20 tracks.
When complete press the “ ” button to begin playback.
5.
6.
To cancel the program sequence press the “ ” STOP button once. The
PROG indicator will go off.
Page 16

4.9 Repeat Single/All Track(s)
During playback pressing the REPEAT button will flag the current track
1.
to repeat indefinitely. You will see the REPEAT indicator to the right of
the display flash.
Pressing the REPEAT button again will repeat all tracks on the disc.
2.
You will see the REPEAT indicator to the right of the display stop
flashing and remain solid.
To cancel the repeat function press the REPEAT button for a third time.
3.
You will see the REPEAT indicator to the right of the display go off.
4.10 Echo Effect (Microphone Only)
When using the microphone(s) you can apply echo to your voice using
1.
the ECHO control.
Rotate clockwise from MIN to MAX to increase the echo amount.
2.
Setting the control to 'MIN' means there will be no echo on the
microphone output.
Page 17

4.11 Balance Control
When playing CD+G tracks with multiplex vocals included rotating the
1.
balance control clockwise reduces the vocals. Rotating the balance
control anti-clockwise reduces the backing track.
When playing non-multiplex CD+G tracks or standard stereo tracks
2.
rotating the balance control anti-clockwise or clockwise pans stereo
audio from the left & right channels.
4.12 A.V.C Control (Auto Voice Control)
When AVC is On, the vocals on a multiplex recording are eliminated as
soon as the singer begins singing into the microphone. When the singer
stops singing, the vocals on the multiplex recording are automatically
re-activated. This function is used primarily during practice sessions.
Page 18
4.13 LED Light & Water Display
You can also enjoy a sound responsive LED light and water display. To
enable the water effect, turn up the MASTER VOLUME to a suitable level.
Press the LIGHT SHOW button on the front of the karaoke machine to
enable the LED light display. Press & hold the LIGHT SHOW button to
disable the LED light display.
4.14 Bluetooth Audio
Follow the pairing instructions below to link the unit to your Bluetooth
1.
device.
Press the MODE button repeatedly to enter Bluetooth mode. The display
2.
will show “BT”.If the unit has never been paired with a Bluetooth device
before or cannot find the last paired device, the display and the
Bluetooth status indicator will keep flashing. Turn on the Bluetooth
function of your device and enable the search until “GOODMANS
KARAOKE ” is found. Select It on the Bluetooth device to make
connection. Enter the pass code “0000” if required.
After successfully paired the unit will display “BT ”.3.
You can now start playing music from your Bluetooth device wirelessly
4.
to the speaker.
You can press the BT PLAY/PAUSE button to pause or resume the
5.
playback.
6. You can press the BT PREVIOUS or BT NEXT button to search
to the previous or next song. Press and hold the STOP/PAIRING button
on the unit will disconnect the current connection and start to search
another new Bluetooth device.
Page 19

Troubleshooting5
Problem What to do
No power when
POWER ON/OFF
BUTTON is pressed
No power when
plugged in
No sound
CD player of Karaoke
machine does not
work normally or the
“No” appears on
the LED DISPLAY
DC plug of the AC adapter is not plugged
into the DC JACK properly.
The AC outlet may not have power.
Check the outlet with a working lamp or
other electrical appliance.
MASTER VOLUME of this unit is set to
minimum.
Turn up the MASTER VOLUME.
Volume control on TV is set to minimum.
Turn up the volume of the TV system.
TV system power is OFF.
Turn ON the TV.
Disc is inserted upside down. Insert disc
correctly.
Disc is dirty. Wipe it clean with soft cloth.
Disc is scratched or warped. Use a new
disc.
A non-standard disc is inserted.
Only use compatible discs mentioned in
this manual.
Lens is dirty.
Clean the optical pickup with a CD lens
cleaner.
Page 20

No sound - If
audio is going
through TV/
home stereo
Source Selection on your TV/home stereo is not set
properly. Select AV INPUT as the source for your
TV/home stereo.
Improper connection to stereo system.
Follow directions on ‘Audio Connection’ section for
connecting to a home stereo system.
Video cable is not connected properly to the TV.
Connect the video cable to the VIDEO OUT of the
unit and to the TV’s VIDEO IN jack.
No song lyrics
appear on the
TV screen
No image on
TV screen
Cannot sing
through the
MIC
Source selector on TV is not set to VIDEO or A/V IN.
Use your TV Remote to select VIDEO or A/V input.
A CD+G disc is loaded but the CDG indicator is
not lit.
Check the disc is a CD+G.
Check disc to ensure it is clean.
TV input is not properly set.
Set TV input to correct A/V input that is connected to
the unit.
Improper MIC volume setting.
Adjust MIC and MASTER VOLUME CONTROLS to
appropriate levels.
Mic is off.
Turn on MIC with the ON/OFF switch located on the
microphone.
Mic is not properly plugged in.
Insert the MIC plug fully into either MIC 1 or MIC 2
Jack of the unit properly.
Page 21

Technical Specifications6
Model Numbel
AC /DC Operation
Speaker Output
Video Output
USB Flash Drive Support
Microphone Jacks
LINE IN Jack
Compact Disc Support
USB file types
7
Customer Support
339562
AC/DC adapter (Included)
Input: AC 100 – 240V ~ 50/60Hz
Output: DC 9V 2.0A
5W
PAL composite (RCA)
Max 32 GB (FAT32 formatted)
Each 6.3 mm (mono)
3.5 mm (stereo)
CD/CD+G/CD-R/CD-RW
MP3
For all product support, please email:
Goodmans@bmstores.co.uk
This product is intended for use within UK
Declaration of Conformance
The full text of the EU declaration is available at the following
internet address:
http://www.bmstores.co.uk/technical-information
is a trademark on a registered trademark of Bluetooth SIG Inc.
 Loading...