

Page 1
USER MANUAL
MODEL: 336801
DAB RADIO
WITH BLUETOOTH
Page 2

336801
1 Welcome
2 Your DAB Radio System
2.1 In The Box
2.2 Main Unit - Front View
2.3 Main Unit - Back View
3 Quick Setup
3.1 Power On (Using Mains)
3.2 Power On (Using Batteries)
3.3 Auto Scan
4 Operational
4.1 Adjust the Volume
4.2 DAB Mode
4.3 Info Mode
4.4 FM Mode
4.5 Favourite / Preset Station
4.6 Line-In Mode
4.7 BlueTooth Mode
4.8 Alarm Mode
4.8.1 Setting the up your Alarm
4.8.2 Turn ON / OFF Alarm
5 Menu Mode
5.1 DAB Radio
5.1.1 Full Scan (DAB Mode Only)
5.1.2 Manual Tune (DAB Mode Only)
5.1.3 DRC (DAB Mode Only)
5.1.4 Prune
5.2 FM Radio
5.2.1 Scan Setting (FM Mode Only)
5.2.2 Audio Setting (FM Mode only)
5.3 System (All Mode)
5.3.1 Sleep
5.3.2 Set Time / Date
5.3.3 Auto Update the time
5.3.4 Set 12/24 Hour
5.3.5 Set Date Format
5.3.6 Backlight
5.3.7 Language
5.3.8 Factory Reset
5.3.9 SW version
6 Troubleshooting
7 Technical Specifi cation
8 Customer Support
Page 3

336801
1 Welcome
Thank you for choosing Goodmans. We’ve been making electronics for the British people for over
90 years. Each of our products have been carefully and passionately designed to stand the test of
time. We hope you enjoy your new DAB Radio.
2 Your DAB Radio
2.1 In The Box
Carefully remove your DAB Radio from the packaging.
Inside the box you will fi nd:
DAB
Mains Adaptor
Quick Start Guide
Guarantee Booklet
Mains Power
Your DAB Radio requires a mains supply of 100-240V ~ 50/60Hz.
Please ensure that your mains supply is compatible before use.
We recommend using only the offi cial Goodmans Adaptor (as supplied).
Disconnect the power adaptor from the mains when not in use.
Position of Your DAB System
Place on a fl at, stable surface that is not subject to vibrations. Avoid the following locations:
Where it is exposed to direct sunlight
Where it is close to heat radiating sources
Where the humidity is high and ventilation is poor
Where it is dusty
Adjusting the Antenna
Fully extend the antenna to ensure good reception in DAB/FM Radio modes.
It may be necessary to alter the position of Your DAB Radio and/or the antenna to achieve the best
signal.
Page 4
336801
LINE IN
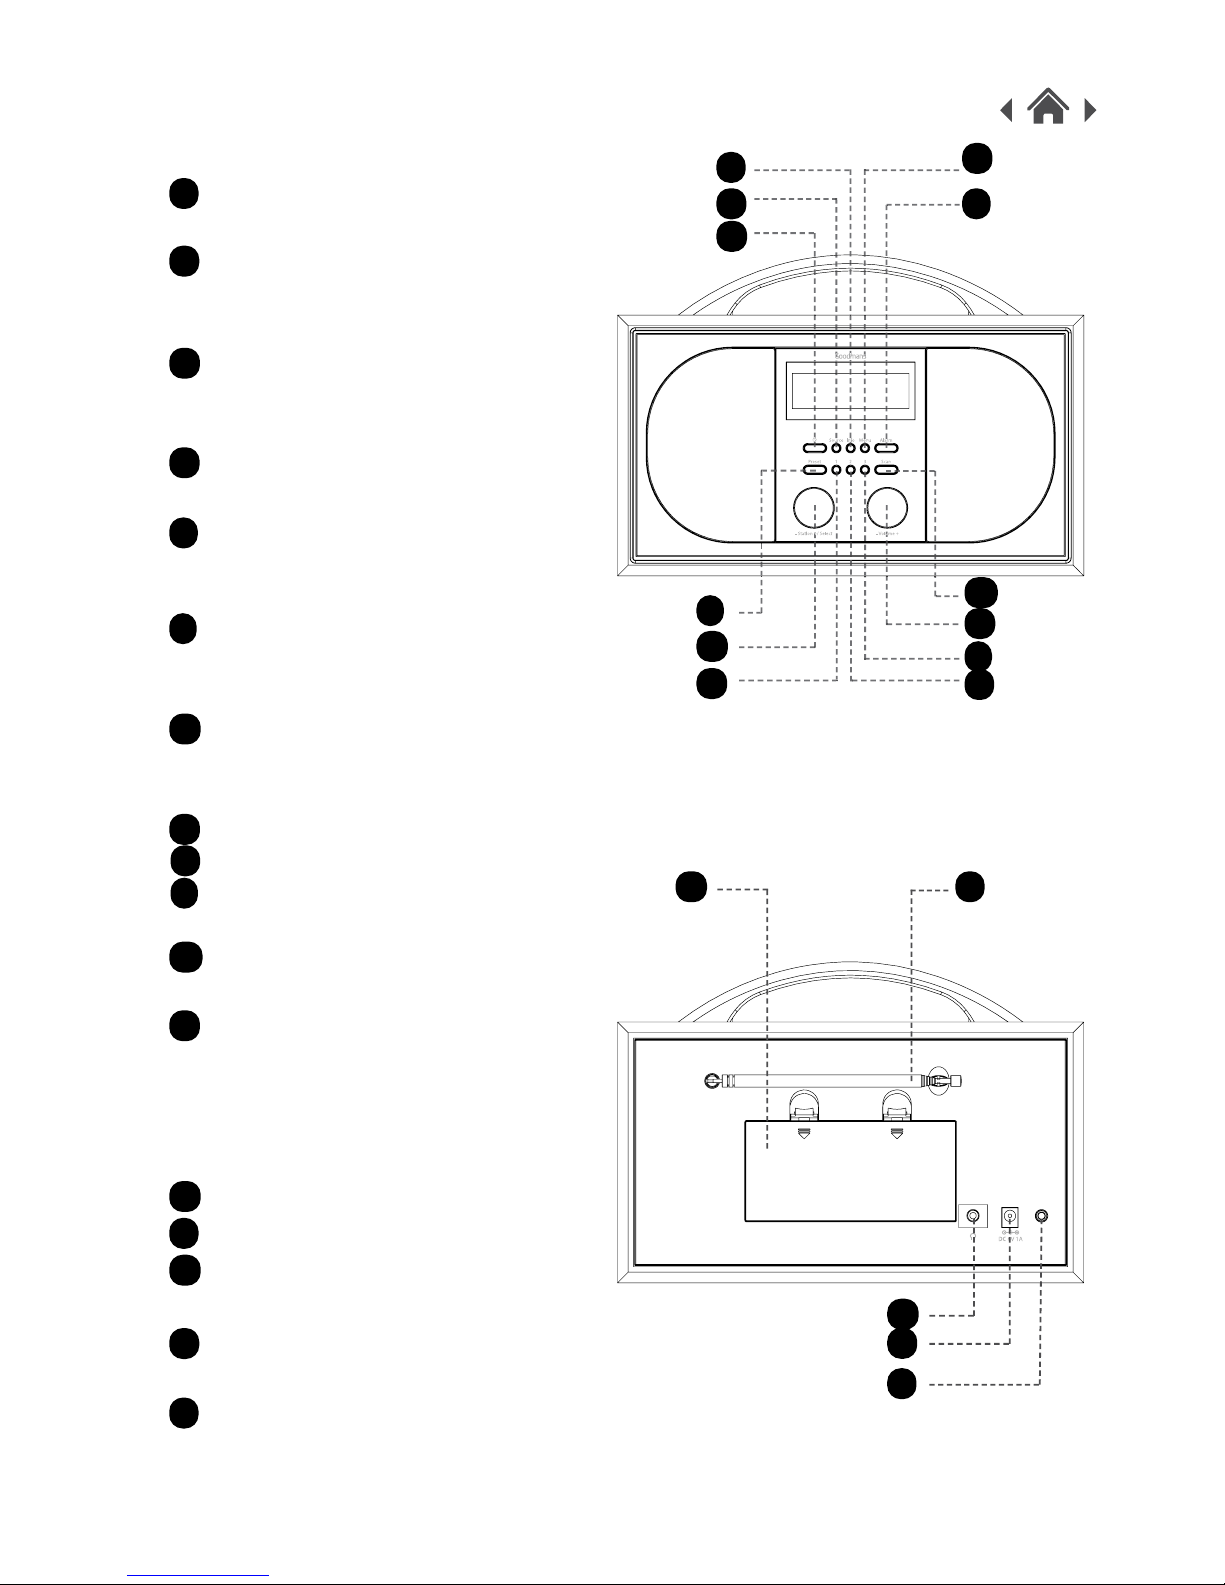
2.2 Main Unit - Front View
INFO Button
Short press to view station information.
SOURCE Button
Press to switch between DAB, FM,
Line in and Bluetooth mode.
POWER Button
Press to switch between ON and
Standby.
MENU Button
Short press to display menu options.
ALARM Button
Short press to view alarm 1 and alarm
2.
PRESET Button
Short press to view and select to save a
station.
STATION / SELECT Button
Rotate Left / Right to choice station and
press down to Select the Station
Favourite 1 / 2 / 3 Button
Press and hold to save station as
Favourite. Or press once to recall a
saved station.
SCAN Button
Short press to auto scan.
VOLUME Button
Rotate Left / Right to decrease or
increase the volume
2.3 Main Unit - Back View
Battery Compartment
Aerial
Headphone Socket
Connect the unit to the headphone.
DC-In Socket
Connect the unit to mains power supply.
Line-In
Connect the unit to other smart device.
A
B
C
D
E
F
G
H
K
L
M
N
O P
Q
R
S
A
B
C
D
E
F
G
H
K
L
M
N
O
P
Q
R
S
Page 5

336801
3 Quick Setup
3.1 Power On (Using Mains)
1. Connect the Adaptor to the DC-In Socket.
2. Connect the Power Adaptor to the mains Socket.
3.2 Power On (Using Batteries)
1. Open the Battery Compartment.
2. Install 4 x “C” size batteries.
3. Insert batteries correctly.
4. Close the Battery Compartment.
3.3 Auto Scan
Press the POWER button to Power-On the Unit. Raise and extend the Aerial.
The radio will automatically tune and operate the quick scan. The Time & Date will also set
automatically once it picks up the DAB Signal.
During scan mode, the LCD will display a slide bar that indicates the progress of the scan, and the
amount of radio stations that have been found so far. Once the scan has fi nished, the radio will
select the fi rst alphanumeric station.
NOTE: The name of the found group of DAB radio stations will be displayed on the bottom half of
the display.
It is possible to perform a manual scan for stations. See 5.1.2
You can also trigger a scan by pressing the SCAN button.
Page 6

336801
4 Operational
4.1 Adjust the Volume
Adjust the Volume by turning the volume control left or right.
A slider bar will appears on the display to show the current volume level.
If there is no sound, then turn right on “VOL +” until you reach a desired level.
If the volume is too high, then turn left on “VOL -” to decrease the volume level.
4.2 DAB Mode
Press the SOURCE button until DAB shows on the screen.
Select your desired DAB Radio Station by turning the STATION Button, and press SELECT to
choose the Station.
4.3 Info Mode
Every time you press the INFO button, the display will cycle through the information for this DAB
Radio Station.
4.4 FM Mode
Press the SOURCE button until FM shows on the screen.
Select your desired FM Radio Station by turning the STATION Button left or right, and press
SELECT to choose the radio Station.
4.5 Favourite / Preset Station
It is possible to store up to 3 of your favourite stations to the favourite keys. This will enable you to
access your favourite stations quickly & easily.
To store a favourite station:
1. You must fi rst be listening to the station that you would like to save.
2. Press & hold one of the 1 / 2 / 3 buttons and the Station will be saved in that slot.
To recall the Favourite Station, just Press 1 or 2 or 3 once, and the Station will be recalled.
You can preset 7 extra stations on your Present Radio station list via the PRESET button.
To preset station:
1. You must fi rst be listening to the station that you would like to save.
2. Press and Hold the PRESET button for 3 seconds.
3. Turn the STATION button to the store location slot you want to save your radio station to.
4. Press SELECT to confi rm and save the Radio station to the desired preset slot.
Page 7

336801
To Recall a PRESET radio station,
1. Press PRESET once, it will enter the preset list.
2. Turn the STATION button to your desired slot.
3. Press the SELECT button once and it will select the preset station.
4.6 Line-In Mode
You can connect an audio device to the unit using a 3.5mm audio cable (not supplied).
1. Connect the 3.5mm plug (not supplied) into the Audio Input socket on the rear of the unit.
2. Connect the other end to your audio device.
3. Press the SOURCE button until the LINE-IN shows on the screen.
You can now start playing the music on your device.
4.7 BlueTooth Mode
Press the SOURCE button until BLUETOOTH shows on the screen.
1. You will hear “Pairing” from the unit if the DAB Radio is ready to be paired.
2. Search for and connect to “GoodmansDAB” in your mobile phone’s Bluetooth menu.
3. You will hear “Connected” if the connection is successful.
4. Now you can play the music via your Bluetooth device.
Bluetooth connection will automatically resume again if you switch between DAB / FM / Line-in.
To connect your DAB radio to a new Bluetooth device, please fi rst unpair it from your current
Bluetooth device.
Page 8

336801
4.8 Alarm Mode
Two alarm are available on this DAB Radio. You can set up your alarm with the following steps.
4.8.1 Setting the up your Alarm
1. Press the ALARM button once to select Alarm 1.
2. Press the SELECT button once (without turning the STATION button) to enter the Alarm
Set-up Wizard.
3. The Hours section will fl ash, you can select the hour required. Press SELECT to confi rm.
4. The Minutes section will fl ash, your can select the minute required. Press SELECT to confi rm.
5. The Duration will fl ash, you can select the length of the alarm duration between 15 / 30 / 45 /
60 / 90 / 120 minutes. Press SELECT to confi rm.
6. The Source will fl ash, you can select the Alarm Source : <FM> / <DAB> / <Buzzer>. Press
SELECT to confi rm.
7. If you choose FM or DAB, you can select either your “Last Listened” or “Preset Station List”
radio station. Press SELECT to confi rm.
8. Now you can select the Alarm Repeat sequence : <Once> / <Daily> / <Weekends> /
<Weekdays>. Press SELECT to confi rm.
If you selected <ONCE> as your Alarm Type, you will be required to enter the Date for your
Alarm to Sound.
9. Now you can select the Alarm Volume, Turn the STATION button to select the Alarm-Volume
Levels. Press SELECT to confi rm. The volume will increase gradually to reach the level you
have set.
10. Turn the STATION button to activate this alarm or press SELECT once to de-active it.
11. Now the Alarm is saved.
12. If the Alarm is Activated, the display will show an Alarm icon with 1 or 2 depending on which
Alarm you just activated.
If you want to set up Alarm 2, Press ALARM button twice to select Alarm 2.
Repeat Step 2-12 above.
4.8.2 Turn ON / OFF Alarm
If you have not setup any alarm, please take Step 4.8.1 to set up your Alarm.
1. Press ALARM button once for Alarm 1 (press twice for Alarm 2).
2. Turn the STATION button.
3. Select <ON> or <OFF> for this alarm.
4. Press SELECT to confi rm.
5. The Alarm Icon will be appear (for activated Alarm) or disappear (for inactive Alarm).
Page 9

336801
5 Menu Mode
Press the MENU button to allow you to access the Menu of the DAB Radio. Choose between:
Full Scan *
Manual tune *
DRC *
Prune *
Scan Setting **
Audio Setting **
System
* Only available on DAB Mode
** Only available on FM Radio Mode
Turn the Station knob to select your desire menu.
5.1 DAB Radio
5.1.1 Full Scan (DAB Mode Only)
1. Short press the MENU button to enter the menu.
2. Turn the STATION button to choose <Full Scan> and press SELECT button to confi rm.
3. The unit will preform a Full Scan on the DAB Radio signal in your area.
Note: If no station is found. Please extend or move the antenna or do the full scan again in another
open area.
5.1.2 Manual Tune (DAB Mode Only)
As well as the normal method of scanning, you can also manually tune to a particular channel or
frequency. This can be useful for adjusting your antenna to achieve the best possible reception
and scanning a particular channel to update the station list.
1. Short press the MENU button to enter the menu.
2. Turn the STATION button to choose <Manual Tune> and press SELECT button.
3. Turn the STATION button to select and press SELECT button to confi rm the change of
particular frequency range.
Page 10

336801
5.1.3 DRC (DAB Mode Only)
This Dynamic Range Control function reduces the difference between the loudest and Quietest
audio being broadcast. Effectively, this makes quiet sounds comparatively louder, and loud sounds
comparatively quieter. Options: off (default) / low / high
1. Short press the MENU button to enter the menu.
2. Turn the STATION button to choose DRC and press SELECT button to confi rm.
3. Turn the STATION button to select and press SELECT button to confi rm the change of
particular option.
5.1.4 Prune
This removes all invalid stations indicated in the station list with ‘a’ ‘?’ in front of the station name.
1. Short press the MENU button to enter the menu.
2. Turn the STATION button to choose Prune and press SELECT button to confi rm.
3. Turn the STATION button to select yes and press SELECT button to confi rm.
5.2 FM Radio
5.2.1 Scan Setting (FM Mode Only)
This allows your Radio station to pick up Stations with a better signal.
Turn the STATION button to choose between <Strong Station Only> or <All Station> and Press
SELECT to confi rm.
5.2.2 Audio Setting (FM Mode only)
By default, all stereo stations are reproduced in stereo. For weak stations, this may result in poor
quality audio. The audio quality can be improved using mono.
1. Turn the STATION button to choose Audio Setting and press SELECT button to confi rm.
2. Turn the STATION button to select and press SELECT button to confi rm the change between
<Stereo allowed> or <Forced mono>.
5.3 System (All Mode)
On this menu, it allows you to confi gure some parameters on your DAB Radio to suit your personal
preferences.
5.3.1 Sleep
Sleep options: Off | 15 | 30 | 45 | 60 | 90
1. Short press the MENU button to enter the menu.
2. Turn the STATION button to choose System and press SELECT button to confi rm.
3. Turn the STATION button to choose Sleep and press SELECT button to confi rm.
4. Turn the STATION button to select and press SELECT button to confi rm the option, then the
count down will start automatically.
Page 11

336801
5.3.2 Set Time / Date
You can set up the time and date manually.
1. Short press the MENU button to enter the menu.
2. Turn the STATION button to choose System and press SELECT button to confi rm.
3. Turn the STATION button to choose Time and press SELECT button to confi rm.
4. Turn the STATION button to choose <Set Time/Date>.
5. The Hour part will fl ash. Turn the STATION button to set the hour for alarm, press SELECT to
confi rm.
6. The Minute part will fl ash. Turn the STATION button to set the minute for alarm, press
SELECT to confi rm.
7. The Date part will fl ash. Turn the STATION button to set the minute for alarm, press SELECT
to confi rm.
8. The Month part will fl ash. Turn the STATION button to set the minute for alarm, press SELECT
to confi rm.
9. The Year part will fl ash. Turn the STATION button to set the minute for alarm, press SELECT
to confi rm.
10. Now the Time will be saved.
11. If you didn’t press SELECT for more then 3 seconds, the time will not be saved and it will exit
the Time/Date setting.
5.3.3 Auto Update the time
1. Short press the MENU button to enter the menu.
2. Turn the STATION button to choose System and press SELECT button to confi rm.
3. Turn the STATION button to choose Time and press SELECT button to confi rm.
4. Turn the STATION button to choose <Auto update> and press SELECT button to confi rm.
5. it allows you to choose between 4 options:
<Update from Any> / <Update from DAB> / <Update from FM> / <No Update>
6. Press SELECT button to confi rm.
5.3.4 Set 12/24 Hour
1. Short press the MENU button to enter the menu.
2. Turn the STATION button to choose System and press SELECT button to confi rm.
3. Turn the STATION button to choose Time and press SELECT button to confi rm.
4. Turn the STATION button to choose <Set 12/24 hour>.
5. Turn the STATION button to choose <12 Hour> / <24 Hour> for time display, and press
SELECT button to confi rm.
Page 12

336801
5.3.5 Set Date Format
1. Short press the MENU button to enter the menu.
2. Turn the STATION button to choose System and press SELECT button to confi rm.
3. Turn the STATION button to choose Time and press SELECT button to confi rm.
4. Turn the STATION button to choose <Set date format>.
5. Turn the STATION button to select <DD-MMYYYY> / <MM-DD-YYYY> for date display
format, and press SELECT button to confi rm.
5.3.6 Backlight
This Setting allows you to adjust the brightness of the Backlight.
1. Short press the MENU button to enter the menu.
2. Turn the STATION button to choose System and press SELECT button to confi rm.
3. Turn the STATION button to choose Backlight and press SELECT button to confi rm.
4. Turn the STATION button to choose <On level> or <Standby Level>.
For On Level: <Low> / <Medium> / <High>
For Standby Level : <Low> / <High>
5. Press SELECT button to confi rm.
5.3.7 Language
This Setting allows you to select your DAB Radio menu language.
Available Language are : English /Suomi / French / Dutch / Italian / Norwegian / Polish / Slovensky
/ Svenska / Cestina / Danish / Nederlands.
5.3.8 Factory Reset
This Setting allows you to reset the DAB Radio to it initial status.
5.3.9 SW version
This setting shows the DAB Radio Firmware version.
Page 13

336801
6 Troubleshooting
In the unlikely event of diffi culties with your appliance please follow the trouble shooting guide
below.
If the problem persists, contact the retailer if the machine is still under guarantee.
PROBLEM Reason(s) Solution(s)
No Power • Power cable not connected
to wall socket
• Power socket is not
switched on
• Make sure the plug is
connected
• Switch the power on
No Sound from Line input • Volume is too low
• Line source volume is too
low
• Increase the volume
• Increase the output
volume of the Line source.
Sound is distorted
Sound is distorted from
Line input
• Volume is too high
• Line source volume is too
high
• Reduce the volume
• Reduce the output volume
of the Line input Source.
Static Sound or No
sound in Radio
• Poor reception • Re-locate the antenna
Page 14

336801
7 Technical Specifi cation
336801
Power Supply
Mains adaptor : 100-240V ~ 50/60Hz
Mains Adapter output: DC 6V, 1000mA
Power Consumption
6 Watts
Battery 4 x “C” (UM2) Batteries
AUX in 3.5mm Stereo Socket
Tuner
DAB 174MHz - 240Mhz
FM 87.5 - 108MHz
Audio
Output Power 2W x 2 (RMS)
Speaker impedance 4 ohms
BlueTooth
Frequency band 2.400GHz - 2.480GHz
Compatible Bluetooth
Profi le:
A2DP (Advanced Audio Distribution Profi le), AVRCP (Audio/Video Remote Control Profi le)Bluetooth 2.1 +EDR
Page 15

336801
Page 16

336801
8 Customer Support
For all product support, please email:
goodmans@bmstores.co.uk
This product is intended for use within the UK
Declaration of Conformance
the full text of the EU declaration of conformity is available at the following
Internet address:
http://www.bmstores.co.uk/technical-information
 Loading...