

USER MANUAL
MODEL: 336723
CD MICRO SYSTEM
WITH BLUETOOTH STREAMING

336723
Welcome1
Troubleshooting
5
Technical Specifications
6
Customer Support
7
Your CD Micro system
2.1 In The Box
2.2 Main Unit & Remote Control
2
Quick Setup
3.1 Fitting Remote battery
3.2 Connecting the Power
3.3 Standby & Auto Standby
3.4 Adjusting the Volume
3.5 Mute Function
3.6 X-Bass
3
Operational4
Basic CD operation
4.1 Load a Disc
4.2 Play a Disc
4.3 Skipping tracks
4.4 Searching tracks
4.5 Repeat & random function
4.6 Program function
Radio Operation
4.7 Full Scan
4.8 Radio station presets
Aux Input Operation
4.9 Line In Mode
Bluetooth Operation
4.10 Connecting & controlling a Bluetooth
3.7 EQ Operation
3.8 Source Modes
3.9 Clock &Timer
3.10 Setting the Alarms
3.11 Snooze Function
3.12 Sleep Function

336723
Welcome
Thank you for choosing Goodmans. We’ve been making electronics for the British
people for over 70 years. Each of our products have been carefully and
passionately designed to stand the test of time. We hope you enjoy your new CD
Micro system.
1
Your CD Micro System2
2.1
Mains Power
Your CD Micro system requires a mains supply of 100-240V ~ 50/60Hz.
Please ensure that your mains supply is compatible before use.
We recommend using only the official Goodmans power cord (as supplied).
Disconnect the power cord from the mains when not in use.
Position of Your CD Micro System
Place on a flat, stable surface that is not subject to vibrations. Avoid the following
locations:
• Where it is exposed to direct sunlight
• Where it is close to heat radiating sources
• Where the humidity is high and ventilation is poor
• Where it is dusty
Adjusting the Antenna
Fully extend the antenna to ensure good reception in FM Radio modes.
It may be necessary to alter the position of Your CD Micro system
and/or the antenna to achieve the best signal.
In The Box
Carefully remove your CD Micro system from the packaging.
Inside the box you will find:
• CD Micro system
• Remote Control
• Mains Adaptor
• Quick Start Guide
• Guarantee Booklet
336723
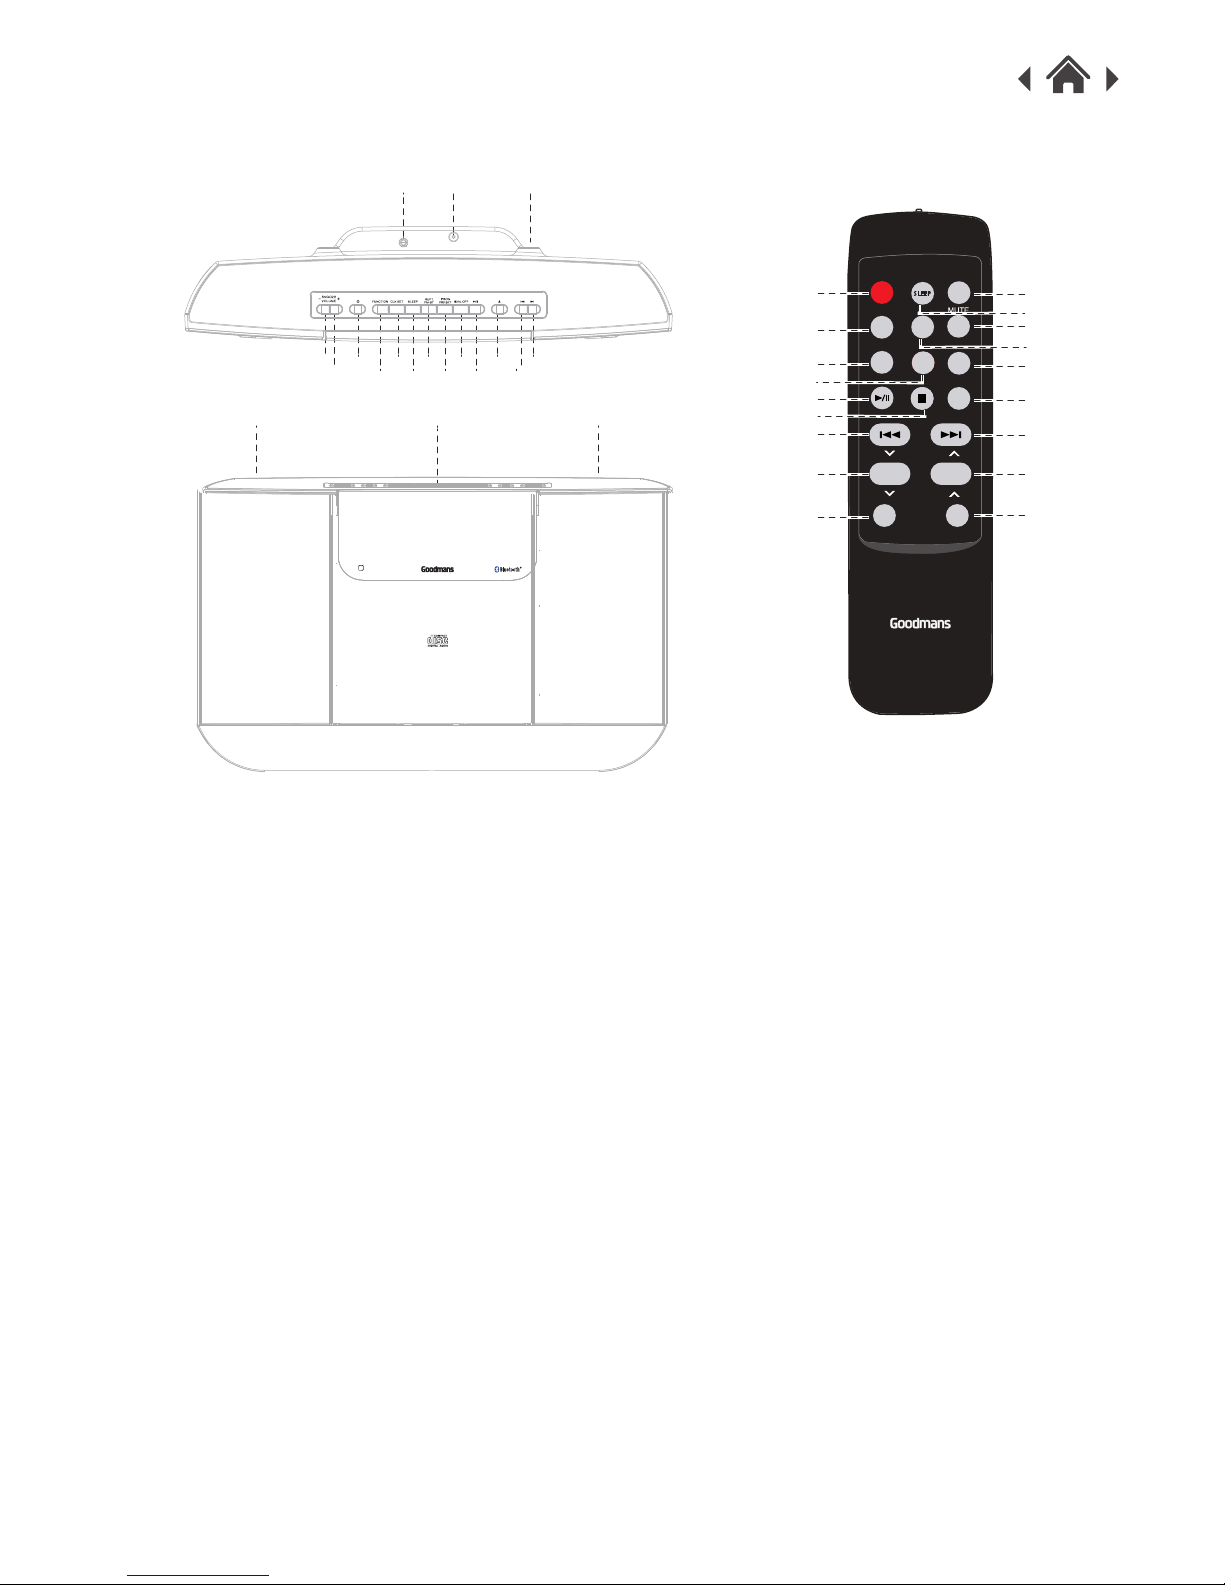
2.2 MAIN UNIT & REMOTE CONTROL
1. SNOOZE/VOLUME - Press to decrease the volume level or delay
the alarm for 9 minutes.
2. SNOOZE/VOLUME + Press to increase the volume level or delay the
alarm for 9 minutes.
3. STANDBY button Press to wake up or enter STANDBY mode.
4. FUNCTION button Press to skip between FM,CD,BT&Line In modes
5. CLOCK SET button Press and hold the button to access the timer
on/off setup menu.
6. SLEEP button Press to select the desired sleep timer or press the
button repeatedly to select “sleep off”.
7. REPEAT/FM STEREO button Press to repeat playback modes or
switch between FM stereo/mono modes..
8. PROG./PRESET button Press to program an alternative playback
sequence on a single disc or radio station presets.
9. STOP/ALARM OFF button Press to stop playing or alarm off.
10. PLAY/PAUSE button Press to play or pause.
11. EJECT button Press to open or close the CD door
Your CD Micro System2
1
2
3
4
5
6
7
8
9 11
10 12
13
14 15 16
17 18 17
CLOCK
STAND BY
OP E N /C LO S E
V OL +
V OL -
TUNER
AL1 AL 2
SNOOZE
SOURCE
E Q
PRESET
PLAY MODE
P R OG SCAN
CLK
UNPAIR
S LE E P
X-BASS
19
20
21
22
23
24
25
26
27
28
29
30
31
32
34
35
36
33

336723
Your CD Micro System2
12. SKIP button
13. SKIP button
14. Line In Socket (Audio input)
15. DC Power Input
16. Antenna
17. Speakers
18. LED Display
19. STANDBY button Press to turn on the unit
20. SOURCE button Press to skip between FM/CD/ BT/LINE-IN modes
21. PLAY MODE button Press to skip between repeat & random
function or FM stereo mode.
22. ALARM 1 button Press to set up alarm 1
23. PLAY / PAUSE/ AUTOSCAN button
24. STOP / UNPAIR button
25. SKIP button
26. PRESET DOWN button
27. VOLUME - button
28. OPEN / CLOSE button
29. SLEEP button
30. MUTE button
31. EQ / X-BASS button
32. ALARM 2 button
33. PROG/CLOCK button
34. SKIP button
35. PRESET UP button
36. VOLUME + buttons
 Loading...