

Page 1
DAB Micro System
REPEAT
LINE-IN
MODEL: 335105
USER MANUAL
Page 2

1 Welcome
2 Your DAB Micro System
2.1 In the box
2.2 Mains Power
2.3 Positioning your DAB Micro System
2.4 Adjusting the Antenna
2.5 Front View
3 Quick Setup
3.1 Connecting the Power
3.2 Adjusting the volume
3.3 Switching Modes
4 Operation
DAB Operation
4.1 Using DAB For
4.2 Positioning the Antenna
4.3 Full Scan
4.4 Manual Tuning
4.5 Pruning
4.6 DRC (Dynamic Range Control)
4.7 Storing a DAB Station Preset
4.8 Recalling a DAB Station Preset
4.9 DAB Display
4.10 Tuning a Station
4.11 Positioning the Antenna
the First Time
Information
4.12 Scan Modes
Page 3

4.13 Stereo / Mono Modes
4.14 Storing a FM Station Preset
4.15 Recalling a FM Station Preset
4.16 FM Display Modes
CD Operation
4.17 Load a Disc
4.18 Play a Disc
4.19 Skip Tracks and Search
4.20 Repeat Single/All Track(s)
Bluetooth Operation
4.21 Connecting a Bluetooth Device
4.22 Controlling a Connected Device
4.23 NFC Pairing
Line In Operation
4.24 Line In Mode
Headphone Socket
4.25 Using Headphones / Earphones
Factory Reset
4.26 Factory Reset
5
Troubleshooting
6 Technical Specifications
7 Customer Support
Page 4

1 Welcome
DAB Micro System
Power Adapter
Quick Start Guide
Guarantee and Safety Booklet
User Manual
Where it is exposed to direct sunlight
Where it is close to heat radiating sources
Where the humidity is high and ventilation is poor
Where it is dusty
Thank you for choosing this Goodmans product. We’ve been making electronics for the
British people for 90 years. Each of our projects has been carefully designed to be great at
what it does and this one is no exception. We hope you enjoy your new DAB Micro
System.
2 Your DAB Micro System
2.1 In the box
Carefully remove your DAB Micro System from the packaging.
Inside the box you will find:
2.2 Mains Power
Your Micro System uses a 12V 1A power adapter. Please ensure that your mains supply is
compatible before use. Disconnect the power adapter from the mains when not in use.
2.3 Positioning your DAB Micro System
Place on a flat, stable surface that is not subject to vibrations. Avoid the following locations:
2.4 Adjusting the Antenna
Fully extend the antenna to ensure good reception in both DAB and FM Radio modes. It
may be necessary to alter the position of the Micro System and/or the antenna to achieve
the best signal.
Page 5
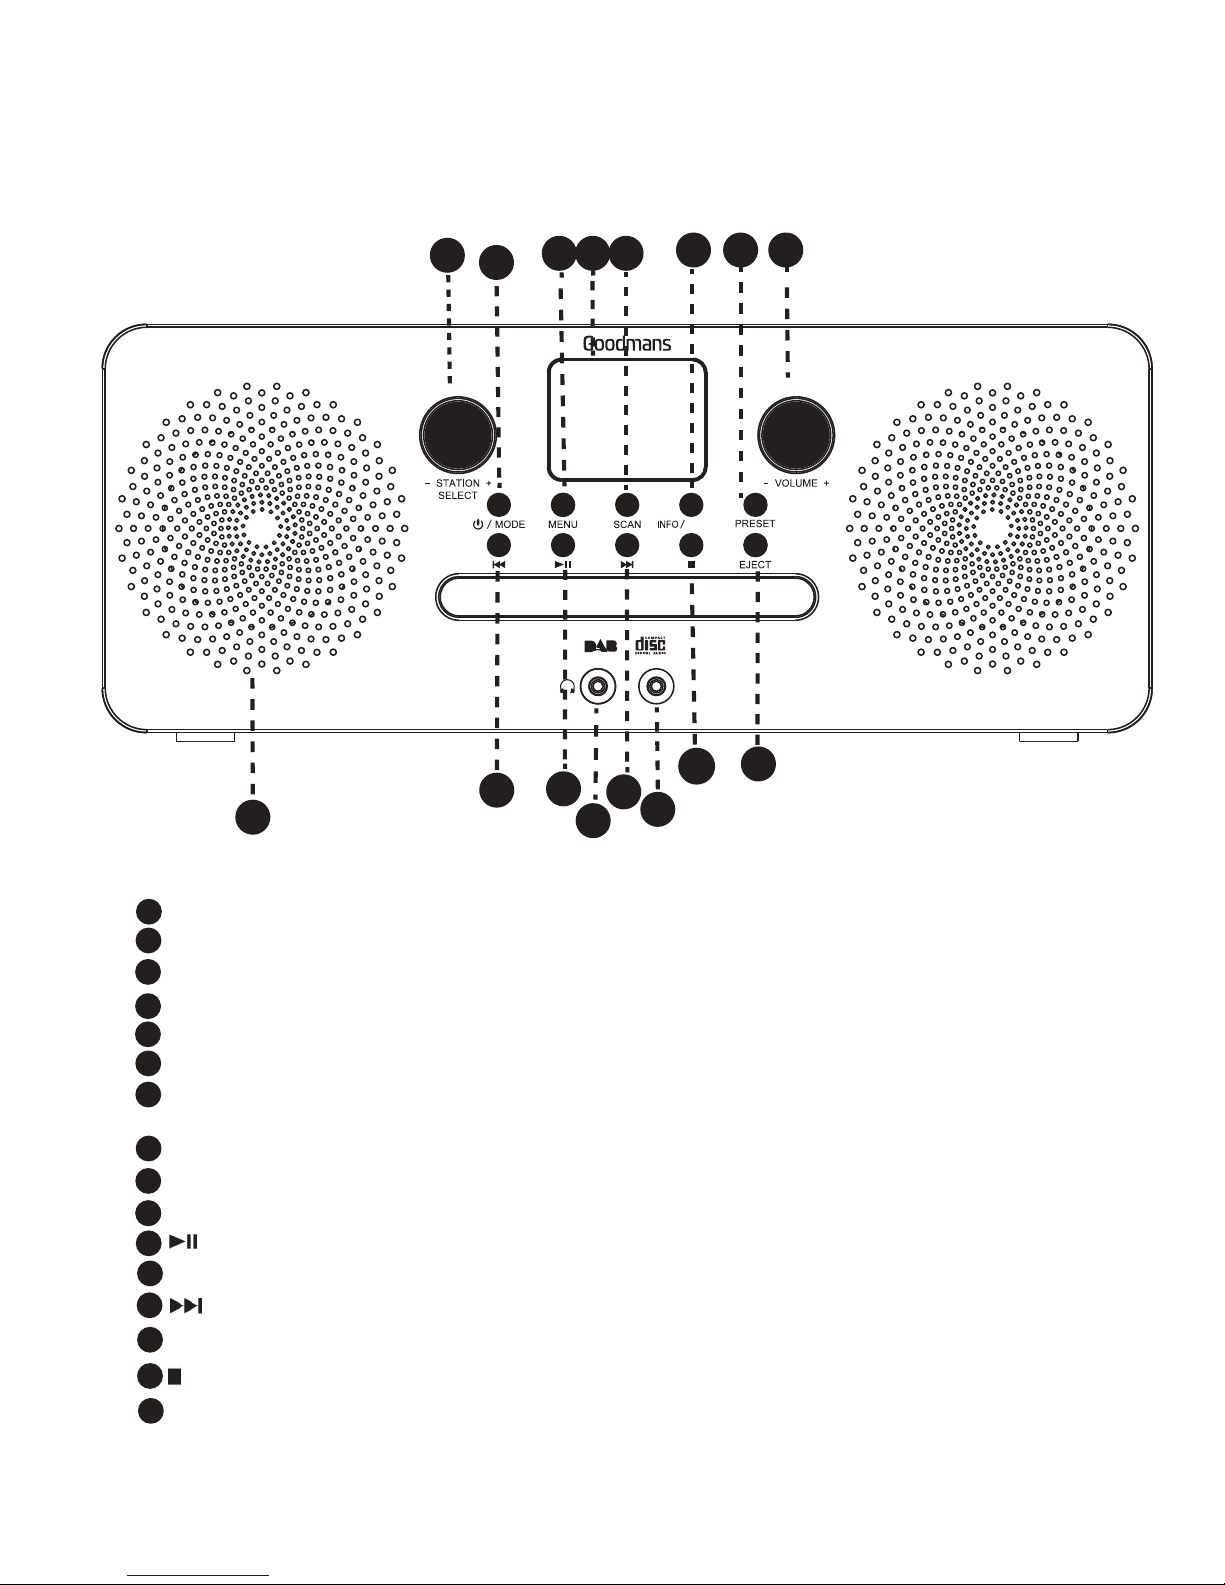
2.5 Front View
A
B
5
C D E
F G
REPEAT
LINE-IN
O
J
I
K
M
L
N
H
P
A
Station/Select,rotate to increase or decrease frequency, go to previous function , go to previous or next track
B
Power/ mode,power on/off,press and release "mode"to switch to FM/CD/BT//DAB/LINE IN
B
B
B
C
Menu
,click to select function
LCD display
D
E
Scan,scan DAB radio stations, hold to auto scan FM stations fast forward
F
Info/repeat,repeatedly press and release to check radio station information
G
Preset,press and hold to preset/ autoscan FM stations fast forward/enter program setting,press and release
to recall / auto scan FM stations fast backward
H
Volume ,rotate to increase or decrease volume
I
Speaker
J
K
M
N
O
,press to previous station/function/ track, hold to fast backward, back by 0.05MHz
,press and release to play/pause
L
Headphone jack
,press to next station/function/ track,hold to fast forward, forward by 0.05MHz
Line in, play music from your device through this connection
N
,press and release to stop,twice to cancel program, hold to clear all previous devices records
O
P
Eject, to eject CD door, press again to close CD door
Page 6

2.6 Rear View
Q
DC 12V
R
R
Telescopic antenna
Q
Feet
3 Quick Setup
3.1 Connecting the Power
1. Insert the power adapter to the 12V DC socket on the rear of your DAB Micro System.
2. Insert the power adapter into a suitable mains socket.
3. Press the Power/Mode button on the front of your DAB Micro System.
3.2 Adjusting the volume
1. Rotate the volume control clockwise or anti-clockwise to increase or decrease the
volume output.
Page 7

3.3 Switching Modes
1. Press the MODE button on the front panel to cycle through the options DAB, FM, CD,
Bluetooth and Line In.
4 Operation
DAB Operation
4.1 Using DAB For the First Time
1. After switching to DAB input mode for the first time a full scan of DAB stations is
performed automatically.
During the full scan mode, the LCD will display a slide bar that indicates the progress of
the scan, and the amount of radio stations that have been found so far. Once the scan has
finished, the radio will select the first alphanumeric station.
NOTE: The station name will be shown on the top of the display. Information about the
DAB radio station will also be displayed.
2. To listen to the located DAB stations use the >>| / |<< buttons. When you reach the
desired station the DAB Micro System will automatically tune to that station and begin
playback.
NOTE: If no stations were found, or no DAB stations can be received currently [No stations
found] will be displayed. In this case you may need to perform another station scan.
4.2 Positioning the Antenna
Positioning of the aerial will influence the DAB signal quality.
1. To find the optimum position, select the signal error indicator by cycling through the
display modes using the INFO button.
2. Once the indicator is displayed, move the aerial and observe the signal level as shown
by the bar graph. When you are happy with the positioning, perform a scan to capture all
of the available stations.
4.3 Full Scan
1. To activate the full scan press the MENU button.
Page 8

2. Select the <Full scan> option and press the centre of the SELECT button. The unit will
search for all available DAB stations that can be tuned to.
4.4 Manual Tuning
As well as an auto tune function, you can manually tune the receiver.
1. Press the MENU button in DAB mode, and use the SELECT button to find <Manual
tune> .
2. Press the centre of the SELECT button to activate the manual tune options.
3. Now use the SELECT button to cycle through the DAB ensembles/multiplexes, which
are numbered from 5A to 13F.
4. Press the centre of the SELECT button to view the ensemble/multiplex details.
5. Any stations found during the manual tune operation will be added to your station list.
4.5 Pruning
When the DAB Micro System has performed a Scan in several locations you may find
there are stored stations that you can no longer receive. This function automatically
removes them from the stored station list.
1. Press the MENU button in DAB mode, then use the SELECT button to find <Prune
Invalid>. Press the centre of the SELECT button.
2. Use the SELECT button to select YES and then press the centre of the SELECT button.
4.6 DRC (Dynamic Range Control)
This function causes the radio to reduce the dynamic range of the audio signal. The
purpose of this is to adapt the dynamic range of the audio signal to listening in a noisy
environment. This is not available on some DAB stations.
1. Press the MENU button in DAB mode and use the SELECT button to find <DRC>.
2. Press the centre of the SELECT button.
3. Choose between DRC off, DRC Low and DRC High using the SELECT button.
4. Press the centre of the SELECT button to save the setting.
Page 9

4.7 Storing a DAB Station Preset
It is possible to store up to 10 of your favourite DAB stations. This will enable you to
access your favourite stations quickly & easily.
1. To store a preset, you must first be listening to the station that you would like to save.
2. Then press & hold the PRESET button.
3. Use the SELECT button to choose an available preset location.
4. Press the centre of the SELECT button to save the preset.
4.8 Recalling a DAB Station Preset
1. To recall a station, press the PRESET button.
2. Use the SELECT button to choose the preset that you want to listen to.
3. Press the centre of the SELECT button to tune to the preset.
4.9 DAB Display Information
When listening to a DAB station you can change the information that will appear on the
display. There are several different types of information that may be sent by the
broadcaster. To change the display information, press the INFO button.
• DLS (Dynamic Label Segment): This is scrolling text information such as the name of an
artist, music title, DJs name or the contact details of the broadcaster.
• PTY (Program type): This describes the “Style” or “genre” of music that is being
broadcast e.g. “Rock “or “Classical”.
• Multiplex Name: Displays the multiplex name such as ‘BBC National DAB’.
• Frequency: Displays the frequency details of the station you are listening to.
• Signal Error: Displays the signal error rate of the station you are listening to.
• Time & date: The time & date is set automatically from the DAB or FM broadcast.
Some DAB radio stations may also broadcast image data. This may be the album art, or
the logo of the radio station being listened to. To increase the image size press the centre
of the SELECT button.
Page 10

Using FM Radio Mode
4.10 Tuning a Station
1. You can scan up or down the frequency range manually by pressing the >>| / |<<
buttons to increase or decrease the frequency in 0.05 MHz increments.
2. To scan through the frequency range quickly press and hold either >>| / |<< buttons.
3. Once a station has been found, the scanning will stop automatically. If no station is
found, then the tuning will stop once it has cycled through the entire FM band (87.5 108MHz).
4.11 Positioning the Antenna
Positioning of the aerial will influence the FM signal quality.
Make sure that the telescopic antenna on the rear of the DAB Micro System is fully
extended and in a vertical position. This will ensure that the maximum signal strength is
available.
4.12 Scan Modes
When performing a scan you can set the sensitivity level of the stations to be found. EG:
strong signals only or all stations.
1. In FM mode, press the MENU button, when <Scan Setting> appears on the display
Press the centre of the SELECT button to view the submenu.
2. Use the SELECT button to select ALL STATIONS (which will detect any station, even
with a weak signal) or STRONG STATION (which will only detect stations with a good
signal strength). Press the centre of the SELECT button to select the required option.
4.13 Stereo / Mono Modes
Sometimes Stereo radio stations can suffer from interference (static & crackles) to reduce
this problem you can enable MONO mode.
1. In FM mode, press the MENU button.
2. Using the SELECT button choose <Audio Setting> and then press the centre of the
SELECT button.
3. Use the SELECT button to choose between STEREO ALLOWED or FORCED MONO.
Page 11

4. Press the centre of the SELECT button to select the required option.
4.14 Storing a FM Station Preset
It is possible to store up to 10 of your favourite FM stations. This will enable you to access
your favourite stations quickly & easily.
1. To store a preset, you must first be listening to the station that you would like to save.
2. Then press & hold the PRESET button.
3. Use the SELECT button to choose an available preset location.
4. Press the centre of the SELECT button to save the preset.
4.15 Recalling a FM Station Preset
1. To recall a station, press the PRESET button.
2. Use the SELECT button to choose the preset that you want to listen to.
3. Press the centre of the SELECT button to tune to the preset.
4.16 FM Display Modes
Every time you press the “INFO” button, the display will cycle through the following display
modes:
• Radio text: Broadcasters can include a scrolling text that displays information about the
current program. If radio text is not available, then the display will show ‘NO RADIOTEXT’.
• Program type: This describes the “Style” or “genre” of music that is being broadcast e.g.
“Rock “or “Classical”.
• Program name: Displays the name of the current station.
• Audio mode: Displays the current FM mode of STEREO or MONO.
• Time & date: The time & date is set automatically from the DAB or FM broadcast.
Page 12

CD Operation
4.17 Load a Disc
1. Open the CD drawer by pressing the EJECT button.
2. Load a disc onto the disc tray with the label side facing up.
3. Press the EJECT button once more to close the CD door.
4.18 Play a Disc
1. Follow the steps above to load a disc (if not already completed).
2. The player will begin to read the disc immediately.
3. When the disc is successfully read press the PLAY/PAUSE button to begin playback.
4. Press the PLAY/PAUSE button once to pause the music playback.
4.19 Skip Tracks and Search
1. Press the >>|button once during playback to skip to the next track. To skip to a specific
track, press this button several times until you reach the track number required.
2. Press the |<< button once during playback to return to the beginning of the current
track. Press the |<< button twice repeatedly to skip to the previous track. To skip back to
a specific track, press this button several times.
3. Hold the >>| button during playback to fast forward the current track.
4. Hold the |<< button during playback to fast rewind the current track.
4.20 Repeat Single/All Track(s)
1. During playback pressing the REPEAT button will flag the current track to repeat
indefinitely. You will see " " on the display.
2. Pressing the REPEAT button again will repeat all tracks on the disc. You will see " "
on the display.
3. To cancel the repeat function press the REPEAT button for a third time.
Page 13

Bluetooth Operation
4.21 Connecting a Bluetooth Device
When using the Bluetooth connection, you can listen to audio wirelessly from a Bluetooth
audio device (For example an MP3 player) within 10 metres of the Micro System.
1. When Bluetooth mode is selected the words ‘Disconnected will show on the display.
This means the unit is in connection mode and will pair with any previously connected
devices.
2. If you have not connected a device before you can now enable ‘discovery’ mode on
your device and select the ‘GOODMANS DABHIFI’ Bluetooth connection. If you are asked
for a pass code enter ‘0000’.
If you turn off either device before pairing is complete the process will need to be repeated
when powered ON again.
3. Once paired a beep will be heard and the display will change to ‘CONNECTED’.
The volume output is affected by the volume level on the audio source EG: Phone or
laptop, so make sure that is set to about 70-80% (not too loud to avoid distortion).
4.22 Controlling a Connected Device
Once connected you can either use the controls on the audio device to begin playback,
skip tracks etc. Or you can use the control buttons on the front panel of the unit.
1. The PLAY/PAUSE button when pressed will begin playback of the selected track on the
audio device. Press again to pause playback.
2. To skip to the next track press the >>| button.
3. To skip to the previous track press the <<| button.
4.23 NFC Pairing
Your DAB Micro System has an NFC connection point on the top panel of the unit.
1. When Bluetooth mode is selected the words ‘Disconnected will show on the display.
This means the unit is in connection mode and will pair with any previously connected
devices.
2. simply touch your NFC enabled device on the top panel and it will automatically pair
with your device.
Page 14

Line In Operation
4.24 Line In Mode
It is possible to connect an external audio source like an MP3 player using a 3.5mm audio
cable (not supplied).
1. Connect one end of the cable to the AUDIO devices headphone output and the other
end to the LINE IN socket on the front of the Micro System.
2. Press the MODE button until you reach the LINE IN MODE option.
3. Adjust the volume to your desired level.
The volume output is affected by the volume level on the source EG: MP3 player so make
sure that is set to about 70-80% (not too loud to avoid distortion).
4. Use your source device to control the playback of your music.
Headphone Socket
4.25 Using Headphones / Earphones
You will require headphones or earphones fitted with a 3.5mm diameter stereo plug. The
headphone socket is located on the front panel of the unit.
Always turn down the volume before connecting headphones or earphones. Slowly raise
the volume until you reach a comfortable listening level.
Long term exposure to loud music may cause permanent hearing damage.
Factory Reset
4.26 Factory Reset
There may be times when you need to reset the unit back to its original factory setting.
1. Press the MENU button.
2. Select the <System Settings> menu and press the centre of the SELECT button to
open the menu.
3. Select <Factory Reset> and press the centre of the SELECT button.
Page 15

4. Use the SELECT button to select ‘Yes’ and press the centre of the SELECT button to
Problem
What to do
No Power
Check the mains plug is connected to the
wall socket. Switch the wall socket on.
Press the STANDBY button to wake from
Standby mode.
No sound
The volume level is too low. Increase using
the volume control.
The external audio source volume is too
low, increase the volume level.
The sound is distorted
Reduce the Micro System volume level
using the volume control.
The external audio source volume is too
high, decrease the volume level.
Unable to play a CD
Check there is a disc present in the CD
drawer.
Remove and re-insert the CD with the label
side facing upwards.
Clean the disc, it may be dirty. If
scratched, try another disc.
Static interference/Burbling sound when
listening to the radio
This is caused by poor reception. Relocate the antenna or if that fails try moving
the Micro System to a different location.
Bluetooth sound is interrupted or distorted
The unit is close to a device that generates
electromagnetic radiation. Re-locate the
Micro System away from other devices.
Obstacle(s) between the unit and the
Bluetooth audio source device. Remove
the obstacle.
factory reset the unit.
5 Troubleshooting
Page 16

6 Technical Specifications
Model Number
335105
Power Adapter
Audio Output
3W RMS x 2
Power Consumption
Radio Frequencies
DAB: 174MHZ – 240MHZ
FM: 87.5MHZ – 108MHZ
Bluetooth Pairing Name
Goodmans DABHIFI
7 Customer Support
For all product support, please email:
goodmans@bmstores.co.uk
This product is intended for use within the UK
12V 1A
12W
Declaration of Conformance
The full text of the EU declaration is available at the following internet address:
http:www.bmstores.co.uk/technical-information
 Loading...