

Page 1
USER MANUAL
MODEL: 329796
LARGE LED CLOCK RADIO
CLOCK RADIO
1200
ALARM1
ALARM2
SLEEP
Page 2

Welcome1
Troubleshooting6
Technical Specifications7
Customer Support8
Your Clock Radio
2.1 In The Box
2.2 Front View
2.3 Rear View
2
Quick Setup
3.1 Getting Your Clock Radio Ready For Use
3
Features4
Getting Your Clock Radio Ready For Use
4.1 Setting The Time And Date
4.2 Setting The Alarm
4.3 Turning The Alarm On/O
4.4 To Set The Alarm To Buzzer
4.5 Set The Alarm To Last Radio Station Played
4.6 Using The Snooze Function
4.7 Turning The Alarm O Each Day
4.8 Using The Dimmer Function
4.9 Turning The Radio On / O And Selecting The Band
5.0 Searching For Radio Stations
5.1 Using The Radio Station Preset Memory
5.2 Using The Sleep Function
Page 3

LARGE LED CLOCK RADIO
Welcome
Thank you for choosing this Goodmans product. We’ve been
making electronics for the British people for 70 years. Each of
our projects has been carefully designed to be great at what it
does and this one is no exception. We hope you enjoy your
new Alarm Clock Radio.
1
Your Radio2
In The Box
Carefully remove your Clock Radio from the box.
Inside the box you will find:
• Clock Radio
• AC Adapter
• Quick Start Guide
• Guarantee Booklet
If any of these items are missing contact
Customer Support at goodmans@bmstores.co.uk
2.1
Power
Your Clock Radio requires a mains supply of 230V AC ~ 50 Hz. or
1 X CR2025 battery (not supplied). Please ensure that your mains
supply is compatible before use. Disconnect the Power Cord
from the mains or remove the batteries when not in use.
Position of Clock Radio
Place on a flat, stable surface that is not subject to vibrations.
Avoid the following locations:
• Where it is exposed to direct sunlight
• Where it is close to heat radiating sources
• Where the humidity is high and ventilation is poor
• Where it is dusty
Adjusting the Aerial
Fully unravel the aerial to ensure good reception for the Clock Radio.
It may be necessary to alter the position of the Clock Radio and/or
the aerial to achieve the best signal.
Page 4
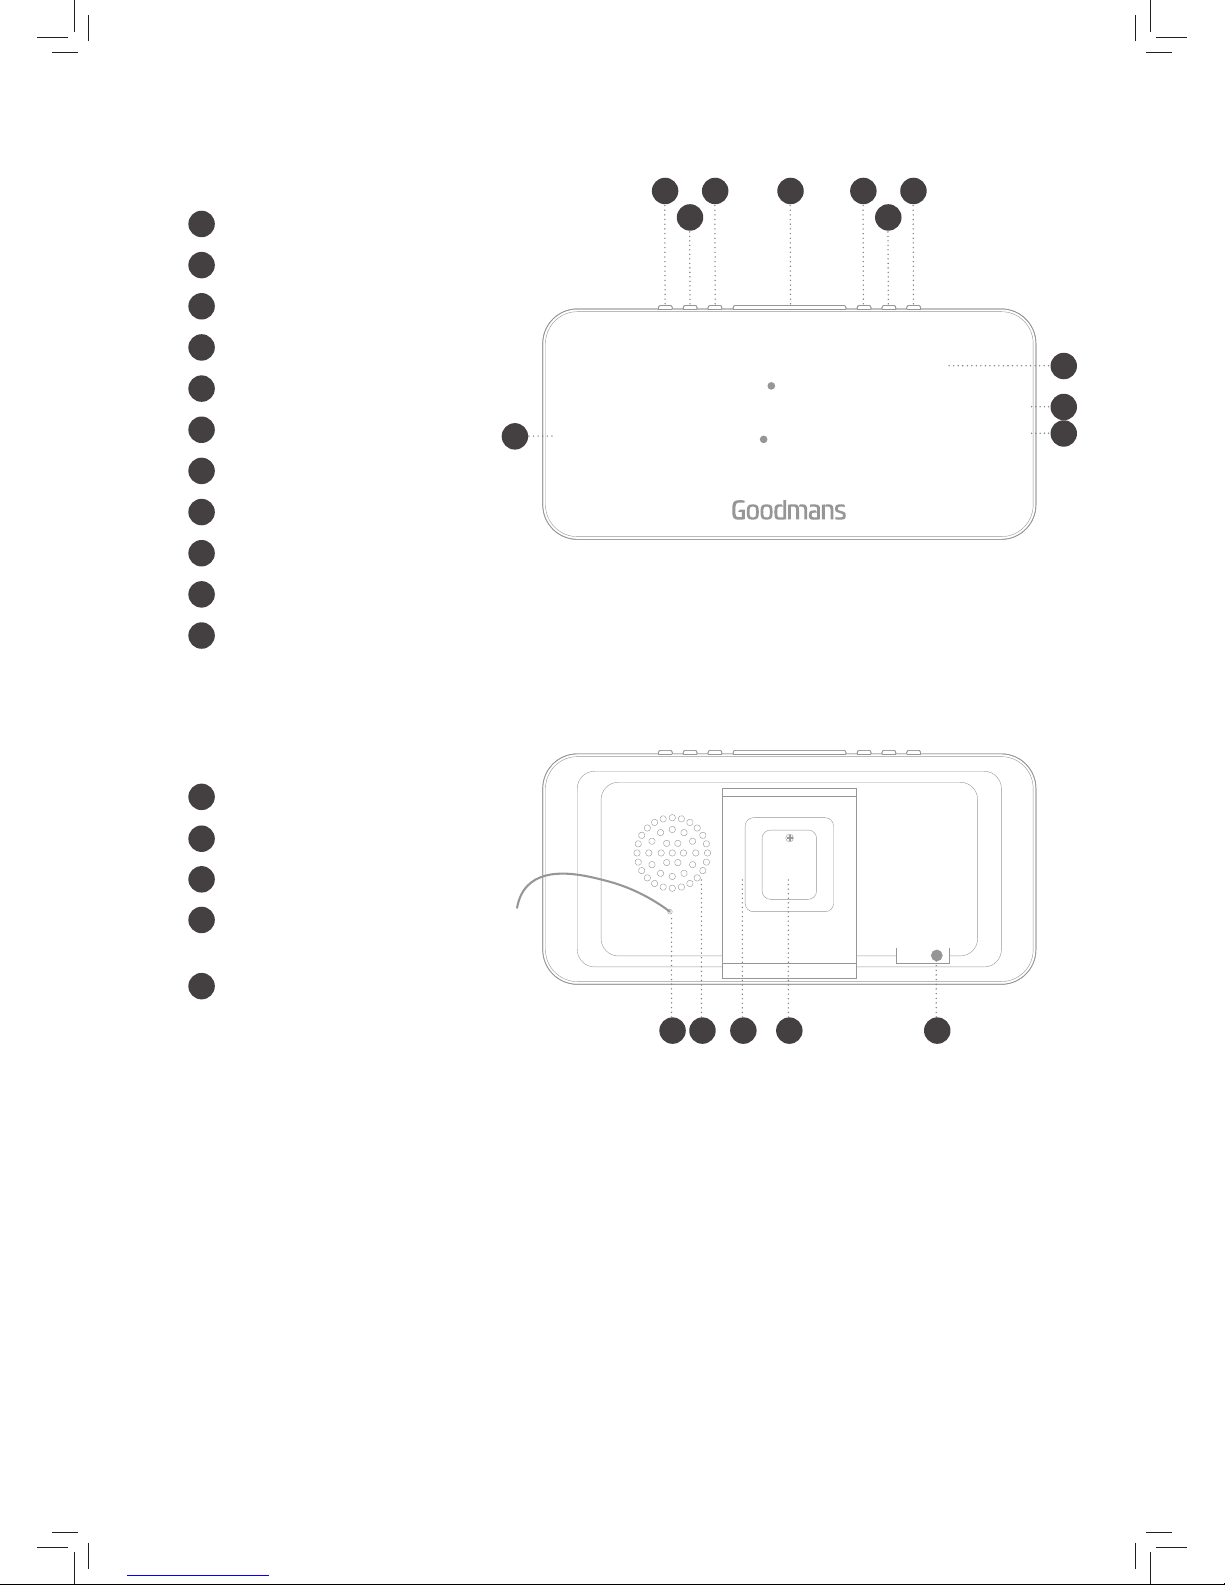
LARGE LED CLOCK RADIO
M BUTTON
LEFT BUTTON
RIGHT BUTTON
SNOOZE/SLEEP
– BUTTON
+ BUTTON
POWER
LED Display
Sleep Indicator
Alarm 1 Indicator
Alarm 2 Indicator
1200
ALARM1
ALARM2
SLEEP
Front View
Rear View
2.2
2.3
A
B
C
A EC GD
B F
D
E
F
G
H
I
J
K
I
J
J
H
Aerial
Speaker
Stand
Battery compartment
Takes 1 x ‘CR2025’ battery
AC Power
Used to connect the Radio to the
mains power supply.
L
M
N
P
O
PL M N O
Page 5

LARGE LED CLOCK RADIO
Quick Setup3
Getting Your Clock Radio Ready For Use
1. Unravel the Aerial.
2. Remove the battery compartment cover.
3. Place a CR2025 battery into the compartment, taking care of polarity.
4. Connect the power cord into the AC-ln socket
5. Connect the Power Plug to the mains socket.
6. Press the power on button.
3.1
1 2 3 5
64
Page 6

LARGE LED CLOCK RADIO
Features4
Setting The Time And Date
1. Press and hold the M button for a few seconds. The ‘hour’
digit(s) on the led display will begin to blink. Press either the
or the button to adjust the ‘hour’ digit(s). Once the
correct ‘hour’ is displayed press the M button to confirm.
2. The ‘minute’ digits will now being to blink. Press either the
or the button to adjust the ‘minute’ digits. Once the
correct ‘hour’ and ‘minutes’ are displayed press the M
button to confirm.
3. Now press either the
or the button to select 12 or 24
hour time (shown on the screen as ‘12h’ or ‘24h’). Once you
have made your selection press the M button to confirm.
4. The ‘year’ will then begin flashing, press either the
or the
button to adjust the year. Once the correct year is
displayed, press the M button to confirm.
5. The 2 numbers that are now flashing represent the current
‘month’. You can press either the
or the button to
adjust the ‘month’ and then press the M button to confirm.
6. The letter ‘d’ followed by 2 numbers will flash on the led
display. This represents the ‘day’ of the month. You can
press either the
or the button to adjust the ‘day’ and
then press the M button to confirm.
7. The led display will now show the correct time and all of the
changes you have made to the time and date will be saved.
4.1
Setting The Alarm
1. Press and hold the ‘Power’ button for a few seconds, and
begin by setting Alarm 1. The current time for Alarm 1 will
appear on the display with the ‘Hour’ digit(s) flashing along
with the Alarm 1 LED indicator.
2. Press either the
or the button to adjust the ‘Hour’
digit(s). After the desired ‘Hour’ is displayed, press the
Power button to confirm.
3. The ‘Minute’ digits will blink. Press either the
or the
button to adjust the ‘Minute’ digits. Once the correct ‘Hour’
and ‘Minutes’ are displayed press the Power Button to
confirm.
4. Next, select the days you want to set the alarm for. Press
either the
or the button to select one of the options (on
the next page) to choose the days the alarm will be
activated. Once you have selected your desired setting,
press the Power button TO CONFIRM.
5. Repeat steps 2-4 to set Alarm 2 and the Alarm 2 LED
indicator will flash. Enter the desired time for Alarm 2. Once
this is completed your settings for Alarms 1 and 2 will be
saved.
4.2
1-7: Set on Every day of the week
6-7: Set on Saturday & Sunday
1-5: Set on Monday to Friday
1: Set on Monday only
2: Set on Tuesday only
3: Set on Wednesday only
4: Set on Thursday only
5: Set on Friday only
6: Set on Saturday only
7: Set on Sunday only
SETTING UP YOUR CLOCK RADIO
Page 7

LARGE LED CLOCK RADIO
Turning The Alarm On/O
To turn the alarm on (after both alarms have been set),
determine which alarm you want to activate (alarm 1 or
alarm 2) and ensure that the alarm clock radio is in normal
mode (i.e The radio is not on). Note: when the radio is on,
the alarm 1 and alarm 2 buttons will function as volume
increase/decrease buttons.
1. The alarm can be set to sound as a buzzer or as the last
radio station played. If you set the alarm to buzzer, the alarm
will sound as a series of beeps when it is activated. If it is
set to the last radio station played, when the alarm sounds,
it will simply turn on the radio to the last radio station
played.
4.3
To Set The Alarm To Buzzer
1. The ‘-’ button is the Alarm 1 button. To activate Alarm 1,
press the ‘-’ button repeatedly until ‘bb’ is displayed on
screen. Wait a few seconds until the clock reverts back to
the current time and you will notice that the Alarm 1 LED
indicator is illuminated, this indicates that Alarm 1 is on.
2. The ‘+’ button is the Alarm 2 button. To activate Alarm 2,
press the ‘+’ button repeatedly until ‘bb’ is displayed on
screen. Wait a few seconds until the clock reverts back to
the current time and you will notice that the Alarm 2 LED
indicator is illuminated, this indicates that Alarm 2 is on.
4.4
Set The Alarm To Last Radio Station Played
1. The ‘-’ button is the Alarm 1 button. To activate Alarm 1,
press the ‘-’ button repeatedly until the frequency of the last
radio station played is displayed on screen. Wait a few
seconds until the clock reverts back to the current time and
you will notice that the Alarm 1 LED indicator is illuminated,
this indicates that Alarm 1 is on.
2. The ‘+’ button is the Alarm 2 button. To activate Alarm 2,
press the ‘+’ button repeatedly until the frequency of the last
radio station played is displayed on screen. Wait a few
seconds until the clock reverts back to the current time and
you will notice that the Alarm 2 LED indicator is illuminated,
this indicates that Alarm 2 is on.
3. Choose which alarm you want to turn OFF (Alarm 1 or
Alarm 2) and ensure that the Alarm is in normal mode (i.e.
the radio is NOT on). Press either the ‘-’ button (for Alarm 1)
or the ‘+’ button (for Alarm 2) repeatedly until ‘OFF’ is
displayed on screen. Wait a few seconds until the clock
reverts back to the current time. You will notice that the
relevant Alarm LED indicator will no longer illuminated which
indicates that the relevant Alarm is OFF.
4.5
Page 8

LARGE LED CLOCK RADIO
Using The Snooze Function
• The Alarm Clock Radio has a snooze function, which stops
the alarm from sounding for 9 minutes. This feature allows
you to ‘snooze’ and wake up more naturally.
• When the alarm sounds, simply press the SNOOZE/SLEEP
button on the top of the Alarm Clock (No.4 on the diagram
on the “Description of Parts” diagram). The alarm will then
cease and restart in approximately 9 minutes.
4.6
Turning The Alarm O Each Day
• To turn the Alarm OFF each day, simply press the Power
button. The alarm will stop sounding and will not sound
again until the next set day (i.e. if your alarm is only set for
every Monday, the alarm will not sound until the following
Monday).
4.7
Using The Dimmer Function
• The Alarm Clock Radio has a Dimmer function which allows
you reduce or increase the brightness of the LED display.
When the Alarm Clock Radio is in normal mode, (i.e. the
alarm is not sounding), simply press the SNOOZE/SLEEP
button to dim or increase the brightness.
4.8
Turning The Radio On / O And Selecting
The Band
1. To turn the radio ON, simply press the Power button once,
this will activate the FM radio.
2. If you wish to select the AM band press the Power button
once again. Pressing the Power button will toggle between
AM and FM radio.
3. To turn the radio OFF, simply press and hold down the
Power button for a few seconds until the radio ceases.
4. You can increase or decrease the Volume of the speaker,
while the radio is turned ON. Simply press the ‘-’ button to
decrease, or press the ‘+’ button. You can press the button
repeatedly or hold the button down until you reach your
desired volume level.
4.9
Page 9

LARGE LED CLOCK RADIO
Searching For Radio Stations
1. To search for radio stations, firstly ensure that the radio
function is turned ON and is set to your desired band (AM
or FM).
2. You can perform an auto search where the tuner will
automatically search up or down the frequency range and
stop on the first available station. To do this press and hold
either
or the buttons until you notice the frequencies
display on screen start to change. After the tuner stops on
the first available station, you can repeat the process until
you reach your desired station.
3. Pressing the
button will perform an auto search down the
frequency range. Pressing the button will perform an auto
search up the frequency range.
4. You can perform a manual search to find your desired
radio station. To do this, simply repeatedly press (do not
hold) either the
or the buttons to search up or down
the frequency range until you reach the desired frequency/
radio station.
5.0
Using The Radio Station Preset Memory
The Alarm Clock Radio has a 20 station memory for the FM
and AM tuners. You can save your favourite stations into the
alarm’s memory so you can quickly tune to these stations.
These pre-sets can be overwritten at any time.
1. Tune the radio to your desired station. (Refer to “turning the
radio on/o and selecting the band” section).
2. Press and hold the M button until ‘p01’ begins to flash on
screen.
3. Press either the
or the buttons to select the preset
you would like to save this to (from 1 – 20). Once you have
reached your desired preset, press the M button once to
save.
4. You can overwrite any preset at any time by following the
previous procedure and ensuring you select the correct
preset to overwrite with a new station.
5. If you would like switch to one of your saved radio stations,
simply press the M button until ‘p01’ is displayed (assuming
that you are listening to the station saved in the first preset).
Press either the
or the buttons to move up or down
your preset list. The saved stations will automatically play
as soon as they are selected. After a few seconds, the
alarm clock radio will display the time on screen once
again.
5.1
Page 10

LARGE LED CLOCK RADIO
Using The Sleep Function
1. When listening to the radio, press and hold the SNOOZE/
SLEEP button until ‘120’ is displayed on screen.
2. ‘120’ represents the number of minutes you would like the
radio to continue playing before it turns itself o. To adjust
the length of time, press the snooze button repeatedly until
you reach the desired minute setting.
3. The time will appear on the display a few seconds after you
have reached your desired setting. The sleep LED indicator
on the left side of the screen will illuminate and the clock’s
radio will automatically turn o according to your selected
time.
4. To cancel, press and hold the SNOOZE/SLEEP button until
you reach the minute select screen which will show your
preselected minutes. Press the SNOOZE/SLEEP button
again, repeatedly, until the time is displayed on screen. The
SLEEP time will be cancelled and the SLEEP LED indicator
will no longer be illuminate.
5.2
Problem What to do
The Alarm Clock Radio is not turning on.
Check that the power adaptor is correctly connected at
both ends.
There is no sound whilst in Radio Function.
Check that the volume has been correctly adjusted.
Check that the Clock is correctly set to Radio Mode.
Check other radio stations.
Crackling whilst in radio mode.
Generally caused by a weak signal.
Try adjusting the position of the antenna cable.
Try a dierent radio station with better reception.
Alarm does not function.
Ensure that the Alarm time and frequency has been
set correctly.
Ensure that the Alarm has been correctly activated.
Increase the radio volume.
Ensure the radio has been tuned correctly to a
station.
The Alarm Clock Radio did not save
original time during a power outage.
Change the back-up battery.
Troubleshooting6
Page 11

LARGE LED CLOCK RADIO
Model Number
329796
Power Supply
220-240V AC ~ 50 Hz
Adapter: AC 6V, 400mA
1 X CR2025 battery not supplied
Frequency Range FM: 87.5-108MHz
Technical Specification7
Customer Support8
For all product support, please email:
goodmans@bmstores.co.uk
329796
This product is intended for use within the UK
Declaration of Conformance
The full text of the EU declaration of conformance is available at the following
internet address:
http://www.bmstores.co.uk/technical-information
Page 12

LARGE LED CLOCK RADIO
 Loading...