

Goodmans 328763 User Manual
USER MANUAL
MODEL: 328763
CD BOOMBOX
FM ST./BT .
POWER

Welcome1
Troubleshooting5
Technical Specifications6
Customer Support7
Your CD Boombox
2.1 In The Box
2.2 Front View
2
Quick Setup
3.1 Power On/Off and Function Selection
3.2 Standby & Auto Standby
3.3 Adjusting the Volume
3
Operation4
CD Operation
4.1 Load a Disc
4.2 Play a Disc
4.3 Skip Tracks And Search For A
Specific Point To Play
4.4 Programmed Play
4.5 Repeat Single/All Track(s)
Radio Operation
4.6 Tuning a Station
2.3 Side view 1
2.4 Side view 2
3.4 Fitting Batteries
Aux-In Mode
4.7 Aux In Mode
Earphones
4.8 Connecting Earphones
Bluetooth Operation
4.9 Pairing a Bluetooth Device
4.91 Operating a Connected Device

328763
Welcome
Thank you for choosing this Goodmans product. We’ve been
making electronics for the British people for 70 years. Each of
our projects has been carefully designed to be great at what it
does and this one is no exception. We hope you enjoy your
new CD Boombox.
1
Your CD Boombox2
In The Box
Carefully remove your CD Boombox from the packaging.
Inside the box you will find:
• CD Boombox
• Mains Power Supply Lead
• Quick Start Guide
• Guarantee Booklet
2.1
Mains Power
Your CD Boombox requires a mains supply of 230-240V AC ~ 50Hz.
Please ensure that your mains supply is compatible before use.
Disconnect the power cord from the mains when not in use.
Position of CD Boombox
Place on a flat, stable surface that is not subject to vibrations. Avoid
the following locations:
• Where it is exposed to direct sunlight
• Where it is close to heat radiating sources
• Where the humidity is high and ventilation is poor
• Where it is dusty
Adjusting the Aerial
Fully extend the aerial to ensure good reception in both MW and FM
Radio modes. It may be necessary to alter the position of the CD
Boombox and/or the aerial to achieve the best signal.
328763
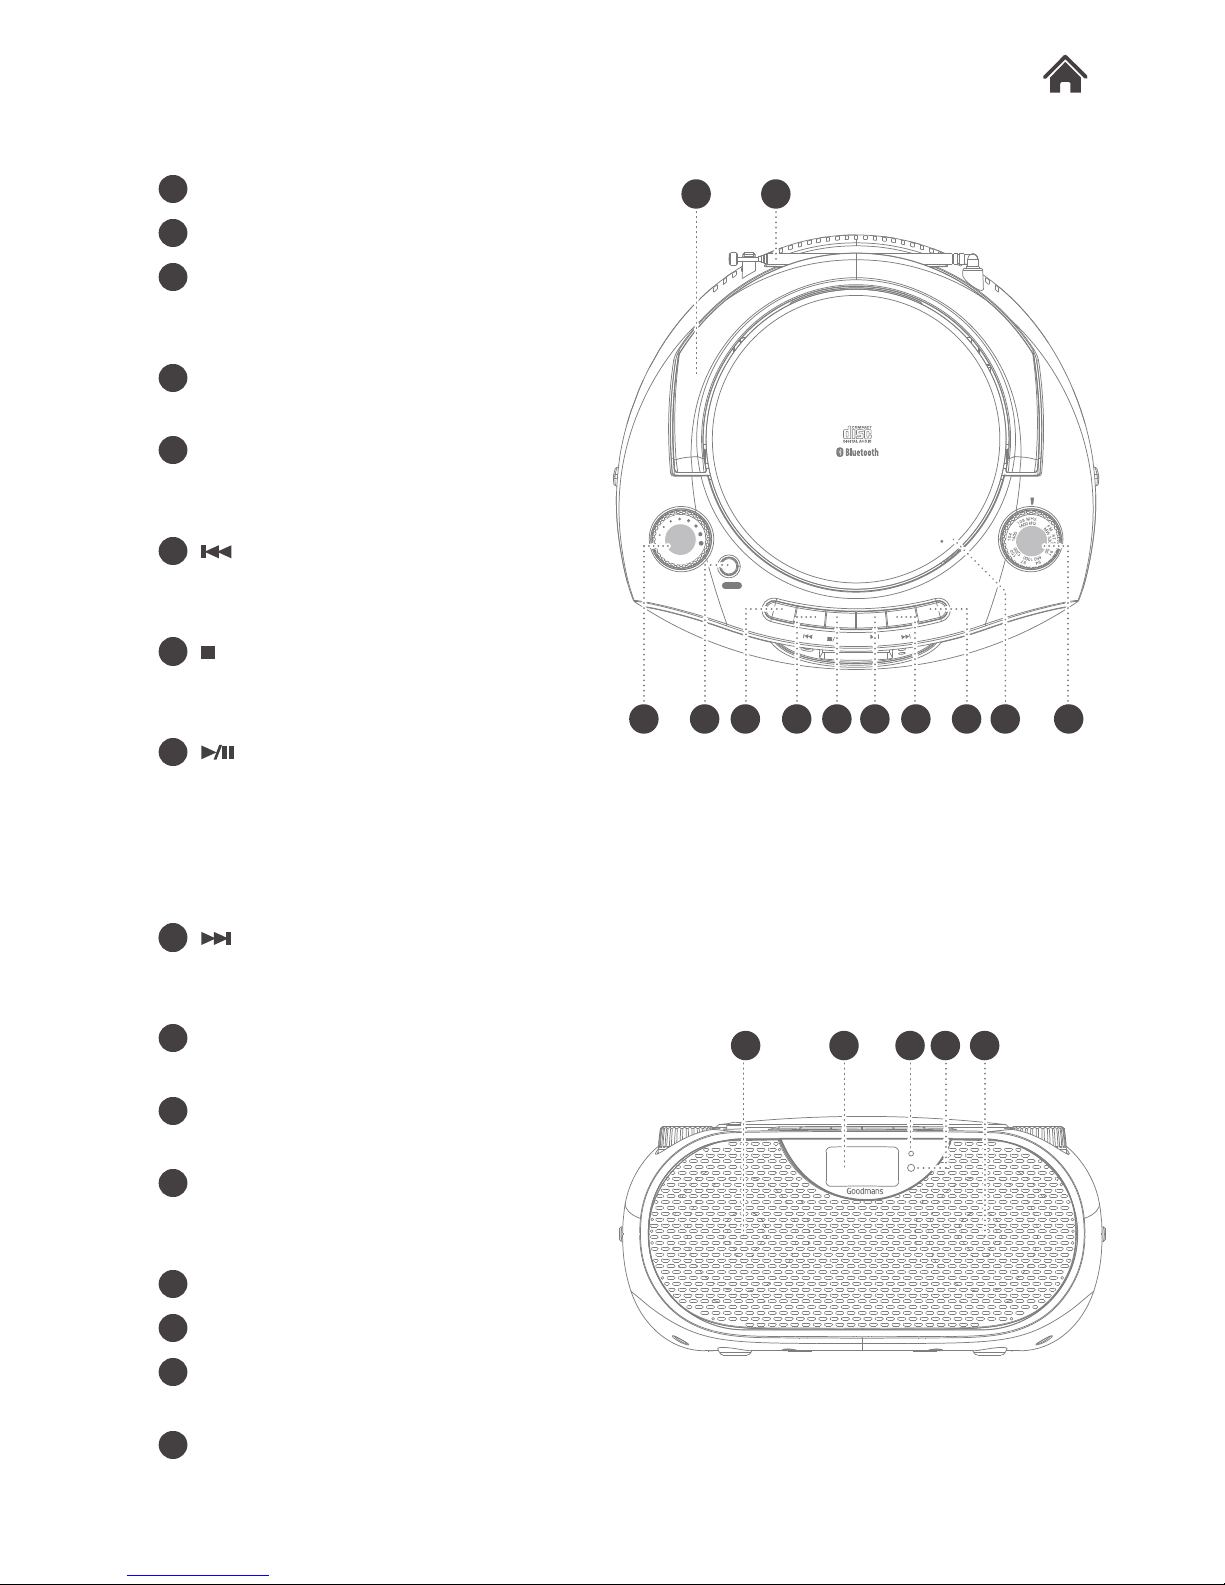
Front View2.2
A Carry handle
B Telescopic antenna.
C VOLUME control. Rotate to
increase or decrease the volume
output.
D BASS. Press to increase the bass
output level.
E REP/PROG. Press duting playback
to cycle repeat modes. Press during
STOP mode to program a playlist.
F
button. Press to skip to previous
CD tracks. Press and hold to fast
rewind CD tracks.
G
/ unpair button. Press to stop
playback of a CD. Press and hold in
BT mode to unpair a device.
H
/ ECO PWR.
Press to Play or Pause playback of a
CD. This button also doubles up as a
standby button. Press and hold to
enter standby and press again to
wake.
I
button. Press to skip to next CD
track(s). Press and hold to fast
forward CD tracks.
J CD/BT. Press to switch between CD
and Bluetooth modes.
K CD compartment release button.
Press to open the CD compartment.
L TUNING dial. Use this dial to locate
a radio frequency using the tuning
control.
M Speakers.
N LCD display
O FM ST/BT indicator. FM stereo and
Bluetooth indication.
P POWER indicator. This will
illuminate when the power is on.
OPEN/CLOSE
BASS
VOLU ME
MIN
MAX
R
E
P
.
/
P
R
O
G
.
CD/BT.
UNPAIR
ECO PWR
TUNI NG
BA
C D E F I J K LG
H
FM ST./BT .
POWER
AUX
AC~
M N
O P M
BA
I
328763
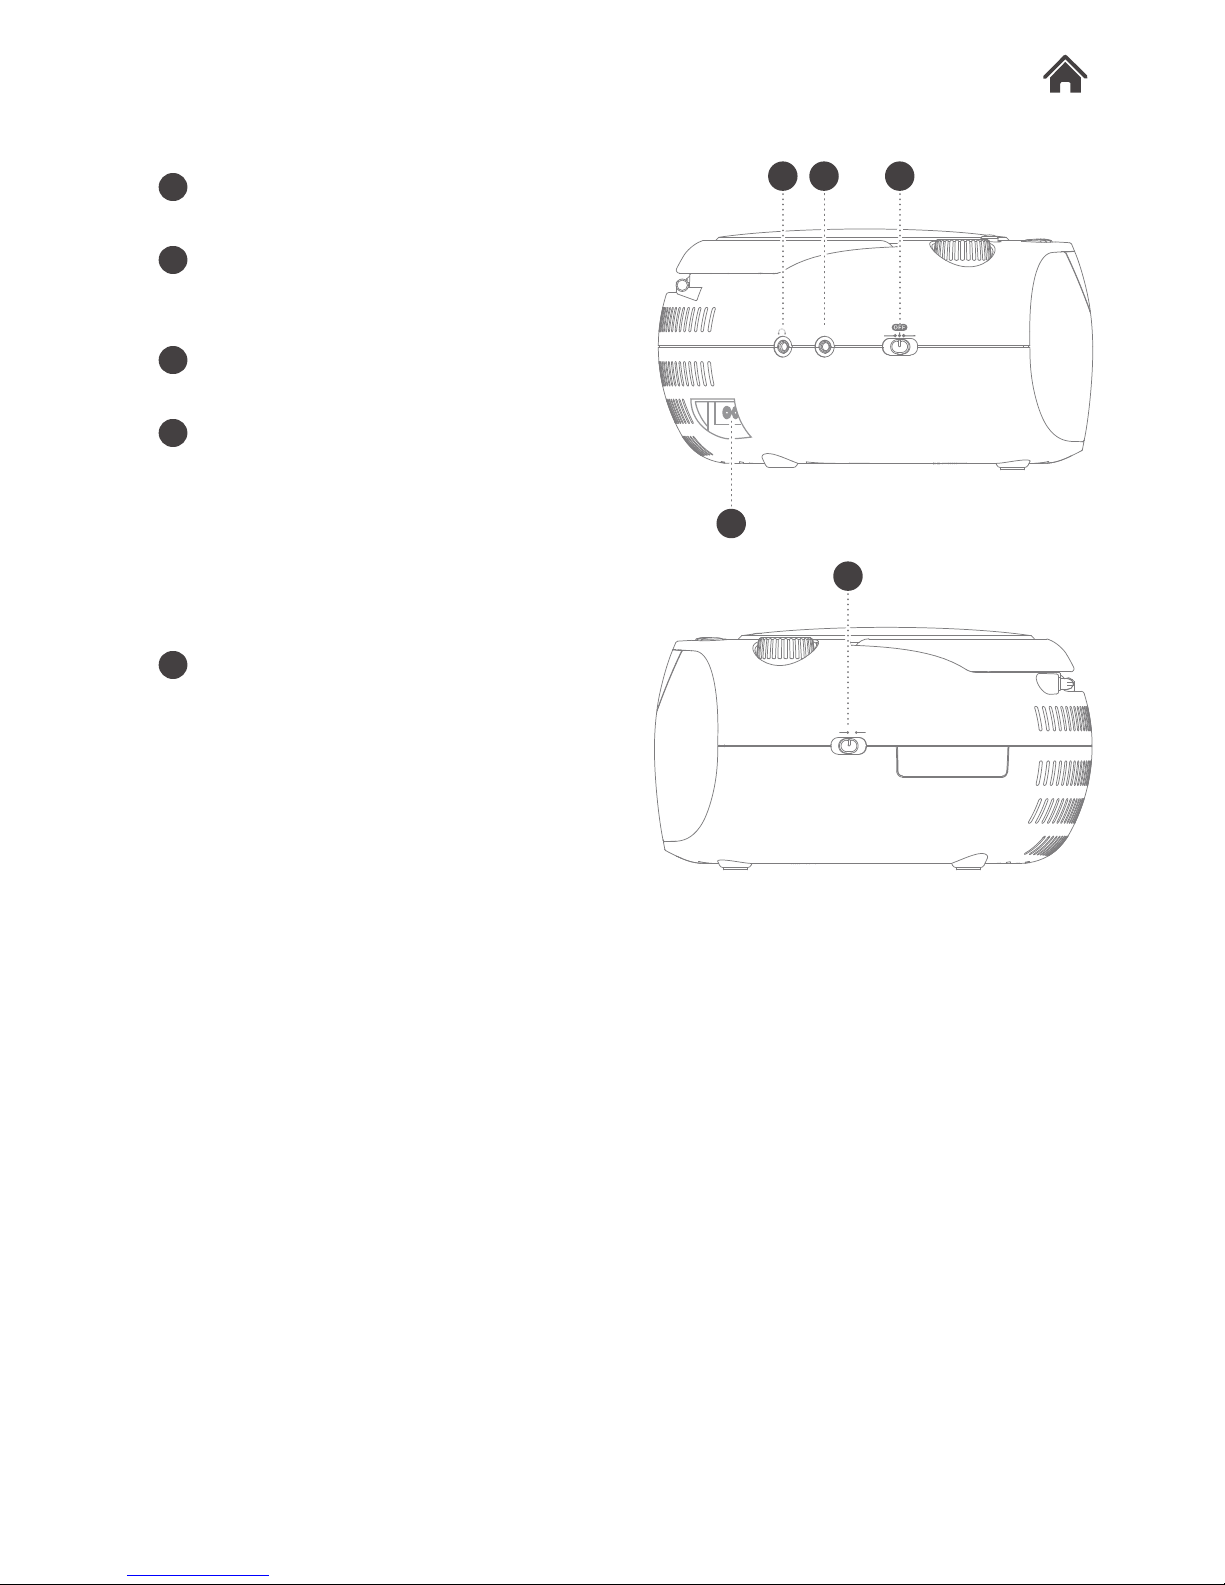
Side View 1
Side View 2
2.3
2.4
Q EARPHONE socket. Connect a pair
of earphones with a 3.5mm jack.
R AUX INPUT socket. Connect
external audio sources with a 3.5mm
audio cable.
S Function switch. Enable CD/
RADIO/ AUX functions or turn off.
T AC mains input socket. Connect
the mains cable to this socket.
U BAND selection switch. Set to
either MW or FM.
FM ST./BT .
POWER
AUX
AC~
AUX
RADI O
CD/
AUX/BT.
OPEN/CLOSE
BASS
VOLU ME
MIN
MAX
R
E
P
.
/
P
R
O
G
.
CD/BT.
UNPAIR
ECO PWR
TUNI NG
MW
FM ST.
M N
Q R S
U
O P M
BA
C D E F I J K LGTH
OPEN/CLOSE
BASS
VOLU ME
MIN
MAX
R
E
P
.
/
P
R
O
G
.
CD/BT.
UNPAIR
ECO PWR
TUNI NG
MW
FM ST.
U
BA
C D E F I J K LG
H
 Loading...