

Page 1

COLOUR
TELEVISIONS
1790T
"
17
17
"
"
14
14
OPERATING INSTRUCTIONS
"
1495T-IB
Page 2

––––––––––––––––––––––––––––––––––––––––––––––––––––––––––––––––––––––––––––––––––
TABLE OF CONTENTS
- TABLE OF CONTENTS
- GENERAL NOTES
- REMOTE CONTROL KEYS
- REMOTE CONTROL KEY FUNCTIONS
- FEATURES ON THE TELEVISION
PART ONE: Safety instructions
1.1 - Precautions for safety
1.2 - Precautions for the remote
1.3 - Cleaning the television
1.4 - Ecological standards
1.5 - Placing the television
PART TWO: Switching on and preliminary operations
2.1 - Connecting the television…to the electricity mains
2.2 - Connecting the television…to the aerial
2.3 - Preparing your remote for use
2.4 - Switching the television on… in stand by
2.5 - Switching the television on
2.6 - Tuning the channels and stor ing them in the programmes
2.7 - Calling up a station on the screen
2.8 - Adjusting volume of the sound
2.9 - Muting
2.10 - Using Teletext
2.11 - Switching the television off… in stand by
2.12 - Switching the television off… automatically
2.13 - Switching the television off… definitely
PART THREE:The television’s Operating System
3.1 - On Screen Display
3.2 - Choosing a language for OSD
PART FOUR:Tuning and programming
4.1 - Automatically finding and storing stations (Set-up Menu)
4.2 - Manually finding and storing stations (Installation menu)
4.3 - Hiding, Moving, Deleting and Locking# the channels
PART FIVE: Video and Sound Adjustments
5.1 - Adjusting the on-screen picture
5.2 - Adjusting speaker sound
5.3 - Receiving a stereo sound signal
PART SIX: Installing External Equipment
6.1 - The television set and external equipment
6.2 - A) Connecting the equipment to the television sockets
6.3 - B) Select the correct SCART or AV channel
PART SEVEN: Switching the television off automatically
7.1 - Programming automatic switch-off
• APPENDIX
- Teletext
- Troubleshooting guide
- Help Line number
- Tuning Tips
- Specifications
ENGLISH - 2
Page 3

ENGLISH - 3
––––––––––––––––––––––––––––––––––––––––––––––––––––––––––––––––––––––––––––––––––
DEAR CUSTOMER,
The television you have purchased offers functions and adjustments to guarantee high quality viewing
and listening.To install and use the television correctly we advise you to read this manual through carefully and, in particular, before you switch the set on, to take heed of the suggestions and warnings given
in 'Part One - Safety instructions' of this manual.
Remember too that to have a good sound and video reception you must have a good signal coming
from your aerial. Phone your local television aerial contractor if you need advice about your aerial.
ON-SCREEN LANGUAGE
If the on-screen menu language is not your preferred language…
Press MENU [9], press the ‘right’key [15] repeatedly until you see the language you want, then press
TV [22] to exit.
(Numbers refer to the ‘REMOTE CONTROL KEYS’ page. More detail is given in section 3.2, page 10.)
––––––––––––––––––––––––––––––––––––––––––––––––––––––––––––––––––––––––––––––––––
GENERAL NOTES
IMPORTANT: This instruction booklet is written to cover a family of similar models but some of the functions described do not work with all of them. These functions are marked with a # symbol as shown in
the following example.
- EXAMPLE:
…open the Sound# menu and choose…
• The numbers and letters between square brackets (example:[…] ) that you will find in the manual
match up with the numbers in sections headed ‘FEATURES OF THE TELEVISION’ and ‘ REMOTE
CONTROL KEYS’.
- EXAMPLE:
number [17] corresponds to the SOUND (Z) key on the remote.
• You can exit the on-screen display (OSD) menus whenever you want and return to the television picture by simply pressing key [22] on the remote.
• To remember the main keys and their functions easily you can see the two on-screen Help pages, giving you a brief graphical description of these keys. To recall these screen pages press key [11] twice
while to exit them press key [22] on the remote.
Page 4
13
2
46
5
79
8
0
SF 10
S.P. P.P
PIP
TXT
TV AV
MENU
help
others
over
view
I / II
P. F.
[2]
[1]
[5]
[6]
[9]
[10]
[13]
[16]
[17]
[18]
[21]
[22]
[3]
[4]
[8]
[7]
[12]
[11]
[15]
[14]
[20]
[19]
[23]
13
2
46
5
79
8
0
SF 10
S.P. P.P
PIP
TV AV
help
others
over
view
I / II
P. F.
MENU
[2]
[1]
[5]
[6]
[9]
[10]
[13]
[16]
[17]
[18]
[21]
[22]
[3]
[4]
[8]
[7]
[12]
[11]
[15]
[14]
[20]
[19]
[23]
ENGLISH - 4
–––––––––––––––––––––––––––––––––––––––––––––––––––––––––––––––––––––––––––––––––––
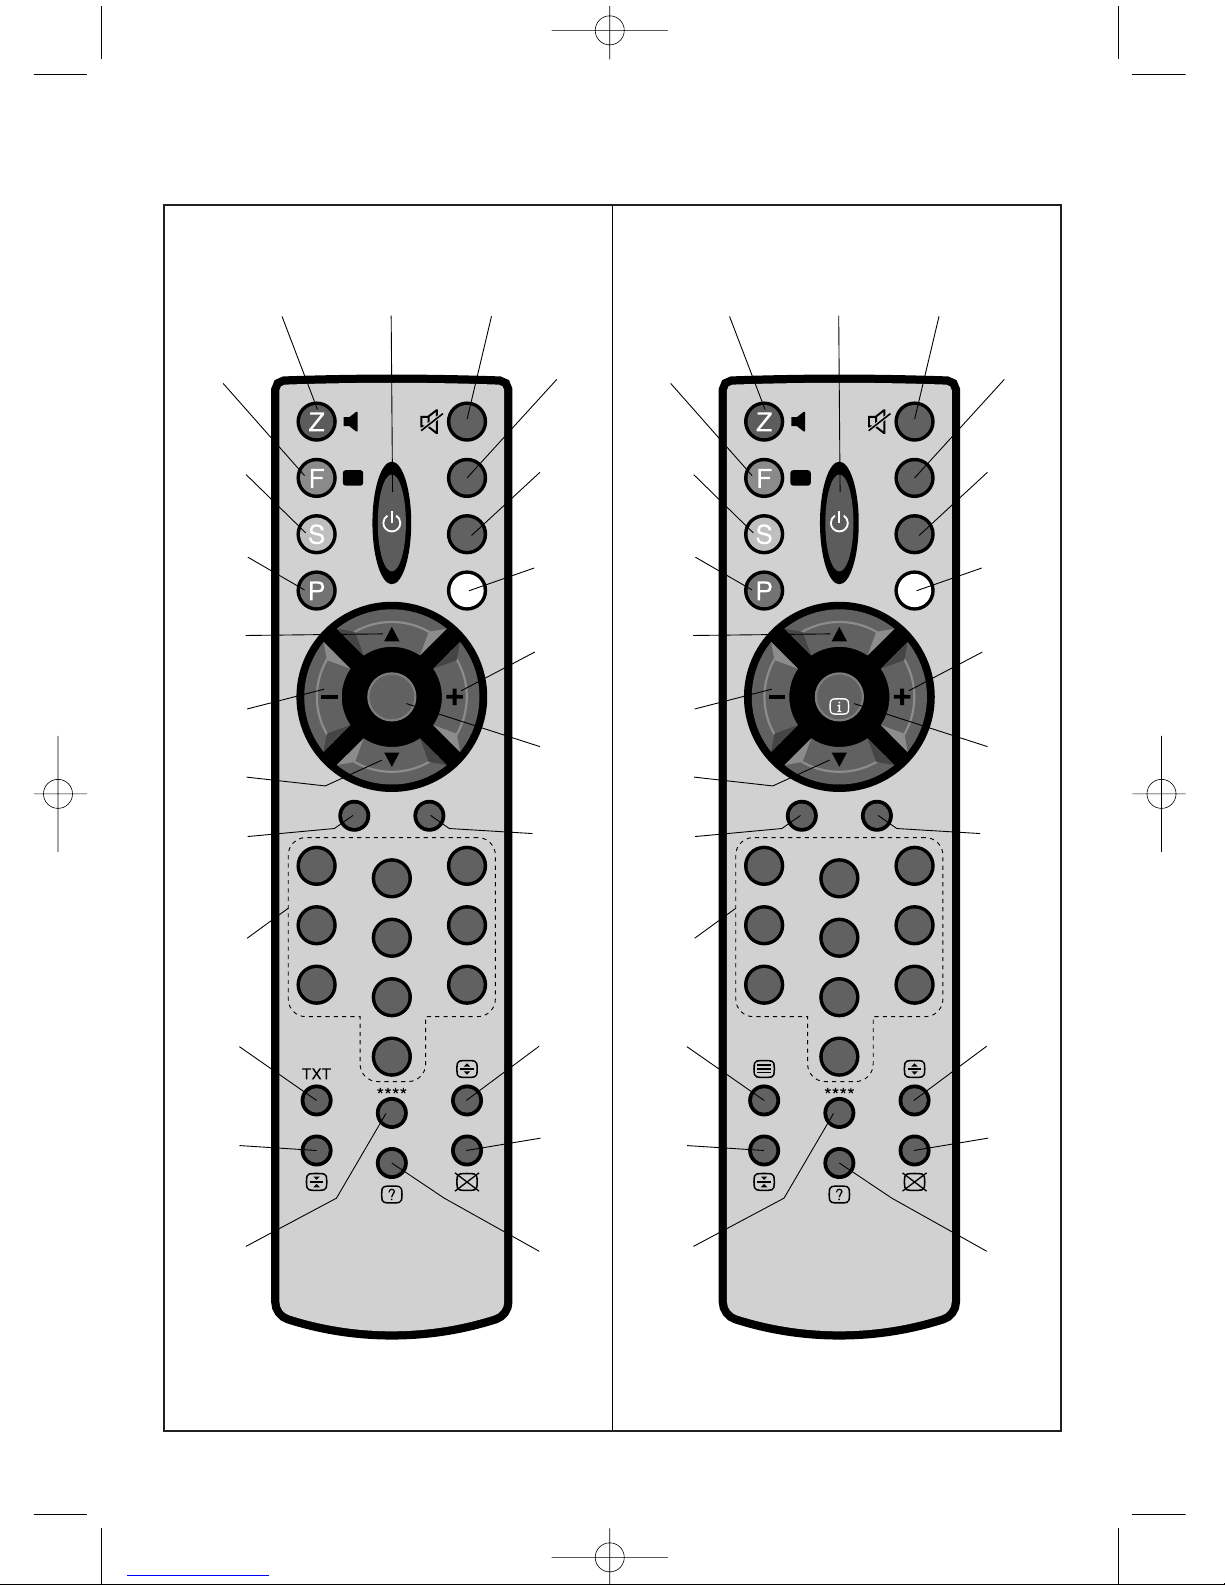
REMOTE CONTROL KEY
Testo del man. SWING (UK) 16-10-2002 16:50 Pagina 4
Page 5

ENGLISH - 5
–––––––––––––––––––––––––––––––––––––––
REMOTE CONTROL KEY
FUNCTIONS
[1] • In the TV mode • it turns Teletext on.
• In the TXT mode • this button mixes the
Teletext page and the picture of the TV programme you are watching.
[2] • For stereo models only • it selects one of
the 2 languages when the station is transmitting in "dual language".
It switches sound from stereo to
mono when there is interference in the
sound of a stereo transmission.
[3] • In the TXT mode • you can enter the
number of the sub-page you are looking for.
[4] • In any mode • it mutes television sound
instantly. Press it again to restore sound.
[5] • In the TXT mode • it temporarily locks the
sub-page on the screen. Press again to
unlock.
[6] • In the TXT mode • press once to magnify
the top half of the page, a second for the bottom half and a third time to view the full page.
[7] • In the TXT mode • press once to show
texts that are normally hidden (for instance
the solutions to games) and a second time
to hide them again.
[8] • In the OSD mode • if pressed for about 5
seconds it stores the changes made to the
sound and picture control settings.
• In the TV mode • press to restore sound
and picture control settings to their
ex-factory state.
• In the TXT mode • press once to hide
teletext while the television is finding the
page you want.Press again to view the
page after the small page number appears
on the television picture to indicate that the
page has arrived.
[9] • In the TV mode • it shows the Main
Settings OSD menu on the screen.
• In the TXT mode • it shows the index page.
[10] Same function as button [6].
[11] • In the TV mode • it shows the two Help
screen pages: press once for the 1
st
screen
page and again for the 2
nd
screen page.
[12] • In any mode • it puts the television on
stand-by. Switch back on by pressing 'up'
[13], 'down' [14] or any number key [21].
[13] • In the TV mode • it recalls the next pro-
gramme number going up in order.
• In the OSD mode • it selects the next
function from the menus moving up.
• In the TXT mode • it calls the next page
going up.
[14] • In the TV mode • it calls up the next pro-
gramme number going down in order.
• In the OSD mode • it selects the next
function from the menus moving down.
• In the TXT mode • it recalls the next page
going down.
[15] • In the TV mode • it increases the volume
of sound.
• In the OSD mode • it increases the setting on the adjustment bar for the selected
function.
[16] • In the TV mode • it lowers the volume of
sound.
• In the OSD mode • it reduces the setting
on the adjustment bar for the selected function.
[17] • In the TV mode • it recalls the Sound#
menu. • In the TXT mode • it recalls the
pages of the subject marked in RED.
[18] • In the TV mode • it recalls the Picture
menu.
• In the TXT mode • it recalls the pages of
the subject marked in GREEN
[19] • In the TV mode • it recalls the Overview
menu.
• In the TXT mode • it recalls the pages of
the subject marked in YELLOW.
[20] • In the TV mode • it recalls the Others
menu.
• In the TXT mode • it recalls the pages of
the subject marked in BLUE.
[21] • In the TV mode • by keying in the number
of the programme you want it will be displayed on the screen.
• In the TXT mode • by keying in the number of the page or sub-page you want it will
be displayed on the screen.
[22] • In the TV mode • it gives the number of
the programme you are watching on the
screen.
• In the TXT mode • it closes Teletext and
the television returns to the TV mode.
• In the OSD mode • it closes any menu or
sub-menu and the television returns to the
TV mode.
[23] • In the TV mode • it selects the external
audio-video equipment, connected to the
television, to one of the scart sockets represented by channels AV1 and AV2#.
- OSD mode means the on-screen display
is visible - please see page 10 for an explanation.
- TXT mode means teletext - see page 19.
Page 6
ENGLISH - 6
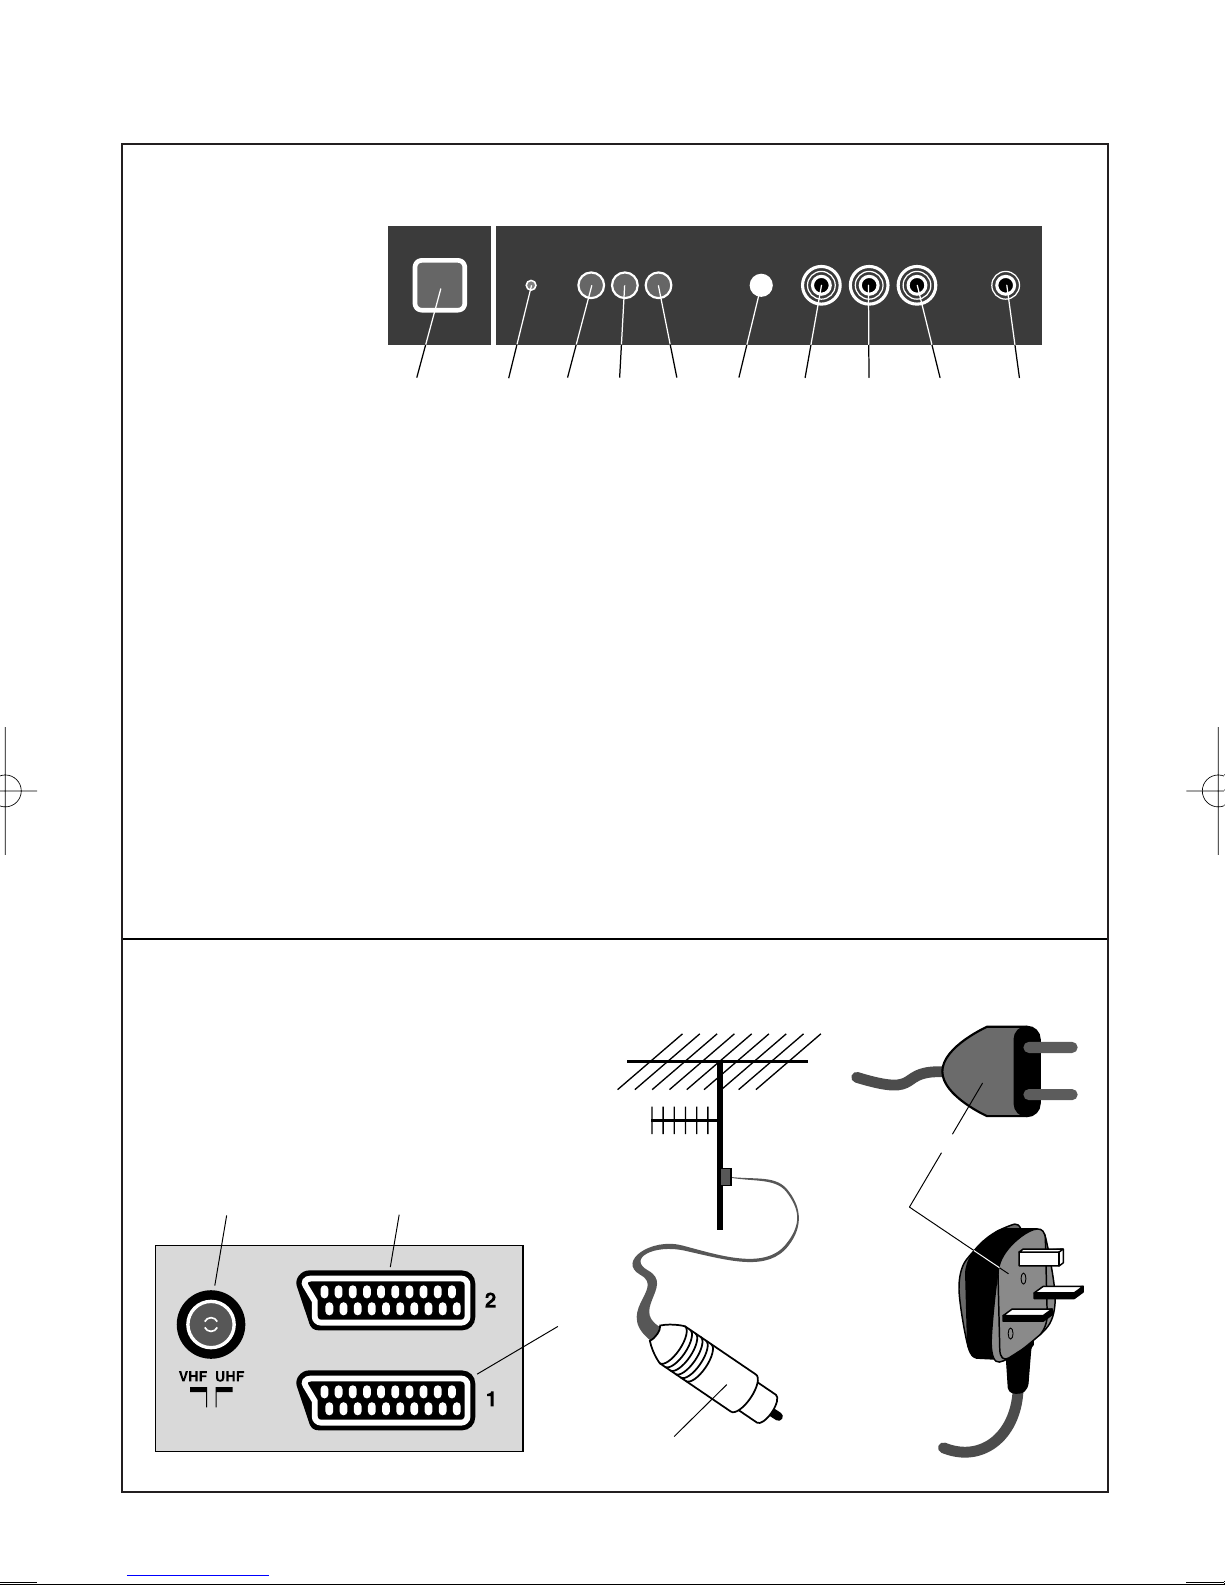
CONTROL PANEL on the front of the television
NOTES:
• Some models have
a control cover flap.
Press in the middle
to release it.
• Front panel styles
may differ.
[A] Main power switch. Switches the television on and off.
[B] Stand-by indicator. Lights when the television is on stand-by. See 'Remote control key func-
tions' item [12], the stand-by button.
[C] • The OSD button • displays the Programme Change, Brightness, Contrast, Colour and
Sharpness controls in sequence. In stereo# version televisions it also displays the Balance,
Treble and Bass adjustments.
[D] • In the TV mode • it lowers the volume of sound.
• If the OSD button has been pressed • it recalls the programme number below the current
one or decreases the setting on the adjustment bar.
[E] • In the Stand By mode • it turns the television on.
• In the TV mode • it increases the volume of sound.
• If the OSD button has been pressed • it recalls the programme number above the current
one or increases the setting on the adjustment bar.
[F] Receiver of the infrared signals sent from the remote.
[G] Cinch# socket for the input of a Video signal.
[H] Cinch socket L# for the input of a Sound signal.
[I] Cinch socket R# for the input of a Sound signal, not on all models.
[L] Socket for connecting stereo headphones or earpiece.
SOCKETS AND PLUGS ON THE REAR COVER of the television
[M] Socket for the aerial input.
[N] Scart 1 socket for external equipment.
[O] Scart 2# socket for external equipment.
[P] Mains supply lead and plug.
[Q] Plug of your aerial’s cable.
[A]
[
B
]
[
C
][D][
E
][
F
][G][H][I][L]
[Q]
[M] [O]
[N]
[
P
]
(Other
European Countries)
(Only for UK)
–––––––––––––––––––––––––––––––––––––––––––––––––––––––––––––––––––––––––––––––––––
FEATURES ON THE TELEVISION
Page 7

–––––––––––––––––––––––––––––––––––––––––––––––––––––––––––––––––––––––––––––––––––
– PART ONE –
Safety instructions
1.1 - PRECAUTIONS FOR SAFETY
• If the plug [P] or power lead is damaged or in any other way not sound, do not connect or switch the
television on. Contact your service centre to get the lead replaced.Telephone numbers are usually
given on your purchase receipt.
• If you cut off the mains plug, for example to fit a different type, please destroy the old plug as it would
be dangerous if inserted into a live power outlet. Follow the wiring instructions supplied with the new
plug. Fit a 5 amp fuse in the plug or fuse box.
•Never use a moulded plug without the fuse cover fitted.If the cover is lost, you must replace the plug.
• This product is only designed for household or similar general use.Any other use may invalidate the
guarantee and could be dangerous.
• High voltage runs through your television set.To avoid electrical discharges never remove the rear
cover of the set and make sure it is far away from steam, moisture and possible sprays of water. Any
maintenance, repair work or adjustments that need doing inside the set must be done only by qualified personnel. In addition, if the television is not working as it should, we advise you switch it off
immediately, take the plug [P] out of the socket and call your service centre.
• Never let children or anyone else push objects into the television and never let them play with the
remote control batteries.
• Never let children or anyone else play with the packaging materials: bags, sheets of plastic, cardboard
etc., as they can be the cause of suffocation and injury.
• Never attempt to recharge, reheat or throw on the fire the remote control batteries. In such a case
there could be a small explosion.
• If there is a thunderstorm or if you’re not going to watch the television for a long time, we advise taking the plug [P] out of the mains and disconnecting the aerial plug [Q].
• If there is an accidental overload of the electricity the television switches off automatically, going in the
standby mode.To switch it back on, first switch the television off completely by pressing the main
switch [A] on the control panel, press this same switch again [A] followed by a numerical key on the
remote [21] that corresponds to the programme (station) wanted.
• The television set has an electronic circuit by means of which it is possible to reduce the consumption
of electricity when the set is off and in stand by. However, during the night, to save more energy, we
suggest turning it off completely by pressing the main switch [A] on the control panel. Switching off
not only saves electricity. Switching back on an hour or more after switching off activates the picture
tube demagnetising circuit, which prevents unwanted blotches of colour appearing on the screen.
1.2 - PRECAUTIONS FOR THE REMOTE
• To ensure your remote works properly you should aim the front of it in the direction of the infrared
sensor [F] on the television control panel, making sure there are no obstacles in its path.
• If the remote isn’t going to be used for some time (a few weeks) remember to take the batteries out
from their compartment at the back.
• When the two batteries are flat, never change just one of them because the flat one left in will take
power from the new one which consequently will not last long.
• Change the batteries when the remote fails to work properly, that is, when its range fails.
1.3 - CLEANING THE TELEVISION
• Clean the television with a soft cloth. Do not use products containing abrasive substances, alcohol or
solvents.
• To clean the television switch it off via the main switch [A] on the control panel and do not let any
cleaning liquids drip into the aeration slits.
1.4 - ECOLOGICAL STANDARDS
• The packaging materials comply with current environmental laws.If you have no problem storing the
ENGLISH - 7
Page 8

ENGLISH - 8
packaging we suggest keeping it at least for the guarantee period. Use local recycling facilities when
you come to dispose of it.
• If the remote batteries are not the ecological type (that is “green”), when they are flat treat them as
polluting waste. Contact your local council or waste disposal site if you need advice. Please do not
throw them away with ordinary household rubbish. To protect the environment it is advisable to use
mercury-free batteries.
1.5 - PLACING THE TELEVISION
• To have a well contrasted picture, place your television where lamp or sun light cannot reflect on the
screen glass.
• Place the set in a well ventilated place.Always keep the aeration slits on the rear cover free as they
are designed to keep the electronic components inside the set cool. Do not cover these slits with
newspapers, serviettes, curtains etc., and leave enough room around the television (at least 5 cm.)
especially if it is standing on a shelf or inside a cabinet.
• The television must not be too near heat sources (stoves, radiators, etc.) or magnetic source like, for
instance, speakers, mobile phones, etc.,). The latter in particular can cause interference and disturb
vision. In this case we suggest switching the television off with the main switch [A] on the control
panel, move the interfering object away and then switch the television back on.
• Do not put candles or other objects with bare flames on top of the television because if the candle
flame accidentally comes into contact with the plastic cabinet it will set it on fire!
• Do not put vases or receptacles full of water (or other liquids) on top of the television because if they
accidentally tip over the liquid, pouring through the ventilation slots, can cause serious damage, fire
or electric shock.
–––––––––––––––––––––––––––––––––––––––––––––––––––––––––––––––––––––––––––––––––––
– PART TWO –
Switching on and preliminary operations
In ‘Part One’ we listed a few rules and suggestions for your own benefit, that you will realise are useful
and appropriate over time.In this ‘Part Two’ we are going to explain some basic functions that will let you
switch on and watch your new television immediately.
2.1 - CONNECTING THE TELEVISION… to the electricity mains
Put the television plug [P] in the socket which should be 230 V~, 50 Hz.
2.2 - CONNECTING THE TELEVISION… to the aerial
Plug the cable of your aerial [Q] into the aer ial socket [M] on the rear cover of the television.
2.3 - PREPARING YOUR REMOTE FOR USE
You will need two 1.5V batteries for your remote.When inserting the batteries into the compartment on
the back of the remote, take care to get polarity correct by observing the guide markings. Also, to
ensure the remote works properly, always aim the front of it towards the television where the infrared ray
signal receiver is positioned [F].
2.4 - SWITCHING THE TELEVISION ON… to standby
Press the main switch [A] on the control panel. The stand-by indicator [B] lights up to show the television is on stand-by.
2.5 - SWITCHING THE TELEVISION ON
With the television on standby, press a key on the numerical keypad. Sometimes you will see the screen
light up for a moment as the automatic picture tube drive adjustment circuit checks the tube. The picture
appears a few seconds later, probably only showing random luminous dots. In technical terms this is
called ‘snow effect’ and appears when there is no channel tuned in on the television.
Page 9

2.6 - TUNING THE CHANNELS AND STORING THEM IN THE PROGRAMMES
At this point, if you want to watch the programmes of a cer tain channel you have to tune in the CHANNEL on which the programme will be broadcast and then store it in a PROGRAMME (choosing a number between 0 and 99).
To ensure programming is done correctly, read carefully through 'Part Four - Tuning and Programming',
which you will find further on in this manual.
2.7 - CALLING UP A STATION ON THE SCREEN
After you have programmed the channels, to recall a station (already tuned in and stored on a programme) you can proceed in three different ways:
a)- Call up the programme number associated to the station on the remote control’s numerical keypad [21].
b)- scroll in sequence the numbers of the programmes using the keys [13 and 14] on the remote.
c)- select the Programme Change menu with key [C] and scroll the programmes using keys [D and E]
on the control panel.
2.8 - ADJUSTING VOLUME OF THE SOUND
To adjust the volume press the key [15 or 16] and the word “Volume” is displayed on the screen along
with an adjusting bar.You can turn the sound down with key [16] or up with key [15] on the remote. The
same thing can be done using keys [D and E] on the control panel.
2.9 - MUTING
You can mute the sound instantly by pressing key [4]:the word “Mute”is displayed on the screen. To get
the sound back simply press this same key again [4].The word “Mute” disappears and the volume
returns to what it was previously.
2.10 - TO USE TELETEXT
If the channel you are tuned to broadcasts teletext, to see it press key [1] on the remote and then tap in
the number (three digits) of the page you want with the remote’s numerical keypad [21].For a more
detailed explanation please go to the paragraph in the Appendix:TELETEXT ser vice.
2.11 - SWITCHING THE TELEVISION OFF… to standby
By pressing key [12] on the remote the television switches off and goes into standby. The corresponding
indicator [B] lights up. In standby the television is ready to be switched on when wanted by simply
pressing any one key on the remote’s numerical keypad [21].
2.12 - SWITCHING THE TELEVISION OFF… automatically
The television has a safety system that, when there is no broadcasting signal (like for instance at night
when some channels close down), after about 15 minutes it switches off automatically and goes into
standby.
2.13 - SWITCHING THE TELEVISION OFF… definitely
To switch the television off definitely (interrupting the supply of electricity, at the end of the day for example) simply press the main switch [A] on the television’s control panel.The luminous indicator [B] also
goes out meaning the television is off.
This operation, already recommended in paragraph 1.1 - PRECAUTIONS FOR SAFETY, besides saving
electricity, has the added advantage of switching the tube demagnetisation circuit back on.
–– Note: Besides the above ways to turn the television off, you can also set a 'sleep timer' to automatically turn off the television after a set period.The details of this function are given in paragraph 7.1 PROGRAMMING AUTOMATIC SWITCH-OFF.
ENGLISH - 9
Page 10

ENGLISH - 10
–––––––––––––––––––––––––––––––––––––––––––––––––––––––––––––––––––––––––––––––––––
– PART THREE –
The television’s Operating System
3.1 - ON SCREEN DISPLAY
Your television has an OSD (On-Screen Display) consisting of a set of menus and sub-menus displayed
over the picture.These offer either controls that you can choose and set according to your viewing and
listening preferences, or functions like tuning, programme lock and sleep timer.
In this ‘Part Three’, before we start explaining the functions and options that you can set in the menus, it
would be a good idea to get to know these menus, looking at them together (see the SUMMARISED TABLE
OF THE OSD MENUS further on) so as to understand their overall structure and the topics dealt with.
Generally speaking, use the OSD menus as follows.
• Please refer to key numbers illustrated on the front fold-out REMOTE KEYS page .
-01- Call up the menu you want on the screen by pressing the key assigned to it which is on the
remote. . Symbols are used to represent the sound [17] and picture [18] menu buttons.
You can also press the MENU key and choose from the main menu in the same way as step 2...
-02- Select the menu item you want by scrolling the list in the menu with key [13 or 14] on the remote.
-03- Change the setting of the selected item with key [15] or [16] on the remote.
-04- When you have finished, exit from whatever menu you are in and hence from the OSD function by
pressing key [22] on the remote.
3.2 - CHOOSING A LANGUAGE FOR THE OSD
Before reading any further you might wish to change the on-screen menu language if is not your preferred one. Please choose a different language as follows...
-01- Press the MENU key [9] to see the Main Settings menu.
-02- If the highlight bar is not on Set-up, press the 'down' key [14] until it is. Press the 'right' key [15] to
make the set-up menu appear on the screen.
-03- If the highlight bar is not on Language, press the 'down' key [14] until it is. Press the 'right' [15] or
'left' key [16] to change language.
-04- Press the TV button [22] to finish.
–––––––––––––––––––––––––––––––––––––––––––––––––––––––––––––––––––––––––––––––––––
– PART FOUR –
Tuning and programming
There are two ways for tuning the channels you can receive and storing them in the programmes:
MANUALLY and AUTOMATICALLY. We recommend manual tuning if you like to choose which number
you want the TV stations to be on, but automatic tuning is faster.
Manual tuning is also good for tuning in older satellite receivers and VCRs which have output via an
aerial cable.
4.1 - AUTOMATICALLY FINDING AND STORING THE STATIONS
This automatically finds and tunes all the channels you can
receive - that the stations in your area use for broadcasting and sequentially assigns the channels to programme numbers
starting from number one. Before continuing it is a good idea
to make sure that the factory-defined broadcasting standard
corresponds to the one normally used in your country (to
check and alter the standard, if necessary, read 4.2 'Manually finding and storing the stations', step – 03-). Lastly
proceed as follows:
Please refer to key numbers illustrated on
the front fold-out REMOTE KEYS page.
[13]
MENU
[16]
[14]
[15]
[9]
Page 11

-01- Press the MENU key [9] to see the Main Settings menu.
-02- Press key [14] to scroll the menu until you reach the “Set-up” function and confirm your choice by
pressing key [15]: the Set-up menu appears on the screen.
-03- With key [14] choose the “CH Table” function and with key [15 or 16] select the European countr y
you are in (the countries that are available are: “Italia”, “France”, “OIRT” (for East European countries) and “Europe” (for the other countries). This choice helps the television find the national
broadcast channels quickly and accurately during automatic tuning. (The country option list may
vary.)
-04- With key [14] choose the “Autostore” function and confirm your choice with key [15]: the
Autostore menu is displayed on the screen with the function “Start” already selected. If you do
not wish to proceed, return to Set-up by choosing the function “Cancel” with key [14] and confir ming with key [15].
-05- If, instead, you do wish to start autostore of the channels, press key [15].The Busy... menu is dis-
played on the screen and the system starts searching. Each broadcasting station that is tuned in
is stored on the list and automatically associated to a programme number; “OK!” also appears
briefly.
When the list is complete, the Busy... menu disappears from the screen and the television shows
the pictures of the channel that, during search, was stored as programme 1.
–– Note: Once autostore has started it should be left to finish although it can be interr upted any time
by pressing key [22] or any other key on the remote.
When autostore is finished and if you want to reorder the stations found, changing, for instance, their
position in relation to the programme numbers assigned to them, proceed as explained further on in
paragraph 4.3 - HIDING, MOVING, DELETING, AND LOCKING# THE CHANNELS.
4.2 - MANUALLY FINDING AND STORING THE STATIONS
(Installation Menu)
If you want to tune the stations manually (one at a time), proceed as follows:
-01- Press key [9] to see the Main Settings menu.
-02- Press key [14] to scroll the menu until you reach
“Installation” and confir m your choice by pressing key
[15]: the Installation sub menu is displayed on the
screen.
-03- Press key [14] to scroll the menu until you reach the
“System” function and then, with key [15 or 16], choose
the broadcasting standard with which the sound/video
signal is transmitted by the broadcasting stations in your
country. For example choose PAL-BG for the Italian,
German stations, etc., SECAM-L for the French stations,
PAL-I for the British stations; NTSC for the American station, etc… . But if you have any doubts
choose the “Auto” option so that the television knows the standard automatically during the tuning
phase (ATTENTION: the only valid option for French stations is SECAM-L). In some cases though
the “Auto” option will not suffice and you will have to specify one of the above standards.The system list may vary or be fixed to one system.
-04- Press key [13] to scroll the menu until you reach the “Channel Type” function. With key [15]
choose the “CH” option if you want to tune the traditional channels via the aerial or “S” for the
cable channels (only if you are connected to this service).
-05- Press key [13] to scroll the menu until you reach the “Programme” function and then set, with the
numerical key [21] on your remote, the number of the programme (two digits, from 01 to 99) you
want to store the station with.
–– Note:We advise leaving programme ‘0’free because if you connect a videorecorder to the aerial
socket [M] on the television set (see also paragraph 6.3), programme ‘0’will be used to store the signal
sent from this external source. See 'Tuning Tips' in the appendix at the end of this booklet for advice on
tuning in external equipment.
-06- Press key [14] to scroll the menu until you reach the “AFC” function and with key [15] select the
option “On”.
ENGLISH - 11
Please refer to key numbers illustrated on
the front fold-out REMOTE KEYS page.
[13]
MENU
[16]
[14]
[15]
[9]
Page 12

ENGLISH - 12
Main Settings
Set-up
Installation
Sound
Picture
Overview
Others
Volume
Others
Lock Off
Sleep Timer Off
TV Exit
Sound
Picture
Overview
Sound
Volume
Balance
Treble
Bass
Spatial Off
Loudness Off
TV Exit
Picture
Overview
Others
Overview
0
Hide
1
Insert
2
Delete
3
Lock
4 TV Exit
5
6
7
8
9
Picture
Brightness
Contrast
Colour
Sharpness
Hue
TV Exit
Sound
Overview
Others
others
over
view
#
#
#
#
SF 10
S.P. P.P
PIP
TV AV
I / II
P. F.
MENU
Page 13

ENGLISH - 13
Autostore
Start
Cancel
Set-up
Language English
CH Table Europe
Autostore
AV1 VCR
Lock Code 123
Installation
Prog.Number 1
Channel Type CH
Channel 1
Fine Tune
AFC On
System AUTO (PAL-BG)
Dual Language Dual-I
Extended Menu On
Store
Installation
Prog.Number 1
Channel Type 1
Extended Menu Off
Store
Busy
0
1 OK!
2 OK!
3 OK!
4 TV Exit
5
6
7
8
9
A table summarising
the On Screen Display
menus and sub-menus.
–––––––––
Note: You will find that some of the
menus, functions and options in this
table only refer to some specific
models #.
Page 14

ENGLISH - 14
-07- Press key [14] to scroll the menu until you reach the “Channel” function and then set, with the
numerical key [21] on your remote, the number of the programme (two digits) you want to tune.
Alternatively, if you don’t this number, press key [15] for a long time to start the automatic search
of the next channel to the one you are watching, or key [16] for the previous one.In this way the
television will tune in to the first channel it comes to and, if reception is not very good, we suggest
varying the reception frequency slightly as follows:
-08- If necessary press key [13] to scroll the menu until you reach “Fine Tune” and then adjust the cursor with key [15 or 16] until you get an interference free picture and sound.
-09- Lastly, to store all the operations you have done press key [14] to scroll the menu until you reach
“Store” and then press key [15]:for a few seconds until the word “Stored” appears, confirming that
the operations have been stored.
–– Note: Repeat this same procedure to store other stations.
Seeing as some of the functions in the Installation sub menu aren’t used a lot, we suggest reducing
the number of those displayed, scrolling the sub menu with key [14] until you reach the “Extended
menu”.With key [15] select the “Off” option and the sub menu will now only show the four most important functions, simplifying daily use. If you wish to restore all the functions in the sub menu, repeat this
procedure but select the “On” option.
4.3 - HIDING, MOVING, DELETING AND LOCKING# THE CHANNELS
Once all the channels have been tuned in you can now ‘reorganise’them, moving them to other programmes (following the order you prefer) or hiding them or cancelling them if reception is not optimum or,
lastly locking them# to prevent them from being watched by an unsuitable public (children for example).
• Please refer to key numbers illustrated on the front fold-out REMOTE KEYS page.
These operations are done in the Overview menu that can be displayed on the screen by pressing the
yellow key [19] on the remote. This menu contains a list of 10 programmes matched to the tuned in
stations.To go to the list of the next 10 programmes press key [15] or key [16] to go to the previous 10
programmes.
There is a 4-colour legend on the right of this menu, corresponding to the 4 coloured keys [17, 18, 19
and 20] on the remote, each one associated to a specific function: “Hide”, "Inser t" (for moving),
"Delete" and “Lock”. Below is a detailed description on how to use each function:
• “HIDE” (in red)
With this function the system ignores the programmes marked in red when you carry out the sequential search of the programmes with key [13 or 14]. This function is useful to hide “empty” programmes
(where no station is stored) and thus speed up the sequential search.These hidden programmes can
however be recalled by tapping in the relative number on the remote’s numerical keypad [21].To hide a
programme proceed as follows in the Overview menu:
-01- Scroll the list of programmes with key [13 or 14] until the programme you wish to hide is high-
lighted
-02- Press key [17] on the remote to mar k the highlighted programme red. If you want remove the red
marking press the same key again.
–– Note: Repeat this same procedure to hide other programmes.
• “INSERT” (in green)
With this function you can move a station to a different programme number. In the Overview menu proceed as follows:
-01- Scroll the list of stations with key [13 or 14] until the station you want to move is highlighted.
-02- Press key [18] to mark this highlighted station green.
-03- Scroll the list again with key [13 or 14] until the new programme number you want to use for this
station is highlighted.
-04- Now press [18] to make the change.
Page 15

–– Note: Repeat this same procedure to change other station/programme combinations.
• “DELETE” (in yellow)
With this function you can delete a station you’re not interested in: actually, this station is moved to the
last programme on the list (number 99).To do this go to the Overview menu and proceed as follows:
-01- Scroll the list of programmes with key [13 or 14] until the station you want to delete is highlighted.
-02- Press key [19] on the remote to cancel the station.
–– Example: if the station to cancel is matched to programme number 2, once deleted the stations that
follow in the list (3, 4, 5 and so on) all go down a number.This means that the station matched to programme 3 will now become programme 2; the station that used to be 4 will now become 3 and so on
for all the others.
• “LOCK”# (in blue)
With this function you can lock the programmes you choose to stop people (like children for example)
watching.This function is programmed in two different parts: A)- marking that indicates the stations to
lock; B)- locking/unlocking.The procedure is explained in detail below:
A)- Marking the stations:
This part marks the stations you want to lock. Go to the Overview menu and when it is displayed on
the screen proceed as follows:
-01- Scroll the list of stations with key [13 or 14] until the station you want to lock is highlighted.
-02- Press key [20] on the remote to mark the highlighted programme blue. If you want remove the
mark press the same key again.
–– Note: Repeat this same procedure to mark other stations. The whole phase A procedure can be
done at any time irrespective of phase B.
B)- Locking:
The procedure described above only INDICATES to the system which programmes will be Locked from
viewing.To LOCK or UNLOCK the stations you marked in phase A, proceed as follows:
-01- Press key [22] to exit the Overview menu (if displayed on the screen).
-02- Press key [9] to see the Main Settings menu.
-03- Press key [14] to scroll the menu until you reach the “Set-up” function and confirm your choice by
pressing key [15]: the Set-up sub menu is displayed on the screen.
-04- Press key [14] to scroll the menu until you reach the “Lock Code” function.
-05- With the keys on the remote’s numerical keypad [21], tap in y
our 3-digit password. ATTENTION:
As you will be using this number to UNLOCK the channel, we suggest you write it in the
space below so as not to forget it because once the Lock is effective, this number will no
longer be visible.
Y
OUR PASSWORD (3 digits): I……I……I……I
-06- Press key [22] to exit the menu and then press key [20] to see the Others menu.
-07- Press key [14] to scroll the menu until you reach the “Lock” function and then, using the keys on
the remote’s numerical keypad [21], tap in your 3-digit password.
The words "Lock ..Off" disappear from the menu and the 3 symbols “ * * * ” appear the instant you
start to enter your password; at the end the words "Lock .. On" appear, confir ming that the Lock is now
effective.
To unlock:
To unlock simply repeat steps -06- and -07- of the locking procedure, tapping in the same 3-digit pass
-
word again that you entered for locking.
–– Note: When Lock is effective it prevents vision of the stations marked in the Overview menu as well
as in the Set-up sub menu because it also contains your password.To use this sub menu again you
have to Unlock as described above.
ENGLISH - 15
Page 16

ENGLISH - 16
–––––––––––––––––––––––––––––––––––––––––––––––––––––––––––––––––––––––––––––––––––
– PART FIVE –
Picture and Sound Adjustments
5.1 - ADJUSTING THE PICTURE
To improve the quality of the picture there are some choices and settings you can do in the Picture
menu. Proceed as follows:
• Please refer to key numbers illustrated on the front fold-out REMOTE KEYS page.
-01- Press the green key [18] to see the Picture menu.
-02- You can now change the other menu functions, first selecting them with key [13 or 14], and then
adjusting each one with key [15 or 16].The functions are displayed in this order:
- “Brightness”: increasing brightness makes all of the picture get brighter, both dark and light areas.
- “Contrast”: with more Contrast the difference between the bright and dark areas is emphasised.
Dark areas seem to get darker and bright areas get even brighter, as far as the picture tube will allow.
- “Colour”: increasing this setting makes the colours in the picture more vivid. Decreasing it, the picture
eventually becomes black and white.
- “Sharpness”: with more Shar pness you will have a sharper picture while with less Sharpness it will
be softer and less sharp.
- “Hue”#:you will only find this function during reception of an NTSC broadcast or with an NTSC input to
scart or AV sockets from external equipment (on compatible models).The hue control is normally adjusted to give the most natural skin colours on a human face (the PAL system does this automatically).
If you want the parameter choices made for the above functions to become an ideal configuration that
you can recall at other times, you will have to store them (while you are in the Picture menu) by keeping key [8] pressed for at least 5 seconds.The word “Stored”appears in the top right-hand corner of
the television confirming storing. This ideal configuration can be recalled any time you want by pressing
the 'PP' (personal preference) key [8] during nor mal viewing.
• Sound setting is also stored and recalled.
5.2 - ADJUSTING SPEAKER SOUND
Besides the ‘Volume’ function that we have already spoken about in paragraph 2.8, some models have
other functions for improving the quality of the sound.You will find these functions in the Sound (#)
menu and you can use them as follows:
-01- Press the red key [17] to see the Sound (#) menu.
-02- You can now modify the other functions in the sub menu first choosing them with key [13 or 14]
and then adjusting each one with key [15 or 16].The functions are, in this order :
- “Balance”, to adjust the quantity of sound emitted by each speaker.
- “T reble”, to adjust dominance of the high frequencies.
- “Bass”, to adjust dominance of the low frequencies.
-03- Now scroll the menu with key [13 or 14] until one of these functions is highlighted and then, with
key [15 or 16], choose either “On” or “Off”, keeping in mind the following:
- “Loudness”: when this function is on it gradually increases the “low” sound frequencies as you lower
the volume.In fact, since lowering the volume also lowers the “low” frequencies, this function reestablishes the missing frequencies resulting in a better balanced sound.
- “Spatial”: when the sound signal is stereo, by choosing “On” you will have what is called the ExtraWide effect that creates the illusion of a virtual “moving away” between the two speakers.
If you want the parameter choices made for the above functions to become an ideal configuration that
you can recall at other times, you will have to store them (while you are in the Sound (#) menu) by
keeping key [8] pressed for at least 5 seconds.The word “Stored” appears in the top r ight-hand cor ner
of the television confirming storing.This ideal configuration can be recalled any time you want by pressing the 'PP' (personal preference) key [8] during nor mal viewing. Models that do not have a sound menu
store volume setting when the picture control settings are stored: see the end of section 5.1 above.
Page 17

5.3 - RECEIVING A STEREO# SOUND SIGNAL
The station can broadcast the sound signal in 2 stereophonic ways: Analogue or Digital (Nicam)
Transmission in the ANALOGUE STEREO# mode:
• no options are available if the station is transmitting the signal in mono;
• if the station is transmitting in stereo the “Mono” option is available.We recommend this option when
in some areas poorly covered by the station there is interference with the stereo sound signal and it
is difficult to hear.
• if the station is transmitting in Dual Language then you have the options “Language I” and
“Language II”.
T
ransmission in the DIGITAL STEREO (NICAM)# mode:
• no options are available if the station is transmitting the signal in mono;
• if the station is transmitting in stereo the “Mono” option is available.We recommend this option when
in some areas poorly covered by the station there is interference with the stereo sound signal and it
is difficult to hear.
• if the station is transmitting in Dual language then you have the options “Mono”, “Language I” and
“Language II”.
All the options described in this paragraph can be chosen by pressing key [2] several times on the
remote.
–––––––––––––––––––––––––––––––––––––––––––––––––––––––––––––––––––––––––––––––––––
– PART SIX –
Installing external equipment
6.1 - THE TELEVISION SET AND EXTERNAL EQUIPMENT
Various external sound/video equipment can be connected to your television set using the sockets and
menu functions to control the signal correctly. Some of the sockets, located on the control panel and
rear cover, are only for the INPUT of the signal coming from external equipment while others are only
for the OUTPUT of the signal
to external equipment and lastly some can be used for both the INPUT
AND OUTPUT of the signal.
There are 2 steps necessary for connecting external equipment:
A)- you first physically connect the equipment using the appropriate cables;
B)- you then choose the appropriate option from the functions in the menus and sub-menus dedicated
to connections. Before starting we advise you read the instruction handbook of the equipment you are
going to connect to the television for any additional instructions.
6.2 - A) CONNECTING THE EQUIPMENT TO THE TELEVISION
SOCKETS
We shall now describe each socket in detail and what can be connected to it:
• VIDEO# [G] and SOUND L/R CINCH SOCKETS# [H and I]
You will find these sockets on the front television panel.
- They are used for the INPUT of a sound/video signal to the television.
- You can connect the following equipment to them: a)- DVD player; b)- Video camera; c)- Console
for video games; d)- Digital photo camera.
- In some models the front sockets are on the same AV channel as the SCART 1 socket. In this case
only connect one input at once, otherwise picture and sound may be degraded.
• SOCKET FOR HEADPHONES [L]
You will find this socket on the front television panel.
- It is used for the OUTPUT of the sound signal from the television.
- You can connect the following equipment to it: a)- Stereo headphones; b)- Ear piece.
ENGLISH - 17
Page 18

ENGLISH - 18
• AERIAL SOCKET [O]
This socket is on the rear television cover.
- It is used for the INPUT of the RF signal to the television.
- You can connect the following equipment to it: a)- The plug of your aerial; b)- Videorecorder.
• SCART 1 [N] and SCART 2# [O] PERITELEVISION SOCKETS
These sockets are on the rear television cover.
- They are used for the OUTPUT/ INPUT of the sound/video signal from and to the television.
- You can connect the following equipment to them: a)- Videorecorder; b)- Video camera;c)- Console
for video games; d)- Digital decoder for satellite;e)- Set Top Box for Internet; f) DVD player (and so on).
6.3 - B) SELECT THE CORRECT SCART OR AV CHANNEL
Once you have connected the equipment with their cables, to receive the sound/video signal on the
screen you have to indicate to the television which specific socket you have connected the equipment
to.The 3 choices descr ibed below can also be made by pressing key [23] on the remote repeatedly
until you see the acronym corresponding to the socket to which the equipment is connected, according
to the following.
• Choose the “AV-1” mode to see the signal coming from the SCART 1 [N] SOCKET or from the
VIDEO# [G] and AUDIO L/R# [H and I] CINCH SOCKETS.
— Note: In models where the front sockets are on the same AV channel as the SCART 1 socket, choo-
sing "AV-1" selects both SCART 1 and front CINCH inputs.
–– Note: Seeing as SCART 1 [N] peritelevision socket is also enabled to receive an RGB video signal,
if the external equipment has a video signal of this kind, you must make an additional choice in the
Set-up sub menu as follows:
• Please refer to key numbers illustrated on the front fold-out REMOTE KEYS page.
-01- Press key [9] to see the Main Settings menu.
-02- Press key [14] to scroll the menu until you reach the “Set-up” function and confirm your choice by
pressing key [15]: the Set-up menu appears on the screen.
-03- Press key [14] to scroll the menu until you reach the “AV1” function and choose option “RGB” with
key [15 or 16]. If the external equipment is sending a nor mal video signal to the socket then
choose the option “CVBS” with key [15 or 16].
• Choose the “AV-2”# mode to see the signal coming from the SCART 2# [N] SOCKET
In some models the front sockets are on a separate AV channel, so it will be "AV-2".
For the remaining sockets the settings and optional choices must be made in other ways.
Here is what you have to do:
• With key [13 or 14] choose a programme between 0 and 99 to view the signal coming from the
AERIAL SOCKET [M]. Alternatively you can tap in the number wanted on the numerical keypad
[21].
–– Note: If you have to connect a video recorder to this socket, to see the picture on the screen you
will have to tune and store the sound/video signal as described in paragraph 4.2 - MANUALLY FINDING AND STORING STATIONS. In this case set number “0” in the “Programme” function and number
“36” (or the number specified in the video recorder instruction booklet) in the “Channel” function.
• SOCKET FOR HEADPHONES [L]: when you connect headphones to this socket, sound is no
longer heard from the television speakers but sent only through the headphones.This means that
the possible headphone sound settings are the same as those made for the television loudspeaker
sound (see paragraph 5.2 - ADJUSTING SPEAKER SOUND).
Page 19

ENGLISH - 19
–––––––––––––––––––––––––––––––––––––––––––––––––––––––––––––––––––––––––––––––––––
– PART SEVEN –
Switching the television off automatically
7.1 - PROGRAMMING AUTOMATIC SWITCH-OFF
This function is used to programme a time (in minutes) that, when elapsed, switches the television off
automatically leaving it in standby. The timer is started and stopped in the Others menu as follows:
-01- Press the blue key [20] to see the Others menu.
-02- Scroll the menu with key [13 or 14], until you reach the “Timer” function and then choose, with key
[15 or 16], one of the options av ailable out of “15”, “30”, “45”, “60”, “75”, “90”, “105”, “120” and “Off”.
To tur n the timer off (if it was turned on earlier) repeat the whole procedure descr ibed above choosing
the “Off” option at point -02-.
–––––––––––––––––––––––––––––––––––––––––––––––––––––––––––––––––––––––––––––––––––
– APPENDIX –
- T
eletext
Teletext is a news and information service transmitted along with the television signal.This information is
organised into pages that fit on the TV screen, with each page identified by a three-digit number.
If a page contains more text than will fit on the screen at once, it is divided up into sub-pages with fourdigit numbers. One page, usually number 100, contains the general index of topics along with their page
numbers.
If a page contains more text than will fit on the screen at once, it is divided up into sub-pages.Subpages have four digit identifiers.
–– Note:Ways of operating teletext differ slightly between service providers, but usually some teletext
page will offer any special instructions you need, as well as a general operation guide.
•T
o enter Teletext press the TXT key [1] on your remote once.The picture you are watching disap-
pears and in its place you will see the Teletext page, showing the general index page first. It is possible to see the television picture mixed with the Teletext page by pressing key [1] on your remote
again. Pressing TXT repeatedly switches between mixed and pure teletext displays.
• T
o see any page press 3 keys on the remote control’s numerical keypad [21] that correspond to the
3-digit number of the page wanted. If you make a mistake, complete the three digits then enter the
number again.
•T
o recall the index page depending on the current topic. Press MENU key [9] on the remote.
•To go to the next or previous page to the one displayed, press key [13] to go up a page or key
[14] to go down a page.
• To recall a topic with the coloured keys on the remote. Some stations put four topic headings or
coloured numbers at the bottom of the displayed page, red, green, yellow and blue corresponding
with four coloured buttons on the remote. To quickly access the pages of one of these topics simply
press the matching coloured key [17, 18, 19 or 20].
• ST
OP Function temporarily locks the pages on the screen. If you need to keep the page you are
looking at on the screen for a longer time simply press key [5] once on your remote.The page will
stay on the screen until you press this same key again.
• Vie
wing the sub pages of a topic. Should a page contain more text than will fit on the screen it is
divided into sub-pages that are shown automatically in sequence. In these cases an indication is
given on the screen (for example 6/18) telling you that you are looking at sub page 6 out of a total of
18 sub pages. If you want to move to one par ticular sub-page without seeing the others that are of
no interest, simply press key [3] on your remote and then tap in, on the remote’s numerical keypad
[21], a 4-digit number that corresponds to the sub-page you want. For example to request sub-page
six, press keys 0, 0, 0, 6.The selected sub-page remains on-screen until you key in a new page number, or press key [3] again and key in a new sub-page number.
Sometimes you have to wait a long time and in this case you exit Teletext temporarily by pressing
Page 20

ENGLISH - 20
key [8] on the remote.You will then see the television picture. When the page (or sub-page) has
been found, the number of this page will appear in the top left hand corner of the picture and you
can see it by pressing the same key [8] on the remote once more.
• Magnifying page contents. To make it easier to read the text on the Teletext pages you can magnify them by pressing key [6] on the remote several times in the following way: pressing it a first time
will magnify the top half of the page, pressing it a second time will magnify the bottom half of the
page and pressing it a third time you will see the whole page again normally.
• T
o have the results to quizzes. Some stations transmit games, quizzes and questions whose solutions and answers are hidden from view temporarily.To see the solutions and answers on the page
press key [7] on the remote. To hide them again press the same key again.
• T
o exit Telete
xt.
You can exit Teletext at any time by pressing [22] on the remote.
- Unlocking
With reference to paragraph 4.3 - HIDING, MOVING, DELETING AND LOCKING# THE CHANNELS,
you can also Unlock in the following way:
-01- Call up programme number 99 on the remote control’s numerical keyboard [21].
-02- Press key [20] to see the Others menu.
-03- Press key [14] to scroll the menu until you reach the “Lock” function and then press key [8]: the
word “Off” will appear in the menu.
Page 21

- Troubleshooting guide
HELP LINE
If you live in Great Britain and you have read these instructions, but there is something about your television which you do not understand, you can phone our help line during normal office hours on:
0113 2793520
You cannot book service calls on this number
Please try checking through the guide below before calling a service engineer.
ENGLISH - 21
Symptoms
• No sound
• Crackling noises or distorted
sound.
• Grainy (snowy) picture
• Extra outlines on objects in the
picture (ghosts).
• Spots or streaks on the picture.
Possible causes
• The volume is set to minimum.
• The mute is switched on.
• Interference from cars,
fluorescent lights, a video
recorder, a radio broadcast, a
personal computer or other
electrical equipment.
• The outside aerial has moved,
or is damaged or has been
disconnected.
• Your video recorder could be
faulty.
• Transmitter trouble .
• Aerial needs repair or
adjustment.
• The aerial is receiving reflected
signals from hills or buildings.
• Interference from electric
motors, motor vehicles, welding
equipment, neon signs, radar
installations and so on.
What to do
• Turn the volume up.
• Press the mute button to
release 'mute'.
• Turn off one piece of equipment
at a time to see if the interference
clears.
• If you have a video recorder try
plugging the aerial directly into
the television. If the fault clears,
the video recorder is probably
faulty.
• Have your aerial system
checked or change its position of
it is a portable aerial.
• Try to tune in a better quality
signal from the same television
station.
• Try to tune in a better quality
signal from the same television
station.
• Move the interfering equipment
further away or, if possible, turn
it off.
• Have y our aerial system
checked.
PICTURE
SOUND
Page 22

Symptoms
• No picture.
• Jumbled teletext characters.
• Set-up, Installation menus and
some programmes don't appear.
• ‘Lock’ is displayed.
• Incorrect colours in parts of
the picture.
• Television seems 'dead' - no
lights come on and nothing
works.
• Stuck on stand-by.
Possible causes
• Brightness and contrast levels
are set to minimum.
• Poor quality signal.
• Channel lock activated.
• Magnetism
• Main power switch is off.
• Mains supply missing.
• Blown fuse or circuit breaker.
• Micro-controller confused by
electrical disturbance.
What to do
• Increase the brightness and
contrast using the remote control.
• As for 'Snowy picture' and
'Ghost'.
• See ‘Lock', page 15.
• Move magnetised objects away
from the television. Switch on
with the main power switch when
the television is cold.
• Make sure it is not a general
power cut.
• Check the power switches on
the television and at the power
outlet.
• Check the fuse or circuit
breaker at your main fuse box.
Look for a possible cause of
failure before you replace or reset it.
• Switch off main power and wait
10 minutes before trying again.
(Leave the TV unplugged and
call a service engineer if this
does not work).
PICTURE
POWER
ENGLISH - 22
Page 23

- Tuning tips
Picture interference from other equipment
If you have used the aerial lead to connect a video recorder, satellite receiver or other piece of equipment, switch the equipment on one piece at a time and check the picture on all your programmes.The
pieces of equipment that are not switched on must be on stand-by. If any of your programmes have
wavy lines on the picture when the equipment is switched on you will have to change the output frequency of the equipment. Please read the instruction book for the equipment to find out how to do this.
Change the output frequency a little at a time (or in 8MHz steps) and keep checking all your programmes.
When there are no wavy lines (or other interference) on any of the pictures, re-tune the programme
number that you have chosen for your equipment (see 'Tuning in other equipment or programmes manually’). Do the same for each piece of equipment, but after you’ve finished with each one, leave it
switched on while you check the next piece of equipment.
Continue until you have all the pieces of equipment working together without interfering with each
other.If you cannot get rid of the interference you may have to connect the equipment with a scart
cable (see ‘Connecting the equipment to the television sockets’on page 17 - 18).
Tuning in older equipment
Sometimes it is easier to tune in older equipment, such as a video recorder or a
satellite receiver, by tuning the equipment to the television.This is especially tr ue if it
is producing a non-standard output frequency. Older equipment typically has a simple
output signal modulator with an adjustment screw on the back: this illustration shows
a typical adjuster.Video game consoles are usually set to broadcast channel 36.
1 - Switch on the equipment so it will produce a recognisable picture (read the user
instructions for the equipment if you need to).
2 - Follow ‘Manually finding and storing the stations’, page 11 - 14.
3 - You might already find a good picture and sound from the equipment. If you do not have good pic-
ture and sound find the adjustment screw illustrated above and using a small flat-bladed screwdriver
carefully turn the screw until the picture and sound are tuned in properly.
4 - Change to a different programme number and back again.If the picture or sound go off tune, readjust the screw (above) very slightly in the direction which you find improves things and try again. Or
you can resort to ‘Fine tuning’in step 8, page 14.
––––––––––––––––––––––––––––––––––––––––––––––––––––––––––––––––––––––––––––––––––
Where we refer to channel 36 above, please note the vast majority of older equipment uses channel
36 but a few use channel 52 or another. If in doubt you can manually step through channels 21 to 69
by repeatedly pressing key [15] in ‘Manually finding and storing the stations’, step 7, page 14. It might
help if you disconnect the television roof aerial cable while you are doing this, so any signal you find
must be from the equipment.
––––––––––––––––––––––––––––––––––––––––––––––––––––––––––––––––––––––––––––––––––
ENGLISH - 23
CH ADJ
Page 24

- Specifications for UK models
–––––––––––––––––––––––––––––––––––––––––––––––––––––––––––––––––––––––––––––––––––
Television standard PAL – I
–––––––––––––––––––––––––––––––––––––––––––––––––––––––––––––––––––––––––––––––––––
Sound system FM intercarrier
–––––––––––––––––––––––––––––––––––––––––––––––––––––––––––––––––––––––––––––––––––
AV features Scart AV input, AV output, RGB input
NTSC-compatible
Front RCA-style AV input
–––––––––––––––––––––––––––––––––––––––––––––––––––––––––––––––––––––––––––––––––––
Mains voltage 220 to 240 volts AC, 50Hz
–––––––––––––––––––––––––––––––––––––––––––––––––––––––––––––––––––––––––––––––––––
Power consumption • 1495T-IB, Stand-by 6W, maximum 40W
• 1790T, Stand-by 6W, maximum 50W
–––––––––––––––––––––––––––––––––––––––––––––––––––––––––––––––––––––––––––––––––––
Sound output power 1.3W rms
–––––––––––––––––––––––––––––––––––––––––––––––––––––––––––––––––––––––––––––––––––
Headphone type Impedance 32 ohms or more, 35mm stereo jack plug
–––––––––––––––––––––––––––––––––––––––––––––––––––––––––––––––––––––––––––––––––––
Aerial impedance 75 ohms
–––––––––––––––––––––––––––––––––––––––––––––––––––––––––––––––––––––––––––––––––––
Broadcast bands UHF broadcast channels 21 - 69
–––––––––––––––––––––––––––––––––––––––––––––––––––––––––––––––––––––––––––––––––––
Programme pre-sets 100
–––––––––––––––––––––––––––––––––––––––––––––––––––––––––––––––––––––––––––––––––––
Picture tube • 1495T-IB, 34cm nominal • 1790T, 41cm nominal, 110 degree low profile
–––––––––––––––––––––––––––––––––––––––––––––––––––––––––––––––––––––––––––––––––––
Dimensions • 1495T-IB, W 36 x H 33,5 x D 38,5 centimetres
• 1790T, W 41 x H 37,5 x D 40 centimetres
–––––––––––––––––––––––––––––––––––––––––––––––––––––––––––––––––––––––––––––––––––
Approximate weight • 1495T-IB, 9 kg
• 1790T, 14 kg
–––––––––––––––––––––––––––––––––––––––––––––––––––––––––––––––––––––––––––––––––––
NOTE:We apologise for any inconvenience caused by minor inconsistencies in these instructions, which
may occur as a result of development and improvement.
10/2002
Cod.: 3601339SW00500
–––––––––––––––––––––––––––––––––––––––––––––––––––––––––––––––––––––––––––––––––––
 Loading...