

Page 1
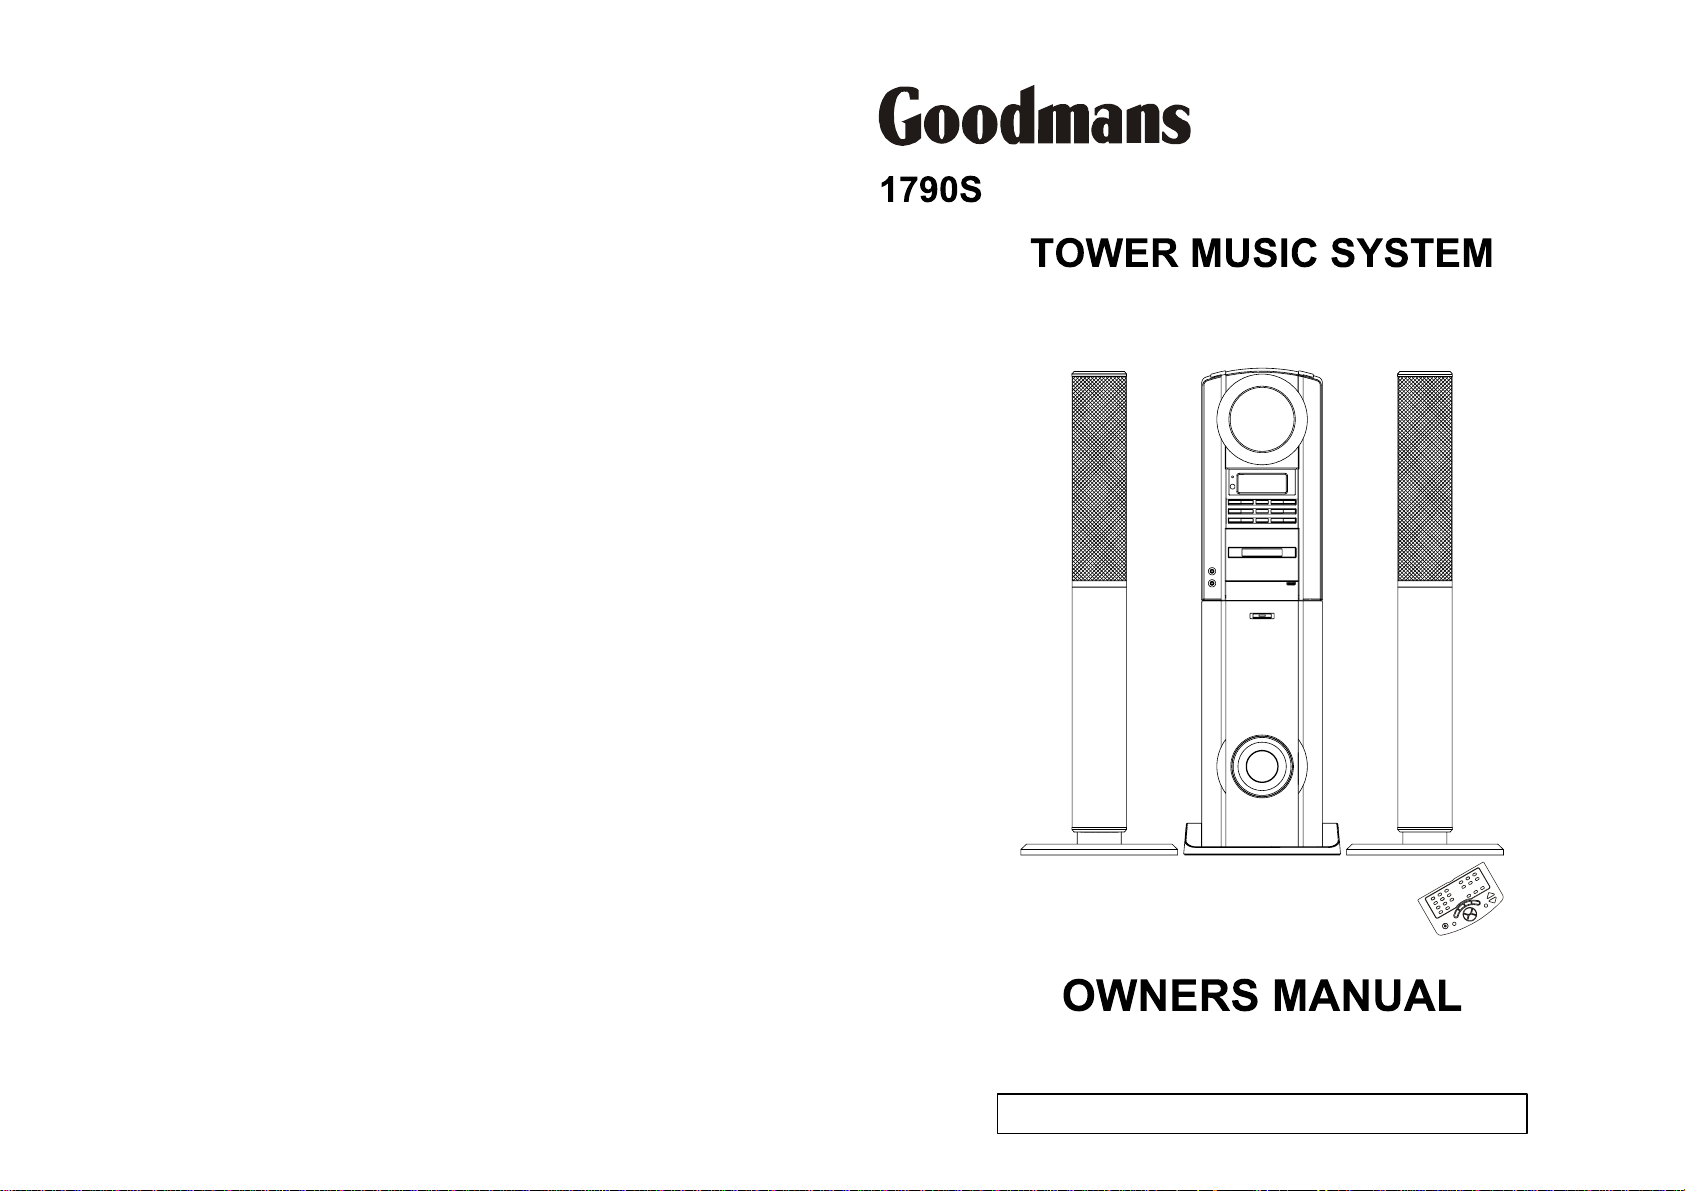
Before operating this unit,
please read this Owner's Manual carefully
GOODMANS HELPLINE 0870 8730080
Page 2
INTRODUCTION
IMPORTANT SAFEGUARDS
This instruction manual is important to you. Please read it. In a short time sho ws exactly how to connect,
operate, and adjust this unit for best performance.
It can save you money. It shows simple things to do and check before you call for help a nd can save the
cost of unnecessary service or call out charge.
WARNING :
Please retain all packaging material for future transportation of the unit or in the unlikely event that the
unit needs to be returned for service.
TO REDUCE THE RISK OF FIRE OR ELECTRIC SHOCK, DO NOT EXPOSE THIS
APPLIANCE TO RAIN OR MOISTURE. DANGEROUS FIGHT VOLTAGES ARE PRESENT
INSIDE THE ENCLOSURE, DO NOT OPEN THE CABINET. REFER SERVICING TO
QUALIFIED PERSONNEL ONLY.
SOME DO'S AND DON'TS ON THE SAFE USE OF EQUIPMENT
This equipment has been designed and manufactured to meet European safety standards but like any
electrical equipment, care must be taken if you are to obtain the best results and safety is to be assured.
DO read the operating instructions before you attempt to use the equipment.
DO ensure that all electrical connections ( including the mains plug, exten sion leads and interconnections
between piece of equipment ) are properly made in accordance with the supplied instructions. Switch off
and withdraw the mains plug when making or changing connections.
DO consult your dealer if you are ever in doubt about the installation, operation, or safety of your equipment.
DO be careful with glass panels or doors on equipment.
DON'T continue to operate the equipment if you are in any doubt about it working normally, or if it is
damaged, in any way - switch off, withdraw the mains plug and consult your dealer.
DON'T remove any fixed cover as this may expose dangerous voltages.
DON'T leave equipment switched on when it is unattended unl ess it is specifically stated that it is de signed
for unattended operation or has a standby mode. Switch off using the switch on the equipment and make
sure that your family knows how to do this. Special arrangements may need to be made for infirm or
handicapped people.
DON'T listen to headphones at high volume, as such use can permanently damage your hearing.
DON'T obstruct the ventilation of the equipment, for example with curtains or soft furnishings. Overheating
will cause damage and shorten the life of the equipment.
DON'T use makeshift stands and never fix legs with wood screws - to ensure complete safety always fit the
manufacturer's approved stand or legs with the fixings provided according to the instructions.
For your convenience a mains plug with a fuse has been fitted to this appliance. For your safety please
observe the following information.
Should the fuse fail in the plug remove the plug from the wall socket and replace the fuse with a 3
1.
Amp ASTA approved to BS1362 fuse.
Never use the plug without the fuse cover fitted. Replacement fuse covers are available from your
2.
dealer or most electrical retail outlets.
If the mains plug is cut off from the cable, rewire the replacement plug in accordance with the
3.
instruction given in this manual.
4.
CAUTION: Under no circumstances should the discarded plug be inserted into the mains socket.
To prevent a shock hazard carefully dispose of the discarded plug. Do not leave the plug lying
around where children might see it.
WARNING:
CAUTION:
MAINS PLUG WIRING DETAILS
accordance with the following wiring codes:
DRIPPING WARNING
The product shall not be exposed to dripping or splashing and that no objects filled with liquids, such as
vases, shall be placed on the product.
VENTILATION WARNING
The normal ventilation of the product shall not be impeded for intended use.
WARNING:
To prevent fire of shock hazard do not expose this unit to rain or moisture.
DANGEROUS VOLTAGES EXIST INSIDE THIS UNIT, DO NOT REMOVE COVER (OR
BACK). NO USER SERVICEABLE PARTS INSIDE. REFER SERVICING TO QUALIFIED
SERVICE PERSONNEL. DISCONNECT FROM MAINS SUPPLY WHEN NOT IN USE.
E
N
UNDER NO CIRCUMSTANCES MUST THE LIVE OR NEUTRAL WIRES BE CONNECTED
TO THE EARTH TERMINAL IN A 3-PIN MAINS PLUG.
This symbol means that this unit is double insulated.
An earth connection is not required.
PRE FITTED MAINS PLUGS
L
BROWN
FUSEBLUE
Cord Grip
The wires in this mains lead are coloured in
accordance with the following wiring codes:
Blue Neutral
Brown live
The wires in this mains lead must be connected to
the terminals in the plugs as follow:
Blue Wire N or Black
Brown Wire L or Red
Only a 3 Amp fuse should be fitted in the plug or a
5 Amp fuse at the distribution board.
DON'T allow electrical equipment to be exposed to rain or moisture.
Above all
NEVER let anyone, especially children, push anything into holes, slots or any other openings in the
case this could result in a fatal electric shock.
NEVER guess or take chances with electrical equipment of any kind.
It is better to be safe than sorry!
-1- -2-
CAUTION
CLASS 1 LASER PRODUCT
Use of Controls or adjustments or performance of
procedures other than those specified herein may
result in hazardous radiation exposure.
CLEANING
Always disconnect unit from power supply before
attempting to clean it.
Use soft cloth moistened with soapy water, wipe
gently.
Do not use solvents or abrasive materials.
LASER SAFETY
This unit employs a laser. Only qualified service
personnel should attempt repair.
DANGER: INVISIBLE LASER
RADIATION WHEN OPEN AND
INTERLOCK FAILED OR DEFEATED.
AVOID DIRECT EXPOSURE TO BEAM.
CAUTION: HAZARDOUS LASER
RADIATION WHEN OPEN AND
INTERLOCK DEFEATED.
Page 3
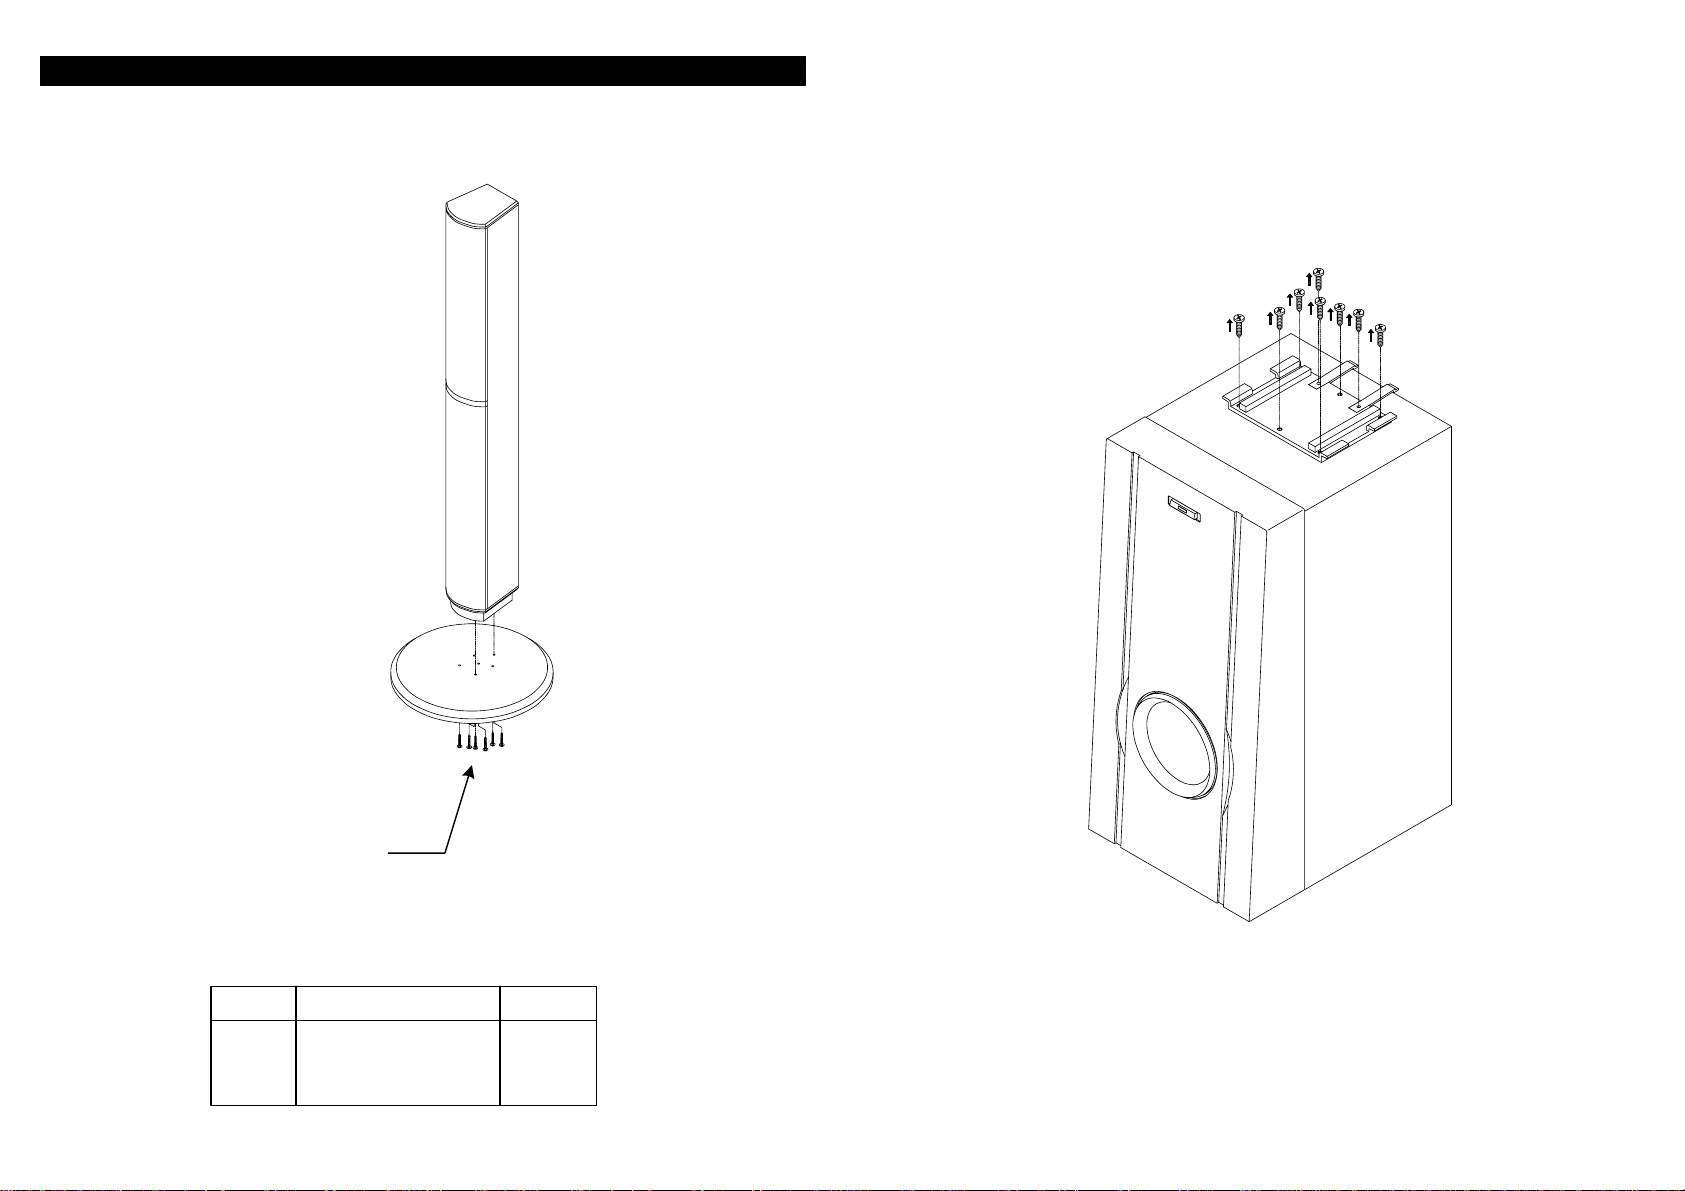
SPEAKER BOX INSTALLATION
Disassemble Adapter Bracket
If you wish to place subwoofer and main-unit separately, we suggest to
remove the adaptor-plate for better looking.
Release 8 pcs mounted screws by screw-driver then take out the adaptor
bracket as per the below drawing.
6 pcs SELF TAPPING SCREW
ITEM
16 PCS
DESCRIPTION QUANTITY
SELF TAPPING SCREW
TAPPING/WH HEAD
-3- -4-
Page 4

LOCATION OF CONTROLS
LOCATION OF CONTROLS (CONT.)
MAIN UNIT FRONT
1. POWER button
Power on/off button to switch the system on
2. CD door
3. CD DOOR OPEN/CLOSE button
While the unit is on, press the button OPEN/
CLOSE to open the cover in CD mode. And you
can insert or remove CD
4. LCD Display
5. CD button
To activate operating mode CD
6. CD PLAY/PAUSE button
To start CD playback/short interruption of CD
playback
7. CD STOP button
interrupting the CD playback/clearing the CD
program
8. Tune/Skip/Search or button
Manual forward or backward tuning to stations,
station search operation/CD forward or
backward title selection/CD forward or
backward search operation
9. D-BASS button
To get the rich bass sound
10. Press EQ button
To select “FLAT, ROCK, JAZZ, POP and
CLASSIC” desired sound effect
11. TAPE button
To activate operating mode TAPE
12. RADIO/BAND button
To activate operating mode TUNER and to
select the reception band
13. Cassette door
14. Cassette Control Keys cover (Open/Close
push area)
15. Cassette Control buttons (Inside Cover)
Cassette control key buttons (RECORD, PLAY,
REW, F.FWD, STOP/EJECT. PAUSE)
16. Subwoofer ON/OFF switch
To switch subwoofer on or off (the subwoofer
light located right below the switch will be
lighted up when the subwoofer is turned on.)
17. Microphone jack (3.5mm)
18. Phones jack (3.5mm)
19. REMAIN/MODE button
To toggle CD display between the individual
playback and remain time/switching to time
display (TIMER ON/OFF) / current time
1 23
10
11
12
13
14
15
16
4
5
6
7
8
9
25
24
23
22
21
20
19
18
17
20. TIMER button
To activate / deactivate the timer
(see Timer section)
21. MEMORY/CLOCK ADJ. button
Tuner memory button/CD program button/clock
setting button
22. AUX button
To activate operating mode AUX
23. VOLUME UP + and DOWN - button
To adjust desired volume
24. IR indicator
25. STANDBY indicator
MAIN UNIT BACK
26
27
28
29
30
34
35
36
26. Battery compartment (3 x "AA" size or UM3
batteries for back-up Tuner memory and
clock)
27. AUX INPUT socket
For connection of an additional audio appliance
28. FM Antenna wire
29. BEAT CUT switch
Uses to reduce the oscillation sound in AM
(MW) record onto the cassette
30. RESET switch
If the set does not display information, or the
data appearing are wrong, press the “RESET”
switch with a sharp object, e.g. needle or ball
point pen. The data must then be re-entered.
31. Subwoofer Output socket
32. Speaker L & R socket
33. Main Unit AC cord
31
32
33
37
34. Subwoofer Input socket
35. Subwoofer Volume Control knob
36. Subwoofer AC cord
37. Speaker
-5-
-6-
Page 5

LOCATION OF REMOTE CONTROLS
Remote Control
56
55
38. Remote Control Transmitter
39. RANDOM button
CD playback in random sequence
40. MEMORY/CLOCK ADJ. button
Tuner memory/CD memory/Clock setting.
41. INTRO button
Plays 10 sec. Of each CD track
42. MEMORY-UP/REPEAT button
Step-wise activating the programmed
transmitting stations in increasing order/Repeat
function for CD mode
43. REMAIN/MODE button
To toggle CD display between the individual
playback and remain times/switching to time
display (TIMER ON/OFF)/current time
44. STEREO/MONO button
Stereo/mono switching for FM stations
45. MUTE button
Sound pause, to switch off the sound
reproduction
46. PRESET EQ button
To select FLAT, ROCK, JAZZ, POP and
CLASSIC
47. D-BASS button
To get the rich bass sound
38
39 40 41 42
43
44
45
46
47
48495051525354
48. VOLUME Up + and Down - buttons
To adjust to the desired volume
49. CD DOOR OPEN/CLOSE button
Open and close the CD door in CD mode
50. PLAY/PAUSE button
To switch on operating mode CD, start CD
playback/short interruption of CD playback
51. STOP button
Interrupting the CD playback/Clearing the CD
program memory
52. CD Skip-Search, Tuning +/
CD Skip-Search, Tuning -
Manual tuning to stations, station search
operation/CD reverse, forward title selection/CD
reverse, forward search operation
53. BAND button
To select the radio reception band
54. POWER button
Switches the unit to and from standby mode
55. FUNCTION MODE button
To select CD/TAPE/TUNER-BAND/AUX
56. 0 - 9, +10 NUMERIC buttons
To recall TUNER preset stations/to recall CD
tracks
OPERATING INSTRUCTION
POWER ON/OFF
Press the POWER button (1) or (54) to turn the
1.
unit 'ON'.
Note: The LCD display illuminate.
2.
You can now select your desired music source
by pressing one of the function buttons CD (5),
TAPE (11), RADIO/BAND (12), AUX (22) or
(55).
NOTE : When TAPE mode is selected, "TAPE"
will show in the display.
To switch to POWER OFF, press the POWER
3.
button (1) or (54) to turn the unit 'OFF'.
SETTING THE TIME
When the unit is first connected to an AC OUTLET the display shows "0:00". To set the clock to the current
time proceed as follow:
During unit at off mode, press the MEMORY/CLOCK
1.
ADJ. button (21)/(40) once, the hour digits begin to
flash.
2.
Press the CD SKIP Forward or Backward
buttons (8) or (52) to adjust the hour.
3.
Press the MEMORY/CLOCK ADJ. button (21) /
(40) again, the minute digits begin to flash.
Press the CD SKIP Forward or Backward
4.
buttons (8) or (52) to adjust the minute.
5.
Press the MEMORY/CLOCK ADJ. button (21) /
(40) once more, the display stops flashing and
the clock begins to run.
POWER
POWER
MEMORY/CLOCK ADJ.
MEMORY/CLOCK ADJ.
MEMORY/CLOCK ADJ.
-7- -8-
Page 6

TIMER ON/OFF SETTING
NOTE: The clock should be adjusted before Timer On/Off setting.
1.
Press the REMAIN/MODE button (19)/(43)
once, the TIMER ON indicator begin to flash.
Press the MEMORY/CLK ADJ. button (21)/(40)
2.
once, the hour digits begin to flash.
3.
Press the CD SKIP forward or backward
buttons (8) or (52) to adjust the hour.
13.
Press the MEMORY/CLK ADJ. button (21)/(40)
once more, then the Timer Off adjustment is
finished with the "OFF" display keep turning ON.
14.
To cancel the Timer Off setting, press REMAIN/
MODE button (19)/(43) until Timer Off setting
mode, the "OFF" display keep turning ON.
Press TIMER button (20) to cancel Timer Off
setting, the "OFF" display will flash.
Note: After setting Timer On and/or Timer off,
press MODE/REMAIN to return to current time
in standby mode.
Timer ON/OFF displays:
4.
Press the MEMORY/CLK ADJ. button (21)/(40)
again, the minute digits begin to flash.
5.
Press the CD SKIP forward or backward
buttons (8) or (52) to adjust the minute.
6.
Press MEMORY/CLK ADJ. button (21)/(40)
once more, then the Timer On adjustment is
finished with the "ON" display keep turning ON.
To cancel the Timer On setting, press REMAIN/
7.
MODE button (19)/(43) until Timer On setting
mode, the "ON" display keep turning ON.
Press "TIMER" button (20) to cancel Timer On
setting, the "ON" display will flash.
Note: To resume Timer ON/OFF setting, similar
operation by using TIMER button
8.
To set Timer Off, press the REMAIN/MODE
button (19)/(43) until the TIMER OFF indicator
begin to flash.
9.
Press the MEMORY/CLK ADJ. button (21)/(40)
once, the hour digits begin to flash.
10.
Press the CD SKIP forward or backward
buttons (8) or (52) to adjust the hour.
11.
Press the MEMORY/CLK ADJ. button (21)/(40)
again, the minute digits begin to flash.
BASIC OPERATION
Electronic volume control
Electronic volume control display
Press VOL-UP or DOWN button (23)/(48) to
1.
increase or reduce the volume, the volume
level will be shown in the LCD display (4)
2.
Holding down the VOL UP/DOWN button
will result in continuous increase or
decrease of the volume.
Muting Function
If the MUTE button (45) is pressed, the audio output
will be muted, and "VOL 0" is shown for 1 second.
Then return to the original display. "VOL 0" will
appear for every 4 seconds. One more press the
button will resume the volume.
Subwoofer Control
Press subwoofer ON/OFF (16) button to switch on
the subwoofer (Note: Make sure the voltage is
correct before plug in AC cord to outlet). Rotate
volume (35) control knob to clockwise (higher vol.
level) or anti-clockwise (lower) until desired volume
obtained.
Switching the display
Pressing REMAIN/MODE button (19)/(43)
during the power Off mode results in the
following changes:
Clock
Timer On
Setting
Pressing MODE/REMAIN button during the
CD playing mode results in the following
changes.
Playing time
Remaining
time
Clock
Timer On
Setting
Pressing MODE/REMAIN button in the tuner
mode results in the following changes.
Tuning display
Clock
Timer On
Setting
Pressing MODE/REMAIN button in the tape
mode results in the following changes.
Tape
Clock
Timer On
Setting
Pressing MODE/REMAIN button in the AUX
mode results in the following changes.
Line
(AUX)
Clock
Timer On
Setting
Timer Off
Setting
Timer Off
Setting
Timer Off
Setting
Timer Off
Setting
Timer Off
Setting
12.
Press the CD SKIP forward or backward
buttons (8) or (52) to adjust the minute.
-9- -10-
Page 7

LISTENING TO THE RADIO
1.
Press the POWER button (1)/(54) to turn the
system 'ON'.
Press the RADIO/BAND button (12)/(55) to
2.
select the radio function.
Example : FM mode
Press the TUNING UP or DOWN buttons (8) or
4.
(52) to tune to the desired station.
PLAYING COMPACT DISCS
1.
Switch on the power and press the CD button
(5)/(55) to select the CD mode.
Reading TOC
To play the disc
Press PLAY/PAUSE button (6)/(50) to play the CD.
Playing track 1
3. Press the RADIO/BAND button (12) or (55) or
(53) [BAND] repeatedly to select AM (MW) or
FM band.
TUNER/BAND
STORING PRESET STATIONS
1.
Tune to the station you wish to store.
The unit enables you to program 20 stations of FM
and 12 stations of AM band.
Press the MEMORY button (21)/(40) once.
2.
3.
Press the MEM-UP/REPEAT button (42) or
enter desired numeric buttons directly on remote
control repeatedly to set the desired preset
station number.
REPEAT
MEMORY UP
Manual Tuning - Press and hold the TUNING
UP or DOWN buttons (8) or (52) until the
display approaches your desired station. Then
tap the buttons repeatedly until the display
shows the exact frequency.
Auto tuning - Press the TUNING forward or
backward buttons momentarily and re lease.
The tuner will move up or down to the next
available station.
5.
When finished listening, press the POWER
button (1)/(54) to shut the system OFF.
4.
Press the MEMORY button (21)/(40) again. The
station is stored.
5.
To store other stations, repeat above steps.
RECALLING PRESET STATION
Press the MEM-UP/REPEAT (4 2) button on
remote control repeatedly to select the desired
station.
If there is no CD inside, a "DISC" display will
2.
appear.
When there is no disc
To pause the playing
Press PLAY/PAUSE button during the disc is
playing, the playing time will flash.
Loading a disc
1.
Press the DOOR OPEN button (3)/(49) one
time to open the CD door.
To stop the disc playing
Press STOP button (7)/(51).
Put a disc inside and then press the DOOR
2.
OPEN button one time to close the CD door.
After that, reading TOC will start.
After reading TOC
Note: This unit is CD-R/RW compatible.
Skip and Search Function
Press the SKIP forward or backward buttons (8) or (52) momentarily.
While paused
Stop condition (TOC display)
PRESET EQUALIZATION
Press the PRESET EQ button (10)/(46) repeatedly
to cycle through the preset EQ show on the LCD
display -- FLAT, ROCK, JAZZ, POP and CLASSIC.
Headphones socket
Headphones socket “PHONES” (18) for
headphones with 16-32 Ohm impedance (3.5mm
jack). Use corresponding adaptors (s pecialist
shops) if you have different plugs. The speakers are
automatically switched off when the h eadphones
are being used.
CAUTION:
Listening at high power for a long moment could
damage users’ ears.
X-Bass function
Press the D-BASS button (9)/(47), the Bass Boosted mode can be set. Once more press this
button can cancel the D-Bass.
Mic mixing function
1. Select the desired mode (CD/Tape/Tun er/
AUX). Connect microphone plug to MIC
socket (17).
2. Place microphone away from the sound
source.
3. If howling occurs, decrease volume or remove
microphone as far as possible from the
PRESS ONCE
BACK TO THE
BEGINNING OF
THE CURRENT
TRACK
NEXT TRACK NEXT TRACK
Press and hold the SKIP button during playback :
NOTE : During the search mode low level audio will be heard to assist in locating the
correct point in the track.
IN PLAY MODE
: FAST BACKWARD
speakers.
-11- -12-
PRESS TWICE
PREVIOUS
TRACK
IN STOP MODE
PRESS ONCE
PREVIOUS
TRACK
: FAST FORWARD
Page 8

To repeat a track or disc
Press MEM-UP/REPEAT button (42) on remote
control one time, "one track repeat" will be
active.(REPEAT Flashing)
One track repeat (flashing)
Random play function
Press RANDOM button (39) on remote control in
stop mode then PLAY/PAUSE to start random play.
Press once again to change normal playing mode.
Random playing start
With one more press, "all track repeat" will be active.
(REPEAT steady on)
With one further press, the repeat mode is cancelled.
All track repeat
Intro play function
During the stop condition, pressing the INTRO
button (41) on remote control then PLAY/PAUSE to
start the intro playing. After that the first 10 seconds
of each song will be played.
If the INTRO button is pressed again, the CD will
change to normal playing mode.
Intro playing
PLAYING CASSETTE TAPE
PLAYBACK
1.
Switch on the power and press the TAPE button
(11)/(55).
2. Open the cassette key cover by pushing the
OPEN/CLOSE area of Cassette Cover (14) to
reveal the cassette buttons (15). Press STOP/
EJECT button to open the cassette door. Insert
a prerecorded tape with exposed tape
downwards and full spool to the left, closed the
cassette door.
To suspend playback
Press down PAUSE button.
3. To playback, press down the PLAY button.
4.
To stop Playback, press down the STOP/
EJECT button
To Fast Forward or Rewind tape
Press down REW or F.FWD button.
PROGRAMMED PLAYBACK
The CD player enables you to program up to 16 tracks in a sequence of your choice. First select CD stop
mode.
1.
Press the MEMORY button (21)/(40) one time.
Program input mode
2.
Press the SKIP forward or backward buttons
(8) or (52) to select the desired track to be
programmed.
5.
Pressing PLAY/PAUSE button (6)/(50) to play
the program tracks.
Note: If the program is already exit (MEMORY
indicator still turned on), press the PLAY/
PAUSE button, the program play will start
again.
Clear the program
Press the STOP button (7)/(51) in stop mode until
MEMORY indicator goes off on LCD display in
Choose track 4
3.
Pressing MEMORY button one time, then track
order to cancel the preset programs.
4 is stored
Continue to program, repeat steps 2 and 3.
4.
Reviewing programs
Press the MEMORY button repeatedly. The
track number programmed on each p rogram
number will be displayed.
-13-
To resume playback, press the PAUSE button
again.
TAPE RECORDING From TUNER
1.
Press the RADIO/BAND button (12)/(55) to
select the TUNER mode.
2.
Follow steps 1, 2, 3 and 4 in "LISTENING TO
THE RADIO" to tune in the station you wish to
record.
Insert a blank tape to cassette compartment
3.
with exposed tape downward and full spool to
the left and then close the cassette door.
4.
Press down the RECORD and PLAY buttons to
start recording.
TAPE RECORDING From CD - Synchronized
Recording from CD player
1.
Switch on the power, press the CD button (5)/
(55) to select the CD mode and than open the
CD door by pressing DOOR OPEN CD button
(3)/(49).
2.
Put a disc inside and then press the CD DOOR
OPEN button one time to close the CD door.
3.
Insert a blank tape to Cassette section cassette
compartment with exposed tape downward and
full spool to the left then close the cassette
door.
4.
Press down the RECORD and PLAY button to
start recording, CD will start play automatically
from beginning of track 1 or other tracks
(currently playing).
Press STOP/EJECT button to stop recording.5.
5.
Press STOP/EJECT button to stop recording
and CD playback will stop too.
Note: 1. Return to Tape mode, rewind the tape to listen to recorded materials.
2. Recording from AUX mode or through microphone (Tape mode): similar to
above descriptions.
-14-
Page 9

CARE AND MAINTENANCE
COMPACT DISC CARE
Treat the disc carefully. Handle the disc only by its edges. Never allow your fingers to come in
contact with the shiny, unprinted side of the disc.
Do not attach adhesive tape, stickers etc., to the disc label.
Clean the disc periodically with soft, lint-free, dry cloth. Never use detergents or adhesive cleaners
to clean the disc. If necessary, use a CD cleaning kit.
If disc skips or gets stuck on a section of the disc, it is probably dirty or damaged (scratched).
When cleaning the disc, wipe in straight lines from the centre of the disc to the edge of the disc.
Never wipe in circular motions.
To remove a disc from its storage case, press down on the centre of the case and lift the disc outs,
holding it carefully by the edges.
Fingerprints and dust should be carefully wiped off the disc's recorded surface with a soft cloth.
Unlike conventional records. compact disc have no grooves to collect dust and microscopic debris
so gently wiping with a soft cloth should remove most particles.
TAPE HEAD CLEANING
The tape heads, pinch roller and capstan require periodic cleaning. This removes particles of the metal oxide
costing that wear off the tape and accumulate on these parts and impair performance. Switch off the power,
press the Stop/Eject Key to open the cassette door, and press the Play Key. Clean the tape heads, pinch roller
and capstan with a soft cloth or cotton swab dampened in isopropyl alcohol or special tape head cleaner.
NOTE: Never use any metal objects on or near the tape heads. Do not allow any cleaning material to fall into
the tape assembly.
COTTON SWAB
RECORD/PLAY HEAD
CLEANING THE UNIT
To prevent fire or shock hazard, disconnect your unit from the AC power source when cleaning.
The finish on the unit may be cleaned with a dust cloth and cared for as other furniture, Use caution
when cleaning and wiping the plastic parts.
If the cabinets become dusty wipe them with a soft dry dust cloth. D o not use any wax or polish
sprays on the cabinets.
If the front panel becomes dirty or smudged with fingerprints it may be cleaned with a soft cloth
slightly dampened with a mild soap and water solution. Never use abrasive cloths or polishes as
these will damage the finish of your unit.
CAPSTAN
PINCH ROLLER
TROUBLESHOOTING GUIDE
Should this unit exhibit a problem, check the following before seeking service.
Symptom
Radio
Noise or sound distorted on AM or
FM broadcasts.
FM STEREO indicator does not
light
AM or FM, no sound.
Cassette Player
No sound.
Sound distorted.
Speed varies
Cassette Recorder
Will not record.
Distorted sound on playback.
Compact Disc Player
CD Player will not play.
CD skips while playing. Disc is dirty or scratched.
Disc is inserted but CD player
skips over spot and will not play,
Station not tuned properly for AM
or FM
FM : Line antenna is not extended.
AM : Unit is not positioned
correctly.
FM MODE button is set to MONO
position.
TUNER Function button is not
pressed.
Volume at minimum
TAPE Function button is not
pressed.
Volume at minimum
Dirty head.
Tape old or worn.
Dirty roller and capstan.
Press prevention tab removed
Defective tape or dirty tape head.
CD Function button is not pressed.
CD is not installed or installed
incorrectly.
Disc inserted upside down. Insert disc properly.
Disc is dirty. Clean disc.
Disc is non-standard. Use correct disc.
Possible cause
Retune the AM or FM broadcast
station.
Extend FM line antenna.
Rotate unit until best reception is
obtained.
Set FM MODE to FM STEREO
position.
Press TUNER function button.
Increase Volume.
Press the TAPE Function button.
Increase Volume
Clean the head.
Replace the tape.
Clean roller and capstan.
Cover hole with tape
Replace tape or clean tape head
Press the CD Function button.
Insert CD with label side out.
Wipe disc with cloth or use
another disc.
Solution
Caution: never allow any water or other liquids to get inside the unit while cleaning.
-15-
-16-
Page 10

SPECIFICATION
GENERAL
Power requirement
Power consumption
Weight
Dimension of:
Main unit
Speaker
Operation temperat ure
RECEIVER SECTION
Receiving bands
Tuning range
CD PLAYER SECTION
Playback system
DAC
Frequency response
CASSETTE SECTION
Recording system
Biasing system
Frequency response
Wow and flutter
AUDIO SECTION
Power output
Speaker impedance
Headphones impedance
AUX input sensitivity
ACCESSORIES
Instruction Booklet
Remote Control Handset
Subwoofer cord
AC
230V~50Hz
DCDC4.5V “AA” size/UM-3 x 3 pcs for Tuner MEMORY back up
3V “AA” size/UM-3 x 2 pcs for Remote Handset
AC 40Watts
Approx. 17.1Kg
Approx. 260mm(W) x 809mm(H) x 250mm(D)
Approx. 260mm(W) x 800mm(H) x 260mm(D)
+5 C -- +35 C
AM(MW)/FM
AM(MW) 522FM 87.5-108MHz
Compact Disc Digital Audio
4 times over sampling,
1 bit D/A converter.
100 -
20,000 Hz
4 tracks 2 channel stereo
AC bias, magnet erase
125 -
0.35% WRMS (JIS)
Maximum 7.5 Watts per channel
Subwoofer: 15 Watts
3 ohms
8 - 32 ohms
0.5V
1
1
1
1620KHz
6300Hz
IMPORTANT NOTES
Hearing is very important to you and to us so plea se take care when operating this e quipment.
It is strongly recommended that you follow the listed guid elines in order to prevent possible
damage or loss of hearing.
ESTABLISH A SAFE SOUND LEVEL
Over time your heating will adapt to con tinuous lou d sounds and w ill give the impression that
the volume has in fact been reduced. What seems normal to you may in fact be harmful.
To guard against this BEFORE YOUR HEARING ADAPTS set the volume at a level.
Slowly increase the level until you can hear comfortably and clearly and without distortion.
Damage to your hearing is accumulative and is irreversible.
Any ringing or discomfort in the ears indicates that the volume is too loud.
Remember listening for prolonged period of time at high volume levels will harm you r
hearing.
Once you have established a comfortable listening level, DO NOT INCREASE THE
SOUND LEVEL FURTHER.
The following list of typical sound levels may assist you in recogn izing just how loud you have
set the volume level.
DECIBEL
Level (dB) Example
30dB
40dB
50dB
60dB
70dB
THE FOLLOWING NOISE CAN BE HARMFUL UNDER CONSTANT EXPOSURE
80dB
90dB
100dB
120dB
PERMANENT LOSS OF HEARING
140dB THRESHOLD OF PAIN Gunshot 2 feet away, jet plane taking off.
Quiet library, soft whisper.
Living room, fridge freezer bedroom away from traffic.
Normal conservation, quiet office, light traffic.
Electric sewing machine.
Vacuum cleaner, hair dryer, noisy restaurant.
Average city traffic, alarm clock buzzer at 2 feet, food mixer.
Motorcycle, heavy goods vehicle, petrol lawn mower.
Pneumatic drill, chair saw, garbage truck, discotheque/night-club.
Rock band concert, thunderclap fast train passing by.
-17-
Goodmans Helpline 0870 8730080
-18-
 Loading...