

Page 1

G-SHOT 3029TFT
Multi-Functional
Digital Still Camera
(User Guide)
Goodmans Helpline Phone Number 0870 873 0080
Page 2

Specifications
● Image Sensor: 3.2 mega pixel CMOS sensor
● Digital Camera Resolution :
- 2048x1536 [3 Mega Pixel ]
- 1600 x 1200 [2 Mega Pixel ]
- 640 x 480 [VGA - 0.3 Mega pixel]
Image Quality Option (only for digital camera): Super Fine ; Fine ; Normal
● External Storage: SD Card (MMC compatible) up to 512MB
● Shutter: Electrical
● Still Image File Format: JPEG
● Movie File Format: AVI (Motion JPEG), with sound
● Voice File Format: WAV
● Movie mode resolution: 640x480(VGA) ; 320 x 240 (QVGA)
● White Balance: Auto / Manual (Sunny, cloudy, Fluorescent, Tungsten)
● Flash Modes: Automatic, On, Anti-red eye, Off
● Microphone: Built-in
● Digital Zoom: 8X Digital Zoom
● Lens Aperture: F 4.0
● Shutter Speed: 1/4 sec to 1/1000sec
● Range of focus: 1m to Infinity
● Self-timer: 5second / 10 second
● PC-CAM frame rate: QVGA (320 x 240) 15 to 25 fps, VGA (640 x 480) 10 to 18 fps
● TV output : NTSC or PAL, selectable
● Digital Printing Format : DPOF
● USB connectivity: version Full Speed 2.0(compatible with USB 1.1)
Page 3
● Internal Storage: 32MB Internal Flash Memory
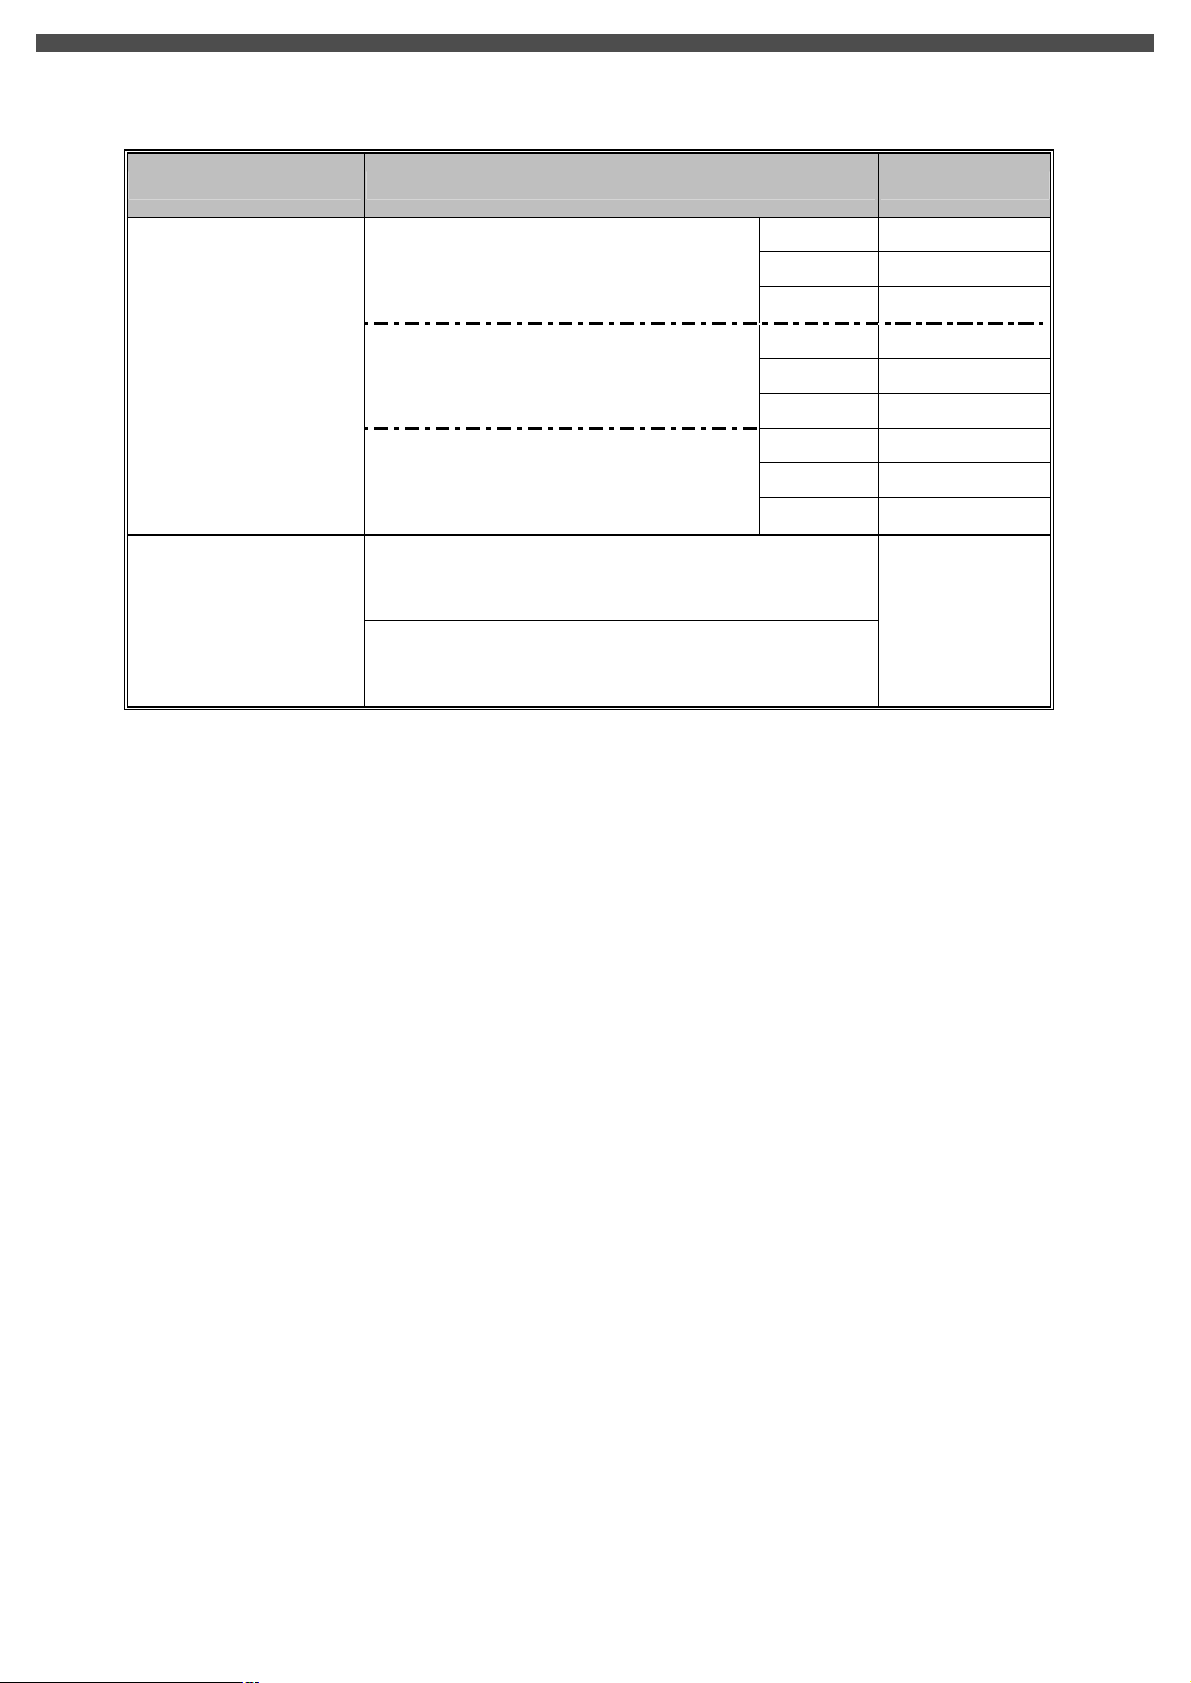
● Number of images stored in 32MB (typical):
Mode Condition Approx. capacity
Digital Camera
2Mega Pixel : 1600 x 1200
0.3Mega Pixel(VGA) : 640 x 480
Digital Video (DV)
NOTE:
• The above figures are only estimates. The actual numbers will vary depending on scene
(image) complexity.
• Part of internal memory is reserved for system buffer, available memory left for image
storage is less than 32MB.
• Compatibility with all SD/MMC memory cards is NOT guaranteed.
● Power: 3 AAA Alkaline Batteries
● Dimensions: 95 x 50 x 33 mm
● Weight: About 95g (without batteries)
Super Fine
43
Fine 63 3Mega Pixel : 2048 x 1536
Normal 100
Super Fine
71
Fine 104
Normal 164
Super Fine
210
Fine 420
Normal 654
VGA(640x480) ~ 1min40sec
QVGA(320x240) ~3min
Page 4

System Requirements
The minimum system requirements for the digital camera are as the following:
System Requirement
OS Windows 98SE/Me/2000/XP
CPU Pentium MMX ‘ Celeron or AMD Athlon® or higher
RAM 128 MB
CD-ROM 4X or above
HDD Hard drive with 500MB free disk space
Color display: 16-bit
Sound Blaster or compatible sound card
USB port
Note: Please note that only the camera driver is compatible with Apple Mac computers. Photo processing
software provided on the disc is not compatible with Apple Mac.
Page 5
TABLE OF CONTENTS
TABLE OF CONTENTS...................................................................................................................................5
1. PACKAGE CONTENTS...............................................................................................................................6
2. IDENTIFYING THE PARTS.........................................................................................................................7
3. CONTROL BUTTON FUNCTIONS.............................................................................................................8
4. PREPARATION.........................................................................................................................................10
Loading the Battery into the Camera........................................................................................................10
Inserting and Removing an SD Card (Not Supplied)................................................................................11
Inserting card:..................................................................................................................................11
Removing card:................................................................................................................................11
Protecting Data on an SD Card................................................................................................................12
5. GETTING STARTED..................................................................................................................................13
Turning the Camera On...........................................................................................................................13
Turning the Camera Off...........................................................................................................................13
Checking Battery Power..........................................................................................................................13
6. MONITOR SCREEN CONTENTS............................................................................................................14
DIGITAL CAMERA MODE..........................................................................................................14
DIGITAL VIDEO MODE............................................................................................................15
7. SETTING THE DEFAULT(Setup Mode)...................................................................................................16
MENU.....................................................................................................................................................16
SETUP MODE........................................................................................................................................16
8. TAKING PHOTOS (Camera mode).............................................................................................................19
Menu Settings (Camera Mode ).........................................................................................................19
Photo Quality (Camera Mode).................................................................................................................20
Using the Flash (Camera Mode)...............................................................................................................20
Changing Zoom Level.............................................................................................................................20
Other Camera Settings.............................................................................................................................21
9. TAKING A MOVIE (DV mode)..................................................................................................................24
Menu Settings (DV Mode ).....................................................................................................................24
Changing resolution (DV Mode)..............................................................................................................24
Changing Zoom Level (DV Mode)..........................................................................................................25
Other Video Recording Settings...............................................................................................................25
10. PLAYBACK (Playback mode)...................................................................................................................27
Playing Photos .................................................................................................................................27
Playing back a Movie ......................................................................................................................28
Viewing Pictures and Movies on a TV.....................................................................................................29
Other Settings (Play back mode)..............................................................................................................29
11. DELETING FILES (Play back mode)........................................................................................................30
12. INSTALLING SOFTWARE DRIVER.......................................................................................................31
13. TRANSFERRING FILES..........................................................................................................................32
Connecting to PC.....................................................................................................................................32
Copying files to PC..................................................................................................................................33
14. REMOVING THE CAMERA...................................................................................................................35
15. USING AS PC CAMERA..........................................................................................................................37
Set the Camera to PC CAMERA mode....................................................................................................37
Recording Video Clips Directly To Your Computer.................................................................................38
16. FREQUENTLY ASKED QUESTION (FAQs)...........................................................................................39
Page 6

1. PACKAGE CONTENTS
• G-Shot3029TFT Digital Camera
• Installation CD (User’s Manual, camera drivers)
• USB cable
• TV cable
• Hand Strap
• 3 AAA Alkaline batteries
• Pouch
• User’s Manual
• Quick Start Guide
• Important Information Sheet
Page 7

D Monitor
2. IDENTIFYING THE PARTS
Front View
Battery
compartment &
SD Card Slot
Shutter
Lens Cover
Self timer
indicator
Microphone
Lens
USB & TV
Port Cover
Rear View
Status LED
Display Switch
4 way multi
function buttons
Menu Button
Mode Button
Power
“On/Off”
Button
Page 8
[ M
ENU
]
3. CONTROL BUTTON FUNCTIONS
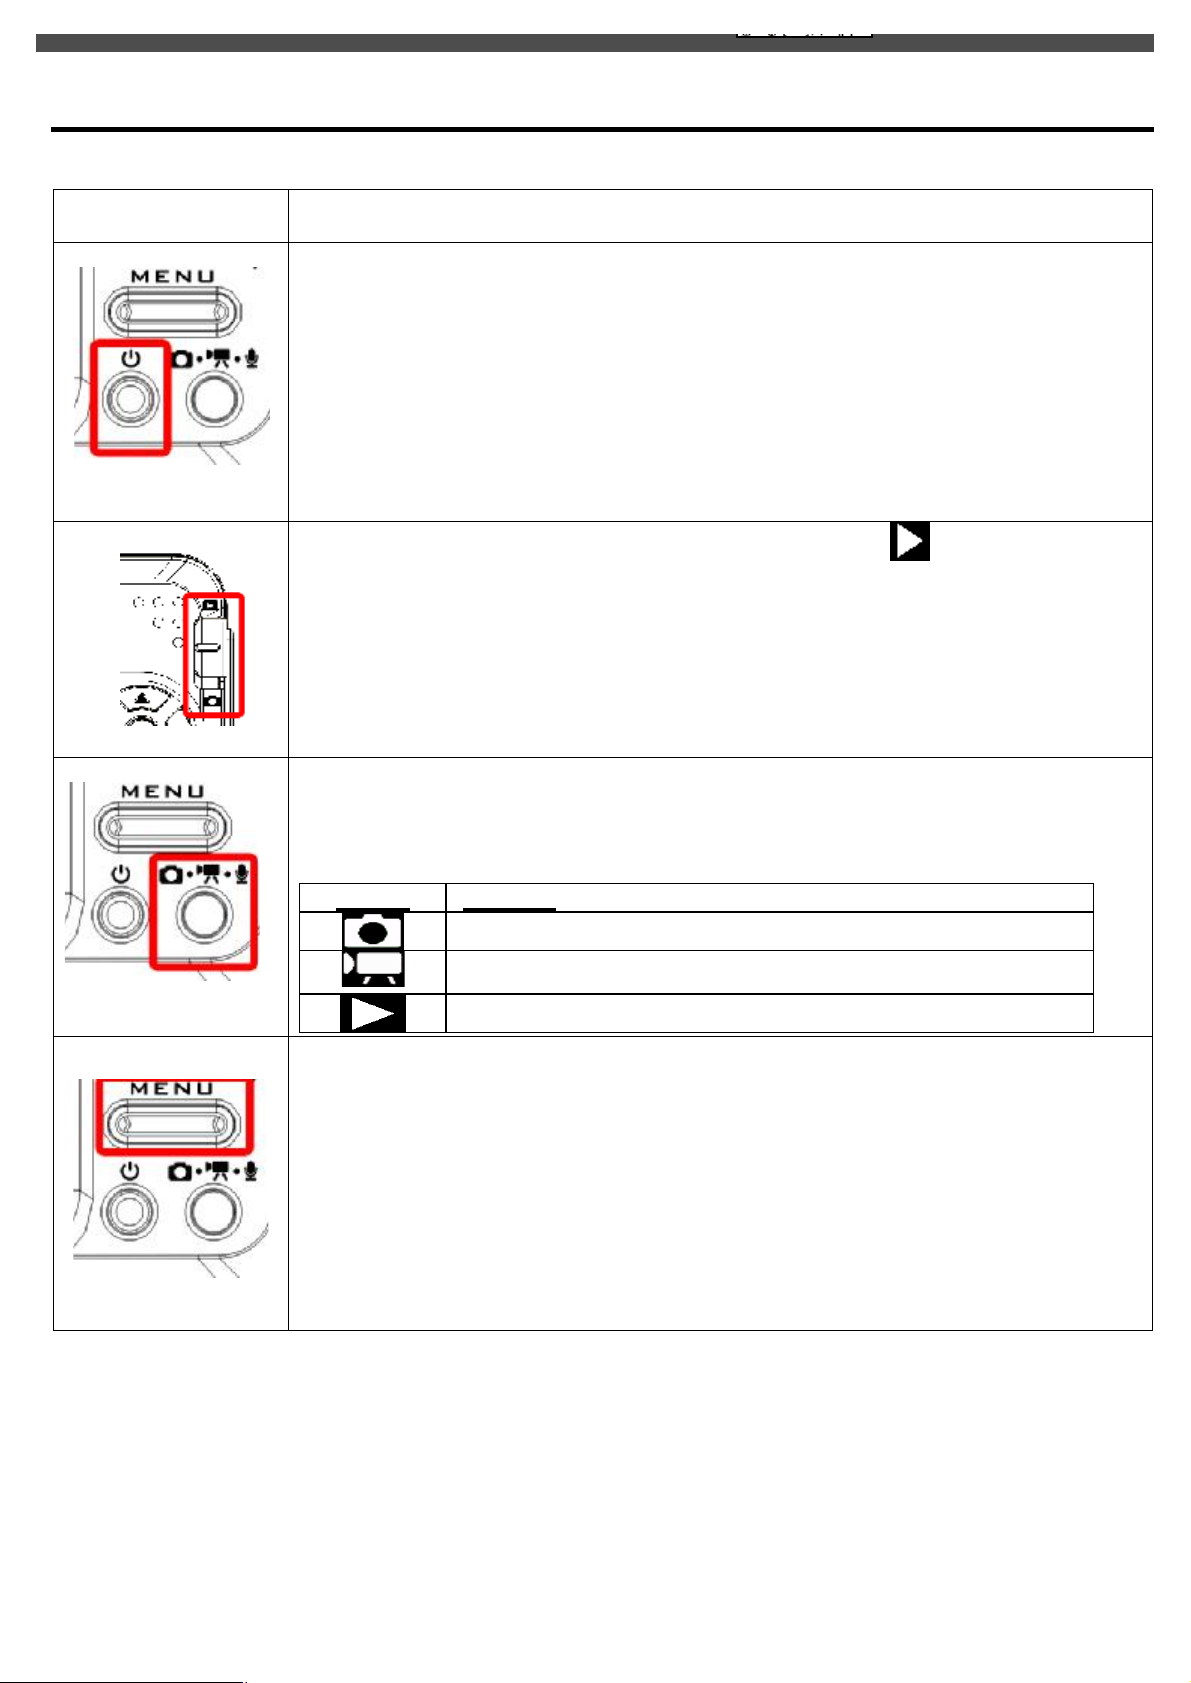
Functional Buttons
ITEM
▪ Power Button : Press the power button for one second to turn on / off the camera
[POWER ON/ OFF]
▪ PREVIEW Switch : Slide the Preview switch to get into (Preview)
Mode, then the last file, e.g. Photo / Movie, taken will be displayed
FUNCTION
[ PREVIEW ]
[ MODE ]
▪ Mode Button : While in Capture mode, press the MODE button to change 3 different
operation modes:
MODE STATUS
Photo Taking Mode
▪Menu button: Press MENU to display a menu for selected mode.
Movie Recording Mode
Playback Mode: [Movie/Photo]
Page 9
BUTTON
[MOVIE MODE] [PHOTO MODE]
[PLAYBACK MODE]
[ OK / Flash ]
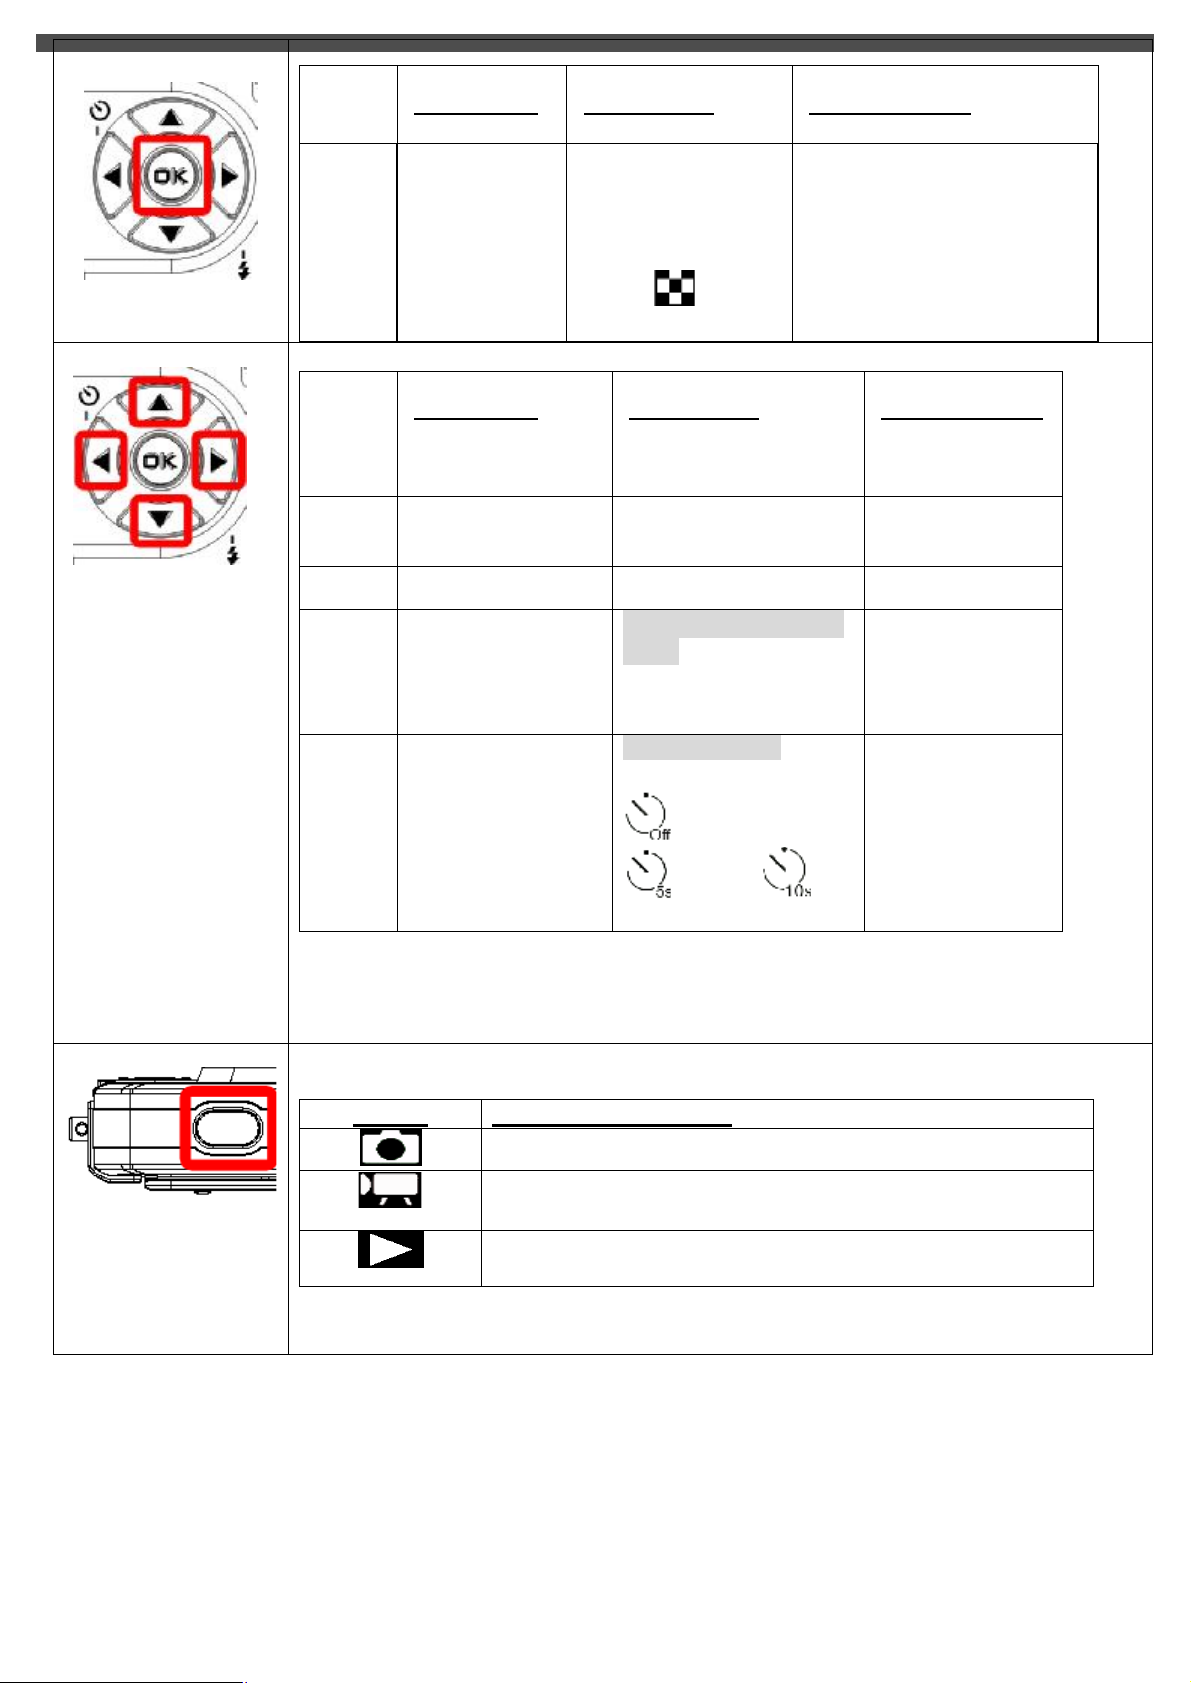
[ DIRECTION KEY]
[OK]
BUTTON
▲
▼
▶
◀
▪ Hide/Show
screen icons
or info
[MOVIE MODE]
▪ Hide/Show
screen icons or
info
▪Six-image
display
[PHOTO MODE]
▪ Hide/Show screen icons
or info
▪Enlarge the camera shots
by pressing the up / down
buttons on the large 4 way
multifunction control
[PLAYBACK MODE]
▪ Zoom-In ▪ Zoom-In ▪ Zoom-In
▪ Zoom-Out ▪ Zoom-Out ▪ Zoom-Out
- -
Toggle between Flash
mode
▪ Next
▪ Off / Anti-Red Eye/
Auto / On
- -
Self Timer Mode
Press the ◀ button to
▪ Previous
(Timer-OFF )/
(5sec )/
(10sec)
Function of [Shutter] in various modes:
MODE FUNCTION OF [REC]
Start taking photo
Start taking movie /Stop taking movie
Start playing movie/ Photo file
Stop playing movie/ Photo file
Page 10
4. PREPARATION
Loading the Battery into the Camera
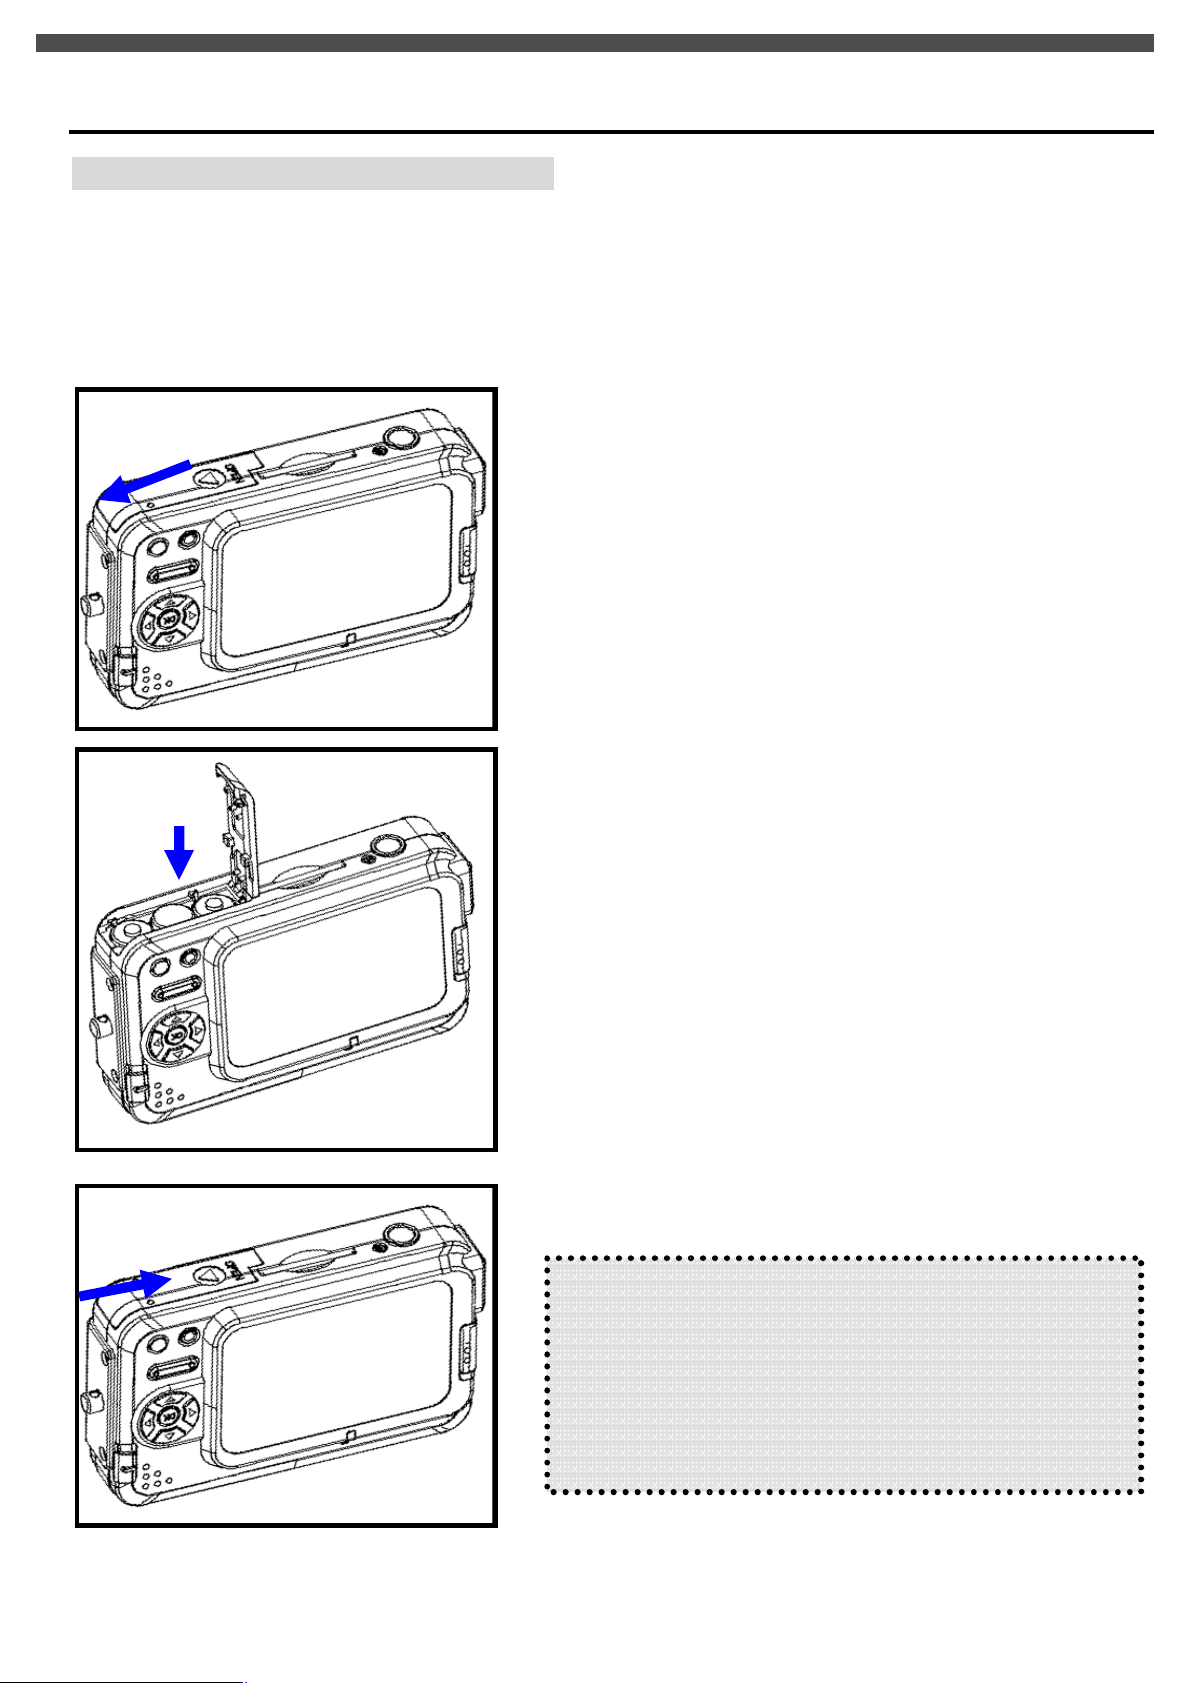
Please load 3 AAA batteries into the battery compartment according to following steps:
(1) Slide the battery cover in the direction indicated by the arrow:
(2) Insert the batteries as indicated on the inner side of the cover.
(3) Note correct polarity as shown below diagram.
(4) Close and lock the battery cover.
vËw
Note:
u Exercise caution when opening the battery cover to
avoid damaging the battery compartment cover and
hinges.
u If you remove the battery from the camera, you will
need to set the date and time again the next time you
reinsert the battery and use the camera.
Page 11
. You can expand
Inserting and Removing an SD Card (Not Supplied)
The camera comes with 32 MB pre-build memory which allows you to store pictures & videos
the memory capacity by using an optional SD or MMC memory card up to 512MB.
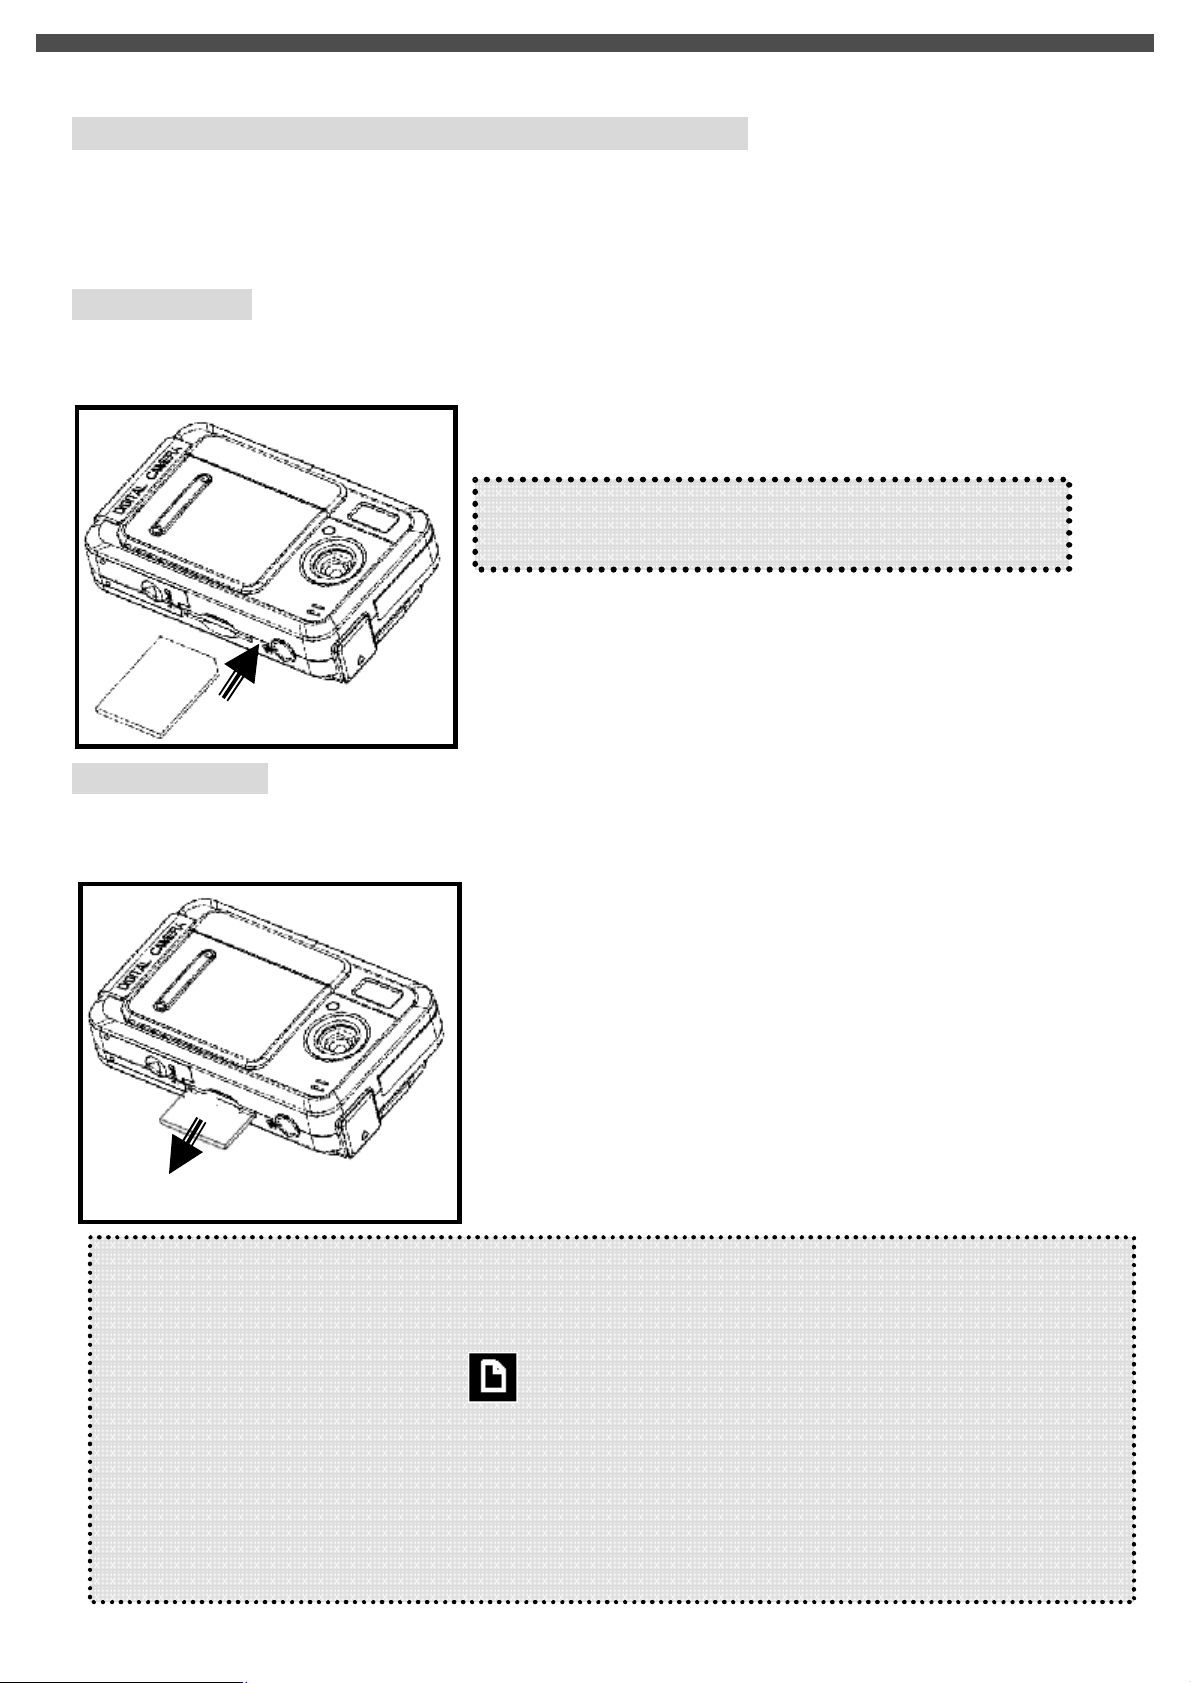
To insert a memory card, refer to the figures shown below:
Inserting card:
● Make sure to turn off the camera.
● Insert the memory card correctly and push it into the card slot as far as it will go. It will click into place.
Note the orientation of the card. If it is inserted
incorrectly, it may become jammed
Removing card:
●To remove the SD/MMC card, gently push the card. After the card pops up, pull the card out of the slot.
● Pull the memory card out with your fingers in the opposite direction.
Note:
l Do not remove the SD/MMC card while the camera is processing data (when the LED is flashing).
When a memory card is fitted, movies and pictures are saved on card rather than on the built-in
memory. And, the SD card icon will be shown on LDC display.
l It may be necessary to format the SD card the first time it is used; especially if the card has been
used in devices other than your camera. To format, see [Format] in SETUP MODE (see page 17).
l If the Built-in memory/ SD card is full, the LCD display will show "MEMORY FULL" flashing in
red color. If the SD card is write-protected, the SD card icon will change in red color.
Page 12
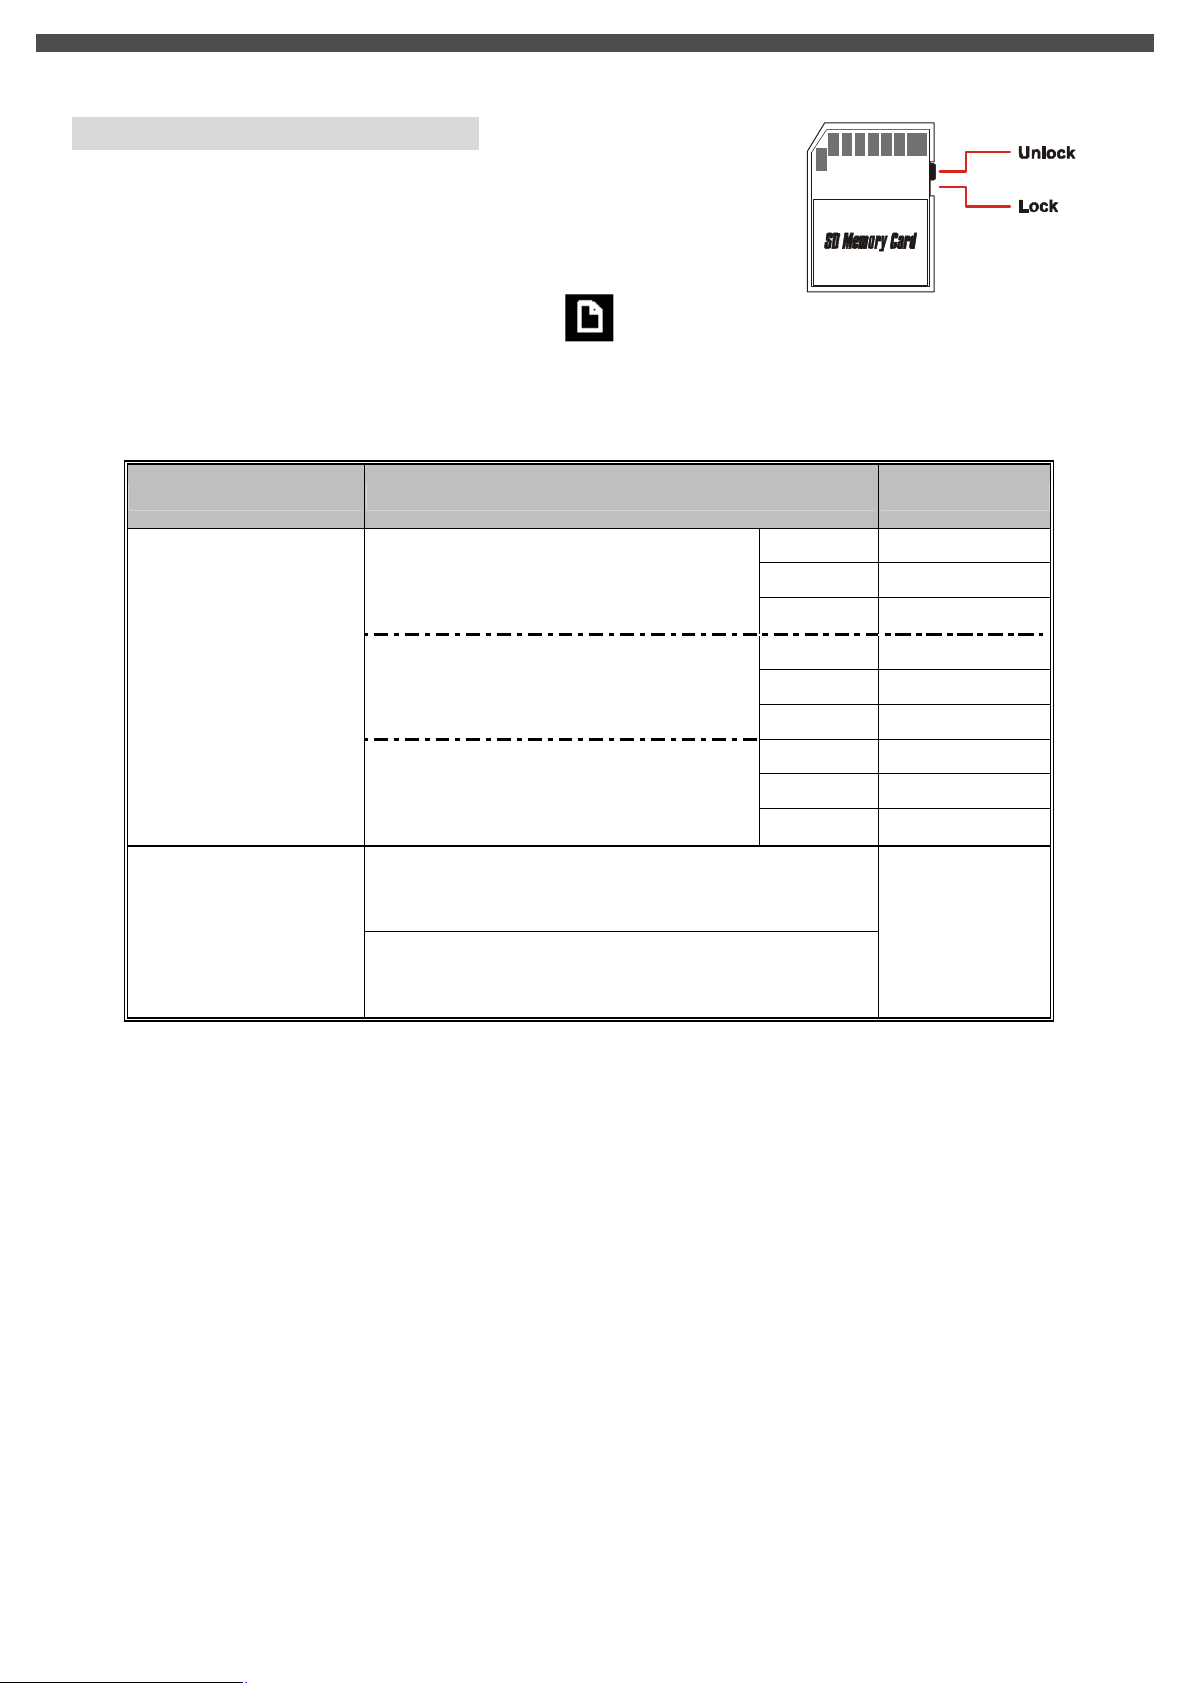
Protecting Data on an SD Card
The SD card comes with a write-protect switch. When the write-protect
switch is set to the Lock position, no further shots can be recorded. To
ensure that the camera can operate normally, you should set the writeprotect switch to the Unlock position before inserting the SD card.
If you insert a write-protected card, the media icon on the LCD display will become red.
l Listed below is the approximate number of images that can be stored cards in 32MB built-in memory.
Actual capacity may vary (up to + 5%) depending on the environment and color condition.
Mode Condition Approx. capacity
Super Fine
43
Fine 63 3Mega Pixel : 2048 x 1536
Normal 100
Camera
2Mega Pixel : 1600 x 1200
Super Fine
Fine 104
71
Normal 164
0.3Mega Pixel(VGA) : 640 x 480
Super Fine
Fine 420
210
Normal 654
VGA(640x480) ~ 1min40sec
Digital Video (DV)
QVGA(320x240) ~3min
Page 13

5. GETTING STARTED
Turning the Camera On
●Press and hold down the [Power] button for 1 ~ 2 seconds to turn on the camera.
When you turn on the camera, you will hear a confirmation-Beep, the Red LED will illuminate. When the Red
LED stops blinking, the camera is ready.
Turning the Camera Off
●Press and hold down the [Power] button for another 1 ~ 2 seconds to turn off the camera.
Checking Battery Power
When the camera is on, you will see the battery power indicator on the bottom left corner of the LCD monitor
screen. It shows you the battery power level.
Page 14

6. MONITOR SCREEN CONTENTS
DIGITAL CAMERA MODE
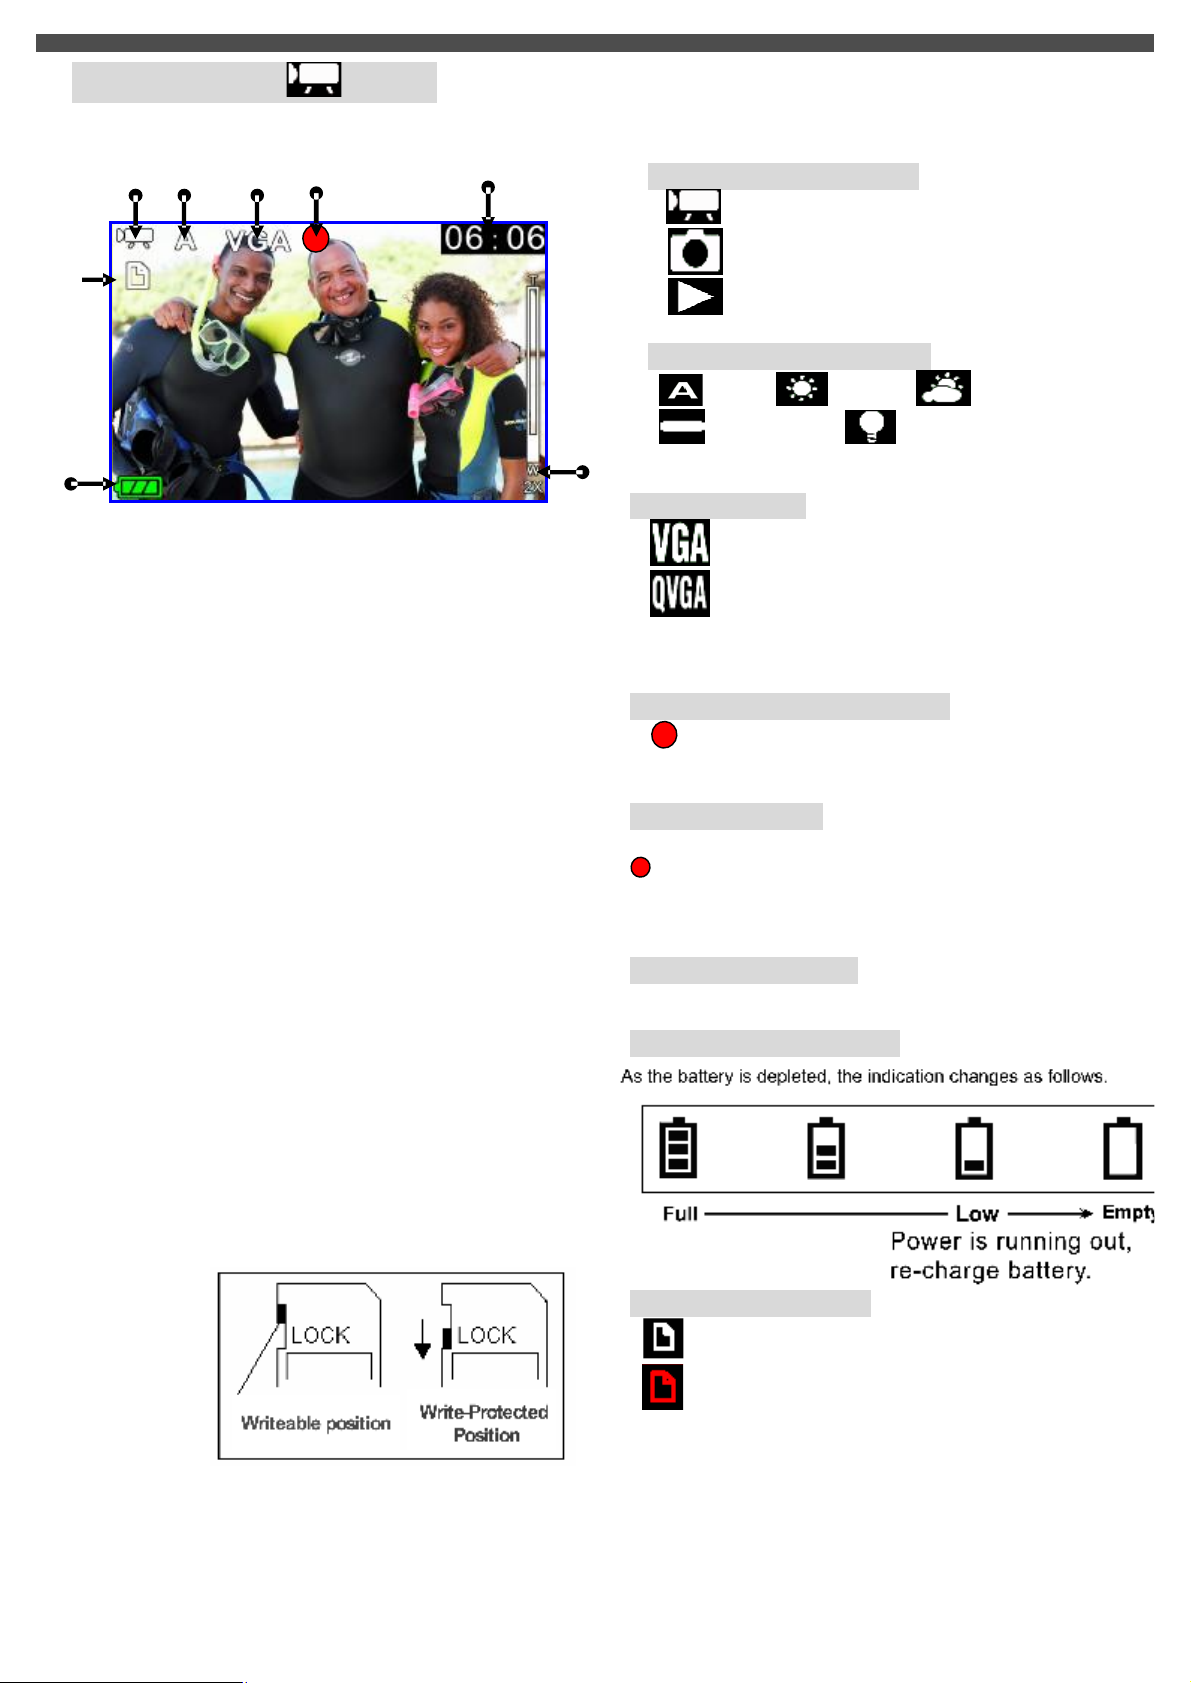
The monitor screen uses various indicators and icons to keep you informed of the status of under camera mode.
(1) (2)
(3)
(4)
(5)
(6)
(7)
(8)
(1) MODE Status Indicator
● Photo Taking Mode
● Movie Recording Mode
● Playback Mode à [Photo/Movie/Voice]
(2) White Balance Indicator
Auto / Sunny / Cloudy/
Fluorescent/ Light bulb
(3) Photo Resolution
●3M
● 2M
● VGA
: 2048 x 1536 pixels
: 1600 x 1200 pixels
: 640 x 480 pixels
(Hints: You can press [t ] left arrow button on the 4
Way multi function switch to quickly change the
resolution-modes for quick access! )
(4) Photo Quality
● SF: SUPER FINE
● F : FINE
● N : NORMAL
(Hints: You can press [ u] Right arrow button on the 4
way multi function switch to quickly access the quality
setting for quick access!.)
(5) Flash Mode
Auto/ Fill-in/ Off
(Hints: You can press [OK] button to toggle around
flash modes for quick access! )
(6) Self Timer
(Timer-OFF )/ (5sec ) / (10sec )
(7) Photo Counter
● No. of Pictures / Remaining Shots
(8) Digital Zoom Level
● Digital zoom ratio meter: 1x to 8x
Page 15
DIGITAL VIDEO MODE
The monitor screen uses various indicators and icons to keep you informed of the status of under video mode.
(1) (2)
(3)
(4)
(5)
(1) MODE Status Indicator
● Movie Recording Mode
(7)
(8)
● Photo Taking Mode
● Playback Mode à[Movie/Photo/Voice]
(2) White Balance Indicator
Auto / Sunny / Cloudy/
Fluorescent/ Light bulb
(6)
(3) Movie Quality
● 640 x 480Pixels
● 320 x 240Pixels
(Hints: You can press [t ] key to toggle around above
quality setting for quick access!.)
(4) Recording Status Indicator
● Movie Recording in progress
● (No icon) : Movie Recording Standby
(5) Recording time
● Elapsed time (hh:mm:ss) : While movie recording
in progress
● Remaining recording time (hh:mm:ss) : While in
standby status
(6) Digital Zoom Level
● Digital zoom ratio meter: 1x to 8x
(8) Battery Level Indicator
(8) Storage Media Type
● : memory card (SD/MMC) is using
● (icon turns red): memory card is write
protected.
Page 16
7. SETTING THE DEFAULT(Setup Mode)
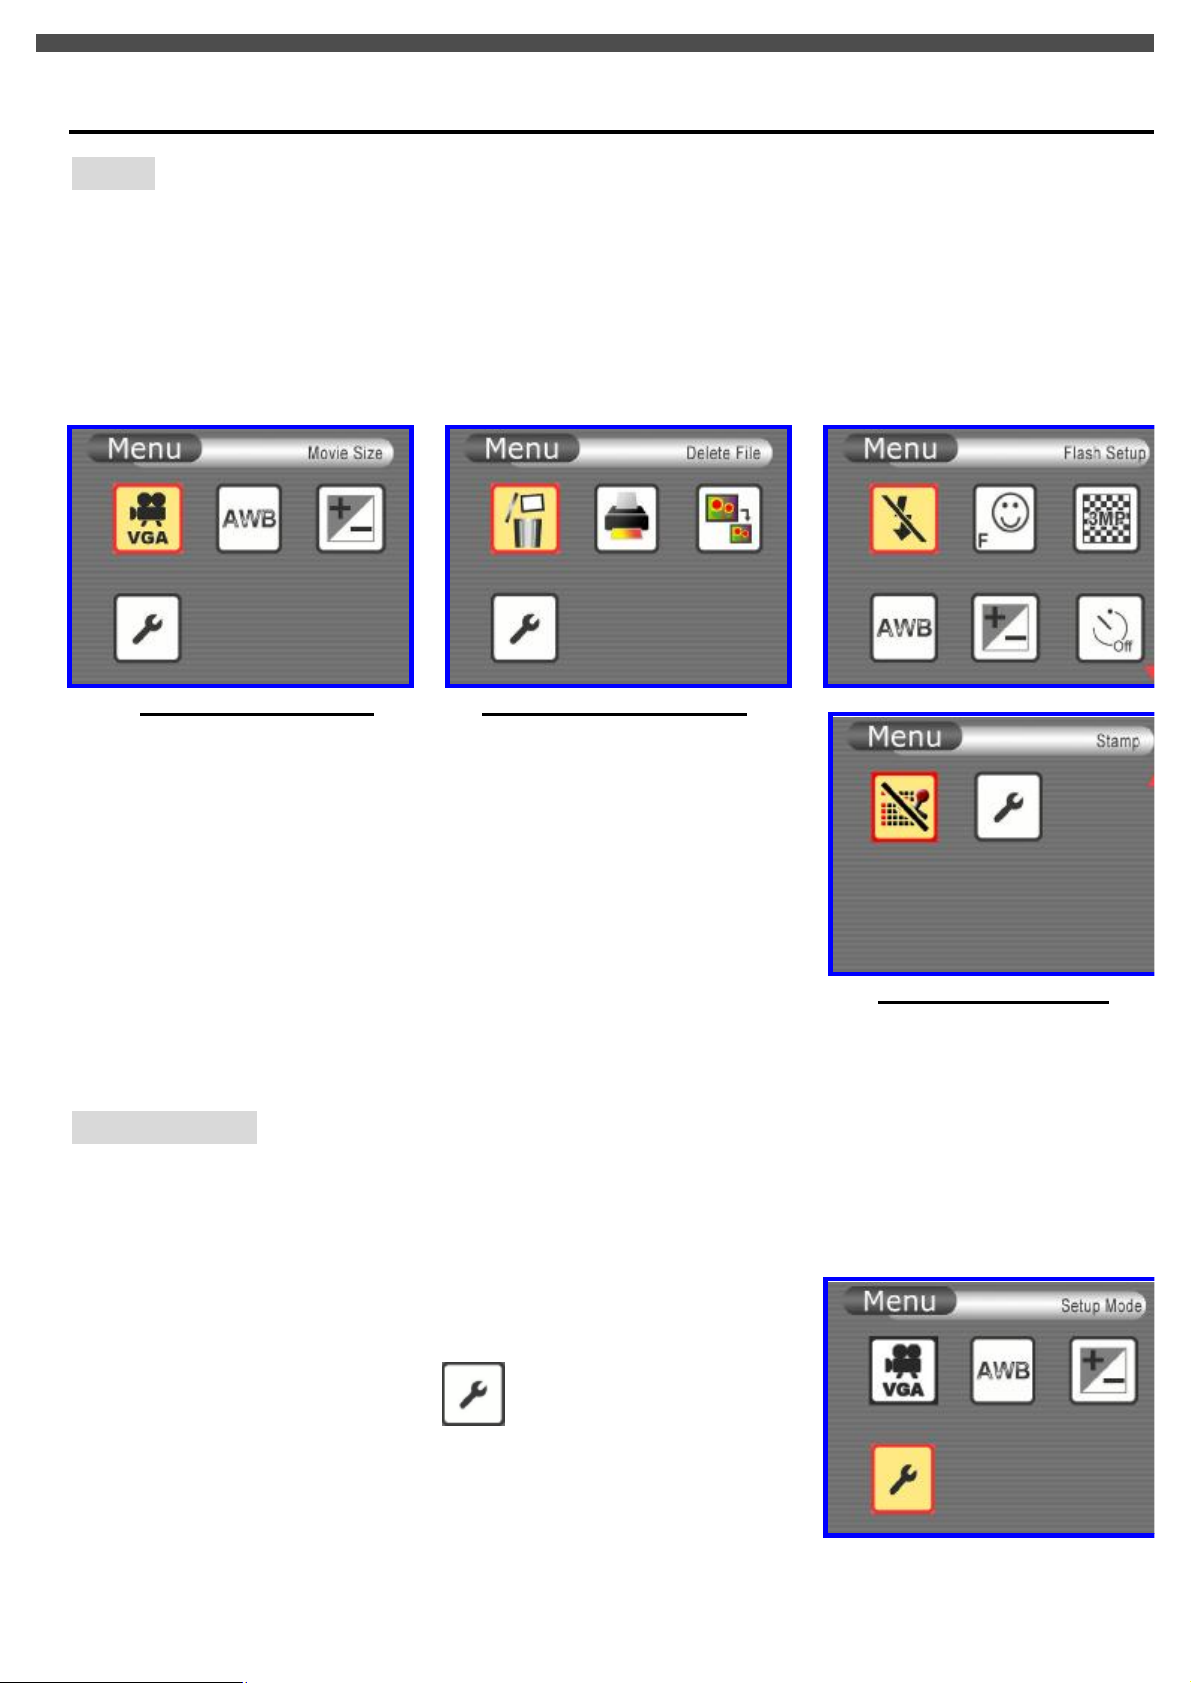
MENU
Different menus are available for Movie, Photo, Playback, and Voice recording mode.
To access the menu:
1. Press the MENU button to open the main menu under different mode.
The selected mode menu is displayed on the LCD screen.
MENU in Movie Mode
MENU in Playback Mode
2. Use the 3/4button on the 4 Way multi function switch to
navigate through function items.
3. Use the [OK] button to enter to specific function item.
(The selected function/option is highlighted with color.)
4. Press [OK] to confirm the selection,
Or, press the MENU button twice to exit the mode menu.
MENU in Photo Mode
SETUP MODE
You can customize the camera settings for your own use, as well as for shooting-related functions. Press the
[MENU] button to display a menu for the selected mode. (The Setup menu is displayed in all modes.)
1. Power on the camera.
2. Press [MENU] button, and use the
3/4button to navigate to Setup icon.
3. Use the [OK] button to enter to Setup Mode.
4. Use 4-way arrow button to navigate through the available function
(The selected function/option is highlighted with colour.)
Page 17

In the below table, default setting is indication with an asterisk [Þ]
Þ 1min / 3min / Never Sleep
[ Auto Off ]
Functions:
- This item determines the auto-off time when the camera stay idle
Þ 1min / 3min
[Beep]
Functions:
- This item allows you to toggle the beep sound on or off
LCD Brightness Range : -2.0 (darker) to +2.0EV(brighter)
ÞDefault setting : 0
Functions:
[Brightness]
- This item allows you to adjust the brightness level of LCD monitor
You can view stored movies and pictures on a Television with 2 main TV systems
[ TV System]
[Format]
[Date/Time
Setting]
[Beep]
[Default Setup ]
Þ TV (PAL) / TV (NTSC)
Note: Setting TV System
- TV(PAL) for PAL standard: UK, Europe, China, Australia, Singapore & Hong Kong etc.
- TV(NTSC) for NTSC standard : USA, Canada, Japan, South Korea and Taiwan etc.
This item allows you to format the store media that is currently in use.
Functions:
- You can use this function to prepare the SD card to record media, BUT all files stored in
media will be gone after executing this function!
This item is for date & time setting.
l Move between Date, Time and Exit by using Left/Right buttons.
l Adjust date and time by using Up/Down buttons, then select OK to validate each
change.
l Select MENU to leave Time Setting without any change.
Note:
- If you remove the battery from the camera, you will need to set the date and time again the
next time you reinsert the battery and use the camera.
Þ 1min / 3min
In case the camera's frequency setting does not match electricity frequency under the
fluorescent light, flickering may be seen. To avoid flickering,
- Select 50Hz for European frequency , Or 60Hz for US / Taiwan frequency
Use this function to return the camera settings to default values except for date & time
This function shows the camera’s software version (this info is used by service centre)
[Version ]
Page 18

Page 19

.
to
8. TAKING PHOTOS (Camera mode)
TO TAKE PHOTO:
1. Slide the Preview switch to [ ] Camera mode.
2. Press [MODE] button repeatedly to get into “Camera”
Mode [ ].
3. To start shooting photo, press [Shutter] once.
Note:
l Before photo is taken, you can see number of [total no. of photos have been taken] / [remaining shots] on
top right corner of LCD. The remaining shot is an approximation based on the unused memory
Menu Settings (Camera Mode )
When in Camera [ ] mode, you can use the default settings that have already been chosen for photo taking
If you want to change the settings to suit your needs, press the Menu button. Then use the 4-way arrow keys
go through each setting and make adjustments.
Your camera offers 3 choices in resolution:
●3M
● 2M
● VGA
: 2048 x 1536 pixels
: 1600 x 1200 pixels
: 640 x 480 pixels
J TIPS - Choice of Resolution
- While in Camera mode, you can press [▲] key to toggle the resolution without entering the options menu.
[3M]
u
u
u
allows a photo to be taken as sharp as possible, which is suitable for 7”x 5” Photo printout; too
large for email.
[2M]
is suitable for 6”x4” Photo printout; acceptable for email.
[VGA]
is good for sharing with email, but it’s too small for photo printout
Page 20

sharper, but they
. To maximize the
setting. To maximize the photo quality,
Photo Quality (Camera Mode)
● SF: SUPER FINE
● F : FINE
● N : NORMAL
JTIPS – Photo Resolution Vs Photo Quality:
u In general, photos taken at higher resolution and quality contain more details and look
also take up more memory space as well as longer processing time for taking next photos
number of photos to be stored, you can choose a lower quality
choose a higher setting
Using the Flash (Camera Mode)
In camera mode, press [u] button to toggle Flash mode.
In camera mode, press [O.K] button to toggle Flash mode.
Red-Eye
: Auto Flash
: Flash (FORCED)
: No Flash
Changing Zoom Level
While recording, you can press the [ p ] or [q] button to zoom in/out the screen.
The digital zoom can be set from 1x to 8x and the magnification ratio is shown
on the LCD monitor.
Page 21

Other Camera Settings
In the below table, default setting is indication with an asterisk [Þ]
Þ No Flash / Anti-Red-Eye / Auto / Always ON
Hints:
- You can press [u] key to toggle around above settings.
[Flash Option]
SF - Super Fine / Þ F - FINE / N - Normal
[Photo Quality]
[Resolution]
[White Balance]
[EV Adjust ]
[Self Timer]
Þ 3M -
Hints:
- You can press [t] key to toggle around above resolution setting.
2048 x 1536pixels
/ 2M -
1600 x 1200pixels
/ VGA -
640 x480pixels
Þ Auto / Sunny / Cloudy / Fluorescent / Light bulb
Hints:
- Adjust the WB according to the light conditions for the recording
Exposure Compensation Range : -2.0EV(underexposure) to +2.0EV(overexposure)
ÞDefault setting : 0
Hints:
- Adjust the exposure compensation setting to obtain the optimum image brightness (Exposure)
when the subject is much brighter or darker than the background
Þ - Timer OFF / - Set the self-timer to be 5 Seconds
/ - Set the self-timer to be 10 Seconds
Hints:
- You can press [t ] key as a quick access to activate self-timer.
Note:
- Self-timer Mode is automatically off switched after a photo is captured, or if the camera is
turned off.
Page 22

[Date Stamp]
[SETUP MODE ]
Þ - Date-Stamp Disabled / - Date-Stamp Enabled
Note:
- Use this function to mark the date stamp on the captured photos. Once this function is enabled,
the date-time setting will be activated and confirmation on current date & time will need to be
inputted.
To adjust basic setting, eg.
Sleep mode / Beep / LCD brightness /
TV System / Format / Date-Time Setting …etc
Hints:
For details on how to use Setup mode, see “SETUP MODE” on page 18
Page 23

Page 24

of recorded movie clip
already been chosen for video recording.
way
Start/Stop
9. TAKING A MOVIE (DV mode)
This mode allows you to take motion video with sound in the Movie Mode. The length
is unlimited (maximum length depends on memory size of SD/MMC card)
TO TAKE MOVIE:
1. Slide the Preview switch to [ ] Camera mode.
2. Press [MODE] button repeatedly to get into DV “Movie-
Taking” Mode [ ].
3. To start recording, press [Shutter] once. Movie recording
begins, with the elapsed recording time shown on the
LCD.
4. To stop recording, press [Shutter] again. The movie is
recorded. The camera is ready to shoot another movie
Note:
u Before movie is taken, you can see the remaining time allowing you to take next movie on top right corner
of LCD. The remaining time is an approximation based on the unused memory
Menu Settings (DV Mode )
When in DV [ ] mode, you can use the default settings that have
If you want to change the recording settings to suit your needs, press the Menu button. Then use the 4arrow keys to go through each setting and make adjustments.
The following sections describe about the video recording settings.
Recording
Changing resolution (DV Mode)
Your camera offers 2 choices in resolution: "VGA" or "QVGA".
u “VGA” (640 x 480 pixels) allows a movie to be taken as sharp as
possible, which is best suitable for TV viewing, but requires more
memory to store.
ØØ Select VGA if you want to produce the best result for viewing
u “QVGA” (320 x 240 pixels) allows for longer recording time to be
stored on the camera, but the quality of image will deteriorate
when shown on a TV.
ØØ Select QVGA if saving memory is top priority
Page 25

Changing Zoom Level (DV Mode)
While recording, you can press the [ p ] or [q] button to zoom in/out the screen.
The digital zoom can be set from 1x to 8x and the magnification ratio is shown
on the LCD monitor.
Other Video Recording Settings
In the below table, default setting is indication with an asterisk [Þ]
Þ 640 x 480Pixels / 320 x 240Pixels
[Movie Quality]
[White Balance]
[EV Adjust ]
[SETUP MODE ]
Þ Auto / Sunny / Cloudy / Fluorescent / Light bulb
Hints:
- Adjust the WB according to the light conditions for the recording
Exposure Compensation Range : -2.0EV(underexposure) to +2.0EV(overexposure)
ÞDefault setting : 0
Hints:
- Adjust the exposure compensation setting to obtain the optimum image brightness (Exposure)
when the subject is much brighter or darker than the background
To adjust basic setting, eg.
Sleep mode / Beep / LCD brightness /
TV System / Format / Date-Time setting …etc
Hints:
For details on how to use Setup mode, see “SETUP MODE” on page 18
Page 26

t
Page 27

w
v
[Thumbnail Display]
x
[S
ingle Display]
10. PLAYBACK (Playback mode)
Playing Photos
1. Turn on the camera, and Slide the Preview switch to [ ] (Preview)
Mode, then the last file, e.g. Photo / Movie, taken will be displayed
2. Press [OK] display key twice to display 6-images [thumbnail display]
3. Use the 4-way keys select the photo you want to view. The selected file is border by a red frame
4. Press the [OK] button again to view [single display] on the selected photo file.
Page 28

w
x
y
Playing back a Movie
1. Turn on the camera, and Slide the Preview switch to [ ] (Preview)
Mode, then the last file, e.g. Photo / Movie, taken will be displayed
2. Press [OK] display key twice to display 6-images [thumbnail display]
3. Use the 4-way keys select the movie file you want to view. The selected file is border by a red frame
4. Press the [OK] button once to view [single display] on the selected movie file.
5. Press the [Shutter] once to play the movie, press shutter again to pause the movie playback
JTIPS – Hide On-Screen Info:
- [O.K] button allows to hide / show on-screen info of the file.
[Single Display]
[PLAY / PAUSE]
Page 29

Viewing Pictures and Movies on a TV
Connect your camera and TV via an AV cable for real- time display. You can export your video clips, still
pictures directly to your TV to share them with friends and family.
1. Turn on your TV and select the appropriate Video Input channel to which the camera is connected.
2. Connect the audio and video ends of the AV cable to your TV.
3. Connect the other end to your camera (AV Out port).
4. Turn on the camera, and Slide the Preview switch to [ ] (Preview) Mode, then the last file, e.g.
Photo / Movie, taken will be displayed
Notes:
l The camera LCD monitor will be turn off when TV mode is being activated
l The default setting of TV system is in PAL mode for most European countries. If your TV is using
NTSC instead of PAL, you need to change TV system setting to NTSC; otherwise the output images
will not be displayed properly. (See “Setup Mode – TV System” page 18)
Other Settings (Play back mode)
Resizes:
- This function allows you to resize photo size
(note: resize photo from low resolution to higher resolution will degrade the photo quality)
[Resize]
Pictbridge: Direct Print Using PictBridge
- This function allows your camera to control the printer to print a single picture or all
pictures stored in the storage media. By connecting the camera to a PictBridge-Compatible
[ PictBridge ]
[DPOF]
printer, you can print images directly from the camera without using a PC. Connect the
camera to the printer and select the images you want to print and the number of copies.
DPOF: Direct Print Out Format
- This function allows you to print on a DPOF-compatible printer or at a professional print
service from the memory card in accordance with the file name recorded on the card
Notes – DPOF :
l DPOF print settings can be configured for images only, not for video clips.
l DPOF print settings can be configured for images on memory card only (NOT for internal memory).
After DPOF settings have been configured, a folder titled “MISC”, which holds DPOF settings information,
will be created on the root level of the storage devices. In case you need to copy images between storage
devices, DO REMEMBER TO COPY THE “MISC” FOLDER AS WELL, should you want to keep the
DPOF settings information.
Page 30

[
DELETE ONE / DELETE ALL
]
y
x
11. DELETING FILES (Play back mode)
TO DELETE FILES:
1. Turn on the camera, and Slide the Preview switch to [ ] (Preview)
Mode, then the last file, e.g. Photo / Movie, taken will be displayed
2. Use the Left/Right arrow buttons select the movie file you want to view. The selected file is border by
a red frame
3. Press the [MENU] button followed by the OK button to enter the DELETE mode.
4. Use the left / right arrow buttons to select delete one or all shots.
5. Press [OK] button to delete the shot or all shots. The camera display will now show [No/Yes].
Highlight [Yes] (to delete the shot) and then press the [OK] button. Press the [MENU] button to return
the camera to its normal operation.
[ DELETE MODE ]
Page 31

w
x
12. INSTALLING SOFTWARE DRIVER
Before connecting this camera to a computer for the first time, you should install a driver on the computer. The
driver is on the CD-ROM disc provided in the package. To install the driver:
1. Insert installer CD into the CD-ROM drive
2. Close the CD-ROM drive. An installer wizard will automatically launch.
If the installer wizard does not appear, then
3. You can click Start in the Windows Taskbar. Then, select Run to continue
4. Click Browse to search the file path, and select “autorun.exe” in your CD-ROM drive
5. Click Open, and then click OK.
u+v
u Click “Install Camera Driver ” and follow the
on-screen instructions to complete driver
installation
Note:
Application software for playing AVI, e.g. Windows Media Player, Quick Time, is NOT included in this
camera package. You have to make sure that application program, exists on your computer system.
Page 32

v
w
u
13. TRANSFERRING FILES
Connecting to PC
1. Firstly turn on the camera[the red LED will illuminate],
then slide the Preview switch to [ ] (Preview) Mode.
2. Connect the computer and camera with the supplied USB cable.
3. Connect the other end of the USB cable to your camera.
Note:
While the camera is being connected to the computer, the RED LED will illuminate and LCD monitor will be
turned off.
Page 33

f
older.
Copying files to PC
By copying files from the camera to your computer, you can permanently save your creative works in the hard
disk.
To do this:
(This step varies according to your operating system)
uFor Windows XP users:
After the camera is connected to your
computer, a dialogue window will appear
automatically. Please select the item Open
folder to view files using Windows
Explorer and click OK.
.
uFor Windows 2000/ME/98SE users:
l Double-click on My Computer.
l Then double-click on the icon of the
removable disk that has just appeared
vDouble-click on DCIM folder.
wDouble-click on the 100COACH
Page 34

Drag the pictures to your desired target
x
folder.
Note:
Ø Please do not copy any files into the “DCIM” folder or “100COACH” folder of your
camera. Otherwise it may cause the camera unstable or crash.
Page 35

Windows
Me Users
14. REMOVING THE CAMERA
Use the procedure below when disconnecting the USB cable from a
Windows PC
u
Page 36

Windows
2000 or Window XP Users
Windows
98 or Windows 98SE Users
u
u
Page 37

x
{
15. USING AS PC CAMERA
Set the Camera to PC CAMERA mode
1. Turn on your camera, and slide the Preview switch to [ ] (Preview) Mode.
2. Connect the camera to a computer with a USB cable.
3. Set up an account with Windows NetMeeting (or other similar programs)
4. Turn on the camera and computer. Start Windows Netmeeting (or other similar programs)
5. Click Tools > Options from the pull-down menu
6. Click Video tab, select Coach Video Camera from the Video Camera Properties drop-down box and
click OK button
7. Click Start Video icon and you should see a live image.
8. Click Stop Video icon (same as the Start Video icon ) to end.
NOTE: The graphics shown are based on the user interface in Windows 98SE
JTIPS
• The video clips recorded are saved in AVI format (.AVI). in resolution of 320x240pixel at 11~15fps.
• If you want to know more about Netmeeting, please consult its on-line help by clicking the “Help”
icon on the pull-down menu. Then click on the Help Topics icon.
Page 38

Recording Video Clips Directly To Your Computer
Besides taking video clips on your digital camera, you can also record them directly to your computer with the
AMCAP program. This program exists on the root directory of installation CD. Browse the installation CD,
you will see Amcap.exe file. Drag this file to your desktop if necessary, you will see the Amcap icon on your
desktop. To recording video clips with AMCAP program, please follow below steps:
1. Turn on your camera, and press the Mode Button to get into [ ] DV mode.
2. Connect your camera to computer with a USB cable
3. Click Amcap icon from desktop
4. Select Devices > Coach Video Camera from the pull-down menu. You should see a live image on
screen. If you cannot see a live image, click Options > Preview from the menu.
5. Click File > Set Capture File from the pull-down menu
6. Enter the filename for the video clip to be captured and click Open button. Make sure to enter avi as the
file extension
7. Keep the default value of 1 MBytes in the Capture file size field and click OK button.
8. Click Capture > Start Capture from the pull-down menu
9. Select OK button to start capturing
10. The time elapsed for video capturing is shown at the bottom of the screen
When video capture is finished, click Capture > Stop Capture from the pull-down menu or press Esc
key on the keyboard
Tip:
The default value of frame rate is 11~15fps at 320x240pixel.. To change the video playback speed, change the
AVI frame rate. Setting it to a larger value results in faster playback, while a small value results in slower
playback
Page 39

s, due to incorrect mains frequency. There will be no
Briefly
16. FREQUENTLY ASKED QUESTION (FAQs)
1. I always take poor quality images at home, why?
It may be due to insufficient light intensity at your home. Try to increase the illumination of your
home when taking images. Or, use the flash in insufficient light environment.
2. Why would I get dark images even when the images are taken outdoors?
The objects may be in a shade, for example, under a tree, or the camera lens is pointing at a bright
section such as the sky.
3. How can I avoid getting dark images?
Pay attention to the background light intensity as it will affect the exposure of the main object. The
camera can calculate the total light intensity of the image and fine-adjust the exposure. If the
background is too dark, the object will be too bright. If the background is too bright, the object will
be too dark.
4. Why would I get fuzzy, unclear images?
There might be some movements of your body or hands when taking images. Hold the camera
steadily with both hands. Use the first finger of your right hand to press the shutter. Stand on solid
ground. Do not move or run when pressing the shutter. Even tiny movements will result in fuzzy
images.
5. Why would I get some blurry areas in an image?
You may have covered part of the lens when taking the image. Or there may be some grease on the
lens. Remove it with a dry and soft cloth.
6. Why would I get horizontal, black stripes in images taken abroad?
The camera is set to your country’s AC mains frequency (e.g. 50Hz for Europe). If you take images
under an electric light source in another country with a different frequency (e.g. 60Hz for US), you
will get horizontal, black stripes in those image
problems when taking images under sunlight.
7. Can I take images in dark environment?
Use strobe flash in dark environment.
8. Can I take close-up shots of an object?
Yes, if it is more than 1.2m away. The object will be out of focus at a distance less than 1m away.
9. Can I use this camera as a PC camera (web cam)?
Yes, if there is a USB port on your computer and appropriate software, such as Microsoft
NetMeeting, is used.
10. Why nothing can be seen from the display when I power on the camera?
Don’t forget to open the slide door.
11. Why the camera suddenly has no response to any key functions?
The camera has suffered an unforeseen problem, eg electrostatic charge, impact..etc. à
remove the battery from the camera, re-insert it, and then try again.
Page 40

Refer to
. Then, reconnect
[A 2]: There may be a problem in connecting the camera to the PC through the USB hub if the PC
To Playback a movie on a PC, video player software is required. Macintosh users can download the
12. Why the camera is not recognized by the PC?
[A 1]: Camera driver is not installed properly. à Install the camera driver again.
chapter12. Turn on the camera slide the Preview switch to [ ] (Preview) Mode
the camera to the PC again.
and the Hub are not compatible. à Wherever possible, connect the camera to the PC directly.
13. Does the camera support Win98?
No. Because Win98 didn’t widely support multi-media devices until it launched Win98SE (Second
Edition). Win98 user may try to download "Direct_X" from Microsoft website to update Win98 for USB
devices.
http://www.microsoft.com/downloads/details.aspx?FamilyID=63dafd1a-f9c9-4f35-89b0-
261abc0e37a9&displaylang=en
14. How can I view movie clip on a PC?
latest version of QuickTime from http://www.apple.com
Windows users can download the latest version of Windows Media Player from
http://www.microsoft.com
15. What is the default setting of the camera?
The table below shows the default setting for each item.
Item Description
Image size : 2048x1536 pixels
Image quality : Fine
Flash : Off
White balance : Auto
TV Output : PAL
Light Frequency : 50Hz
Exposure : 0
Auto power off : 1 minute
Beep : On
Self-Timer : Off
Date Stamp : Off
 Loading...