

Page 1
CONDENSING UNIT
HEAT PUMP
INSTALLATION & SERVICE REFERENCE
© 2005-2010 Goodman Manufacturing Company, L.P.
5151 San Felipe, Suite 500, Houston, TX 77056
www.goodmanmfg.com -or- www.amana-hac.com
P/N: IO-259K Date: August 2010
Important Safety Instructions
The following symbols and labels are used throughout this
manual to indicate immediate or potential safety hazards. It is
the owner’s and installer’s responsibility to read and comply
with all safety information and instructions accompanying these
symbols. Failure to heed safety information increases the risk
of personal injury, property damage, and/or product damage.
WARNING
HIGH VOLTAGE!
Disconnect ALL power before servicing.
Multiple power sources may be present.
Failure to do so may cause property damage,
personal injury or death.
Install ati on an d re pair of t his u ni t sho uld b e p erf orm ed
by indiv id uals me et ing t he requi re men ts of an
ONLY
“entry level technician” as specified by the
Conditi oni ng , Heat i ng and Ref ri ge rat i on I n st itut e ( A HRI )
Attempting to install or repair this unit without such
background may re su lt i n prod uct d ama ge, p erson al
injury or de at h.
Air
CAUTION
Scroll equipped units should never be used to evacuate
the air conditioning system. Vacuums this low can cause
internal electrical arcing resulting in a damaged or failed
compressor.
To receive the 10-Year Parts Limited Warranty for Goodman
branded products, online registration must be completed within
60 days of installation. Online registration is not required in
California or Quebec. Full warranty details available at
www.goodmanmfg.com.
IMPORTANT: To register your Goodman brand unit, go to
www.goodmanmfg.com. Click on the word “Warranty” located
on the left side of the home page. Next, click on the word
“Product Registration” located on the left side of the Warranty
page and complete the forms in the manner indicated on the
Product Registration page.
To register your Amana brand unit, go to www.amana-hac.com.
Click on the word “Warranty” located on the top right of the
home page. Next, click on the word “Product Registration”
located on the left side of the Warranty page and complete the
forms in the manner indicated on the Product Registration page.
Product limited warranty certificates for models currently in
production can be viewed at www.goodmanmfg.com or
www.amana-hac.com. If your model is not currently in pro-
.
duction or does not appear on the website, please contact
your installing contractor or contact customer service (877254-4729) to obtain a copy of your warranty certificate.
Each product overview page contains a Product Warranty link;
by clicking on it you will be able to view the limited warranty
coverage for that specific product. To view warranty registration information, click on the Product Warranty text on the left
navigation panel on the home page of each website. The Online
Product Registration pages are located in this same section.
Important Note to the Owner regarding Product Warranty
Your warranty certificate is supplied as a separate document
with the unit installed by your contractor. Read the limited
warranty certificate carefully to determine what is and is not
covered and keep the warranty certificate in a safe place. If you
are unable to locate the warranty certificate please contact
your installing contractor or contact customer service (877254-4729) to obtain a copy.
To receive the 10-Year Parts Limited Warranty for Amana
branded products, online registration must be completed within
60 days of installation. Online registration is not required in
California or Quebec. Full warranty details available at
www.amana-hac.com.
Shipping Inspection
Always keep the unit upright; laying the unit on its side or top
may cause equipment damage. Shipping damage, and subsequent investigation is the responsibility of the carrier. Verify
the model number, specifications, electrical characteristics,
and accessories are correct prior to installation. The distributor or manufacturer will not accept claims from dealers for transportation damage or installation of incorrectly shipped units.
Codes & Regulations
This product is designed and manufactured to comply with
national codes. Installation in accordance with such codes and/
or prevailing local codes/regulations is the responsibility of the
installer. The manufacturer assumes no responsibility for equipment installed in violation of any codes or regulations.
The United States Environmental Protection Agency (EPA)
has issued various regulations regarding the introduction and disposal of refrigerants. Failure to follow these
regulations may harm the environment and can lead to
the imposition of substantial fines. Should you have any
questions please contact the local office of the EPA.
Page 2
If replacing a condensing unit or air handler, the system must
be manufacturer approved and Air Conditioning, Heating and
Refrigeration Institute (AHRI) matched. NOTE: Installation of
unmatched systems is not allowed.
Operating the unit in a structure that is not complete (either as
part of new construction or renovation) will void the warranty.
Installation Clearances
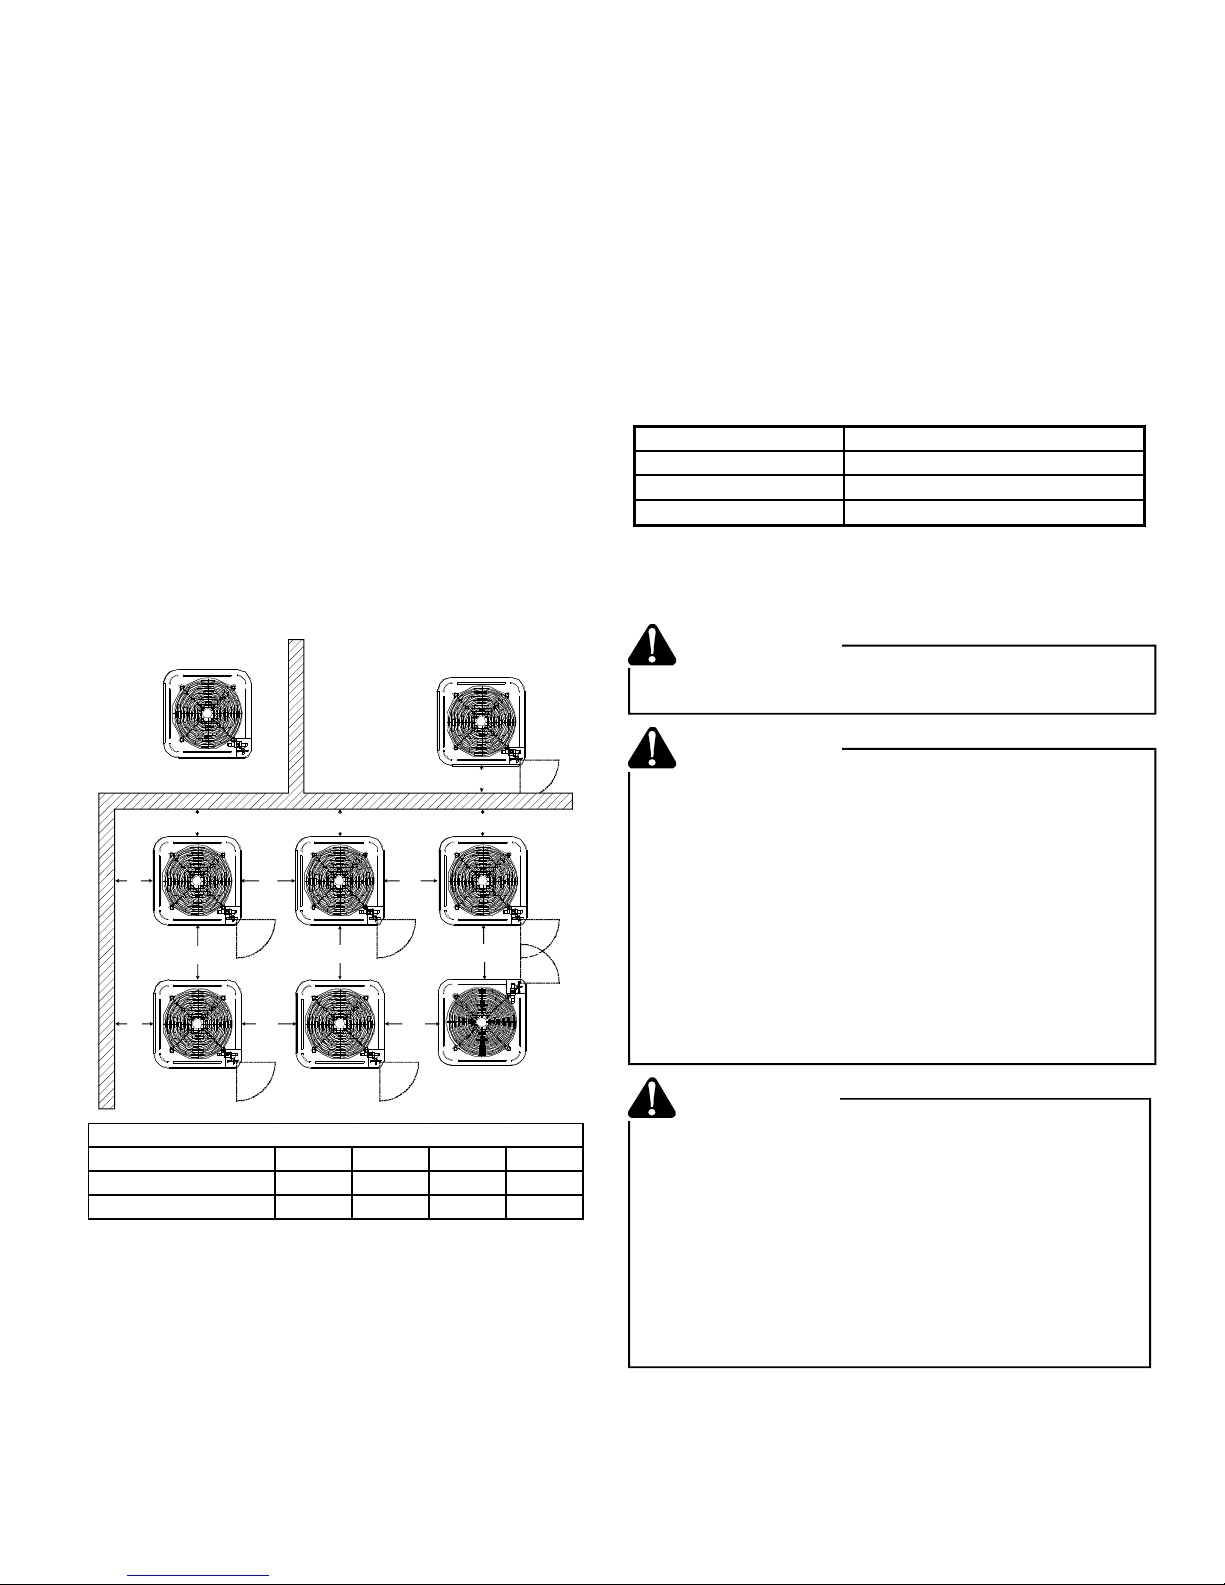
Special consideration must be given to location of the condensing unit(s) in regard to structures, obstructions, other units,
and any/all other factors that may interfere with air circulation.
Where possible, the top of the unit should be completely unobstructed; however, if vertical conditions require placement beneath an obstruction there should be a minimum of 60
inches between the top of the unit and the obstruction(s).
The specified dimensions meet requirements for air circulation
only. Consult all appropriate regulatory codes prior to determining final clearances.
Another important consideration in selecting a location for the
unit(s) is the angle to obstructions. Either side adjacent the
valves can be placed toward the structure provided the side
away from the structure maintains minimum service clearance.
Corner installations are strongly discouraged.
the unit can vibrate during operation, sound vibration transmission should be considered when installing the unit. Vibration
absorbing pads or springs can be installed between the condensing unit legs or frame and the roof mounting assembly to
reduce noise vibration.
NOTE: These units require special location consideration in
areas of heavy snow accumulation and/or areas with prolonged
continuous subfreezing temperatures. Heat pump unit bases
have cutouts under the outdoor coil that permit drainage of
frost accumulation. Situate the unit to permit free unobstructed
drainage of the defrost water and ice.
In more severe weather locations, it is recommended that the
unit be elevated to allow unobstructed drainage and air flow.
The following elevation minimums are recommended:
Design Temperature Suggested Minimum Elevation
+15° and above 2 1/2"
-5° to +14° 8"
below -5° 12"
Safe Refrigerant Handling
While these items will not cover every conceivable situation,
they should serve as a useful guide.
WARNING
To avoid possible injury, explos ion or death, practice
safe handling of refrigerants.
NOT
RECOMMENDED
B B B
AA AAA
C
AA
A
Model Type A B C AA
Residential
Light Commercial
AA
Minimum Airflow Clearance
10" 10" 18" 20"
12" 12" 18" 24"
AA
C
AA
CC
B
AA
OK!
OK!
OK!
OK!
OK!
OK!
This unit can be located at ground floor level or on flat roofs. At
ground floor level, the unit must be on a solid, level foundation
that will not shift or settle. To reduce the possibility of sound
transmission, the foundation slab should not be in contact with
or be an integral part of the building foundation. Ensure the
foundation is sufficient to support the unit. A concrete slab
raised above ground level provides a suitable base.
Rooftop Installations
If it is necessary to install this unit on a roof structure, ensure
the roof structure can support the weight and that proper consideration is given to the weather-tight integrity of the roof. Since
WARNING
Refrigerants are hea vier than air. They can "push out"
the oxygen in your lungs or in any enclosed space.To
avoid possible dif ficulty in breathing or death :
•
Never purge refrigerant into an enclosed room or
space. By law, all refrigerants must be reclaimed.
•
If an indoor leak is suspected, throughly ventilate the
area before begi nning work.
• Liquid refrigerant can be very cold. To avoid possible
frostbite or blindness, avoid contact and wear gloves
and goggles. If liquid refrigerant does contact your
skin or eyes, seek medical help immediately.
• Always follow EPA regulations. Never burn refrig erant, as poisonous gas will be produced.
WARNING
To avoi d po ssible e x pl o sion:
•
Never apply flame or steam to a refrigerant cylinder.
If you must heat a cylinder for faster charging,
partially immerse it in warm water.
•
Never fill a cylinder more than 80% full of liquid re frigerant.
• Never add anything other than R-22 to an R-22 cy linder or R-410A to an R - 410A cylinder . Th e ser v ic e
equipment used must be listed or certified for the
type of refrigerant used.
• Store cylinder s in a cool, dry plac e. Never use a cy linder as a platfo rm o r a ro ll er .
2
Page 3
WARNING
To avoid possible explosion, use only returnable (not
disposable) service cylinders when removing refrigerant from a system.
• Ensure the cylinder is free of damage which could
lead to a leak or explosion.
• Ensure the hydrostatic test date does not excee d
5 years.
• Ensure the pressure rating meets or exceeds 400
lbs.
When in doubt, do not us e cylinder.
Refrigerant Lines
CAUTION
The compressor POE oil for R-410A units is extremely
susceptible to moisture absorption and c ould cause
compressor failure. Do not leave system open to atmosphere any longer than necessary for installation.
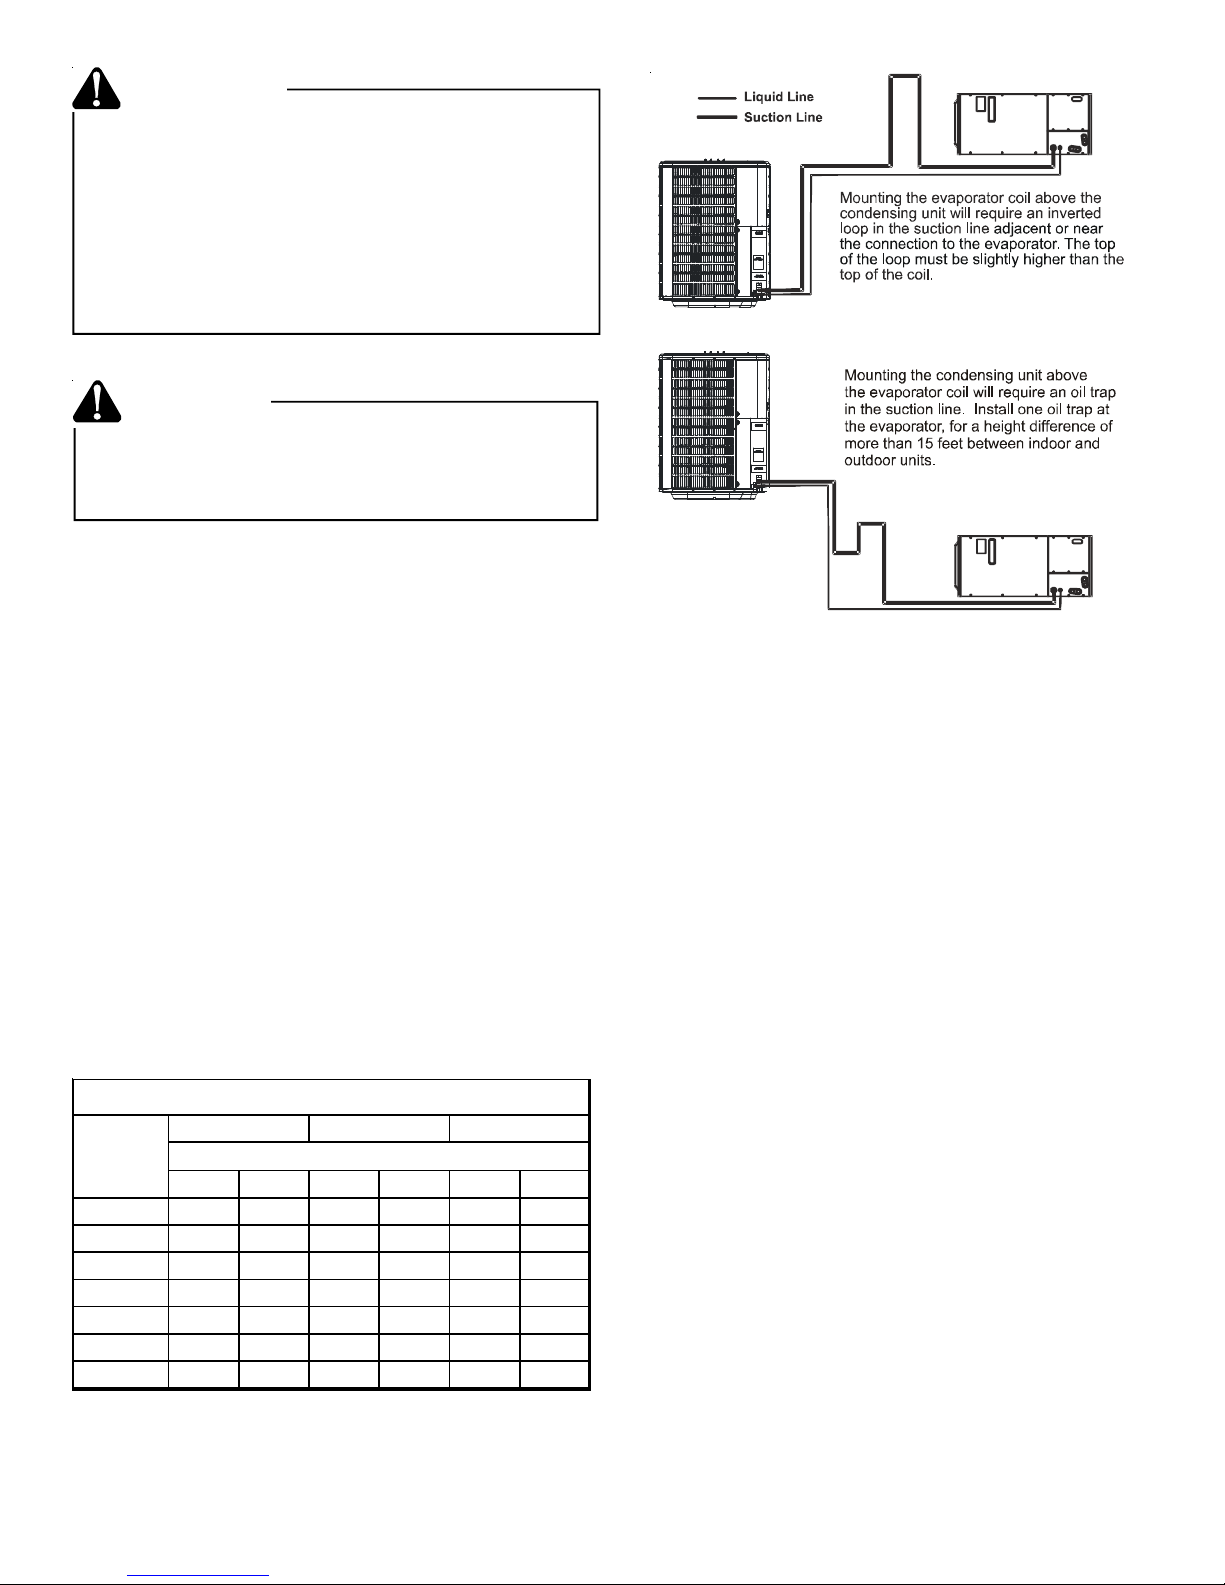
Use only refrigerant grade (dehydrated and sealed) copper tubing to connect the condensing unit with the indoor evaporator.
After cutting the tubing, install plugs to keep refrigerant tubing
clean and dry prior to and during installation. Tubing should
always be cut square keeping ends round and free from burrs.
Clean the tubing to prevent contamination.
Do NOT let refrigerant lines come in direct contact with plumbing, ductwork, floor joists, wall studs, floors, and walls. When
running refrigerant lines through a foundation or wall, openings
should allow for sound and vibration absorbing material to be
placed or installed between tubing and foundation. Any gap
between foundation or wall and refrigerant lines should be filled
with a pliable silicon-based caulk, RTV or a vibration damping
material. Avoid suspending refrigerant tubing from joists and
studs with rigid wire or straps that would come in contact with
the tubing. Use an insulated or suspension type hanger. Keep
both lines separate and always insulate the suction line.
These sizes are recommended for line lengths of 79 feet or
less to obtain optimum performance. For alternate line sizing
options or runs of more than 79 feet, refer to Remote Cooling
Service Manual, or TP-107 Long Line Set Application R-410A,
or contact your distributor for assistance.
RECOMMENDED INTERCONNECTING TUBING (Ft)
Cond
Unit
Tons Suct Liq Suct Liq Suct Liq
1 1/2 5/8 1/4 3/4 3/8 3/4 3/ 8
2 5/81/43/43/83/43/8
2 1/2 5/8 1/4 3/4 3/8 7/8 3/ 8
3 3/4 3/8 7/8 3/8 1 1/8 3/8
3 1/2 7/8 3/8 1 1/8 3/8 1 1/8 3/8
4 7/ 8 3/8 1 1/8 3/8 1 1/8 3/8
5 7/ 8 3/8 1 1/8 3/8 1 1/8 3/8
* Lines greater than 79 feet in length or vertical elevation
changes more than 50 feet
Service Manual or contact your distributor for assistance.
0-24 25-49 50-79*
Line Diameter (In. OD)
refer to the Remote Cooling
Insulation is necessary to prevent condensation from forming
and dropping from the suction line. Armflex (or satisfactory
equivalent) with 3/8” min. wall thickness is recommended. In
severe conditions (hot, high humidity areas) 1/2” insulation may
be required. Insulation must be installed in a manner which
protects tubing from damage and contamination.
Where possible, drain as much residual compressor oil from
existing systems, lines, and traps; pay close attention to low
areas where oil may collect. NOTE: If changing refrigerant
types, ensure the indoor coil and metering device is compatible with the type of refrigerant being used; otherwise, the indoor coil must be replaced.
Burying Refrigerant Lines
If burying refrigerant lines can not be avoided, use the following
checklist.
1. Insulate liquid and suction lines separately.
2. Enclose all underground portions of the refrigerant lines
in waterproof material (conduit or pipe) sealing the ends
where tubing enters/exits the enclosure.
3. If the lines must pass under or through a concrete slab,
ensure lines are adequately protected and sealed.
Refrigerant Line Connections
IMPORTANT
To avoid overheating the service valve, TXV valve, or filter
drier while brazing, wrap the component with a wet rag, or
use a thermal heat trap compound. Be sure to follow the
manufacturer’s instruction when using the heat trap
compound. Note: Remove Schrader valves from service
valves before brazing tubes to the valves. Use a brazing
3
Page 4
alloy of 2% minimum silver content. Do not use flux.
Torch heat required to braze tubes of various sizes is
proportional to the size of the tube. Tubes of smaller size
require less heat to bring the tube to brazing temperature
before adding brazing alloy. Applying too much heat to
any tube can melt the tube. Service personnel must use
the appropriate heat level for the size of the tube being
brazed. Note: The use of a heat shield when brazing is
recommended to avoid burning the serial plate or the finish
on the unit.
1. The ends of the refrigerant lines must be cut square, deburred, cleaned, and be round and free from nicks or dents.
Any other condition increases the chance of a refrigerant
leak.
2. “Sweep” the refrigerant line with nitrogen or inert gas during brazing to prevent the formation of copper-oxide inside the refrigerant lines. The POE oils used in R-410A
applications will clean any copper-oxide present from the
inside of the refrigerant lines and spread it throughout the
system. This may cause a blockage or failure of the metering device.
3. After brazing, quench the joints with water or a wet cloth
to prevent overheating of the service valve.
4. Ensure the filter drier paint finish is intact after brazing. If
the paint of the steel filter drier has been burned or chipped,
repaint or treat with a rust preventative. This is especially
important on suction line filter driers which are continually wet when the unit is operating.
NOTE: Be careful not to kink or dent refrigerant lines. Kinked
or dented lines will cause poor performance or compressor
damage.
Do NOT make final refrigerant line connection until plugs are
removed from refrigerant tubing.
NOTE: Before brazing, verify indoor piston size by checking
the piston kit chart packaged with indoor unit.
Leak T esting (Nitrogen or Nitrogen-Traced)
WARNING
To avoid the risk of fire or explosion, never use
oxygen, high pressure air or flammable gases for leak
testing of a refrigeration system.
apply the detector to suspect areas. If leaks are found, repair
them. After repair, repeat the pressure test. If no leaks exist,
proceed to system evacuation.
System Evacuation
Condensing unit liquid and suction valves are closed to contain
the charge within the unit. The unit is shipped with the valve
stems closed and caps installed. Do not open valves until
the system is evacuated.
REFRIGERAN T UNDE R PRESSURE!
Failure to f ol low proper proced ures may cause
property dam ag e , personal injur y or death.
NOTE: Scroll compressors should never be used to evacuate
or pump down a heat pump or air conditioning system.
CAUTION
Prolonged operation at suction pressures less than 20
psig for more than 5 seconds will result in overheating of
the scrolls and permanent damage to the scroll tips, drive
bearings and internal seal.
1. Connect the vacuum pump with 250 micron capability to
the service valves.
2. Evacuate the system to 250 microns or less using suction and liquid service valves. Using both valves is necessary as some compressors create a mechanical seal
separating the sides of the system.
3. Close pump valve and hold vacuum for 10 minutes. Typically pressure will rise during this period.
5000
4500
4000
3500
MICRONS
3000
IN
2500
ACUUM
2000
V
1500
1000
500
CONDENSIBLES OR SMALL
LEAK PRESENT
NO LEAKS
NO CONDENSIBLES
LEAK(S)
PRESENT
WARNING
To avoid possible explosion, the line from the
nitrogen cylinder must include a pressure regulator
and a pressure relief valve. The pressure relief valve
must be set to open at no more than 150 psig.
Pressure test the system using dry nitrogen and soapy water
to locate leaks. If you wish to use a leak detector, charge the
system to 10 psi using the appropriate refrigerant then use
nitrogen to finish charging the system to working pressure then
0 1 2 3 4 5 6 7 8 9
MINUTES
10
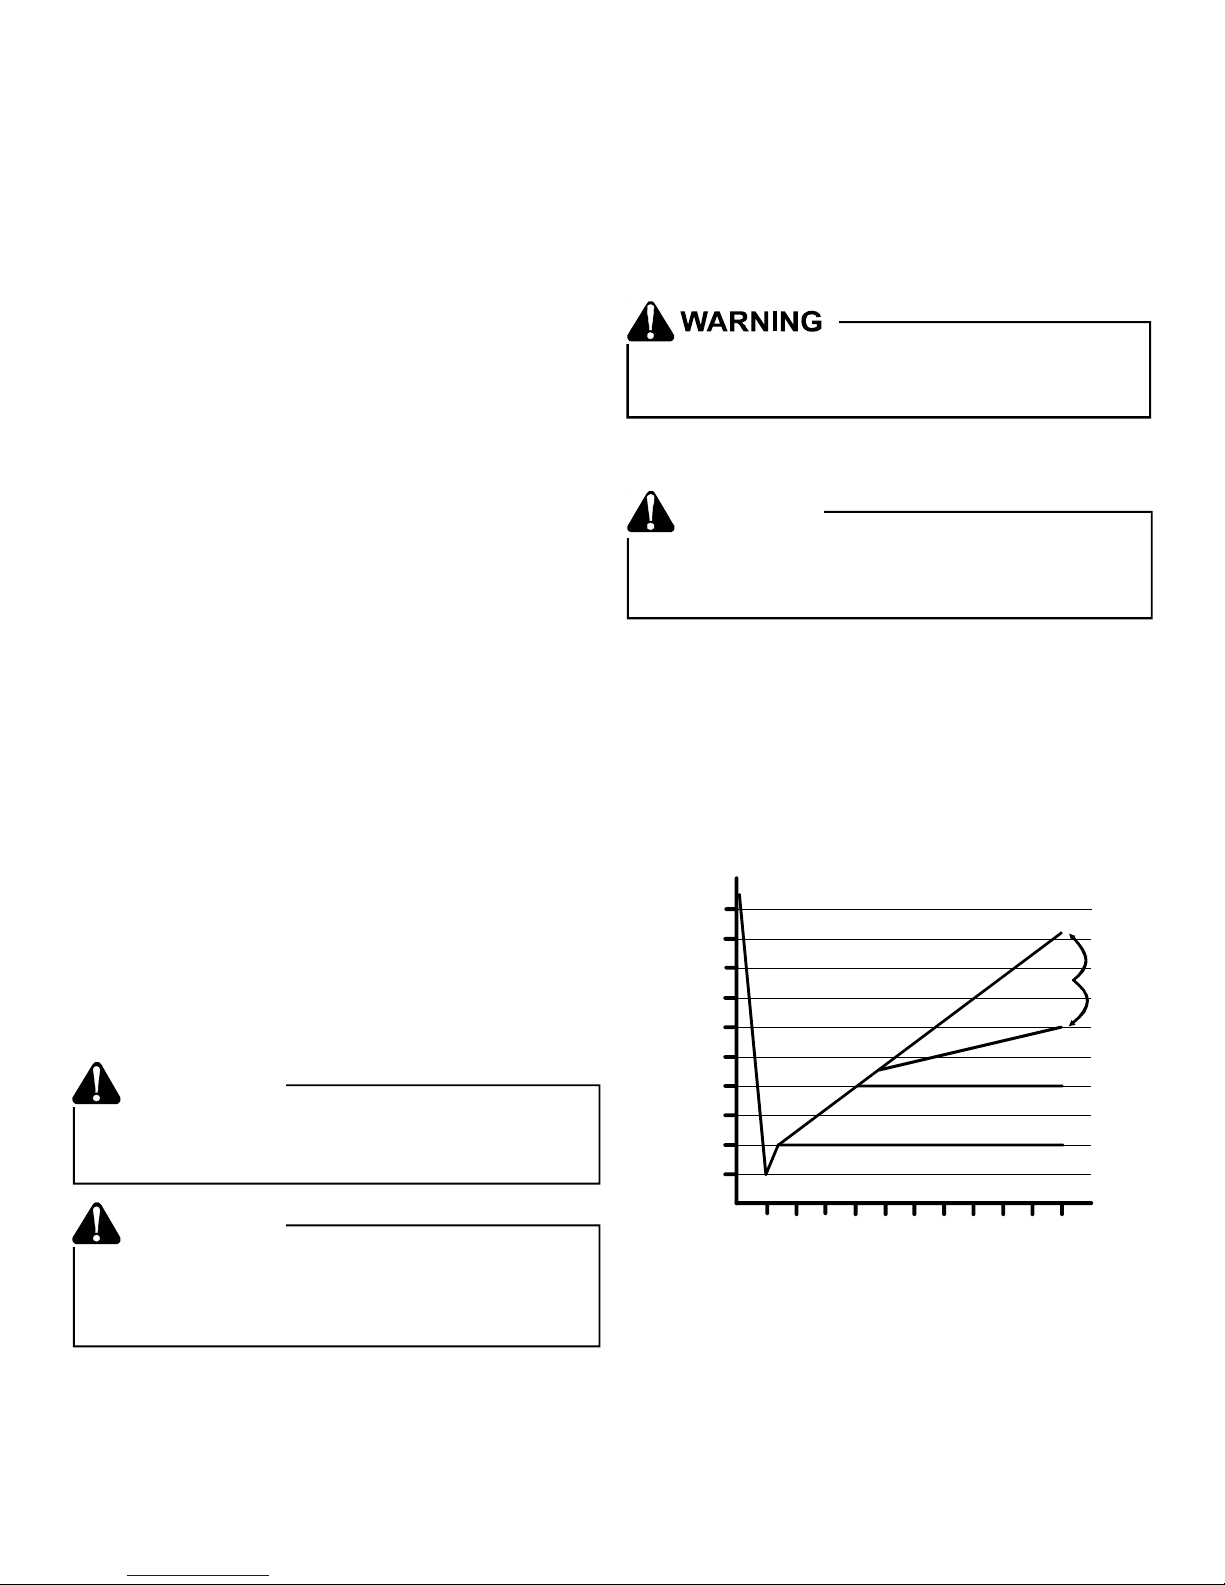
• If the pressure rises to 1000 microns or less and remains
steady the system is considered leak-free; proceed to
startup.
• If pressure rises above 1000 microns but holds steady
below 2000 microns, moisture and/or noncondensibles
may be present or the system may have a small leak.
Return to step 2: If the same result is encountered check
for leaks as previously indicated and repair as necessary
then repeat evacuation.
4
Page 5
• If pressure rises above 2000 microns, a leak is present.
Check for leaks as previously indicated and repair as necessary then repeat evacuation.
Electrical Connections
WARNING
HIGH VOLTAGE!
Disconnect ALL power before servicing.
Multiple power sources may be presen t .
Failure to do so may c a us e propert y da m a ge,
personal injury or death due to electric shock.
Wiring must conform with NEC or CEC and all
local codes. Undersized wires could cause
poor equipment pe r formance, equipment damage
or fire.
WARNING
To avoid the risk of fire or equipment damage, us e
copper conductors.
NOTICE
Units with reciprocating compressors and non-bleed TXV’s
require a Hard Start Kit.
The condensing unit rating plate lists pertinent electrical data
necessary for proper electrical service and overcurrent protection. Wires should be sized to limit voltage drop to 2% (max.)
from the main breaker or fuse panel to the condensing unit.
Consult the NEC, CEC, and all local codes to determine the
correct wire gauge and length.
Local codes often require a disconnect switch located near the
unit; do not install the switch on the unit. Refer to the installation instructions supplied with the indoor furnace/air handler for
specific wiring connections and indoor unit configuration. Likewise, consult the instructions packaged with the thermostat
for mounting and location information.
Overcurrent Protection
The following overcurrent protection devices are approved for
use.
• Time delay fuses
• HACR type circuit breakers
These devices have sufficient time delay to permit the motorcompressor to start and accelerate its load.
Three Phase Compressor Rotation
CAUTION
Use care whe n h and li ng sc ro ll com pressors . Dom e tem peratures cou ld be ho t.
Three phase compressors are power phase dependent and
can rotate in either direction.
Verify proper rotation for three phase compressors by ensuring
the suction pressure drops and discharge pressure rises when
the compressor is energized. NOTE: When operated in reverse, a three phase scroll compressors is noisier and its current draw substantially reduced compared to marked values.
To correct, disconnect power and switch any two leads at the
unit contactor and re-observe.
High Voltage Connections
Route power supply and ground wires through the high voltage
port and terminate in accordance with the wiring diagram provided inside the control panel cover.
Low Voltage Connections
Condensing unit control wiring requires 24 Volt minimum, 25VA
service from the indoor transformer. Low voltage wiring for twostage units depends on the thermostat used and the number
of control wires between the indoor unit and the condensing
unit. Route control wires through the low voltage port and terminate in accordance with the wiring diagram provided inside
the control panel cover.
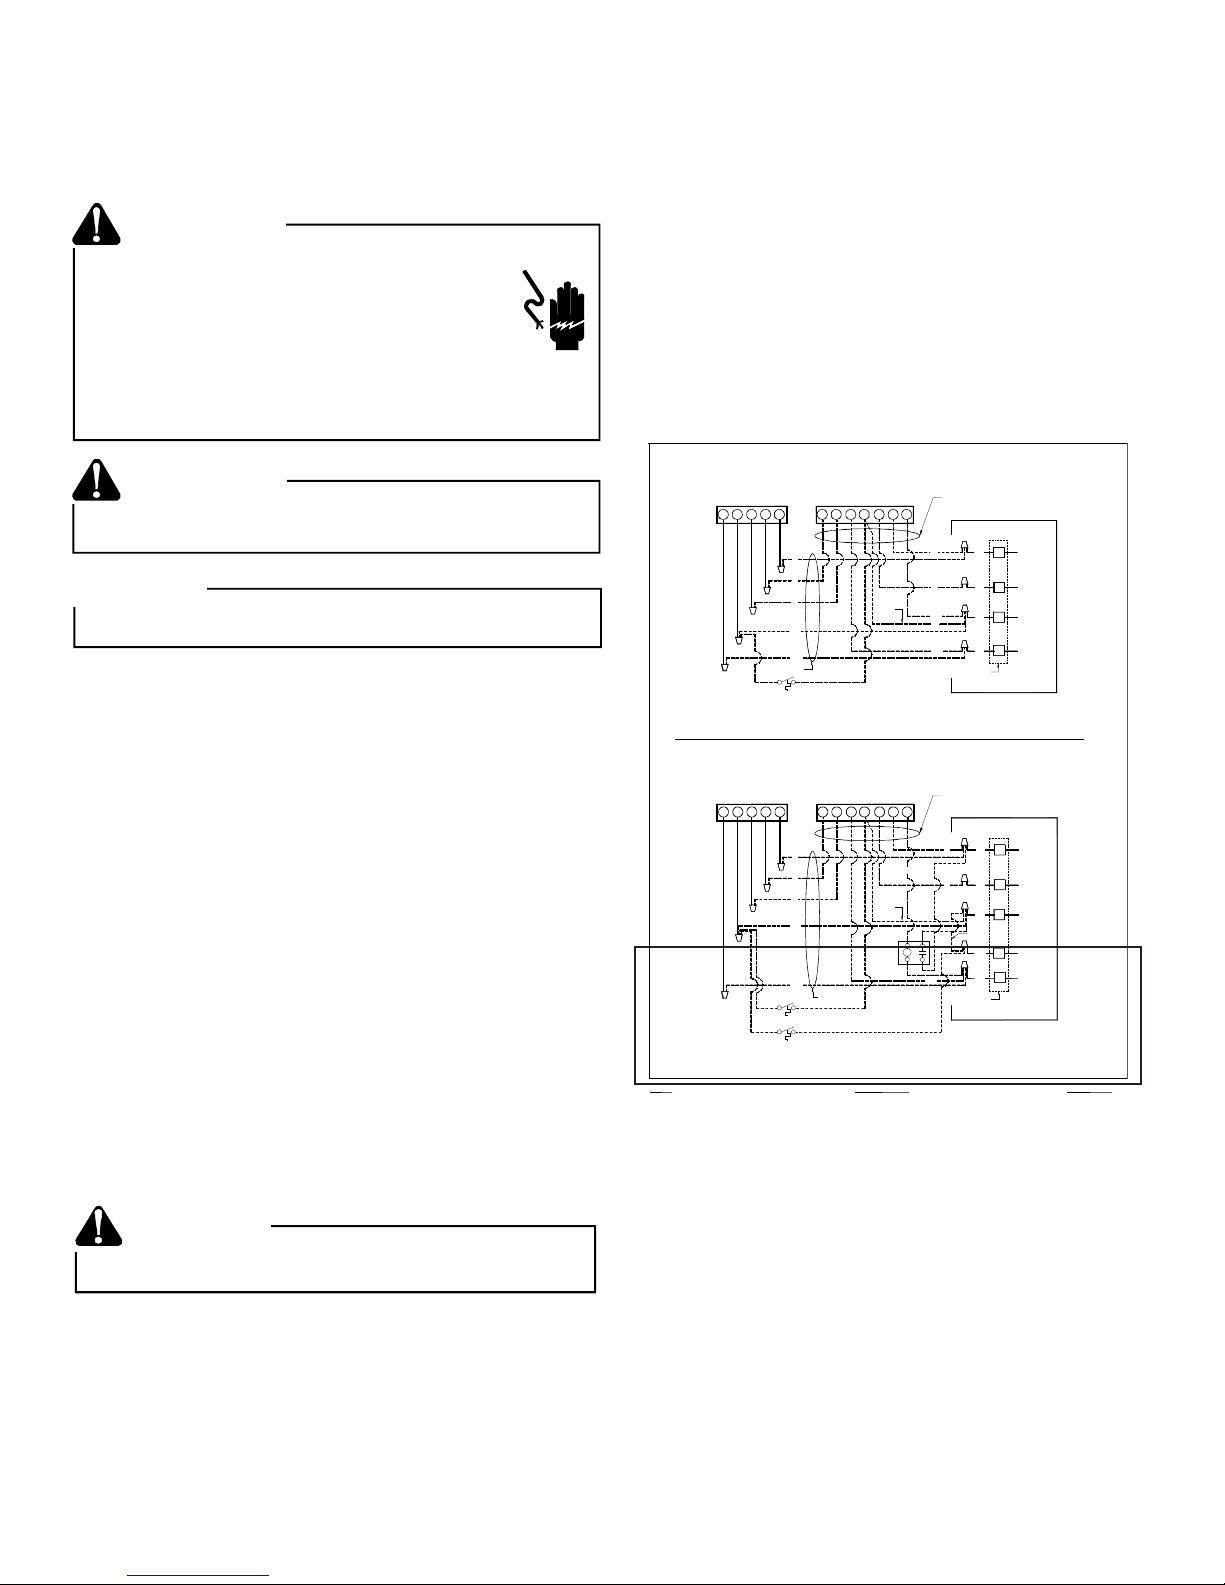
SYSTEM COMPOSITE DIAGRAM
HEAT PUMPS
10 KW & BELOW
HEAT PUMP
W2
COYR
O
R
Y
W
B
E
R
H
E
L
L
A
I
D
U
L
N
T
E
O
G
E
W
E
#18 GA. 5 WI RE
21
(OPTIONAL)
OUTDOOR THERMOSTAT
CLOSE ON TEMPERATURE FALL
SYSTEM COMPOSITE DIAGRAM
HEAT PUMPS
ABOVE 10 KW
HEAT PUMP
W2COYR
O
B
Y
W
R
R
L
E
H
E
A
U
L
I
D
N
E
L
T
G
O
E
E
W
2 1
OT-1
21
OT-2
(OPTIONAL)
OUTDOOR THERMOSTAT
NOTES:
1) OUTDOOR THE RMOSTAT (OT-1) SHOULD BE THE
FIRST TO CLOSE A ND THE LAST TO OPEN.
2) CONNECT WHITE AND BROWN WIRES FROM AIR HANDLER TOGETHER I F OT-2 IS NOT USED .
3) REMOVE WIRE WHEN USING OUTDOOR THERMOSTAT
4) TERMINAL BLOCK MARKINGS ARE FOR AMANA
AIRHANDLERS.
CLOSE ON TEMPERATURE FALL
TYPICA L H/P
ROOM THERMOSTAT
YO CW2GR E
R
Y
O
W
BL
TYPICA L H/P
ROOM THERMOSTAT
YO CW2GR E
R
Y
O
W
BL
#18 GA. 5 WI RE
#18 GA. 7 WIRE
INDOOR UNIT
R
R
G
G
SEE
NOTE
#3
BR
W
W
BL
BL
SEE NOTE #4
#18 GA. 6 WIRE NEEDED WHEN OT IS USED
#18 GA. 7 WIRE
INDOOR UNIT
R
BR
SEE
NOTE
#3
1
EHR
3
NOMENCLATURE
OT ---OUTDOOR THERMOSTAT (OPTIONAL)
EHR -EMERGENCY HEAT RELAY (OPTIONAL)
R
G
G
W
SEE
NOTE
#2
2
BR
4
BL
BL
SEE NOT E #4
#18 GA. 7 WIRE NEEDED WHEN TWO OT'S ARE USED
R
G
W2
C
R RED
G
W2
W3
C
RED
GREEN
WHITE
BLUE
GREEN
WHITE
BROWN
BLUE
COLOR CO D E S
R --RED
Y --YELLOW
BL-BLUE
BR-BROWN
O --ORANGE
W -WHITE
G --GREEN
Thermostat
with Low Voltage Wires to Heat Pump Unit
NOTE: For two-stage units, refer to the Installation Instructions
supplied with the variable speed indoor units for field wiring
connections.
System Start Up
NOTE: Power must be supplied to the 18 SEER outdoor
units containing ECM motors before the power is applied
to the indoor unit. Sending a low voltage signal without
high voltage power present at the outdoor unit can cause
malfunction of the control module on the ECM motor.
5
Page 6
Adequate refrigerant charge for a matching evaporator and 15
feet lineset is supplied with the condensing unit. If line set
exceeds 15 feet in length, refrigerant should be added at .6
ounces per foot of liquid line.
Open the suction service valve first! If the liquid service valve is
opened first, oil from the compressor may be drawn into the
indoor coil TXV, restricting refrigerant flow and affecting operation of the system.
CAUTION
POSSIBLE REFRIGERANT LEAK
To avoid a possible refrigerant leak, open the service
valves until the top of the stem is 1/8” from the retainer.
Do not introduce liquid refrigerant from the cylinder into the
crankcase of the compressor as this may damage the
compressor.
1. Break vacuum by fully opening liquid and suction base
valves.
2. Set thermostat to call for cooling. Check indoor and outdoor fan operation and allow system to stabilize for 10
minutes for fixed orifices and 20 minutes for expansion
valves.
Charge V erification
WARNING
When opening valves with retainers, open each valve only until
the top of the stem is 1/8” from the retainer. To avoid loss of
refrigerant, DO NOT apply pressure to the retainer. When opening valves without a retainer remove service valve cap and insert a hex wrench into the valve stem and back out the stem
by turning the hex wrench counterclockwise. Open the valve
until it contacts the rolled lip of the valve body.
NOTE: These are not back-seating valves. It is not necessary
to force the stem tightly against the rolled lip.
After the refrigerant charge has bled into the system, open the
liquid service valve. The service valve cap is the secondary
seal for the valve and must be properly tightened to prevent
leaks. Make sure cap is clean and apply refrigerant oil to threads
and sealing surface on inside of cap. Tighten cap finger-tight
and then tighten additional 1/6 of a turn (1 wrench flat), or to
the following specification, to properly seat the sealing surfaces.
1. 3/8” valve to 5 - 10 in-lbs
2. 5/8” valve to 5 - 20 in-lbs
3. 3/4” valve to 5 - 20 in-lbs
4. 7/8” valve to 5 - 20 in-lbs
REFRIGERANT UNDER PRESSURE!
• Do not overcharge system with refrigerant.
• Do not operate unit in a vacuum or at negative pres sure.
Failure to follow proper procedures may cause
proper ty damage , pe rsonal injury or de a th.
CAUTION
Use refrigerant certified to standards. Used
refriger ant ma y ca u se co m p res s or da ma g e . Most port ab le
machi ne s cann o t clea n use d refrig era n t to me et
standar ds .
AHRI
AHRI
NOTICE
Violation of EPA regulations may result in fines or other
penalties.
CAUTION
Operating the compressor with the suction valve closed will
void the warranty and cause serious compressor damage.
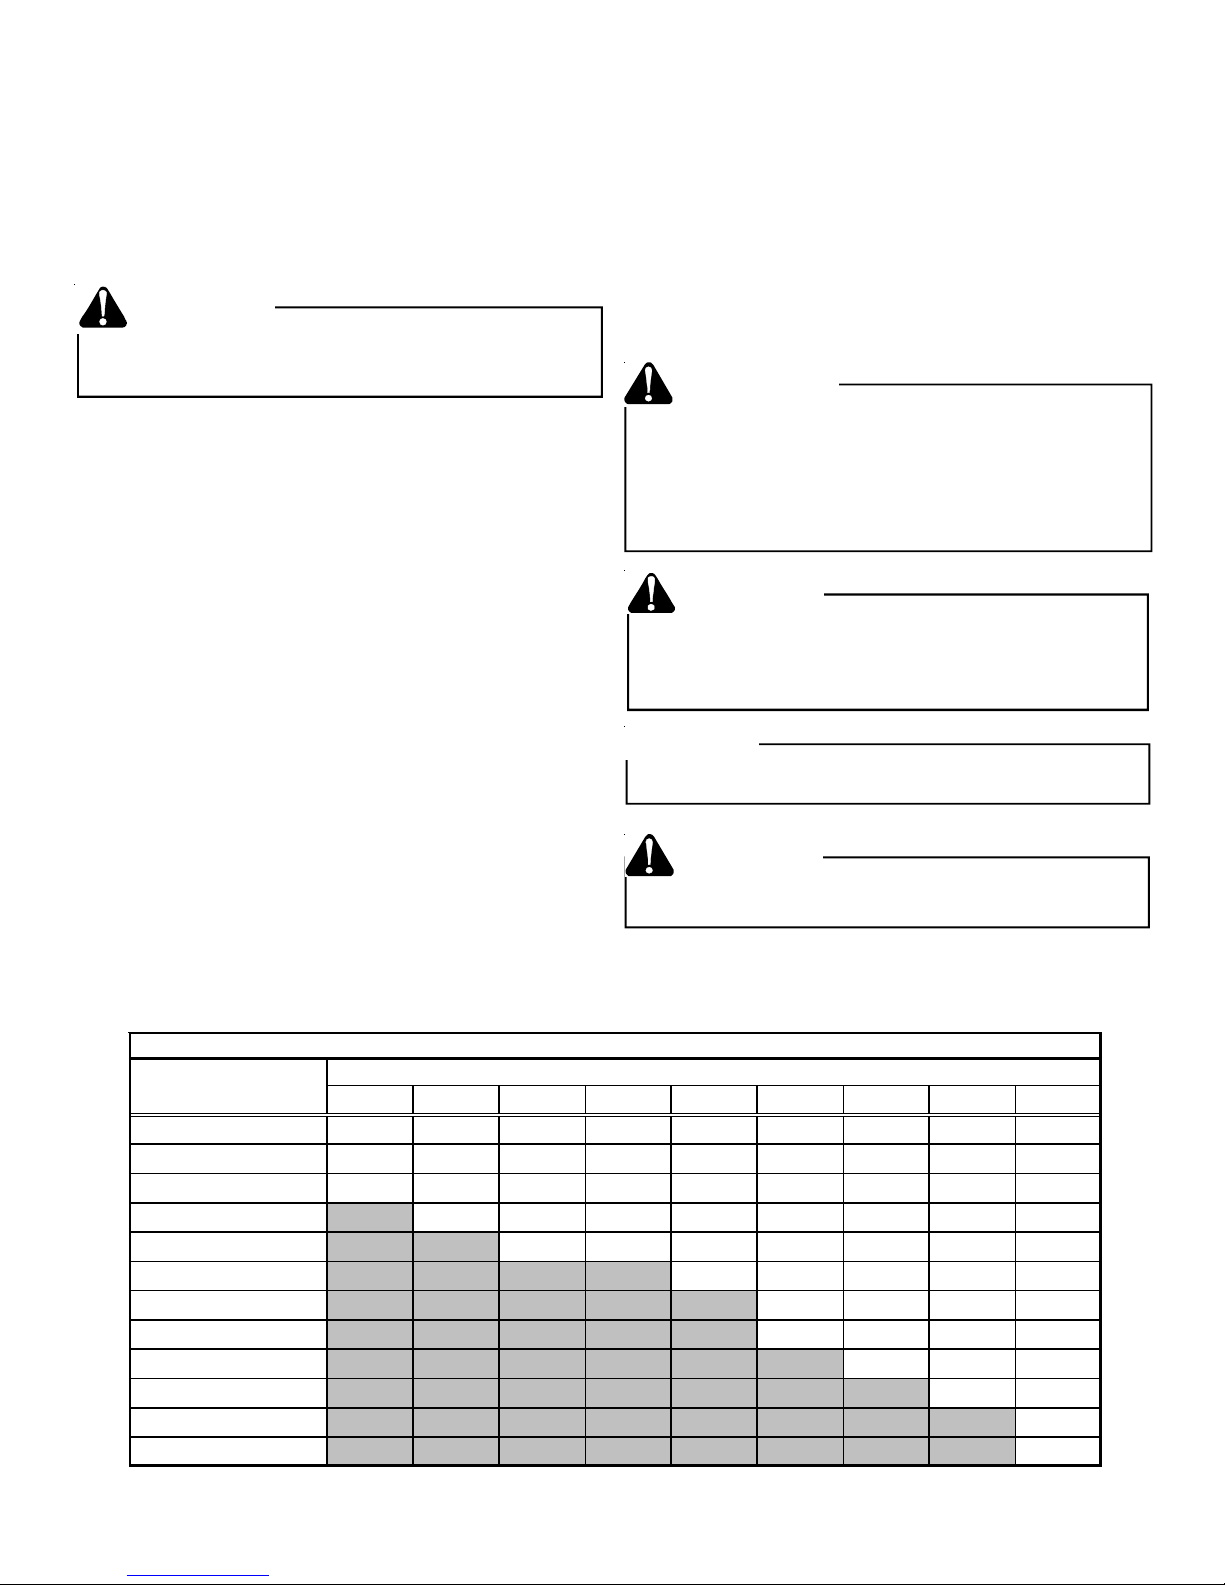
Outdoo r Dry Bul b
Temperature, °F
60
65
70
75
80
85
90
95
100
105
110
115
55 57 59 61 63 65 67 69 71
10 13 17 20 23 26 29 30 31
8 1114161922262729
5 8 10 13 15 19 23 24 25
----4 6 9 1115202123
---- ---- 1 4 7 12 17 18 2 0
---- ---- ---- ---- 3 8 13 15 16
---- ---- ---- ---- ---- 5 10 11 13
---- ---- ---- ---- ---- 1 5 8 10
---- ---- ---- ---- ---- ---- 3 5 8
---- ---- ---- ---- ---- ---- ---- 3 5
---- ---- ---- ---- ---- ---- ---- ---- 3
---- ---- ---- ---- ---- ---- ---- ---- 2
SYSTEM SUPERHEAT
Indoor W e t Bulb Tem pe rature, °F
6
Page 7
Final Charge Adjustment
The outdoor temperature must be 60°F or higher. Set the room
thermostat to COOL, fan switch to AUTO, and set the temperature control well below room temperature.
After system has stabilized per startup instructions, check
subcooling and superheat as detailed in the following section.
Fixed Orifice
CAUTION
To preve nt p ers onal i nj ury, caref ully co nnec t and dis con nect
manifo ld ga uge h os es. E scapi ng liqui d ref rige ra nt ca n cau se
burns. Do not vent r efrigerant into the a tmosphere . Recover
all refrigerant during system repair and before final unit
disposal.
1. Purge gauge lines. Connect service gauge manifold to
base-valve service ports. Run system at least 10 minutes
to allow pressure to stabilize.
2. For best results, temporarily install a thermometer on the
suction line near the compressor. The thermometer
should be located within 4” to 6” of the compressor. Ensure the thermometer makes adequate contact and is
insulated.
NOTE: An optional, less accurate, method is to locate
the thermometer at the suction line service valve. Ensure
the thermometer makes adequate contact and is insulated.
3.Refer to the superheat table provided for proper system
superheat. Add charge to lower superheat or recover
charge to raise superheat.
4. Disconnect manifold set, installation is complete.
Superheat Formula = Suct. Line Temp. - Sat. Suct. Temp.
Expansion Valve System
Single Speed Application
1. Purge gauge lines. Connect service gauge manifold to
base-valve service ports. Run system at least 10 minutes
to allow pressure to stabilize.
2. Temporarily install thermometer on liquid (small) line near
liquid line service valve with adequate contact and insulate for best possible reading.
3. Check subcooling and superheat. Systems with TXV application should have a subcooling of 7 ± 2 ºF and superheat of 7 to 9 ºF.
a. If subcooling and superheat are low, adjust TXV to
7 to 9 ºF superheat, then check subcooling.
NOTE: To adjust superheat, turn the valve stem
clockwise to increase and counter clockwise to decrease.
b. If subcooling is low and superheat is high, add charge
to raise subcooling to 7 ± 2ºF then check superheat.
c. If subcooling and superheat are high, adjust TXV
valve to 7 to 9 ºF superheat, then check subcooling.
d. If subcooling is high and superheat is low, adjust
TXV valve to 7 to 9 ºF superheat and remove charge
to lower the subcooling to 7 ± 2ºF.
NOTE: Do NOT adjust the charge based on suction pressure unless there is a gross undercharge.
4. Disconnect manifold set, installation is complete.
Subcooling Formula = Sat. Liquid Temp. - Liquid Line
Temp.
Two Speed Application
Run the remote on low stage cooling for 10 minutes until refrigerant pressures stabilize. Follow the guidelines and methods
below to check unit operation and ensure that the refrigerant
charge is within limits. Charge the unit on low stage.
1. Purge gauge lines. Connect service gauge manifold to
base-valve service ports. Run system at least 10 minutes
to allow pressure to stabilize.
2. Temporarily install thermometer on liquid (small) line near
liquid line service valve with adequate contact and insulate for best possible reading.
3. Check subcooling and superheat. Systems with TXV application should have a subcooling of 5 to 7 ºF and superheat of 7 to 9 ºF.
a. If subcooling and superheat are low, adjust TXV to
7 to 9 ºF superheat, then check subcooling.
NOTE: To adjust superheat, turn the valve stem
clockwise to increase and counter clockwise to decrease.
b. If subcooling is low and superheat is high, add charge
to raise subcooling to 5 to 7 ºF then check superheat.
c. If subcooling and superheat are high, adjust TXV
valve to 7 to 9 ºF superheat, then check subcooling.
d. If subcooling is high and superheat is low, adjust
TXV valve to 7 to 9 ºF superheat and remove charge
to lower the subcooling to 5 to 7 ºF.
NOTE: Do NOT adjust the charge based on suction pressure unless there is a gross undercharge.
4. Disconnect manifold set, installation is complete.
Subcooling Formula = Sat. Liquid Temp. - Liquid Line
Temp.
NOTE: Check the Schrader ports for leaks and tighten valve
cores if necessary. Install caps finger-tight.
Heat Pump - Heating Cycle
The proper method of charging a heat pump in the heat mode
is by weight with the additional charge adjustments for line
size, line length, and other system components. Make final
charge adjustments in the cooling cycle.
7
Page 8
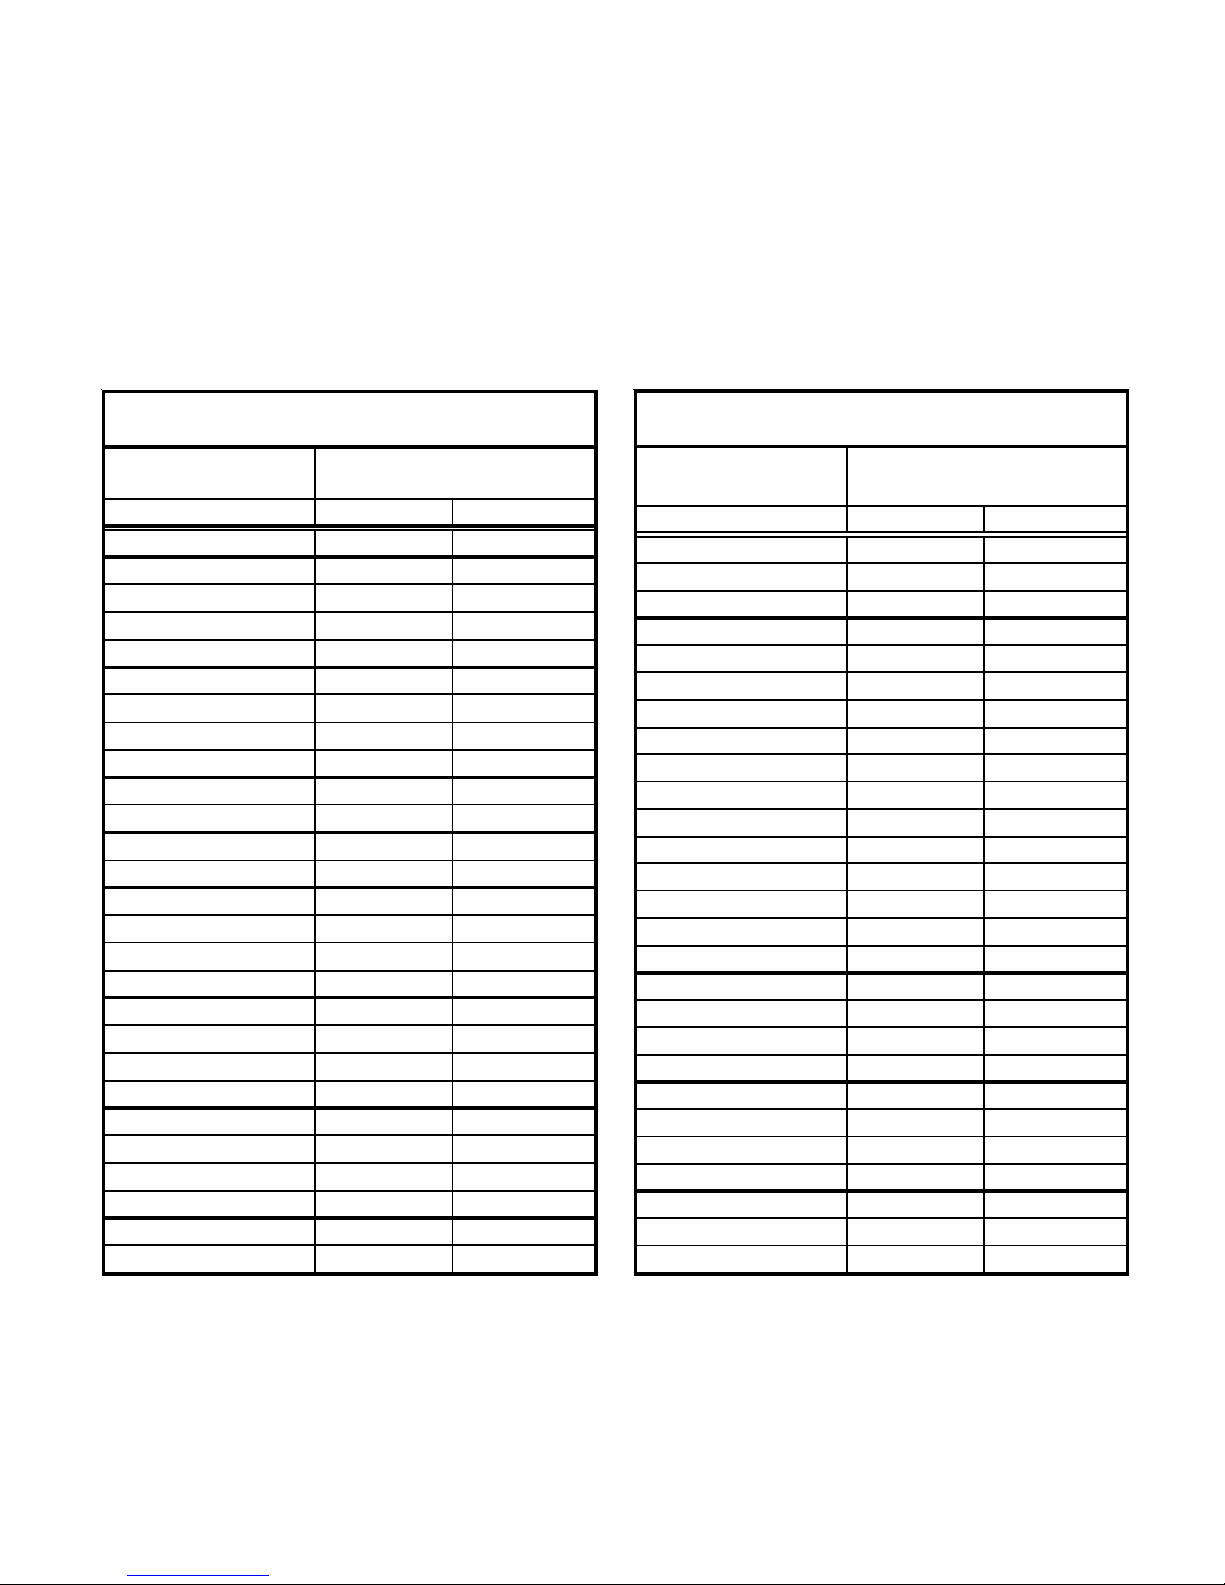
SATURATED SUCTION PRESSURE
TEMPERATURE CHART
SUCTION PRESSURE
P SIG R-22 R-410A
50 26 1
52 28 3
54 29 4
56 31 6
58 32 7
60 34 8
62 35 10
64 37 11
66 38 13
68 40 14
70 41 15
72 42 16
74 44 17
76 45 19
78 46 20
80 48 21
85 50 24
90 53 26
95 56 29
100 59 31
110 64 36
120 69 41
130 73 45
140 78 49
150 83 53
160 86 56
170 90 60
S ATUR AT ED SUC T I ON
TEMPERATURE ºF
SA TURATED LIQUID PRESSURE
TEMPERATURE CHART
LIQUID PRESSURE
P SIG R-22 R-410A
200 101 70
210 105 73
220 108 76
225 110 78
235 113 80
245 116 83
255 119 85
265 121 88
275 124 90
285 127 92
295 130 95
305 133 97
325 137 101
355 144 108
375 148 112
405 155 118
415 157 119
425 n/a 121
435 n/a 123
445 n/a 125
475 n/a 130
500 n/a 134
525 n/a 138
550 n/a 142
575 n/a 145
600 n/a 149
625 n/a 152
SATURATED LIQUID
TEMPERATURE ºF
8
Page 9
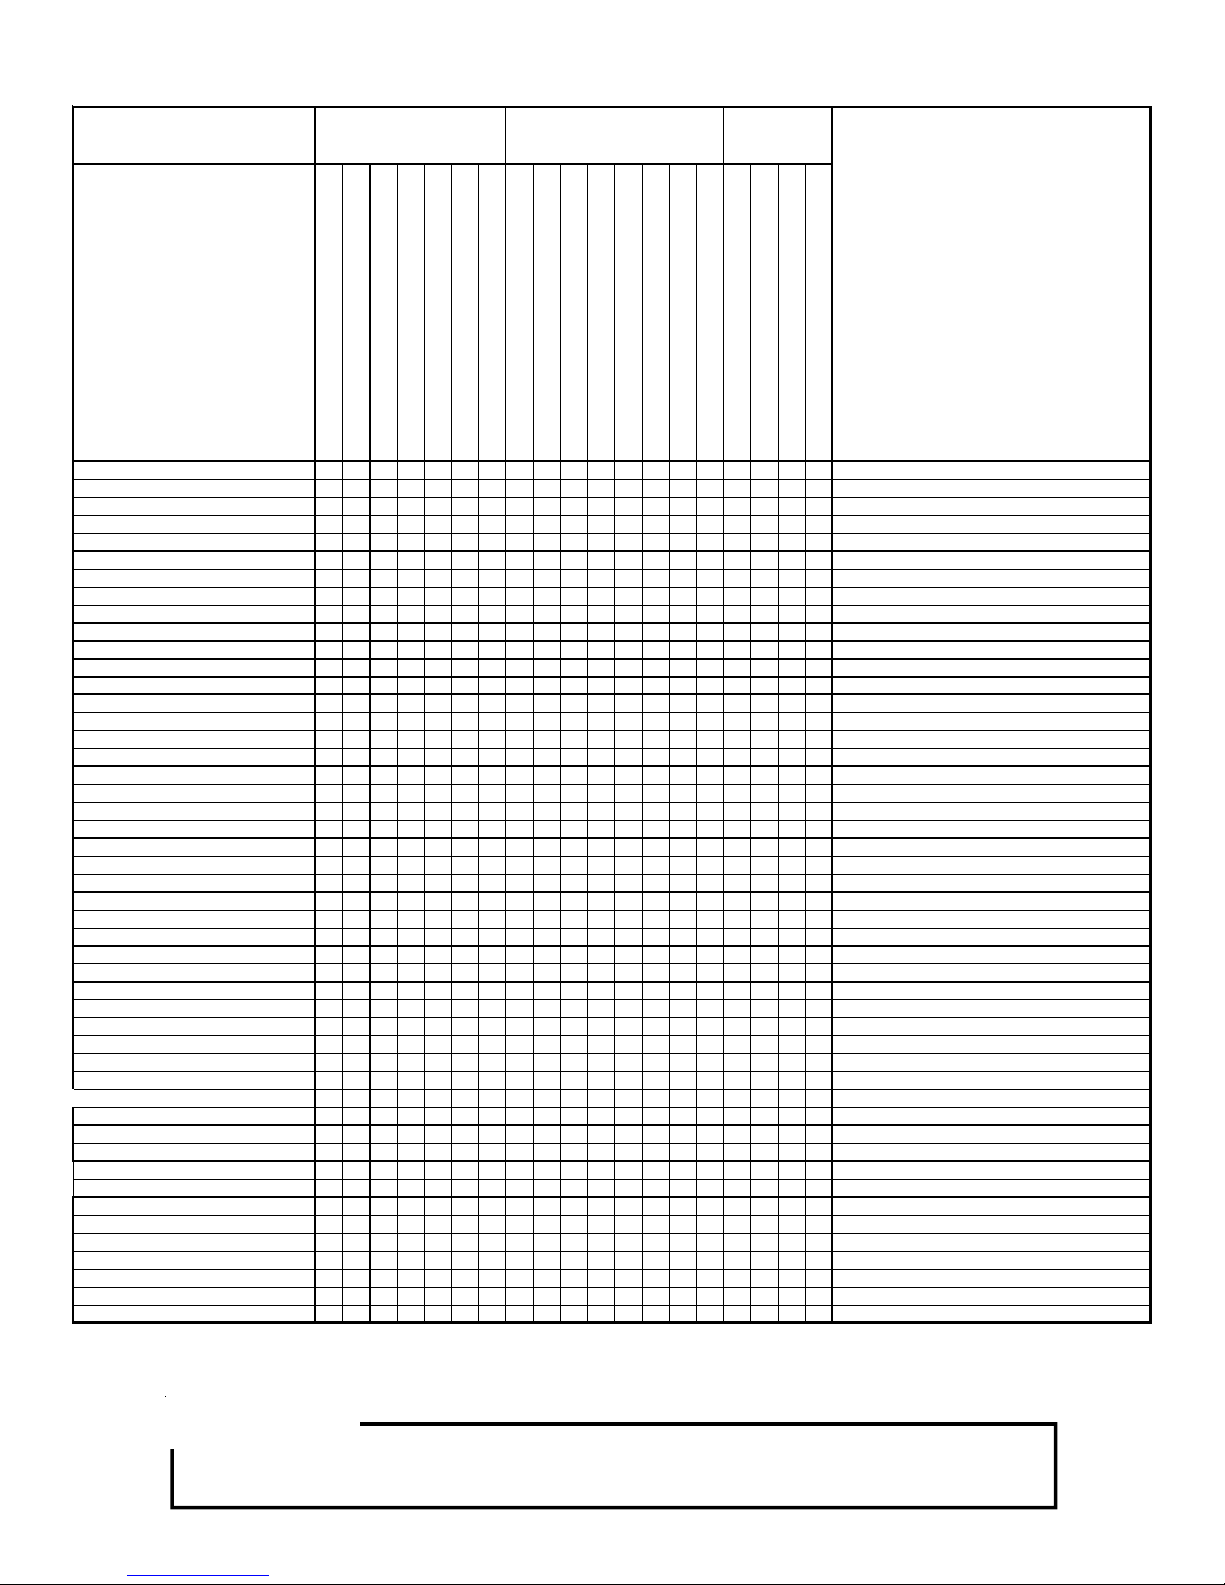
Troubleshooting Information
Complaint
POSSIBLE CAUSE
DOTS IN ANALYSIS
GUIDE INDICATE
"POSSIBLE CAUSE"
Power Failure
Blown Fuse
Unbalanced Power , 3PH
Loose Connection
Shorted or Brok en Wires
Open Fan Overload
Faulty Therm o stat
Faulty Transf ormer
Shorted or Open Cap ac i tor
Internal Compressor Overloa d Open
Shorted or Groun ded Compressor
Compressor Stuck
Faulty Compressor Contactor
Faulty Fan Rela y
Open Control Circuit
Low Voltage
Faulty Evap. Fan Motor
Shorted or Groun ded Fan Motor
Improper Coo ling Antici pat or
Shortage of Refrigerant
Restricted Liquid Line
Open Elemen t or Limit on Elec . Heater
Dirty Air Filter
Dirty Indoor Co il
Not enough air across Indoor Coil
Too much air ac r os s Indoor Coil
Overcharge of R efrigerant
Dirty Outdoor Coil
Noncondensibles
Recirculation of Condensing Air
Infiltration of Outdoor Air
Improperly Lo cated Thermostat
Air Flow Unbala nc ed
System Undersized
Broken Internal Parts
Broken Valves
Inefficient Compre s so r
Wrong Type Expansion Valve
Expansion Devic e Restricted
Oversized Expans ion Valve
Undersized Expansion Valve
Expansion Val ve B ul b Loose
Inoperative Expansion Valve
Loose Hold-down B olts
Faulty Reversing Valve
Faulty Defr os t C ontrol
Faulty Defrost Thermos ta t
Flowrator Not Seating Properly
SYMPTOM
No Cooling Unsatisfactory Cooling/Heating
System wi ll not start
Compressor will not start - fan runs
•
•••
•••
•••
••••••
••• •
••
• ••••
•
••
•••
•••
•••
•
Cooling or Heating Cycle (Heat Pump)
System
Operating
Pressures
Test Method
Remedy
Comp. and Cond. Fan will not start
Evaporator fan will not start
Condenser fa n will not start
Compressor r un s - goes off on overl o ad
Compressor cycles on overload
System runs continuous ly - little c oo l ing/htg
Too cool and then too warm
Not cool enoug h on warm days
Certain areas too cool, others too warm
Compressor is noisy
System runs - blows cold ai r i n heating
Unit will not terminate defrost
Unit will not defrost
Low suction pressure
Low head press ure
High suction pressure
High head pressure
Test Voltage
Inspect Fuse Size & Ty pe
Test Voltage
Inspect Co nnection - Tigh ten
Test Circuits With Ohmmeter
••
♦
♦
•
•
••
••
••
••
•• •• •
♦♦
♦
••
••• •
••• •
••• •
•• •
•• •
••
♦
♦
♦
♦
•• •
•••
••
••
••
•• ••
•
♦
•
♦
••
••• • ••
••• • •• •
••
••• • •
••
•• •
•
•
•
•••
♦♦♦ ♦♦♦
♦♦♦♦♦ ♦
♦♦♦♦♦♦♦
♦
Heating Cycle Only (Heat Pump)
Test Contin ui ty of Overload
Test Contin ui ty of Thermostat & Wir i ng
Check Control Circuit wit h Voltmeter
Test Capacitor
Test Contin ui ty of Overload
Test Motor Windings
Use Test Cord
Test Contin ui ty of Coil & Cont ac ts
Test Contin ui ty of Coil And Contacts
Test Control Circuit with Voltmeter
Test Voltage
Repair or Replace
♦
Test Motor Windings
Check Resistance of Anticipator
Test For Leak s, Add Refriger a nt
Remove Restr iction, Repl a ce Restrict ed Part
Test Heater E lement and Contr o l s
Inspect Filter-Clean or Replace
♦
Inspect Coil - Clean
♦
Check Blower Speed, Duct Static Press, Filter
♦
Reduce Blower Speed
•
Recover Part of Charge
••
Inspect Coil - Clean
•
Recover Charge, E v ac uate, Recharge
•
Remove Obstruction to Air Flow
Check W i n dows, Doors, Vent Fans, Etc .
Relocate Ther mo stat
Readjust Air Volume Dampers
Refigure Cool ing Load
Replace Com p r es sor
Test Compressor Efficiency
Test Compressor Efficiency
Replace Valv e
♦
Remove Restriction or Repl ace Expansion Devi ce
Replace Valv e
Replace Valv e
Tighten Bulb Bracket
Check Valve Op er ation
Tighten Bolts
Replace Valv e or S ol e no i d
Test Control
Test Defrost Thermostat
Check Flowrator & Seat or Replace Flowrator
For detailed service information refer to the Remote Condensing Unit Service manual.
NOTICE
Units with rotary or reciprocating compressors and non-bleed TXV’s
require a Hard Start Kit.
9
Page 10

THIS PAGE LEFT INTENTIONALLY BLANK
10
Page 11

THIS PAGE LEFT INTENTIONALLY BLANK
11
Page 12

5151 San Felipe, Suite 500, Houston, TX 77056
© 2005-2010 Goodman Manufacturing Company, L.P.
Goodman Manufacturing Company , L.P.
www.goodmanmfg.com
12
 Loading...