

Page 1
DAIKIN ROOM AIR CONDITIONER
Operation Manual
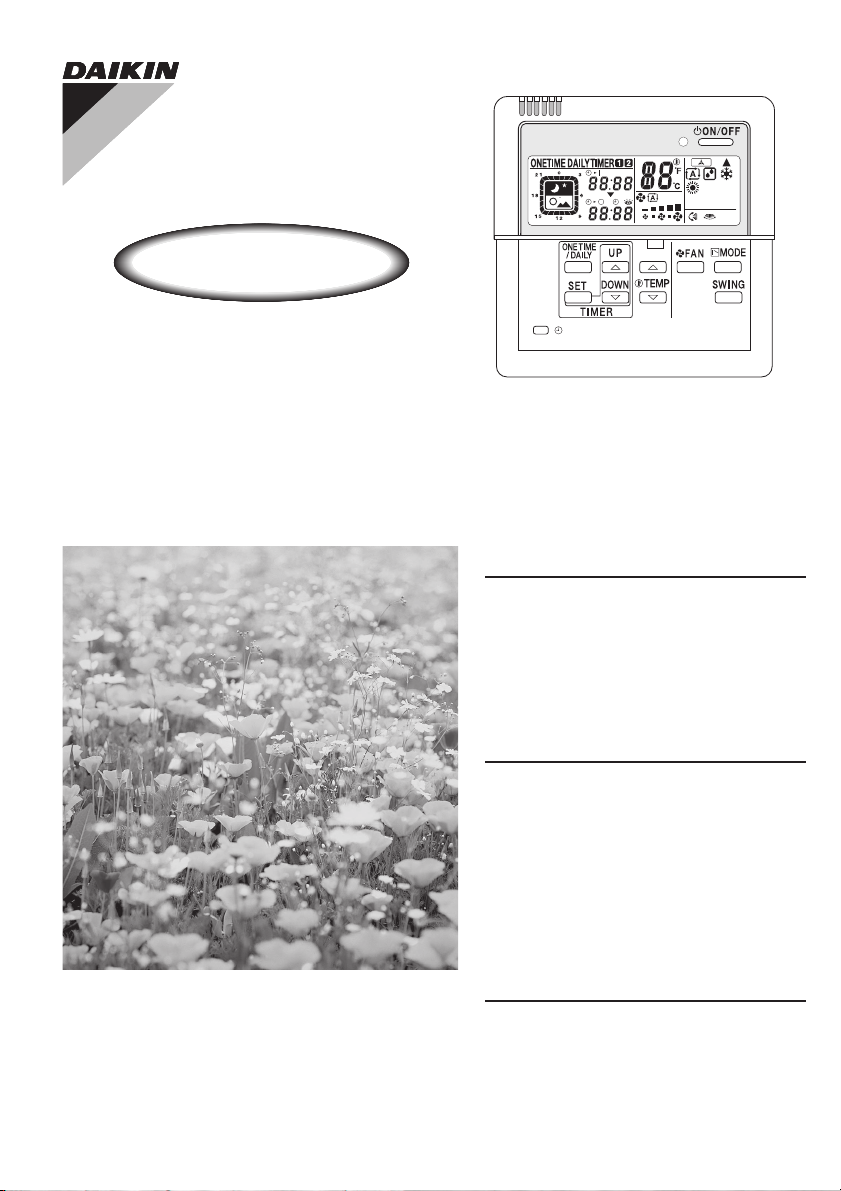
OPTIONAL SLENDER
REMOTE CONTROLLER
Use wisely, save power
Thank you very much for purchasing the Daikin room air
conditioner.
This manual contains precautions and economical use of
your air conditioner.
For correct use of your air conditioner, please read this
manual carefully before use and keep it at hand for easy
reference.
Fill out the warranty card and store it in a safe place.
BRC944B2
READ BEFORE OPERATION
Safety Precautions ........................2
Controller Commands and their
Corresponding Functions .............4
Preparation before Operation .......5
OPERATION
Automatic · DRY · Cooling · Heating
Operation ......................................7
Adjusting Airflow Direction ............9
Timer Operation
ONE TIME Timer .........................11
DAILY Timer ................................13
CARE
Cleaning ......................................15
Page 2
Safety Precautions
• Keep this manual where the operator can easily find it.
• Read this manual carefully before starting the unit.
• For safety reason, the operator must read the following cautions carefully.
• This manual classifies precautions into DANGER, WARNING and CAUTION. Be sure to follow all
precautions below: they are all important for ensuring safety.
DANGER
Indicates an imminently hazardous
situation which, if not avoided, will
result in death or serious injury.
Never do. Be sure to follow the instructions.
Be sure to ground the air conditioner.
Never touch the air conditioner (including the
remote controller) with a wet hand.
If you do not follow these instructions
exactly, the unit may cause property
damage, personal injury or loss of life.
WARNING
If you do not follow these instructions exactly,
the unit may cause minor or moderate
property damage or personal injury.
Never cause the air conditioner (including the
remote controller) to get wet.
CAUTION
DANGER
• For refrigerant leakage, consult your dealer.
Refrigerant gas is heavier than air and replaces oxygen. A massive leak could lead to oxygen depletion,
especially in basements, and an asphyxiation hazard could occur leading to serious injury or death.
• Refrigerant gas may produce a toxic gas if it comes in contact with fire such as from a fan heater, stove or
cooking device. Exposure to this gas could cause severe injury or death.
Any abnormalities in the operation of the air conditioner such as smoke or fire could result in severe injury or death.
•
Turn off the power and contact your dealer immediately for instructions.
Do not install the unit in an area where flammable materials are present due to risk of explosion resulting in serious injury or death.
•
• If equipment utilizing a burner is used in the same room as the air conditioner, there is the danger of
oxygen deficiency which could lead to an asphyxiation hazard resulting in serious injury or death.
Be sure to ventilate the room sufficiently to avoid this hazard.
• Safely dispose of the packing materials.
Packing materials, such as nails and other metal or wooden parts, may cause stabs or other injuries. Tear
apart and throw away plastic packaging bags so that children will not play with them. Children playing
with plastic bags face the danger of death by suffocation.
WARNING
• It is not good for health to expose your body to the air flow for a long time.
Do not put your finger, a rod or other objects into the air outlet or inlet. As the fan is rotating at a high
•
speed and could, cause injury. Always keep small children away from the unit during operation.
• Do not attempt to repair, relocate, modify or reinstall the air conditioner by yourself. Incorrect work or
modifications could cause electric shocks, fire or other damage.
For repairs and reinstallation, consult your Daikin dealer for advice and information.
• If the air conditioner is not cooling (heating) properly, the refrigerant may be leaking, contact your
authorized dealer or qualified service repairman.
When making repairs which requires adding refrigerant, consult with your authorized dealer or
qualified service repairman.
• Do not attempt to install the air conditioner by yourself. Improper installation could result in water
leakage, electric shocks or fire. For installation, consult your authorized dealer or a qualified technician.
2
Page 3

CAUTION
• The air conditioner must be grounded to the earth. Improper grounding may result in electric
shocks. Do not connect the earth grounding wire to a gas pipe, water pipe, lightning rod, or a
telephone ground line. Follow all local and state electrical codes.
• Do not use this unit for cooling precision instruments, food, plants, animals or works of art.
• Never expose little children, plants or animals directly to the air flow.
Do not block air inlets nor outlets. Impaired air flow may result in poor performance or equipment problems.
•
•
Do not stand, sit, or place objects on the outdoor unit. To avoid injury, do not remove the fan guard.
• Do not place anything under the indoor or outdoor unit that must be kept away from moisture , such as
electrical or electronic equipment. In certain conditions, moisture in the air may condense and drip.
• Check the unit stand and fittings for damage annually.
Do not touch the air inlet and aluminum fins of outdoor unit. It may cause injury and/or damage the heat transfer surface.
•
•
This appliance is NOT intended for use by young children or impaired persons without proper supervision.
•
Young children should be supervised to ensure that they DO NOT play with or near the air flow of this appliance.
• Do not pull at the conduit or hang anything on it. Otherwise it will cause fire or electric shock.
• Do not touch the heat exchanger fins. Improper handling may result in injury.
• Do not turn off the power immediately after stopping operation. Always wait at least five minutes before
turning off the power. Otherwise, water leakage and trouble may occur.
•
To avoid personal injury or equipment damage be sure to stop the operation, turn the breaker off or pull out the supply
cord before cleaning or servicing the unit. NOTE: More than one disconnect may be required to shut off all power.
Do not connect the air conditioner to a power supply different from the one specified. It may cause improper operation or fire.
•
Depending on the environment, state and local electrical codes, a ground fault circuit interrupter may be
•
required. Improper grounding or lack of a ground fault circuit interrupter may result in electrical shock, injuries, or death.
Arrange the drain hose to ensure smooth drainage. Improper drainage may cause water damage to the building, or it’s furnishing.
•
•
Depending on the usage environment, water may leak from the air conditioner. If this happens, contact your Daikin Dealer.
•
Safely dispose of the packing materials. Packing materials, such as nails and other metal or wooden parts,
may cause stabs or other injuries. Tear apart and throw away plastic packaging bags so that children will not
play with them. If children play with a plastic bag which was not torn apart, they face the risk of suffocation.
• The remote controller should be installed in such away that children cannot play with it.
Do not place objects in direct proximity of the outdoor unit and do not let leaves and other debris accumulate around the unit.
•
Leaves are a hotbed for small animals which can enter the unit. Once in the unit, such animals can cause
malfunctions, smoke or fire when making contact with electrical parts.
• Do not operate the air conditioner with wet hands.
• Do not wash the indoor unit with excessive water, only use a slightly wet cloth.
• Do not place things such as vessels containing water or anything else on top of the unit. Water
may penetrate into the unit and degrade electrical insulations, resulting in an electric shock.
Installation site.
To install the air conditioner in the following types of environments, consult your authorizede dealer.
• Places with an oily ambient or where steam or soot occurs.
• Salty environment such as coastal areas.
• Places where sulfide gas occurs such as hot springs.
• Places where snow may block the outdoor unit.
The drain from the outdoor unit must be discharged to a place of good drainage.
Consider nuisance to your neighbors from noises.
For installation, choose a place as described below.
A place solid enough to bear the weight of the unit which does not amplify the operation noise or vibration.
•
A place from where the air discharged from the outdoor unit or the operation noise will not annoy your neighbors.
•
Electrical work.
•
For power supply, be sure to use a separate power circuit dedicated to the air conditioner. Follow all local and state electrical codes.
System relocation.
• Relocating the air conditioner requires specialized knowledge and skills. Please consult your
authorized dealer if relocation is necessary for moving or remodeling.
3
Page 4
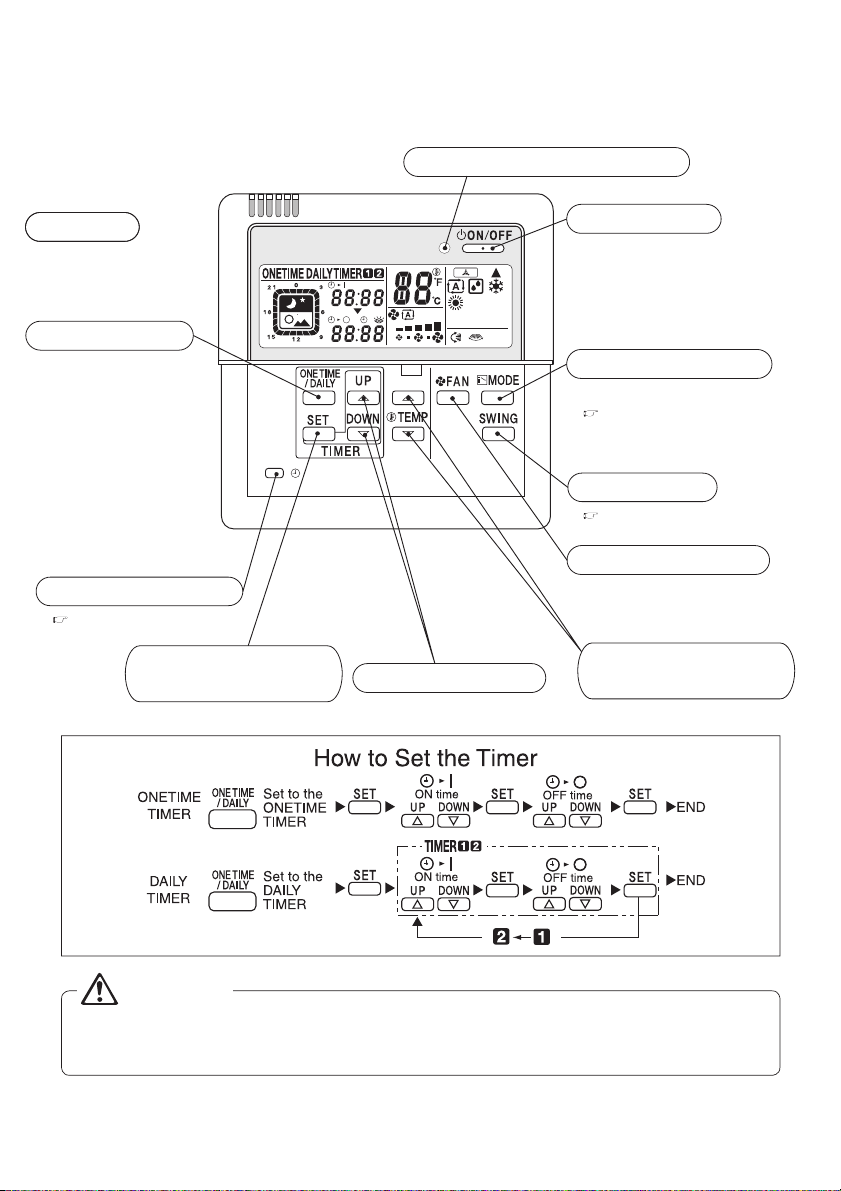
Controller Commands and their Corresponding Functions
Run indicator lamp (green)
Display
Displays the operating
Displays the operating
conditions.
conditions.
Timer select button
Selects one of the following:
ONE TIME timer ON
DAILY timer ON
TIMER OFF
Clock setting button
( page 5)
Time setting button
for the timer
Timer setting button
Sets the current time and timer.
ON/OFF button
Press to start the system.
Press again to stop the system.
Mode select button
Selects an operation mode.
( page 7)
Swing button
( page 9)
Airflow rate button
Adjusts the airflow rate.
Temperature adjustment
button
Adjusts the temperature setting.
CAUTION
This remote controller cannot be used together with a standard wireless remote controller.
Otherwise, what appears on this remote controller's display may fail to correspond to actual
operating conditions.
4
Page 5
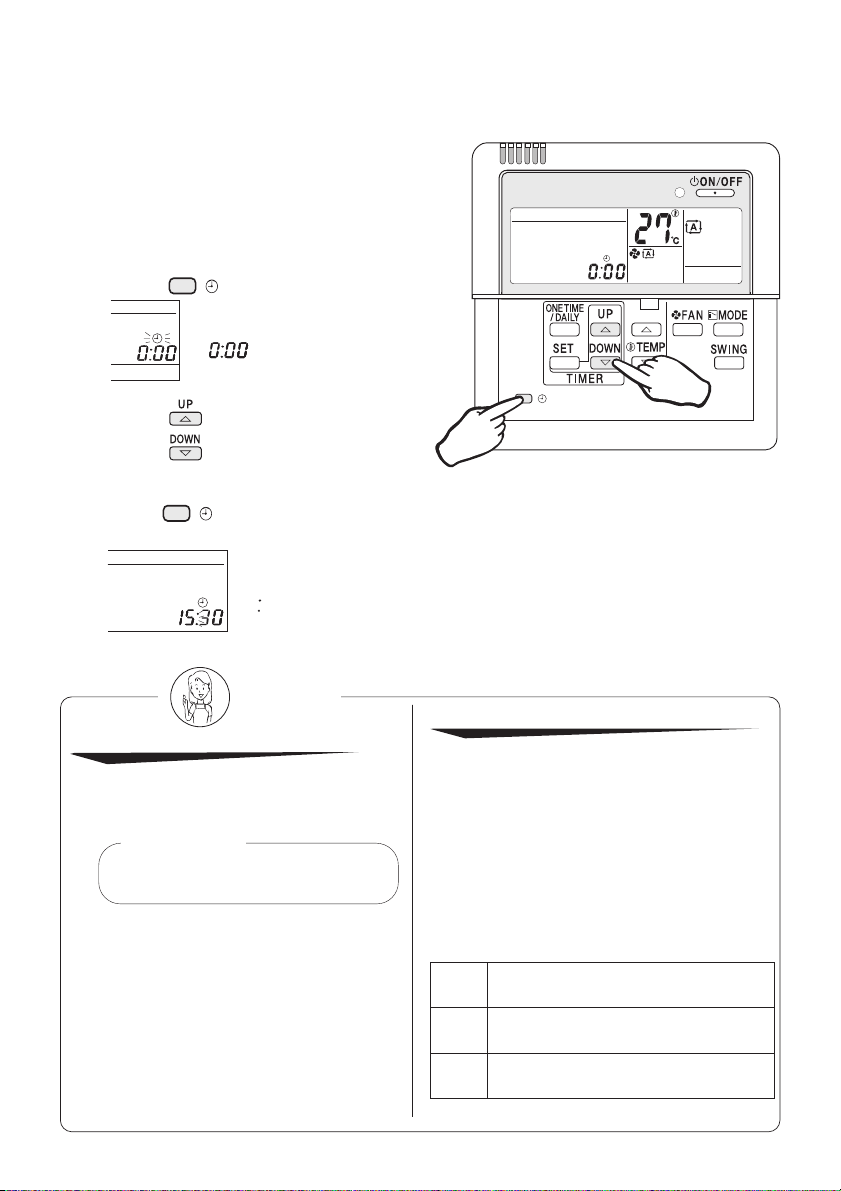
Preparation before Operation
Checking the power
If nothing appears on the remote controller's
display, turn on the circuit breaker.
Setting the current time
1 Press
.
The current time starts blinking.
lights up.
2 Press and set the current time.
Hold the button down to rapidly advance the time.
3 Press
To use the unit efficiently
Avoid overcooling or overheating.
Moderate room temperature setting
contributes to power saving.
Recommended
temperature setting
For cooling ·············· 26~28°C (79°F~82°F)
For heating ············· 20~22°C (68°F~72°F)
Hang a blind or a curtain on the window.
This will enhance the cooling/heating effect
by intercepting direct sunlight and drafts.
A clogged air filter reduces
the cooling/heating effect and wastes
energy. Clean the air filter monthly (every
two weeks as required) or so.
.
blinks.
(This completes the current time setting)
The clock's accuracy is ±30 seconds per month.
Notes
2
1.3
Please take note of the following points
Electric power is consumed even when the air
conditioner is not in operation.
When the unit is not used for a long period of
time such as during off-season, turn off the
breaker.
Operating conditions
If the operation is continued under any
conditions other than the following, the safety
device may work to stop the operation.
Also, dew may form on the indoor unit and drip
from it. (Cooling/DRY)
-10 to 46
Outdoor temp.
Cooling
Room temp.
Indoor humidity
Outdoor temp.
DRY
Room temp.
Indoor humidity
Outdoor temp.
Heating
Room temp.
Operation limit differ according to the model.
°C (14°F to 115°F)
18 to 32
°C (64°F to 90°F)
Less than 80%
°C (14°F to 115°F)
-10 to 46
18 to 32
°C (64°F to 90°F)
Less than 80%
°C (5°F to 68°F)
-15 to 20
Less than 27
°C
5
Page 6

Preparation before Operation
Setting Temperature Indication change
Temperature indication can be changed between Celsius and Fahrenheit before use.
To change from Celsius temperature
indication to Fahrenheit one
1 Press and hold down at the
same time for 5 seconds while the
Celsius temperature is indicated.
To change from Fahrenheit
temperature indication to Celsius one
2 Press and hold down at the
same time for 5 seconds while
the Fahrenheit temperature is
indicated.
1·2
Notes
Temperature indication change between Celsius and Fahrenheit on the remote controller
Change the temperature indication in the modes other than the DRY mode.
In the DRY mode, temperature indication setting cannot be changed because the temperature is not indicated.
When the Fahrenheit temperature indication is changed to Celsius one, the temperature value
(0.5°C) will be rounded up. Thus, the preset temperature may be changed.
Example:
A preset temperature of 65°F (equivalent to 18.5°C) will be changed to 19°C (66°F) by changing the temperature indication.
In this case, if you change the Celsius temperature indication again to the Fahrenheit one, the preset temperature is shown not as 65°F but
as 66°F (equivalent to 19°C). If the preset temperature is 66°F (equivalent to 19°C) and is changed to the Celsius temperature indication,
the indication becomes 19°C (66°F). In this case, no change by the temperature indication change is observed.
When the temperature indication change is set, the preset temperature is transmitted to the
indoor unit so that the reception sound will be heard from the indoor unit.
6
Page 7

Automatic · DRY · Cooling · Heating Operation
Select your desired operation mode.
Once preset, the system can get restarted in the same operation mode.
Run indicator lamp (green)
1 Press
operation mode.
Each time the button is pressed, the mode
changes as follows.
(Automatic)
(Heating)
(DRY) (Cooling)
The system does not have the FAN mode.
to select your desired
(DRY)
(Cooling)
Heat pump
model
Cooling only
model
2
1
2 Press
The run indicator lamp lights up.
.
To stop the operation:
Press again.
The run indicator lamp goes out.
Automatic operation
In Automatic, the temperature setting and
operation mode (DRY, Cooling or Heating) are
automatically selected according to the room
temperature and outdoor temperature at the
time of starting operation.
DRY operation
In this mode, humidity is removed from the air.
Note
While running in the DRY mode, you may
feel cool or warm air from the air outlet. In
this case, readjust the airflow direction with
the vertical airflow direction louvers. (except
Duct Connected type)
7
Page 8

To adjust the temperature and airflow rate:
Operation
Setting
to be adjusted
mode
Automatic DRYCooling Heating
Temperature is adjustable.
Temperature
cannot be
adjusted.
(Temperature)
Recommended temperature
Cooling : 26°C-28°C (79°F~82°F)
Heating : 20°C-22°C (68°F~72°F)
Five levels of airflow rate setting
from " " to " " plus " " are available.
Airflow rate
cannot be
(Airflow rate)
When the unit runs in the cooling or heating mode at a low airflow rate, the cooling or heating effect
may be insufficient.
adjusted.
To adjust the airflow direction:
( page 9)
Heating operation
Since the heating operation is performed by
taking the heat from outdoor into the room,
the heating capacity decreases as the outdoor
temperature lowers. If the room is not heated
sufficiently, it is recommended to use other
heating appliance at the same time.
Since the air conditioner heats the whole room
by circulating hot air, it takes some time to
heat the entire room completely.
8
If the outdoor unit gets frosted during heating
operation, the heating capacity is decreased.
In this case, the unit starts defrosting
operation.
No hot air comes out of the indoor unit during
defrosting operation.
Page 9

Adjusting Airflow Direction
Adjust the airflow direction for maximum comfort.
To adjust the Airflow Direction
1 Press
Each time the button is pressed, the airflow
direction louvers change their movement.
during operation
.
Wall Mounted Types (without horizontal swing function)
Swing
Airflow direction
louvers stop
The horizontal airflow direction louvers
move up and down.
The louvers stop just when the
button is pressed.
1
Adjustment of horizontal airflow direction
The automatic moving range of the horizontal airflow direction louvers varies depending on the
operation mode.
Notes
In fixing the horizontal airflow direction, keep the horizontal airflow direction louvers tilted
downward in the heating mode, and keep them nearly horizontal level in the cooling or DRY mode.
This will enhance the cooling and heating effect.
On the air conditioners with vertical and horizontal swing function, be sure to adjust the airflow
directions using the remote controller. Do not forcibly adjust louvers by hand or a malfunction may
occur.
9
Page 10

Wall Mounted Type (with horizontal swing function)
Swing horizontally
Swing vertically
Airflow direction
louvers stop
The horizontal airflow direction louvers
move up and down.
The horizontal airflow direction louvers
stop just when the button is pressed.
Then the vertical ones start moving
right and left.
The vertical airflow direction louvers
stop just when the button is pressed.
The vertical and horizontal louvers cannot move at the same time.
Duct Connected Type (without swing function)
This function cannot be used.
Note
The operating procedure and remote controller display are different depending on the
indoor unit being connected.
Read How to Adjust the Airflow Direction in the air conditioner’s Operation Manual.
10
Page 11

Timer Operation
The Timer Operation feature automatically turns off operation when you go to sleep and turns it back
on when you wake up.
Use the DAILY Timer mode on weekdays, and the ONE TIME timer mode on weekends.
To select the ONE TIME timer
mode:
1
Press
timer mode.
Each time the button is pressed,
the modes change as follows.
The timer lamp lights up.
to select the ONE TIME
ON time
OFF time
ONE TIME timer
DAILY timer
TIMER OFF
To cancel the timer settings:
1 Press to clear the timer settings.
The ONE TIME or
DAILY TIMER disappears
from the display, and the
timer lamp goes out too.
1
3·5
2·4·6
(Timer settings displayed)
Notes
Even when the timer has been off, its
programmed settings are still in memory.
If the system has the timer control ON but
you start and stop it manually using the
ON/OFF button before the designated ON
time, the system will restart again at the
programmed ON time.
Precautions in setting the timer
Before starting the timer operation, make sure
the current time is correct. If not, set the clock
correctly. (
In making time settings,
make it easy to disable the timer too.
If one minute has passed before making any
timer setting, the previous timer settings are
reintroduced and the timer is on standby.
In this case, use the
and make your desired timer settings.
page 5)
is displayed to
(time setting) button
Timer operation
When the ON timer is programmed, the
system starts one hour (maximum) earlier
so that the temperature set by the remote
controller is reached just in time.
When the ONE TIME timer is programmed,
the current time is no longer displayed.
11
Page 12

ONE TIME timer
Once the timer has been activated and then deactivated, it is in the OFF mode.
The ON or OFF timers can be programmed.
1
Press
ONE TIME
2 Press .
to select the ONE TIME timer.
light up.
4 Press .
5
Press
to make the OFF timer setting.
blinks.
blinks.
3 Press to make the ON timer setting.
When the ON timer is not used,
save the setting as
Each time the button is pressed,
the setting changes in a 10minute increment or decrement.
Hold the button down to advance
quickly.
Example of display with the ONE TIME timer programmed
ONE TIME timer
programmed.
The set time is
displayed.
ON timer activated
and system starts.
The ON timer setting
no longer displays.
OFF timer activated,
and system stops.
The timer setting no
longer displays.
When the OFF timer is not used,
save the setting as .
6 Press .
(The ONE TIME timer is now programmed.)
Both of the ON and OFF time
cannot be set as
Notes
In the following cases, reset the
clock (the time setting is kept in the
memory).
The circuit breaker has been
activated.
The power fails.
12
Page 13

Timer Operation
To select the DAILY timer mode:
1
Press
Each time the button is pressed, the modes
change as follows.
ONE TIME timer
DAILY timer
TIMER OFF
to select the DAILY timer mode.
24-hour timer display
The settings of timers
1 2
and can be seen
at a glance.
ON time
OFF time
1 2
Timers
Two pairs of ON and OFF time
settings can be programmed.
1
2
The timer lamp lights up.
To cancel the timer settings:
1 Press to clear the timer settings.
The ONE TIME or
DAILY TIMER , and the
timer lamp are no longer
displayed.
Example of display with DAILY timer programmed
1 1
Timers and
programmed.
2
Timer alone
programmed.
2·3
(Timer settings displayed)
Note
The system starts and stops
repeatedly until the DAILY timer is
set off. Before you leave home for a
long time, set the DAILY timer off.
13
Page 14

DAILY timer
After programming, the system starts and stops each day at the preset times. Two pairs of time settings
can be programmed.
(Example: 8:00
1 Press
~ 10:00, and 18:00 ~ 23:00)
to select the DAILY timer.
DAILY timer indication appears.
lights up.
2 Make the ON and OFF time settings. Take the steps from to .
Program example: 8:00
Settings
ON time setting
When the timer is not
Timer Timer
used, save the setting
as
1
OFF time setting
~ 10:00, and 18:00 ~ 23:00
Procedure
Press Press
1
to make the
timer setting.
ON time setting
2
OFF time setting
3 Press
When the timer is not
used, save the setting
as
2
.
The DAILY timer is now programmed.
Note
If the following appears on the display, the timer must be reprogrammed.
The 24-hour timer display
is blinking.
This means that Timers and are
programmed for the same time settings.
New time settings must be made.
14
This means that the timer has not been
programmed yet.
The 24-hour timer display
is blinking.
Page 15

Cleaning
Cleaning the remote controller
Wipe it clean with soft, dry cloth.
Do not use any water hotter than 40°C (104°F), or volatile liquids such as benzine, gasoline and
thinner, polishing powder, or anything hard such as a scrub brush.
When the unit is not used for a long time
On a sunny day, keep the system running for
half a day in the FAN mode to dry it up inside.
FAN mode
3
1 Press
mode.
2 Press
temperature to 32°C (90°F).
3 Press .
The airflow rate remains the same, and is not
adjustable.
Run the system when the room temperature
12
is below 28°C (82°F).
Finally turn off the circuit breaker dedicated for
the room air conditioner.
Clean the air filter and place it back into
position.
to select the cooling
to adjust the set
15
Page 16

Two-dimensional bar code
is a code for manufacturing.
3P202922-2B
M08B096(0807)
AK HT
 Loading...