

Page 1
User Guide
Blood Glucose
Monitoring System (Cloudia)
Page 2

Contents
About GoodLife 4
About the System 5
Important Information 6
Important Safety Instruction 8
Blood Glucose Meter 10
Meter LCD Window 12
Blood Glucose Test Strip 14
Glucose Control Solution 17
Check Strip 20
Setting Meter Parameters 22
Performing Blood Test 26
Understanding Your Test Result 31
Data Transmission 33
Memory Recall 35
Replacing the battery 36
How to Clean and Disinfect 38
Storage and Handling 46
Display Messages and Problem-Solving Guide 47
Performance Evaluations
System Specication
54
FCC Regulations 66
Warranty 70
How to view transmitted reading
58
52
iglucose Diabets Management
5456
Please read this User Guide before using your GoodLife
Blood Glucose Meter (Cloudia). If you have any questions
or enquiries, please contact customer support at 1-855692-3511 for assistance.
Page 3

4 5
About GoodLife™
About the System
Intended Use
Principle of the Test
GoodLife Blood Glucose Monitoring System(Cloudia)
is intended to be used for the quantitative measurement of glucose (sugar) in fresh capillary whole
blood sample drawn from the ngertips only. It is
intended to be used for single patient and should not
be shared. It is not indicated for the diagnosis or
screening of diabetes or for neonatal use.
The GoodLife System is an electrochemical biosensor
system that measures the amount of electric current
produced and displays the result as a blood glucose
level.
The GoodLife Blood Glucose Monitoring System
(Cloudia) (GoodLife System) is designed to provide
blood glucose measurements with easy and comfortable testing. The system requires 0.5μL of blood
sample and 5 seconds for the test to complete.
The GoodLife System consists of:
GoodLife Blood Glucose Meter (Cloudia), GoodLife
Blood Glucose Test Strips (Cloudia), Check Strip,
GoodLife Glucose Control Solution(Level I & II), Safety
Lancet (optional for
purchase).
These products are intended to be used together to
get accurate blood glucose test results. Do not use
other test strips or control solutions with your meter.
NOTE:
Not for use on patients who are dehydrated, hypotensive, in shock, or in a hyperosmolar state.ÿ
Page 4
The GoodLife System is intended for in vitro diagnostic use with capillary whole blood. The system should
not be used for diagnosis and screening of diabetes
or for testing newborn infant (neonatal testing).
CAUTION
The test result does not suggest any medical
indication. The user should consult his or her
clinician for further diagnostic and treatment.
Call your doctor immediately if you experience
symptoms that are not consistent with your
blood glucose test results.
Severe dehydration or excessive water loss may
cause false, high results. Call your doctor right
away if you suspect you are suering from dehydration.
A sample with large amount of reducing
substances such as triglycerides(>1000mg/dL),
ascorbic acid (>2.25mg/dL), uric acid (>15mg/dL)
and xylose (> 50mg/dL).
1.
2.
3.
4.
A red blood cell count (hematocrit) that is either
very high (over 55%) or very low (under 30%) can
cause false result.
High altitudes above than 8,800 feet (2,750
meter) may aect the test results.
Temperatures outside the range of 50°F to104°F
(10°C to 40°C), 20%-80% RH may aect the test
results.
Do not use GoodLife system to test on critically ill
patient.
Not for use on patients who are dehydrated,
hypotensive,in shock, or in a hyperosmolar state.
5.
6.
7.
8.
9.
6
7
Important Information
Triglyserides
Ascorbic acid
Substance
Highest c oncentration
without interference
( mg/dL)
Toxic
Concertration
( mg/dL)
Theraprutic
Physiological
Levels
N/A
N/A
N/A
N/A
0.40 - 2.00
150 - 500
2.52 - 8.00
57
Uric acid
Xylose
2.25
1000
15
50
Theraprutic/
Page 5

8 9
Important Safety Instruction
The meter and lancing device are for single
patient use. Do not share them with anyone
including other family members. Do not use on
multiple patients.
Because all parts of the kit may come in contact
with your blood, all parts of the kit are considered
biohazardous and can potentially transmit infectious diseases. Please refer to "How to Clean and
Disinfect" section to help mitigate biohazard.
Users should wash hands thoroughly with soap
and water and dry thoroughly after handling the
meter, test strips and any lancing device.
For customer support contact at 1-855-692-3511.
(Mon-Fri 9:00 am~4:30 pm Pacic Time)
NOTE:Please make sure that all products listed on the
"contents" of the box are contained in the package before
using this system. If you nd any imperfection in our products,
please contact customer support at 1-855-692-3511.
(Mon~Fri 9:00am~4:30pm Pacic Time)
1.
2.
3.
“FDA Public Health Notication: Use of Fingerstick
Devices on More than one Person Poses Risk for
Transmitting Bloodborne Pathogens: Initial Communication” (2010)
http://www.fda.gov/MedicalDevice/
Safety/AlertsandNotices/ucm224025.htm
“CDC Clinical Reminder: Use of Fingerstick
Devices on More than One Person Poses Risk for
Transmitting Bloodborne Pathogens” (2010)
http://www.cdc.gov/injectionsafety/FingerstickDeviceBGM.html
References
1.
2.
Page 6
10 11
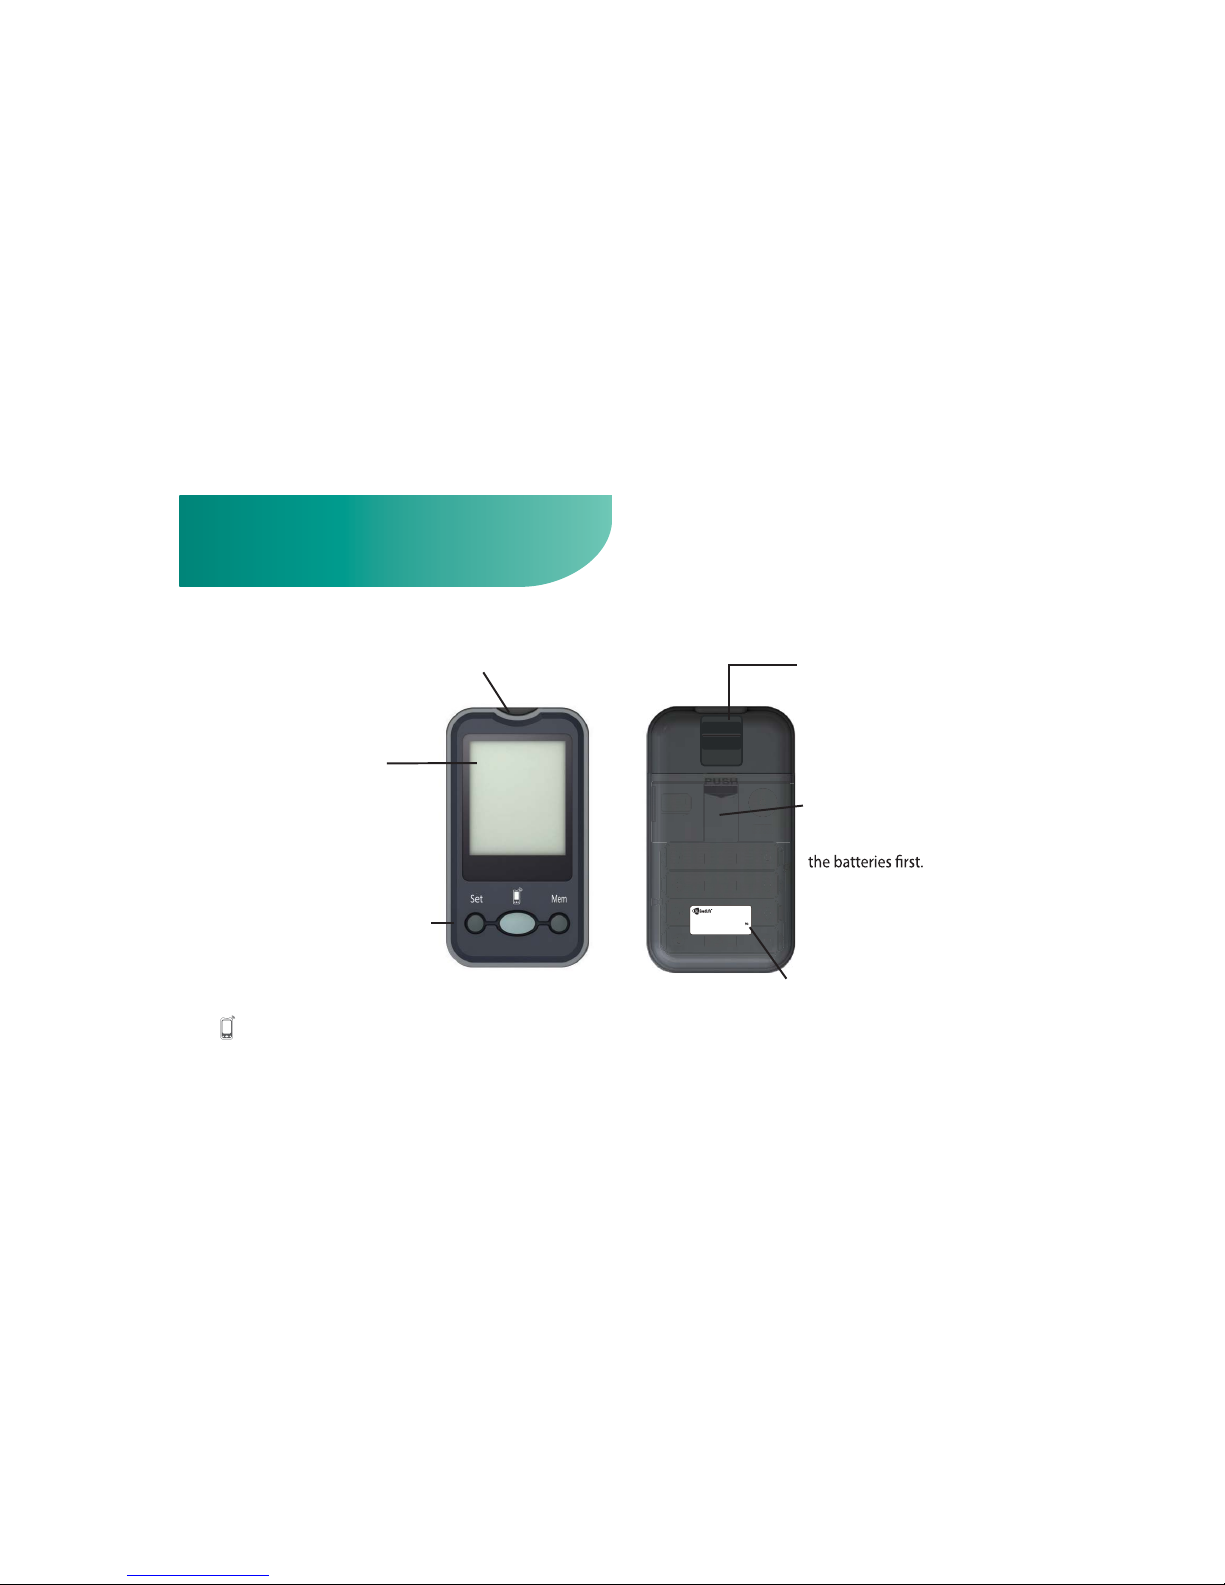
Blood Glucose Meter
DISPLAY: The large, easy
to read display shows
the test results, messages, blood glucose results stored in memory,
time and date.
Mem Button: Press Mem button to enter memory mode to
recall the information stored in
meter’s memory.
Set Button: Press Set button to
enter date and time setting.
STRIP SLOT: Holds a Blood Glucose Test Strip or Check
Strip in place when you perform blood glucose test
or perform check test.
: Holds
-
Button: For data transmission
3L-02-XXXXXX V1.0
Blood Glucose
Monitoring System
Cloudia
For Self-testing
Battery:AAA,6V
HMD BioMedical Inc.
Hsinchu , Taiwan
serial no.:
XXXXX-0000001
SIM:
8901204043780370392
For In Vitro Diagnostic Use Only FCC ID:
AYY0000001
3L-02-XXXXXX V1
SIM
AAA
AAA
AAA
AAA
SMM
AAAAAA
AA
3L-02-810035 V1.0
Blood Glucose
Monitoring System
Cloudia
For Self-testing
Battery:AAA,6V
serial no.: 65534-XXXXXXX
For In Vitro Diagnostic Use Only
FCC ID: AYY0000002
Distrubutor:
Kannact Inc. / KRemedy
10260 SW. Greenburg Road Suite 525,
Portland OR 97223
Battery Compartment
four AAA batteries. Before us
ing the meter, please install
Meter SN Label: The label shows the
meter serial number.
STRIP EJECTOR:
For easy ejection
of the test strip.
Page 7
12 13
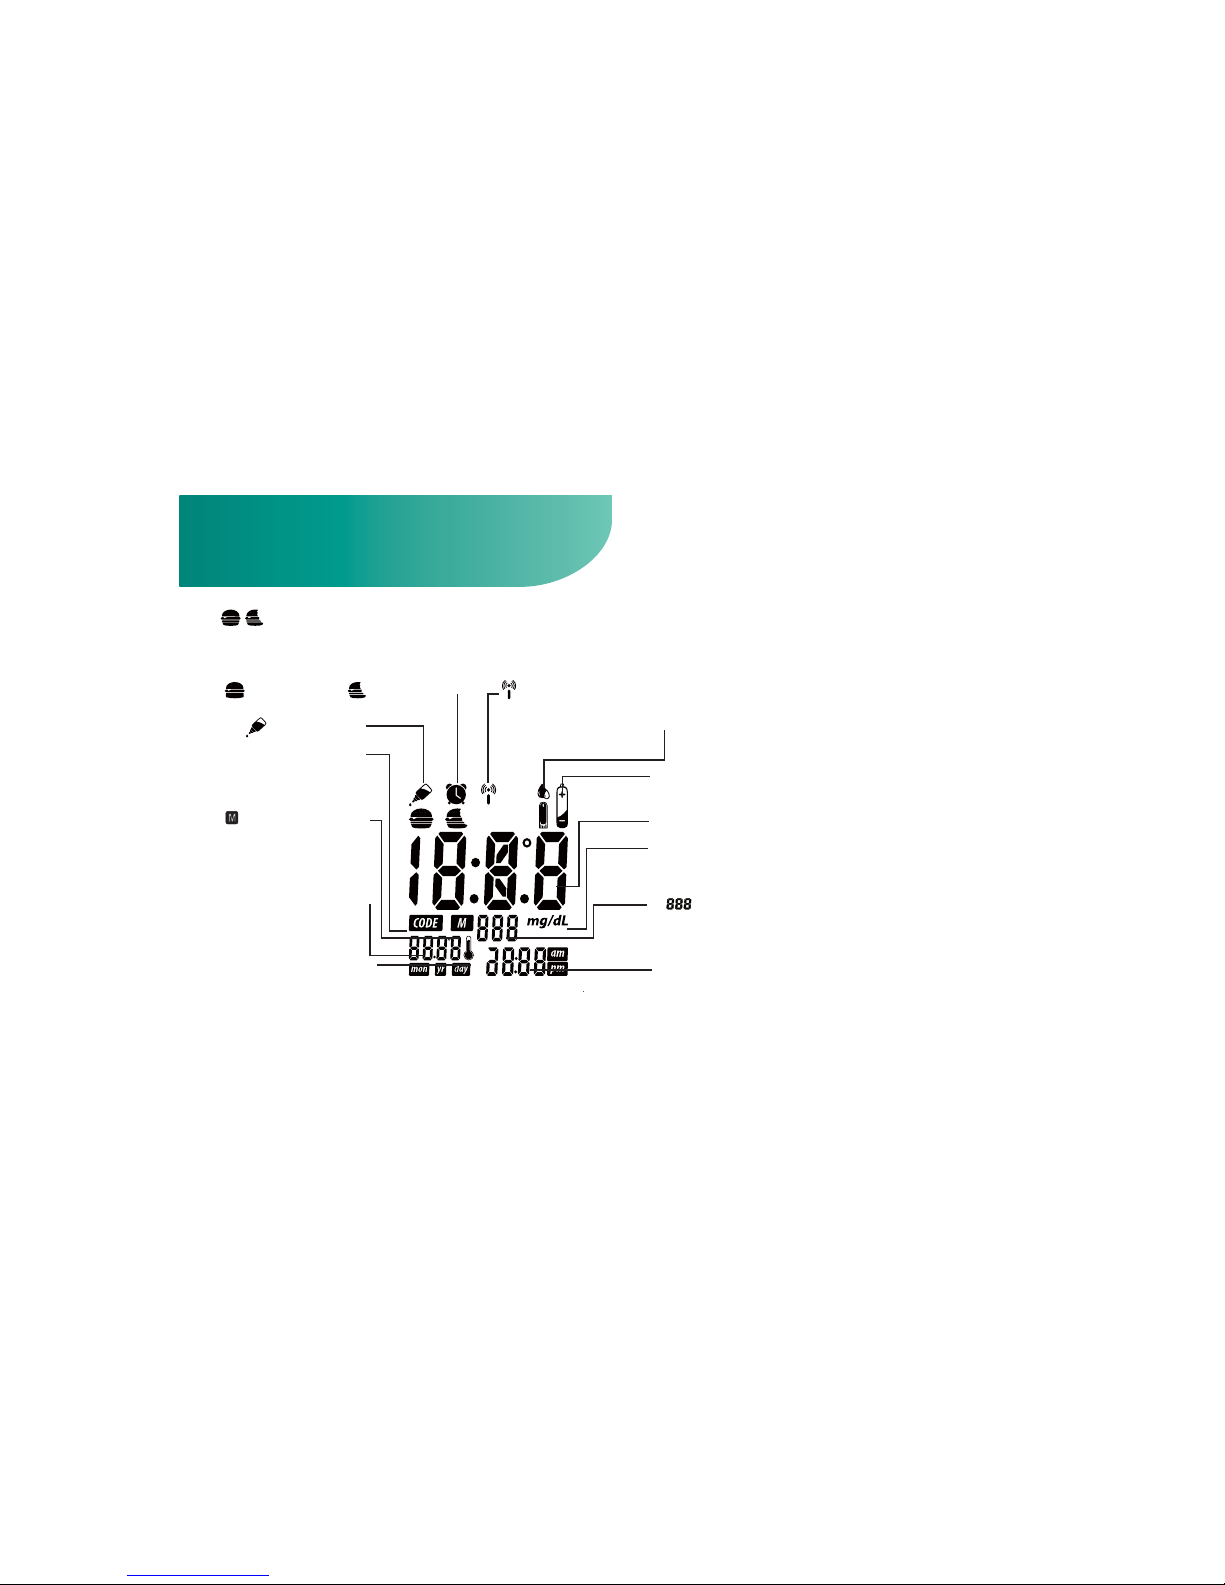
Meter LCD Window
DATE: Month/Year/Day
and the temperature at
the moment of the test.
THERMOMETER SYMBOL:
Appears when ambient
temperature is above or below the acceptable range
needed for testing.
CODE: A code number
should appear before meter is used to test sample.
Ř
Meter is at a Mem-
ory mode. Prior analysis
results can be read.
Symbol:The test
can be adjusted and
stored into 3 types of test
modes - Before Meal Test
(
), After Meal Test(
) and Control Solution
Test(
).
Alarm Symbol:
Appears when
alarm is set.
Symbol: Appears
when data transmission.
Test Result
Time: 12 and 24 hour period format.
mg/dL: The units of measurement in the U.S. are mg/dL.
Ř
Memory capacity is 999 entries. The display shows to
ensure that all digits are working properly.
Strip Symbol: Appears when the strip is inserted and meter is
ready for blood testing. Replace vial cap after removing test strips.
Battery Symbol: Appears when battery is low.
Page 8
14 15
(correct) (incorrect )
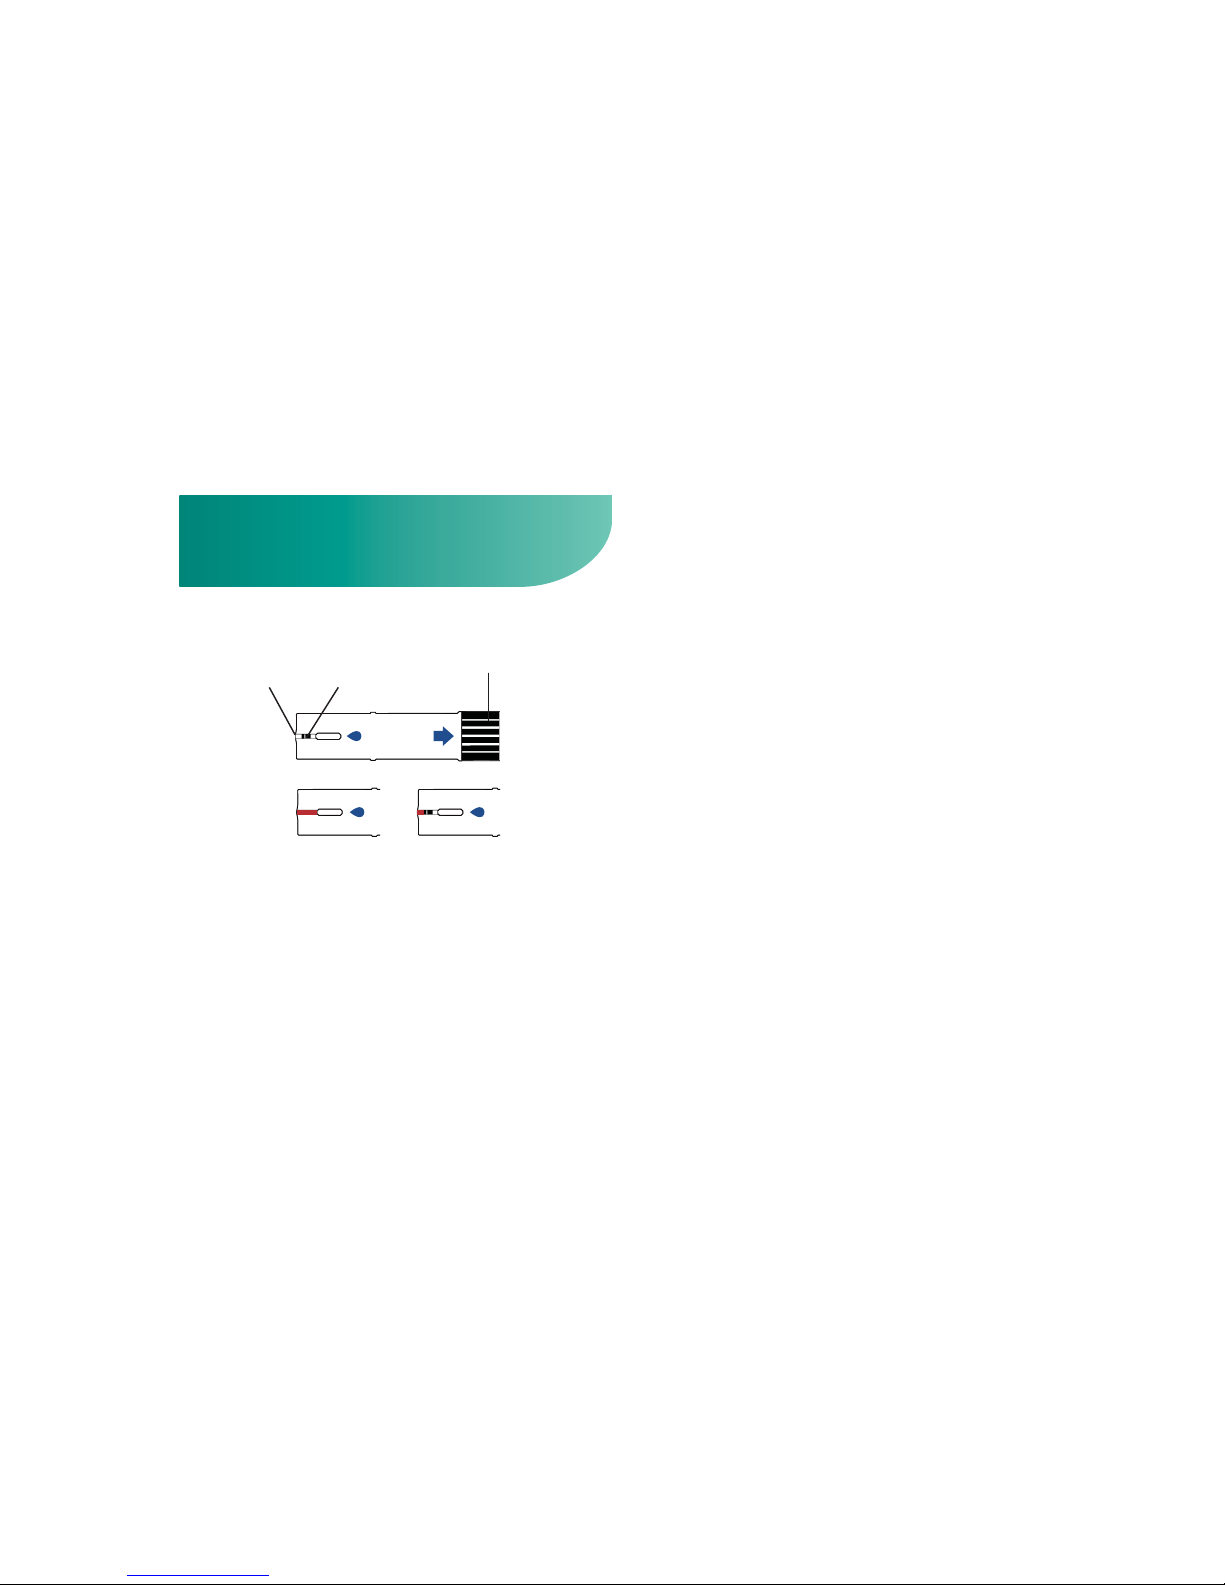
Blood Glucose Test Strip
Aperture: apply
the blood to the
front of the strip.
Black Electrode End:
Insert this end of test
strip into meter.
Blood Reaction
Zone: It must be
lled with blood
entirely.
GoodLife System measures the amount of
glucose in capillary whole blood. Blood can be
applied to the front of the test strip and is automatically drawn to the test strip through capillary
action.
GoodLife Blood Glucose Test Strips (Cloudia) are
intend ed for in vitro diagnostic use with capillary
whole blood or GoodLife Glucose Control
1.
2.
Solution.
Results will not be accurate if used with plasma or
serum samples.
Do not use test strips beyond the expiration date
indicated on the strip vial label.
The discard date for test strips is 90 days after rst
opening the vial. Record the discard date on the
vial when you open a new vial of test strips.
Blood Glucose Test Strip can be damaged by heat
and light. Keep them sealed in the original vial.
Store the vial in a cool, dry place between
104°F(40°C) and 50°F (10°C). Do not refrigerate.
Do not use damaged test strips in any way. Use
test strip immediately after taking it out from the
vial or foil packet; replace the vial cap and close it
tightly.
3.
4.
5.
6.
7.
Page 9
16 17
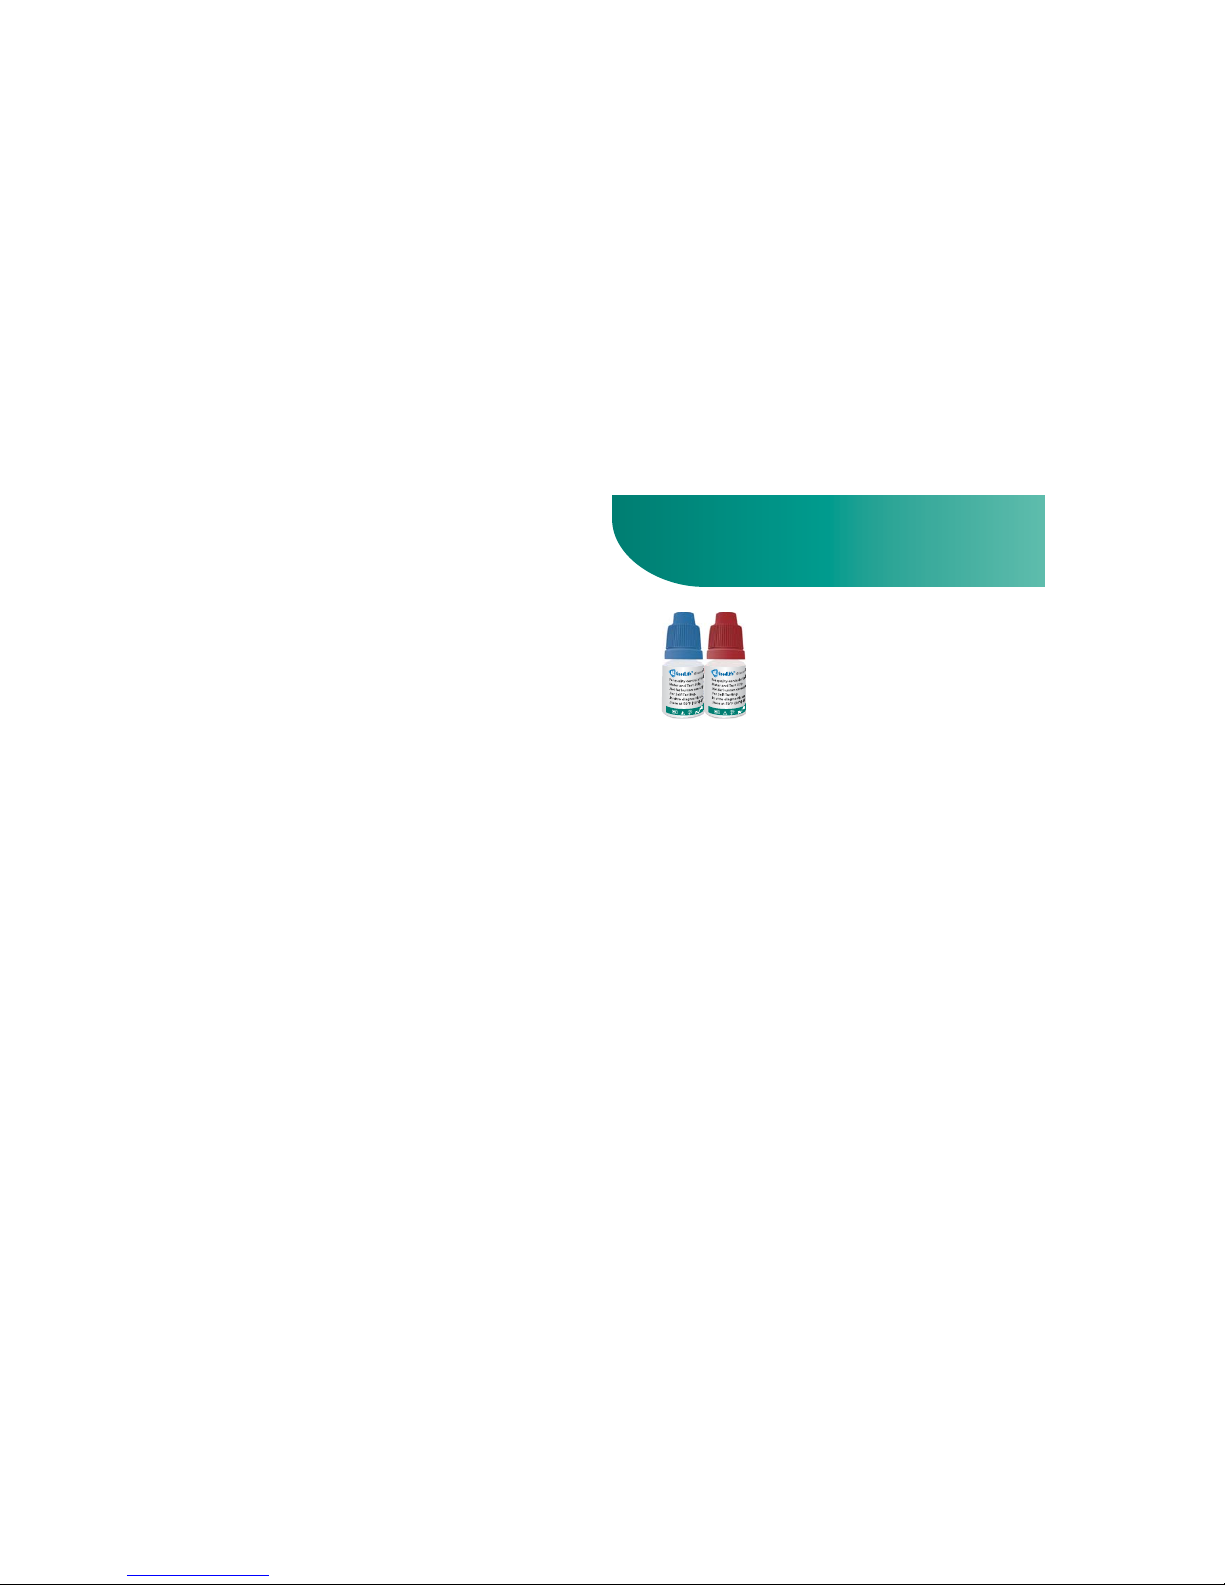
Glucose Control Solution
IMPORTANT INFORMATION
Do not transfer test strips to a new vial. Always
carry test strips in their original vial.
Do not place in direct heat or sunlight.
Do not carry loose test strips in your carrying
case.
Test strips are for single use only.
8.
9.
10.
11.
GoodLife Glucose Control Solution is
used to check if the GoodLife Blood
Glucose Monitoring System(Cloudia)
and Test Strip are working correctly as
a system.
Users should perform a control
solution test when:
a new vial of test strip is opened.
a meter is dropped
whenever results are not consistent with patient’s symptoms.
1.
2.
3.
Do not use control solution beyond the expiration date indicated on the bottle label.
The discard date for control solution is 90 days
after rst opening. Record the discard date on the
bottle when you open a new bottle of control
solution.
1.
2.
Page 10

18 19
Test result will show up in 5 seconds. The result
should correspond to the range printed on the
label of strip vial used.
NOTE:
Repeat test if the result falls outside the control
range. If you continue to get the result falling outside the
control range, the potential causes are
1. the test strip is damaged or get moist
2. the test strip is expired.
3. the meter and strip may not be working properly.
Do not use the system to test your blood until you get a
test result falls within the control range.
Contact customer support at 1-855-692-3511 or your
healthcare provider for help.
5.Store the control solution closed at temperatures
between 50ºF (10ºC) and 86ºF (30ºC).
Please carefully read the label before use.
For purchase of control solution, please contact
your local distributor or customer support at
1-855-692-3511 for more information.
3.
4.
5.
Perform Control Test
Insert a new test strip into the strip slot, the
meter will activate.
The code number will appear on the screen.
Compare the code number shown on the screen
against the code number on the test strip vial. If
the two numbers match, you may begin test,
otherwise contact customer support at 1-855692-3511 or your healthcare provider for help.
When shows up, press Set button and choose
control solution test.
Gently shake the control solution and apply a
drop to the aperture of strip. Make sure that the
control solution has saturated the blood reaction
zone.
1.
2.
3.
4.
Page 11
20 21
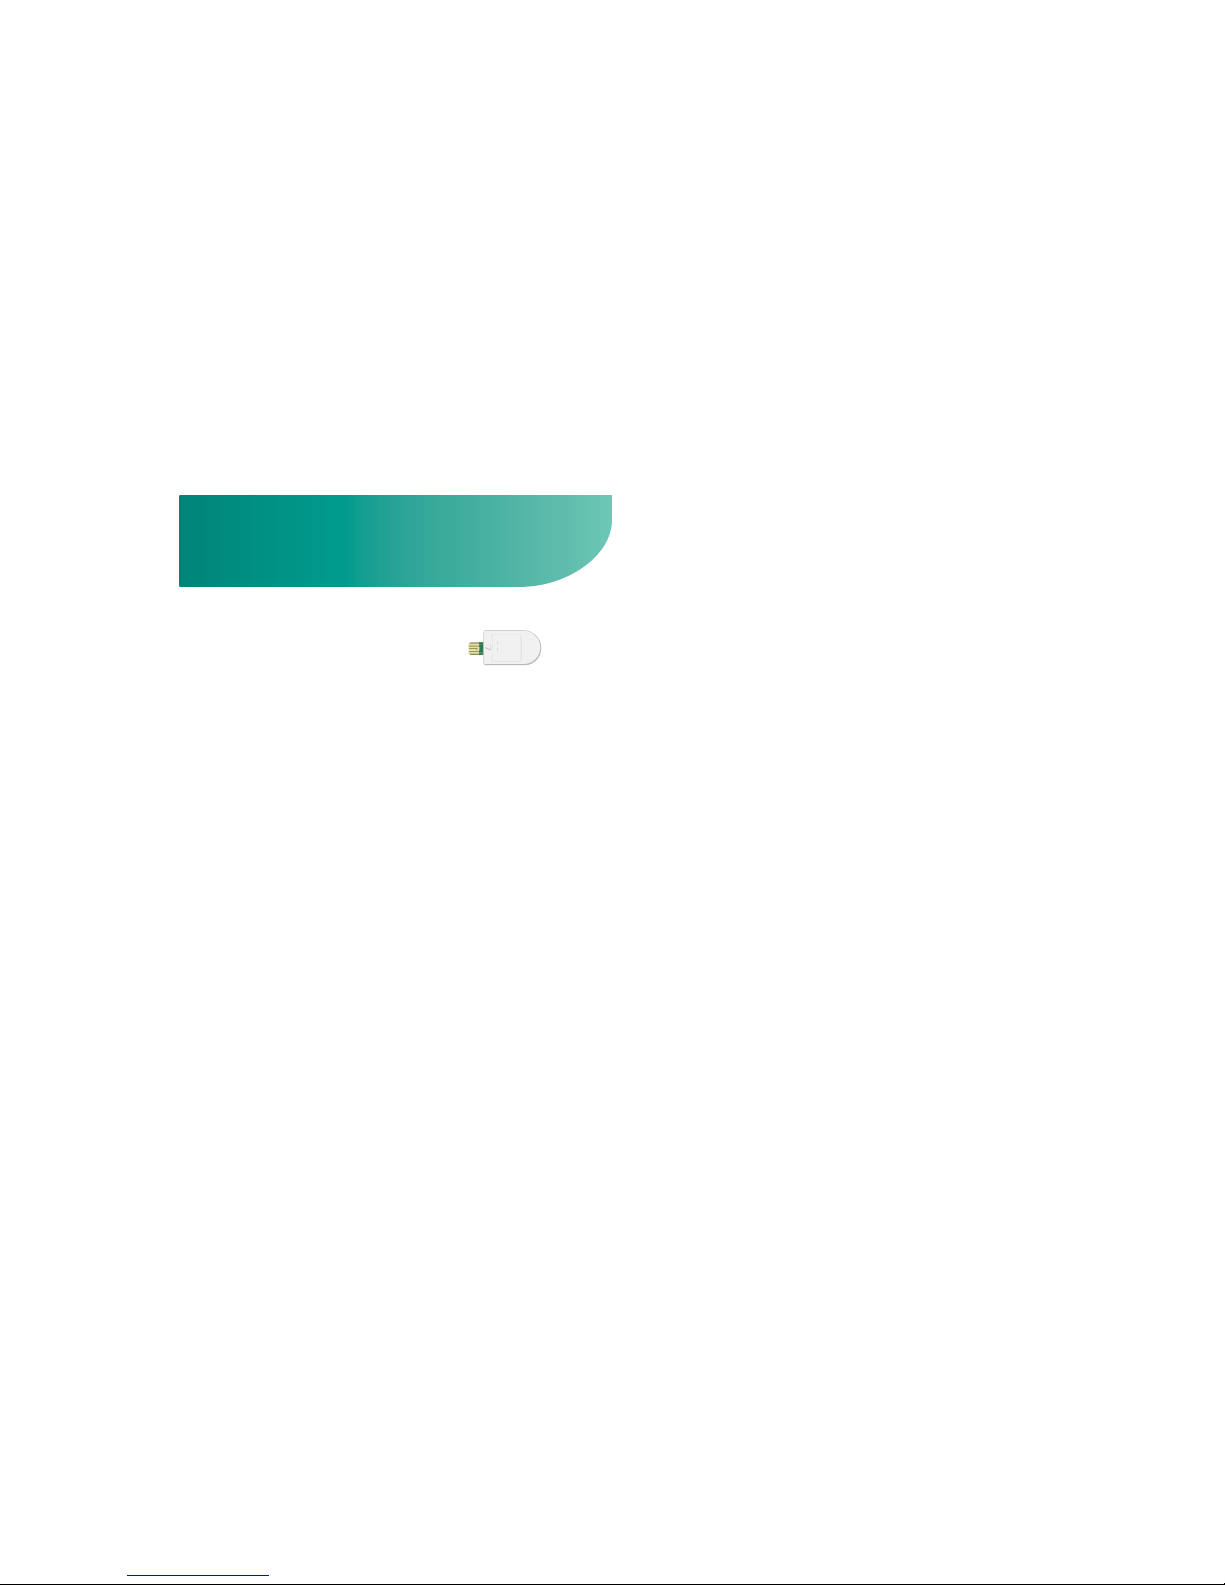
Check Strip
CHECK
How to check meter by check strip
How to delete memory
The Check Strip can be used in 2
ways:
1.2.To test only the function of
the meter and not complete
BGM test system. Please
check the complete test
system with Control Solution
To delete all test memories.
Insert the check strip into strip slot with label side
up as above.
You should obtain an “OK“ reading within 10
seconds, which means your meter is working
properly.
Remove the check strip to exit. Meter will automatically turn o.
NOTE
:
If you do not get "OK" reading but appear other
error message, turn o the meter by remove check strip
from the meter. Then check the battery and repeat the
test. If the second result persists, contact customer
support at 1-855-692-3511 or your healthcare provider.
1.
2.
Insert check strip into strip slot with label side up.
After “OK” displayed, press and hold the Set
button until ashing “dEL” shows up with a beep
sound.
Press and hold the Mem button until you hear a
beep sound, Meter will display “OK” before
turning o and all the memory has been deleted
successfully.
Remove the check strip from the meter.
1.
2.
3.
4.
Page 12

22 23
Setting Meter Parameters
Setting Time & Date
Setting Temperature Unit/ 12h,24h period/ Alarm
Press the Mem button, the meter will enter to the
setting of “year”. Press Set button to select the
desired year.
Press the Mem button to conrm and shift to the
next setting.
Repeat above steps to set the month, day, hour
and minute by Set and Mem buttons.
After minute is set, the meter will display “OK”
before turning o.
Note: While setting the time and date, you can exit the
setting mode anytime by pressing Mem button for 3
seconds.
1.
2.
Press the Set and Mem buttons at same time for
2 seconds to turn on the meter.
1.
When you begin to use the meter or replace a new
battery, please follow the steps below to set the
date and time manually.
Celsius and Fahrenheit can be set according to your
preference.
Then press the Set button to choose between “C”
(for Celsius) and “F” (for Fahrenheit).
When Temperature Unit preference is set, press
the Mem button to enter the 12h/24h period set
ting.
Press the Set button to choose your preference of
12h/24h period.
When 12h/24h period is set, press the Mem
button to enter the alarm setting.
Press the Set button to turn on or turn o the
alarm. The GoodLife has 5 alarms to keep your
blood glucose monitoring on time.
2.
3.
4.
5.
6.
When “ON“ is choosen, press the Mem button
to congure the alarm hour. Press the Set
button to change hour. When alarm hour is
set, Press the Mem button to congure the
alarm minutes. Press the Set button to change
minutes and press the Mem button to enter
next setting.
When “OFF“ is chosen, press the Mem button
to enter next setting.
t
t
Page 13

24 25
Setting Auto Data Transmission
To congure the other 4 alarms, please repeat
step 6.
After setting, the meter will display “OK“ before
turning o.
7.
8.
Press and hold the Set button for 2 seconds to
turn on the meter when “ON“ show up, it means
auto transmission.
Press the Set button to choose between
“ON“(auto) and “OFF“ (manual).
1.
2.
When the preference is set, press the Mem button,
the meter will display “OK“ before turning o.
Page 14
26 27
Performing Blood Test
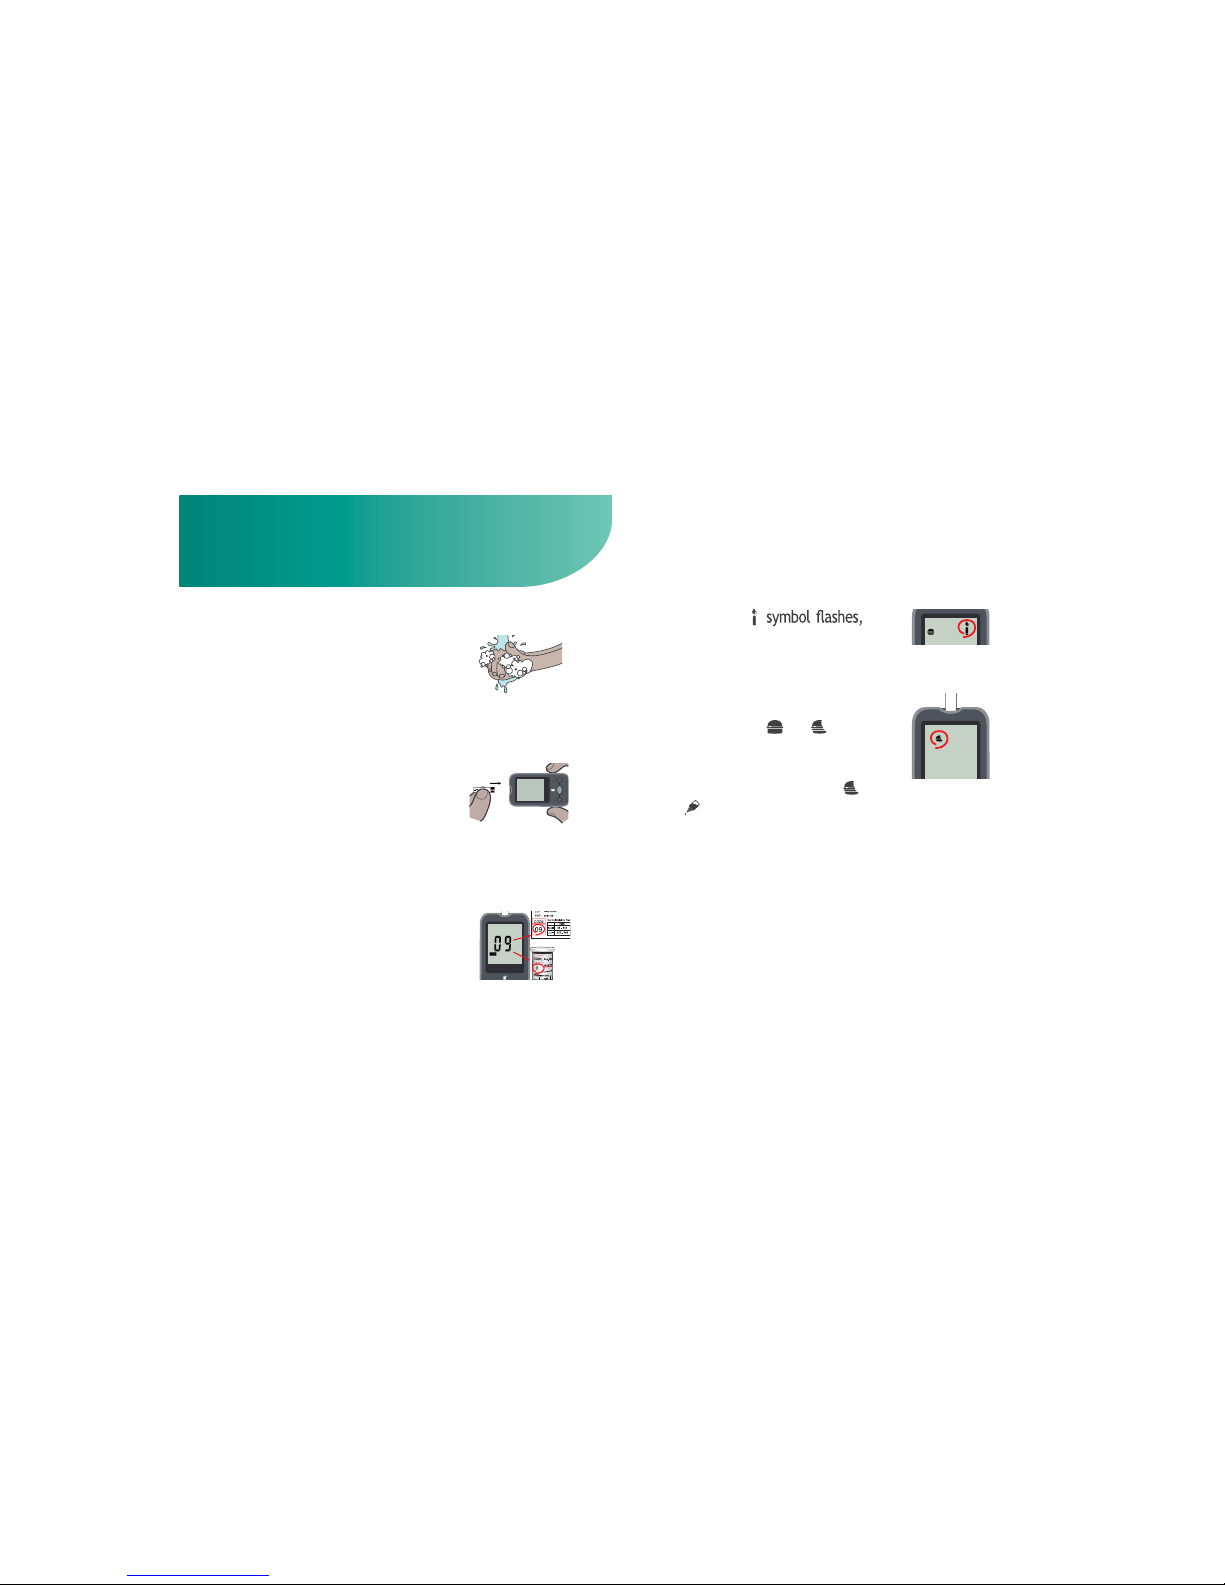
1. Wash your hands in warm,
soap water. Rinse and dry
completely.
!!
2.
Set
Mem
3.
9
4. When the
you are ready to perform a test.
5. If the test is done within 2
hours of a meal, press the
Set button to change the
setting from
to . If the
test is a control solution test,
press the Set button again to
change the setting from
to
.
6. Use safety lancet or lancing device to obtain the
required blood volume. To perform the test, you
need 0.5 uL of blood sample.
Remove new test strip from
vial. Be sure to tightly replace
vial cap after removing test
strips. Insert test strip immediately into strip slot as
illustrated. The meter turns on
automatically.
Check if the code number on
the meter matches the code
on the vial. If the 2 numbers
match, you may begin blood
testing. Otherwise insert
another new one. If the code
number still doesn’t match,
please contact customer
support at 1-855-692-3511 for
help.
Caution: To avoid the blood borne pathogen transmission, the lancing device is for single patient use. Do not
share with anyone else including other family members.
Do not use on multiple patients.
NOTE: Please refer to safety lancet or lancing device user
manual for further instructions on use and handling.
Page 15
28 29
7.
Mem
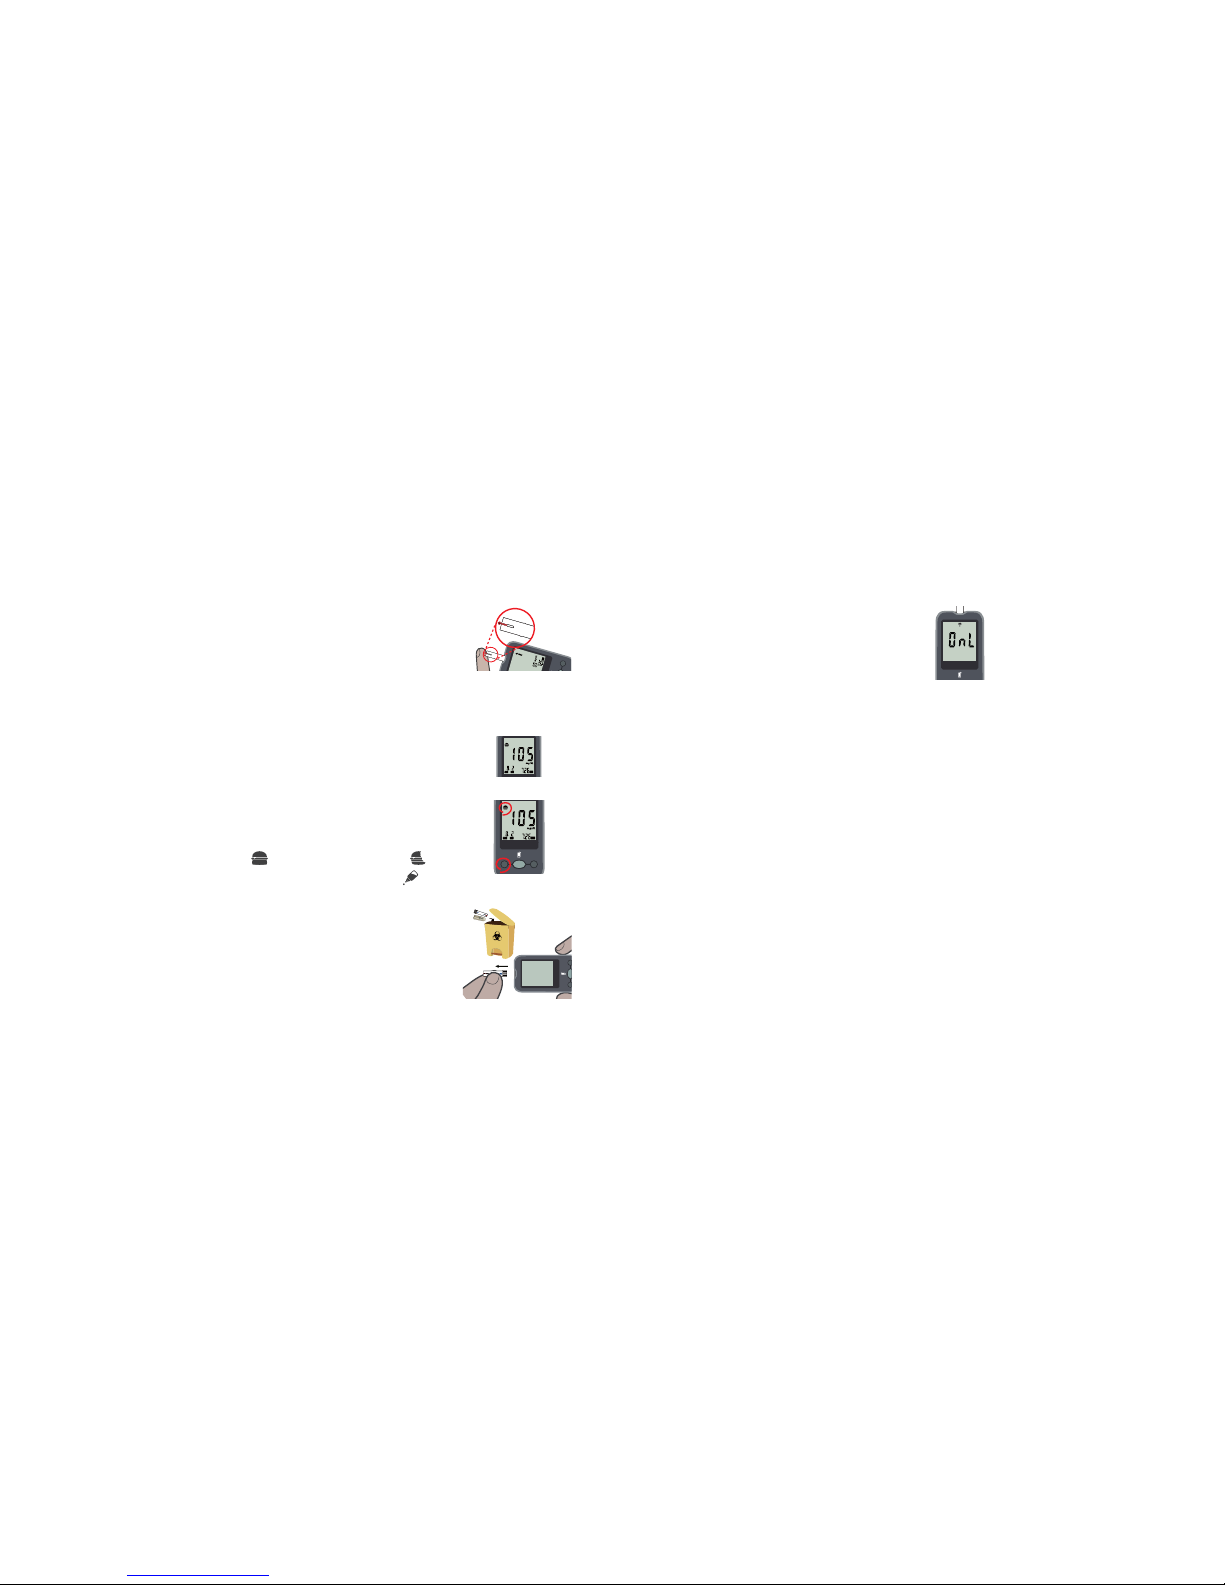
8. Test result will show up in 5
seconds.
9. Before removing the strip from the
meter, you can press Set button to
set the test as BEFORE MEALS TEST
, or AFTER MEALS TEST , or a
CONTROL SOLUTION TEST
.
Set
Mem
10. After setting complete, remove
the strip from meter. Please
follow the healthcare provider’s
recommendations for disposal of
used lancets and strips.
Set
Mem
11.
Set
Mem
WARNING: Inaccurate results may occur in severely hy potensive individuals or patients in shock, inaccurate low
results may occur in individuals experiencing a hyperglycemic/hyperosmolar state, with or without ketosis, and critically ill patients should not be tested with the meter.
Important Safety Information
* The meter is for single patient use. Do not share them
with anyone including other family member.
Apply the blood sample to the
front aperture of test strip in a
way that comfortab.e for you.
Make sure that the blood drop
has saturated the blood
reaction zone.
After removing the strip, the
result will be transmitted to database through GSM system automatically. It will diaplay “OK” if
the transmission succeeds.
Press the “Mem” button to turn
the meter o. If “Err” appears,
please refer to “Display Messages
and Problem-Solving Guide.
Page 16
30 31
Understanding Your Test Result
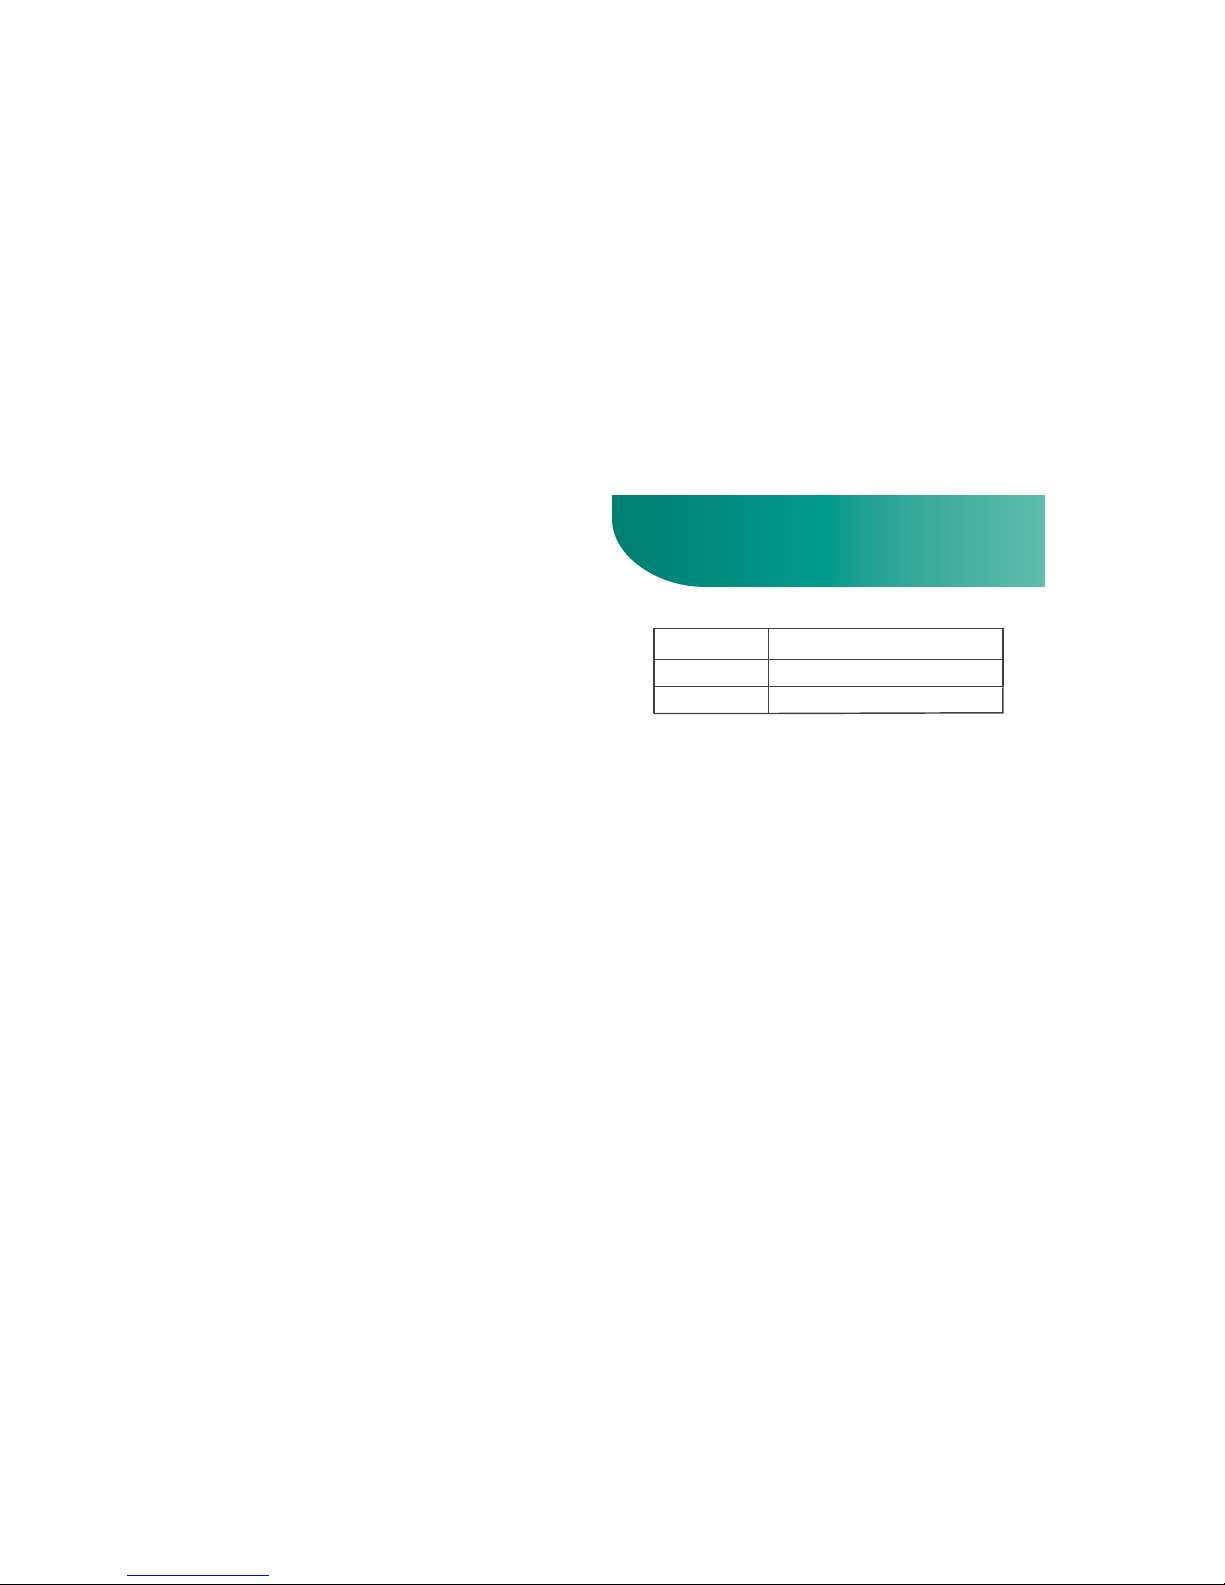
Expected range for people without diabetes :
Time of Day Expected Range, Non-Diabetes
Before Meals Less than 100 mg/dL
After Meals Less than 140 mg/dL
Source: American Diabetes, Association Position Statement,
Diabetes Care Vol.37 (Suppl.1) p.s16 (2014).
Consult your healthcare professional to nd out
your target blood glucose value.
If your blood glucose result seems unusually high
or low, or inconsistent with your previous results,
check the following:
1. Does the code number on the test strip vial
match the code number on the meter?
2. pirts tset eht ot deilppa elpmas doolb eht saW
immediately after the strip was removed from
Was the size of the blood sample sucient?
the vial?
3.
* All parts of the kit are considered biohazardous
and canpotentially transmit infectious disease.
Please refer to “How to Clean and Disinfect“
section to help mitigate biohazards.
* Safety Lancet is for single use only.
Page 17

32 33
4. Was the test strip vial cap tightly sealed?
5. Was the test strip used before the expiration
date?
6. Were the test strips stored away from extreme
temperatures or from areas of high humidity?
Data Transmission
Then run a quality control check with your
Glucose Control Solution and a new test strip. If
the control test result is within the acceptable
range, review testing procedure and repeat your
blood glucose test with a new test strip. If your
blood glucose value is still inconsistent with your
previous results, contact your doctor immediately
for help.
When the meter is set as “auto transmission”
(refer to the section “Setting Auto Data Transmission”), the test result will be transmitted to the
database through GSM system after every time
you test.
When the meter is set as “manual transmission”,
press es and holds the button for 2 seconds to
turn the meter on.
The test result could be transmitted to a secure web
database for further management.
NOTE:
1. It is recommended to transmit in good reception areas.
1.
2.
When the meter displays “Err”, please refer to the
section “Display Messages and Problem-Solving
Guide“.
3.
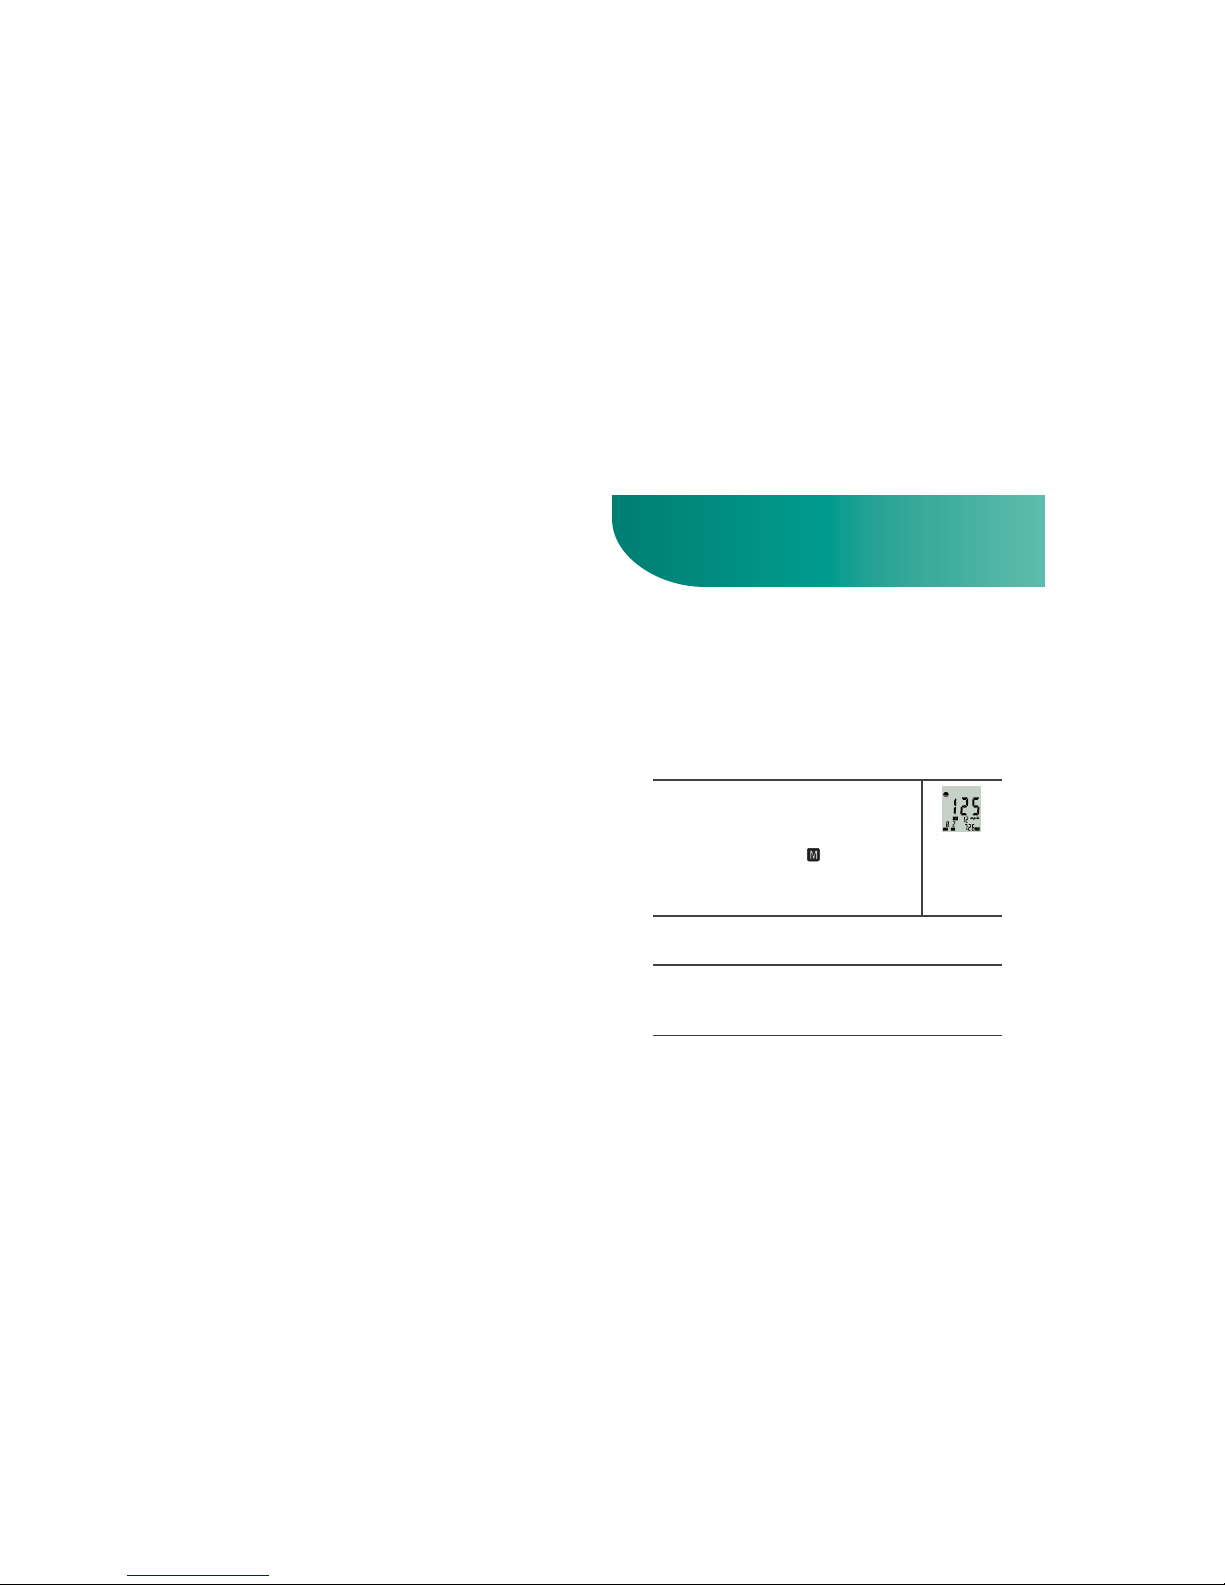
If there is no record in the meter, it will display “M0”,
and then “OK“ before turning o.
If there are records in the meter that haven’t been
transmitted, it will display “OnL“ and transmit the
data. After that, it will display “OK“. Press the Mem
button to turn o or allow the system to auto turn o
after 3 minutes of inactivity.
t
t
Page 18
34 35
Memory Recall
To recall Results Stored in Memory
2. By pressing Mem button, you will see your
test record from the latest to the earliest.
3.
Press and hold the Mem button for 2 seconds
to turn the system o or allow the system to
auto turn o after 30 seconds of inactivity.
For example:
Pacemaker (Keep a safe distance more than 15cm),
Medical telemetry or telemetry equipment (Telemetry),
Physiological signal sensing or monitoring device (such
as ECG, EMG, EEG, ERG, ENG, MEG, Holter, asphyxia
monitors, etc.),
NMR diagnosis photography devices,
Electronic microscope,
Life-sustaining devices with micro-processor control
(such as infusion pumps, hemodialysis machines, breathing assistor, anesthesia machines, infant incubators, etc.)
t
t
t
t
t
t
The test records in the meter will not be removed
after transmission. Please refer to the section
“Check Strip” for removing records.
3.
The GoodLife Blood Glucose Meter automatically
store a maximum of 999 test results including the
result done before a meal or after a meal, or for a
control solution test.
When recalling the results, each single result appears
from the latest to the earliest with time and date.
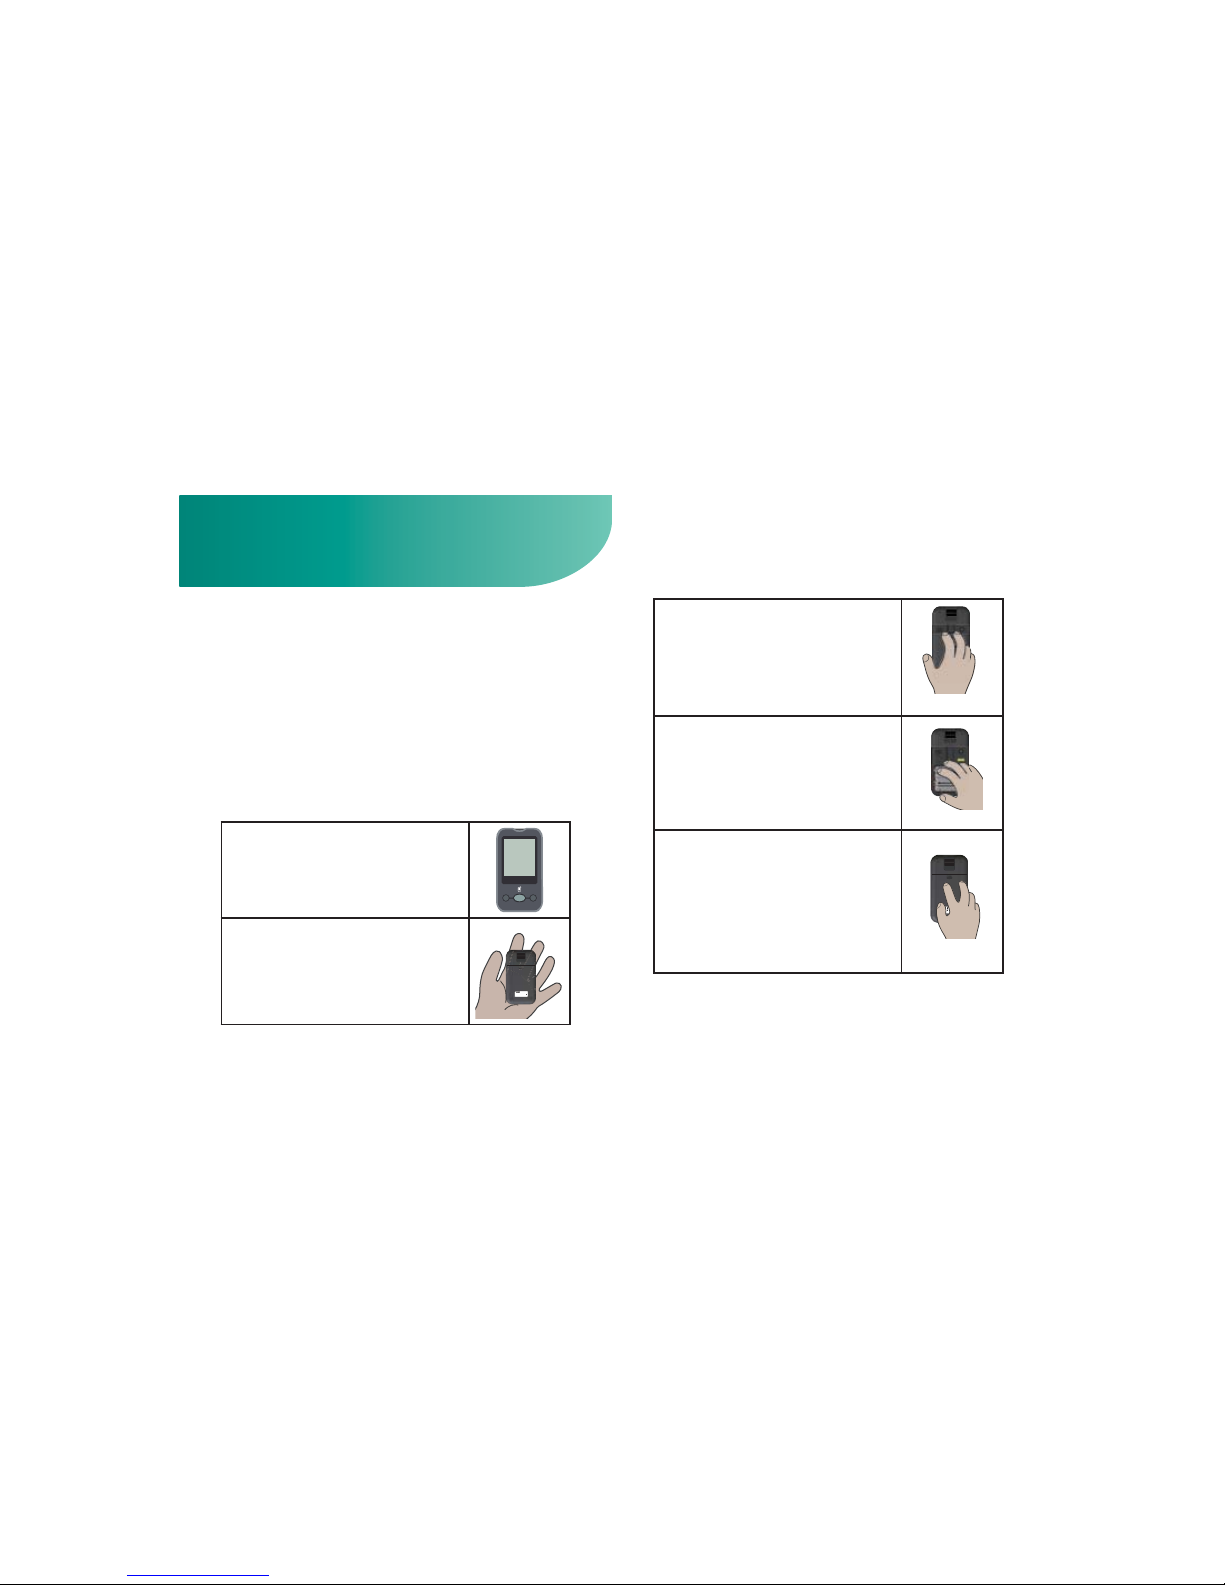
Turn meter on by pressing Mem
button till you hear a beep sound. The
rst result displayed on the screen is
your latest test result. 12 represents
the 12
th
recorded of the overall results
on this meter.
1.
Page 19
36 37
Replacing the battery
To Replace the Batteries
1. Make sure the meter is turned o.
Set
Mem
2. Place the meter face down on a
at surface.
3. Slide battery compartment door
open.
NOTE: Every time when the batteries are replaced, the
meter will turn on. Please follow the section “Setting
Meter Parameters“ to set the time and date.
The GoodLife Blood Glucose Meter comes with four
AAA batteries. Please install your batteries before
starting.
When the battery symbol appears on the meter
display, batteries level is getting low. You will still be
able to test with low battery, but you should replace
them as soon as possible. When battery symbol
appears ashing on the display, the meter will no
longer give results and you must replace the batteries immediately.
Remove the old batteries and
insert 4 new AAA batteries into
the battery compartment. Be sure
to align the plus (+) and minus (-)
signs correctly.
4.
Close the battery compartment
door. Check to see that your
meter is working. If it fails to turn
on, the batteries may have been
inserted incorrectly. Remove the
batteries and reinsert them
correctly.
5.
3L-02-810035 V1.0
Blood Glucose
Monitoring System
Cloudia
For Self-testing
Battery:AAA,6V
serial no.: 65534-XXXXXXX
For In Vitro Diagnostic Use Only
FCC ID: AYY0000001
Distrubutor:
Kannact Inc. / KRemedy
10260 SW. Greenburg Road Suite 525,
Portland OR 97223
For Self-testing
Battery:AAA,6V
HMD BioMedical Inc.
Hsinchu , Taiwan
3L-02-XXXXXX V1.0
IG1-0000001
8901204043780370392
Blood Glucose
Monitoring System
For Self-testing
Battery:AAA,6V
HMD BioMedical Inc.
Hsinchu , Taiwan
3L-02-XXXXXX V1.0
IG1-0000001
8901204043780370392
Blood Glucose
Monitoring System
Page 20
38 39
How to Clean and Disinfect
1. www.cloroxprofessional.com
2. www.amazon.com
3. or call the Clorox service number at 1-800234-7700
Dierences between Cleaning and Disinfection
t Clean: to remove visible signs of dirt or
pollution.
t Disinfect: to free from infection especially by
destroying harmful microorganisms.
NOTE:
If the meter is operated by the care giver rather
than the primary user, the meter should be disinfected by
the meter operator rather than by the user.
To mitigate the risk of bloodborne pathogen transmission (eg. viral hepatitis), the meter must be properly cleaned and disinfected.
The life of the meter is 5 years for 18,250 cleaning and
disinfection cycles. The meter, for single patient
home use, should be cleaned and disinfected at least
once per week as recommended.
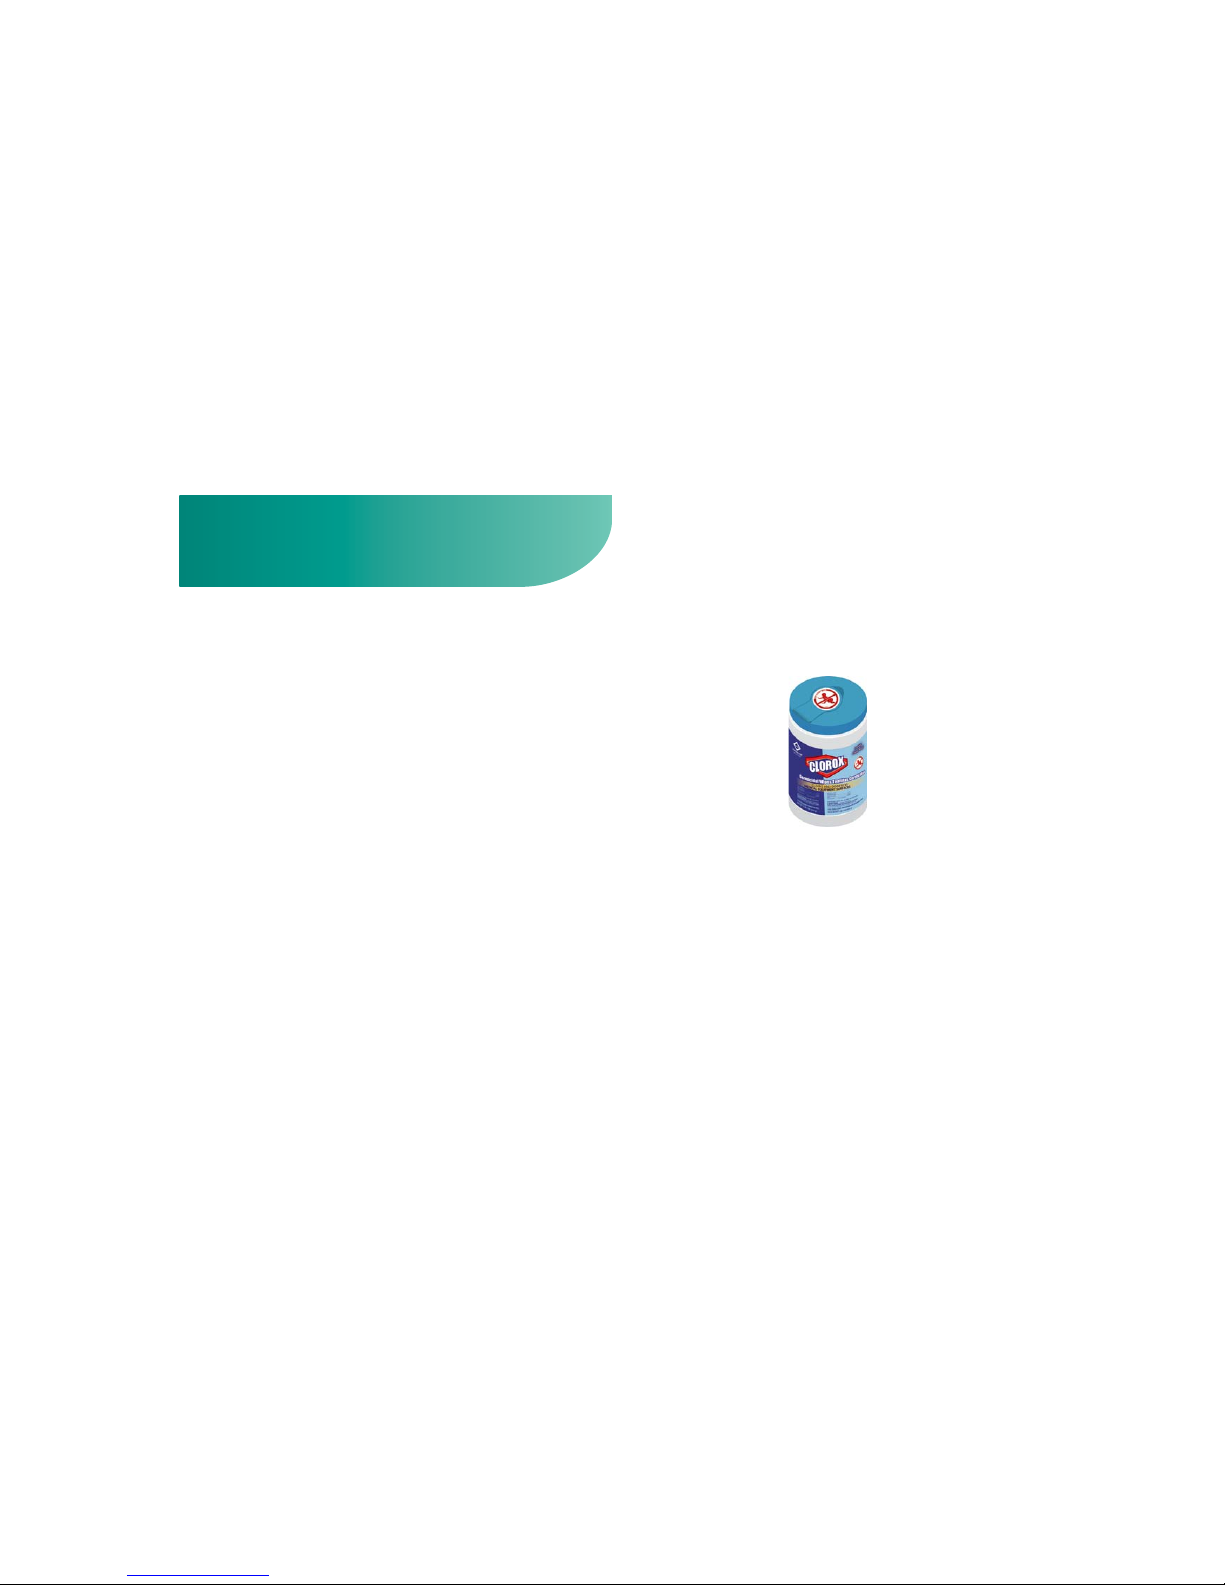
The following disinfactant product with sodium
hypochlorite 0.55% as the active ingredient have
been shown to be safe for use with GoodLife meter,
but any disinfectant product with the EPA registration number of 67619-12 may be used on this device.
It should be cleaned and disinfected once per week.
The Clorox Germicidal Wipes can be purchased on
Page 21
40 41
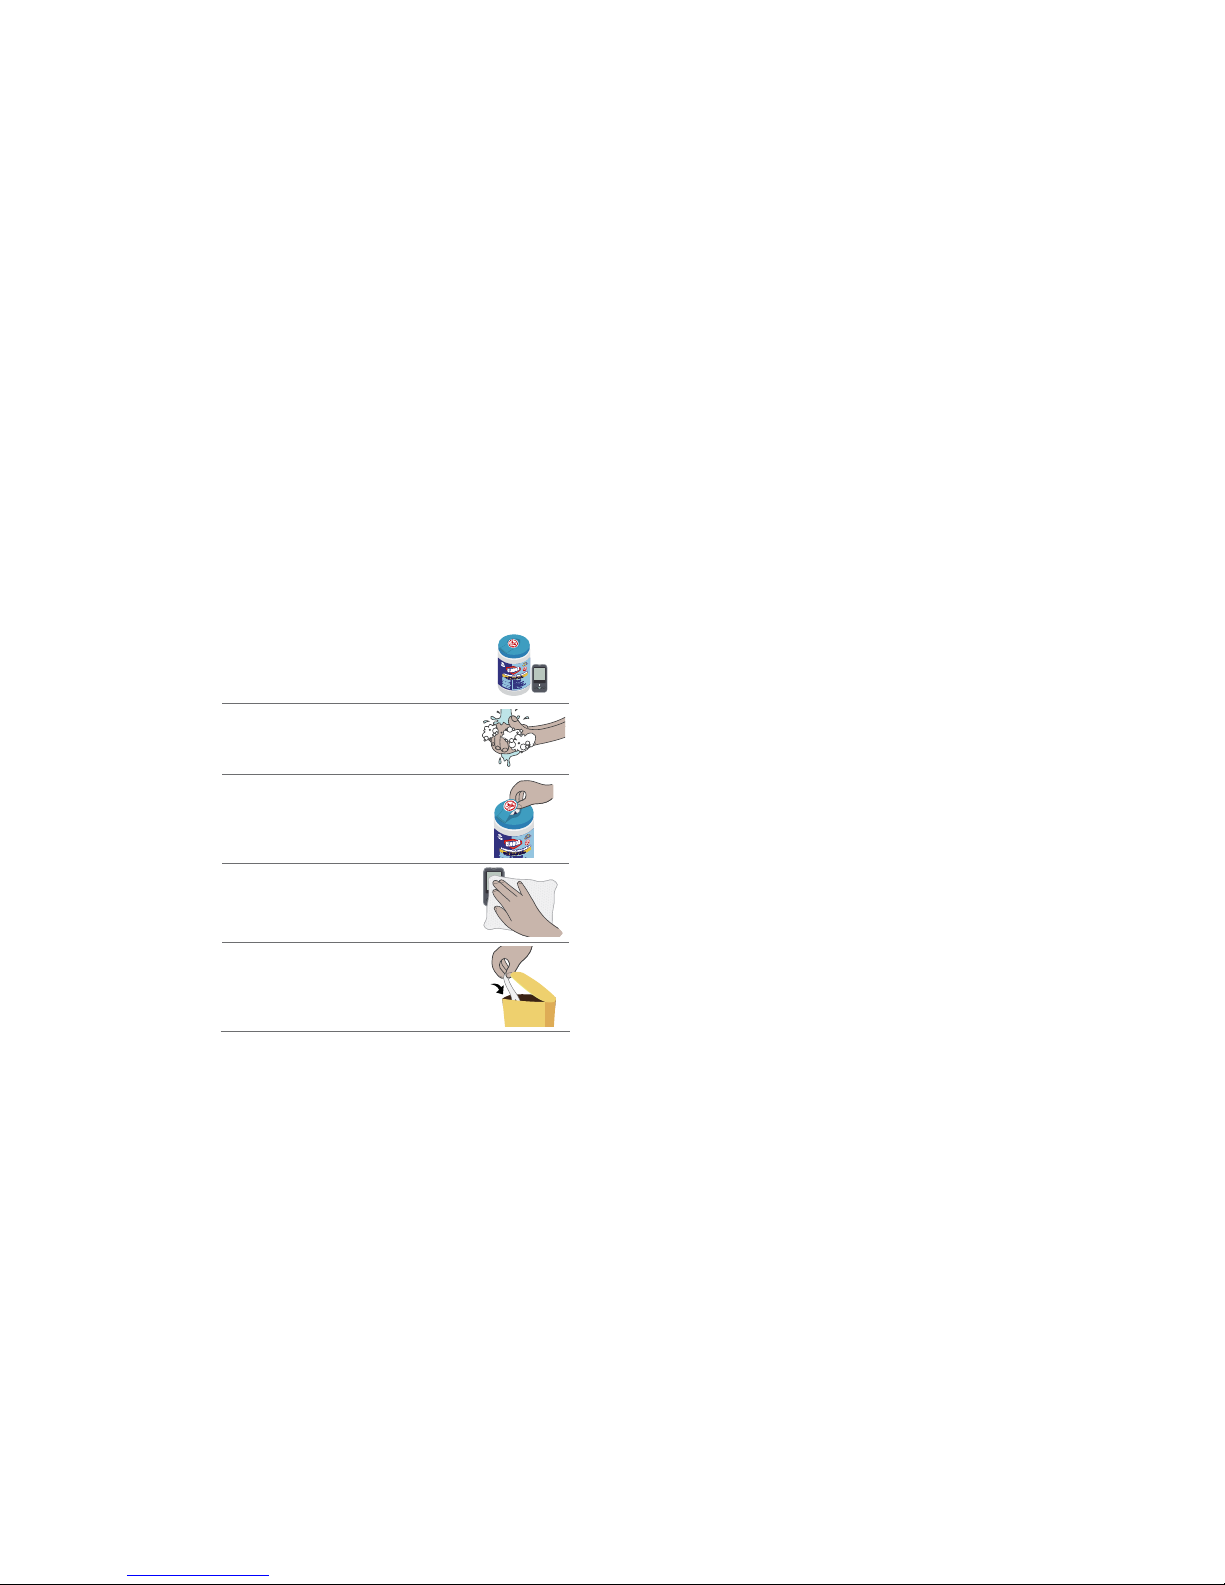
Cleaning Procedures
1. Place device and wipes on a
smooth surface. Be sure there
is enough light.
Set
Mem
2. Wash hand with soap and
water then pat dry.
3. Take a piece of premoistened
wipe out of canister.
Remember to recap the
canister.
4. Wipe entire device until
visibly clean.
Set
Mem
5. Throw away the used wipe.
Please do not reuse the
wipe.
CAUTION
1. The meter should always be cleaned
before it is disinfected.
2. All parts of the meter should be
considered to be biohazardous. Make
sure that you clean and disinfect the
entire meter.
Set
Mem
Page 22
42 43
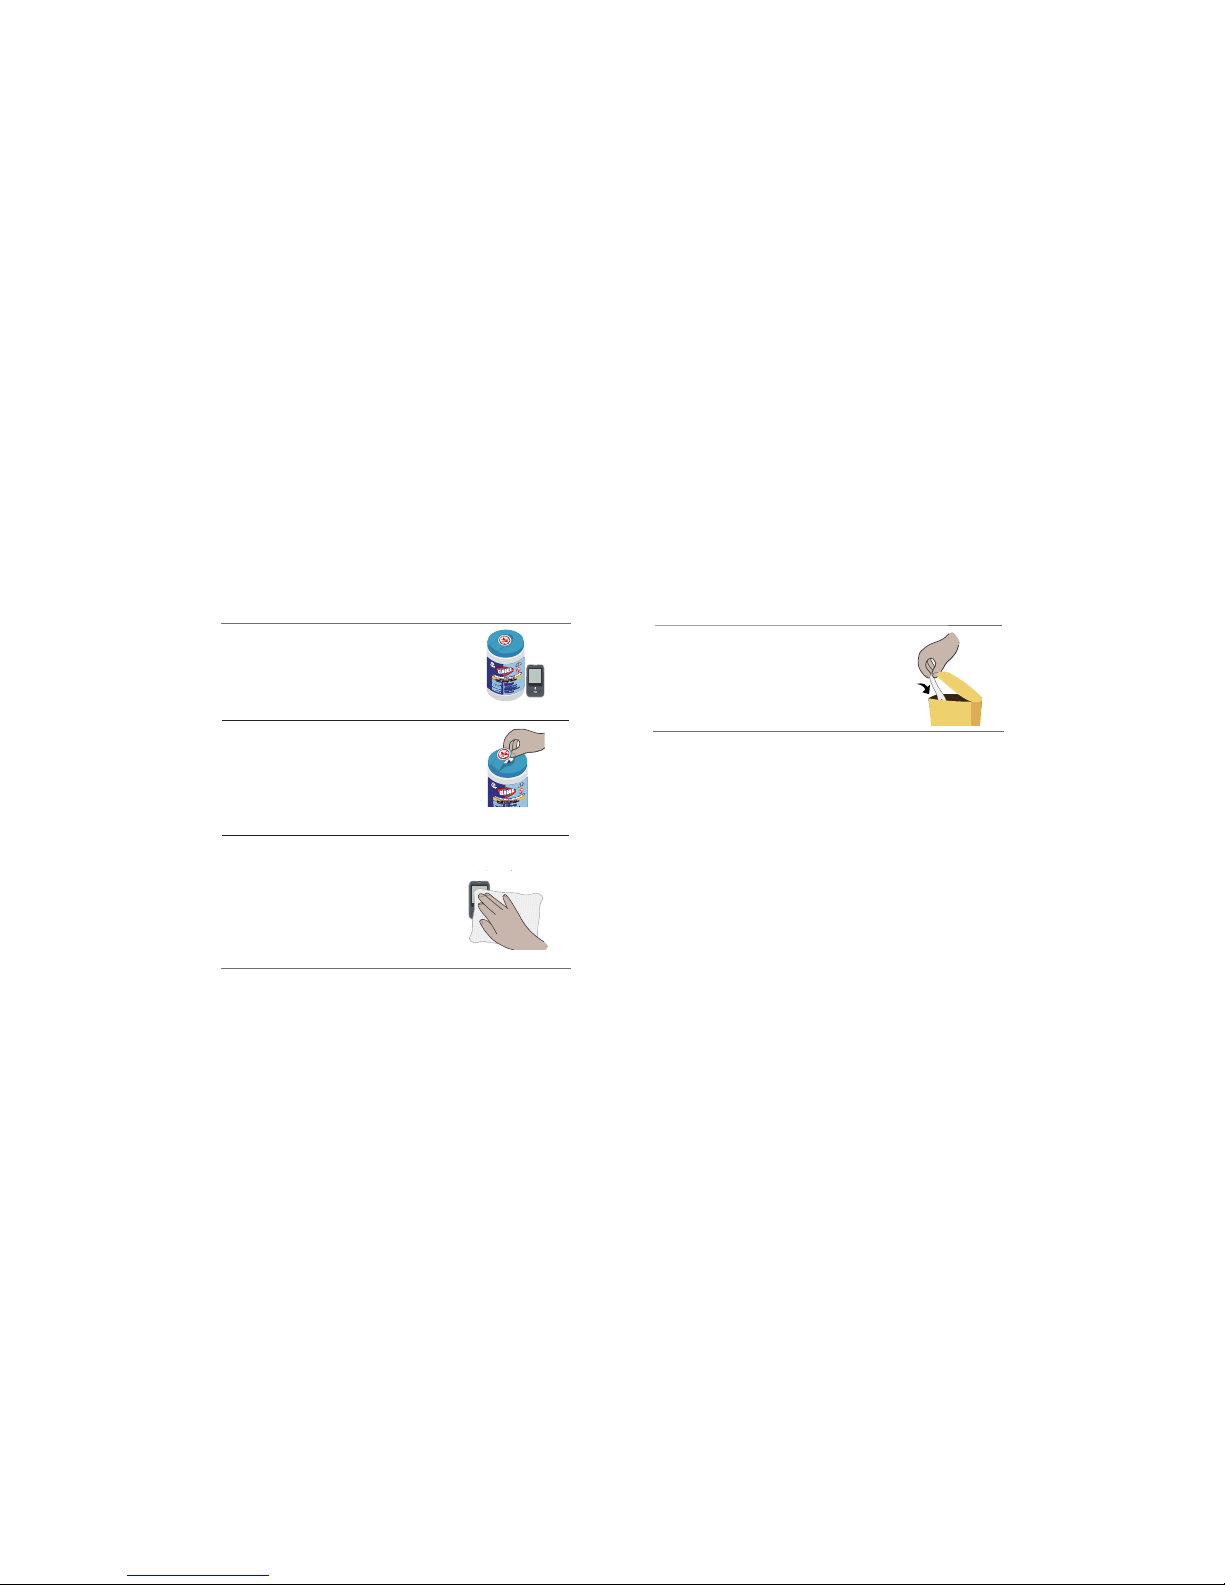
Disinfection Steps
1. Prepare wipes and meter.
Set
Mem
2. Take a piece of moistened
wipe out of canister.
Remember to recap the
canister.
3.
Slowly wipe the meter back and
forth for at least 3 times.
Repeat the same wiping
procedure to all meter
outer surfaces.
4. Make sure the meter stays wet for 1 min.
Please do not get disinfectant liquid
into the test strip slot.
5. Throw away the used wipes.
Please do not reuse the wipe.
Warning
1. Please use disinfectant with caution.
2. For your own safety, please do not mix
disinfectant with other liquid.
3. Please read the instructions carefully on
the canister before starting cleaning and
disinfection.
4. Please don’t use the wipes on any human part.
5. Store disinfectants out of the reach of
children.
6. If any signs of deterioration are noted as below:
Cloudy Display, material cracking, brittle,
softening or meter buttons malfunction,
Set
Mem
Page 23

44 45
performance of meter has changed (i.e.
control fails). Stop using the meter and
please contact customer support at 1-855692-3511.
NOTE
1. The Clorox Germicidal Wipes can be purchased on
www. cloroxprofessional.com, www.amazon.com
or call the Clorox service number at 1-800-234-
7700.
2. If you have any question about the cleaning and
disinfection or need more information, please
contact your distributor or customer support at
1-855-692-3511.
References
1. “FDA Public Health Notication: Use
of Fingerstick Devices on More than
one Person Poses Risk for Transmitting
Bloodborne Pathogens: Initial
Communication” (2010)
http://www.fda.gov/MedicalDevice/
Safety/AlertsandNotices/ucm224025.htm
2. “CDC Clinical Reminder: Use of Fingerstick
Devices on More than One Person
Poses Risk for Transmitting Bloodborne
Pathogens” (2010)
http://www.cdc.gov/injectionsafety/
Fingerstick-DeviceBGM.html
Page 24
46 47
Storage and Handling
CAUTION
Display Messages and
Problem-Solving Guide
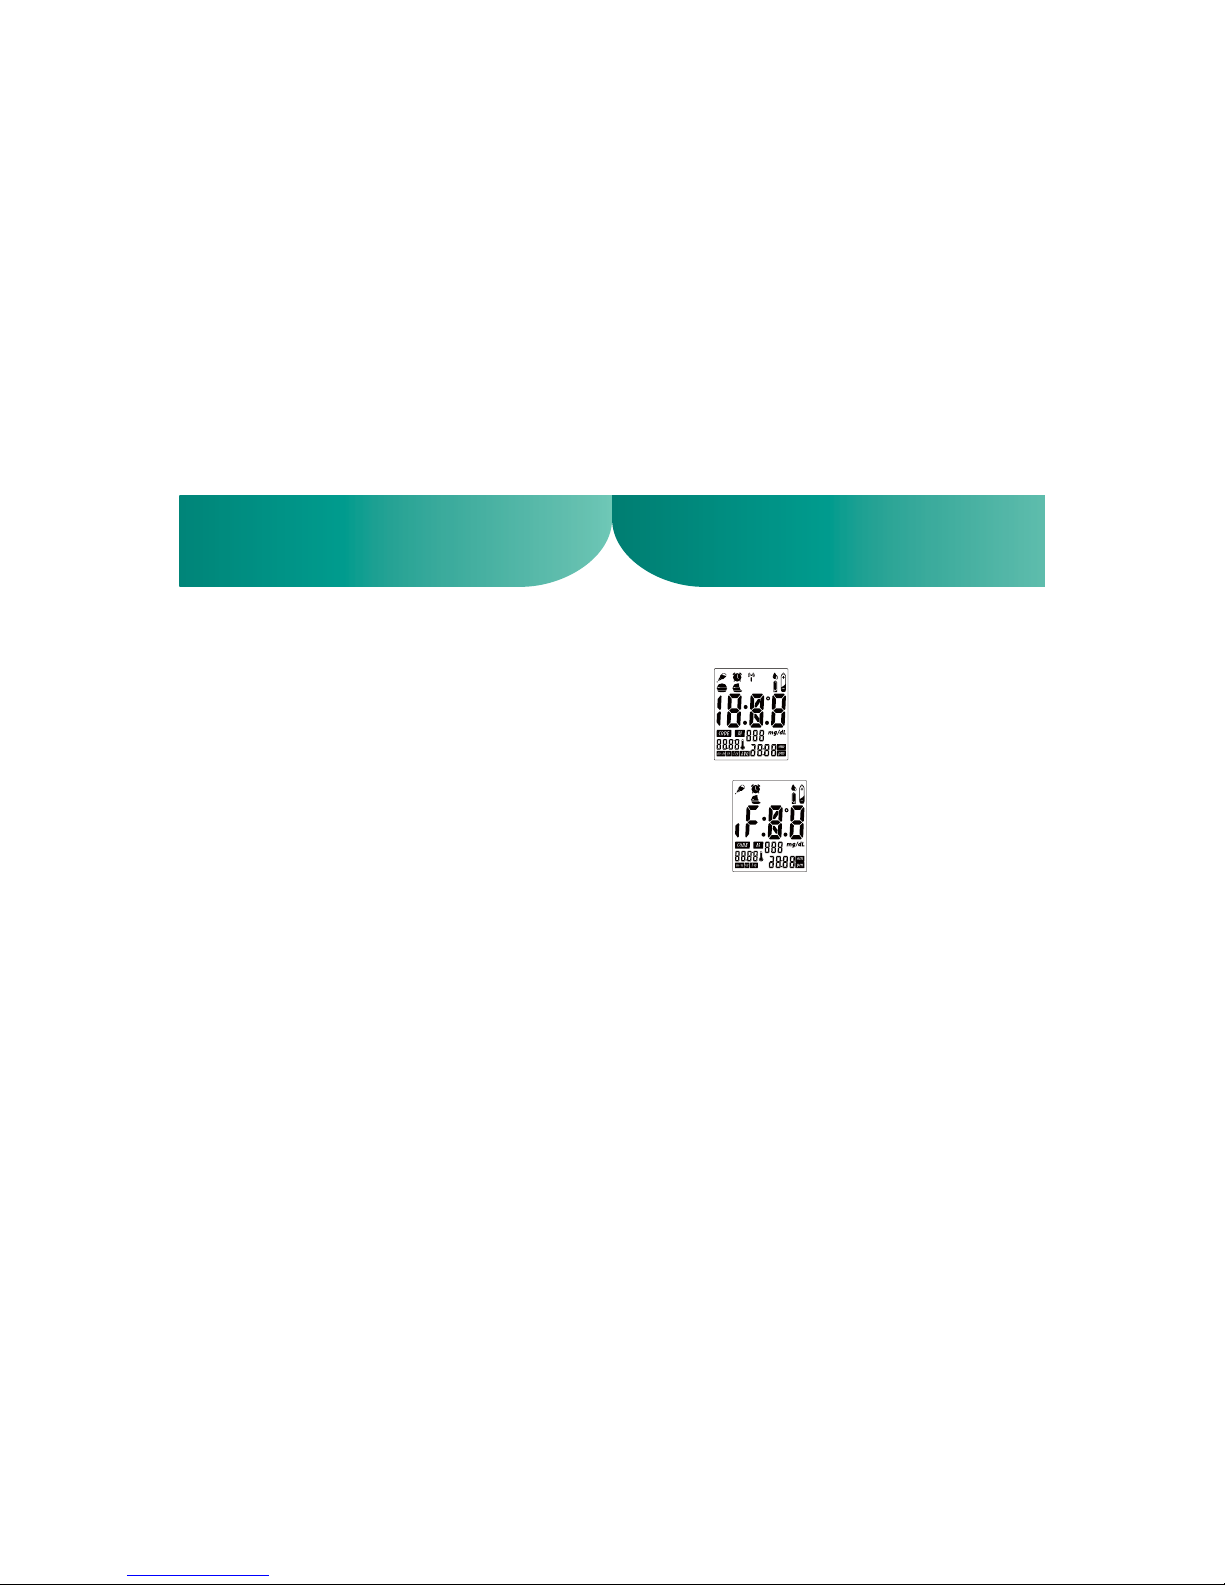
Display check
Normal:
Abnormal:
(for example)
Keep your meter free of dust or water. Protect it
from extreme temperature and humidity.
Store the meter and test strips between 50ºF
(10ºC) and 104ºF (40ºC)
1.
2.
If the meter will not be used for over 1 week, it is
recommended to remove the battery from the
meter. This will prevent the potential meter damage
due to leaking battery.
Please follow all the instructions on the User Guide
while operating GoodLife Blood Glucose Meter.
HMD BioMedical Inc. will not be responsible for any
impairment occurred from NOT following the
instructions.
Every time when meter is turned on, the meter will
display as illustrated.
If some parts of the display are not working, contact
customer support at 1-855-692-3511 for help.
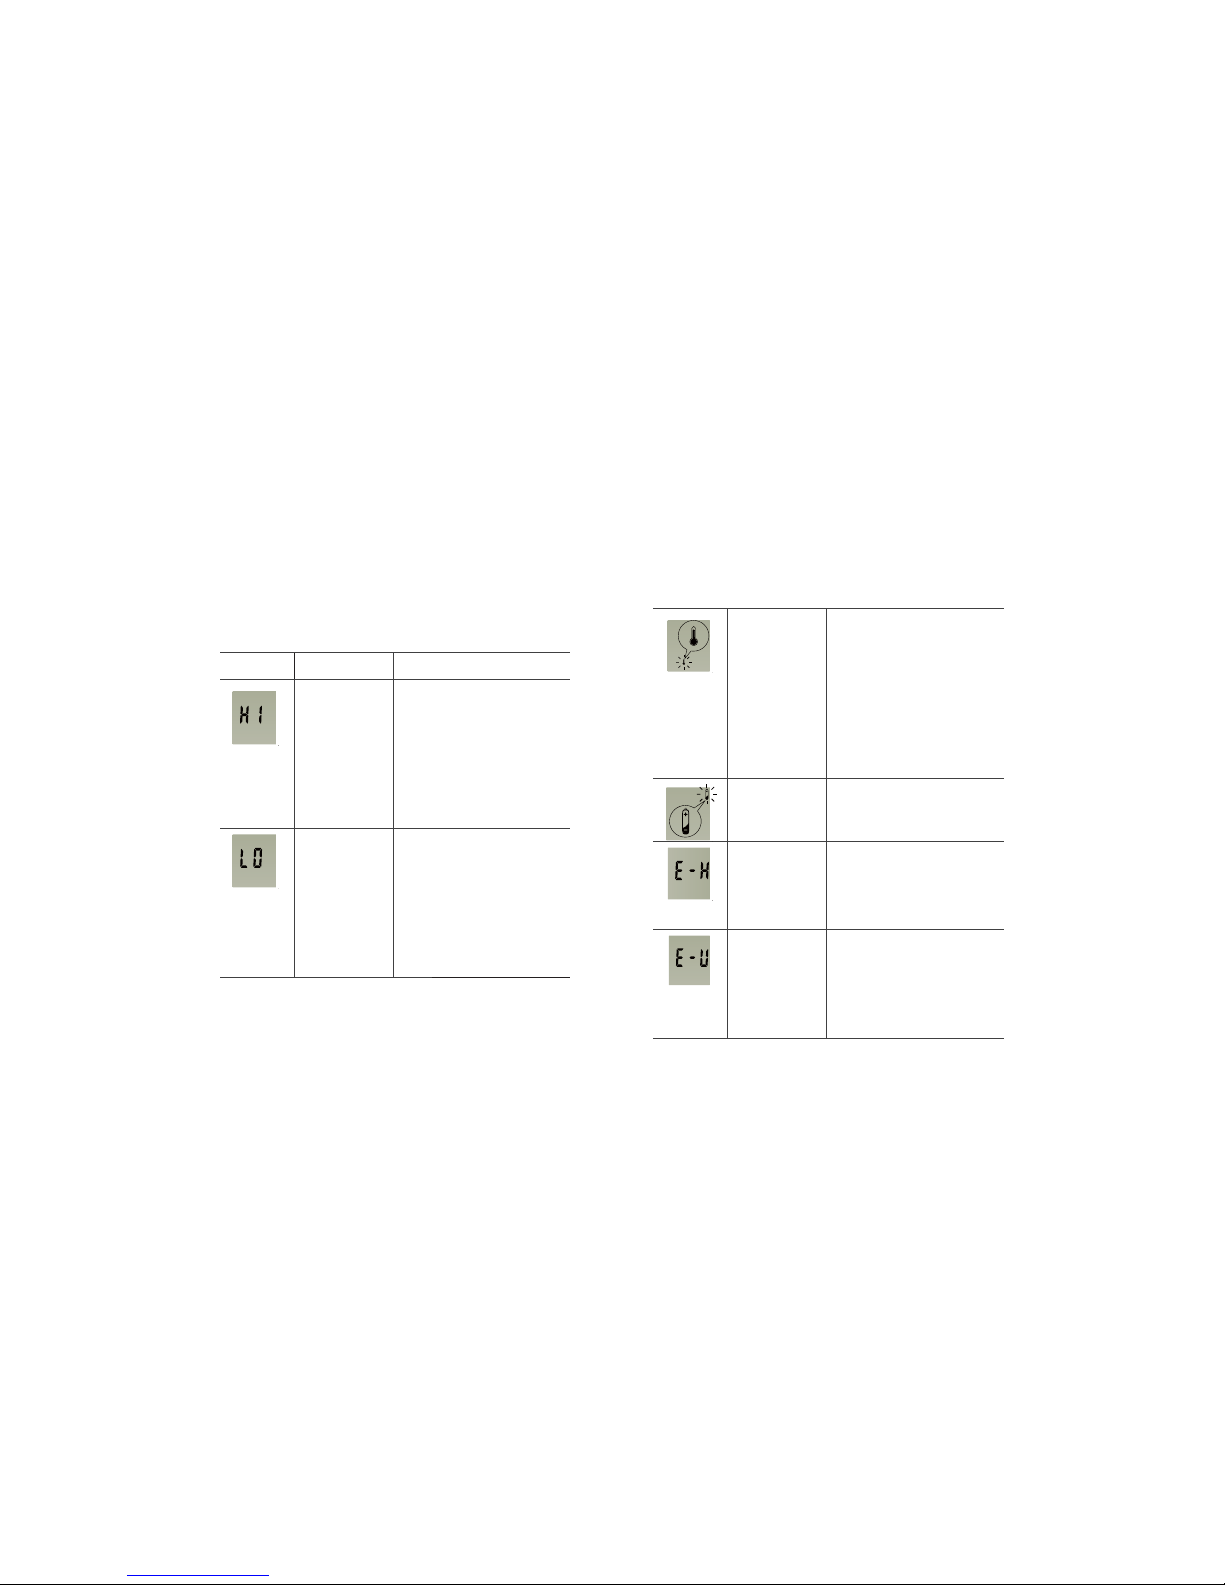
When any of the following messages appears, there
is a problem with your GoodLife Blood Glucose Meter
or perform wrong steps during a test. There
messages will help you to identify certain problems.
If error messages appear that are not listed on the
Page 25
48 49
Display Description Action to Take
Blood glu cose result
may be
higher than
600 mg/dL.
Review proper testing
procedure and perform
a quality check with
control solution. Re peat blood test, if “HI”
still appears, call your
doctor immediately.
Blood glu cose result
may be
lower than
20 mg/dL.
Review proper testing
procedure and perform
a quality check with
control solution. Repeat
test, if “LO” still ap pears, call your doctor
immediately.
Tempera ture is
above or
below the
operating
range of
test strips.
The result you have
obtained may not be
accurate. Move to an
area with temperature
between 50ºF - 104ºF
(10ºC to 40ºC ). Do not
articially heat or cool
the meter.
Battery is
low.
Change battery imme diately.
Test strip
unknown
or may be
damaged.
Perform the test with
new test strip.
Test strip
is used or
ton saw tset
performed
correctly.
Perform the test with a
new test strip and follow
the test procedure
correctly.
following messages, contact customer support at
1-855-692-3511 for help.
Page 26
50 51
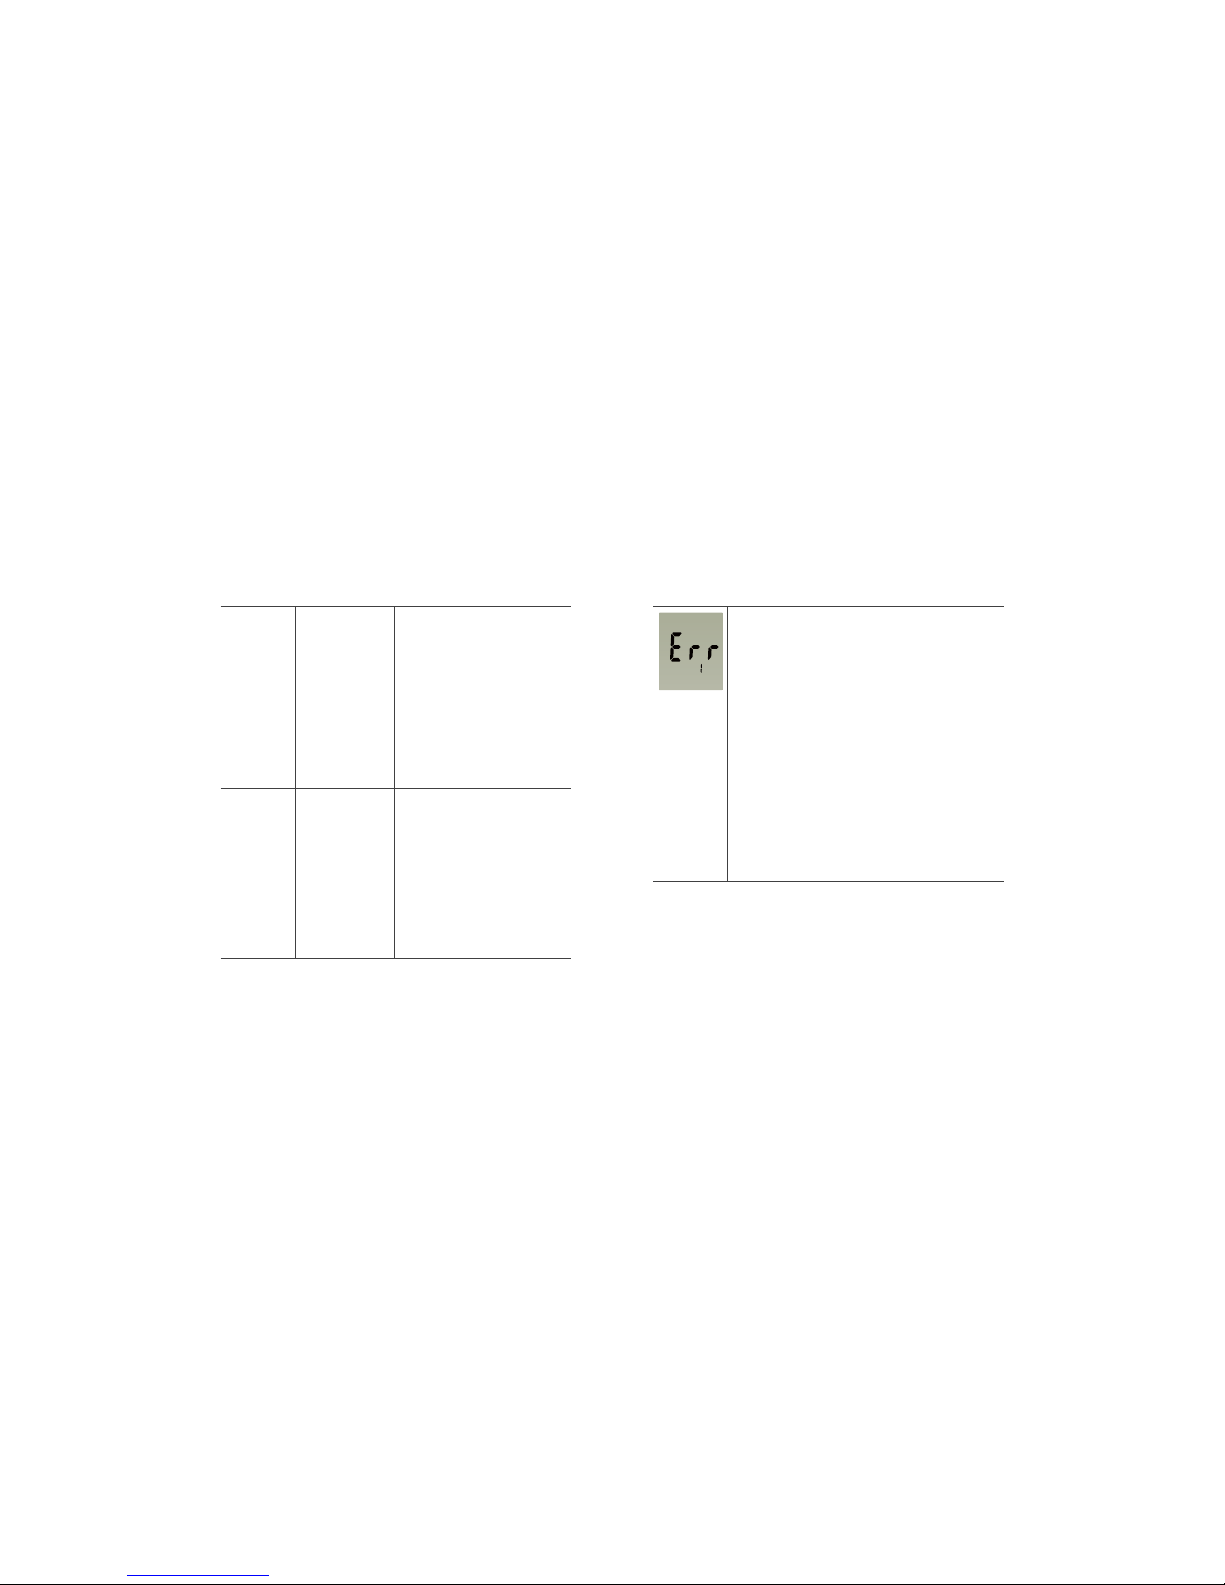
No responses
when
strip is
inserted
into the
meter.
Maybe:
1. Battery is
dead.
2. Wrong
strip was
inserted.
3. Meter is
defective.
You have to:
1. Replace battery.
2. Insert the test strip
correctly.
3. Contact customer
support at 1-855-6923511 for help.
No responses
when
blood
sample is
applied
to the
strip.
Maybe:
1. Blood
sample is
not suf
cient.
-
2. Meter is
defective.
You have to:
1. Repeat test with suf
cient sample.
-
2. Perform Meter Check
by inserting check strip.
Error message:
Err1. Data communi
cation module is
malfunction
Err2. Failure to con
nect to Base
Station
Err5. Failure to con-
nect to the
Sever
Err6. TCP/IP data
transmission
failure
Err1. The meter might
be damaged.
Contact custom
er support at
1-855-692-3511
for help.
Err2. Antenna or SIM
Card might be
damaged. Contact customer
support at 1-855692-3511 for
help.
Err5, 6. Move to an
area of better
reception and
try again.
Page 27
52 53
1. Assay Method: Electrochemical biosensor
2.
Test Sample: Fresh Capillary Whole Blood
3.
Sample Size: 0.5 μL
4.
Measuring Time: 5 seconds
5.
Measuring Range: 20 – 600 mg/dL
6.
Acceptable Hematocrit Range: 30%-55%
7.
Operating Temp. Range: 50°F-104°F(10°C40°C)
8.
Operating Relative Humidity: 20% - 80% RH
9.
Memory Capacity: 999 test results with time
and date
10.
Result Setting: Before meal, After meal and
Control solution test setting
11.
Power Supply: AAA Alkaline Batteries x 4
12. Battery Life: Approximately 1000 tests
13.
Automatic shut-o: In 3 minutes
14.
Meter Dimension: 108.9mm (L) x 59.9mm
(W) x 16.5mm (H)
15.
Weight: Approximate 100g (with batteries)
Page 28
54 55
Precision
Within-run
Level No. of test Mean (mg/dL) Within-Run C.V. (%)
40.6
93.3
120
213
336
532
100
100
100
100
100
100
41.5
99.5
124.0
216.4
340.7
531.7
4.5
4.2
3.1
3.8
3.5
3.3
Between-run
Level No. of test Mean (mg/dL) Within-Run C.V. (%)
50
100
300
100
100
100
61.5
123.9
346.8
4.7
4.2
3.9
Performance Evaluations
Accuracy
Glucose concentration < 75 mg/dL
Within ± 5 mg/dL Within ± 10 mg/dL Within ± 15 mg/dL
6/13 (46%) 11/13 (85%) 13/13 (100%)
Glucose concentration ≥ 75 mg/dL
Within ± 5 % Within ± 10 % Within ± 15 % Within ± 20 %
35/87 (40%) 67/87 (77%) 78/87 (90%) 85/87 (98%)
Tests were conducted by trained technicians in
the laboratory setting. The venous whole blood
from one subject was adjusted to 6 dierent
levels. Strips out of a single lot were tested. The
results are shown in the following table.
Tests were performed at hospital by healthcare
professionals and diabetic patients. Fresh capillary
nger whole blood samples were tested with the
GoodLife System; venous blood samples from the
subjects were tested with YSI Model 2300 Glucose
Analyzer as reference. The results are shown in the
following table.
Page 29

56 57
Hardware and Software requirement
iglucose Diabets Management
Introduction of the system
How to use
The system is an optional software for use with the
iglucose system with data management capacities.
t is designed to connect to glucose meters (Cloudia)
and automatically transmit blood glucose readings
or control solution test results to a secure database.
Users can then utilize the iglucose Diabets management portal (web-based application) to view their
blood glucose readings at home through their PC or
other Internet capable devices.
The system provides an integrated table including
test results of blood glucose measurements and
quality controls.
The system does not recommend any medical treatment or dosing recommendations.
Hardware requirement:
PC, NB, iPad or Cellular-Internet phone
Software requirement:
Microsoft IE 8.0 , Mozilla FireFox 3.6,
Google Chrome v-12, Apple Safari 5
Minimum requirements:
Pentium processor, 64mb ram, 1 gb disc space
1.
2.
3.
Start the PC or other compatible-Internet
connected device. Connect to the chosen Web
Browser to the Internet.(e.g. Microsoft IE, Google
Chrome or Apple Safari)
Enter the Website address www.iglucose.net, the
user could view the record table of the blood
glucose or control solution measurement.The
user could view the test result according to
his/her Meter ID.
1.
2.
Page 30
58 59
How to view transmitted reading
Open a web browser window on your computer
and go to www.iglucose.net
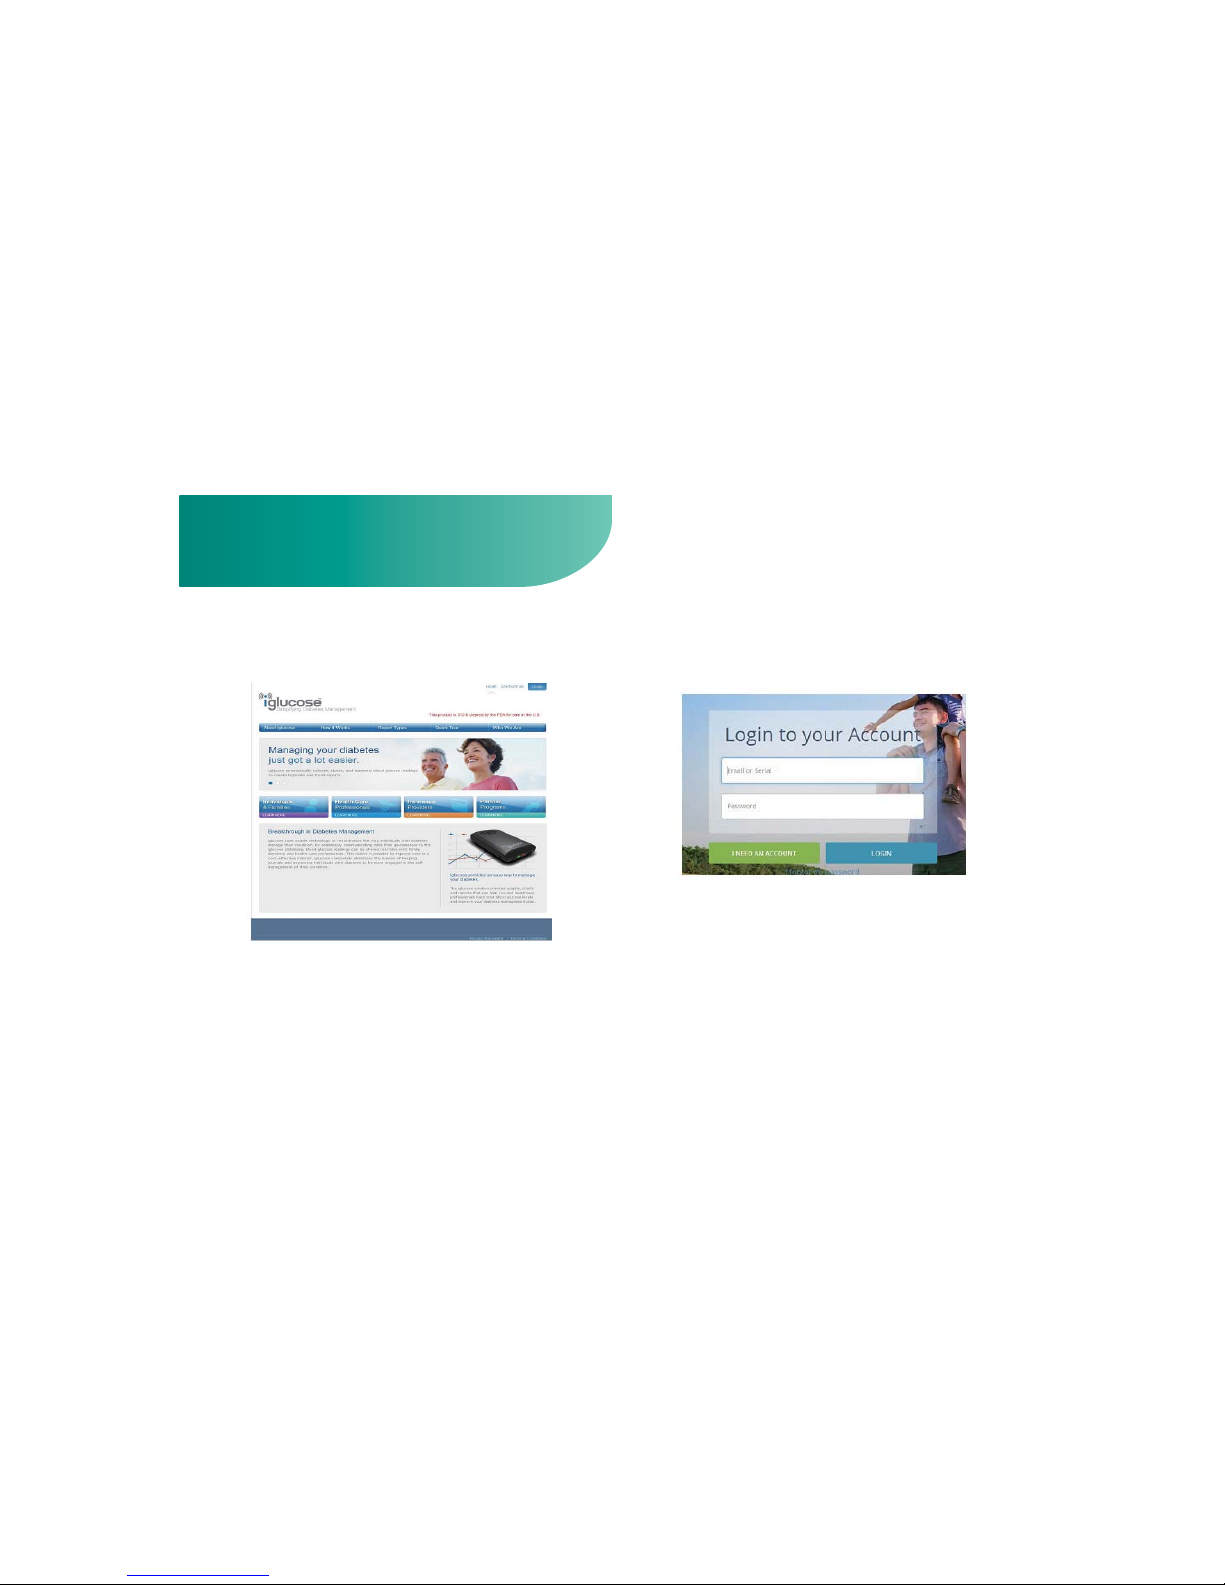
1.
Click on the “login” button from the iglucose
homepage.
2.
Enter the meter serial number in "Email or Serial"
and "Password" and click the "login" button
3.
If you have no any account, please you apply a new
account.
Page 31
60 61
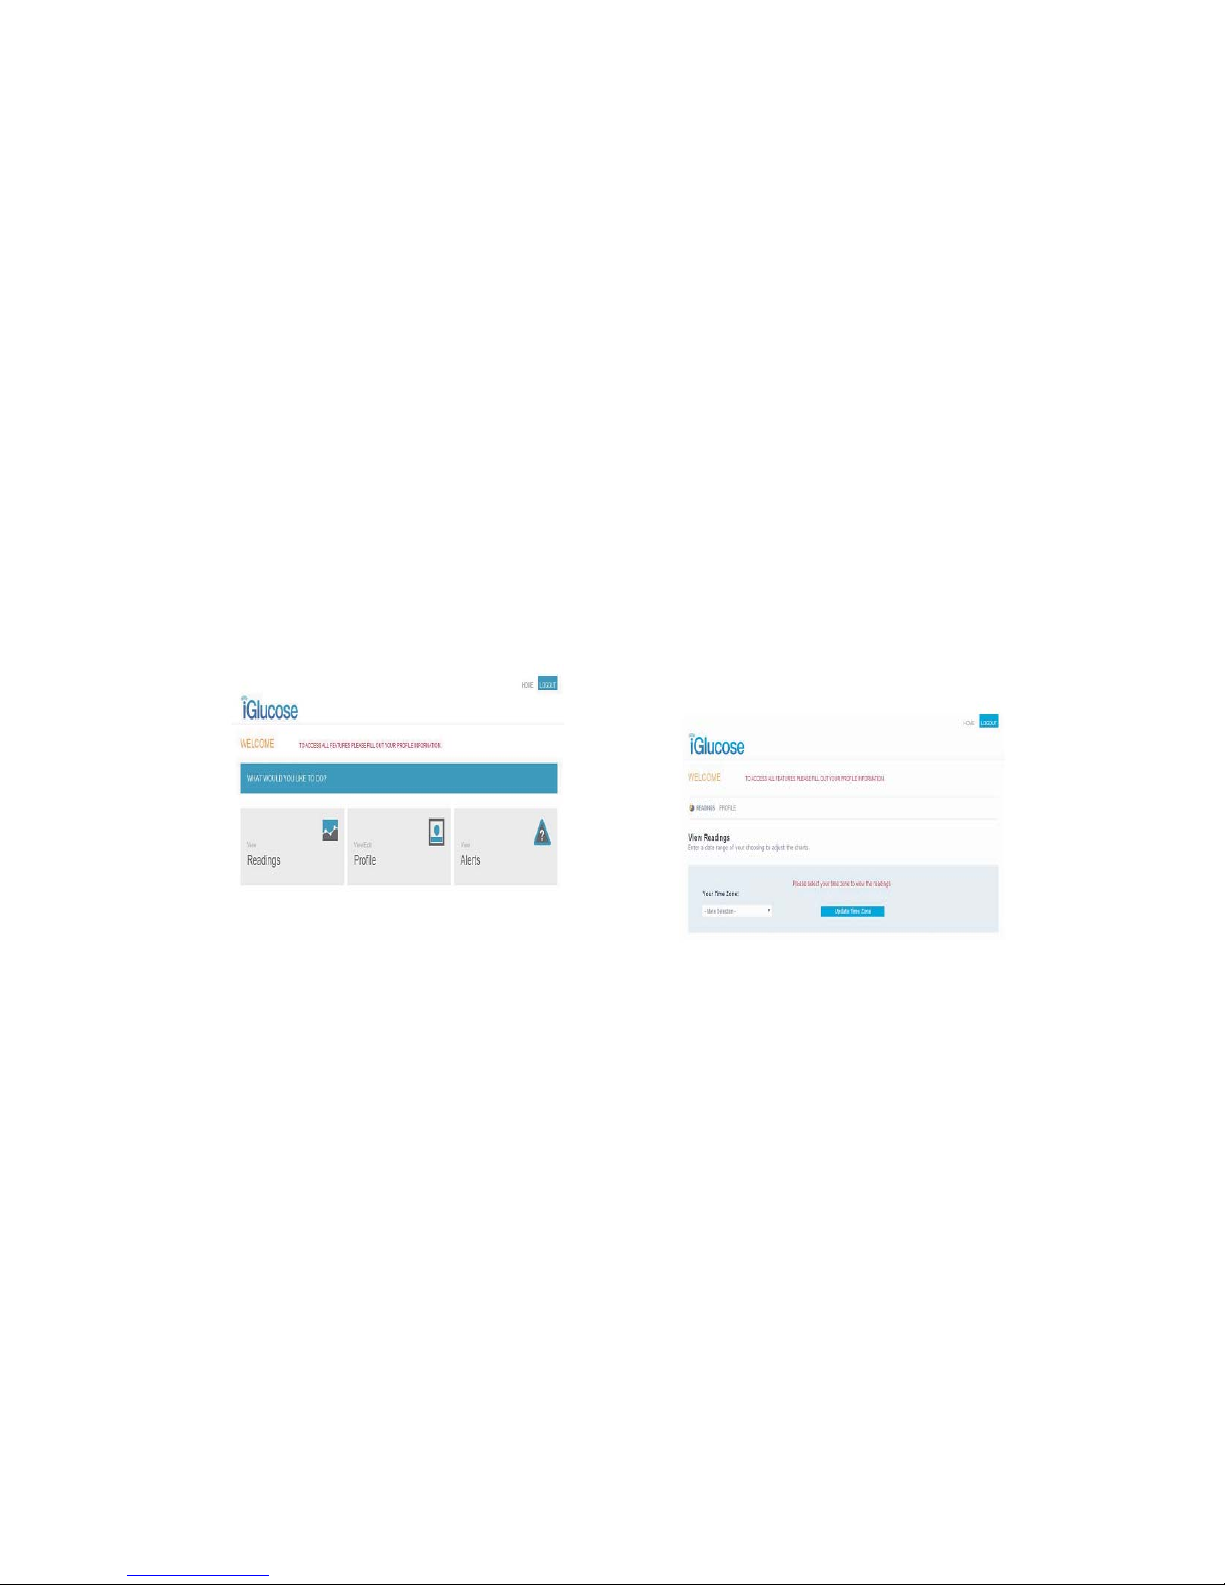
The "welcome" page will appear.
Click on the "View Readings" button.
4.
"Your Time zone" page will appear, choose your
time zone and click on "Update Time zone"
button.
5.
Page 32
62 63
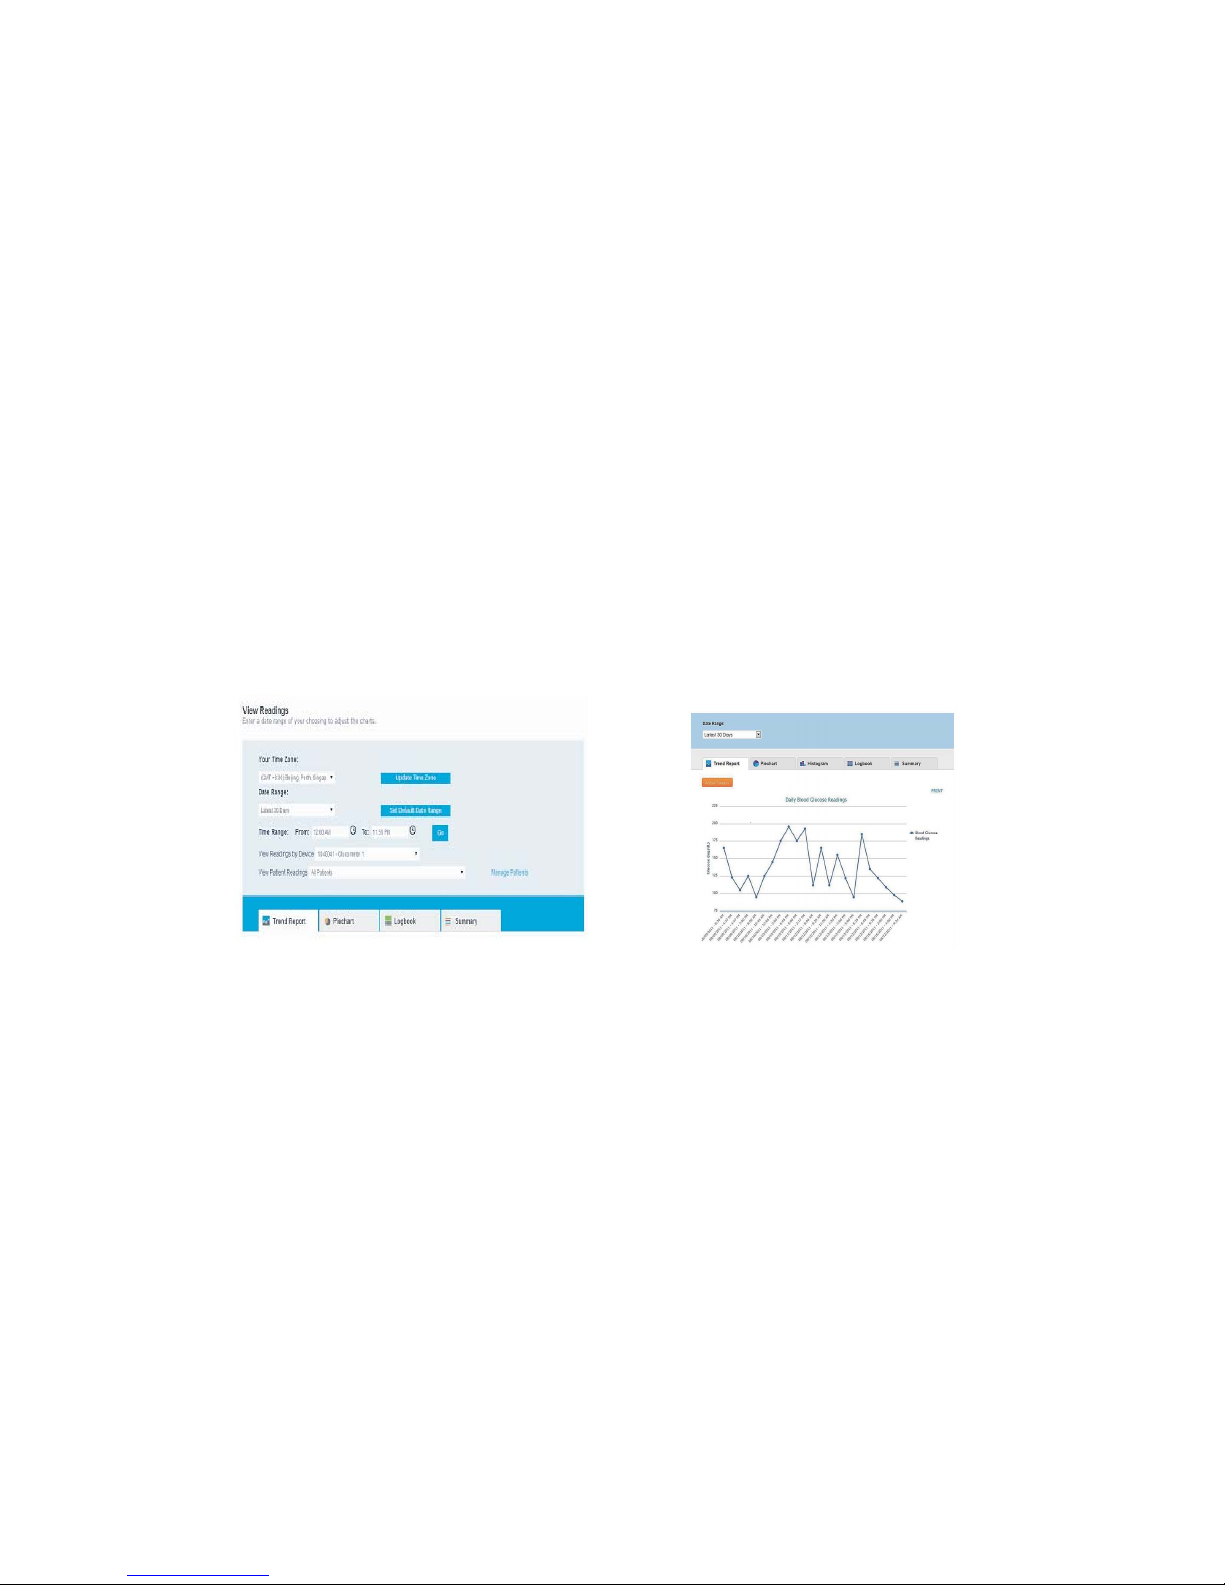
Select any of the following tabular or graphic
report formats to view your reading: Trend
Report, Pie Chart, logbooks or Summary.
6.
Trend Report:Displays high and low glucose readings within a customized date and time range.
Page 33
64 65
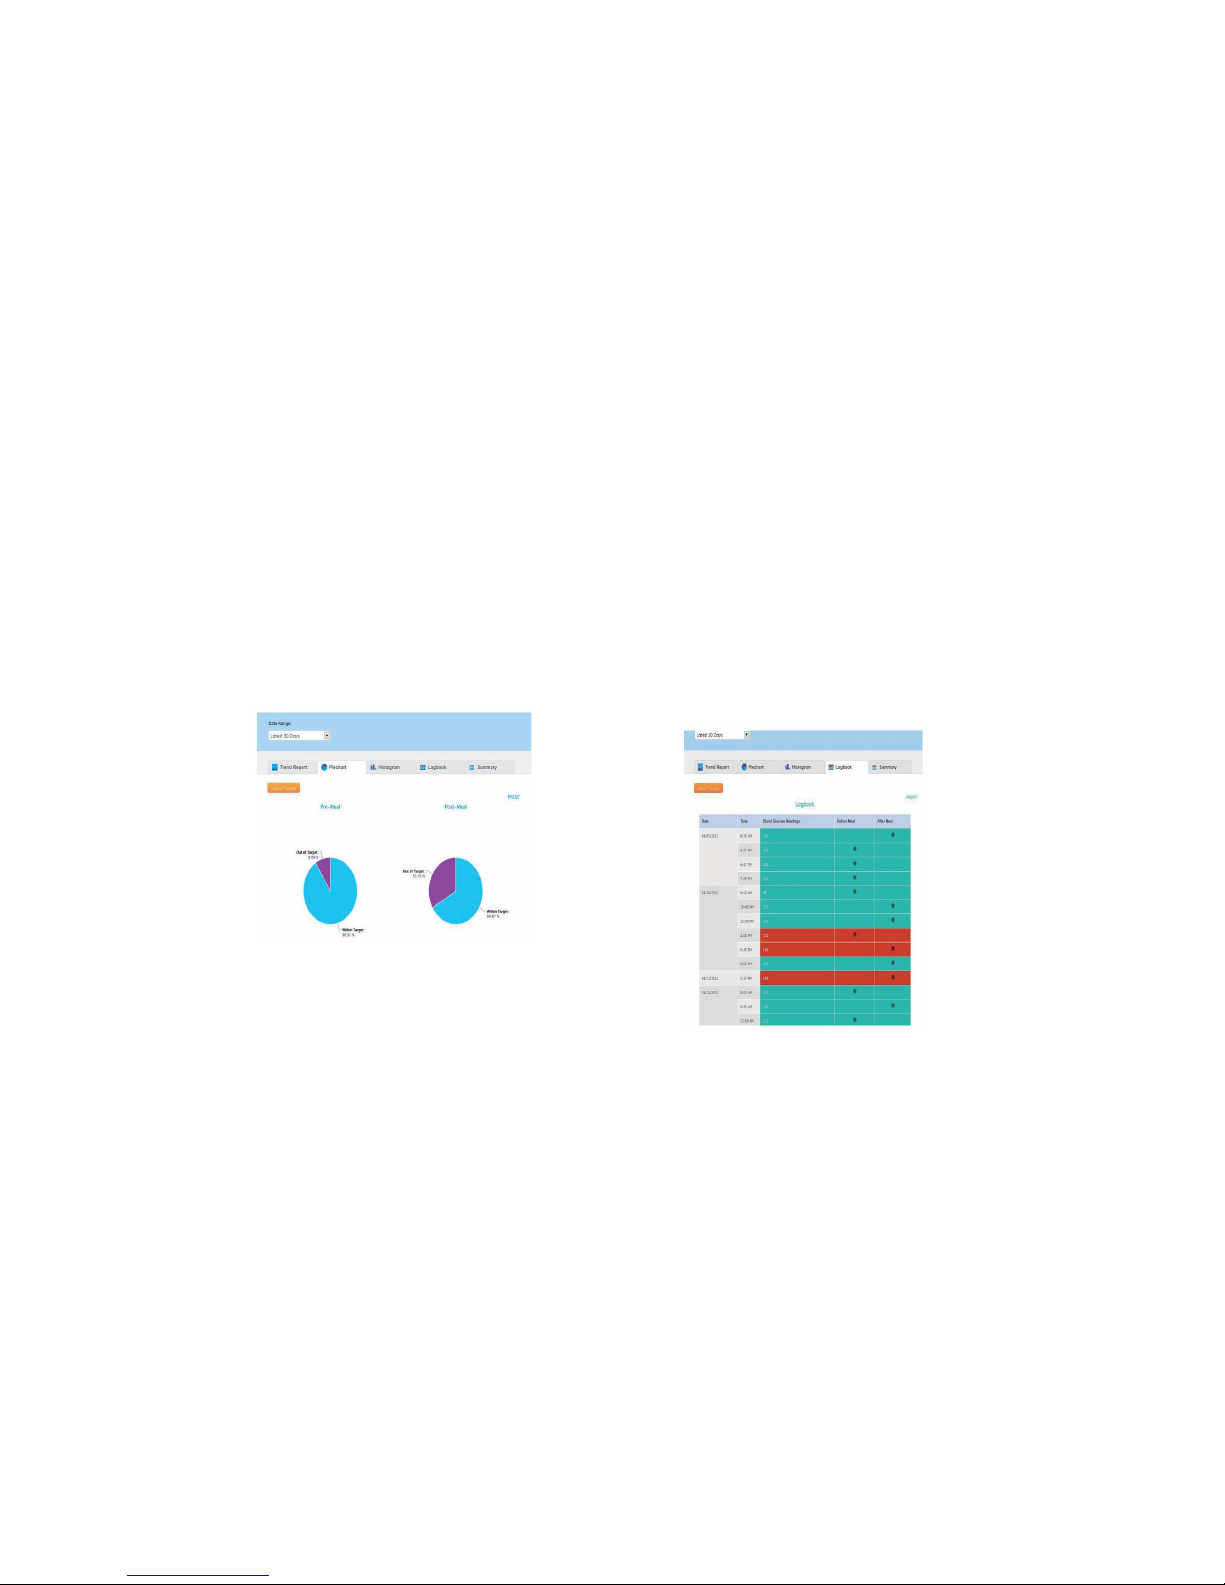
Pie Chart: Displays percentage of pre-meal and
post- meal glucose readings that fall in and out of
target ranges.
logbooks: Displays daily and historical glucose
readings with date and time stamp. Glucose readings are also displayed before and after meals
with pre-determined out-of-target ranges.
Page 34

66 67
FCC Regulations
15.19(a)(3):
This device complies with part 15 of the FCC Rules.
Operation is subject to the following two conditions: (1)
This device may not cause harmful interference, and (2)
this device must accept any interference received,
including interference that may cause undesired operation.
15.105(b):
NOTE:This equipment has been tested and found to
comply with the limits for a Class B digital device, pursuant to part 15 of the FCC Rules. These limits are designed
to pro vide reasonable protection against harmful interference in a residential installation.
This equipment generates, uses and can radiate radio
frequency energy and, if not installed and used in accordance with the instructions, may cause harmful interference to radio communications. However, there is no
guarantee that interference will not occur in a particular
installation. If this equipment does cause harmful interference to radio or television reception, which can be
determined by turning the equipment o and on, the
user is encouraged to try to correct the interference by
one or more of the following measures:
t3FPSJFOUPSSFMPDBUFUIFSFDFJWJOHBOUFOOB
t*ODSFBTFUIFTFQBSBUJPOCFUXFFOUIFFRVJQNFOUBOE
receiver.
t$POOFDUUIFFRVJQNFOUJOUPBOPVUMFUPOBDJSDVJU
dierent from that to which the receiver is connected.
t$POTVMUUIFEFBMFSPSBOFYQFSJFODFESBEJP57UFDIOJ
cian for help.
RF Exposure Information (SAR)
This device meets the government’s requirements for
exposure to radio waves.
This device is designed and manufactured not to exceed
the emission limits for exposure to radio frequency (RF)
energy set by the Federal Communications Commission
of the U.S. Government.
The exposure standard for wireless mobile devices
employs a unit of measurement known as the Specic
Absorption Rate, or SAR. The SAR limit set by the FCC is
1.6W/kg.
*Tests for SAR are conducted using standard operating
positions accepted by the FCC with the device transmitting at its highest certied power level in all tested
frequency bands. Although the SAR is determined at the
Page 35

68 69
highest certied power level, the actual SAR level of the
device while operating can be well below the maximum
value. This is because the device is designed to operate at
multiple power levels so as to use only the poser required
to reach the er levels so as to use only the poser required
to reach thestation antenna, the lower the power output.
The highest SAR value for the device as reported to the
FCC when tested for use when worn on the body, as
described in this user guide, is 1.26 W/kg(Body-worn SAR
Value) and 3.26 W/kg(Extremity-worn SAR Value). (Bodyworn measurements dier among device models,
depending upon available accessories and FCC requirements.)
While there may be dierences between the SAR levels
of various devices and at various positions, they all meet
the government requirement.
The FCC has granted an Equipment Authorization for this
device with all reported SAR levels evaluated as in
compliance with the FCCRF exposure guidelines. SAR
information on this device is on le with the FCC and can
be found under the Display Grant section of
www.fcc.gov/oet/ea/fccid/
after searching on FCC ID:
AYY0000002.
This device is compliance with SAR for general population /uncontrolled exposure limits in ANSI/IEEE C95.11999 and had been tested in accordance with the
measurement methods and procedures specied in
applicable FCC KDB guidance.
For body worn operation, this device has been tested
and meets the FCC RF exposure guidelines for use with
an accessory that contains no metal and the positions
the hand set a minimum of 1.0cm from the body. Use of
other accessories may not ensure compliance with FCC
RF exposure guidelines.
Changes or modications not expressly approved by the
party responsible for compliance could void the user‘s
authority to operate the equipment.
Page 36

70
Warranty
POST- SALE SERVICE
Manufacturer:
HMD BioMedical Inc.
Hsinchu,Taiwan
Questions?
Please call toll free number
at 1-855-692-3511
Mon-Fri 9:00am-4:30pm(Pacic Standard Time)
Please contact a healthcare provider for assistance at all other times.
E-mail: [email protected]
HMD BioMedical Inc. warrants to the original
purchaser that this instrument will be free of defects
in material and workmanship for 5 years from the date
of original purchase. During the stated 5-year period,
HMD shall, at no charge, replace a unit found to be
defective with an equivalent or current version of the
owner’s model.
This warranty is limited to replacement due to defects
in parts or workmanship. HMD shall not be required to
replace any units which malfunction or are damaged
due to abuse, accidents, alteration, misuse, neglect,
maintenance by other than HMD, or failure to operate
the instrument according to instructions.
3K-02-XXXXXX V1.3
 Loading...