

GOOD LIFE BarkWise Complete Instruction Manual
BarkWise™ Complete Instruction Manual
ON / OFF
ON / OFF
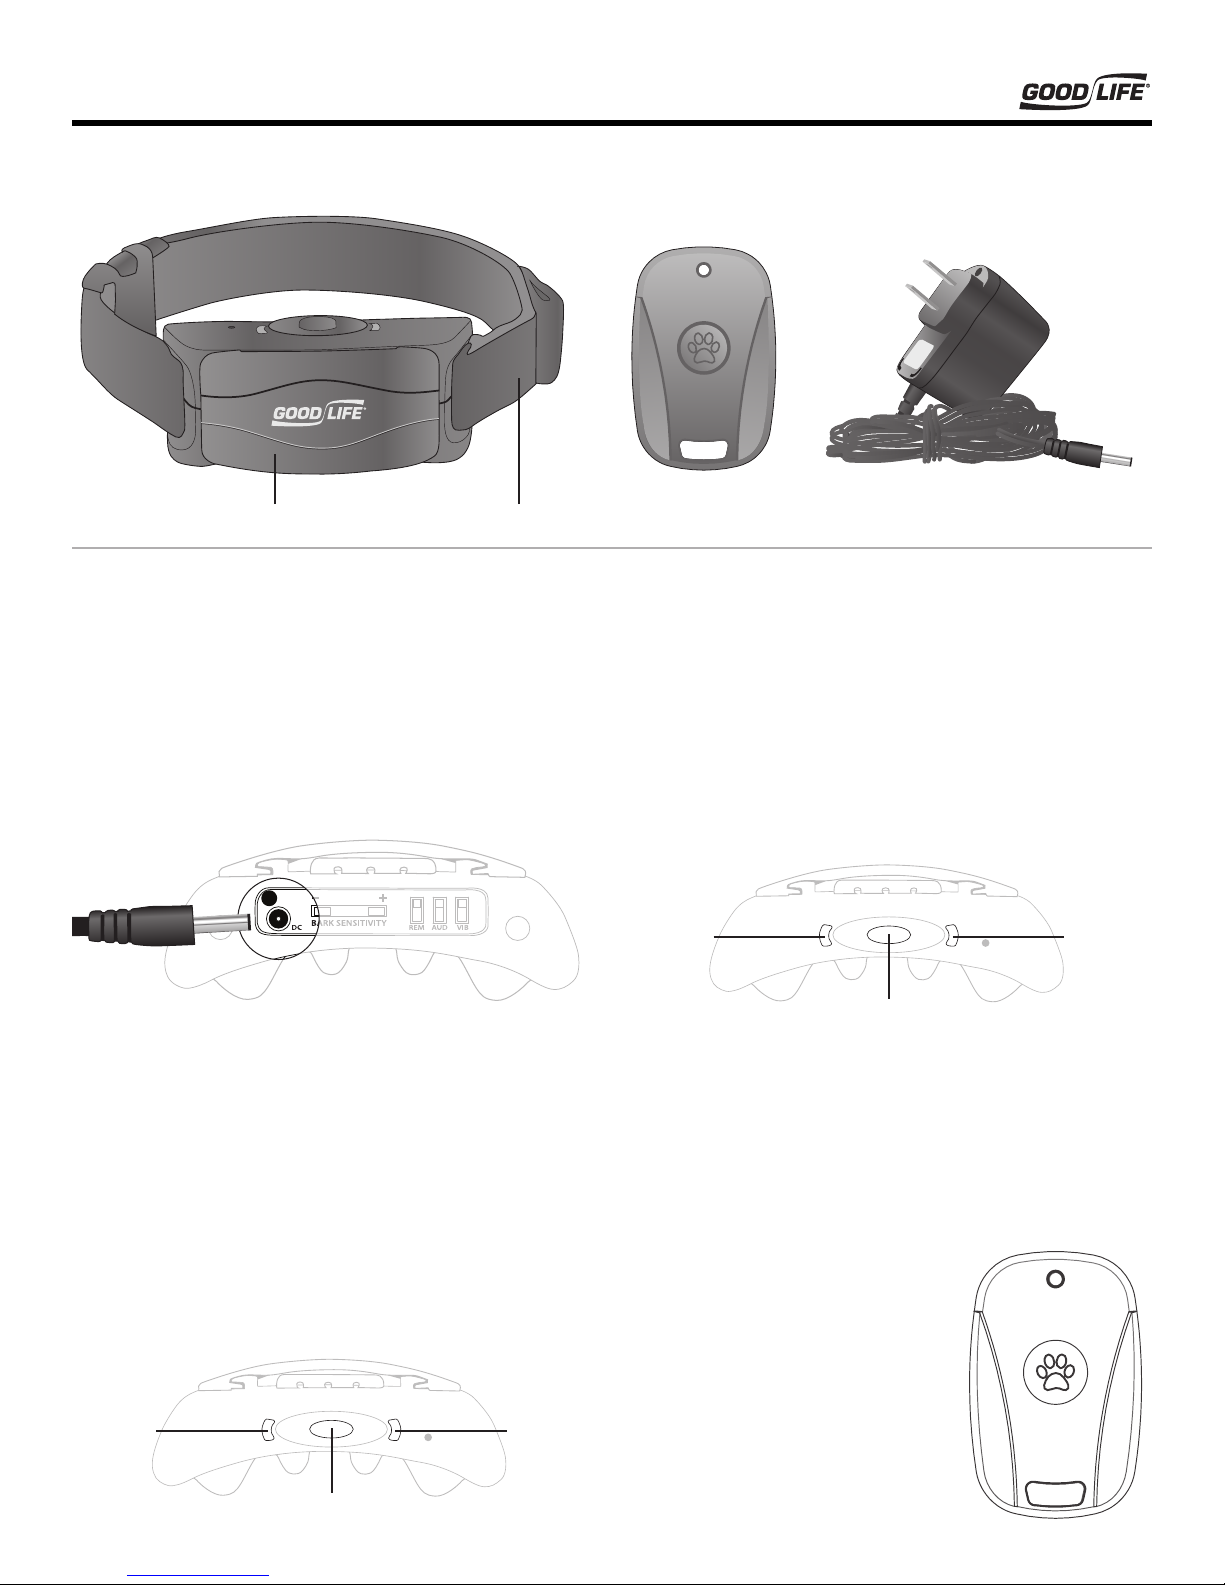
Included In Your Package
BarkWise™ Complete AC AdapterNylon Strap Remote Control
Getting Started
1. Charging BarkWise™
Insert the small end of the AC adapter into BarkWise as shown
below and plug the other end into an outlet. The blue LED
light will turn on to indicate that the unit is plugged in. Barkwise will be fully charged after 2 hours. The blue LED light will
still be turned on but you can now unplug the unit.
When BarkWise is running low on battery and needs to be
charged again, the red LED will ash.
Battery life varies between 12-24 hours depending on which
features are used (vibration, sound or remote) and how often
the unit is activated. Make sure to charge BarkWise daily. This
will also give your dog regular breaks from training.
2. Turn BarkWise™ On / O
Power BarkWise ON by pressing and holding the power button on the top of the unit for 5 seconds. Press rmly and listen
for the button to click. The unit will beep 3 times with a
(Continued from lefthand column)
ashing blue light. BarkWise™ is now powered on.
Power OFF by pressing and holding the power button for 5
seconds. It will beep 1 time and the red light will ash.
3. LED lights
Blue LED Red LED
Power Button
• Blue LED Light: Flashes when the unit is powered on or
when it is activated by barking or the remote. Turns on
and stays a solid blue when the unit is plugged in.
• Red LED Light: When the power button is being pressed,
the red light indicates that the unit is being powered
OFF. In all other cases, the light ashes when BarkWise is
running low on power and needs to be charged.
4. Remote Control
Press the button on the remote
to activate BarkWise™ (a blue LED
light will indicate the button is
pressed).
Blue LED Red LED
Power Button
This will activate BarkWise based
on your control panel settings.
You can use the remote control
up to 75 feet away from the unit.
BarkWise™ Complete Instruction Manual
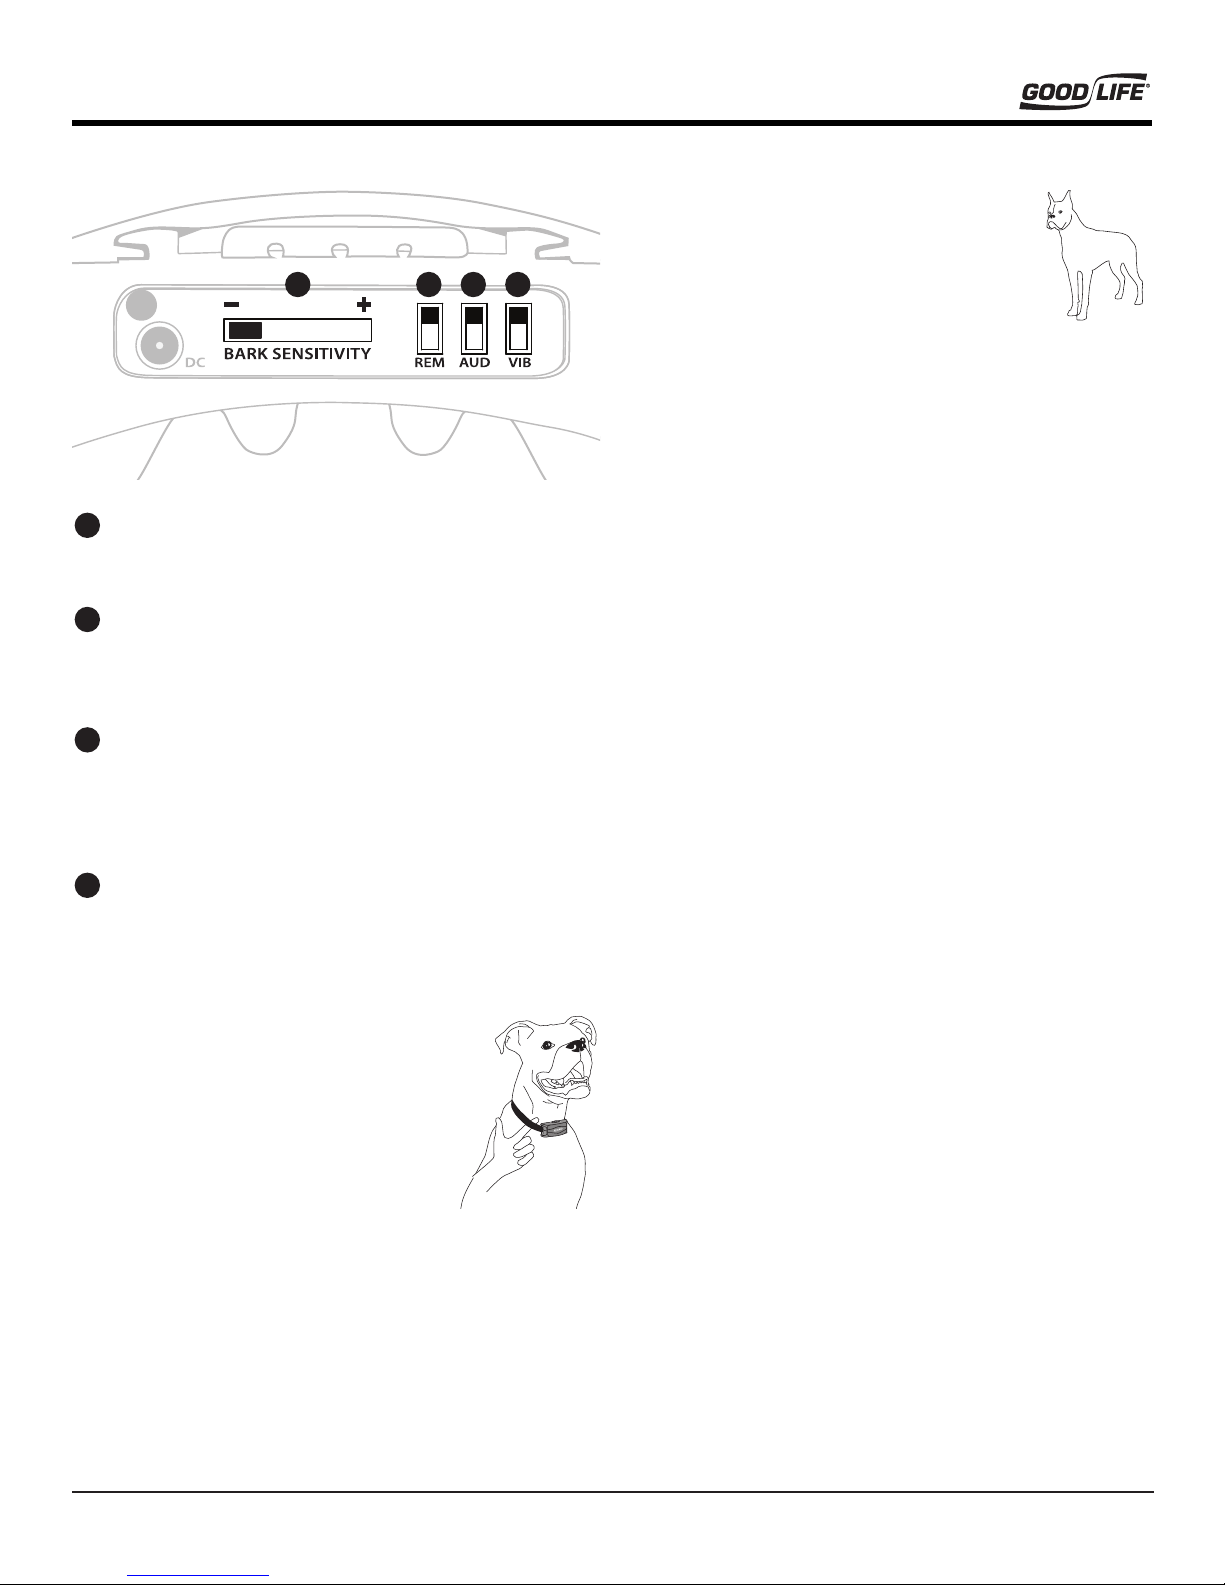
5. Control panel
1 2 3 4
Bark sensitivity slider
1
Allows you to adjust BarkWise™ sensitivity to barking.
This ranges from low to high.
REM (Remote Only or Mic)
2
Choose between having Barkwise™ activate when your
dog barks (UP) or only by pushing the button on the
included remote (DOWN).
AUD (Audible / Ultrasonic Mode)
3
Use either Ultrasonic mode (UP) or Audible mode
(DOWN) for training your dog. Audible mode is useful for
hearing the device activate to your dog’s bark, letting you
know that the bark sensitivity slider is set correctly.
VIB (Vibration / No Vibration)
4
Select BarkWise™ to vibrate (DOWN) or not vibrate (UP)
in response to barking.
6. Put BarkWise™ on your dog
1. Place BarkWise underneath your dog’s
neck and ensure the vibration prongs are
touching his skin.
2. Adjust the collar strap so that it is snug
but not restricting. You should be able to
place 1 nger comfortably between the
nylon strap and your dog’s neck.
3. Slip the loose end of the strap under the attached loop.
4. After wearing the collar for a short time, recheck to see if
it’s tting properly. Continue to do this periodically as your
dog becomes more comfortable with wearing it.
5. If the collar length is too long, mark the trim length with a
pen, then remove the collar. Cut the excess and carefully
seal the frayed end with a ame. Fit the collar to your dog’s
neck and tuck in the strap using the provided loop.
Training Your Dog
1. Acclimation Period - For the rst day, have
your dog wear BarkWise but don’t turn it on.
This allows your dog to become familiar with
the weight and feel of it. This also allows you to
make sure the collar ts correctly.
2. Begin Training - While not an absolute requirement, it’s
helpful for some dogs to begin training on Remote Only
mode. Do this by ipping the REM switch on the control
panel downward (see the illustration to the left). This
means that BarkWise will only activate when you take
action by pressing the remote. This is important because:
a. Some dogs respond better when their owner is present
b. You can combine activating the collar with a stern com-
mand, and give treats when the dog stops barking
3. Consistency is Key - Just like teaching your dog to sit or
roll over, it does take practice. Some bad habits will take
more time to break. Stick with it and don’t get discouraged!
We’re Here to Help
Toll Free: 1-800-657-8214
Outside US: 1-541-245-4488
This device complies with part 15 of the FCC Rules. Operation is subject to the following
two conditions: (1) this device may not cause harmful interference, and (2) this device
must accept any interference received, including interference that may cause undesired
operation.
This device complies with Industry Canada licence-exempt RSS standard(s). Operation is
subject to the following two conditions: (1) this device may not cause interference, and (2)
this device must accept any interference, including interference that may cause undesired
operation of the device.
Le présent appareil est conforme aux CNR d’Industrie Canada applicables aux appareils
radio exempts de licence. L’exploitation est autorisée aux deux conditions suivantes : (1)
l’appareil ne doit pas produire de brouillage, et (2) l’utilisateur de l’appareil doit accepter
tout brouillage radioélectrique subi, même si le brouillage est susceptible d’en compromettre le fonctionnement.
Note
This equipment has been tested and found to comply with the limits for a Class B digital
device, pursuant to Part 15 of the FCC Rules. These limits are designed to provide reasonable protection against harmful interference in a residential installation. This equipment
generates, uses and can radiate radio frequency energy and, if not installed and used in accordance with the instructions, may cause harmful interference to radio communications.
However, there is no guarantee that interference will not occur in a particular installation.
If this equipment does cause harmful interference to radio or television reception, which
can be determined by turning the equipment o and on, the user is encouraged to try to
correct the interference by one or more of the following measures:
-- Reorient or relocate the receiving antenna.
-- Increase the separation between the equipment and receiver.
-- Connect the equipment into an outlet on a circuit dierent from that to which the
receiver is connected.
-- Consult the dealer or an experienced radio/TV technician for help.
Caution
Changes or Modications not expressly approved by the party responsible could void the
user’s authority to operate this device.
Warning
Risk of explosion if battery is replaced by an incorrect type. Dispose of used batteries
according to the instructions. This product needs power supplied by an adapter that can
meet LPS. The maximum operating temperature is 45°C.
Website: www.ultimatebarkcontrol.com
Email: customerservice@goodlifeinc.com
©2016 Good Life, Inc. DESIGNED IN OREGON MADE IN CHINA
 Loading...