

Good Earth Lighting SE1095-BP2-02LF0-G, SE1095-WH3-02LF0-G User Manual
GND
FRONT
Silicone
Silicone
Silicona
Model / Model / Modelo #:SE1095-BP2-02LF0-G, SE1095-WH3-02LF0-G
Three Head 2N1 Security and Area Light
(Page 2)
Éclairage de sécurité et projecteur extérieur 2N1 à trois têtes
(Page 3)
Luz de seguridad y de área de tres cabezales 2N1
(Página 4)
Required
Nécessaire
Obligatorio
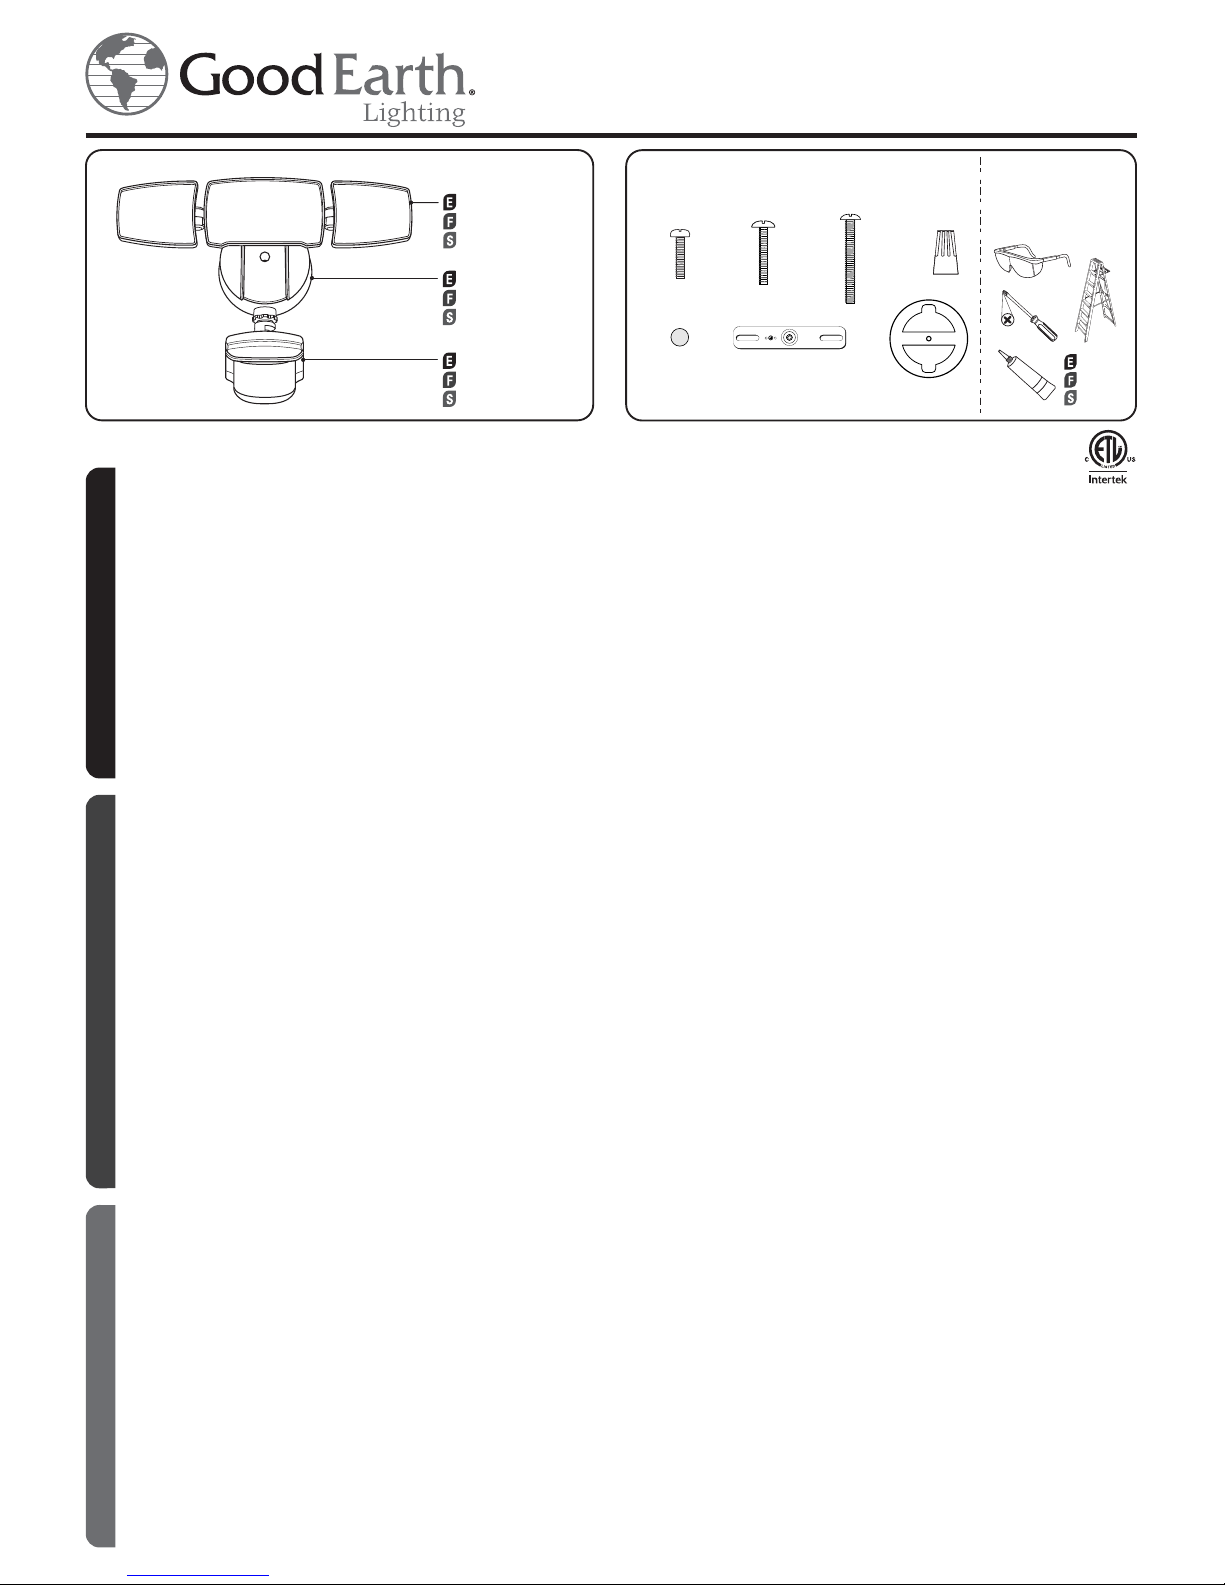
Hardware kit* / Trousse de quincaillerie*
/ Kit de aditamentos*
*Actual hardware may differ from illustration
* La quincaillerie incluse peut être différente de l’illustration.
*Los aditamentos reales pueden diferir de los que se muestran en la ilustración.
CC
x1
EE
x1
AA
x2
BB
x2
DD
x1
GG
x1
FF
x1
English
Warnings and Cautions / Avertissements et mises en garde / Advertencias y precauciones
Coupez l’alimentation au panneau central de disjoncteurs ou de fusibles avant de retirer l’ancien luminaire ou d’installer le nouveau luminaire.
Les luminaires à DEL peuvent être endommagés par les décharges électrostatiques. Avant l’installation, procédez à une décharge électrostatique de votre corps en touchant
une surface métallique nue reliée à la terre.
Pour connaître les exigences électriques, consultez l’étiquette sur le luminaire. Conducteurs d’alimentation d’au moins 90 °C. Les ampoules à DEL émettent progressivement
moins de lumière au cours de leur durée de vie.
N’UTILISEZ PAS CE LUMINAIRE SUR UN CIRCUIT AVEC GRADATEUR.
Si vous avez des doutes sur la mise à la terre de la boîte de sortie, ou sur la marche à suivre pour effectuer la mise à la terre du luminaire, ou si la boîte de sortie est en plastique
et qu’elle n’a pas de fil de mise à la terre, faites appel à un électricien qualifié.
Choisissez l’emplacement du luminaire avec précaution. N’installez pas le luminaire dans un endroit où il y a un passage de piétons ou de véhicules, des piscines ou des plans
d’eau ou bien des arbres et des buissons qui bougent avec le vent. Tous ces éléments peuvent activer le détecteur de mouvement du luminaire de sécurité et perturber le
fonctionnement normal du luminaire. N’installez PAS le luminaire à proximité d’autres sources de lumière, car le capteur crépusculaire est susceptible de confondre cette
lumière avec la lumière du jour.
Ce luminaire est conforme à l’alinéa 15 du règlement de la FCC. Son utilisation est soumise aux deux conditions suivantes : (1) Ce luminaire ne doit provoquer aucune
interférence nuisible; et (2) il doit accepter toutes les interférences reçues, y compris celles pouvant causer un fonctionnement indésirable. Avertissement : Les modifications
apportées à ce luminaire qui ne sont pas expressément autorisées par la partie responsable de la conformité peuvent annuler le droit de l’utilisateur de se servir de ce
luminaire. REMARQUE : Cet équipement a été testé et jugé conforme aux limites pour un équipement numérique de Classe B en vertu de la Partie 15 des Règlements de la FCC.
Ces limites sont conçues pour assurer une protection raisonnable contre les interférences nuisibles dans une installation résidentielle. Cet équipement émet, utilise et peut
rayonner de l’énergie de fréquence radio et, s’il n’est pas installé et utilisé conformément aux instructions, il pourrait causer des interférences nuisibles aux communications
radio. Cependant, il n’existe aucune garantie qu’aucune interférence ne se produira dans une installation particulière. Si cet équipement cause des interférences nuisibles pour
la réception de programmes à la radio ou à la télévision, ce qui peut être déterminé en allumant et en éteignant à plusieurs reprises l’équipement en question, l’utilisateur est
encouragé à corriger l’interférence en prenant une ou plusieurs des mesures suivantes : Réorienter ou déplacer l’antenne de réception. Augmenter la distance entre
l’équipement et le récepteur. Connecter l’équipement à une prise de courant raccordée à un circuit différent de celui auquel le récepteur est connecté. Consulter le détaillant ou
un technicien radio ou télévision expérimenté pour lui demander conseil.
Español
Antes de retirar la lámpara vieja o instalar la nueva, corte la alimentación en el interruptor de circuito o el panel de fusibles.
Las LED pueden dañarse por una descarga electrostática. Antes de la instalación, realice una descarga usted mismo tocando una superficie de metal desnuda de puesta a
tierra para eliminar este riesgo.
Para conocer los requisitos eléctricos, fíjese en la lámpara. Conductores de electricidad para 90° mínimo. Las LED emiten cada vez menos luz durante su vida útil.
NO USE ESTA LÁMPARA CON UN CIRCUITO REGULADOR DE INTENSIDAD.
Si no está seguro de que la caja eléctrica tenga una puesta a tierra adecuada, si la caja es de plástico y no tiene una puesta a tierra o si no está familiarizado con los métodos
de puesta a tierra adecuados para la lámpara, consulte a un electricista calificado.
Seleccione con cuidado la ubicación de instalación. No instale en áreas que cuenten con circulación peatonal o vehicular, piscinas o cuerpos de agua, o con árboles o
arbustos que se muevan con el viento. Todos estos pueden activar la luz de seguridad con sensor de movimiento y pueden alterar el funcionamiento esperado de la luz.
NO instale cerca de otras fuentes de luz, ya que esto puede engañar el sensor anochecer-amanecer y hacerle creer que es de día.
Este dispositivo cumple con la Parte 15 de las reglas FCC. El funcionamiento está sujeto a las siguientes dos condiciones: (1) Este dispositivo no debe causar interferencia
perjudicial y (2) debe aceptar cualquier interferencia recibida, incluida la interferencia que pudiese causar un funcionamiento no deseado. Advertencia: los cambios o
modificaciones a esta unidad que no estén expresamente aprobados por la parte responsable del cumplimiento podrían anular la autorización del usuario para utilizar el equipo.
NOTA: Este equipo ha sido sometido a pruebas y se ha comprobado que cumple con los límites para un dispositivo digital de clase B, conforme a la parte 15 de las Normas de la
FCC. Estos límites están concebidos para proporcionar una protección razonable contra las interferencias perjudiciales en una instalación residencial. Este equipo gener a, usa
y puede irradiar energía de radiofrecuencia y, si no se instala y utiliza de acuerdo con las instrucciones, puede causar interferencias perjudiciales para las radiocomunicaciones. Sin embargo, no hay garantía de que no vaya a ocurrir interferencia en una instalación específica. Si este equipo causa interferencia perjudicial para la recepción de radio
o televisión, lo cual se puede determinar apagando y encendiendo el equipo, se recomienda al usuario que intente corregir la interferencia tomando una o más de las siguientes
medidas: Reoriente o reubique la antena receptora. Aumente la separación entre el equipo y el receptor. Conecte el equipo a un tomacorriente de un circuito distinto al circuito
al que el receptor esté conectado. Consulte al distribuidor o a un técnico experto en radio/TV para obtener ayuda.
Shut off power at the circuit breaker or fuse panel before removing the old fixture or installing the new one.
LEDs can be damaged by electrostatic discharge shock. Before installation, discharge yourself by touching a grounded bare metal surface to remove this hazard.
For electrical requirements, see fixture. Minimum 90° supply conductors. LEDs gradually emit less light over their lifetime.
DO NOT USE THIS FIXTURE WITH A DIMMING CIRCUIT.
If unsure if the electrical box is properly grounded, or the box is plastic and has no ground wire, or are unfamiliar with the methods of properly grounding fixture,
consult a qualified electrician.
Select the installation location carefully. Do not install in areas having pedestrian or motorized traffic, pools or bodies of water, or trees/bushes that move in the wind. All of
these may trigger the motion sensor security light and may be disruptive to the intended operation of the light. Do NOT install near other sources of light, as this can fool the
Dusk-to-Dawn sensor into thinking it is daylight.
This device complies with Part 15 of the FCC rules. Operation is subject to the following two conditions: (1) This device may not cause harmful interference, and (2) this device
must accept any interference received, including interference that may cause undesired operation. Warning: Changes or modifications to this unit not expressly approved by
the party responsible for compliance could void the user’s authority to operate the equipment. NOTE: This equipment has been tested and found to comply with the limits for a
Class B digital device, pursuant to Part 15 of the FCC Rules. These limits are designed to provide reasonable protection against harmful interference in a residential installation.
This equipment generates, uses and can radiate radio frequency energy and, if not installed and used in accordance with the instructions, may cause harmful interference to
radio communications. However, there is no guarantee that interference will not occur in a particular installation. If this equipment does cause harmful interference to radio or
television reception, which can be determined by turning the equipment off and on, the user is encouraged to try to correct the interference by one or more of the following
measures: Reorient or relocate the receiving antenna. Increase the separation between the equipment and receiver. Connect the equipment into an outlet on a circuit different
from that to which the receiver is connected. Consult the dealer or an experienced radio/TV technician for help.
Français
Light head
Tête d’éclairage
Foco de la lámpara
Sensor head
Tête du détecteur
Foco del sensor
Wall plate
Plaque murale
Placa para pared
1
B
1
A
Installation For Round Surface Mount Electrical Boxes
Installation For Recessed Electrical Boxes
GND
FRON
T
For Recessed
Electrical Boxes
English
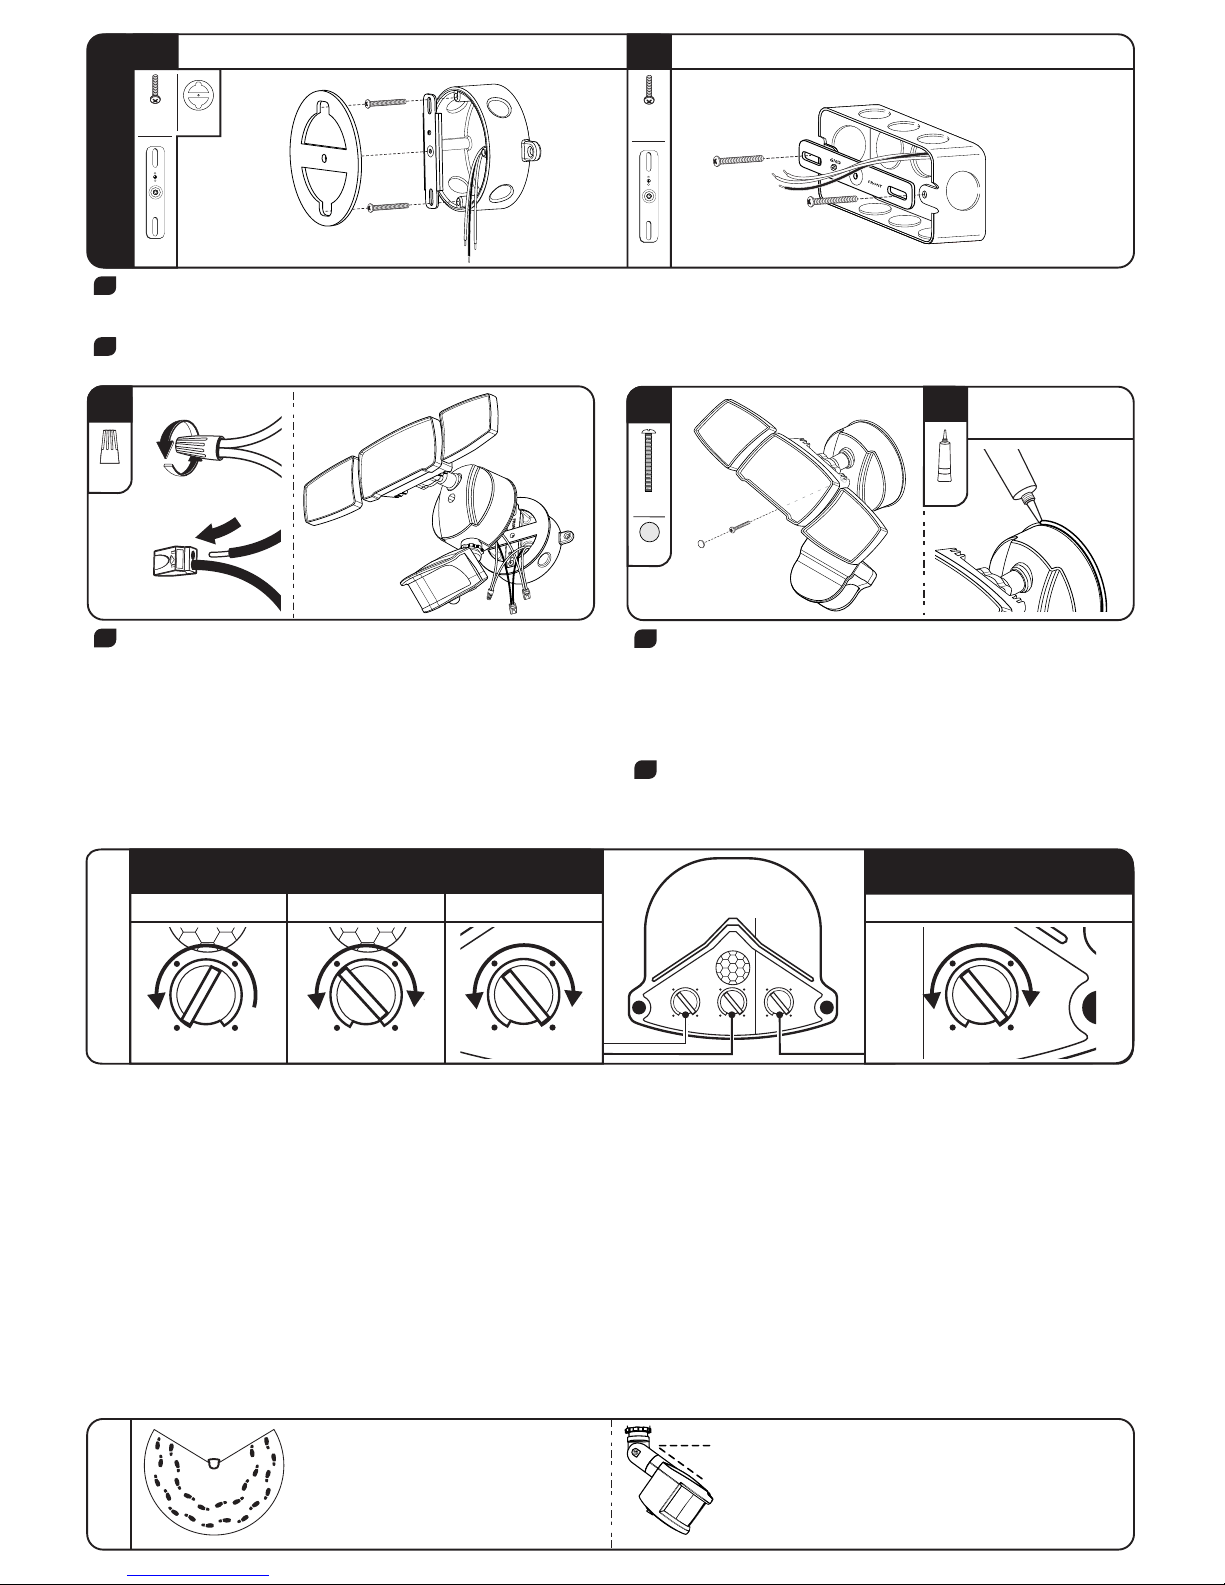
1A
1B
Pull supply wires out of the electrical box. Using machine screws (AA or BB), secure mounting strap (FF) to the electrical box. Ensure the side marked “FRONT” is
facing out. Remove protective paper from adhesive face of foam gasket (GG). Pull supply wires through the opening in gasket and adhere gasket to the mounting strap and outer
edge of round surface electrical box.
Pull supply wires out of the electrical box. Using machine screws (AA or BB), secure mounting strap (FF) to the electrical box. Ensure the side marked “FRONT” is facing out.
x2
AA/BB
x2
AA/BB
FF x1 FF x1
GG x1
GND
FRONT
GND
FRONT
3
A
FF x1
EE x1
Silicone
3
B
AREA LIGHT SETTINGS: Decide if area light at lower brightness is to be activated at dusk. Locate right control knob and set to desired time the area light is on. Setting to “Dusk To
Dawn” turns light on from sunset to sunrise.
SECURITY MOTION LIGHT SETTINGS: The motion sensor on this fixture has a built in Dusk-to-Dawn sensor that automatically disables the motion sensor during daylight hours
regardless of motion detection. The additional 360° sensor detects motion up to 14 ft. below.
Test: The motion sensor must be tested prior to starting. To test fixture, restore power to fixture, locate middle control knob and set to “Test.” During test mode, the lights will come on
for 40 seconds, regardless of motion detection or the time of day. The light will shut off automatically after 40 seconds. Leave the knob on “TEST” and test the sensitivity by crossing
in the path of the sensor. The light will come on only if it senses movement. Once movement stops, it will turn off in 5 seconds. The test is now complete.
Timer: Once fixture is tested, set middle control knob to desired time the light stays on once motion is detected.
Range: Locate left control knob and set to desired range of motion detection. Rotating knob to “Max” increases the distance of the motion sensor up to 100 ft. NOTE: A higher
sensitivity level increases the chances of a false activation being triggered. For maximum range performance, allow the fixture to operate at any setting (with power) for at least
48 hours.
Manual Mode: To control the security light from inside the home, activate manual “ON” mode by toggling the wall light switch OFF and ON within 2 seconds. The security light will
turn on and stay on for approximately 8 hours, or until the Dusk-to-Dawn sensor detects light in the morning. Once the Dusk-to-Dawn sensor detects light, the manual “ON” mode will
automatically go back to its original settings of the AUTO motion sensor mode.
For Recessed
Electrical Boxes
2
Fixture must be properly grounded. Connect fixture ground wire to ground wire
in electrical box using wire nut (DD). These wires can be either green or bare
copper. Insert black supply lead into connector on black fixture wires and white
supply lead into connector on white fixture wires. Push excess wire into
electrical box.
NOTE: If eave mounting the fixture, position the sensor head with the adjustment
controls and drain holes facing downward to prevent water damage.
3
A
3
B
Position fixture over the mounting strap. Secure long machine screw (CC)
through the center hole of the wall plate and mounting strap. NOTE: Ensure
gasket (GG) properly seals gap between wall plate and electrical box to prevent
water seepage into electrical box. Restore power to the electrical box and
ensure that the light is functioning properly.
If the light is functioning properly, fit
the silicone cap (EE) into the mounting screw opening to prevent water seepage
into the housing.
For recessed electrical boxes, use silicone adhesive caulking (not included) to
seal the gap between the wall plate and the mounting surface to prevent water
seepage into the electrical enclosure.
240°
45°
The 240 degree coverage of the motion sensor is
measured side to side. The sensor is more effective
side-to-side, rather than motion coming straight at it
(in-and-out). Adjust the motion sensor head so that
it detects motion moving across the coverage area.
The position of the sensor should not exceed 45° below horizontal.
Do not aim the motion sensor at any water, bushes or plants that
may move in the wind, pedestrian traffic, moving cars, etc., as this
will trigger the motion sensor. NOTE: If the sensor arm becomes
loose, readjust the sensor head and tighten the joint screw on the
sensor arm.
Motion Sensor
2
DD x1
2
Range
2N1
30
SECURITY LIGHT
(High Beam)
AREA LIGHT
(Low Beam)
Feet
60
5 Max.
3hrs 5hrs
OFF Dusk To Dawn
1
Minutes
5
Test 10
Operation Instructions
Timer
AREA LIGHT SETTINGS
(Lower Brightness)
AREA LIGHT
(Low Beam)
3hrs 5hrs
OFF Dusk To Dawn
SECURITY MOTION LIGHT SETTINGS
(Full Brightness)
Test
2N1
AREA LIGHT
(Low Beam)
3hrs 5hrs
OFF Dusk To Dawn
1
Minutes
5
Test 10
Timer
2N1
AREA LIGHT
(Low Beam)
3hrs 5hrs
OFF Dusk To Dawn
1
Minutes
5
Test 10
Range
Range
2N1
30
(High Beam)
AREA LIGHT
(Low Beam)
Feet
60
5 Max.
3hrs 5hrs
OFF Dusk To Dawn
1
Minutes
5
Test 10
 Loading...