

Good Earth Lighting G2401-TWH-I User Manual
Bulb
Ampoule
Bombilla
Model: G2401-TWH-I
Modèl : G2401-TWH-I
Modelo: G2401-TWH-I
Good Earth Lighting
®
12 in. Allison Flush Mount (Page 2)
Luminaire encastré Allison de 30,5 cm (Page 3)
Lámparas
Allison
de montaje al ras de 30,5 cm (Página 5)
To Begin/Pour commencer/Para comenzar
WARNING: Review important safety instructions before installation. Check to make
sure you have the following:
AVERTISSEMENT: lisez ces instructions importantes relatives à la sécurité avant
l'installation. Vérifiez que vous disposez des équipements suivants:
ADVERTENCIA: Revise las instrucciones de seguridad importantes antes de realizar
la instalación. Asegúrese de que tiene lo siguiente:
Diffuser
Diffuseur
Difusor
Pan
Disque de fixation
Placa
*Actual hardware may differ from illustration.
*Le matériel réel peut être différent de celui qui est illustré.
*La tornillería puede variar de la que se muestra en la ilustración.
Grounding Wire
Fil de mise à la terre
Cable de puesta a tierra
Bulb Socket
Douille d'ampoule
Portalámpara
Installation Time: 45 Minutes
Durée de l'installation : 45 minutes
Tiempo de instalación: 45 minutos
Flathead Screwdriver
Tournevis à lame plate
Destornillador de cabeza plana
Wire Strippers
Outil à dénuder
Pelacables
Wire Cutters
Coupe-fil
Alicates para cortar alambre
Phillips Screwdriver
Tournevis à pointe cruciforme
Destornillador en cruz
Pliers
Tenailles
Alicates
Electrical Tape
Ruban isolant
Cinta aislante
Step Ladder
Escabeau
Escalera de mano
Soft Cloth
Tissu doux
Paño suave
Safety Glasses
Lunettes de sécurité
Anteoios de seguridad
Required/Requis/Se necesitan
Hardware Kit*
Kit de visserie*
Juego de piezas de instalación*
Wires
Fils
Cables
Plastic Diffuser Securing Screw
Vis de fixation du diffuseur en plastique
Tornillo de sujeción del difusor de plástico
Mounting Bracket
Support de montage
Soporte de montaje
Contact Pins
Chevilles de contact
Espigas de contacto
- 1 -

ON
OFF
ON
OFF
ON
OFF
2
Fig. 6
Fig. 7
Fig. 5
Fig. 3
Fig. 2
Fig. 1
Fig. 1
Fig. 2
Fig. 4
Fig. 8
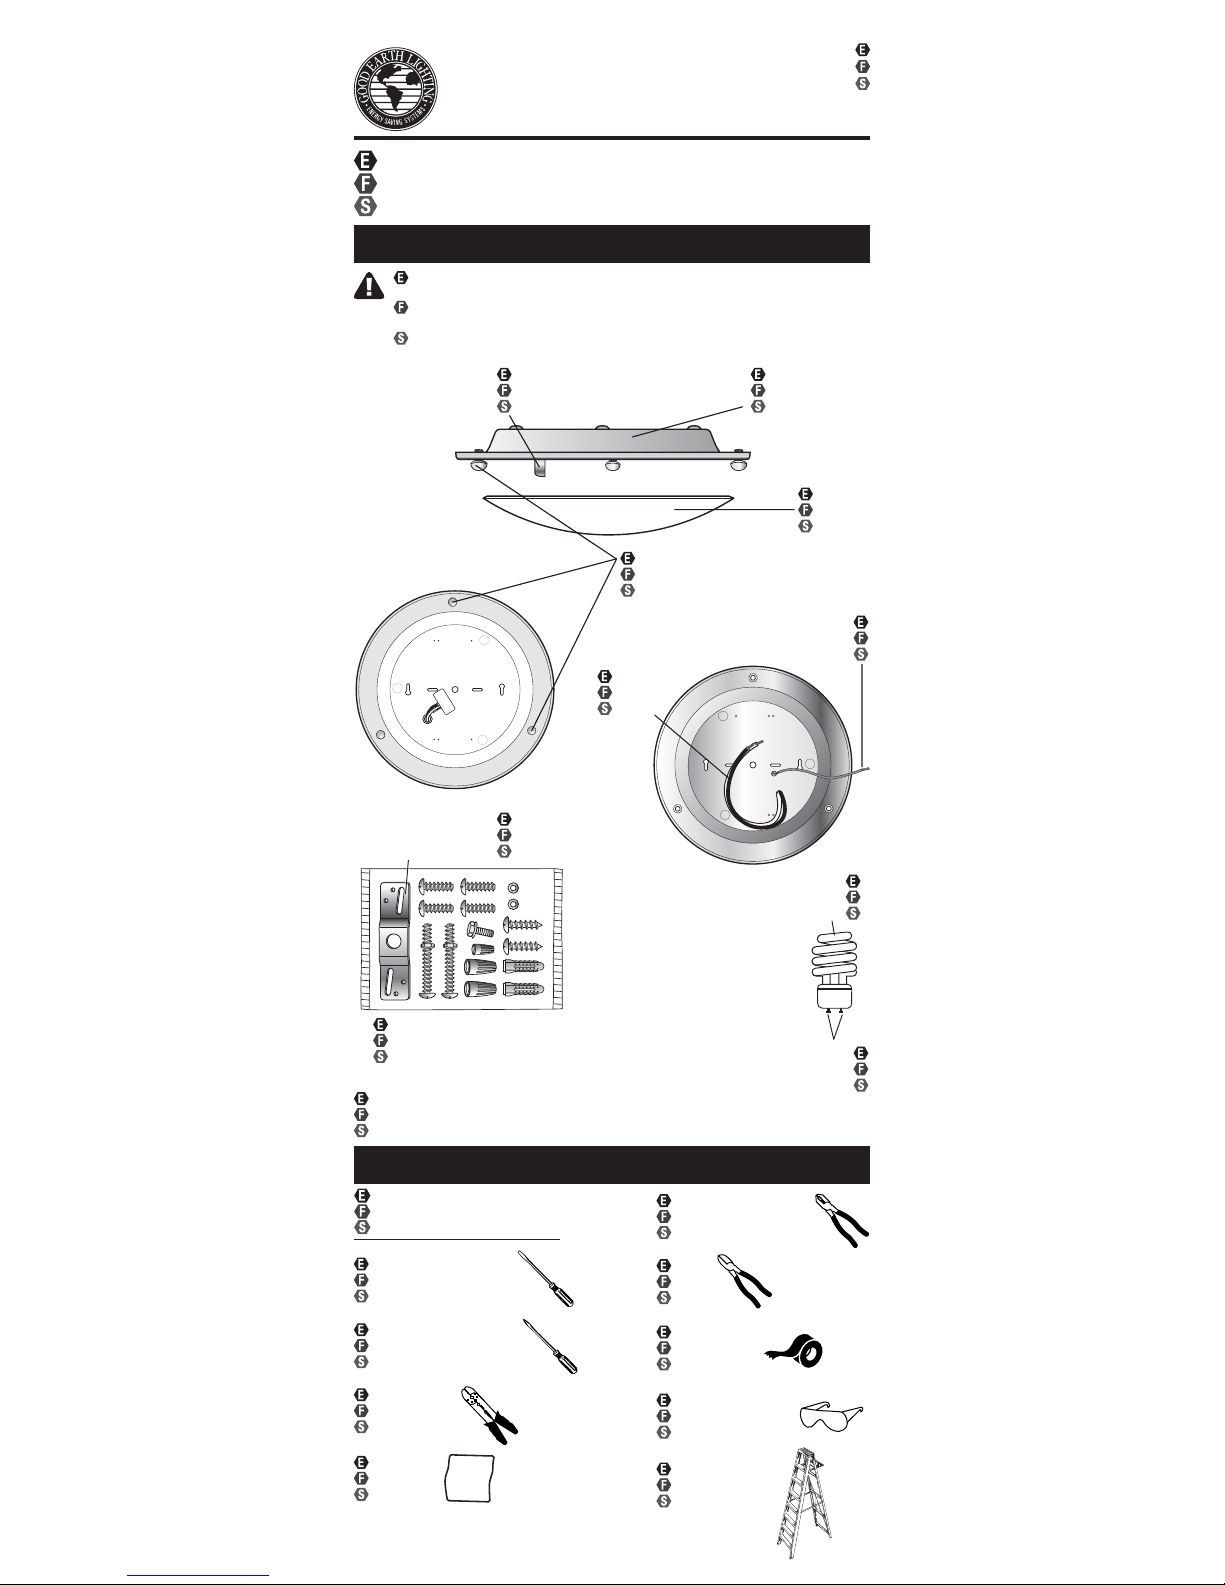
Preparation
Fixture Installation
DO NOT USE THIS FIXTURE WITH A DIMMING CIRCUIT. If you presently have dimmer controls,
you will need to remove them, and replace them with regular electrical switches. If you have a
three way dimmer, you will have to replace it with a regular three way switch.
If you are unfamiliar with electrical installations, we recommend you have a qualified
electrician do your installation.
Remove the old fixture. Make yourself a sketch of how the
fixture is wired (index the sketch by wire color) or mark the
wires themselves with masking tape and a pencil so you will
know how to connect the wires to your new fixture (Fig. 2). If
several wires are involved or if the wiring seems more
complicated and perhaps even includes a red wire, take note
of the connections before you disconnect them.
1
OFF
WARNING: Shut off power at the circuit breaker or fuse
panel before removing the old fixture (Fig. 1).
english
Pull the existing supply wires around the sides of the
mounting bracket (Fig. 2). Do NOT pull the supply wires
through the center hole of the mounting bracket. Using your
old electrical box screws, secure the mounting bracket to the
electrical box.
1
Screw the long machine screws (included) into the threaded
holes on the mounting bracket (Fig. 1). If your mounting bracket
has more than 2 threaded holes, measure the center-to-center
distance of the holes to make sure it matches the hole
openings in the ceiling pan of your fixture. Make sure your
machine screws protrude downward far enough to pass
through the elongated holes in your pan.
2
For safety and proper operation, your fixture must be
properly grounded. If you are unfamiliar with the methods of
properly grounding your fixture, consult a qualified
electrician. A copper ground wire is pre-attached to your
fixture pan. If your electrical box is made of plastic and/or
has a green or bare copper grounding wire inside, the
fixture grounding wire and the electrical box ground wire
should be connected together using one of the small wire
nuts (included) (Fig. 6). If your electrical box is made of metal and is already grounded, you
simply secure the bare end of the fixture ground wire to the crossbar using the green
grounding screw on the crossbar (Fig. 5).
4
3
Connect the supply leads from the electrical box to the
fixture wire leads using the medium wire nuts supplied in
your installation hardware kit as per the illustration. The
black lead from the fixture goes to the black
supply lead, and the white lead from the fixture
goes to the white supply lead (Fig. 7). Secure
the wire nuts properly to prevent the wires
from coming loose. Tape the wire nuts to the
wire using electrical tape. Carefully push the
excess wires back inside the electrical box.
5
6
Position the fixture pan over the electrical box so that the
machine screws protruding from the face of the
mounting bracket pass through the elongated holes in
the fixture pan (Fig. 8). Secure the fixture pan to the
electrical box with the nuts and washers provided in your
hardware kit. The fixture pan should be tight up against
the ceiling surface.
7
To install the bulb socket, snap the metal socket clip into the
rectangular hole until you feel it snap (Fig. 3). Feed the bulb
socket wires through the circular wire hole, pull
them through on the other side as much as you
can without pulling it tight (Fig. 4).
Fig. 9
Insert the proper GU24 base 13W compact fluorescent bulb
into the socket (Fig. 9). Depending on the store where you
purchased your fixture, it may or may not include the bulb
with it. If you need to purchase a bulb, you will need to
purchase a 13 Watt CF13W/self-ballasted GU24 base
compact fluorescent bulb. Hold the bulb by its’ base, insert
the pins into the 2 curved slots in the bulb socket and twist
clockwise until the bulb "seats". The bulb can only go into the socket one way. Do NOT force
the bulb. CAUTION: DO NOT HOLD THE BULB BY THE GLASS DURING INSERTION OR
REMOVAL TO PREVENT ACCIDENTAL BREAKAGE! HOLD THE BULB BY THE PLASTIC BASE.
- 2 -

Fig. 1
3
6
Fig. 3
Fig. 4
Fig. 6
Fig. 5
Restore power to the fixture.
Fig. 10Fig. 10
ON
OFF
ON
OFF
ON
OFF
ÉTEINT
Fig. 2
Cleaning Instructions
Your fixture is made from quality materials that will last for many, many years with minimum
care. You may want to periodically clean the diffuser, or interior of the fixture using a mild,
non-abrasive glass cleaner and soft cloth. Do NOT use solvents, or cleaners containing
abrasive agents. When cleaning the inside of the fixture, make sure you have the power turned
off, and do not spray liquid cleaner directly onto the bulb, socket, ballast, or wiring.
Préparation
N'UTILISEZ PAS CE LUMINAIRE AVEC UN CIRCUIT CONTRÔLÉ PAR DES GRADATEURS
DE LUMIÈRE. Si vous avez actuellement des gradateurs de lumière, il vous faudra les
retirer et les remplacer par des commutateurs électriques ordinaires. Si vous avez un
gradateur/commutateur à trois positions, il vous faudra le remplacer par un
commutateur à trois positions ordinaire. Si vous n'êtes pas à l'aise avec les installations
électriques, nous vous recommandons de demander à un électricien professionnel de
réaliser votre installation.
français
1
AVERTISSEMENT: coupez l'alimentation électrique au
niveau du disjoncteur ou du panneau de fusibles avant
de retirer l'ancien luminaire (Fig. 1).
10
Restore power to the electrical box to make sure your fixture is working properly.
If your fixture was shipped with the diffuser securing screws
preattached, back two of them out until there is 1/4 in. space
between the screw head and the fixture’s pan. If the diffuser
securing screws were shipped in plastic bag, screw two (2) of
the plastic diffuser screws into the corresponding holes in the
face of the pan, but do not screw these in entirely. Position the
diffuser under the heads of the two (2) screws, and tighten the
screws slightly (Fig. 10).
Screw the third remaining screw into the last hole, and
tighten all the screws down so the edges of the screw
heads capture the edge of the glass diffuser (Fig. 11).
Bulb Replacement Instructions
9
8
Fig. 11
1
Shut off main power supply. Allow sufficient time for bulb to cool properly before
handling.
2
Remove the diffuser by first losening two diffuser securing
screws and removing the third (Fig. 1). Carefully place the
diffuser to the side.
Fig. 1
Your bulb should last up to 10,000 hours in normal use. When bulb replacement is necessary,
you must replace the bulb with a 13 Watt CF13W self-ballasted GU24 base fluorescent bulb.
These bulbs are readily available at your local home center and most larger hardware stores.
Remove the old bulb by grasping it firmly at the
plastic base of the bulb and firmly twist the bulb
counter-clockwise until it “unseats” and lines up
with the large end of the openings
(Fig. 2)
. Pull
straight out
(Fig. 3)
. Be careful not to drop the bulb.
Grasp the replacement bulb in the same manner
and re-insert the replacement bulb into the socket
and twist the bulb clockwise until it ‘seats’ (Fig. 4).
Do not force the bulb into the socket or twist
forcefully (Fig. 5).
Re-attach the diffuser to the ceiling pan (Fig. 6).
4
5
Troubleshooting Guide
Minor problems often can be fixed without the help of an electrician. Before doing any work on the
fixture, shut off power supply at the circuit breaker panel to avoid electrical shock.
Problem Cause Solution
Fixture doesn’t light Bulb is defective Replace bulb
Power is off Check if power supply is on
Bad wire connection Check wiring
Bad switch Test or replace switch
Fuse blows or circuit breaker trips Crossed wires or power wire Check wiring connections
when light is turned on is grounded out
- 3 -
 Loading...