

Page 1

Betriebsanleitung
User manual
Mode d‘emploi
Istruzioni per l‘uso
Instrucciones de uso
Art. 59509
Gebruiksaanwijzing
Brugervejledning
Bruksanvisning
Návod k použití
Instrukcja obsługi
16 Zoll Standventilator
16 Inch Pedestal Fan
Ventilateur sur pied de 16 pouces
Ventilatore a piedistallo da 16 pollici
Ventilador de pedestal de 16 pulgadas
Ventilator op voetstuk van 16 Zoll
16 tommer piedestalventilator
16 tum Piedestaläkt
16palcový podstavcový ventilátor
Wentylator podłogowy 16 cali
Page 2

Betriebsanleitung
BETRIEBSANLEITUNG
DE
Inhaltsverzeichnis
1 Sicherheitshinweise �������������������������������������������������������������������������������� 2
2 Beschreibung und Funktion �������������������������������������������������������������������� 3
2�1 Produkt ����������������������������������������������������������������������������������������������������3
2�2 Lieferumfang �������������������������������������������������������������������������������������������� 3
2�3 Bedienelemente ��������������������������������������������������������������������������������������� 4
2�4 Technische Daten ������������������������������������������������������������������������������������4
3 Bestimmungsgemäßer Gebrauch ����������������������������������������������������������� 5
4 Vorbereitung ������������������������������������������������������������������������������������������� 5
5 Montage �������������������������������������������������������������������������������������������������� 5
6 Funktionstasten und Statusanzeigen ������������������������������������������������������ 6
7 Fernbedienung ���������������������������������������������������������������������������������������� 6
7�1 Fernbedienung aktivieren ������������������������������������������������������������������������6
7�2 Erläuterung der Tasten ����������������������������������������������������������������������������7
7�3 Batterie wechseln ������������������������������������������������������������������������������������7
8 Anschluss Bedienung ����������������������������������������������������������������������������� 7
8�1 Inbetriebnahme ���������������������������������������������������������������������������������������� 7
8�2 Höhe einstellen ���������������������������������������������������������������������������������������� 7
8�3 Neigungswinkel einstellen �����������������������������������������������������������������������7
9 Wartung,Pege,LagerungundTransport ���������������������������������������������� 8
10 Entsorgungshinweise ������������������������������������������������������������������������������ 8
10�1 Produkt ����������������������������������������������������������������������������������������������������8
10�2 Batterien ��������������������������������������������������������������������������������������������������8
10.3Verpackung ����������������������������������������������������������������������������������������������8
11 EU-Konformitätserklärung ���������������������������������������������������������������������� 8
12 Verwendete Symbole ������������������������������������������������������������������������������ 8
1
Page 3

1 Sicherheitshinweise
Die Betriebsanleitung ist Bestandteil des Produktes und enthält wichtige Hinweise zum korrekten Gebrauch.
• Lesen Sie die Betriebsanleitung vollständig und sorgfältig vor Gebrauch.
Die Betriebsanleitung muss bei Unsicherheiten und Weitergabe des Produktes verfügbar sein.
• Bewahren Sie die Betriebsanleitung auf.
Stromschlaggefahr
Kommt das Produkt mit Wasser in Berührung, kann das zu Stromschlägen führen.
• Benutzen Sie das Produkt nicht mit feuchten Händen.
• Benutzen Sie das Produkt nicht in unmittelbarer Nähe von Wasser, wie z. B. Badewannen, Waschbecken oder Pools.
Regen, der auf das Produkt spritzt, kann zu einem Stromschlag führen.
• Stellen Sie das Produkt nicht an ein offenes Fenster.
Spannungsfrei nur bei gezogenem Stecker.
• Ziehen Sie im Notfall, nach Gebrauch und bei Gewitter den Netzstecker direkt am Steckergehäuse aus der Steckdose.
• Öffnen Sie niemals das Gehäuse.
• Modizieren Sie Produkt und Zubehör nicht.
• Schließen Sie Anschlüsse und Schaltkreise nicht kurz.
• Überprüfen Sie regelmäßig, ob das Gerätekabel noch intakt ist.
• Benutzen Sie das Produkt nicht, wenn das Kabel beschädigt ist.
Ein defektes Gerät darf nicht in Betrieb genommen werden, sondern muss sofort vom Netz getrennt und gegen unbeabsichtigte Weiterbenutzung gesichert werden.
• Benutzen Sie Produkt, Produktteile und Zubehör nur in einwandfreiem Zustand.
• Wenden Sie sich bei Fragen, Defekten, mechanischen Beschädigungen, Störungen und anderen nicht durch die Begleitdokumentation behebbaren Problemen, an Händler oder Hersteller.
• Reparieren Sie defekte Produkte nicht selbst, sondern wenden Sie sich an den Händler oder Hersteller.
Einzugsgefahr
Rotierende Teile können lockere Kleidung, Haare oder Ähnliches einziehen. Dies kann zu Verletzungen oder Schäden am Gerät führen.
• Halten Sie Ihre Haare und lose Kleidung von rotierenden Teilen fern.
• Stellen Sie sicher, dass sich der Ventilator nicht in der Nähe von Vorhängen oder Gegenständen bendet, die in den Ventilator
gezogen werden können.
Verletzungsgefahr durch bewegliche Produktteile
Hinter dem Schutzgitter des Ventilators benden sich bewegliche Teile.
• Stecken Sie keine Finger oder Gegenstände durch das Schutzgitter.
Dies kann zu Verletzungen oder Schäden am Gerät führen.
• Betreiben Sie das Gerät nur mit geschlossenem, intaktem Schutzgitter.
• Verwenden Sie das Gerät nicht, wenn das Schutzgitter beschädigt ist.
• Schalten Sie das Gerät aus und ziehen Sie den Netzstecker, bevor Sie das Schutzgitter entfernen.
• Ziehen Sie das Produkt immer am Stecker, nicht am Kabel.
Stolpergefahr
• Achten Sie darauf, dass das Anschlusskabel so verlegt wird, dass es niemanden behindert und nicht beschädigt wird.
Aufgrund unterschiedlich hoher Risiken und Gefahrenpotentiale dürfen einige Arbeitsschritte nur von geschulten Fachkräften ausgeführt werden.
• Montage, Betrieb, Pege, Lagerung, Transport und Entsorgung dürfen nur von Endverbrauchern und Benutzern mit mechanischen und elektrotechnischen Grundkenntnissen vorgenommen werden.
• Demontage, Wartungsarbeiten und Reparaturen dürfen nur von geschulten Fachkräften durchgeführt werden.
Hierfür sind spezielle Sicherheitsmaßnahmen, Fachwissen und Werkzeuge nötig.
Nicht für Kinder und Personen mit physisch und/oder psychisch eingeschränkten Fähigkeiten geeignet.
• Sichern Sie das Produkt gegen unbeabsichtigte Benutzung.
• Sichern Sie Verpackung, Kleinteile und Dämmmaterial gegen unbeabsichtigte Benutzung.
Betriebs- und Lagerbedingungen
• Lassen Sie das Produkt im Betrieb NIE unbeaufsichtigt.
• Decken Sie das Produkt nicht ab.
• Halten Sie Ventilatorschlitze und Lüftungsschlitze frei.
• Betreiben Sie das Produkt nicht in staubigen Umgebungen oder bei mangelhafter Belüftung.
• Betreiben Sie das Produkt nicht im Bereich von explosiven und/oder brennbaren Gasen.
• Platzieren und betreiben Sie das Produkt nicht in der Nähe von offenen Flammen und Koch- oder wärmeerzeugenden Produk-
ten wie Heizkörpern oder Öfen.
• Platzieren, installieren und transportieren Sie Produkt, Produktteile und Zubehör sicher.
• Platzieren Sie das Produkt auf einer stabilen, ebenen, trockenen und staubfreien Fläche, sodass es während des Betriebs
nicht kippen und der Untergrund nicht durch Vibrationen beschädigt werden kann.
• Achten Sie auf einen festen Stand.
Der Ventilator darf nicht auf dem Netzkabel stehen, damit er während des Betriebs nicht umkippt.
• Vermeiden Sie extreme Belastungen wie Hitze und Kälte, Nässe und direkte Sonneneinstrahlung, Mikrowellen sowie Vibrationen und mechanischen Druck.
• Schalten Sie das Gerät aus und trennen Sie das Produkt bei Nichtgebrauch, zur Reinigung oder bei Störung vom Netz.
Batteriegefahren
Die Fernbedienung ist mit einer Lithium-Knopfzelle ausgestattet. Diese ist tauschbar.
• Halten Sie Batterien von Kindern fern.
DE
2
Page 4
Betriebsanleitung
Wenn diese verschluckt wird, kann dies zu schweren inneren Verätzungen und zum Tode führen. Wenn Sie vermuten, dass die Batte-
DE
rie verschluckt oder auf andere Weise in den Körper gelangt ist, suchen Sie umgehend einen Arzt auf.
• Verwenden Sie niemals Batterien, wenn diese verbeult, undicht oder beschädigt sind.
• Entfernen Sie ausgelaufene, deformierte oder korrodierte Zellen aus dem Produkt und entsorgen Sie diese mittels geeigneter
Schutzvorrichtungen.
Wenn eine Batterie ausgelaufen ist, vermeiden Sie den Kontakt mit Haut, Augen und Schleimhäuten. Spülen Sie ggf. die betroffenen
Stellen mit Wasser und suchen Sie umgehend einen Arzt auf.
• Verformen, verbrennen oder zerlegen Sie Batterien nicht und zerlöchern Sie diese niemals mit einem scharfen Gegenstand.
Extreme Hitzeeinwirkung kann zu einer Explosion und/oder zum Austreten von ätzenden Flüssigkeiten führen. Mechanische Beschädigungen können zu gasförmigen Substanzen führen, die stark reizend, brennbar oder giftig sein können.
• Schließen Sie Batterien nicht kurz und tauchen Sie diese nicht in Flüssigkeiten ein.
Es besteht die Gefahr von Explosion, Feuer, Hitze, Rauch und/oder Gasentwicklung.
• Nehmen Sie die Batterie sofort aus dem Wasser, wenn sie versehentlich hineingefallen ist. Legen Sie die Batterie in einen sicheren, offenen Bereich und halten Sie sich fern, bis sie vollständig getrocknet ist. Verwenden Sie die getrocknete Batterie
nicht wieder, sondern entsorgen Sie diese wie in Kapitel 10.2 angegeben.
2 Beschreibung und Funktion
2.1 Produkt
Dieses Produkt ist ein leistungsstarker Standventilator, der Belüftung in 3 verschiedenen Stufen und unterschiedlichen Modi erzeugt.
○ mit Fernbedienung und Timer
○ 3 Leistungsstufen: Leicht, Stark, Turbo
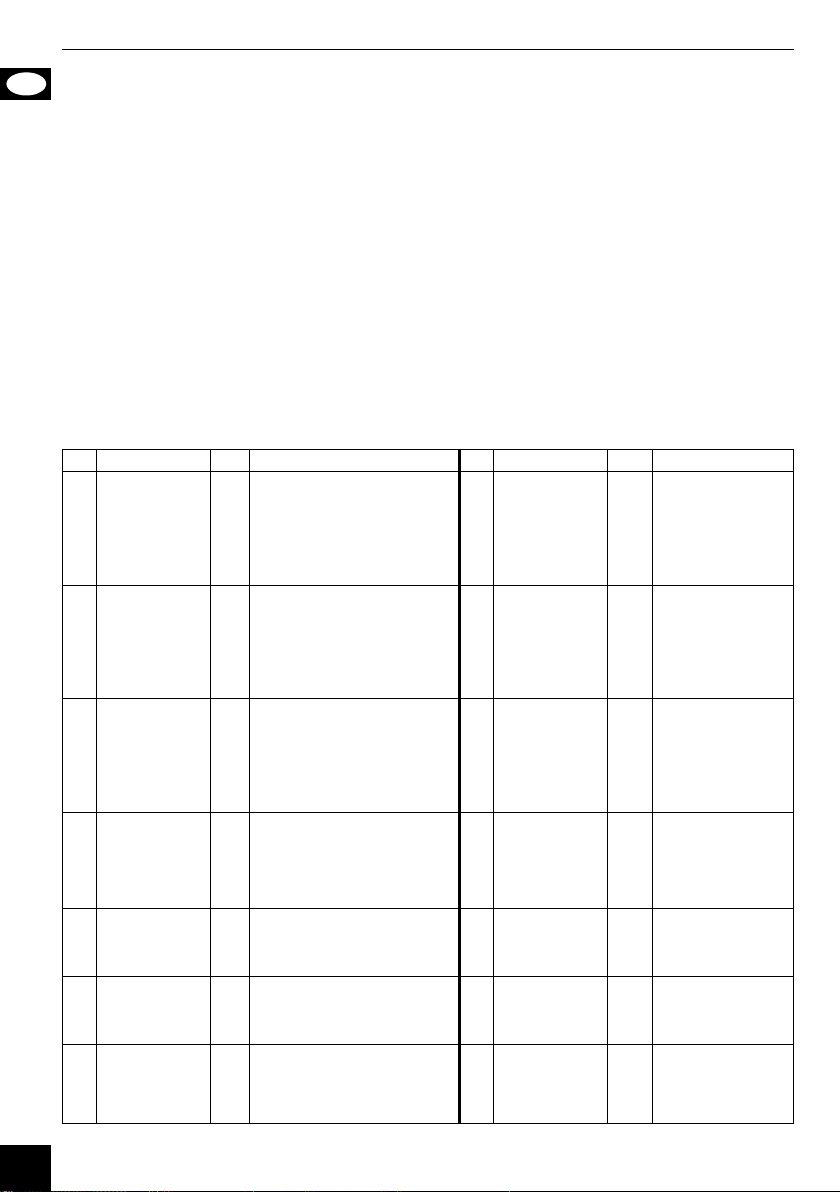
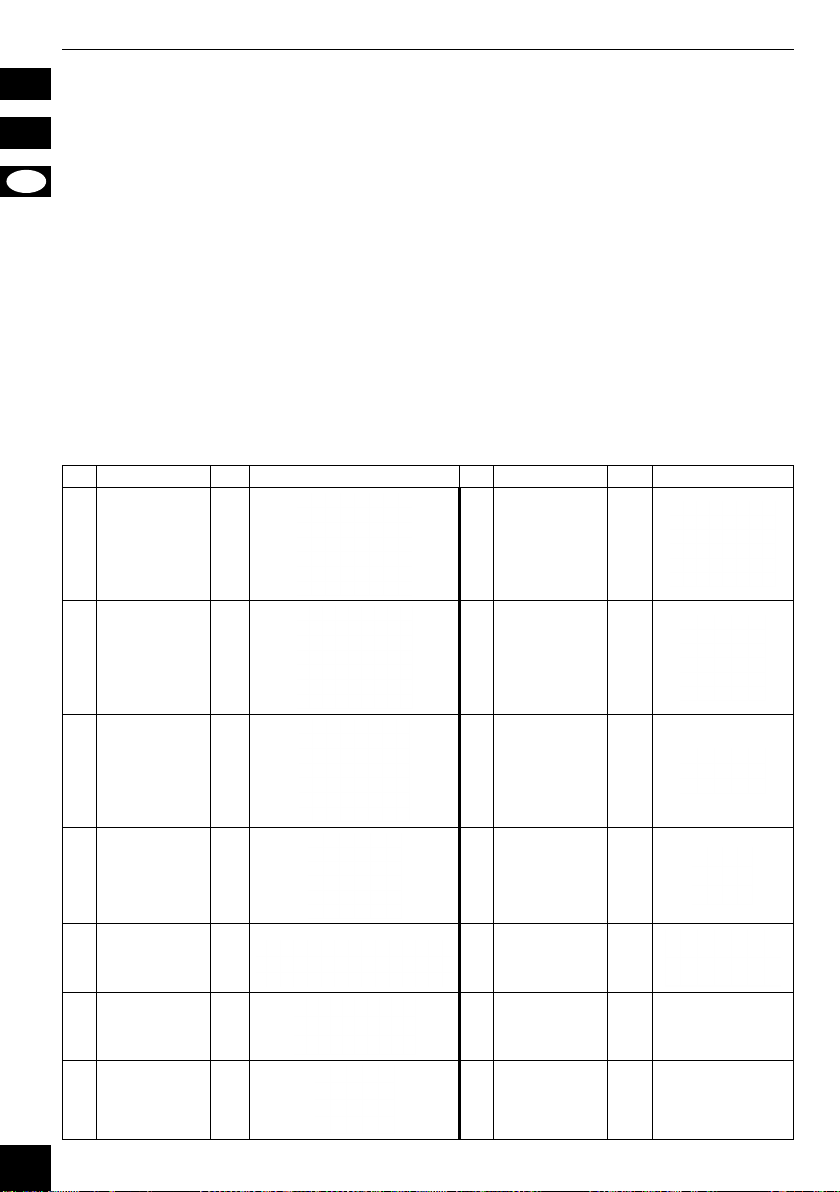
2.2 Lieferumfang
Nr. Beschreibung Stk. Abbildung Nr. Beschreibung Stk. Abbildung
1 Sockel 1
Hinteres
2
Schutzgitter
Vorderes
Schutzgitter mit
3
Versiegelungs-
klemmen
4 Rotor 1 11
Ständer mit Funk-
tionstasten, Sta-
5
tusanzeigen und
Motorblock
6 Sockelschraube 1 13
7 Unterlegscheibe 1
1 9 Fixierschraube 1
1 10
1 12 Fernbedienung 1
8 Fixiermutter 1
Kreuzschlitz-
schraube
Ø x L =
4,4 x 9,2 mm
Schraubenmutter
Ø = 4,9 mm
Lithium-
Knopfzelle
(CR2025)
14 Betriebsanleitung 1 -
1
1
1 -
3
Page 5

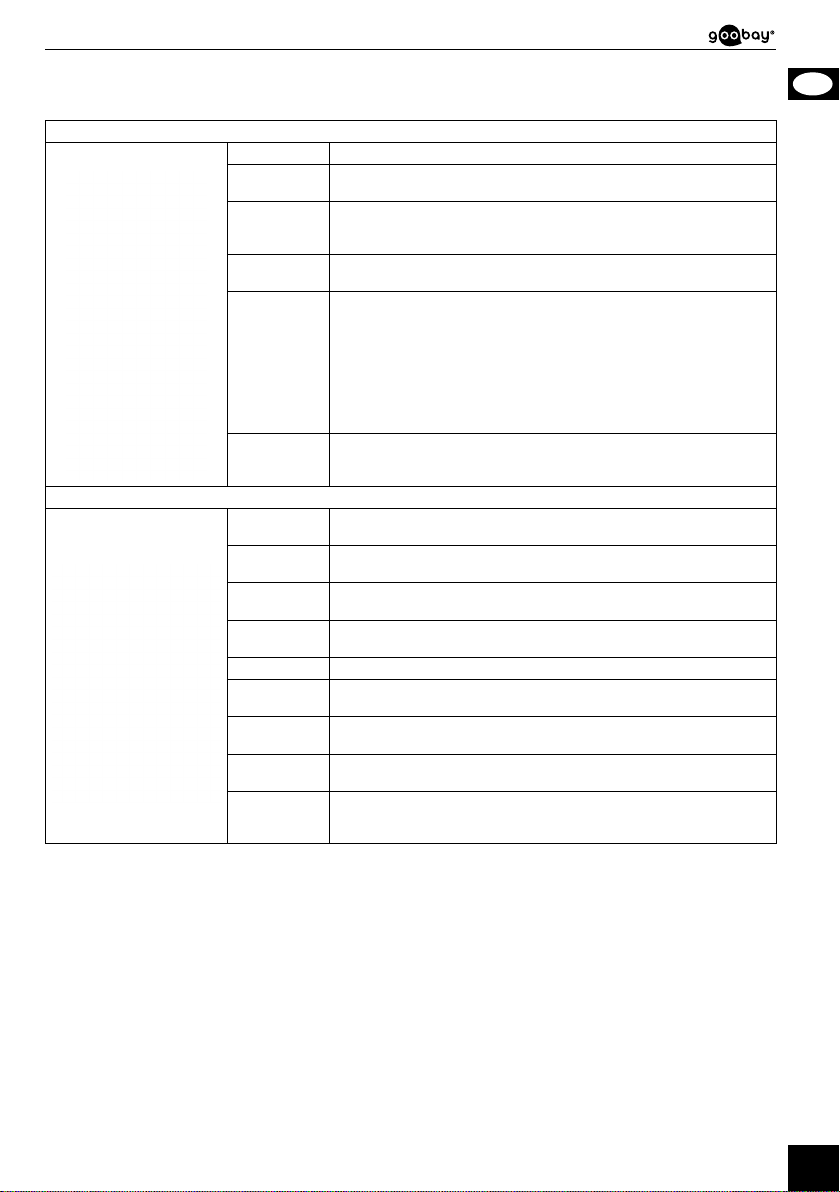
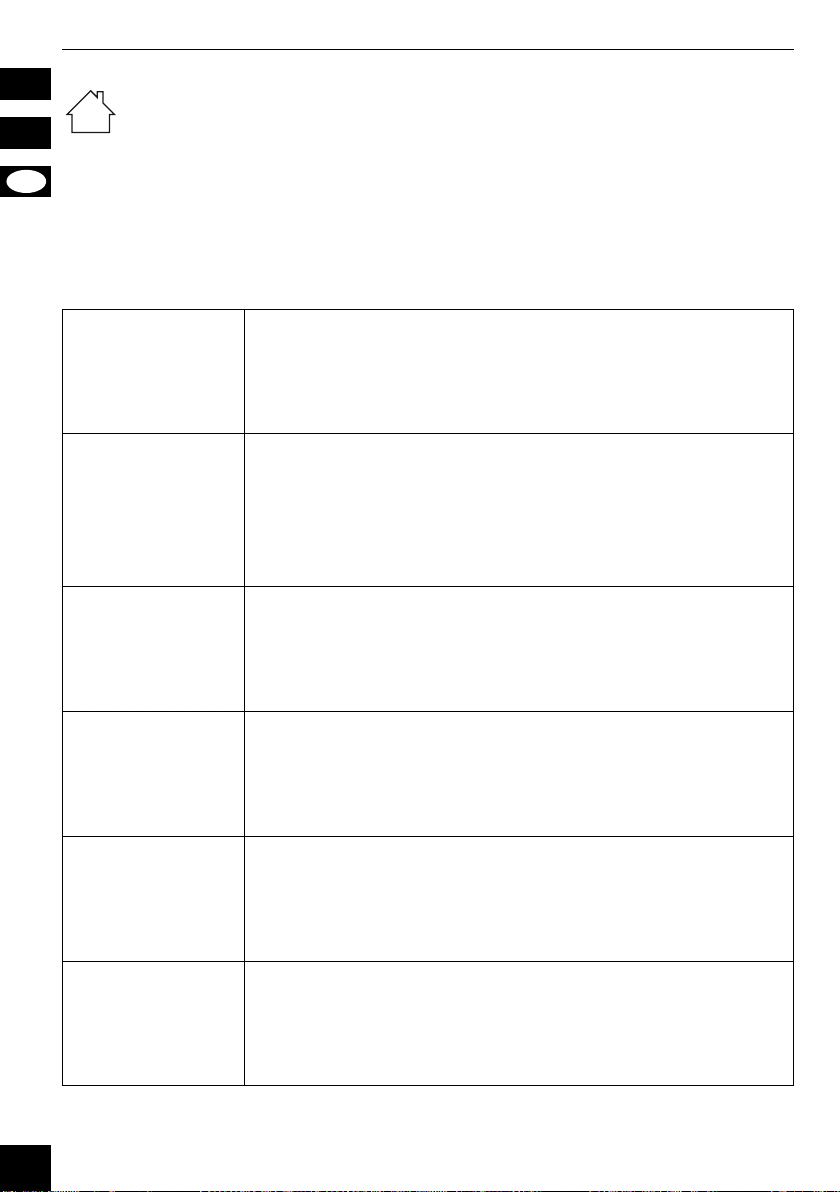
2.3 Bedienelemente
2.4 Technische Daten
Artikelnummer 59509
Eingang 220-240 V
Nennleistung 45 W
Ventilator Leistungsaufnahme (P) 38,1 W
Leistungsaufnahme im Bereitschaftszustand (P
Max. Volumenstrom (F) 33,5 m³/min
Serviceverhältnis (SV) 0,9 (m³/min)/W
Messnorm für die Ermittlung des Serviceverhältnisses IEC 60879:2019
Max. Luftgeschwindigkeit (c) 2,0 m/s
Schallleistungspegel (L
Schutzart / Schutzklasse
Geräteanschluss Eurostecker (Typ C, CEE 7/16)
Kabellänge (inkl. Stecker) 1,6 m
Maße
B x H x T
Ø
Farbe weiß-grau
Gewicht 4550 g
Typ Infrarot
Eingangsspannung 3,0 V
Maße | Gewicht 40 x 86 x 7 | 11 g
Typ Lithium-Knopfzelle (CR2025)
Nennspannung, Kapazität 3,0 V
Gewicht 3 g
) 58 dB(A)
WA
) 0,4 W
SB
IPX0 / II
39 x 125 x 39 cm
Fernbedienung
Batterie
43 cm
15 Statusanzeigen
16 Funktionstasten
17 Netzkabel mit
Eurostecker
18 Feststellschraube
19 Feststellring
20 Batteriefach
, 50 Hz
, 150-165 mAh
DE
4
Page 6

Betriebsanleitung
3 Bestimmungsgemäßer Gebrauch
DE
schweren Unfällen, Personen- und Sachschäden führen.
IPX0: Dieses Produkt ist nicht gegen Wasser geschützt.
4 Vorbereitung
Dieses Produkt ist ausschließlich für den privaten Gebrauch und den dafür vorgesehenen Zweck geeignet. Dieses Produkt
ist nicht für den gewerblichen Gebrauch bestimmt. Eine andere als in Kapitel „Beschreibung und Funktion“ bzw. in den
„Sicherheitshinweisen“ beschriebene Verwendung ist nicht gestattet. Dieses Produkt darf nur in trockenen Innenräumen
benutzt werden. Das Nichtbeachten und Nichteinhalten dieser Bestimmungen und der Sicherheitshinweise kann zu
1. Kontrollieren Sie den Lieferumfang auf Vollständigkeit und Unversehrtheit.
2. Vergleichen Sie die technischen Daten von Produkt und Stromnetz.
Diese müssen identisch sein.
5 Montage
1. Stecken Sie den Ständer (5) in den Sockel (1).
2. Legen Sie Ständer und Sockel auf die Seite, so dass Sie die Unterseite vom Sockel sehen
können.
VORSICHT! Der Sockel ist schwer!
• Achten Sie darauf, dass keine Finger oder Gliedmaßen unter dem Sockel eingeklemmt werden!
3. Platzieren Sie die Unterlegscheibe (7) über dem Loch in der Mitte des Sockels.
4. Stecken Sie die Sockelschraube (6) mit der Gewindeseite durch die Unterlegscheibe.
5. Drehen Sie die Sockelschraube im Uhrzeigersinn fest.
Der Ständer und der Sockel sind nun fest miteinander verbunden.
6. Stellen Sie Ständer und Sockel wieder auf.
7. Schieben Sie das hintere Schutzgitter (2) auf die Achse des Motorblocks (5).
Achten Sie dabei darauf, dass das Loch am Rand des hinteren Schutzgitters unten ist.
8. Schieben Sie die Fixiermutter (8) auf die Achse des Motorblocks.
9. Drehen Sie die Fixiermutter im Uhrzeigersinn fest.
Das hintere Schutzgitter ist nun befestigt.
10. Schieben Sie den Rotor (4) auf die Achse des Motorblocks.
Achten Sie darauf, dass die Aussparungen auf der Rückseite des Rotors über den Stiften auf
der Motorachse liegen.
11. Schieben sie die Fixierschraube (9) auf die Achse des Motorblocks.
12. Drehen Sie die Fixierschraube gegen den Uhrzeigersinn fest.
Der Rotor ist nun befestigt.
13. Hängen Sie das vordere Schutzgitter (3) mit dem Haken an das hintere Schutzgitter.
Achten Sie dabei darauf, dass das Loch am Rand des vorderen Schutzgitters dem Loch am
Rand des hinteren Schutzgitters gegenübersteht.
14. Schieben Sie die 4 Verriegelungsklemmen, die sich jeweils seitlich am vorderen Schutzgitter
benden, über die Rahmen von beiden Schutzgittern.
15. Schieben Sie die Kreuzschlitzschraube (10) durch die Löcher der beiden Schutzgitter.
16. Fixieren Sie die Kreuzschlitzschraube mit der Schraubenmutter (11).
17. Drehen Sie die Kreuzschlitzschraube im Uhrzeigersinn fest.
Das vordere Schutzgitter ist nun befestigt und der Ventilator ist einsatzbereit.
5
Page 7
6 Funktionstasten und Statusanzeigen
Der Ventilator verfügt über 5 Funktionstasten und 12 Statusanzeigen.
In der nachfolgenden Tabelle werden die Funktionstasten und die Statusanzeigen erläutert.
Funktionstasten
Bezeichnung Beschreibung
ON/SPEED
SWING
MODE
TIMER
OFF
POW
SLE
NAT
NOR
SW Wenn die Statusanzeige leuchtet, ist die Oszillationsfunktion aktiviert.
H
M
4H, 2H,
1H, 0.5H
Drücken Sie die Taste, um den Ventilator einzuschalten. Drücken Sie die Taste
erneut, um die Leistungsstufe auszuwählen.
Drücken Sie die Taste, um die Oszillationsfunktion ein- oder auszuschalten.
Wenn die Oszillationsfunktion angeschaltet ist, bewegt sich der Ventilator hin
und her.
Drücken Sie die Taste, um den gewünschten Modus einzustellen. Sie können
zwischen den Modi NORMAL, NATURAL und SLEEP wählen.
Drücken Sie die Taste, um die Timerfunktion zu aktivieren. Drücken Sie die Taste erneut, um die Dauer der Timerfunktion zu verlängern.
Sie können die Timerfunktion in einem Intervall von einer halben Stunde einstellen (0,5h, 1h, 1,5h, 2h, 2,5h, 3h, 3,5h, 4h, 4,5h, 5h, 5,5h, 6h, 6,5h, 7h, 7,5h).
Nachdem die eingestellte Zeit abgelaufen ist, schaltet sich der Ventilator selbst
aus. Um die Timerfunktion zu beenden, drücken Sie die Taste bis alle Status-
anzeigen für den Timer (4H, 2H, 1H, 0.5H) erloschen sind. Alternativ können
Sie den Ventilator aus- und wieder einschalten, um den eingestellten Timer zu
löschen.
Drücken Sie die Taste, um den Ventilator auszuschalten. Die eingestellte Leistungsstufe und der eingestellte Modus bleiben gespeichert und sind aktiv, wenn
sie den Ventilator wieder einschalten.
Statusanzeigen
Wenn die Statusanzeige leuchtet, ist der Ventilator mit dem Stromnetz verbunden.
Wenn die Statusanzeige leuchtet, ist der Modus SLEEP aktiv. Der Ventilator
führt ein Programm von unterschiedlichen Gebläsestufen aus.
Wenn die Statusanzeige leuchtet, ist der Modus NATURAL aktiv. Der Ventilator
führt ein Programm von unterschiedlichen Gebläsestufen aus.
Wenn die Statusanzeige leuchtet, ist der Modus NORMAL aktiv. Der Ventilator
erzeugt gleichmäßig Gebläse in der eingestellten Leistungsstufe.
Wenn die Statusanzeige leuchtet, ist die Leistungsstufe H eingestellt. Der Ventilator erzeugt starkes Gebläse.
Wenn die Statusanzeige leuchtet, ist die Leistungsstufe M eingestellt. Der Ventilator erzeugt mittelstarkes Gebläse.
Wenn die Statusanzeige leuchtet, ist die Leistungsstufe L eingestellt. Der Venti-
L
lator erzeugt leichtes Gebläse.
Wenn eine der Statusanzeigen leuchtet, ist die Timerfunktion für die angegebe-
ne Zeit aktiv. Wenn mehrere der Statusanzeigen leuchten, ist die Timerfunktion
für die zusammengerechnete Zeit aktiv.
DE
7 Fernbedienung
7.1 Fernbedienung aktivieren
• Ziehen Sie den Kontaktschutz aus dem Batteriefach (20).
Die Fernbedienung ist nun aktiviert.
6
Page 8

Betriebsanleitung
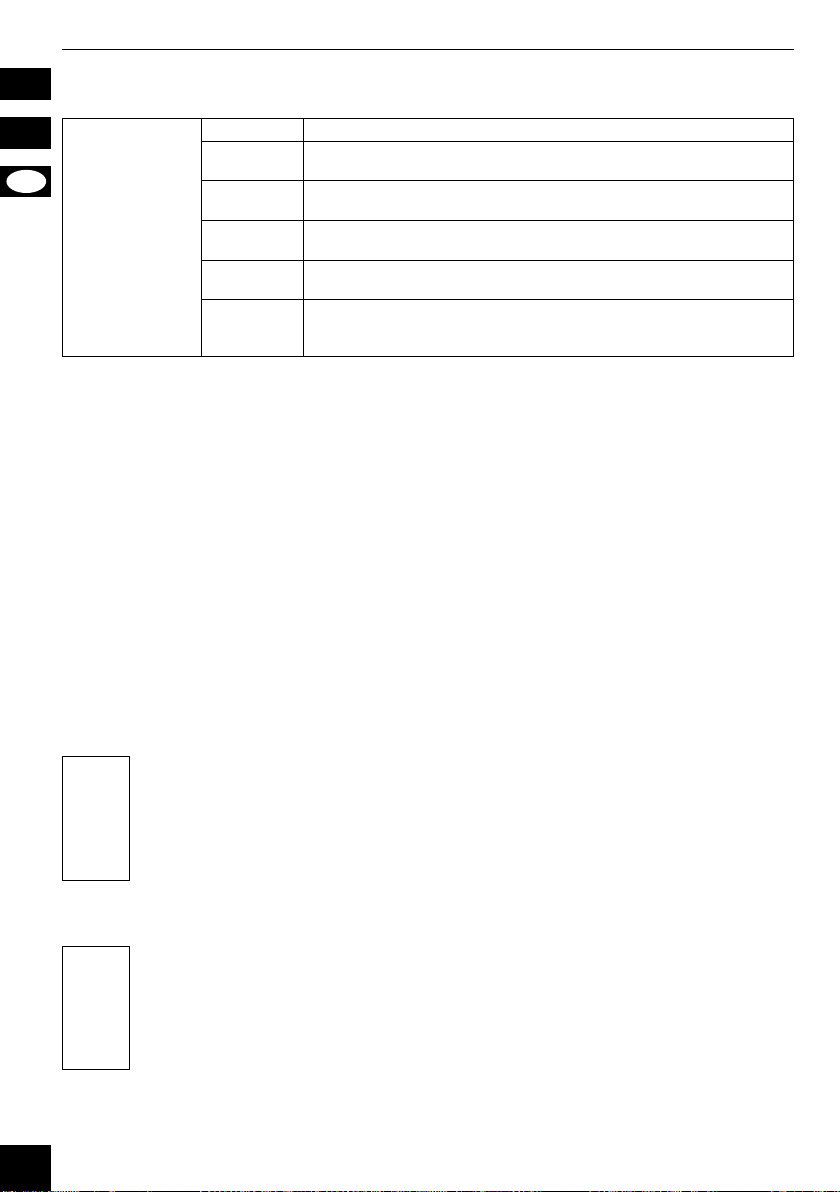
7.2 Erläuterung der Tasten
DE
Sie können den Ventilator alternativ über die Fernbedienung steuern.
In der nachfolgenden Tabelle wird die Funktion der Tasten auf der Fernbedienung beschrieben.
Bezeichnung Beschreibung
OFF Drücken Sie die Taste, um den Ventilator auszuschalten.
TIMER
MODE Drücken Sie die Taste, um den gewünschten Modus einzustellen.
SWING Drücken Sie die Taste, um die Oszillationsfunktion ein- oder auszuschalten.
Drücken Sie die Taste, um die Timerfunktion zu aktivieren. Drücken Sie die Taste erneut, um die Dauer der Timerfunktion zu verlängern.
ON/SPEED
7.3 Batterie wechseln
Tauschen Sie die leere Batterie bei Bedarf mit einer neuen gleichen Typs. Siehe hierzu Kapitel 2.4.
1. Öffnen Sie das Batteriefach (20), indem sie den kleinen Hebel zur Seite drücken und dann das Batteriefach herausziehen.
2. Entnehmen Sie die leere Batterie.
3. Legen Sie die neue Batterie mit dem Pluspol nach oben in das Batteriefach.
4. Schieben Sie das Batteriefach wieder zu.
5. Entsorgen Sie die leere Batterie fachgerecht.
Lesen Sie hierzu auch das Kapitel 10.2.
Drücken Sie die Taste, um den Ventilator einzuschalten. Drücken Sie die Taste erneut,
um die Leistungsstufe auszuwählen.
8 Anschluss Bedienung
8.1 Inbetriebnahme
1. Wählen Sie einen geeigneten Standort für den Ventilator aus.
Achten Sie dabei insbesondere auf die in Kapitel 1 „Sicherheitshinweise“ genannten Bedingungen.
2. Schließen Sie das Netzkabel (17) des Ventilators an eine freie und gut zugängliche Steckdose an.
3. Drehen Sie die Vorderseite des Ventilators in die Richtung, in die Sie lüften wollen.
Der Ventilator ist nun betriebsbereit.
4. Stellen Sie mit Hilfe der Funktionstasten (16) oder der Fernbedienung (12) die Leistungsstufe, den Modus und die Timerfunk-
tion ein.
5. Schalten Sie den Ventilator nach Gebrauch aus.
8.2 Höhe einstellen
Sie können die Höhe des Ventilators von 108 bis 128 cm einstellen.
1. Ziehen Sie das Netzkabel aus der Steckdose, bevor Sie die Höhe einstellen.
2. Drehen Sie den Feststellring (19) gegen den Uhrzeigersinn, um ihn zu lösen.
3. Beschweren Sie den Sockel mit Ihrem Fuß und greifen Sie den Ventilator am Gehäuse, wo sich die Funktionstas-
ten und die Statusanzeigen benden.
4. Schieben Sie den oberen Teil des Ventilators hoch oder runter, bis Sie die gewünschte Höhe eingestellt haben
und halten Sie den Ventilator auf dieser Position.
5. Drehen Sie mit der anderen Hand den Feststellring im Uhrzeigersinn, um ihn festzuziehen.
Die Höhe des Ventilators ist nun eingestellt.
8.3 Neigungswinkel einstellen
Sie können außerdem den Neigungswinkel des Ventilators einstellen.
1. Ziehen Sie das Netzkabel aus der Steckdose, bevor Sie den Neigungswinkel einstellen.
2. Drehen Sie die Feststellschraube (18) gegen den Uhrzeigersinn, um ihn zu lösen.
3. Fassen Sie den Ventilator am Schutzgitter und bewegen Sie ihn entlang der horizontalen Achse hin und her, bis
Sie den gewünschten Neigungswinkel eingestellt haben. Halten Sie den Ventilator an dieser Position.
4. Drehen Sie mit der anderen Hand die Feststellschraube im Uhrzeigersinn, um sie festzuziehen.
Der Neigungswinkel des Ventilators ist nun eingestellt.
7
Page 9
9 Wartung, Pege, Lagerung und Transport
Das Produkt ist wartungsfrei.
ACHTUNG! Sachschäden
• Ziehen Sie vor jeder Reinigung den Netzstecker.
• Verwenden Sie zum Reinigen nur ein trockenes und weiches Tuch.
• Verwenden Sie keine Reinigungsmittel und Chemikalien.
• Lagern Sie das Produkt bei längerem Nichtgebrauch für Kinder unzugänglich und in trockener und staubgeschützter Umgebung.
• Entnehmen Sie die Batterien / Akkus bei längerem Nichtgebrauch.
• Kontrollieren Sie regelmäßig den festen Sitz des Produktes/der Schrauben.
• Lagern Sie das Produkt kühl und trocken.
• Heben Sie die Originalverpackung für den Transport auf.
• Lassen Sie Wartungs-, Demontage und Reparaturarbeiten nur von Fachpersonal durchführen.
10 Entsorgungshinweise
10.1 Produkt
Elektrische und elektronische Geräte dürfen nach der europäischen WEEE Richtlinie nicht mit dem Hausmüll entsorgt werden.
Deren Bestandteile müssen getrennt der Wiederverwertung oder Entsorgung zugeführt werden, weil giftige und gefährliche
Bestandteile bei unsachgemäßer Entsorgung die Gesundheit und Umwelt nachhaltig schädigen können.
Sie sind als Verbraucher nach dem Elektrogesetz (ElektroG) verpichtet, elektrische und elektronische Geräte am Ende ihrer
Lebensdauer an den Hersteller, die Verkaufsstelle oder an dafür eingerichtete, öffentliche Sammelstellen kostenlos zurückzugeben.
Einzelheiten dazu regelt das jeweilige Landesrecht. Das Symbol auf dem Produkt, der Betriebsanleitung und/oder der Verpackung
weist auf diese Bestimmungen hin. Mit dieser Art der Stofftrennung, Verwertung und Entsorgung von Altgeräten leisten Sie einen wich-
tigen Beitrag zum Schutz unserer Umwelt.
WEEE Nr.: 82898622
10.2 Batterien
Batterien und Akkumulatoren dürfen nicht mit dem Hausmüll entsorgt werden. Deren Bestandteile müssen getrennt der
Wiederverwertung oder Entsorgung zugeführt werden, weil giftige und gefährliche Bestandteile bei unsachgemäßer
Entsorgung die Umwelt nachhaltig schädigen können. Sie sind als Verbraucher verpichtet, diese am Ende ihrer Lebensdauer
an den Hersteller, die Verkaufsstelle oder an dafür eingerichtete, öffentliche Sammelstellen kostenlos zurückzugeben.
Einzelheiten dazu regelt das jeweilige Landesrecht. Das Symbol auf dem Produkt, der Betriebsanleitung und/oder der Verpackung
weist auf diese Bestimmungen hin. Mit dieser Art der Stofftrennung, Verwertung und Entsorgung von Altbatterien und -akkumulatoren
leisten Sie einen wichtigen Beitrag zum Schutz unserer Umwelt.
D-34000-1998-0099
DE
10.3 Verpackung
Verpackungen können kostenlos in den entsprechenden Sammelstellen entsorgt werden - Papier in der Papiertonne,
Kunststoffe im gelben Sack und Glas im Altglas-Container.
DE4535302615620
11 EU-Konformitätserklärung
Mit dem CE-Zeichen erklärt Goobay®, eine registrierte Marke der Wentronic GmbH, dass das Produkt die grundlegenden
Anforderungen und Richtlinien der europäischen Bestimmungen erfüllt.
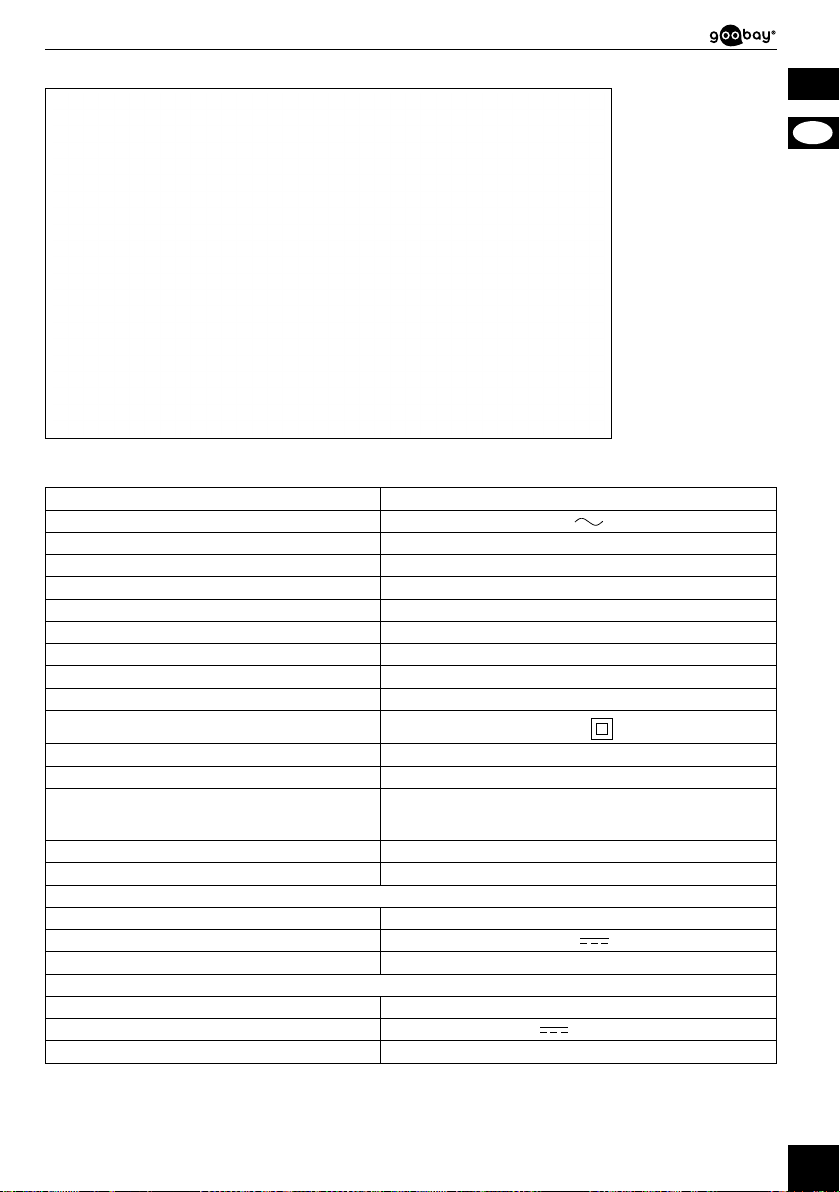
12 Verwendete Symbole
Nur zur Verwendung im Innenbereich IEC 60417- 5957
Wechselspannung IEC 60417- 5032
Gleichspannung IEC 60417- 5031
Recycling ISO 7001 - PI PF 066
Schutzklasse II IEC 60417- 5172
8
Page 10

User Manual
USER MANUAL
EN
Table of contents
1 Safety instructions �������������������������������������������������������������������������������� 10
2 DescriptionandFunction ���������������������������������������������������������������������� 11
2�1 Product �������������������������������������������������������������������������������������������������� 11
2.2 ScopeofDelivery ����������������������������������������������������������������������������������� 11
2.3 OperatingElements ������������������������������������������������������������������������������� 12
2.4 Specications �����������������������������������������������������������������������������������������12
3 Intended Use ���������������������������������������������������������������������������������������� 13
4 Preparation ������������������������������������������������������������������������������������������� 13
5 Assembly ���������������������������������������������������������������������������������������������� 13
6 Function buttons and status indicators ������������������������������������������������� 14
7 Remote control ������������������������������������������������������������������������������������� 14
7�1 Activating the remote control �����������������������������������������������������������������14
7.2 Explanationofthebuttons ���������������������������������������������������������������������15
7�3 Changing the battery �����������������������������������������������������������������������������15
8 Connectionandoperation ��������������������������������������������������������������������� 15
8�1 Commissioning ��������������������������������������������������������������������������������������15
8�2 Adjusting the height �������������������������������������������������������������������������������15
8�3 Adjusting the tilt angle ����������������������������������������������������������������������������15
9 Maintenance,Care,StorageandTransport ������������������������������������������ 16
10Disposalinstructions ����������������������������������������������������������������������������� 16
10�1 Product ��������������������������������������������������������������������������������������������������16
10�2 Batteries ������������������������������������������������������������������������������������������������� 16
10�3 Packaging ���������������������������������������������������������������������������������������������� 16
11 EU Declaration of conformity ���������������������������������������������������������������� 16
12 Symbols used ��������������������������������������������������������������������������������������� 16
9
Page 11

1 Safety instructions
The user manual is part of the product and contains important information for correct use.
• Read the user manual completely and carefully before use.
The user manual must be available for uncertainties and passing the product.
• Keep this user manual.
Risk of electric shock
When the product comes into contact with water, this may cause an electric shock.
• Do not use the product with wet hands.
• Do not use the product in the immediate vicinity of water, such as bathtubs, washbasins or pools.
Rain splashing on the product may cause an electric shock.
• Do not place the product near an open window.
Voltage-free only with pulled plug.
• In case of emergency, after use and during a thunderstorm, pull the mains plug out of the socket directly at the plug housing.
• Do not open the housing.
• Do not modify product and accessories.
• Do not short-circuit connectors and circuits.
• Check regularly that the appliance cable is still intact.
• Do not use the product if the cable is damaged.
A defective device may not be put into operation, but must be disconnected from mains and protected against further use.
• Use product, product parts and accessories only in perfect condition.
• In case of questions, defects, mechanical damage, trouble and other problems non-recoverable by the documentation, contact
your dealer or producer.
• Do not repair defective products yourself, but contact the dealer or the manufacturer.
Risk of entry
Rotating parts can pull loose clothing and hair. This may result in injuries or damage to the device.
• Keep hair and loose clothing away from rotating parts.
• Make sure that the fan is not near curtains or other objects that could be pulled into the fan.
Risk of injury by moving product parts
There are moving parts behind the blade guard of the fan.
• Do not insert your nger or other objects through the blade guard.
This may result in injuries or damage to the device
• Only operate the device if the blade guard is closed and in good order.
• Do not use the device if the blade guard is damaged.
• Switch the device off and unplug the power cord before removing the blade guard.
• Always pull the product by the plug, not the cable.
Tripping hazard
• Mind placing cables in a way that nobody will be disabled and the cable not be damaged.
Caused to different risk levels and hazard potentials some working steps only may be done by trained specialists.
• Assembly, operation, maintenance, storage, transport and disposal may only be carried out by end users and users with basic
mechanical and electrical knowledge.
• Disassembly, maintenance work and repairs may only be carried out by trained specialists.
Special safety measures, expertise and tools are required for this.
Not recommended for children and people with physical and/or mentally limited capabilities.
• Secure the product against accidental use.
• Secure packaging, small parts and insulation against accidental use.
Operation and storage conditions
• NEVER leave the product unattended while in operation.
• Do not cover the product.
• Keep fan slots and vents free.
• Do not operate the product in dusty environments or in areas with inadequate ventilation.
• Do not operate the fan in the vicinity of explosive and/or ammable gases.
• Do not place or operate the product near open ames, cooking appliances or devices that generate heat such as radiators or
stoves.
• Place, install and transport product, product parts and accessories in a safe way.
• Place the product on a stable, level, dry and dust-free surface so that it cannot tip over during operation and the surface cannot
be damaged by vibrations.
• Make sure that the product stands securely.
The fan must not stand on the mains cable so that it does not tip over during operation.
• Avoid stresses such as heat and cold, moisture and direct sunlight, microwaves, vibrations and mechanical pressure.
• Switch off the device and disconnect it from the mains when not in use, for cleaning or in the event of a malfunction.
Battery hazards
The remote control is equipped with a lithium button cell. It can be replaced.
• Keep batteries out of the reach of children.
If swallowed, there is a risk of severe internal burns or even death. Seek immediate medical attention if you believe someone may
have swallowed or otherwise ingested the battery.
• Never use batteries when they are dented, leaked or damaged.
• Remove leaked, deformed or corroded batteries from the product and dispose them by appropriate protectives.
If a battery has leaked, avoid contact with skin, eyes and mucous membranes. If necessary, rinse affected areas with water and seak
EN
10
Page 12

User Manual
medical attention immediately.
• Do not deform, burn or disassemble batteries and never puncture them with a sharp object.
Extreme heat can lead to explosion and/or leakage of corrosive liquid. Mechanical damage can cause gaseous substances to escape,
which can be highly irritating, ammable or toxic.
EN
• Do not short-circuit batteries or immerse them in liquids.
There is a risk of explosion, re, heat, smoke and/or gas development.
• If the battery is accidentally dropped into water, remove it immediately. Place the battery in a safe, open area and stay away
until it is completely dry. Do not reuse the dried battery, but dispose of it as indicated in chapter 10.2.
2 Description and Function
2.1 Product
This product is a powerful pedestal fan that generates ventilation at 3 different levels and in different modes.
○ with remote control and timer
○ 3 power levels: light, strong, turbo
2.2 Scope of Delivery
No. Designation Pcs. Description No. Designation Pcs. Description
1 Base 1
2 Rear blade guard 1 9 Fixing screw 1
Front blade guard
3
4 Rotor 1 11
5
6 Base screw 1 13
7 Washer 1
with
locking clips
Stand with function buttons, sta-
tus indicators and
motor block
1 10
1 12 Remote control 1
8 Fixing nut 1
Phillips screw
Ø x L =
4.4 x 9.2 mm
Screw nut
Ø = 4.9 mm
Lithium button cell
(CR2025)
14 User Manual 1 -
1
1
1 -
11
Page 13
2.3 Operating Elements
2.4 Specications
Article number 59509
Input 220-240 V
Rated power 45 W
Fan power input (P) 38.1 W
Standby power consumption (P
Max. fan ow rate (F) 33.5 m³/min
Service value (SV) 0.9 (m³/min)/W
Measurement standard for service value IEC 60879:2019
Max. air velocity (c) 2.0 m/s
Fan sound power level (L
Protection level / Protection class
Device connection Euro plug (Type C. CEE 7/16)
Cable length (incl. plug) 1.6 m
Dimensions
W x H x D
Ø
Colour white-grey
Weight 4550 g
Type Infrared
Input voltage 3.0 V
Dimensions | Weight 40 x 86 x 7 | 11 g
Typ Lithium button cell (CR2025)
Nominal voltage, Capacity 3.0 V
Weight 3 g
) 0.4 W
SB
) 58 dB(A)
WA
Remote control
Battery
, 50 Hz
IPX0 / II
39 x 125 x 39 cm
43 cm
, 150-165 mAh
15 Status indicators
16 Function buttons
17 Mains cable with
euro plug
18 Locking screw
19 Locking ring
20 Battery compartment
EN
12
Page 14
User Manual
3 Intended Use
EN
IPX0: This product is not protected against water.
4 Preparation
This product is intended exclusively for private use and its intended purpose. This product is not intended for commercial
use. We do not permit using the device in other ways like described in chapter „Description and Function“ or in the „Safety
Instructions“. Use the product only in dry interior rooms. Not attending to these regulations and safety instructions might
cause fatal accidents, injuries, and damages to persons and property.
1. Check the scope of delivery for completeness and integrity.
2. Compare the specications of product and power supply.
These must be identical.
5 Assembly
1. Insert the stand (5) into the base (1).
2. Place the stand and the base on their sides so that you can see the underside of the base.
CAUTION! The base is heavy!
• Make sure that no ngers or limbs are wedged under the base!
3. Place the washer (7) over the hole in the centre of the base.
4. Insert the base screw (6) with the threaded side in the washer.
5. Tighten the base screw clockwise.
The stand and the base are now rmly connected to each other.
6. Put the stand and the base back in place.
7. Slide the rear blade guard (2) on the axle of the motor block (5).
Make sure that the hole at the edge of the rear blade guard is at the bottom.
8. Slide the xing nut (8) onto the axle of the motor block.
9. Tighten the xing nut clockwise.
The rear blade guard is now xed.
13
10. Push the rotor (4) onto the axle of the motor block.
Make sure that the recesses on the back of the rotor are over the pins on the motor axle.
11. Slide the xing screw (9) onto the axle of the motor block.
12. Tighten the xing screw anticlockwise.
The rotor is now xed.
13. Hang the front blade guard (3) onto the rear blade guard with the hook.
Make sure that the hole on the edge of the front blade guard faces the hole on the edge of the
rear blade guard.
14. Slide the 4 locking clips, each located on the side of the front blade guard, over the frames of
both blade guards.
15. Push the Phillips screw (10) through the holes of both blade guards.
16. Fix the Phillips screw with the screw nut (11).
17. Tighten the Phillips screw clockwise.
The front blade guard is now xed and the fan is ready for use.
Page 15
6 Function buttons and status indicators
The fan has 5 function buttons and 12 status indicators.
In the following table, the function buttons and the status indicators are explained.
Function buttons
Designation Description
ON/SPEED
SWING
MODE
TIMER
OFF
POW When the status indicator lights up, the fan is connected to the mains.
SLE
NAT
NOR
SW When the status indicator lights up, the oscillation function is activated.
H
M
4H, 2H,
1H, 0.5H
Press the button to switch on the fan. Press the button again to select the power level.
Press the button to switch the oscillation function on or off. When the oscillation
function is switched on, the fan moves from side to side.
Press the button to set the desired mode. You can choose between the modes
NORMAL, NATURAL and SLEEP.
Press the button to activate the timer function. Press the button again to extend
the duration of the timer function.
You can set the timer function at half-hour intervals (0.5h, 1h, 1.5h, 2h, 2.5h, 3h,
3.5h, 4h, 4.5h, 5h, 5.5h, 6h, 6.5h, 7h, 7.5h).
After the set time has elapsed, the fan switches itself off. To end the timer func-
tion, press the button until all status displays for the timer (4H, 2H, 1H, 0.5H)
have gone out. Alternatively, you can switch the fan off and on again to clear
the set timer.
Press the button to switch off the fan. The set power level and mode remain sa-
ved and are active when you switch the fan on again.
Status indicators
When the status indicator lights up, the SLEEP mode is active. The fan runs a
programme of different fan speeds.
When the status indicator lights up, the NATURAL mode is active. The fan is
running a programme of different fan speeds.
When the status indicator lights up, the NORMAL mode is active. The fan is ge-
nerating a steady ow of air at the set power level.
When the status indicator lights up, the power level H is set. The fan generates
strong airow.
When the status indicator lights up, the power level M is set. The fan generates
medium-strong airow.
When the status indicator lights up, the power level L is set. The fan generates
L
light airow.
If one of the status indicators lights up, the timer function is active for the spe-
cied time. If several of the status indicators light up, timer function covers the
sum of the active time intervals.
EN
7 Remote control
7.1 Activating the remote control
• Pull the contact protector out of the battery compartment (20).
The remote control is now activated.
14
Page 16
User Manual
7.2 Explanation of the buttons
You can also control the fan via the remote control.
The following table describes the function of the buttons on the remote control.
EN
7.3 Changing the battery
If necessary, replace the empty battery with a new one of the same type. See chapter 2.4.
1. Open the battery compartment (20) by pushing the small lever to the side and then pulling out the battery compartment.
2. Remove the empty battery.
3. Place the new battery in the battery compartment with the positive pole facing upwards.
4. Close the battery compartment again.
5. Dispose of the empty battery properly.
See also chapter 10.2.
Designation Description
OFF Press the button to switch off the fan.
TIMER
MODE Press the button to set the desired mode.
SWING Press the button to switch the oscillation function on or off.
ON/SPEED Press the button to switch on the fan. Press the button again to select the power level.
Press the button to activate the timer function. Press the button again to extend the duration of the timer function.
8 Connection and operation
8.1 Commissioning
1. Select a suitable location for the fan.
Pay particular attention to the requirements mentioned in chapter 1 „Safety instructions“.
2. Connect the fan‘s mains cable (17) to a free and easily accessible socket.
3. Turn the front of the fan in the direction you want to ventilate.
The fan is now ready for operation.
4. Set the power level, mode and timer function using the function buttons (16) or the remote control (12).
5. Switch off the fan after use.
8.2 Adjusting the height
You can adjust the height of the fan from 108 to 128 cm.
1. Unplug the mains cable from the socket before adjusting the height.
2. Turn the locking ring (19) anticlockwise to loosen it.
3. Weight down the base with your foot and grasp the fan by the housing where the function buttons and status indicators are located.
4. Slide the upper part of the fan up or down until you have set the desired height and hold the fan at this position.
5. With the other hand, turn the locking ring clockwise to tighten it.
The height of the fan is now adjusted.
8.3 Adjusting the tilt angle
You can also adjust the fan‘s tilt angle.
1. Unplug the mains cable from the socket before adjusting the tilt angle.
2. Turn the locking screw (18) anticlockwise to loosen it.
3. Hold the fan by the blade guard and move it back and forth along the horizontal axis until you have set the desired tilt angle. Hold the fan in this position.
4. With the other hand, turn the locking screw clockwise to tighten it.
The fan‘s tilt angle is now adjusted.
15
Page 17
9 Maintenance, Care, Storage and Transport
The product is maintenance-free.
NOTICE! Material damage
• Always disconnect the mains plug before cleaning.
• Only use a dry and soft cloth for cleaning.
• Do not use detergents or chemicals.
• Store the product out of the reach of children and in a dry and dust-protected environment when not in use.
• Remove batteries / rechargeable batteries when not in use.
• Regularly check the tightness of product/screws.
• Store cool and dry.
• Keep and use the original packaging for transport.
• Have maintenance, disassembly and repair work carried out by qualied personnel only.
10 Disposal instructions
10.1 Product
According to the European WEEE directive, electrical and electronic equipment must not be disposed with consumers waste.
Its components must be recycled or disposed apart from each other. Otherwise contaminative and hazardous substances can
damage the health and pollute the environment.
As a consumer, you are committed by law to dispose electrical and electronic devices to the producer, the dealer, or public
collecting points at the end of the devices lifetime for free. Particulars are regulated in national right. The symbol on the product, in the
user manual, or at the packaging alludes to these terms. With this kind of waste separation, application, and waste disposal of used
devices you achieve an important share to environmental protection.
WEEE No: 82898622
10.2 Batteries
(Rechargeable) batteries must not be disposed of with household waste. Their components have to be supplied separately to
the recycling or disposal, because toxic and dangerous ingredients can harm the environment if not disposed of sustainably.
As a consumer, you are obliged to return them at the end of their service lives to the manufacturer, the sales outlet or
established for this purpose, public collection points for free. Details regulates the respective country‘s law. The symbol on the
product, the instruction manual and / or the packaging draws attention to those provisions. With this kind of material separation,
recovery and disposal of waste (rechargeable) batteries you make an important contribution to protecting our environment.
D-34000-1998-0099
10.3 Packaging
Packaging can be disposed of free of charge at the suitable collection points – paper belongs in paper bins, plastics belong in
yellow sacks and glass belongs in used glass bins.
DE4535302615620
EN
11 EU Declaration of conformity
With the CE sign Goobay®, a registered trademark of the Wentronic GmbH ensures, that the product is conformed to the
basic European standards and directives.
12 Symbols used
For indoor use only IEC 60417- 5957
Alternating current IEC 60417- 5032
Direct current IEC 60417- 5031
Recycling ISO 7001 - PI PF 066
Class II equipment IEC 60417- 5172
16
Page 18

Mode d‘emploi
MODE D‘EMPLOI
Table des matières
FR
1 Consignes de sécurité �������������������������������������������������������������������������� 18
2 Descriptionetfonction �������������������������������������������������������������������������� 19
2�1 Produit ���������������������������������������������������������������������������������������������������19
2�2 Contenu de la livraison ��������������������������������������������������������������������������19
2�3 Eléments de commande ������������������������������������������������������������������������ 20
2.4 Spécications �����������������������������������������������������������������������������������������20
3 Utilisationprévue ���������������������������������������������������������������������������������� 21
4 Préparation ������������������������������������������������������������������������������������������� 21
5 Montage ������������������������������������������������������������������������������������������������ 21
6 Boutons de fonction et indicateurs d‘état ���������������������������������������������� 22
7 Télécommande ������������������������������������������������������������������������������������� 22
7�1 Activation de la télécommande �������������������������������������������������������������� 22
7.2 Explicationdesboutons ������������������������������������������������������������������������� 23
7.3 Remplacementdelapile �����������������������������������������������������������������������23
8 Connexion et fonctionnement ��������������������������������������������������������������� 23
8�1 Mise en service �������������������������������������������������������������������������������������� 23
8�2 Réglage de la hauteur ���������������������������������������������������������������������������23
8�3 Réglage de l‘angle d‘inclinaison ������������������������������������������������������������23
9 Maintenance,Entretien,StockageetTransport ������������������������������������ 24
10Instructionspourl’élimination ��������������������������������������������������������������� 24
10�1 Produit ���������������������������������������������������������������������������������������������������24
10�2 Batteries ������������������������������������������������������������������������������������������������� 24
10�3 Emballages �������������������������������������������������������������������������������������������� 24
11 Déclaration UE de conformité ��������������������������������������������������������������� 24
12 Symboles utilisés ���������������������������������������������������������������������������������� 24
17
Page 19

1 Consignes de sécurité
Le mode d‘emploi fait partie intégrante du produit et comprend d‘importantes informations pour une bonne installation et une bonne
utilisation.
• Lisez le mode d‘emploi attentivement et complètement avant de l‘utiliser.
Le mode d‘emploi doit être disponible à des incertitudes et transfert du produit.
• Conservez soigneusement ce mode d‘emploi.
Risque de choc électrique
Lorsque le produit entre en contact avec de l‘eau, cela peut provoquer un choc électrique.
• N’utilisez pas le produit avec des mains humides.
• N‘utilisez pas le produit à proximité immédiate de l‘eau, comme les baignoires, les lavabos ou les piscines.
La pluie éclaboussant le produit peut provoquer un choc électrique.
• Ne posez pas le produit près d’une fenêtre ouverte.
Sans surcharge de tension uniquement lorsque le bouchon est tiré.
• En cas d‘urgence, après l‘utilisation et pendant un orage, retirez la che secteur de la prise directement au niveau du boîtier de
la che.
• Ne pas ouvrir le boîtier.
• Ne modiez pas le produit et les accessoires.
• Pas court-circuiter des connexions et circuits.
• Vériez régulièrement si le câble de l’appareil est encore intact.
• N’utilisez pas le produit si le câble est endommagé.
Un appareil défectueux ne doit pas être mis en service. Il doit au contraire être immédiatement mis hors tension et protégé contre toute utilisation involontaire.
• Utilisez le produit, pièces et accessoires des produits uniquement en parfait état.
• En cas de questions, les défauts, les dommages mécaniques, des ingérences et d‘autres problèmes, non récupérables par la
documentation, contactez votre revendeur ou le producteur.
• Ne réparez pas vous-même les produits défectueux, mais contactez le revendeur ou le fabricant.
Risque de happement
Les pièces rotatives peuvent happer les vêtements légers et les cheveux. Cela pourrait provoquer des blessures ou endommager l’appareil.
• Tenez vos cheveux et vêtements lâches à l’écart des pièces rotatives.
• Veillez à ne pas poser le ventilateur à proximité de rideaux ou d’objets pouvant être aspirés.
Risque de blessure par le mouvement des composants du produit
Derrière la grille protectrice du ventilateur se trouvent des pièces mobiles.
• N’insérez pas vos doigts ni d’objets à travers la grille protectrice
Cela pourrait provoquer des blessures ou endommager l’appareil.
• N’utilisez l’appareil qu’avec une grille protectrice fermée et intacte.
• N’utilisez pas l’appareil si la grille protectrice est endommagée.
• Éteignez l’appareil et débranchez la che secteur avant de retirer la grille protectrice.
• Tirez toujours le produit par la che, et non par le câble.
Risque de trébucher
• Faire attention à placer les câbles de sorte que qu‘ils ne soient pas endommagés et que personne ne soit entravé.
A cause de risques de niveaux différents et de dangers potentiels, certains travaux ne peuvent être effectués que par des spécialistes entraînés.
• Le montage, l‘utilisation, l‘entretien, le stockage, le transport et l‘élimination ne doivent être effectués que par des utilisateurs naux et des utilisateurs ayant des connaissances mécaniques et électriques de base.
• Le démontage, les travaux d‘entretien et les réparations ne doivent être effectués que par des spécialistes qualiés.
Des mesures de sécurité, des compétences et des outils spéciaux sont nécessaires à cet effet.
Non recommandé pour les enfants et les personnes dont les capacités physiques et/ou mentaux limités.
• Protégez le produit contre toute utilisation accidentelle.
• Sécuriser l‘emballage, petites pièces et l‘isolation contre l‘utilisation accidentelle.
Exploitation et les conditions de stockage
• NE JAMAIS laisser sans surveillance pendant l‘opération.
• Ne couvrez pas le produit.
• Gardez les fentes de ventilation et les évents libre.
• N’utilisez pas le produit dans des environnements poussiéreux ou insufsamment aérés.
• N’utilisez pas le produit à proximité de gaz explosifs et/ou inammables.
• N’installez et n’utilisez pas le produit à proximité de ammes nues et de produits de cuisson ou générant de la chaleur comme
les radiateurs ou les fours.
• Placer, installer et transporter le produit, pièces et accessoires des produits d‘une manière secure.
• Placez le produit sur une surface stable, plane, sèche et sans poussière an qu‘il ne puisse pas basculer pendant le fonctionnement et que la surface ne soit pas endommagée par les vibrations.
• Veillez à ce que le produit tienne bien debout.
Le ventilateur ne doit pas reposer sur le câble secteur an qu‘il ne se renverse pas pendant le fonctionnement.
• Éviter des conditions extrêmes, telles que la chaleur extrême et froid, l‘humidité et de la lumière directe du soleil, ainsi que microondes, des vibrations et de la pression mécanique.
• Éteignez l‘appareil et débranchez-le du secteur lorsque vous ne l‘utilisez pas, pour le nettoyer ou en cas de dysfonctionnement.
Risques de batterie
La télécommande est équipée d‘une pile bouton au lithium. Elle peut être remplacée.
FR
18
Page 20
Mode d‘emploi
• Tenez les piles à l’écart des enfants.
En cas d’ingestion, cela peut provoquer de graves brûlures internes et la mort. Si vous pensez que la pile a été avalée ou a été ingérée de quelque manière que ce soit, consultez immédiatement un médecin.
• N’utilisez jamais des piles cabossées, endommagées ou qui fuient.
• Retirer expiré, les cellules déformées ou corrodées au moyen de dispositifs de sécurité appropriés à partir du produit et en disposer.
Si une pile a fui, évitez tout contact avec la peau, les yeux et les muqueuses. Si nécessaire, rincez les zones touchées à l‘eau et faites
immédiatement appel à un médecin.
FR
• Ne déformez pas, ne brûlez pas et ne démontez pas les piles et ne les perforez jamais avec un objet pointu.
Une chaleur extrême peut entraîner une explosion et/ou une fuite de liquide corrosif. Les dommages mécaniques peuvent provoquer
la fuite de substances gazeuses, qui peuvent être très irritantes, inammables ou toxiques.
• Ne court-circuitez pas les piles et ne les plongez pas dans des liquides.
Il y a un risque d‘explosion, d‘incendie, de chaleur, de fumée et/ou de dégagement de gaz.
• Si la batterie est accidentellement tombée dans l‘eau, retirez-la immédiatement. Placez la batterie dans un endroit sûr et ouvert
et tenez-vous à l‘écart jusqu‘à ce qu‘elle soit complètement sèche. Ne réutilisez pas la batterie sèche, mais jetez-la comme indiqué au chapitre 10.2.
2 Description et fonction
2.1 Produit
Ce produit est un puissant ventilateur sur pied qui génère une ventilation à 3 niveaux différents et en plusieurs modes.
○ avec télécommande et minuterie
○ 3 niveaux de puissance : léger, fort, turbo
2.2 Contenu de la livraison
N° Désignation Pcs. Description N° Désignation Pcs. Description
1 Base 1
Grille protectrice
2
arrière
Grille protectrice
3
avant avec clips
de verrouillage
4 Rotor 1 11
Support avec bou-
tons de fonction,
5
indicateurs d‘état et
bloc moteur
6 Vis de la base 1 13
7 Rondelle 1
1 9 Vis de xation 1
1 10
1 12 Télécommande 1
8 Écrou de xation 1
Vis cruciforme
Ø x L =
4,4 x 9,2 mm
Écrou
Ø = 4,9 mm
Pile bouton au
lithium (CR2025)
14 Mode d‘emploi 1 -
1
1
1 -
19
Page 21

2.3 Eléments de commande
2.4 Spécications
Numéro de l‘article 59509
Entrée 220-240 V
Puissance nominale 45 W
Puissance absorbée (P) 38,1 W
Consommation d’électricité en mode «veille» (P
Débit d’air maximal (F) 33,5 m³/min
Valeur de service (SV) 0,9 (m³/min)/W
Norme de mesure de la valeur de service IEC 60879:2019
Vitesse maximale de l’air (c) 2,0 m/s
Niveau de puissance acoustique (L
Degré de protection / Classe de protection
Raccordement d’appareil Fiche Euro (type C, CEE 7/16)
Longueur du câble (incl. Fiche) 1,6 m
Dimensions
B x I x H
Ø
Couleur blanc-gris
Poids 4550 g
Type Infrarouge
Tension d‘entrée 3,0 V
Dimensions | Poids 40 x 86 x 7 | 11 g
Type Pile bouton au lithium (CR2025)
Tension nominale, Capacité 3,0 V
Poids 3 g
) 0,4 W
SB
) 58 dB(A)
WA
Télécommande
Batterie
, 50 Hz
IPX0 / II
39 x 125 x 39 cm
43 cm
, 150-165 mAh
15 Indicateurs d‘état
16 Boutons de fonction
17 Câble secteur avec
che Euro
18 Vis de verrouillage
19 Bague de verrouillage
20 Compartiment des
piles
FR
20
Page 22
Mode d‘emploi
3 Utilisation prévue
blessures et dommages à la personne et à ses biens.
IPX0 : Ce produit n‘est pas protégé contre l‘eau.
FR
4 Préparation
Ce produit est exclusivement destiné à un usage privé et aux ns initialement prévues. Ce produit n’est pas destiné à un
usage commercial. Nous n’autorisons pas l’utilisation du dispositif d’une façon différente de celle décrite au chapitre
„Description et Fonctions“ et „Consignes de sécurité“. Utilisez le produit uniquement dans des espaces intérieurs secs. Ne
pas respecter ces instructions de sécurité et points de règlement est susceptible de provoquer des accidents mortels,
1. Vériez le contenu de livraison pour l‘exhaustivité et l‘intégrité.
2. Comparez les caractéristiques techniques du produit et du réseau électrique.
Ces données doivent être identiques.
5 Montage
1. Insérez le support (5) dans la base (1).
2. Placez le support et la base sur leurs côtés de manière à pouvoir voir le dessous de la base.
ATTENTION ! La base est lourde !
• Veillez à ce qu‘aucun doigt ou membre ne soit coincé sous la base !
3. Placez la rondelle (7) sur le trou situé au centre de la base.
4. Insérez la vis de la base (6) avec le côté leté à travers la rondelle.
5. Serrez la vis de la base dans le sens des aiguilles d‘une montre.
Le support et la base sont maintenant fermement reliés l‘un à l‘autre.
6. Remettez le support et la base en place.
7. Faites glisser la grille protectrice arrière (2) sur l‘axe du bloc moteur (5).
Veillez à ce que le trou situé sur le bord de la grille protectrice arrière se trouve en bas.
8. Faites glisser l‘écrou de xation (8) sur l‘axe du bloc moteur.
9. Serrez l‘écrou de xation dans le sens des aiguilles d‘une montre.
La grille protectrice arrière est maintenant xée.
21
10. Poussez le rotor (4) sur l‘axe du bloc moteur.
Veillez à ce que les évidements à l‘arrière du rotor se trouvent sur les goupilles de l‘axe du
moteur.
11. Faites glisser la vis de xation (9) sur l‘axe du bloc moteur.
12. Serrez la vis de xation dans le sens inverse des aiguilles d‘une montre.
Le rotor est maintenant xé.
13. Accrochez la grille protectrice avant (3) sur la grille protectrice arrière à l‘aide du crochet.
Assurez-vous que le trou sur le bord de la grille protectrice avant fait face au trou sur le bord
de la grille protectrice arrière.
14. Faites glisser les 4 clips de verrouillage, situés chacun sur le côté de la grille protectrice avant,
sur les cadres des deux grilles protectrices.
15. Faites passer la vis cruciforme (10) dans les trous des deux grilles protectrices.
16. Fixez la vis cruciforme avec l‘écrou (11).
17. Serrez la vis cruciforme dans le sens des aiguilles d‘une montre.
La grille protectrice avant est maintenant xée et le ventilateur est prêt à être utilisé.
Page 23

6 Boutons de fonction et indicateurs d‘état
Le ventilateur comporte 5 boutons de fonction et 12 indicateurs d‘état.
Dans le tableau suivant, les boutons de fonction et les indicateurs d‘état sont expliqués.
Boutons de fonction
Désignation Description
ON/SPEED
SWING
MODE
TIMER
OFF
POW Lorsque l‘indicateur d‘état s‘allume, le ventilateur est connecté au secteur.
SLE
NAT
NOR
SW Lorsque l‘indicateur d‘état s‘allume, la fonction d‘oscillation est activée.
H
M
4H, 2H,
1H, 0.5H
Appuyez sur le bouton pour mettre le ventilateur en marche. Appuyez à nouveau sur le bouton pour sélectionner le niveau de puissance.
Appuyez sur le bouton pour activer ou désactiver la fonction d‘oscillation. Lorsque la fonction d‘oscillation est activée, le ventilateur se déplace d‘un côté à
l‘autre.
Appuyez sur le bouton pour régler le mode souhaité. Vous avez le choix entre
les modes NORMAL, NATURAL et SLEEP.
Appuyez sur le bouton pour activer la fonction de minuterie. Appuyez à nouveau
sur le bouton pour prolonger la durée de la fonction de minuterie.
Vous pouvez régler la fonction de minuterie par intervalles d‘une demi-heure
(0,5h, 1h, 1,5h, 2h, 2,5h, 3h, 3,5h, 4h, 4,5h, 5h, 5,5h, 6h, 6,5h, 7h, 7,5h).
Une fois le temps programmé écoulé, le ventilateur s‘arrête de lui-même. Pour
mettre n à la fonction minuterie, appuyez sur le bouton jusqu‘à ce que tous les
afchages d‘état de la minuterie (4H, 2H, 1H, 0.5H) s‘éteignent. Vous pouvez
également éteindre et rallumer le ventilateur pour effacer la minuterie réglée.
Appuyez sur le bouton pour arrêter le ventilateur. Le niveau de puissance et le
mode réglés restent enregistrés et sont actifs lorsque vous remettez le ventilateur en marche.
Indicateurs d‘état
Lorsque l‘indicateur d'état s'allume, le mode SLEEP est actif. Le ventilateur exécute un programme de différentes vitesses de ventilation.
Lorsque l‘indicateur d‘état s‘allume, le mode NATURAL est actif. Le ventilateur
exécute un programme de différentes vitesses de ventilation.
Lorsque l‘indicateur d'état s'allume, le mode NORMAL est actif. Le ventilateur
génère un ux d'air constant au niveau de puissance déni.
Lorsque l‘indicateur d‘état s‘allume, le niveau de puissance H est réglé. Le ven-
tilateur génère un ux d‘air fort.
Lorsque l‘indicateur d‘état s‘allume, le niveau de puissance M est réglé. Le ven-
tilateur génère un ux d‘air moyennement fort.
Lorsque l'indicateur d'état s'allume, le niveau de puissance L est déni. Le ven-
L
tilateur génère un ux d'air léger.
Si l'un des indicateurs d'état s'allume, la fonction de minuterie est active pour la
durée spéciée. Si plusieurs des indicateurs d'état s'allument, la fonction de minuterie est active pendant la durée totale.
FR
7 Télécommande
7.1 Activation de la télécommande
• Retirez la protection de contact du compartiment des piles (20).
La télécommande est maintenant activée.
22
Page 24
Mode d‘emploi
7.2 Explication des boutons
Vous pouvez également commander le ventilateur à l‘aide de la télécommande.
Le tableau suivant décrit la fonction des boutons de la télécommande.
Désignation Description
OFF Appuyez sur le bouton pour arrêter le ventilateur.
FR
TIMER
MODE Appuyez sur le bouton pour régler le mode souhaité.
SWING Appuyez sur le bouton pour activer ou désactiver la fonction d‘oscillation.
Appuyez sur le bouton pour activer la fonction de minuterie. Appuyez à nouveau sur le
bouton pour prolonger la durée de la fonction de minuterie.
ON/SPEED
7.3 Remplacement de la pile
Si nécessaire, remplacez la pile vide par une nouvelle pile du même type. Voir le chapitre 2.4.
1. Ouvrez le compartiment de piles (20) en poussant le petit levier sur le côté, puis en tirant sur le compartiment de piles.
2. Retirez la pile vide.
3. Placez la nouvelle pile dans son compartiment avec le pôle positif vers le haut.
4. Refermez le compartiment de piles.
5. Mettez la pile vide au rebut de manière appropriée.
Voir également le chapitre 10.2.
Appuyez sur le bouton pour mettre le ventilateur en marche. Appuyez à nouveau sur le
bouton pour sélectionner le niveau de puissance.
8 Connexion et fonctionnement
8.1 Mise en service
1. Choisissez un emplacement approprié pour le ventilateur.
Faites particulièrement attention aux conditions mentionnées dans le chapitre 1 „Consignes de sécurité“.
2. Branchez le câble secteur (17) du ventilateur sur une prise libre et facilement accessible.
3. Tournez l‘avant du ventilateur dans la direction où vous voulez ventiler.
Le ventilateur est maintenant prêt à fonctionner.
4. Réglez le niveau de puissance, le mode et la fonction de minuterie à l‘aide des boutons de fonction (16) ou de la télécommande (12).
5. Éteignez le ventilateur après utilisation.
8.2 Réglage de la hauteur
Vous pouvez régler la hauteur du ventilateur de 108 à 128 cm.
1. Débranchez le câble secteur de la prise avant de régler la hauteur.
2. Tournez la bague de verrouillage (19) dans le sens inverse des aiguilles d‘une montre pour la desserrer.
3. Appuyez sur la base avec votre pied et saisissez le ventilateur par le boîtier où se trouvent les boutons de fonction et les indicateurs d‘état.
4. Faites glisser la partie supérieure du ventilateur vers le haut ou vers le bas jusqu‘à ce que vous ayez réglé la
hauteur souhaitée et maintenez le ventilateur dans cette position.
5. De l‘autre main, tournez la bague de verrouillage dans le sens des aiguilles d‘une montre pour la serrer.
La hauteur du ventilateur est maintenant réglée.
8.3 Réglage de l‘angle d‘inclinaison
Vous pouvez également régler l‘angle d‘inclinaison du ventilateur.
1. Débranchez le câble secteur de la prise avant de régler l‘angle d‘inclinaison.
2. Tournez la vis de verrouillage (18) dans le sens inverse des aiguilles d‘une montre pour la desserrer.
3. Tenez le ventilateur par la grille protectrice et déplacez-le d‘avant en arrière le long de l‘axe horizontal jusqu‘à ce
que vous ayez réglé l‘angle d‘inclinaison souhaité. Maintenez le ventilateur dans cette position.
4. De l‘autre main, tournez la vis de verrouillage dans le sens des aiguilles d‘une montre pour la serrer.
L‘angle d‘inclinaison du ventilateur est maintenant réglé.
23
Page 25
9 Maintenance, Entretien, Stockage et Transport
Le produit est sans entretien.
AVERTISSEMENT! Dommages matériels
• Débranchez toujours la prise de courant avant de nettoyer.
• Utilisez uniquement un chiffon doux et sec pour le nettoyage.
• Ne pas utiliser de détergents et de produits chimiques.
• Conserver le produit hors de la portée des enfants et dans une ambiance sèche et protégé de la poussière lorsqu‘il ne est pas
en cours d‘utilisation.
• Retirez les piles / accus lorsqu‘ils ne sont pas en cours d‘utilisation.
• Vériez régulièrement l‘étanchéité du produit/du vis.
• Endroit frais et sec.
• Conserver et utiliser l‘emballage d‘origine pour le transport.
• Faites effectuer les travaux d‘entretien, de démontage et de réparation uniquement par du personnel qualié.
10 Instructions pour l’élimination
10.1 Produit
Selon la directive européenne DEEE, la mise au rebut des appareils électriques et électroniques avec les déchets
domestiques est strictement interdite. Leurs composants doivent être recyclés ou éliminés de façon séparée. Les composants
toxiques et dangereux peuvent causer des dommages durables à la santé et à l‘environnement s‘ils ne sont pas éliminés
correctement.
Vous, en tant que consommateur, êtes commis par la loi à la mise au rebut des appareils électriques et électroniques auprès du
fabricant, du distributeur, ou des points publics de collecte à la n de la durée de vie des dispositifs, et ce de façon gratuite. Les détails
sont réglementés dans le droit national. Le symbole sur le produit, dans le manuel d‘utilisation, ou sur l‘emballage fait référence à ces
termes. Avec ce genre de séparation des déchets, d‘application et d‘élimination des déchets d‘appareils usagés, vous réalisez une
part importante de la protection de l‘environnement.
No DEEE : 82898622
10.2 Batteries
Batteries (rechargeables) ne doivent pas être jetés avec les ordures ménagères. Leurs composants doivent être fournis
séparément au recyclage ou d‘élimination, parce que les ingrédients toxiques et dangereuses peuvent nuire à l‘environnement
si ne sont pas éliminés de façon durable. En tant que consommateur, vous êtes obligé de les retourner à la n de leur service
vit au fabricant, le point de vente ou établis à cet effet, des points de collecte publics gratuitement. Détails réglemente la loi du
pays respectif. Le symbole sur le produit, le manuel d‘instruction et / ou l‘emballage attire l‘attention sur ces dispositions. Avec ce type
de matériel de séparation, la récupération et l‘élimination des déchets de piles (rechargeables), vous apportez une contribution
importante à la protection de notre environnement.
D-34000-1998-0099
FR
10.3 Emballages
Les emballages peuvent être mis au rebut gratuitement dans les lieux de collecte adaptés - le papier dans le conteneur à
papier, les matériaux plastiques dans le conteneur à plastique et le verre dans le conteneur à verre.
DE4535302615620
11 Déclaration UE de conformité
En utilisant le marquage CE, Goobay®, nom commercial déposé de Wentronic GmbH, déclare que l‘appareil est conforme
aux conditions et directives de base de la réglementation européenne.
12 Symboles utilisés
Pour usage intérieur uniquement IEC 60417- 5957
Courant alternatif IEC 60417- 5032
Courant continu IEC 60417- 5031
Recyclage ISO 7001 - PI PF 066
Classe de protection, Classe II IEC 60417- 5172
24
Page 26

Istruzioni per l‘uso
ISTRUZIONI PER L‘USO
Tabella dei contenuti
1 Istruzioniperlasicurezza ��������������������������������������������������������������������� 26
2 Descrizione e Funzione ������������������������������������������������������������������������ 27
IT
2�1 Produtto �������������������������������������������������������������������������������������������������27
2�2 Contenuto della confezione �������������������������������������������������������������������27
2�3 Elementi di comando �����������������������������������������������������������������������������28
2.4 Speciche ����������������������������������������������������������������������������������������������28
3 Scopod‘utilizzo ������������������������������������������������������������������������������������� 29
4 Preparazione ���������������������������������������������������������������������������������������� 29
5 Montaggio ��������������������������������������������������������������������������������������������� 29
6 Pulsanti di funzione e indicatori di stato ������������������������������������������������ 30
7 Telecomando ���������������������������������������������������������������������������������������� 30
7�1 Attivazione del telecomando ������������������������������������������������������������������ 30
7.2 Spiegazionedeipulsanti ������������������������������������������������������������������������ 31
7�3 Cambiare la batteria ������������������������������������������������������������������������������31
8 Collegamento e funzionamento ������������������������������������������������������������ 31
8�1 Iniziare ���������������������������������������������������������������������������������������������������31
8�2 Regolazione dell‘altezza ������������������������������������������������������������������������ 31
8�3 Regolazione dell‘angolo di inclinazione ������������������������������������������������� 31
9 Manutenzione,cura,conservazioneetrasporto ����������������������������������� 32
10Noteperlosmaltimento ������������������������������������������������������������������������ 32
10�1 Prodotto �������������������������������������������������������������������������������������������������32
10�2 Batterie ��������������������������������������������������������������������������������������������������32
10�3 Imballaggi ����������������������������������������������������������������������������������������������32
11 Dichiarazione di conformità UE ������������������������������������������������������������ 32
12 Simboli utilizzati ������������������������������������������������������������������������������������ 32
25
Page 27

1 Istruzioni per la sicurezza
Le instruzioni per l‘uso è parte integrante del prodotto e contiene importanti informazioni per un uso corretto.
• Leggere attentamente e completamente le istruzioni prima dell‘uso.
Le istruzioni per l‘uso essere disponibile per le incertezze e trasferimento del prodotto.
• Conservare questo istruzioni per l‘uso.
Pericolo di scossa elettrica
Quando il prodotto entra in contatto con l‘acqua, questo può causare una scossa elettrica.
• Non utilizzare il prodotto con le mani bagnate.
• Non utilizzare il prodotto nelle immediate vicinanze di acqua, come vasche da bagno, lavandini o piscine.
Se il prodotto è esposto alla pioggia, può provocare una scossa elettrica.
• Non posizionare il prodotto vicino a una nestra aperta.
Alleviare lo stress solo quando la spina è tirato.
• In caso di emergenza, dopo l‘uso e durante un temporale, estrarre la spina di rete dalla presa direttamente dall‘alloggiamento della spina.
• Non aprire la custodia.
• Non modicare prodotti e accessori.
• Non corto do collegamenti e circuiti.
• Controllare regolarmente che il cavo dell’apparecchio sia ancora intatto.
• Non utilizzare il prodotto se il cavo è danneggiato.
Un apparecchio difettoso non può essere messo in funzione ma deve essere scollegato subito dalla rete elettrica e protetto dall’ulteriore utilizzo involontario.
• Utilizzare il prodotto, le parti del prodotto e gli accessori solo in perfette condizioni.
• In caso di domande, difetti, danni meccanici, interferenze e altri problemi, non recuperabili per la documentazione, rivolgersi al
rivenditore o produttore.
• Non riparare personalmente i prodotti difettosi, ma contattare il rivenditore o il produttore.
Pericolo di risucchio
I componenti rotanti possono risucchiare vestiti ampi e capelli lunghi. Possono vericarsi lesioni o danni al dispositivo.
• Tenere capelli e indumenti larghi lontano dai componenti in rotazione.
• Accertarsi che il ventilatore non sia posizionato accanto a tende o oggetti che potrebbe rimanere impigliati.
Pericolo di lesioni da parti in movimento prodotto
Dietro la griglia di protezione del ventilatore ci sono parti in movimento.
• Non inserire le dita o oggetti di alcun tipo nella griglia di protezione.
Possono vericarsi lesioni o danni al dispositivo.
• Utilizzare il dispositivo solo con griglia di protezione chiusa e integra.
• Non utilizzare il dispositivo se la griglia di protezione è danneggiata.
• Spegnere il dispositivo e scollegare la spina prima di rimuovere la griglia di protezione.
• Tirare sempre il prodotto per la spina, non per il cavo.
Pericolo di inciampare
• Prestare attenzione a collocare i cavi in un modo che nessuno possa scollegarlo accidentalmente provocando danni allo stesso.
A causa di diversi livelli di rischio e delle potenzialità di pericolo, alcune fasi di lavorazione possono essere eseguite solo da personale specializzato.
• Il montaggio, il funzionamento, la manutenzione, l‘immagazzinamento, il trasporto e lo smaltimento devono essere eseguiti
solo da utenti nali e utenti con conoscenze meccaniche ed elettriche di base.
• Lo smontaggio, i lavori di manutenzione e le riparazioni devono essere eseguiti solo da specialisti qualicati.
Per questo sono necessarie misure di sicurezza, competenze e strumenti speciali.
Non raccomandato per i bambini e le persone con capacità siche e / o mentalmente limitato.
• Assicurare il prodotto contro l‘uso accidentale.
• Assicurare l‘imballaggio, le piccole parti e il materiale isolante contro l‘uso accidentale.
Condizioni di funzionamento e di stoccaggio
• MAI lasciare incustodita nché è accesa.
• Non coprire il prodotto.
• Evitare di ostruire le aperture delle ventole e prese d‘aria.
• Non utilizzare il prodotto in ambienti polverosi o in caso di ventilazione difettosa.
• Non utilizzare il prodotto in aree con gas esplosivi e/o inammabili.
• Non posizionare e utilizzare il prodotto vicino a amme libere o apparecchi di cottura o di riscaldamento, come ad esempio termosifoni o forni.
• Luogo, installare e trasportare prodotti, parti e accessori prodotti in modo sicuro.
• Posizionare il prodotto su una supercie stabile, piana, asciutta e priva di polvere in modo che non possa ribaltarsi durante il
funzionamento e che la supercie non possa essere danneggiata dalle vibrazioni.
• Assicurarsi che il prodotto stia in piedi in modo sicuro.
Il ventilatore non deve poggiare sul cavo di rete in modo che non si ribalti durante il funzionamento.
• Evitare condizioni estreme, calore estremo e ispezionata la freddezza, umidità e luce diretta del sole, così come forni a microonde, vibrazioni e pressione meccanica.
• Spegnere l‘apparecchio e scollegarlo dalla rete quando non viene utilizzato, per la pulizia o in caso di malfunzionamento.
Pericoli della batteria
Il telecomando è dotato di una pila a bottone al litio. Può essere sostituita.
• Tenere le batterie fuori dalla portata dei bambini.
IT
26
Page 28

Istruzioni per l‘uso
Se la batteria venisse ingerita potrebbe causare irritazioni gravi e la morte. Se si ipotizza che la batteria sia stata ingerita o assunta in
altro modo, rivolgersi immediatamente a un medico.
• Non utilizzare mai batterie che presentano ammaccature, perdite o danni.
• Rimuovere le cellule scaduti, deformate o corrose mediante opportuni dispositivi di sicurezza dal prodotto e smaltire.
Se una batteria è fuoriuscita, evitare il contatto con la pelle, gli occhi e le mucose. Se necessario, sciacquare immediatamente le aree
colpite con acqua e consultare immediatamente un medico.
• Non deformare, bruciare o smontare le batterie e non forarle mai con un oggetto appuntito.
Il calore estremo può causare esplosioni e/o perdite di liquido corrosivo. I danni meccanici possono causare la fuoriuscita di sostanze
gassose, che possono essere altamente irritanti, inammabili o tossiche.
• Non cortocircuitare le batterie e non immergerle in liquidi.
Esiste il rischio di esplosione, incendio, calore, fumo e/o sviluppo di gas.
IT
• Se la batteria viene accidentalmente fatta cadere in acqua, rimuoverla immediatamente. Posizionare la batteria in un luogo si-
curo e aperto e stare lontano no a quando non è completamente asciutta. Non riutilizzare la batteria asciutta, ma smaltirla
come indicato nel capitolo 10.2.
2 Descrizione e Funzione
2.1 Produtto
Questo prodotto è un potente ventilatore da piedistallo che genera ventilazione in 3 diversi livelli e diverse modalità.
○ con telecomando e timer
○ 3 livelli di potenza: leggero, forte, turbo
2.2 Contenuto della confezione
N° Designazione Pz. Descrizione N° Designazione Pz. Descrizione
1 Base 1
Griglia di prote-
2
zione posteriore
Griglia di prote-
zione anteriore
3
con clip di bloc-
caggio
4 Rotore 1 11
Supporto con pul-
santi di funzione,
5
indicatori di stato
e blocco motore
6 Vite della base 1 13
7 Rondella 1
1 9 Vite di ssaggio 1
1 10
1 12 Telecomando 1
Dado di
8
ssaggio
Vite Phillips
Ø x L =
4,4 x 9,2 mm
Dado
Ø = 4,9 mm
Cella a bottone al
litio (CR2025)
14 Istruzioni per l‘uso 1 -
1
1
1
1 -
27
Page 29

2.3 Elementi di comando
2.4 Speciche
Numero dell‘articolo 59509
Ingresso 220-240 V
Potenza nominale 45 W
Potenza assorbita del ventilatore (P) 38,1 W
Consumo elettrico in modo attesa (P
Portata massima d’aria (F) 33,5 m³/min
Valori di esercizio (SV) 0,9 (m³/min)/W
Norme di misura per il valore di esercizio IEC 60879:2019
Velocità massima dell’aria (c) 2,0 m/s
Livello di potenza sonora del ventilatore (L
Grado di protezione / Classe di protezione
Collegamento apparecchio Spina Euro (tipo C, CEE 7/16)
Lunghezza del cavo (incl. Spina) 1,6 m
Dimensioni
L x P x H
Ø
Colore bianco-grigio
Peso 4550 g
Tipo Infrarossi
Tensione di ingresso 3,0 V
Dimensioni | Peso 40 x 86 x 7 | 11 g
Tipo Cella a bottone al litio (CR2025)
Tensione nominale, Capacità 3,0 V
Peso 3 g
) 0,4 W
SB
) 58 dB(A)
WA
Telecomando
Batteria
, 50 Hz
IPX0 / II
39 x 125 x 39 cm
43 cm
, 150-165 mAh
15 Indicatori di stato
16 Pulsanti di funzione
17 Cavo di rete con
spina Euro
18 Vite di bloccaggio
19 Anello di bloccaggio
20 Vano batterie
IT
28
Page 30

Istruzioni per l‘uso
3 Scopo d‘utilizzo
persone e proprietà.
IPX0: Questo prodotto non è protetto dall‘acqua.
4 Preparazione
IT
Questo prodotto è stato concepito esclusivamente per l’utilizzo privato e per lo scopo da esso previsto. Questo prodotto
non è concepito per l’utilizzo commerciale. Non è consentito l’uso del dispositivo in modo diverso da quello descritto nel
capitolo „Descrizione e Funzione“ o „Istruzioni per la sicurezza“. Usare il prodotto solamente in ambienti interni asciutti. La
mancata osservanza di queste regole e delle istruzioni per la sicurezza può provocare incidenti fatali, lesioni e danni a
1. Controllare fornitura sia completa e garantire l‘integrità.
2. Confronto le speciche del prodotto e alimentazione.
Questi devono essere identici.
5 Montaggio
1. Inserire il supporto (5) nella base (1).
2. Posizionare il supporto e la base sui loro lati in modo da poter vedere il lato inferiore della
base.
ATTENZIONE! La base è pesante!
• Assicurarsi che non ci siano dita o arti incastrati sotto la base!
3. Posizionare la rondella (7) sul foro al centro della base.
4. Inserire la vite della base (6) con il lato lettato attraverso la rondella.
5. Stringere la vite della base in senso orario.
Il supporto e la base sono ora saldamente collegati l‘uno all‘altro.
6. Rimettere il supporto e la base al loro posto.
7. Far scorrere la griglia di protezione posteriore (2) sull‘asse del blocco motore (5).
Assicurarsi che il foro sul bordo della griglia di protezione posteriore sia in basso.
8. Far scorrere il dado di ssaggio (8) sull‘asse del blocco motore.
9. Stringere il dado di ssaggio in senso orario.
La griglia di protezione posteriore è ora ssata.
29
10. Spingere il rotore (4) sull‘asse del blocco motore.
Assicurarsi che gli incavi sul retro del rotore siano sopra i perni dell‘asse del motore.
11. Spingere la vite di ssaggio (9) sull‘asse del blocco motore.
12. Stringere la vite di ssaggio in senso antiorario.
Il rotore è ora ssato.
13. Appendere la griglia di protezione anteriore (3) sulla griglia di protezione posteriore con il gancio.
Assicurarsi che il foro sul bordo della griglia di protezione anteriore sia rivolto verso il foro sul
bordo della griglia di protezione posteriore.
14. Far scorrere le 4 clip di bloccaggio, ciascuna situata sul lato della griglia di protezione anteriore, sui telai di entrambe le griglie di protezione.
15. Spingere la vite Phillips (10) attraverso i fori delle due griglie di protezione.
16. Fissare la vite Phillips con il dado (11).
17. Stringere la vite Phillips in senso orario.
La griglia di protezione anteriore è ora ssata e il ventilatore è pronto per l‘uso.
Page 31

6 Pulsanti di funzione e indicatori di stato
Il ventilatore ha 5 pulsanti di funzione e 12 indicatori di stato.
Nella seguente tabella vengono spiegati i pulsanti di funzione e gli indicatori di stato.
Pulsanti di funzione
Designazione Descrizione
ON/SPEED
SWING
MODE
TIMER
OFF
POW
SLE
NAT
NOR
SW Quando l‘indicatore di stato si accende, la funzione di oscillazione è attivata.
H
M
4H, 2H,
1H, 0.5H
Premere il pulsante per accendere il ventilatore. Premere nuovamente il pulsante per selezionare il livello di potenza.
Premere il pulsante per attivare o disattivare la funzione di oscillazione. Quando
la funzione di oscillazione è attivata, il ventilatore si muove da un lato all‘altro.
Premere il pulsante per impostare la modalità desiderata. È possibile scegliere
tra le modalità NORMAL, NATURAL e SLEEP.
Premere il pulsante per attivare la funzione timer. Premere nuovamente il pulsante per prolungare la durata della funzione timer.
È possibile impostare la funzione timer a intervalli di mezz‘ora (0,5h, 1h, 1,5h,
2h, 2,5h, 3h, 3,5h, 4h, 4,5h, 5h, 5,5h, 6h, 6,5h, 7h, 7,5h).
Trascorso il tempo impostato, il ventilatore si spegne da solo. Per terminare la
funzione del timer, premere il pulsante nché tutte le indicazioni di stato del timer (4H, 2H, 1H, 0.5H) non si sono spente. In alternativa, è possibile spegnere
e riaccendere il ventilatore per cancellare il timer impostato.
Premere il pulsante per spegnere il ventilatore. Il livello di potenza e la modalità
impostati rimangono memorizzati e sono attivi quando si riaccende il ventilatore.
Indicatori di stato
Quando l‘indicatore di stato si accende, il ventilatore è collegato alla rete elettrica.
Quando l‘indicatore di stato si accende, la modalità SLEEP è attiva. Il ventilatore esegue un programma di diverse velocità.
Quando l‘indicatore di stato si accende, la modalità NATURAL è attiva. Il ventilatore esegue un programma di diverse velocità del ventilatore.
Quando l‘indicatore di stato si accende, la modalità NORMAL è attiva. Il ventila-
tore sta generando un usso d‘aria costante al livello di potenza impostato.
Quando l‘indicatore di stato si accende, il livello di potenza H è impostato. Il
ventilatore genera un forte usso d‘aria.
Quando l‘indicatore di stato si accende, viene impostato il livello di potenza M. Il
ventilatore genera un usso d‘aria medio-forte.
Quando l'indicatore di stato si accende, viene impostato il livello di potenza L.
L
La ventola genera un usso d'aria leggero.
Se uno degli indicatori di stato si accende, la funzione timer è attiva per il tempo
specicato. Se diversi indicatori di stato si accendono, la funzione timer è attiva
per il tempo totale.
IT
7 Telecomando
7.1 Attivazione del telecomando
• Estrarre la protezione di contatto dal vano batterie (20).
Il telecomando è ora attivato.
30
Page 32

Istruzioni per l‘uso
7.2 Spiegazione dei pulsanti
Potete anche controllare il ventilatore tramite il telecomando.
La seguente tabella descrive la funzione dei pulsanti del telecomando.
Designazione Descrizione
OFF Premere il pulsante per spegnere il ventilatore.
Premere il pulsante per attivare la funzione timer. Premere nuovamente il pulsante per
prolungare la durata della funzione timer.
IT
TIMER
MODE Premere il pulsante per impostare la modalità desiderata.
SWING Premere il pulsante per attivare o disattivare la funzione di oscillazione.
ON/SPEED
7.3 Cambiare la batteria
Se necessario, sostituire la batteria scarica con una nuova dello stesso tipo. Vedi capitolo 2.4.
1. Aprire il vano batterie (20) spingendo la piccola leva di lato e poi estraendo il vano batterie.
2. Rimuovere la batteria vuota.
3. Posizionare la nuova batteria nel vano batteria con il polo positivo rivolto verso l‘alto.
4. Chiudere nuovamente il vano batteria.
5. Smaltire correttamente la batteria vuota.
Vedi anche il capitolo 10.2.
Premere il pulsante per accendere il ventilatore. Premere nuovamente il pulsante per
selezionare il livello di potenza.
8 Collegamento e funzionamento
8.1 Iniziare
1. Selezionare una posizione adatta per il ventilatore.
Prestare particolare attenzione alle condizioni menzionate nel capitolo 1 „Istruzioni per la sicurezza“.
2. Collegare il cavo di rete (17) del ventilatore a una presa libera e facilmente accessibile.
3. Girare la parte anteriore del ventilatore nella direzione in cui si vuole ventilare.
Il ventilatore è ora pronto per il funzionamento.
4. Impostare il livello di potenza, la modalità e la funzione del timer utilizzando i pulsanti di funzione (16) o il telecomando (12).
5. Spegnere il ventilatore dopo l‘uso.
8.2 Regolazione dell‘altezza
È possibile regolare l‘altezza del ventilatore da 108 a 128 cm.
1. Scollegare il cavo di rete dalla presa prima di regolare l‘altezza.
2. Girare l‘anello di bloccaggio (19) in senso antiorario per allentarlo.
3. Appesantire la base con il piede e afferrare il ventilatore per l‘alloggiamento dove si trovano i pulsanti di funzione
e gli indicatori di stato.
4. Far scorrere la parte superiore del ventilatore verso l‘alto o verso il basso no a impostare l‘altezza desiderata e
tenere il ventilatore in questa posizione.
5. Con l‘altra mano, girare l‘anello di bloccaggio in senso orario per stringerlo.
L‘altezza del ventilatore è ora regolata.
8.3 Regolazione dell‘angolo di inclinazione
È anche possibile regolare l‘angolo di inclinazione del ventilatore.
1. Scollegare il cavo di rete dalla presa prima di regolare l‘angolo di inclinazione.
2. Girare la vite di bloccaggio (18) in senso antiorario per allentarla.
3. Tenere il ventilatore per la griglia di protezione e muoverlo avanti e indietro lungo l‘asse orizzontale nché non si
è impostato l‘angolo di inclinazione desiderato. Tenere il ventilatore in questa posizione.
4. Con l‘altra mano, girare la vite di bloccaggio in senso orario per stringerla.
L‘angolo di inclinazione del ventilatore è ora regolato.
31
Page 33

9 Manutenzione, cura, conservazione e trasporto
Il prodotto è esente da manutenzione.
AVVERTENZA! Danni materiali
• Scollegare sempre la spina di alimentazione prima della pulizia.
• Utilizzare un panno asciutto e morbido solo per la pulizia.
• Non utilizzare detergenti e prodotti chimici.
• Conservare il prodotto fuori dalla portata dei bambini e in un ambiente asciutto e protetto dalla polvere quando non in uso.
• Rimuovere le batterie / batterie ricaricabili quando non in uso.
• Controllare regolarmente la tenuta del prodotto/vite.
• Conservare fresco e asciutto.
• Conservare e utilizzare l‘imballaggio originale per il trasporto.
• Far eseguire i lavori di manutenzione, smontaggio e riparazione solo da personale qualicato.
10 Note per lo smaltimento
10.1 Prodotto
In conformità alla Direttiva Europea WEEE, le attrezzature elettriche ed elettroniche non devono essere smaltite insieme ai
riuti urbani. I componenti devono essere riciclati o smaltiti separatamente. Componenti tossici e pericolosi possono causare
danni permanenti alla salute e all‘ambiente se smaltiti in modo inadeguato.
Il consumatore è obbligato per legge a portare le attrezzature elettriche ed elettroniche presso punti di raccolta pubblici oppure
presso il rivenditore o il produttore al termine della loro durata utile. Devono anche essere osservate tutte le leggi e le normative locali.
Il simbolo apposto sul prodotto, nel manuale o sulla confezione richiama l’attenzione su questi termini. Con questo tipo di raccolta
differenziata e smaltimento dei prodotti usati si contribuisce in modo sostanziale alla protezione dell’ambiente.
WEEE No: 82898622
10.2 Batterie
Batterie (ricaricabili) non devono essere smaltiti insieme ai riuti domestici. I loro componenti devono essere forniti a parte
riciclaggio o lo smaltimento, perché gli ingredienti tossici e pericolosi possono danneggiare l‘ambiente se non smaltiti in modo
sostenibile. Come consumatore, si è obbligati a restituirli al termine della loro vita utile al produttore, il rivenditore o istituiti a tal
ne, i punti di raccolta pubblici gratis. Dettagli regola legge del rispettivo paese. Il simbolo sul prodotto, il manuale di istruzioni
e / o la confezione richiama l‘attenzione a tali disposizioni. Con questo tipo di materiale di separazione, recupero e smaltimento dei
riuti di pile (ricaricabili) si effettua un importante contributo alla tutela del nostro ambiente.
D-34000-1998-0099
10.3 Imballaggi
Gli imballaggi possono essere smaltiti gratuitamente negli appositi punti di raccolta: la carta nella campana, la plastica nel
sacco giallo e il vetro nel contenitore per riuti in vetro.
DE4535302615620
IT
11 Dichiarazione di conformità UE
Usando il marchio CE, Goobay®, un marchio registrato della Wentronic GmbH, dichiarache il dispositivo è conforme ai
requisiti di base ed alle linee guida delle normative Europee.
12 Simboli utilizzati
Solo per uso interno IEC 60417- 5957
Corrente alternata IEC 60417- 5032
Corrente continua IEC 60417- 5031
Riciclaggio ISO 7001 - PI PF 066
Classe di isolamento, Classe II IEC 60417- 5172
32
Page 34

Instrucciones de uso
INSTRUCCIONES DE USO
Índice de contenidos
1 Instrucciones de seguridad ������������������������������������������������������������������� 34
2 Descripciónyfuncionamiento ��������������������������������������������������������������� 35
2�1 Producto ������������������������������������������������������������������������������������������������35
2�2 Volumen de suministro ��������������������������������������������������������������������������35
ES
2�3 Elementos de manejo ���������������������������������������������������������������������������� 36
2�4 Datos técnicos ���������������������������������������������������������������������������������������36
3 Usoconformealoprevisto ������������������������������������������������������������������� 37
4 Preparación ������������������������������������������������������������������������������������������ 37
5 Montaje ������������������������������������������������������������������������������������������������� 37
6 Botonesdefuncióneindicadoresdeestado ���������������������������������������� 38
7 Control remoto �������������������������������������������������������������������������������������� 38
7�1 Activando el control remoto �������������������������������������������������������������������38
7.2 Explicacióndelosbotones ��������������������������������������������������������������������39
7�3 Cambio de la batería �����������������������������������������������������������������������������39
8 Conexiónymanejo ������������������������������������������������������������������������������� 39
8�1 Puesta en funcionamiento ���������������������������������������������������������������������39
8�2 Ajuste de la altura ���������������������������������������������������������������������������������� 39
8.3 Ajustedelángulodeinclinación ������������������������������������������������������������39
9 Mantenimiento,conservación,almacenamientoytransporte ��������������� 40
10Indicacionesparalaeliminación ����������������������������������������������������������� 40
10�1 Producto ������������������������������������������������������������������������������������������������40
10�2 Baterías �������������������������������������������������������������������������������������������������40
10�3 Embalajes ���������������������������������������������������������������������������������������������� 40
11DeclaracióndeconformidadCE ����������������������������������������������������������� 40
12 Símbolos utilizados ������������������������������������������������������������������������������� 40
33
Page 35

1 Instrucciones de seguridad
Las instrucciones de uso son parte del producto y contienen información importante para el uso correcto.
• Lea las instrucciones de uso completamente y cuidadosamente antes de usar.
Las instrucciones de uso deben estar disponibles en caso de incertidumbre y transmisión del producto.
• Guarde las instrucciones de uso.
Peligro de descarga eléctrica
Si el producto entra en contacto con el agua, puede provocar una descarga eléctrica.
• No utilice el producto con las manos húmedas.
• No utilice el producto en las proximidades del agua, como bañeras, lavabos o piscinas.
Si el producto se moja con la lluvia puede producirse una descarga eléctrica.
• No coloque el producto junto a una ventana abierta.
Libre de voltaje solo con enchufe extraído.
• En caso de emergencia, después del uso y durante las tormentas eléctricas, desenchufe el cable de alimentación directamente de la carcasa del enchufe.
• No abra la carcasa.
• No modique el producto y los accesorios.
• No cortocircuite las conexiones y los circuitos.
• Compruebe con regularidad que el cable del aparato esté intacto.
• No utilice el producto si el cable está dañado.
Un aparato defectuoso no debe ponerse en funcionamiento, sino que debe desconectarse inmediatamente de la red y asegurarse
contra cualquier uso accidental posterior.
• Utilice el producto, las piezas del producto y los accesorios solo si están en perfecto estado.
• En caso de defectos, daños mecánicos, averías y otros problemas que no se puedan resolver con la documentación incluida,
póngase en contacto con el vendedor o el fabricante.
• No repare los productos defectuosos usted mismo, pero contáctese con el distribuidor o el fabricante.
Peligro de arrastre
Las piezas rotativas pueden atrapar la ropa o el cabello sueltos. Esto puede causar lesiones o daños en el aparato.
• Mantenga su cabello y la ropa suelta alejados de las piezas rotativas.
• Asegúrese de que el ventilador no se halle cerca de cortinas ni objetos que puedan ser succionados por él.
Peligro de lesiones por piezas del producto móviles
Detrás de la rejilla protectora del ventilador hay piezas móviles.
• No introduzca ningún dedo ni objeto a través de la rejilla de protección.
Esto puede causar lesiones o daños en el aparato.
• Utilice el aparato solo con la rejilla de protección cerrada e intacta.
• No utilice el aparato si la rejilla de protección presenta daños.
• Apague el aparato y desconecte el enchufe antes de retirar la rejilla protectora.
• Tire siempre del producto por el enchufe, no por el cable.
Riesgo de tropiezo
• Asegúrese de que el cable de conexión esté enrutado de forma que no obstaculice ni dañe a nadie.
Debido a los distintos y elevados riesgos y peligros potenciales, algunas fases de trabajo solo pueden ser llevadas a cabo por personal especializado.
• El montaje, el funcionamiento, el mantenimiento, el almacenamiento, el transporte y la eliminación sólo pueden ser realizados
por usuarios nales y usuarios con conocimientos básicos de mecánica y electricidad.
• El desmontaje, los trabajos de mantenimiento y las reparaciones sólo pueden ser realizados por especialistas formados.
Para ello se necesitan medidas de seguridad, conocimientos y herramientas especiales.
No adecuado para niños ni personas cuyas capacidades físicas y/o psíquicas estén limitadas.
• Asegure el producto contra el uso accidental.
• Proteja el embalaje, las piezas pequeñas y el material aislante contra un uso accidental.
Condiciones de funcionamiento y almacenamiento
• ¡No lo deje NUNCA en funcionamiento y sin supervisión!
• No cubra el producto.
• Mantenga libres las ranuras de ventilación y del ventilador.
• No utilice el producto en entornos llenos de polvo o mal ventilados.
• No use el producto en zonas donde haya gases explosivos y/o inamables.
• No coloque el producto ni lo ponga en marcha cerca de llamas abiertas ni productos que sirvan para cocinar o generar calor,
como radiadores u hornos.
• Coloque, instale y transporte de forma segura el producto, sus piezas y sus accesorios.
• Coloque el producto sobre una supercie estable, nivelada, seca y libre de polvo, de modo que no pueda volcarse durante el
funcionamiento y que la supercie no se dañe por las vibraciones.
• Asegúrese de que el producto se apoya de forma segura.
El ventilador no debe apoyarse en el cable de alimentación para que no se vuelque durante el funcionamiento.
• Evite exponer el dispositivo a cargas extremas, como calor y frío, humedad y la radiación directa del sol, así como a vibraciones y presión mecánica.
• Apague el aparato y desconéctelo de la red eléctrica cuando no lo utilice, para limpiarlo o en caso de avería.
Peligros de la batería
El control remoto está equipado con una pila de botón de litio. Se puede sustituir.
• Mantenga las baterías fuera del alcance de los niños.
Su ingesta puede provocar quemaduras internas graves e incluso la muerte. Si sospecha que la batería se ha ingerido o se ha intro-
ES
34
Page 36

Instrucciones de uso
ducido en el cuerpo de otra manera, acuda de inmediato a un médico.
• Nunca use las baterías cuando estén abolladas, con fugas o dañadas.
• Retire del producto las células que presenten derrames, estén deformadas o corroídas y elimínelas utilizando los medios de
protección adecuados.
Si una batería tiene una fuga, evita el contacto con la piel, los ojos y las membranas mucosas. Si es necesario, enjuague las zonas
afectadas con agua y busque atención médica inmediatamente.
• No deforme, queme o desmonte las baterías y nunca las perfore con un objeto punzante.
El calor extremo puede provocar una explosión y/o una fuga de líquido corrosivo. Los daños mecánicos pueden provocar el escape
de sustancias gaseosas, que pueden ser muy irritantes, inamables o tóxicas.
• No cortocircuite las baterías ni las sumerja en líquidos.
Existe el riesgo de explosión, incendio, calor, humo y/o desarrollo de gas.
• Si la batería se cae accidentalmente al agua, retírela inmediatamente. Coloque la batería en un lugar seguro y abierto y man-
téngala alejada hasta que esté completamente seca. No vuelva a utilizar la batería seca, pero deséchela como se indica en el
ES
capítulo 10.2.
2 Descripción y funcionamiento
2.1 Producto
Este producto es un potente ventilador de pedestal que genera ventilación en 3 niveles diferentes y distintos modos.
○ con control remoto y temporizador
○ 3 niveles de potencia: ligero, fuerte, turbo
2.2 Volumen de suministro
Nº Designación Pcs. Descripción Nº Designación Pcs. Descripción
1 Base 1
Rejilla protectora
2
trasera
Rejilla protecto-
3
ra delantera con
clips de bloqueo
4 Rotor 1 11
Soporte con bo-
tones de función,
5
indicadores de
estado y bloque
motor
6 Tornillo de la base 1 13
7 Arandela 1
1 9
1 10
1 12 Control remoto 1
8
Tornillo Phillips
4,4 x 9,2 mm
Célula de botón
de litio (CR2025)
Instrucciones
14
Tuerca de
jación
Tornillo de
jación
Ø x L =
Tuerca
Ø = 4,9 mm
de uso
1
1
1
1
1 -
1 -
35
Page 37

2.3 Elementos de manejo
2.4 Datos técnicos
Número de artículo 59509
Entrada 220-240 V
Potencia nominal 45 W
Potencia utilizada por el ventilador (P) 38,1 W
Consumo de energía en modo de espera (P
Caudal máximo del ventilador (F) 33,5 m³/min
Valor de servicio (SV) 0,9 (m³/min)/W
Norma de medición del valor de servicio IEC 60879:2019
Velocidad máxima del aire (c) 2,0 m/s
Nivel de potencia acústica del ventilador (L
Tipo de protección / Clase de protección
Conexión de dispositivo Enchufe Euro (tipo C, CEE 7/16)
Longitud de cable (incl. enchufe) 1,6 m
Dimensiones
L x An x Al
Ø
Color blanco-gris
Peso 4550 g
Tipo Infrarrojo
Voltaje de entrada 3,0 V
Dimensiones | Peso 40 x 86 x 7 | 11 g
Tipo Célula de botón de litio (CR2025)
Tensión nominal, Capacidad 3,0 V
Peso 3 g
) 0,4 W
SB
) 58 dB(A)
WA
Control remoto
Batería
, 50 Hz
IPX0 / II
39 x 125 x 39 cm
43 cm
, 150-165 mAh
15 Indicadores de estado
16 Botones de función
17 Cable de alimentación
con enchufe Euro
18 Tornillo de bloqueo
19 Anillo de bloqueo
20 Compartimiento de
la batería
ES
36
Page 38

Instrucciones de uso
3 Uso conforme a lo previsto
materiales.
IPX0: Este producto no está protegido contra el agua.
4 Preparación
Este producto es exclusivamente para uso privado y para la nalidad prevista. Este producto no está pensado para su uso
con nes comerciales. No se permite un uso distinto al descrito en el capítulo «Descripción y funcionamiento» o
«Indicaciones de seguridad». Este producto solamente se puede utilizar en interiores secos. La inobservancia y el
incumplimiento de estas normas e indicaciones de seguridad pueden derivar en accidentes graves, daños personales y
1. Compruebe que el volumen de suministro esté completo e íntegro.
2. Comparar los datos técnicos del producto con los de la red eléctrica.
Estos deben ser idénticos.
ES
5 Montaje
1. Inserte el soporte (5) en la base (1).
2. Coloque el soporte y la base de forma que pueda ver la parte inferior de la base.
¡CUIDADO! ¡La base es pesada!
• Asegúrese de que ningún dedo o extremidad quede atrapado bajo la base.
3. Coloque la arandela (7) sobre el agujero del centro de la base.
4. Introduzca el tornillo de la base (6) con el lado roscado a través de la arandela.
5. Apriete el tornillo de la base en el sentido de las agujas del reloj.
El soporte y la base están ahora rmemente unidos entre sí.
6. Vuelva a colocar el soporte y la base en su sitio.
7. Deslice la rejilla protectora trasera (2) sobre el eje del bloque motor (5).
Asegúrese de que el oricio del borde de la rejilla protectora trasera esté en la parte inferior.
8. Coloque la tuerca de jación (8) en el eje del bloque motor.
9. Apriete la tuerca de jación en el sentido de las agujas del reloj.
La rejilla protectora trasera está ahora jada.
37
10. Empuje el rotor (4) sobre el eje del bloque motor.
Asegúrese de que los huecos de la parte posterior del rotor se encuentren sobre los pasadores del eje del motor.
11. Deslice el tornillo de jación (9) sobre el eje del bloque del motor.
12. Apriete el tornillo de jación en sentido contrario a las agujas del reloj.
El rotor está ahora jado.
13. Cuelgue la rejilla protectora delantera (3) en la rejilla protectora trasera con el gancho.
Asegúrese de que el oricio del borde de la rejilla protectora delantera esté orientado hacia el
oricio del borde de la rejilla protectora trasera.
14. Deslice los 4 clips de bloqueo, cada uno situado en el lado de la rejilla protectora delantera,
sobre los marcos de ambas rejillas protectoras.
15. Introduzca el tornillo Phillips (10) a través de los agujeros de ambas rejillas protectoras.
16. Fije el tornillo Phillips con la tuerca (11).
17. Apriete el tornillo Phillips en el sentido de las agujas del reloj.
La rejilla protectora delantera está ahora jada y el ventilador está listo para su uso.
Page 39

6 Botones de función e indicadores de estado
El ventilador tiene 5 botones de función y 12 indicadores de estado.
En la siguiente tabla se explican los botones de función y los indicadores de estado.
Botones de función
Designación Descripción
ON/SPEED
SWING
MODE
TIMER
OFF
POW
SLE
NAT
NOR
SW
H
M
4H, 2H,
1H, 0.5H
Pulse el botón para encender el ventilador. Pulse de nuevo el botón para seleccionar el nivel de potencia.
Pulse el botón para activar o desactivar la función de oscilación. Cuando la función de oscilación está activada, el ventilador se mueve de lado a lado.
Pulse el botón para ajustar el modo deseado. Puede elegir entre los modos
NORMAL, NATURAL y SLEEP.
Pulse el botón para activar la función de temporizador. Vuelva a pulsar el botón
para prolongar la duración de la función de temporizador.
Puede ajustar la función de temporizador en intervalos de media hora (0,5h, 1h,
1,5h, 2h, 2,5h, 3h, 3,5h, 4h, 4,5h, 5h, 5,5h, 6h, 6,5h, 7h, 7,5h).
Una vez transcurrido el tiempo ajustado, el ventilador se apaga solo. Para nalizar la función del temporizador, pulse el botón hasta que se apaguen todas las
indicaciones de estado del temporizador (4H, 2H, 1H, 0.5H). Alternativamente,
puede apagar y encender el ventilador para borrar el temporizador ajustado.
Pulse el botón para apagar el ventilador. El nivel de potencia y el modo ajus-
tados permanecen guardados y se activan cuando se vuelve a encender el
ventilador.
Indicadores de estado
Cuando el indicador de estado se ilumina, el ventilador está conectado a la red
eléctrica.
Cuando el indicador de estado se ilumina, el modo SLEEP está activo. El ventilador ejecuta un programa de diferentes velocidades del ventilador.
Cuando el indicador de estado se ilumina, el modo NATURAL está activo. El
ventilador ejecuta un programa de diferentes velocidades del ventilador.
Cuando el indicador de estado se ilumina, el modo NORMAL está activo. El
ventilador está generando un ujo de aire constante con el nivel de potencia
establecido.
Cuando el indicador de estado se ilumina, la función de oscilación está activa-
da.
Cuando el indicador de estado se ilumina, el nivel de potencia H está ajustado.
El ventilador genera un fuerte ujo de aire.
Cuando el indicador de estado se ilumina, se ajusta el nivel de potencia M. El
ventilador genera un ujo de aire medio-fuerte.
Cuando se enciende el indicador de estado, se ajusta el nivel de potencia L. El
L
ventilador genera un ujo de aire ligero.
Si se enciende uno de los indicadores de estado, la función de temporizador
está activa durante el tiempo especicado. Si se encienden varios indicadores de estado, la función de temporizador está activa durante la suma total de
tiempo.
ES
7 Control remoto
7.1 Activando el control remoto
• Saque el protector de contacto del compartimento de la batería (20).
El control remoto está ahora activado.
38
Page 40

Instrucciones de uso
7.2 Explicación de los botones
También puede controlar el ventilador a través del control remoto.
La siguiente tabla describe la función de los botones del control remoto.
Designación Descripción
OFF Pulse el botón para apagar el ventilador.
TIMER
MODE Pulse el botón para ajustar el modo deseado.
Pulse el botón para activar la función de temporizador. Vuelva a pulsar el botón para
prolongar la duración de la función de temporizador.
ES
7.3 Cambio de la batería
Si es necesario, sustituya la batería agotada por una nueva del mismo tipo. Véase el capítulo 2.4.
1. Abra el compartimento de la batería (20) empujando la pequeña palanca hacia un lado y extrayendo el compartimento de la
batería.
2. Retire la batería vacía.
3. Coloque la nueva batería en el compartimento con el polo positivo hacia arriba.
4. Vuelva a cerrar el compartimento de la batería.
5. Deseche la batería vacía de forma adecuada.
Véase también el capítulo 10.2.
SWING Pulse el botón para activar o desactivar la función de oscilación.
ON/SPEED
Pulse el botón para encender el ventilador. Pulse de nuevo el botón para seleccionar el
nivel de potencia.
8 Conexión y manejo
8.1 Puesta en funcionamiento
1. Seleccione una ubicación adecuada para el ventilador.
Preste especial atención a las condiciones mencionadas en el capítulo 1 „Instrucciones de seguridad“.
2. Conecte el cable de alimentación (17) del ventilador a una toma de corriente libre y de fácil acceso.
3. Gire la parte delantera del ventilador en la dirección que desee ventilar.
El ventilador ya está listo para funcionar.
4. Ajuste el nivel de potencia, el modo y la función del temporizador mediante los botones de función (16) o el
control remoto (12).
5. Apague el ventilador después de usarlo.
8.2 Ajuste de la altura
Puede ajustar la altura del ventilador de 108 a 128 cm.
1. Desenchufe el cable de alimentación de la toma de corriente antes de ajustar la altura.
2. Gire el anillo de bloqueo (19) en sentido contrario a las agujas del reloj para aojarlo.
3. Apoye la base con el pie y agarre el ventilador por la carcasa donde se encuentran los botones de función y los
indicadores de estado.
4. Sujete el ventilador por la rejilla protectora y muévalo hacia delante y hacia atrás a lo largo del eje horizontal has-
ta que haya ajustado el ángulo de inclinación deseado. Mantenga el ventilador en esta posición.
5. Con la otra mano, gire el anillo de bloqueo en el sentido de las agujas del reloj para apretarlo.
La altura del ventilador está ahora ajustada.
8.3 Ajuste del ángulo de inclinación
También puede ajustar el ángulo de inclinación del ventilador.
1. Desenchufe el cable de alimentación de la toma de corriente antes de ajustar el ángulo de inclinación.
2. Gire el tornillo de bloqueo (18) en sentido contrario a las agujas del reloj para aojarlo.
3. Sujete el ventilador por la rejilla de protección y muévalo hacia delante y hacia atrás a lo largo del eje horizontal
hasta que haya ajustado el ángulo de inclinación deseado. Mantenga el ventilador en esta posición.
4. Con la otra mano, gire el tornillo de bloqueo en el sentido de las agujas del reloj para apretarlo.
El ángulo de inclinación del ventilador está ahora ajustado.
39
Page 41

9 Mantenimiento, conservación, almacenamiento y transporte
El producto no necesita mantenimiento.
¡ATENCIÓN! Daños materiales
• Desconecte siempre el enchufe de la red antes de la limpieza.
• Utilice solo un paño seco y suave para realizar la limpieza.
• No utilice productos de limpieza ni productos químicos.
• En caso de no utilizarse durante un tiempo prolongado, almacene el producto lejos del alcance de los niños en un lugar seco y
resguardado del polvo.
• Si no lo va a utilizar durante un tiempo prolongado, retire las baterías/acumuladores.
• Compruebe regularmente el correcto asiento del producto/de los tornillos.
• Almacénelo en un lugar fresco y seco.
• Conserve y utilice el embalaje original para el transporte.
• Haga que los trabajos de mantenimiento, desmontaje y reparación sean realizados únicamente por personal cualicado.
10 Indicaciones para la eliminación
10.1 Producto
De acuerdo con la directiva RAEE europea, los dispositivos eléctricos y electrónicos no se deben desechar junto con los
residuos domésticos. Sus componentes deben reciclarse o desecharse por separado, ya que la eliminación de forma
inadecuada de los componentes tóxicos o peligrosos puede ocasionar perjuicios duraderos a la salud y al medio ambiente.
Según la ley alemana de dispositivos eléctricos (ElektroG), como usuario está obligado a devolver los dispositivos eléctricos y
electrónicos al fabricante, al lugar de venta o a un centro público de recogida al nal de su vida útil, de forma gratuita. Los detalles
especícos se articulan mediante la legislación del país. El símbolo en el producto, el manual del operador y/o el embalaje señala
estas normas. Con esta forma de separación de sustancias, reciclaje y eliminación de dispositivos obsoletos contribuye de forma
importante a la protección del medio ambiente.
RAEE n.º: 82898622
10.2 Baterías
Las baterías y los acumuladores no se deben desechar con los residuos domésticos. Sus componentes deben reciclarse o
desecharse por separado, ya que la eliminación de forma inadecuada de los componentes tóxicos o peligrosos puede
ocasionar perjuicios duraderos al medio ambiente.
Como usuario, está obligado a devolverlos al fabricante, al lugar de venta o a un centro público de recogida al nal de su vida
útil, de forma gratuita. Los detalles especícos se articulan mediante la legislación del país. El símbolo en el producto, el manual del
operador y/o el embalaje señala estas normas. Con esta forma de separación de sustancias, reciclaje y eliminación de baterías y
acumuladores obsoletos contribuye de forma importante en la protección del medio ambiente.
D-34000-1998-0099
ES
10.3 Embalajes
Los embalajes se pueden eliminar de forma gratuita depositándolos en los correspondientes puntos de recogida: el papel en
el contenedor de papel, el plástico en el contenedor amarillo y el vidrio en el contenedor de vidrio usado.
DE4535302615620
11 Declaración de conformidad CE
Al utilizar la marca CE, Goobay®, una marca registrada de Wentronic GmbH, declara que este dispositivo cumple con las
directivas y requisitos básicos de las regulaciones europeas.
12 Símbolos utilizados
Sólo para uso en interiores IEC 60417- 5957
Corriente alterna IEC 60417- 5032
Corriente continua IEC 60417- 5031
Reciclaje ISO 7001 - PI PF 066
Clase de aislamiento, Clase II IEC 60417- 5172
40
Page 42

Gebruiksaanwijzing
GEBRUIKSAANWIJZING
Inhoudsopgave
1 Veiligheidsvoorschriften ������������������������������������������������������������������������ 42
2 Beschrijving en werking ������������������������������������������������������������������������ 43
2�1 Product ��������������������������������������������������������������������������������������������������43
2�2 Leveringsomvang ����������������������������������������������������������������������������������43
2�3 Bedieningselementen ����������������������������������������������������������������������������44
2�4 Technische gegevens ����������������������������������������������������������������������������44
NL
3 Gebruik conform de voorschriften ��������������������������������������������������������� 45
4 Voorbereiding ���������������������������������������������������������������������������������������� 45
5 Montage ������������������������������������������������������������������������������������������������ 45
6 Functietoetsen en statusindicatoren ����������������������������������������������������� 46
7 Afstandsbediening �������������������������������������������������������������������������������� 46
7�1 Activeren van de afstandsbediening ������������������������������������������������������ 46
7�2 Verklaring van de toetsen ����������������������������������������������������������������������47
7�3 De batterij vervangen �����������������������������������������������������������������������������47
8 Aansluiting en bediening ����������������������������������������������������������������������� 47
8�1 Ingebruikname ��������������������������������������������������������������������������������������� 47
8�2 Instellen van de hoogte ��������������������������������������������������������������������������47
8�3 Instellen van de kantelhoek �������������������������������������������������������������������47
9 Onderhoud,verzorging,opslagentransport ���������������������������������������� 48
10 Aanwijzingen voor afvalverwijdering ����������������������������������������������������� 48
10�1 Product ��������������������������������������������������������������������������������������������������48
10�2 Batterijen ������������������������������������������������������������������������������������������������ 48
10.3Verpakkingen �����������������������������������������������������������������������������������������48
11 EU-conformiteitsverklaring �������������������������������������������������������������������� 48
12 Gebruikte symbolen ������������������������������������������������������������������������������ 48
41
Page 43

1 Veiligheidsvoorschriften
Deze vormt een onderdeel van het product en bevat belangrijke aanwijzingen voor het correcte gebruik.
• Lees de gebruiksaanwijzing voor gebruik volledig en zorgvuldig door.
De gebruiksaanwijzing moet beschikbaar zijn in geval van onduidelijkheden en het doorgeven van het product.
• Bewaar de gebruiksaanwijzing.
Gevaar voor een elektrische schok
Wanneer het product in contact komt met water, kan dit een elektrische schok veroorzaken.
• Gebruik het product niet met natte handen.
• Gebruik het product niet in de onmiddellijke nabijheid van water, zoals badkuipen, wastafels of zwembaden.
Regendruppels die op het product terechtkomen, kunnen leiden tot een elektrische schok.
• Plaats het product niet bij een open raam.
Spanningsloosheid alleen bij een uitgetrokken stekker.
• In geval van nood, na gebruik en bij onweer, de netstekker direct bij de stekkerbehuizing uit het stopcontact trekken.
• De behuizing niet openen.
• Breng geen wijzigingen aan producten of accessoires aan.
• Aansluitingen en schakelcircuits niet kortsluiten.
• Controleer regelmatig of de kabel van het apparaat nog intact is.
• Gebruik het product niet als de kabel is beschadigd.
Een defect apparaat mag niet in bedrijf worden gesteld, maar moet onmiddellijk van het net worden losgekoppeld en tegen onbedoeld
verder gebruik worden beveiligd.
• Gebruik product, productonderdelen en accessoires alleen in perfecte staat.
• Bij vragen, defecten, mechanische beschadigingen, storingen of andere problemen die niet door de bijgevoegde documentatie
kunnen worden verholpen, neemt u contact op met uw dealer of fabrikant.
• Repareer defecte producten niet zelf, maar neem contact op met de dealer of de fabrikant.
Risico op intrekken
Roterende delen kunnen losse kleding en haar in het apparaat trekken. Dit kan leiden tot letsel of schade aan het apparaat.
• Houd uw haar en losse kleding uit de buurt van draaiende onderdelen.
• Zorg ervoor dat de ventilator niet in de buurt van gordijnen of voorwerpen staat, die de ventilator in kunnen worden gezogen.
Gevaar voor letsel door bewegende productonderdelen
Achter de beschermrooster van de ventilator bevinden zich bewegende delen.
• Steek geen vingers of voorwerpen door het beschermrooster.
Dit kan leiden tot letsel of schade aan het apparaat.
• Gebruik het apparaat alleen met een intact en gesloten beschermrooster.
• Gebruik het apparaat niet als het beschermrooster beschadigd is.
• Schakel het apparaat uit en trek de stekker uit het stopcontact, voordat u het beschermrooster verwijdert.
• Trek het product altijd aan de stekker, niet aan het snoer.
Struikelgevaar
• Zorg ervoor dat de aansluitkabel zo wordt gelegd dat deze niemand hindert of beschadigt.
Vanwege de wisselende risico‘s en mogelijke gevaren mogen sommige werkstappen alleen door opgeleide vakmensen worden uitgevoerd.
• Montage, bediening, onderhoud, opslag, vervoer en verwijdering mogen uitsluitend worden uitgevoerd door eindgebruikers en
gebruikers met elementaire mechanische en elektrische kennis.
• Demontage-, onderhouds- en reparatiewerkzaamheden mogen alleen door geschoolde specialisten worden uitgevoerd.
Hiervoor zijn speciale veiligheidsmaatregelen, deskundigheid en gereedschap vereist.
Niet geschikt voor kinderen en personen met lichamelijke en/of geestelijke beperkingen.
• Beveilig het product tegen onbedoeld gebruik.
• Beveilig de verpakking, kleine onderdelen en isolatiemateri aal tegen onbedoeld gebruik.
Bedrijfs- en opslagomstandigheden
• Laat het NOOIT onbeheerd achter tijdens bedrijf.
• Niet afgedekt gebruiken.
• Houd de ventilatorsleuven en luchtsleuven vrij.
• Gebruik het product niet in stofge omgevingen of bij gebrekkige ventilatie.
• Gebruik het product niet in een omgeving met explosieve en/of brandbare gassen.
• Plaats en gebruik het product niet in de buurt van open vuur, kookapparatuur of producten die hitte genereren, zoals verwarmingen en ovens.
• Plaats, installeer en transporteer producten, productonderdelen en accessoires op een veilige manier.
• Plaats het product op een stabiele, vlakke, droge en stofvrije ondergrond, zodat het tijdens het gebruik niet kan omvallen en
het oppervlak niet door trillingen kan worden beschadigd.
• Zorg ervoor dat het product stevig staat.
De ventilator mag niet op het netkabel staan, zodat hij tijdens de werking niet omvalt.
• Extreme belastingen, zoals warmte en koude, natheid en directe zonnestraling, microgolven alsmede trillingen en mechanische druk vermijden.
• Schakel het apparaat uit en trek de stekker uit het stopcontact als u het niet gebruikt, om het te reinigen of in geval van een
storing.
Gevaren in samenhang met de batterij
De afstandsbediening is uitgerust met een lithium knoopcel. Deze kan worden vervangen.
• Houd batterijen uit de buurt van kinderen.
Het inslikken hiervan kan ernstige inwendige brandwonden veroorzaken en tot de dood leiden. Als u vermoedt dat de batterij werd in-
NL
42
Page 44

Gebruiksaanwijzing
geslikt of op een andere manier in het lichaam terecht is gekomen, moet u onmiddellijk een arts bezoeken.
• Gebruik geen batterijen als deze gedeukt, lek of anderszins beschadigd zijn.
• Verwijder lekkende, vervormde of gecorrodeerde cellen uit het product en gooi ze weg met geschikte beschermingsmiddelen.
Vermijd het contact met huid, ogen en slijmvliezen, wanneer een batterij is uitgelopen.
Spoel evt. de betreffende plekken met water en raadpleeg onmiddellijk een arts.
• Vervorm, verbrand of demonteer batterijen niet en doorboor ze nooit met een scherp voorwerp.
Extreme hitte kan leiden tot explosie en/of lekkage van bijtende vloeistof. Mechanische beschadiging kan leiden tot het ontsnappen
van gasvormige stoffen, die zeer irriterend, ontvlambaar of giftig kunnen zijn.
• Sluit batterijen niet kort en dompel ze niet onder in vloeistoffen.
Er bestaat gevaar voor explosie, brand, hitte, rook en/of gasontwikkeling.
• Als de batterij per ongeluk in water valt, verwijder deze dan onmiddellijk. Leg de batterij in een veilige, open ruimte en blijf uit
de buurt tot de batterij volledig droog is. Gebruik de gedroogde batterij niet opnieuw, maar voer deze af zoals aangegeven in
hoofdstuk 10.2.
2 Beschrijving en werking
2.1 Product
NL
Dit product is een krachtige pedestal ventilator die ventilatie genereert in 3 verschillende niveaus en verschillende modi.
○ met afstandsbediening en timer
○ 3 vermogensniveaus: licht, sterk, turbo
2.2 Leveringsomvang
Nr. Benaming Pcs. Beschrijving Nr. Benaming Pcs. Beschrijving
1 Voetstuk 1
Achter bescherm-
2
rooster
Voorste be-
3
schermrooster
met borgklemmen
4 Rotor 1 11
Standaard met
functietoetsen,
5
statusindicatoren
en motorblok
6 Voetschroef 1 13
7 Sluitring 1
1 9
1 10
1 12
8 Bevestigingsmoer 1
Bevestigings-
schroef
Kruiskopschroef
Ø x L =
4,4 x 9,2 mm
Schroefmoer
Ø = 4,9 mm
Afstandsbedie-
ning
Lithium knoopcel
(CR2025)
Gebruiksaan-
14
wijzing
1
1
1
1
1 -
1 -
43
Page 45

2.3 Bedieningselementen
2.4 Technische gegevens
Artikelnummer 59509
Ingang 220-240 V
Nominaal vermogen 45 W
Opgenomen vermogen (P) 38,1 W
Elektriciteitsverbruik in de stand-by-stand (P
Maximaal ventilatordebiet (F) 33,5 m³/min
Bedrijfswaarde (SV) 0,9 (m³/min)/W
Meetnorm voor bedrijfswaarde IEC 60879:2019
Maximale luchtsnelheid (c) 2,0 m/s
Geluidsvermogensniveau van de ventilator (L
Beschermingsgraad / Beschermingsklasse
Apparaataansluiting Eurostekker (Typ C, CEE 7/16)
Snoerlengte (inkl. stekker) 1,6 m
Afmetingen
(l x b x h)
Ø
Kleur wit-grijs
Gewicht 4550 g
Type Infrarood
Ingangsspanning 3,0 V
Afmetingen | Gewicht 40 x 86 x 7 | 11 g
Type Lithium knoopcel (CR2025)
Nominale spanning, Capaciteit 3,0 V
Gewicht 3 g
) 0,4 W
SB
) 58 dB(A)
WA
IPX0 / II
39 x 125 x 39 cm
Afstandsbediening
Batterij
, 50 Hz
43 cm
, 150-165 mAh
15 Statusindicatoren
16 Functietoetsen
17 Netkabel met
Eurostekker
18 Borgschroef
19 Borgring
20 Batterijvak
NL
44
Page 46

Gebruiksaanwijzing
3 Gebruik conform de voorschriften
schade.
IPX0: Dit product is niet beschermd tegen water.
4 Voorbereiding
Dit product is uitsluitend bestemd voor privégebruik en het daarvoor bedoelde doeleinde. Dit product is niet bestemd voor
commercieel gebruik. Een ander gebruik dan beschreven in het hoofdstuk „Beschrijving en functie“ of in de „Veiligheidsinstructies“ is niet toegestaan. Dit product mag alleen worden gebruikt in droge binnenruimten. Het niet in acht nemen en niet
opvolgen van deze instructies en veiligheidsvoorschriften kan leiden tot ernstige ongevallen, lichamelijk letsel en materiële
1. Controleer of de leveringsomvang volledig en onbeschadigd is.
2. Vergelijk de technische gegevens van het product en het spanningsnet.
Deze moeten identiek zijn.
5 Montage
NL
1. Plaats de standaard (5) in de voetstuk (1).
2. Leg de standaard en de basis op hun kant, zodat u de onderkant van de voetstuk kunt zien.
VOORZICHTIG! Het voetstuk is zwaar!
• Zorg ervoor dat er geen vingers of ledematen onder het voetstuk geklemd raken!
3. Plaats de sluitring (7) over het gat in het midden van het voetstuk.
4. Steek de voetschroef (6) met de schroefdraadzijde door de sluitring.
5. Draai de voetschroef met de wijzers van de klok mee vast.
De standaard en de voetstuk zijn nu stevig met elkaar verbonden.
6. Zet de standaard en de voetstuk weer op hun plaats.
7. Schuif de achterste beschermrooster (2) op de as van het motorblok (5).
Zorg ervoor dat het gat aan de rand van de achterste beschermrooster aan de onderkant zit.
8. Schuif de bevestigingsmoer (8) op de as van het motorblok.
9. Draai de bevestigingsmoer met de klok mee vast.
De achterste beschermrooster is nu bevestigd.
45
10. Schuif de rotor (4) op de as van het motorblok.
Zorg ervoor dat de uitsparingen aan de achterkant van de rotor over de pennen op de as van
het motorblok vallen.
11. Schuif de bevestigingsschroef (9) op de as van het motorblok.
12. Draai de bevestigingsschroef tegen de wijzers van de klok in vast.
De rotor is nu vastgezet.
13. Hang de voorste beschermrooster (3) met de haak aan de achterste beschermrooster.
Zorg ervoor dat het gat aan de rand van de voorste beschermrooster tegenover het gat aan de
rand van de achterste beschermrooster zit.
14. Schuif de 4 borgklemmen, die zich elk aan de zijkant van de voorste beschermrooster bevinden, over de frames van beide beschermroosters.
15. Duw de kruiskopschroef (10) door de gaten van beide beschermroosters.
16. Zet de kruiskopschroef vast met de schroefmoer (11).
17. Draai de kruiskopschroef met de klok mee vast.
De voorste beschermrooster is nu bevestigd en de ventilator is klaar voor gebruik.
Page 47

6 Functietoetsen en statusindicatoren
De ventilator heeft 5 functietoetsen en 12 statusindicatoren.
In de volgende tabel worden de functietoetsen en de statusindicatoren verklaard.
Functietoetsen
Benaming Beschrijving
ON/SPEED
SWING
MODE
TIMER
OFF
POW
SLE
NAT
NOR
SW Wanneer de statusindicator oplicht, is de oscillatiefunctie geactiveerd.
H
M
4H, 2H,
1H, 0.5H
Druk op de knop om de ventilator in te schakelen. Druk nogmaals op de knop
om het vermogensniveau te selecteren.
Druk op de toets om de oscillatiefunctie in of uit te schakelen. Als de oscillatiefunctie is ingeschakeld, beweegt de ventilator van links naar rechts.
Druk op de toets om de gewenste modus in te stellen. U kunt kiezen tussen de
modi NORMAL, NATURAL en SLEEP.
Druk op de toets om de timerfunctie te activeren. Druk nogmaals op de toets
om de duur van de timerfunctie te verlengen.
U kunt de timerfunctie instellen met intervallen van een half uur (0,5u, 1u, 1,5u,
2u, 2,5u, 3u, 3,5u, 4u, 4,5u, 5u, 5,5u, 6u, 6,5u, 7u, 7,5u).
Na het verstrijken van de ingestelde tijd schakelt de ventilator zichzelf uit. Om
de timerfunctie te beëindigen, drukt u op de toets tot alle statusindicaties voor
de timer (4H, 2H, 1H, 0.5H) zijn gedoofd. U kunt de ventilator ook uit- en weer
inschakelen om de ingestelde timer te wissen.
Druk op de toets om de ventilator uit te schakelen. Het ingestelde vermogensniveau en de modus blijven bewaard en zijn actief wanneer u de ventilator weer
inschakelt.
Statusindicatoren
Wanneer de statusindicator oplicht, is de ventilator aangesloten op het elektriciteitsnet.
Wanneer de statusindicator brandt, is de SLEEP-modus actief. De ventilator
draait een programma met verschillende ventilatorsnelheden.
Wanneer de statusindicator brandt, is de NATURAL-modus actief. De ventilator
draait een programma van verschillende ventilatorsnelheden.
Wanneer de statusindicator oplicht, is de NORMAL-modus actief. De ventilator
genereert een constante luchtstroom op het ingestelde vermogensniveau.
Wanneer de statusindicator oplicht, is vermogensniveau H ingesteld. De ventilator genereert een sterke luchtstroom.
Wanneer de statusindicator oplicht, is vermogensniveau M ingesteld. De ventilator genereert een middelsterke luchtstroom.
Wanner de statusindicator oplicht, is vermogensniveau L ingesteld. De ventila-
L
tor genereert een lichte luchtstroom.
Wanneer een van de statusindicatoren oplicht, is de timerfunctie gedurende de
opgegeven tijd actief. Als meerdere statuslampjes oplichten, is de timerfunctie
actief voor de totale som van de tijd.
NL
7 Afstandsbediening
7.1 Activeren van de afstandsbediening
• Trek de contactbeveiliging uit het batterijvak (20).
De afstandsbediening is nu geactiveerd.
46
Page 48

Gebruiksaanwijzing
7.2 Verklaring van de toetsen
U kunt de ventilator ook via de afstandsbediening bedienen.
De volgende tabel beschrijft de functie van de toetsen op de afstandsbediening.
Benaming Beschrijving
OFF Druk op de toets om de ventilator uit te schakelen.
TIMER
MODE Druk op de toets om de gewenste modus in te stellen.
SWING Druk op de toets om de oscillatiefunctie in of uit te schakelen.
Druk op de toets om de timerfunctie te activeren. Druk nogmaals op de toets om de
duur van de timerfunctie te verlengen.
NL
7.3 De batterij vervangen
Vervang, indien nodig, de lege batterij door een nieuwe van hetzelfde type. Zie hoofdstuk 2.4.
1. Open het batterijvak (20) door het kleine hendeltje opzij te schuiven en vervolgens het batterijvak naar buiten te trekken.
2. Verwijder de lege batterij.
3. Plaats de nieuwe batterij in het batterijvak met de pluspool naar boven.
4. Sluit het batterijvak weer.
5. Gooi de lege batterij op de juiste manier weg.
Zie ook hoofdstuk 10.2.
ON/SPEED
Druk op de knop om de ventilator in te schakelen. Druk nogmaals op de knop om het
vermogensniveau te selecteren.
8 Aansluiting en bediening
8.1 Ingebruikname
1. Kies een geschikte plaats voor de ventilator.
Let vooral op de voorwaarden vermeld in hoofdstuk 1 „Veiligheidsvoorschriften“.
2. Sluit het netkabel (17) van de ventilator aan op een vrij en gemakkelijk bereikbaar stopcontact.
3. Draai de voorkant van de ventilator in de richting waarin u wilt ventileren.
De ventilator is nu klaar voor gebruik.
4. Stel het vermogensniveau, de modus en de timerfunctie in met de functietoetsen (16) of met de
afstandsbediening (12).
5. Schakel de ventilator uit na gebruik.
8.2 Instellen van de hoogte
U kunt de hoogte van de ventilator instellen van 108 tot 128 cm.
1. Haal de netkabel uit het stopcontact voordat u de hoogte instelt.
2. Draai de borgring (19) tegen de wijzers van de klok in om hem los te maken.
3. Druk met uw voet het voetstuk naar beneden en pak de ventilator vast bij de behuizing waar zich de functietoetsen en statusindicatoren bevinden.
4. Schuif het bovenste deel van de ventilator omhoog of omlaag tot u de gewenste hoogte hebt ingesteld en houd
de ventilator in deze positie.
5. Draai met de andere hand de vergrendelring met de klok mee om hem vast te draaien.
De hoogte van de ventilator is nu aangepast.
8.3 Instellen van de kantelhoek
U kunt ook de kantelhoek van de ventilator aanpassen.
1. Haal de netkabel uit het stopcontact voordat u de hellingshoek instelt.
2. Draai de borgschroef (18) tegen de wijzers van de klok in om hem los te draaien.
3. Houd de ventilator bij het beschermrooster vast en beweeg hem heen en weer langs de horizontale as tot u de
gewenste kantelhoek hebt ingesteld. Houd de ventilator in deze positie.
4. Draai met de andere hand de borgschroef met de klok mee om hem vast te draaien.
De kantelhoek van de ventilator is nu ingesteld.
47
Page 49

9 Onderhoud, verzorging, opslag en transport
Het product is onderhoudsvrij.
ATTENTIE! Materiële schade
• Trek altijd de stekker uit het stopcontact voordat u het apparaat schoonmaakt.
• Gebruik alleen een droge en zachte doek om te reinigen.
• Gebruik geen reinigingsmiddel en chemische producten.
• Als het product langere tijd niet wordt gebruikt, bewaar het dan in een droge en stofdichte omgeving en houd het buiten het bereik van kinderen.
• Verwijder de batterijen/accu‘s wanneer deze langere tijd niet worden gebruikt.
• Controleer de goede plaatsing van het product/de schroeven regelmatig.
• Sla het product koel en droog op.
• Bewaar de originele verpakking voor het transport en gebruik deze.
• Laat onderhouds- en reparatiewerkzaamheden alleen door gekwaliceerd personeel uitvoeren.
10 Aanwijzingen voor afvalverwijdering
10.1 Product
Elektrische en elektronische apparaten mogen volgens de Europese AEEA-richtlijn niet met het huisvuil worden weggegooid.
De onderdelen daarvan moeten gescheiden bij de recycling of de afvalverwijdering worden ingeleverd, omdat giftige en
gevaarlijke onderdelen bij onvakkundige afvalverwijdering de gezondheid en het milieu duurzaam schade kunnen berokkenen.
U bent als consument volgens de Duitse Wet op de elektronica (ElektroG) verplicht om elektrische en elektronische apparaten
aan het einde van hun levensduur kosteloos terug te geven aan de fabrikant, de winkel of aan de daarvoor voorziene, openbare
inzamelpunten. Bijzonderheden daarover regelt het betreffende nationale recht. Het symbool op het product, de gebruiksaanwijzing
en/of de verpakking verwijst naar deze bepalingen. Met dit type scheiding van stoffen, recycling en afvalverwijdering van oude
apparaten levert u een belangrijke bijdrage aan de bescherming van ons milieu.
AEEA nr.: 82898622
10.2 Batterijen
Batterijen en accu‘s mogen niet samen met het huishoudelijk afval worden weggegooid. De componenten moeten afzonderlijk
worden gerecycled of afgevoerd, omdat giftige en gevaarlijke componenten het milieu blijvend kunnen beschadigen, als ze
niet op de juiste wijze worden afgevoerd. Als consument bent u verplicht deze aan het einde van hun levensduur kosteloos
terug te geven aan de fabrikant, het verkooppunt of de speciale openbare inzamelpunten. Nadere bijzonderheden zijn bepaald
in het nationale recht. Het symbool op het product, de gebruiksaanwijzing en/of de verpakking verwijst naar deze bepalingen. Door zo
gebruikte batterijen en accu‘s te scheiden, te recyclen en af te voeren, levert u een belangrijke bijdrage aan de bescherming van ons
milieu.
D-34000-1998-0099
NL
10.3 Verpakkingen
Verpakkingen kunnen kosteloos worden afgevoerd via de betreffende inzameling – papier bij het oud papier, plastic in de gele
zak en glas in de glasbak.
DE4535302615620
11 EU-conformiteitsverklaring
Met het CE-teken verklaart Goobay®, een geregistreerd handelsmerk van Wentronic GmbH, dat het product aan de fundamentele vereisten en richtlijnen van de Europese bepalingen voldoet.
12 Gebruikte symbolen
Alleen voor binnengebruik IEC 60417- 5957
Wisselstroom IEC 60417- 5032
Gelijkstroom IEC 60417- 5031
Recycling ISO 7001 - PI PF 066
Beschermingsklasse II IEC 60417- 5172
48
Page 50

Brugervejledning
BRUGERVEJLEDNING
Indholdsfortegnelse
1 Sikkerhedsanvisninger �������������������������������������������������������������������������� 50
2 Beskrivelse og funktion ������������������������������������������������������������������������� 51
2�1 Produkt ��������������������������������������������������������������������������������������������������51
2�2 Leveringsomfang �����������������������������������������������������������������������������������51
2�3 Betjeningselementer ������������������������������������������������������������������������������ 52
2�4 Tekniske data ����������������������������������������������������������������������������������������� 52
3 Bestemmelsesmæssig anvendelse ������������������������������������������������������ 53
4 Forberedelse ����������������������������������������������������������������������������������������� 53
DA
5 Montering ���������������������������������������������������������������������������������������������� 53
6 Funktionsknapperogstatusindikatorer ������������������������������������������������� 54
7 Fjernbetjening ��������������������������������������������������������������������������������������� 54
7�1 Aktivering af fjernbetjeningen ����������������������������������������������������������������54
7.2 Forklaringafknapperne ������������������������������������������������������������������������� 55
7�3 Udskiftning af batteriet ��������������������������������������������������������������������������� 55
8 Tilslutning og betjening ������������������������������������������������������������������������� 55
8�1 Ibrugtagning ������������������������������������������������������������������������������������������� 55
8�2 Justering af højden ��������������������������������������������������������������������������������55
8�3 Justering af hældningsvinklen ���������������������������������������������������������������55
9 Vedligeholdelse,pleje,opbevaringogtransport ����������������������������������� 56
10Ombortskaelse ����������������������������������������������������������������������������������� 56
10�1 Produkt ��������������������������������������������������������������������������������������������������56
10�2 Batterierne ���������������������������������������������������������������������������������������������56
10�3 Emballage ���������������������������������������������������������������������������������������������� 56
11 EU-overensstemmelseserklæring ��������������������������������������������������������� 56
12 Brugte symboler ������������������������������������������������������������������������������������ 56
49
Page 51

1 Sikkerhedsanvisninger
Brugsanvisningen er en integreret del af produktet og indeholder vigtige anvisninger for korrekt brug.
• Læs brugsanvisningen helt og omhyggeligt igennem før ibrugtagning.
Brugsanvisningen skal være tilgængelig i tilfælde af usikkerhed, og hvis du giver produktet videre.
• Gem brugsanvisningen.
Fare for elektrisk stød
Når produktet kommer i kontakt med vand, kan det forårsage et elektrisk stød.
• Brug ikke produktet med våde hænder.
• Produktet må ikke anvendes i umiddelbar nærhed af vand, f.eks. i badekar, håndvaske eller pools.
Regnsprøjt på produktet kan forårsage elektrisk stød.
• Placer ikke produktet ved et åbent vindue
Det er kun spændingsfrit, når stikket er trukket ud.
• I nødstilfælde, efter brug og under tordenvejr skal netstikket trækkes ud af stikkontakten direkte ved stikkontaktens hus.
• Åbn ikke kabinettet.
• Modicer ikke produktet og tilbehøret.
• Kortslut ikke tilslutninger og koblingskredse.
• Kontrollér regelmæssigt, at apparatkablet stadig er intakt.
• Brug ikke produktet, hvis kablet er beskadiget.
Et defekt apparat må ikke tages i brug, men skal omgående afbrydes fra lysnettet og sikres imod utilsigtet fortsat anvendelse.
• Anvend kun produktet, produktdelene og tilbehøret i fejlfri stand.
• Kontakt forhandleren eller producenten i tilfælde af spørgsmål, defekter, mekaniske skader, fejl og andre problemer, som ikke
kan løses ved hjælp af den medfølgende dokumentation.
• Reparer ikke selv defekte produkter, men kontakt forhandleren eller producenten.
Indtrækningsfare
Roterende dele kan trække løstsiddende tøj og hår ind. Dette kan føre til personskader eller beskadigelse af apparatet.
• Hold dit hår og løstsiddende tøj væk fra roterende dele.
• Sørg for, at ventilatoren ikke er placeret i nærheden af gardiner eller genstande, der kan blive trukket ind i ventilatoren.
Fare for personskader på grund af produktdele
Bag ventilatorens beskyttelsesgitter er der bevægelige dele.
• Stik ikke ngre eller genstande gennem beskyttelsesgitteret.
Dette kan føre til personskader eller beskadigelse af apparatet.
• Brug kun apparatet med beskyttelsesgitteret lukket og intakt.
• Brug ikke apparatet, hvis beskyttelsesgitteret er beskadiget.
• Sluk produktet, og frakobl netstikket, inden du fjerner beskyttelsesgitteret.
• Træk altid produktet i stikket og ikke i kablet.
Fare for at snuble
• Sørg for, at tilslutningskablet trækkes på en sådan måde, at det ikke er til gene for nogen og ikke bliver beskadiget.
På grund af varierende høje risici og potentielle farer må visse arbejdstrin kun udføres af uddannet fagpersonale.
• Montering, drift, vedligeholdelse, opbevaring, transport og bortskaffelse må kun udføres af slutbrugere og brugere med grundlæggende mekanisk og elektrisk viden.
• Demontering, vedligeholdelse og reparationer må kun udføres af uddannet fagpersonale.
Der kræves særlige sikkerhedsforanstaltninger, ekspertise og værktøj til dette.
Egner sig ikke til børn og personer med nedsatte fysiske og/eller psykiske evner.
• Sikr produktet mod utilsigtet brug.
• Sørg for, at sikre emballage, smådele og isoleringsmateriale mod utilsigtet anvendelse.
Drifts- og opbevaringsbetingelser
• Må ALDRIG være uden opsyn under drift.
• Dæk ikke produktet til.
• Sørg for at holde ventilatoråbningerne og udluftningsåbningerne fri.
• Brug ikke produktet i støvede omgivelser eller ved mangelfuld udluftning.
• Anvend ikke produktet i nærheden af eksplosive og/eller brandfarlige gasser.
• Placer og anvend ikke produktet i nærheden af åben ild eller varmegenererende produkter som f.eks. radiatorer eller ovne.
• Sørg for at placere, installere og transportere produkt, produktdele og tilbehør på sikker vis.
• Placer produktet på en stabil, plan, tør og støvfri overade, så det ikke kan vælte under drift, og så overaden ikke kan blive
beskadiget af vibrationer.
• Sørg for, at produktet står sikkert.
Ventilatoren må ikke stå på netkablet, så den ikke vælter under drift.
• Undgå ekstreme belastninger som varme og kulde, nedbør og direkte solindstråling, mikrobølger samt vibrationer og mekaniske tryk.
• Sluk for apparatet og tag det ud af stikkontakten, når det ikke er i brug, når det skal rengøres eller i tilfælde af fejl.
Batterifarer
Fjernbetjeningen er udstyret med en lithium-knapcelle. Den kan udskiftes.
• Batterierne bør opbevares utilgængeligt for børn.
Indtagelse kan medføre alvorlige indre kvæstelser og i værste fald have døden til følge. Hvis du har mistanke om indtagelse, skal du
øjeblikkelig søge lægehjælp.
• Brug aldrig batterier, hvis de er bulede, utætte eller beskadigede.
• Fjern utætte, deformerede eller korroderede celler fra produktet, og foretag bortskaffelse ved hjælp af egnede beskyttelsesforanstaltninger.
DA
50
Page 52

Brugervejledning
Hvis et batteri har lækket, skal du undgå kontakt med hud, øjne og slimhinder. Skyl eventuelle påvirkede steder med vand, og søg omgående læge.
• Du må ikke deformere, brænde eller adskille batterier og aldrig punktere dem med en skarp genstand.
Ekstrem varme kan føre til eksplosion og / eller lækage af ætsende væske. Mekaniske skader kan medføre, at gasformige stoffer slipper ud, som kan være meget irriterende, brandfarlige eller giftige.
• Kortslut ikke batterier eller nedsænk dem i væsker.
Der er risiko for eksplosion, brand, varme, røg og / eller gasudvikling.
• Hvis batteriet ved et uheld falder i vand, skal du straks fjerne det. Anbring batteriet i et sikkert, åbent område og hold dig væk,
indtil det er helt tørt. Genbrug ikke det tørrede batteri, men bortskaf det som angivet i kapitel 10.2.
2 Beskrivelse og funktion
2.1 Produkt
Dette produkt er en kraftig piedestalventilator, der genererer ventilation i 3 forskellige niveauer og forskellige tilstande.
○ med fjernbetjening og timer
○ 3 effektniveauer: let, stærk, turbo
2.2 Leveringsomfang
Nr. Betegnelse Stk. Beskrivelse Nr. Betegnelse Stk. Beskrivelse
DA
1 Sokkel 1
Bageste beskyt-
2
telsesgitter
Forreste beskyt-
3
telsesgitter med
låseclips
4 Rotor 1 11
Stativ med funk-
tionsknapper, sta-
5
tusindikatorer og
motorblok
6 Sokkelskrue 1 13
7 Skive 1
1 9
1 10
1 12 Fjernbetjening 1
Fastgørel-
8
sesmøtrik
Fastgørelses-
skrue
Phillips-skrue
Ø x L =
4,4 x 9,2 mm
Skruemøtrik
Ø = 4,9 mm
Lithium
knapcelle
(CR2025)
14 Brugervejledning 1 -
1
1
1
1
1 -
51
Page 53

2.3 Betjeningselementer
2.4 Tekniske data
Varenummer 59509
Indgang 220-240 V
Nominel effekt 45 W
Ventilatorens effektoptag (P) 38,1 W
Elforbrug i standby tilstand (P
Maksimal ventilatorluftstrøm (F) 33,5 m³/min
Nytteværdi (SV) 0,9 (m³/min)/W
Målestandard for nytteværdi IEC 60879:2019
Maksimal lufthastighed (c) 2,0 m/s
Ventilatorlydeffektniveau (L
Beskyttelsestype / Kapslingsklasse
Apparattilslutning Euro-stik (Typ C, CEE 7/16)
Kabellængde (inkl. stik) 1,6 m
Mål
(B x H x T)
Ø
Farve hvid-grå
Vægt 4550 g
Type Infrarød
Indgangsspænding 3,0 V
Mål | Vægt 40 x 86 x 7 | 11 g
Type Lithium knapcelle (CR2025)
Nominel spænding, kapacitet 3,0 V
Vægt 3 g
) 0,4 W
SB
) 58 dB(A)
WA
IPX0 / II
39 x 125 x 39 cm
43 cm
Fjernbetjening
Batteri
15 Statusindikatorer
16 Funktionsknapper
17 Netkabel med
Euro-stik
18 Låseskrue
19 Låsering
20 Batterirum
, 50 Hz
, 150-165 mAh
DA
52
Page 54

Brugervejledning
3 Bestemmelsesmæssig anvendelse
IPX0: Dette produkt er ikke beskyttet mod vand.
4 Forberedelse
Dette produkt er udelukkende beregnet til privat brug og det dertil beregnede formål. Dette produkt er ikke beregnet til
erhvervsmæssig brug. Enhver anvendelse, der afviger fra kapitlet »Beskrivelse og funktion« eller »Sikkerhedsanvisninger«, er ikke tilladt. Dette produkt må kun anvendes indendørs i tørre rum. Hvis disse bestemmelser og sikkerhedsanvisninger ikke følges eller overholdes, kan det medføre alvorlige ulykker, person- og tingsskader.
1. Kontrollér, at du har modtaget alle dele, og at de er intakte.
2. Sammenlign de tekniske data for produktet og lysnettet.
De tekniske data skal være identiske.“
5 Montering
1. Sæt stativet (5) i soklen (1).
DA
2. Placer stativet og soklen på siden, så du kan se undersiden af soklen.
FORSIGTIG! Soklen er tung!
• Sørg for, at der ikke sidder ngre eller lemmer fastklemt under soklen!
3. Placer skiven (7) over hullet i midten af soklen.
4. Sæt sokkelskruen (6) med gevindskruen ind gennem skiven.
5. Spænd sokkelskruen med uret.
Stativet og soklen er nu solidt forbundet med hinanden.
6. Sæt stativet og soklen på plads igen.
7. Skub det bageste beskyttelsesgitter (2) på akslen på motorblokken (5).
Sørg for, at hullet i kanten af det bageste beskyttelsesgitter er i bunden.
8. Skub fastgørelsesmøtrikken (8) på akslen på motorblokken.
9. Spænd fastgørelsesmøtrikken med uret.
Det bageste beskyttelsesgitter er nu fastgjort.
53
10. Skub rotoren (4) på akslen på motorblokken.
Sørg for, at fordybningerne på bagsiden af rotoren ligger over stifterne på akslen på motoren.
11. Skub fastgørelsesskruen (9) på akslen på motorblokken.
12. Spænd fastgørelsesskruen mod uret.
Rotoren er nu fastgjort.
13. Hæng det forreste beskyttelsesgitter (3) på det bageste beskyttelsesgitter med krogen.
Sørg for, at hullet på kanten af det forreste beskyttelsesgitter vender mod hullet på kanten af
det bageste beskyttelsesgitter.
14. Skub de 4 låseclips, der hver er placeret på siden af det forreste beskyttelsesgitter, over ram-
mene på begge beskyttelsesgitre.
15. Skub Phillips-skruen (10) gennem hullerne i begge beskyttelsesgitre.
16. Fastgør Phillips-skruen med skruemøtrikken (11).
17. Spænd Phillips-skruen med uret.
Det forreste beskyttelsesgitter er nu fastgjort, og ventilatoren er klar til brug.
Page 55

6 Funktionsknapper og statusindikatorer
Ventilatoren har 5 funktionsknapper og 12 statusindikatorer.
I den følgende tabel forklares funktionsknapperne og statusindikatorerne.
Funktionsknapper
Betegnelse Beskrivelse
ON/SPEED
SWING
MODE
TIMER
OFF
POW Når statusindikatoren lyser, er ventilatoren tilsluttet til strømnettet.
SLE
NAT
NOR
SW Når statusindikatoren lyser, er oscillationsfunktionen aktiveret.
H
M
4H, 2H,
1H, 0.5H
Tryk på knappen for at tænde for ventilatoren. Tryk på knappen igen for at vælge effektniveau.
Tryk på knappen for at slå svingningsfunktionen til eller fra. Når svingningsfunktionen er slået til, bevæger ventilatoren sig fra side til side.
Tryk på knappen for at indstille den ønskede tilstand. Du kan vælge mellem tilstandene NORMAL, NATURAL og SLEEP.
Tryk på knappen for at aktivere timerfunktionen. Tryk på knappen igen for at for-
længe varigheden af timerfunktionen.
Du kan indstille timerfunktionen med intervaller på en halv time (0,5h, 1h, 1,5h,
2h, 2,5h, 3h, 3,5h, 4h, 4,5h, 5h, 5,5h, 6h, 6,5h, 7h, 7,5h).
Efter udløbet af den indstillede tid slukker ventilatoren sig selv. For at afslutte
timerfunktionen skal du trykke på knappen, indtil alle statusvisninger for timeren
(4H, 2H, 1H, 0.5H) er slukket. Alternativt kan du slukke og tænde for ventilatoren igen for at slette den indstillede timer.
Tryk på knappen for at slukke for ventilatoren. Det indstillede effektniveau og
den indstillede tilstand forbliver gemt og er aktive, når du tænder for ventilatoren igen.
Statusindikatorer
Når statusindikatoren lyser, er SLEEP-tilstanden aktiv. Ventilatoren kører et program med forskellige ventilatorhastigheder.
Når statusindikatoren lyser, er NATURAL-tilstanden aktiv. Ventilatoren kører et
program med forskellige ventilatorhastigheder.
Når statusindikatoren lyser, er NORMAL-tilstanden aktiv. Ventilatoren genererer
en jævn luftstrøm ved det indstillede effektniveau.
Når statusindikatoren lyser, er effektniveauet H indstillet. Ventilatoren genererer
en kraftig luftstrøm.
Når statusindikatoren lyser, er effektniveauet M indstillet. Ventilatoren genererer
en middelstærk luftstrøm.
Når statusindikatoren lyser, er effektniveau L indstillet. Ventilatoren genererer
L
en let luftstrøm.
Hvis en af statusindikatorerne lyser, er timerfunktionen aktiv i det angivne tids-
rum. Hvis ere af statusindikatorerne lyser, er timerfunktionen aktiv i den sam-
lede sum af tiden.
DA
7 Fjernbetjening
7.1 Aktivering af fjernbetjeningen
• Træk kontaktbeskytteren ud af batterirummet (20).
Fjernbetjeningen er nu aktiveret.
54
Page 56

Brugervejledning
7.2 Forklaring af knapperne
Du kan også styre ventilatoren via fjernbetjeningen.
I følgende tabel beskrives funktionen af knapperne på fjernbetjeningen.
Betegnelse Beskrivelse
OFF Tryk på knappen for at slukke for ventilatoren.
TIMER
MODE Tryk på knappen for at indstille den ønskede tilstand.
SWING Tryk på knappen for at slå svingningsfunktionen til eller fra.
Tryk på knappen for at aktivere timerfunktionen. Tryk på knappen igen for at forlænge
varigheden af timerfunktionen.
ON/SPEED
Tryk på knappen for at tænde for ventilatoren. Tryk på knappen igen for at vælge effekt-
niveau.
DA
7.3 Udskiftning af batteriet
Udskift om nødvendigt det tomme batteri med et nyt batteri af samme type. Se kapitel 2.4.
1. Åbn batterirummet (20) ved at skubbe det lille håndtag til siden og derefter trække batterirummet ud.
2. Fjern det tomme batteri.
3. Placer det nye batteri i batterirummet med den positive pol opad.
4. Luk batterirummet igen.
5. Bortskaf det tomme batteri korrekt.
Se også kapitel 10.2.
8 Tilslutning og betjening
8.1 Ibrugtagning
1. Vælg et passende sted til ventilatoren.
Vær særlig opmærksom på de betingelser, der er nævnt i kapitel 1 „Sikkerhedsanvisninger“.
2. Tilslut ventilatorens netkabel (17) til en ledig og let tilgængelig stikkontakt.
3. Drej ventilatorens forside i den retning, du ønsker at ventilere.
Ventilatoren er nu klar til brug.
4. Indstil effektniveau, tilstand og timerfunktion ved hjælp af funktionsknapperne (16) eller fjernbetjeningen (12).
5. Sluk for ventilatoren efter brug.
8.2 Justering af højden
Du kan justere ventilatorens højde fra 108 til 128 cm.
1. Tag netkablet ud af stikkontakten, før du justerer højden.
2. Drej låseringen (19) mod uret for at løsne den.
3. Vægt soklen ned med foden, og tag fat i ventilatoren ved huset, hvor funktionsknapperne og statusindikatorerne er placeret.
4. Skub den øverste del af ventilatoren op eller ned, indtil du har indstillet den ønskede højde, og hold ventilatoren i
denne position.
5. Med den anden hånd skal du dreje låseringen med uret for at stramme den.
Ventilatorens højde er nu justeret.
8.3 Justering af hældningsvinklen
Du kan også justere ventilatorens hældningsvinkel.
1. Tag netkablet ud af stikkontakten, før du justerer hældningsvinklen.
2. Drej låseskruen (18) mod uret for at løsne den.
3. Hold ventilatoren ved beskyttelsesgitteret, og bevæg den frem og tilbage langs den vandrette akse, indtil du har
indstillet den ønskede hældningsvinkel. Hold ventilatoren i denne position.
4. Med den anden hånd drejes låseskruen med uret for at stramme den.
Ventilatorens hældningsvinkel er nu justeret.
55
Page 57

9 Vedligeholdelse, pleje, opbevaring og transport
Produktet er vedligeholdelsesfrit.
PAS PÅ! Materielle skader
• Tag altid stikket ud af stikkontakten før rengøring.
• Anvend altid en tør og blød klud til rengøring.
• Anvend aldrig rengøringsmidler og kemikalier.
• Opbevar produktet utilgængeligt for børn og på et tørt og støvbeskyttet sted, hvis det ikke skal bruges i længere tid.
• Tag batterierne/akkuerne ud, hvis produktet ikke skal bruges i længere tid.
• Kontrollér regelmæssigt, at produktet/skruerne sidder godt fast.
• Skal opbevares køligt og tørt.
• Gem og anvend den originale emballage, hvis produktet på et tidspunkt skal transporteres.
• Laat onderhouds-, demontage- en reparatiewerkzaamheden alleen door gekwaliceerd personeel uitvoeren
10 Om bortskaffelse
10.1 Produkt
Elektriske og elektroniske apparater må iht. Rådets WEEE-direktiv ikke bortskaffes med almindeligt husholdningsaffald.
Apparaternes bestanddele skal sorteres og bortskaffes separat på en kommunal genbrugsstation, fordi giftige og farlige
bestanddele ved forkert bortskaffelse kan skade sundheden og miljøet.
Som forbruger er du forpligtet til efter gældende lov at returnere elektrisk og elektronisk affald til producenten, forhandleren,
eller til en offentlig opsamlingssted ved afslutning af produktets levetid. Detaljerne reguleres i de nationale lovgivning. Symbolet på
dette produkt, i bruger manualen, eller på indpakningen opfylder disse regler. Med denne form for affaldssortering, anvendelse, og
affaldsgenbrug opnår du en vigtig del i at bevare miljøet.
WEEE No: 82898622
10.2 Batterierne
Batterierne må ikke bortskaffes sammen med husholdningsaffald. Deres komponenter skal genbruges eller bortskaffes hver
for sig. Ellers kan forurenende og skadelige stoffer forurene vores miljø. Som forbruger er du forpligtet til efter gældende lov at
returnere elektrisk og elektronisk affald til producenten, forhandleren, eller til en offentlig opsamlingssted ved afslutning af
produktets levetid. Detaljerne reguleres i de nationale lovgivning. Symbolet på dette produkt, i bruger manualen, eller på
indpakningen opfylder disse regler. Med denne form for affaldssortering, anvendelse, og affaldsgenbrug opnår du en vigtig del i at
bevare miljøet.
D-34000-1998-0099
10.3 Emballage
Emballage kan bortskaffes gratis på de tilsvarende indsamlingssteder − papir i papircontaineren, kunststof i den gule pose og
glas i genbrugsglascontaineren.
DE4535302615620
DA
11 EU-overensstemmelseserklæring
Ved at anvende CE-mærkningen erklærer Goobay®, som er et registreret mærkenavn tilhørende Wentronic GmbH, at
udstyret overholder de europæiske regulativers mindstekrav og retningslinjer.
12 Brugte symboler
Kun til indendørs brug IEC 60417- 5957
Vekselstrøm IEC 60417- 5032
Jævnstrøm IEC 60417- 5031
Genbrug ISO 7001 - PI PF 066
Kapslingsklasse II IEC 60417- 5172
56
Page 58

Bruksanvisning
BRUKSANVISNING
Innehållsförteckning
1 Säkerhetsanvisningar ��������������������������������������������������������������������������� 58
2 Beskrivning och funktion ����������������������������������������������������������������������� 59
2�1 Produkt ��������������������������������������������������������������������������������������������������59
2�2 Leveransomfång ������������������������������������������������������������������������������������ 59
2�3 Kontroller �����������������������������������������������������������������������������������������������60
2�4 Tekniska data ����������������������������������������������������������������������������������������� 60
3 Avsedd användning ������������������������������������������������������������������������������ 61
4 Förberedelse ����������������������������������������������������������������������������������������� 61
5 Montering ���������������������������������������������������������������������������������������������� 61
6 Funktionsknapparochstatusindikatorer ����������������������������������������������� 62
SV
7 Fjärrkontroll ������������������������������������������������������������������������������������������� 62
7�1 Aktivera fjärrkontrollen ��������������������������������������������������������������������������� 62
7.2 Förklaringavknapparna ������������������������������������������������������������������������ 63
7�3 Byte av batteri ���������������������������������������������������������������������������������������� 63
8 Anslutning och drift ������������������������������������������������������������������������������� 63
8�1 Idrifttagning �������������������������������������������������������������������������������������������� 63
8�2 Justera höjden ���������������������������������������������������������������������������������������63
8�3 Justering av lutningsvinkeln ������������������������������������������������������������������� 63
9 Underhåll,vård,lagringochtransport ��������������������������������������������������� 64
10 Avfallshantering ������������������������������������������������������������������������������������ 64
10�1 Produkt ��������������������������������������������������������������������������������������������������64
10�2 Batterierna ���������������������������������������������������������������������������������������������64
10.3Förpackningar ���������������������������������������������������������������������������������������� 64
11 EU-försäkran om överensstämmelse ��������������������������������������������������� 64
12 Använda symboler �������������������������������������������������������������������������������� 64
57
Page 59

1 Säkerhetsanvisningar
Bruksanvisningen är en del av produkten och innehåller viktiga anvisningar om korrekt användning.
• Läs igenom bruksanvisningen noggrant och i sin helhet innan du använder produkten.
Bruksanvisningen måste konsulteras om du är osäker på något och medfölja om produkten byter ägare.
• Spara bruksanvisningen.
Risk för elstötar
Om produkten kommer i kontakt med vatten kan detta orsaka en elektrisk stöt.
• Använd inte produkten med fuktiga händer.
• Använd inte produkten i omedelbar närhet av vatten, t.ex. badkar, tvättställ eller pooler.
Regnstänk på produkten kan leda till elstötar.
• Ställ inte produkten vid ett öppet fönster.
Produkten är bara spänningsfri när kontakten inte är ansluten.
• I nödfall, efter användning och under åskväder, ska du dra ut nätkontakten ur uttaget direkt vid kontaktens hölje.
• Öppna inte kåpan.
• Produkten och dess tillbehör får inte modieras.
• Kortslut inte anslutningar och kopplingskretsar.
• Kontrollera regelbundet att apparatkabeln inte är skadad.
• Använd inte produkten om kabeln är skadad.
Produkten får inte användas om den är defekt. Koppla i så fall bort den från nätspänningen omedelbart och säkerställ att den inte kan
slås på igen av misstag.
• Använd bara produkten, produktdelar och tillbehör om de är i felfritt skick.
• Kontakta återförsäljaren eller tillverkaren vid frågor, defekter, mekaniska skador, störningar eller andra problem som inte kan lö-
sas med hjälp av de medföljande anvisningarna.
• Reparera inte defekta produkter själv, men kontakta återförsäljaren eller tillverkaren.
Indragningsrisk
Hår och löst sittande kläder kan fastna i roterande delar. Detta kan leda till personskador eller skador på produkten.
• Håll hår och lösa kläder på avstånd från roterande delar.
• Kontrollera att äkten inte benner sig i närheten av gardiner eller föremål som kan sugas in i äkten.
Skaderisk på grund av rörliga produktdelar
Det nns rörliga delar bakom äktens skyddsgaller.
• För aldrig in ngrar eller föremål genom skyddsgallret.
Detta kan leda till personskador eller skador på produkten.
• Använd produkten endast med skyddsgallret intakt.
• Använd inte produkten om skyddsgallret är skadat.
• Stäng av produkten och dra ut nätkontakten innan du avlägsnar skyddsgallret.
• Dra alltid produkten i kontakten, inte i kabeln.
Snubbelrisk
• Säkerställ att anslutningskabeln dras så att den inte är i vägen och att den inte skadas.
På grund av risker och möjliga faror får vissa arbetssteg endast utföras av behörig fackpersonal.
• Montering, drift, underhåll, lagring, transport och bortskaffande får endast utföras av slutanvändare och användare med grundläggande mekanisk och elektrisk kunskap.
• Demontering, underhåll och reparationer får endast utföras av utbildade specialister.
För detta krävs särskilda säkerhetsåtgärder, expertis och verktyg.
Inte avsedd för barn och personer med nedsatt fysisk och/eller mental förmåga.
• Säkra produkten mot oavsiktlig användning.
• Se till att förpackning, smådelar och isoleringsmaterial inte används på annat sätt än avsett.
Användnings- och förvaringsförhållanden
• Lämna ALDRIG produkten utan uppsikt.
• Täck inte över produkten.
• Håll äkt- och ventilationsöppningarna fria.
• Använd inte produkten i dammiga miljöer eller vid otillräcklig ventilation.
• Använd inte produkten i områden med explosiva eller brännbara gaser.
• Placera eller använd inte produkten i närheten av öppen eld eller värmealstrande utrustning som t.ex. element och ugnar.
• Placera, installera och transportera produkten, produktdelar och tillbehör på ett säkert sätt.
• Placera produkten på en stabil, plan, torr och dammfri yta så att den inte kan välta under drift och så att ytan inte skadas av vibrationer.
• Se till att produkten står stadigt på ett säkert sätt.
Fläkten får inte stå på nätkabeln så att den inte tippar över under drift.
• Undvik extrema belastningar som hetta och kyla, fukt och direkt solljus, mikrovågor samt vibrationer och mekaniskt tryck.
• Stäng av apparaten och koppla bort den från elnätet när den inte används, för rengöring eller i händelse av fel.
Batterifaror
Fjärrkontrollen är utrustad med en litiumknappcell. Den kan bytas ut.
• Förvara batterier utom räckhåll för barn.
Om den sväljs kan det leda till allvarliga inre brännskador och dödsfall. Uppsök omedelbart läkare vid misstanke om att batteriet har
svalts eller på annat sätt hamnat i kroppen.
• Använd aldrig batterier som är tillbucklade, otäta eller skadade.
• Avlägsna tomma, deformerade eller korroderade batterier och kassera dem med hjälp av lämplig skyddsanordning.
Om ett batteri läcker ska du undvika kontakt med hud, ögon och slemhinnor. Skölj vid behov de berörda ställena med vatten och sök
SV
58
Page 60

Bruksanvisning
läkarvård omgående.
• Deformera inte, bränn eller ta isär batterierna och punktera dem aldrig med vassa föremål.
Extrem värme kan leda till explosion och / eller läckage av frätande vätska. Mekaniska skador kan orsaka att gasformiga ämnen släpper ut, vilket kan vara mycket irriterande, brandfarligt eller giftigt.
• Kortslut inte batterier eller doppa dem inte i vätskor.
Det nns en risk för explosion, brand, värme, rök och / eller gasutveckling.
• Om batteriet av misstag tappas i vatten, ta bort det omedelbart. Placera batteriet på ett säkert, öppet område och håll dig borta
tills det är helt torrt. Återanvänd inte det torkade batteriet, utan kassera det enligt kapitel 10.2.
2 Beskrivning och funktion
2.1 Produkt
Den här produkten är en kraftfull piedestaläkt som genererar ventilation i 3 olika nivåer och olika lägen.
○ med fjärrkontroll och timer
○ 3 effektnivåer: lätt, stark, turbo
2.2 Leveransomfång
Nr. Benämning St. Beskrivning Nr. Benämning St. Beskrivning
SV
1 Bas 1
Bakre skydds-
2
3
4 Rotor 1 11
5
6 Basskruv 1 13
7 Bricka 1
galler
Främre skydds-
galler med lås-
klämmor
Stativ med funktionsknappar, statusindikatorer och
motorblock
1 9 Fästskruv 1
1 10
1 12 Fjärrkontroll 1
8 Fästmutter 1
Phillipsskruv
Ø x L =
4,4 x 9,2 mm
Skruvmutter
Ø = 4,9 mm
Litiumknappcell
(CR2025)
14 Bruksanvisning 1 -
1
1
1 -
59
Page 61

2.3 Kontroller
2.4 Tekniska data
Artikelnummer 59509
Ingång 220-240 V
Nominell effekt 45 W
Fläktens ineffekt (P) 38,1 W
Effektförbrukning i standbyläge (P
Fläktens högsta ödeshastighet (F) 33,5 m³/min
Driftsvärde (SV) 0,9 (m³/min)/W
Standard som använts för mätning av driftsvärde IEC 60879:2019
Maximal lufthastighet (c) 2,0 m/s
Fläktens ljudeffektnivå (L
Kapslingsklassning / Skyddsklass
Enhetsanslutning Euro-kontakt (Typ C, CEE 7/16)
Kabellängd (inkl. Kontakt) 1,6 m
Mått
(B x H x D)
Ø
Färg vit-grå
Vikt 4550 g
Typ Infraröd
Inspänning 3,0 V
Mått | Vikt 40 x 86 x 7 | 11 g
Typ Litiumknappcell (CR2025)
Nominell spänning, kapacitet 3,0 V
Vikt 3 g
) 0,4 W
SB
) 58 dB(A)
WA
39 x 125 x 39 cm
Fjärrkontroll
Batteri
IPX0 / II
43 cm
, 150-165 mAh
15 Statusindikatorer
16 Funktionsknappar
17 Nätkabel med
Euro-kontakt
18 Låsskruv
19 Låsring
20 Batterifack
, 50 Hz
SV
60
Page 62

Bruksanvisning
3 Avsedd användning
IPX0: Denna produkt är inte skyddad mot vatten.
4 Förberedelse
Denna produkt är bara avsedd att användas av privatpersoner och inom angivna användningsområden. Denna produkt är
inte avsedd för yrkesmässigt bruk. Produkten får inte användas på annat sätt än som beskrivs i kapitlet ”Beskrivning och
funktion” eller ”Säkerhetsanvisningar”. Denna produkt får bara användas i torra inomhusmiljöer. Underlåtenhet att följa
dessa bestämmelser och säkerhetsanvisningarna kan leda till svåra olyckor och/eller person- och sakskador.
1. Kontrollera att leveransen är fullständig och inte är skadad.
2. Jämför teknisk information för produkt och strömförsörjning.
Dessa måste vara identiska.
5 Montering
SV
1. Sätt in stativet (5) i basen (1).
2. Placera stativet och basen på sidorna så att du kan se undersidan av basen.
FÖRSIKTIGT! Basen är tung!
• Se till att inga ngrar eller lemmar fastnar under basen!
3. Placera brickan (7) över hålet i mitten av basen.
4. Sätt in basskruven (6) med den gängade sidan genom brickan.
5. Dra åt basskruven medurs.
Stativet och basen är nu fast anslutna till varandra.
6. Sätt tillbaka stativet och basen på plats.
7. Skjut in det bakre skyddsgallret (2) på axeln på motorblocket (5).
Se till att hålet i kanten på det bakre skyddsgallret är längst ner.
8. Skjut fästmuttern (8) på motorblockets axel.
9. Dra åt fästmuttern medurs.
Det bakre skyddsgallret är nu fastsatt.
61
10. Skjut rotorn (4) på axeln på motorblocket.
Se till att fördjupningarna på rotorns baksida ligger över stiften på motoraxeln.
11. Skjut fästskruven (9) på motorblockets axel.
12. Dra åt fästskruven moturs.
Rotorn är nu xerad.
13. Häng det främre skyddsgallret (3) på det bakre skyddsgallret med kroken.
Se till att hålet i kanten på det främre skyddsgallret är vänd mot hålet i kanten på det bakre
skyddsgallret.
14. Skjut de 4 låsklämmorna, som var och en sitter på sidan av det främre skyddsgallret, över ra-
marna på de båda skyddsgallren.
15. Skjut Phillipsskruven (10) genom hålen i båda skyddsgallren.
16. Fäst Phillipsskruven med skruvmuttern (11).
17. Dra åt Phillipsskruven medurs.
Det främre skyddsgallret är nu fastsatt och äkten är klar för användning.
Page 63

6 Funktionsknappar och statusindikatorer
Fläkten har 5 funktionsknappar och 12 statusindikatorer.
I följande tabell förklaras funktionsknapparna och statusindikatorerna.
Funktionsknappar
Benämning Beskrivning
ON/SPEED
SWING
MODE
TIMER
OFF
POW När statusindikatorn lyser är äkten ansluten till elnätet.
SLE
NAT
NOR
SW När statusindikatorn lyser är oscillationsfunktionen aktiverad.
H
M
4H, 2H,
1H, 0.5H
Tryck på knappen för att slå på äkten. Tryck på knappen igen för att välja effektnivå.
Tryck på knappen för att slå på eller av oscillationsfunktionen. När oscillationsfunktionen är påslagen rör sig äkten från sida till sida.
Tryck på knappen för att ställa in önskat läge. Du kan välja mellan lägena NORMAL, NATURAL och SLEEP.
Tryck på knappen för att aktivera timerfunktionen. Tryck på knappen igen för att
förlänga timerfunktionens varaktighet.
Du kan ställa in timerfunktionen med halvtimmesintervaller (0,5h, 1h, 1,5h, 2h,
2,5h, 3h, 3,5h, 4h, 4,5h, 5h, 5,5h, 6h, 6,5h, 7h, 7,5h).
När den inställda tiden har gått ut stänger äkten av sig själv. För att avsluta timerfunktionen trycker du på knappen tills alla statusindikatorer för timern (4H,
2H, 1H, 0.5H) har slocknat. Alternativt kan du stänga av och sätta på äkten
igen för att rensa den inställda timern.
Tryck på knappen för att stänga av äkten. Den inställda effektnivån och det inställda läget förblir sparade och är aktiva när du slår på äkten igen.
Statusindikatorer
När statusindikatorn lyser är SLEEP-läget aktivt. Fläkten kör ett program med
olika äkthastigheter.
När statusindikatorn lyser är NATURAL-läget aktivt. Fläkten kör ett program
med olika äkthastigheter.
När statusindikatorn lyser är NORMAL-läget aktivt. Fläkten genererar ett jämnt
luftöde vid den inställda effektnivån.
När statusindikatorn lyser är effektnivån H inställd. Fläkten genererar ett kraftigt
luftöde.
När statusindikatorn lyser är effektnivån M inställd. Fläkten genererar ett medelstarkt luftöde.
När statusindikatorn lyser är effektnivå L inställd. Fläkten genererar ett lätt luft-
L
öde.
Om någon av statusindikatorerna lyser är timerfunktionen aktiv under den an-
givna tiden. Om era av statusindikatorerna lyser är timerfunktionen aktiv under
den totala summan av tiden.
SV
7 Fjärrkontroll
7.1 Aktivera fjärrkontrollen
• Dra ut kontaktskyddet ur batterifacket (20).
Fjärrkontrollen är nu aktiverad.
62
Page 64

Bruksanvisning
7.2 Förklaring av knapparna
Du kan också styra äkten via fjärrkontrollen.
I följande tabell beskrivs funktionen för knapparna på fjärrkontrollen.
Benämning Beskrivning
OFF Tryck på knappen för att stänga av äkten.
TIMER
MODE Tryck på knappen för att ställa in önskat läge.
SWING Tryck på knappen för att slå på eller av oscillationsfunktionen.
ON/SPEED Tryck på knappen för att slå på äkten. Tryck på knappen igen för att välja effektnivå.
7.3 Byte av batteri
Byt vid behov ut det tomma batteriet mot ett nytt av samma typ. Se kapitel 2.4.
SV
1. Öppna batterifacket (20) genom att skjuta den lilla spaken åt sidan och dra ut batterifacket.
2. Ta ut det tomma batteriet.
3. Placera det nya batteriet i batterifacket med den positiva polen uppåt.
4. Stäng batterifacket igen.
5. Kassera det tomma batteriet på rätt sätt.
Se även kapitel 10.2.
Tryck på knappen för att aktivera timerfunktionen. Tryck på knappen igen för att förlänga timerfunktionens varaktighet.
8 Anslutning och drift
8.1 Idrifttagning
1. Välj en lämplig plats för äkten.
Var särskilt uppmärksam på de villkor som nämns i kapitel 1 „Säkerhetsanvisningar“.
2. Anslut äktens nätkabel (17) till ett fritt och lättillgängligt uttag.
3. Vrid äktens framsida i den riktning du vill ventilera.
Fläkten är nu klar för drift.
4. Ställ in effektnivå, läge och timerfunktion med hjälp av funktionsknapparna (16) eller fjärrkontrollen (12).
5. Stäng av äkten efter användning.
8.2 Justera höjden
Du kan justera äktens höjd från 108 till 128 cm.
1. Dra ut nätkabeln ur uttaget innan du justerar höjden.
2. Vrid låsringen (19) moturs för att lossa den.
3. Tyngda ner basen med foten och ta tag i äkten vid höljet där funktionsknapparna och statusindikatorerna nns.
4. Skjut äktens övre del uppåt eller nedåt tills du har ställt in önskad höjd och håll äkten i detta läge.
5. Med den andra handen vrider du låsringen medurs för att dra åt den.
Fläktens höjd är nu justerad.
8.3 Justering av lutningsvinkeln
Du kan också justera äktens lutningsvinkel.
1. Dra ut nätkabeln ur uttaget innan du justerar lutningsvinkeln.
2. Vrid låsskruven (18) moturs för att lossa den.
3. Håll äkten vid skyddsgallret och ytta den fram och tillbaka längs den horisontella axeln tills du har ställt in öns-
kad lutningsvinkel. Håll äkten i detta läge.
4. Med den andra handen vrider du låsskruven medurs för att dra åt den.
Fläktens lutningsvinkel är nu justerad.
63
Page 65

9 Underhåll, vård, lagring och transport
Produkten är underhållsfri.
NOTERA! Sakskador
• Dra alltid ur nätkontakten innan du rengör.
• Använd endast en torr och mjuk trasa vid rengöring.
• Använd inte rengöringsmedel eller kemikalier.
• Om produkten inte ska användas under en längre tid ska den förvaras utom räckhåll för barn på en torr och dammfri plats.
• Ta ur batterierna om produkten inte ska användas under en längre tid.
• Kontrollera skruvarna och att produkten sitter fast ordentligt med jämna mellanrum.
• Lagra produkten på en torr och sval plats.
• Spara originalförpackningen och använd den om produkten ska transporteras.
• Underhåll, demontering och reparation får endast utföras av kvalicerad personal.
10 Avfallshantering
10.1 Produkt
Elektriska och elektroniska produkter får enligt EU-direktiv WEEE inte kastas i hushållsavfallet. Produktens olika delar måste
separeras och skickas till återvinning eller avfallshantering eftersom giftiga och farliga komponenter kan orsaka skador på
hälsa och miljö om de hanteras på fel sätt.
Du som konsument är förpliktigad enligt lag att lämna elektriska eller elektroniska apparater till insamlingsplatser eller till
återförsäljaren vid slutet av apparatens livstid. Detaljer regleras i nationella lagar. Symbolerna på produkten, i bruksanvisningen eller
på förpackningen hänvisar till dessa villkor. Med denna avfallsseparering, tillämpning och avfallshantering bidrar du till att förbättra
miljön.
WEEE-nr: 82898622
10.2 Batterierna
Batterierna får inte kastas i hushållsavfallet. Dess komponenter ska återvinnas och kasseras åtskiljda från varandra. Annars
kan förorenande och farliga ämnen förorena miljön. Du som konsument är förpliktigad enligt lag att lämna batterier till
insamlingsplatser eller till återförsäljaren vid slutet av dess livstid. Detaljer regleras i nationella lagar. Symbolerna på
produkten, i bruksanvisningen eller på förpackningen hänvisar till dessa villkor. Med denna avfallsseparering, tillämpning och
avfallshantering av batterier bidrar du till att förbättra miljön.
D-34000-1998-0099
10.3 Förpackningar
Förpackningar kan kostnadsfritt kasseras på motsvarande återvinningstationer – papper, plast och glas i respektive kärl eller
containrar.
DE4535302615620
SV
11 EU-försäkran om överensstämmelse
Genom att använda CE-märkningen deklarerar Goobay®, ett registrerat varumärke för Wentronic GmbH, att enheten
uppfyller de grundläggande kraven och riktlinjerna enligt Europeiska bestämmelser.
12 Använda symboler
Endast för inomhusbruk IEC 60417- 5957
Växelström IEC 60417- 5032
Likström IEC 60417- 5031
Återvinning ISO 7001 - PI PF 066
Skyddsklass II IEC 60417- 5172
64
Page 66

Návod k použití
NÁVOD K POUŽITÍ
Obsah
1 Bezpečnostnípokyny ���������������������������������������������������������������������������� 66
2 Popisafunkce �������������������������������������������������������������������������������������� 67
2�1 Produkt ��������������������������������������������������������������������������������������������������67
2�2 Rozsah dodávky ������������������������������������������������������������������������������������67
2.3 Ovládacíprvky ��������������������������������������������������������������������������������������� 68
2�4 Technická data ��������������������������������������������������������������������������������������� 68
3 Použitídleurčení ���������������������������������������������������������������������������������� 69
4 Příprava ������������������������������������������������������������������������������������������������ 69
5 Montហ�������������������������������������������������������������������������������������������������� 69
6 Funkčnítlačítkaastavovéindikátory ���������������������������������������������������� 70
7 Dálkové ovládání ���������������������������������������������������������������������������������� 70
CS
7�1 Aktivace dálkového ovládání �����������������������������������������������������������������70
7.2 Vysvětlenítlačítek ����������������������������������������������������������������������������������71
7.3 Výměnabaterie ��������������������������������������������������������������������������������������71
8 Připojeníaprovoz ��������������������������������������������������������������������������������� 71
8.1 Uvedenídoprovozu �������������������������������������������������������������������������������71
8�2 Nastavení výšky �������������������������������������������������������������������������������������71
8�3 Nastavení úhlu sklonu ���������������������������������������������������������������������������71
9 Údržba,péče,skladováníapřeprava ��������������������������������������������������� 72
10 Pokyny k likvidaci ���������������������������������������������������������������������������������� 72
10�1 Produkt ��������������������������������������������������������������������������������������������������72
10�2 Baterie ���������������������������������������������������������������������������������������������������72
10�3 Obaly �����������������������������������������������������������������������������������������������������72
11ProhlášeníoshoděspředpisyEU ������������������������������������������������������� 72
12Použitésymboly ������������������������������������������������������������������������������������ 72
65
Page 67

1 Bezpečnostní pokyny
Návod k použití je součástí produktu a obsahuje důležité pokyny pro správné použití.
• Před použitím si pečlivě přečtěte kompletní návod k použití.
Návod k použití musí být k dispozici při pochybnostech a dalším předání produktu.
• Návod k použití uschovejte.
Nebezpečí úrazu elektrickým proudem
Pokud se výrobek dostane do kontaktu s vodou, může dojít k úrazu elektrickým proudem.
• Produktu se při jeho používání nedotýkejte vlhkýma rukama.
• Nepoužívejte výrobek v bezprostřední blízkosti vody, jako jsou vany, umyvadla nebo bazény.
Vystavení produktu stříkající dešťové vodě může mít za následek zasažení elektrickým proudem.
• Produkt neumísťujte do otevřeného okna.
Bez napětí je jen po vytažení zástrčky.
• V případě nouze, po použití a během bouřky vytáhněte síťovou zástrčku ze zásuvky přímo na krytu zástrčky.
• Pouzdro neotvírejte.
• Neprovádějte žádné změny na produktu a příslušenství.
• Nezkratujte přípojky a elektrické obvody.
• Pravidelně kontrolujte, zda je kabel přístroje stále nepoškozený.
• Nepoužívejte produkt, je-li kabel poškozený.
Vadný přístroj nesmíte uvést do provozu, ale musíte jej okamžitě odpojit od elektrické sítě a zajistit proti dalšímu neúmyslnému použití.
• Používejte pouze produkt, díly produktu a příslušenství v bezvadném stavu.
• V případě dotazů, závad, mechanických poškození, poruch a jiných problémů, které nelze vyřešit s pomocí průvodní dokumen-
tace, se obraťte na prodejce nebo výrobce.
• Vadné výrobky sami neopravujte, ale obraťte se na prodejce nebo výrobce.
Nebezpečí vtažení
Rotující díly mohou vtáhnout volný oděv a rozpuštěné vlasy. V opačném případě může dojít ke zranění osob nebo poškození přístroje.
• Své vlasy a volné součástí oděvu udržujte v bezpečné vzdálenosti od otáčejících se součástí.
• Ujistěte se, že se ventilátor nenachází v blízkosti závěsů nebo předmětů, které do něho mohou být vtaženy.
Nebezpečí zranění pohyblivými díly produktu
Za ochrannou mřížkou ventilátoru se nacházejí pohyblivé části.
• Nezasouvejte prsty nebo jakékoli předměty do otvorů ochranné mřížky.
V opačném případě může dojít ke zranění osob nebo poškození přístroje.
• Přístroj používejte pouze se zavřenou, nepoškozenou ochrannou mřížkou.
• Přístroj nepoužívejte, zjistíte-li poškození ochranné mřížky.
• Před odstraněním ochranné mřížky přístroj vypněte a vytáhněte síťovou zástrčku ze zásuvky.
• Výrobek vždy táhněte za zástrčku, nikoli za kabel.
Nebezpečí zakopnutí
• Dbejte na to, aby byl připojovací kabel položen tak, aby nepředstavoval překážku a nemohl se poškodit.
Kvůli různě vysokým rizikům a potenciálům nebezpečí smí některé pracovní kroky provádět jen školení odborní pracovníci.
• Montáž, obsluhu, údržbu, skladování, přepravu a likvidaci mohou provádět pouze koncoví uživatelé a uživatelé se základními
mechanickými a elektrotechnickými znalostmi.
• Demontáž, údržbu a opravy smí provádět pouze vyškolení odborníci.
K tomu jsou zapotřebí speciální bezpečnostní opatření, odborné znalosti a nástroje.
Nevhodné pro děti a osoby s fyzicky anebo psychicky omezenými schopnostmi.
• Zajistěte výrobek proti náhodnému použití.
• Zajistěte obal, drobné díly a izolační materiál proti neúmyslnému použití.
Provozní a skladovací podmínky
• NIKDY nenechávejte produkt v provozu bez dozoru!
• Nezakrývejte produkt.
• Drážka ventilátoru a větrací drážka musí být vždy volné.
• Använd inte produkten i dammiga miljöer eller vid otillräcklig ventilation.
• Produkt nepoužívejte v oblastech s výbušnými a/nebo hořlavými plyny.
• Produkt neumísťujte a nepoužívejte v blízkosti otevřeného ohně, varných zařízení nebo jiných zdrojů tepla, jakými jsou topná
tělesa a kamna.
• Produkt, díly produktu a příslušenství bezpečně umístěte, instalujte a přepravujte.
• Výrobek umístěte na stabilní, rovný, suchý a bezprašný povrch, aby se během provozu nemohl převrátit a aby se povrch ne-
poškodil vibracemi.
• Ujistěte se, že výrobek bezpečně stojí.
Ventilátor nesmí stát na síťovém kabelu, aby se během provozu nepřevrátil.
• Zamezte extrémním zatížením, jako je horko a chlad, mokro a přímé sluneční záření, mikrovlny a vibrace a mechanický tlak.
• Pokud přístroj nepoužíváte, při čištění nebo v případě poruchy jej vypněte a odpojte od elektrické sítě.
Nebezpečí hrozící u baterií
Dálkové ovládání je vybaveno lithiovým knoíkovým článkem. Ten lze vyměnit.
• Uchovávejte baterie mimo dosah dětí.
Spolknutí článku může vést k závažnému vnitřnímu poleptání a k úmrtí. Pokud máte podezření, že baterii někdo spolkl nebo se mu jinak dostala do těla, neprodleně vyhledejte lékaře.
• Nikdy nepoužívejte promáčknuté, netěsné nebo poškozené baterie.
• Vyteklé, deformované nebo korodované články vyjměte z produktu a zlikvidujte pomocí vhodných ochranných zařízení.
Pokud je baterie vyteklá, vyhněte se kontaktu s pokožkou, očima a sliznicemi. Popřípadě opláchněte postižená místa vodou a ihned
CS
66
Page 68

Návod k použití
vyhledejte lékaře.
• Baterie nedeformujte, nespalujte ani nerozebírejte a nikdy je nepropichujte ostrými předměty.
Extrémní teplo může vést k výbuchu a / nebo úniku korozivní kapaliny. Mechanické poškození může způsobit únik plynných látek, které mohou být vysoce dráždivé, hořlavé nebo toxické.
• Baterie nezkratujte a neponořujte je do kapalin.
Hrozí nebezpečí výbuchu, požáru, tepla, kouře a / nebo vývoje plynu.
• Pokud baterie náhodně spadne do vody, okamžitě ji vyjměte. Umístěte baterii na bezpečné a otevřené místo a držte se stra-
nou, dokud není zcela suchá. Vysušenou baterii znovu nepoužívejte, ale zlikvidujte ji, jak je uvedeno v kapitole 10.2.
2 Popis a funkce
2.1 Produkt
Tento výrobek je výkonný podstavný ventilátor, který generuje ventilaci ve 3 různých úrovních a režimech.
○ s dálkovým ovládáním a časovačem
○ 3 úrovně výkonu: lehký, silný, turbo
2.2 Rozsah dodávky
Číslo Označení Kusů. Popis Číslo Označení Kusů. Popis
CS
1 Podstavec 1
Zadní ochranná
2
mřížka
Přední ochran-
ná mřížka se
3
zajišťovacími spo-
nami
4 Rotor 1 11
Stojan s
funkčními tlačítky,
5
indikátory stavu a
blokem motoru
6 Šroub podstavy 1 13
7 Podložka 1
1 9
1 10
1 12
Upevňovací
8
matice
Upevňovací
šroub
Křížový šroub
Ø x L =
4,4 x 9,2 mm
Matice
Ø = 4,9 mm
Dálkové
ovládání
Lithiová knof-
líková buňka
(CR2025)
14 Návod k použití 1 -
1
1
1
1
1
1 -
67
Page 69

2.3 Ovládací prvky
15 Stavové indikátory
16 Funkční tlačítka
17 Síťový kabel se
zástrčkou Euro
18 Zajišťovací šroub
19 Zajišťovací kroužek
20 Přihrádka na baterie
2.4 Technická data
Objednací číslo 59509
Vstup 220-240 V
Jmenovitý výkon 45 W
Příkon ventilátoru (P) 38,1 W
Spotřeba energie v pohotovostním režimu (P
Maximální průtok ventilátoru (F) 33,5 m³/min
Provozní hodnota (SV) 0,9 (m³/min)/W
Norma pro měření provozní hodnoty IEC 60879:2019
Maximální rychlost proudění vzduchu (c) 2,0 m/s
Hladina akustického výkonu ventilátoru (L
Stupeň krytí / Třída ochrany
Připojení zařízení Euro zástrčka (typ C, CEE 7/16)
Délka kabelu (vč. Zástrčky) 1,6 m
Rozměry
(Š x V x H)
Ø
Barva bílo-šedá
Hmotnost 4550 g
Typ Infračervený
Vstupní napětí 3,0 V
Rozměry | Hmotnost 40 x 86 x 7 | 11 g
Typ Lithiová knoíková buňka (CR2025)
Jmenovité napětí, kapacita 3,0 V
Hmotnost 3 g
) 0,4 W
SB
) 58 dB(A)
WA
Dálkové ovládání
Baterie
, 50 Hz
IPX0 / II
39 x 125 x 39 cm
43 cm
, 150-165 mAh
CS
68
Page 70

Návod k použití
3 Použití dle určení
IPX0: Tento výrobek není chráněn proti vodě.
4 Příprava
Tento produkt je určen výhradně pro soukromé použití a pro stanovený účel. Tento produkt není určen pro komerční
použití. Jiné použití než použití popsané v kapitole „Popis a funkce“ nebo v „Bezpečnostních pokynech“ není dovoleno.
Tento produkt se smí používat jen v suchých místnostech. Nerespektování a nedodržení těchto ustanovení a
bezpečnostních pokynů může vést k těžkým úrazům, újmám na zdraví osob a věcným škodám.
1. Zkontrolujte úplnost a neporušenost obsahu dodávky.
2. Porovnejte technická data výrobku a elektrické sítě.
Tato data musí být identická.
5 Montáž
CS
1. Vložte stojan (5) do podstavce (1).
2. Postavte podstavec a podstavec na bok tak, abyste viděli spodní stranu podstavce.
POZOR! Podstavec je těžký!
• Dbejte na to, aby se pod podstavec nezaklínily prsty nebo končetiny!
3. Umístěte podložku (7) nad otvor uprostřed podstavce.
4. Vložte šroub podstavce (6) závitovou stranou skrz podložku.
5. Šroub podstavce utáhněte ve směru hodinových ručiček.
Stojan a podstavec jsou nyní navzájem pevně spojeny.
6. Vraťte stojan a podstavec zpět na místo.
7. Nasaďte zadní ochrannou mřížku (2) na osu bloku motoru (5).
Ujistěte se, že otvor na okraji zadní ochranné mřížky je dole.
8. Nasaďte upevňovací matici (8) na osu bloku motoru.
9. Upevňovací matici utáhněte ve směru hodinových ručiček.
Zadní ochranná mřížka je nyní upevněna.
69
10. Nasuňte rotor (4) na osu bloku motoru.
Dbejte na to, aby prohlubně na zadní straně rotoru byly nad kolíky na ose motoru.
11. Nasaďte upevňovací šroub (9) na osu bloku motoru.
12. Upevňovací šroub utáhněte proti směru hodinových ručiček.
Rotor je nyní upevněn.
13. Zavěste přední ochrannou mřížku (3) na zadní ochrannou mřížku pomocí háčku.
Dbejte na to, aby otvor na okraji přední ochranné mřížky směřoval k otvoru na okraji zadní
ochranné mřížky.
14. Přesuňte 4 zajišťovací spony, z nichž každá je umístěna na boku přední ochranné mřížky, přes
rámy obou ochranných mřížek.
15. Zasuňte křížový šroub (10) do otvorů obou ochranných mřížek.
16. Křížový šroub upevněte maticí (11).
17. Utáhněte křížový šroub ve směru hodinových ručiček.
Přední ochranná mřížka je nyní upevněna a ventilátor je připraven k použití.
Page 71

6 Funkční tlačítka a stavové indikátory
Ventilátor má 5 funkčních tlačítek a 12 stavových indikátorů.
V následující tabulce jsou vysvětlena funkční tlačítka a stavové indikátory.
Funkční tlačítka
Označení Popis
ON/SPEED
SWING
MODE
TIMER
OFF
POW Když se rozsvítí stavový indikátor, je ventilátor připojen k elektrické síti.
SLE
NAT
NOR
SW Když se rozsvítí stavový indikátor, je aktivována funkce oscilace.
H
M
4H, 2H,
1H, 0.5H
Stisknutím tlačítka ventilátor zapnete. Dalším stisknutím tlačítka zvolíte úroveň
výkonu.
Stisknutím tlačítka zapnete nebo vypnete funkci oscilace. Když je funkce oscilace zapnutá, ventilátor se pohybuje ze strany na stranu.
Stisknutím tlačítka nastavte požadovaný režim. Můžete si vybrat mezi režimy
NORMAL, NATURAL a SLEEP.
Stisknutím tlačítka aktivujete funkci časovače. Dalším stisknutím tlačítka prodloužíte dobu trvání funkce časovače.
Funkci časovače můžete nastavit v půlhodinových intervalech (0,5h, 1h, 1,5h,
2h, 2,5h, 3h, 3,5h, 4h, 4,5h, 5h, 5,5h, 6h, 6,5h, 7h, 7,5h).
Po uplynutí nastavené doby se ventilátor sám vypne. Chcete-li funkci časovače
ukončit, stiskněte tlačítko , dokud nezhasnou všechny stavové displeje
časovače (4H, 2H, 1H, 0.5H). Případně můžete ventilátor vypnout a znovu zapnout, abyste nastavený časovač vymazali.
Stisknutím tlačítka vypněte ventilátor. Nastavená úroveň výkonu a režim
zůstávají uloženy a jsou aktivní při opětovném zapnutí ventilátoru.
Stavové indikátory
Když se rozsvítí stavový indikátor, je aktivní režim SLEEP. Ventilátor spustí program různých rychlostí ventilátoru.
Když se rozsvítí stavový indikátor, je aktivní režim NATURAL. Ventilátor spouští
program různých rychlostí ventilátoru.
Když se rozsvítí stavový indikátor, je aktivní režim NORMAL. Ventilátor vytváří
stálý proud vzduchu při nastavené úrovni výkonu.
Když se rozsvítí stavový indikátor, je nastavena úroveň výkonu H. Ventilátor generuje silný proud vzduchu.
Když se rozsvítí stavový indikátor, je nastavena úroveň výkonu M. Ventilátor generuje středně silné proudění vzduchu.
Když se rozsvítí stavový indikátor, je nastaven stupeň výkonu L. Ventilátor ge-
L
neruje slabé proudění vzduchu.
Pokud se rozsvítí jeden ze stavových indikátorů, je po zadanou dobu aktiv-
ní funkce časovače. Pokud se rozsvítí několik stavových indikátorů, je funkce
časovače aktivní po celkový součet časů.
CS
7 Dálkové ovládání
7.1 Aktivace dálkového ovládání
• Vytáhněte chránič kontaktů z prostoru pro baterie (20).
Dálkový ovladač je nyní aktivován.
70
Page 72

Návod k použití
7.2 Vysvětlení tlačítek
Ventilátor můžete ovládat také pomocí dálkového ovládání.
Následující tabulka popisuje funkce tlačítek na dálkovém ovladači.
Označení Popis
OFF Stisknutím tlačítka vypněte ventilátor.
TIMER
MODE Stisknutím tlačítka nastavte požadovaný režim.
SWING Stisknutím tlačítka zapnete nebo vypnete funkci oscilace.
ON/SPEED Stisknutím tlačítka ventilátor zapnete. Dalším stisknutím tlačítka zvolíte úroveň výkonu.
7.3 Výměna baterie
V případě potřeby vyměňte vybitou baterii za novou stejného typu. Viz kapitola 2.4.
1. Otevřete přihrádku na baterie (20) zatlačením malé páčky do strany a poté ji vytáhněte.
2. Vyjměte prázdnou baterii.
3. Novou baterii vložte do přihrádky na baterie kladným pólem nahoru.
CS
4. Přihrádku na baterie opět zavřete.
5. Prázdnou baterii řádně zlikvidujte.
Viz také kapitola 10.2.
Stisknutím tlačítka aktivujete funkci časovače. Dalším stisknutím tlačítka prodloužíte
dobu trvání funkce časovače.
8 Připojení a provoz
8.1 Uvedení do provozu
1. Vyberte vhodné místo pro ventilátor.
Dbejte zejména na podmínky uvedené v kapitole 1 „Bezpečnostní pokyny“.
2. Připojte síťový kabel (17) ventilátoru do volné a snadno přístupné zásuvky.
3. Otočte přední část ventilátoru směrem, kterým chcete větrat.
Ventilátor je nyní připraven k provozu.
4. Pomocí funkčních tlačítek (16) nebo dálkového ovladače (12) nastavte úroveň výkonu, režim a funkci časovače.
5. Po použití ventilátor vypněte.
8.2 Nastavení výšky
Výšku ventilátoru můžete nastavit v rozmezí 108 až 128 cm.
1. Před nastavením výšky odpojte síťový kabel ze zásuvky.
2. Otočením zajišťovacího kroužku (19) proti směru hodinových ručiček jej uvolněte.
3. Nohou zatěžkejte podstavec a uchopte ventilátor za kryt, kde jsou umístěna funkční tlačítka a stavové indikátory.
4. Posouvejte horní část ventilátoru nahoru nebo dolů, dokud nenastavíte požadovanou výšku, a držte ventilátor v
této poloze.
5. Druhou rukou otočte zajišťovacím kroužkem ve směru hodinových ručiček, abyste jej utáhli.
Výška ventilátoru je nyní nastavena.
8.3 Nastavení úhlu sklonu
Můžete také nastavit úhel sklonu ventilátoru.
1. Před nastavením úhlu sklonu odpojte síťový kabel ze zásuvky.
2. Otočením zajišťovacího šroubu (18) proti směru hodinových ručiček jej uvolněte.
3. Držte ventilátor za ochrannou mřížku a pohybujte jím dopředu a dozadu podél vodorovné osy, dokud nenastavíte
požadovaný úhel sklonu. Ventilátor v této poloze podržte.
4. Druhou rukou otočte zajišťovacím šroubem ve směru hodinových ručiček, abyste jej utáhli.
Úhel sklonu ventilátoru je nyní nastaven.
71
Page 73

9 Údržba, péče, skladování a přeprava
Produkt je bezúdržbový.
DŮLEŽITÉ! Věcné škody
• Před čištěním vždy odpojte síťovou zástrčku.
• Používejte k čištění jen suchý a měkký hadřík.
• Nepoužívejte čisticí prostředky a chemikálie.
• Skladujte produkt při delším nepoužívání na místě nepřístupném pro děti a v suchém prostředí chráněném před prachem.
• Při delším nepoužívání vyjměte baterie/akumulátory.
• Pravidelně kontrolujte řádné upevnění produktu/šroubů.
• Skladujte v chladu a suchu.
• Uschovejte originální obal a použijte jej pro přepravu.
• Údržbu, demontáž a opravy smí provádět pouze kvalikovaný personál.
10 Pokyny k likvidaci
10.1 Produkt
Elektrické a elektronické přístroje se podle evropské směrnice WEEE nesmí likvidovat společně s domovním odpadem. Jejich
součásti se musí odevzdat k recyklaci nebo k likvidaci jako tříděný odpad, protože toxické a nebezpečné složky mohou při
neodborné likvidaci trvale poškodit životní prostředí.
Jako spotřebitel jste povinni podle zákona o odpadech vrátit elektrické a elektronické přístroje na konci jejich životnosti
výrobci, prodejci nebo bezplatně veřejnému sběrnému místu. Podrobnosti jsou upraveny příslušným zákonem státu. Symbol na
výrobku, návodu k obsluze a/nebo balení poukazuje na tato ustanovení. Díky správnému třídění, recyklaci a likvidaci starých zařízení
významně přispíváte k ochraně životního prostředí.
WEEE číslo: 82898622
10.2 Baterie
Baterie a akumulátory se nesmí vyhazovat do domovního odpadu. Jejich součásti se musí vytřídit podle materiálu a odevzdat
k recyklaci nebo k likvidaci, protože toxické a nebezpečné součásti mohou při nesprávné likvidaci dlouhodobě poškodit životní
prostředí. Jako spotřebitelé jste povinni je na konci jejich životnosti odevzdat bezplatně výrobci, do prodejny nebo na k tomu
zřízených veřejných sběrných místech. Podrobnosti upravují právní předpisy příslušné země. Symbol na produktu, v návodu
k použití anebo na obalu upozorňuje na tyto předpisy. Tímto způsobem třídění materiálů, recyklace a likvidace starých baterií a
akumulátorů přispějete významně k ochraně našeho životního prostředí.
D-34000-1998-0099
10.3 Obaly
Obaly lze zdarma likvidovat na veřejných sběrných místech - papír v popelnicích na papír, plasty ve žlutých pytlech a sklo
v kontejnerech na použité sklo.
DE4535302615620
11 Prohlášení o shodě s předpisy EU
Se symbolem CE Goobay®, registrovaná ochranná známka společnosti Wentronic GmbH zaručuje, že tento produkt
odpovídá základním evropskými standardům a směrnicím.
12 Použité symboly
Pouze pro vnitřní použití IEC 60417- 5957
Střídavý proud IEC 60417- 5032
Stejnosměrný proud IEC 60417- 5031
Recyklace ISO 7001 - PI PF 066
Třída ochrany II IEC 60417- 5172
CS
72
Page 74

Instrukcja obsługi
INSTRUKCJA OBSŁUGI
Spis treści
1 Zasadybezpieczeństwa ����������������������������������������������������������������������� 74
2 Opisifunkcja ���������������������������������������������������������������������������������������� 75
2�1 Produkt ��������������������������������������������������������������������������������������������������75
2�2 Zakres dostawy ��������������������������������������������������������������������������������������75
2.3 Elementyobsługowe ������������������������������������������������������������������������������76
2�4 Dane techniczne ������������������������������������������������������������������������������������ 76
3 Zastosowaniezgodnezprzeznaczeniem ��������������������������������������������� 77
4 Przygotowanie �������������������������������������������������������������������������������������� 77
5 Montaż �������������������������������������������������������������������������������������������������� 77
6 Przyciskifunkcyjneiwskaźnikistanu ��������������������������������������������������� 78
7 Pilot zdalnego sterowania ��������������������������������������������������������������������� 78
7.1 Uruchamianiepilotazdalnegosterowania ��������������������������������������������� 78
7.2 Objaśnienieprzycisków �������������������������������������������������������������������������79
PL
7�3 Wymiana baterii ������������������������������������������������������������������������������������� 79
8 Podłączenieiobsługa ��������������������������������������������������������������������������� 79
8�1 Uruchomienie ����������������������������������������������������������������������������������������� 79
8.2 Regulacjawysokości �����������������������������������������������������������������������������79
8.3 Regulacjakątanachylenia ��������������������������������������������������������������������� 79
9 Konserwacja,pielęgnacja,przechowywanieitransport ����������������������� 80
10Wskazówkidotycząceodpadów ����������������������������������������������������������� 80
10�1 Produkt ��������������������������������������������������������������������������������������������������80
10�2 Baterii ����������������������������������������������������������������������������������������������������� 80
10.3Opakowania ������������������������������������������������������������������������������������������� 80
11DeklaracjazgodnościznormamiUE ���������������������������������������������������� 80
12 Stosowane symbole ������������������������������������������������������������������������������ 80
73
Page 75

1 Zasady bezpieczeństwa
Instrukcja obsługi jest częścią składową produktu i zawiera ważne zasady prawidłowego użytkowania.
• Szczegółowo zapoznać się z całą instrukcją obsługi.
Instrukcja obsługi musi być dostępna w przypadku wątpliwości podczas obsługi, a także w razie przekazania produktu innym osobom.
• Przechować instrukcję obsługi.
Ryzyko porażenia prądem elektrycznym
W przypadku kontaktu produktu z wodą może dojść do porażenia prądem.
• Nie korzystać z urządzenia z mokrymi rękami.
• Nie używać produktu w bezpośrednim sąsiedztwie wody, np. w wannach, umywalkach lub basenach.
Krople deszczu spadające na produkt mogą spowodować porażenie prądem.
• Nie stawiać produktu w pobliżu otwartego okna.
Brak napięcia wyłącznie przy wyciągniętej wtyczce.
• W nagłych wypadkach, po użyciu i podczas burzy, wyciągnąć wtyczkę sieciową z gniazdka bezpośrednio przy obudowie wtyczki.
• Pod żadnym pozorem nie otwierać obudowy.
• Nie modykować produktu ani wyposażenia dodatkowego.
• Nie zwierać przyłączy ani obwodów sterujących.
• Regularnie sprawdzać, czy przewód zasilania urządzenia pozostaje nieuszkodzony.
• Nie używać produktu, gdy kabel jest uszkodzony.
Uszkodzonego urządzenia nie wolno uruchamiać, lecz niezwłocznie odłączyć od sieci i zabezpieczyć przed przypadkowym dalszym
użyciem.
• Korzystać jedynie z produktu, części produktu i wyposażenia dodatkowego w nienagannym stanie.
• W razie pytań, awarii i uszkodzeń mechanicznych, usterek i innych problemów, których nie można rozwiązać na podstawie
dołączonej dokumentacji zwrócić się do dystrybutora lub producenta.
• Nie naprawiać uszkodzonego wyrobu samodzielnie – zwrócić się do sprzedawcy albo producenta.
Niebezpieczeństwo wciągnięcia
Luźna odzież lub włosy mogą zostać wciągnięte przez obracające się części. Może to spowodować obrażenia lub uszkodzenie
urządzenia.
• Trzymać włosy i luźne ubranie z daleka od wirujących elementów.
• Wentylator nie może znajdować się w pobliżu ranek ani przedmiotów, które mogłyby zostać przez niego wciągnięte.
Ruchome części produktu stwarzają ryzyko odniesienia obrażeń
Za kratką ochronną wentylatora znajdują się ruchome części.
• Nie przekładać palców ani przedmiotów przez kratownicę ochronną. Może to spowodować obrażenia lub uszkodzenie
urządzenia.
Może to spowodować obrażenia lub uszkodzenie urządzenia.
• Korzystać z produktu tylko z zamkniętą, nieuszkodzoną kratownicą ochronną.
• Nie używać urządzenia, gdy kratownica ochronna jest uszkodzona.
• Przed zdjęciem kratownicy ochronnej należy najpierw wyłączyć urządzenie i odłączyć wtyczkę sieciową.
• Zawsze wyciągaj produkt za wtyczkę, a nie za kabel.
Ryzyko potknięcia się
• Zwrócić uwagę, aby kabel przyłączeniowy został ułożony w taki sposób, aby nikomu nie przeszkadzał i nie został uszkodzony.
Ze względu na różnego rodzaju wysokie ryzyka i potencjalne zagrożenia niektóre czynności mogą wykonywać wyłącznie przeszkoleni specjaliści.
• Montaż, obsługa, konserwacja, przechowywanie, transport i utylizacja mogą być wykonywane wyłącznie przez użytkowników
końcowych i użytkowników posiadających podstawową wiedzę z zakresu mechaniki i elektryki.
• Demontaż, prace konserwacyjne i naprawy mogą być przeprowadzane wyłącznie przez przeszkolonych specjalistów.
Wymagane są do tego specjalne środki bezpieczeństwa, wiedza i narzędzia.
Nie nadaje się dla dzieci i osób o ograniczonych zdolnościach zycznych lub psychicznych.
• Zabezpieczyć produkt przed przypadkowym użyciem.
• Zabezpieczyć opakowanie, drobne części i materiał izolacyjny przed przypadkowym użyciem.
Warunki eksploatacji i przechowywania
• NIGDY nie zostawiać włączonego produktu bez nadzoru!
• Nie przykrywać produktu.
• Nie zasłaniać otworów wentylacyjnych.
• Nie korzystać z urządzenia w zapylonym otoczeniu ani przy niedostatecznej wentylacji.
• Nie korzystać z produktu w stree występowania gazów wybuchowych ani palnych.
• Nie umieszczać produktu ani nie korzystać z niego w pobliżu źródeł otwartego ognia ani urządzeń do gotowania lub
wytwarzających ciepło, takich grzejniki czy piece.
• Produkt, jego części i wyposażenie dodatkowe umieścić w bezpiecznym miejscu, zamontować i przenieść.
• Umieść produkt na stabilnej, równej, suchej i wolnej od kurzu powierzchni, tak aby nie przewrócił się podczas pracy, a powierz-
chnia nie została uszkodzona przez wibracje.
• Należy upewnić się, że produkt stoi stabilnie.
Wentylator nie może stać na kablu zasilającym, aby nie przewrócił się podczas pracy.
• Unikać skrajnych obciążeń, takich jak wysoka i niska temperatura, wilgoć i bezpośrednie działanie promieni słonecznych, mikrofale oraz wibracje i nacisk mechaniczny.
• Wyłączyć urządzenie i odłączyć je od sieci, gdy nie jest używane, w celu czyszczenia lub w przypadku awarii.
Zagrożenia dla akumulatora
Pilot jest wyposażony w litowe ogniwo guzikowe. Można je wymienić.
PL
74
Page 76

Instrukcja obsługi
• Baterie trzymać z dala od dzieci.
W razie połknięcia może ona spowodować poważne oparzenia wewnętrzne i śmierć. W razie przypuszczenia, że doszło do połknięcia
baterii lub że w inny sposób dostała się ona do ciała, należy bezzwłocznie udać się do lekarza.
• Nigdy nie używać wgniecionych, nieszczelnych lub uszkodzonych baterii.
• Rozlane, zdeformowane lub skorodowane ogniwa wyjąć z produktu i zutylizować z zachowaniem odpowiednich zabezpieczeń.
W przypadku wycieku baterii unikać kontaktu ze skórą, oczami i śluzówkami. W razie potrzeby przepłukać skażone miejsca wodą i
niezwłocznie skontaktować się z lekarzem.
• Nie wolno deformować, palić ani demontować baterii i nie wolno ich przebijać ostrym przedmiotem.
Ekstremalne ciepło może doprowadzić do eksplozji i/lub wycieku żrącej cieczy. Uszkodzenia mechaniczne mogą powodować wydostawanie się substancji gazowych, które mogą być wysoce drażniące, łatwopalne lub toksyczne.
• Nie wolno zwierać baterii ani zanurzać ich w cieczach.
Istnieje ryzyko wybuchu, pożaru, wydzielania ciepła, dymu i/lub gazu.
• Jeśli bateria zostanie przypadkowo wrzucona do wody, należy ją natychmiast wyjąć. Umieść baterię w bezpiecznym, otwar-
tym miejscu i nie zbliżaj się do niej aż do całkowitego wyschnięcia. Wysuszonej baterii nie należy używać ponownie, lecz
zutylizować zgodnie z opisem w rozdziale 10.2.
2 Opis i funkcja
2.1 Produkt
Ten produkt jest potężny wentylator cokołu, który generuje wentylację w 3 różnych poziomach i różnych trybach.
○ z pilotem zdalnego sterowania i wyłącznikiem czasowym
○ 3 poziomy mocy: lekki, silny, turbo
2.2 Zakres dostawy
Nr. Oznaczenie Szt. Opis Nr. Oznaczenie Szt. Opis
PL
1 Baza 1
Tylna kratka och-
2
3
4 Wirnik 1 11
5
6 Śruba bazy 1 13
7 Podkładka 1
ronna
Przednia kratka
ochronna z za-
trzaskami
Podstawa z przy-
ciskami funkcyjny-
mi, wskaźnikami
stanu i blokiem
silnika
1 9 Śruba mocująca 1
1 10
1 12
Nakrętka
8
mocująca
Śruba
krzyżakowa
Ø x L =
4,4 x 9,2 mm
Nakrętka
Ø = 4,9 mm
Pilot zdalnego
sterowania
Litowe ogniwo
guzikowe
(CR2025)
14 Instrukcja obsługi 1 -
1
1
1
1
1 -
75
Page 77

2.3 Elementy obsługowe
2.4 Dane techniczne
Numer artykułu 59509
Wejście 220-240 V
Moc nominalna 45 W
Moc wentylatora (P) 1. 38,1 W
Pobór mocy w trybie czuwania (P
Maksymalne natężenie przepływu wentylatora (F) 3. 33,5 m³/min
Wartość eksploatacyjna (SV) 4. 0,9 (m³/min)/W
Norma dla pomiaru wartości eksploatacyjnej 5. IEC 60879:2019
Maksymalna prędkość powietrz (c) 6. 2,0 m/s
Poziom mocy akustycznej wentylatora (L
Stopień ochrony / Klasa ochronności
Przyłącza urządzenia Wtyk europejski (typ C, CEE 7/16)
Długość kabla (incl. Wtyk) 1,6 m
Wymiary
(dł. x szer. x wys.)
Ø
Kolor biało-szary
Masa 4550 g
Typ Podczerwień
Napięcie wejściowe 3,0 V
Wymiary | Masa 40 x 86 x 7 | 11 g
Typ Litowe ogniwo guzikowe (CR2025)
Napięcie nominalne, Pojemność 3,0 V
Masa 3 g
) 2. 0,4 W
SB
) 7. 58 dB(A)
WA
Pilot zdalnego sterowania
Bateria
, 50 Hz
IPX0 / II
39 x 125 x 39 cm
43 cm
, 150-165 mAh
15 Wskaźniki stanu
16 Przyciski funkcyjne
17 Kabel zasilający z
wtykiem europejskim
18 Śruba blokująca
19 Pierścień blokujący
20 Komora baterii
PL
76
Page 78

Instrukcja obsługi
3 Zastosowanie zgodne z przeznaczeniem
oraz szkód osobowych i materialnych.
IPX0: Ten produkt nie jest chroniony przed wodą.
4 Przygotowanie
Produkt służy wyłącznie do użytku prywatnego i do tego celu został przewidziany. Produkt nie jest przeznaczony do
zastosowań profesjonalnych. Użytkowanie w sposób inny niż opisano w rozdziałach „Opis i funkcje” oraz „Wskazówki
dotyczące bezpieczeństwa” jest niedopuszczalne. Niniejszy produkt może być stosowany wyłącznie w suchych po
mieszczeniach. Nieprzestrzeganie tych postanowień i zasad bezpieczeństwa może doprowadzić do poważnych wypadków
1. Sprawdzić zawartość opakowania pod względem kompletności i integralności.
2. Należy porównać ze sobą dane techniczne wyrobu i napięcie sieciowe.
Wartości te muszą być identyczne.
5 Montaż
1. Włożyć podstawę (5) do bazy (1).
2. Umieść podstawę i bazę na swoich bokach tak, aby można było zobaczyć spód bazy.
OSTROŻNIE! Baza jest ciężka!
• Upewnij się, że pod bazą nie zaklinowały się palce ani kończyny!
PL
3. Nałożyć podkładkę (7) na otwór w środku podstawy.
4. Włożyć śrubę bazy (6) gwintowaną stroną przez podkładkę.
5. Dokręcić śrubę bazę zgodnie z ruchem wskazówek zegara.
Podstawa i baza są teraz mocno ze sobą połączone.
6. Umieścić podstawę i bazę z powrotem na miejscu.
7. Wsunąć tylną kratę ochronną (2) na oś bloku silnika (5).
Zwrócić uwagę na to, aby otwór na krawędzi tylnej kraty ochronnej znajdował się na dole.
8. Nasunąć nakrętkę mocującą (8) na oś bloku silnika.
9. Dokręcić nakrętkę mocującą zgodnie z ruchem wskazówek zegara.
Tylna kratka ochronna jest teraz zamocowana.
77
10. Nasunąć wirnik (4) na oś bloku silnika.
Zwrócić uwagę, aby wgłębienia na tylnej stronie wirnika znalazły się nad kołkami na osi silnika.
11. Wsunąć śrubę mocującą (9) na oś bloku silnika.
12. Dokręcić śrubę mocującą w kierunku przeciwnym do ruchu wskazówek zegara.
Wirnik jest teraz zamocowany.
13. Zawiesić przednią kratę ochronną (3) za pomocą haka na tylnej kracie ochronnej.
Zwrócić uwagę, aby otwór na krawędzi przedniej kraty ochronnej był skierowany w stronę otworu na krawędzi tylnej kraty ochronnej.
14. Nasunąć 4 zatrzaski, każdy z boku przedniej kratki ochronnej, na ramki obu kratek ochron-
nych.
15. Przełożyć śrubę krzyżakową (10) przez otwory obu kratek ochronnych.
16. Przymocować śrubę krzyżakową za pomocą nakrętki (11).
17. Dokręcić śrubę krzyżakową zgodnie z ruchem wskazówek zegara.
Przednia kratka ochronna jest teraz zamocowana i wentylator jest gotowy do użycia.
Page 79

6 Przyciski funkcyjne i wskaźniki stanu
Wentylator posiada 5 przycisków funkcyjnych i 12 wskaźników stanu.
W poniższej tabeli objaśniono przyciski funkcyjne i wskaźniki stanu.
Przyciski funkcyjne
Oznaczenie Opis
ON/SPEED
SWING
MODE
TIMER
OFF
POW Gdy świeci się wskaźnik stanu, wentylator jest podłączony do sieci.
SLE
NAT
NOR
SW Gdy świeci się wskaźnik stanu, aktywowana jest funkcja oscylacji.
H
M
4H, 2H,
1H, 0.5H
Nacisnąć przycisk, aby włączyć wentylator. Ponownie nacisnąć przycisk, aby
wybrać poziom mocy.
Nacisnąć przycisk w celu włączenia lub wyłączenia funkcji oscylacji. Gdy funkcja oscylacji jest włączona, wentylator porusza się z boku na bok.
Nacisnąć przycisk w celu ustawienia żądanego trybu. Można wybrać pomiędzy
trybami NORMAL, NATURAL i SLEEP.
Nacisnąć przycisk , aby aktywować funkcję timera. Naciśnij przycisk ponownie,
aby przedłużyć czas trwania funkcji wyłącznika czasowego.
Funkcję timera można ustawić w odstępach półgodzinnych (0.5h, 1h, 1.5h, 2h,
2.5h, 3h, 3.5h, 4h, 4.5h, 5h, 5.5h, 6h, 6.5h, 7h, 7.5h).
Po upływie ustawionego czasu wentylator sam się wyłączy. Aby zakończyć
funkcję timera, należy naciskać przycisk do momentu, aż zgasną wszystkie
wskazania stanu timera (4H, 2H, 1H, 0.5H). Alternatywnie można wyłączyć i ponownie włączyć wentylator, aby skasować ustawiony zegar.
Aby wyłączyć wentylator, należy nacisnąć przycisk. Ustawiony poziom mocy i
tryb pracy pozostają zapisane i są aktywne przy ponownym włączeniu wenty-
latora.
Wskaźniki stanu
Gdy wskaźnik stanu świeci się, aktywny jest tryb SLEEP. Wentylator realizuje
program różnych prędkości wentylatora.
Gdy wskaźnik stanu świeci się, aktywny jest tryb NATURAL. Wentylator pracuje
z programem różnych prędkości wentylatora.
Gdy wskaźnik stanu świeci się, aktywny jest tryb NORMAL. Wentylator wytwarza stały strumień powietrza przy ustawionym poziomie mocy.
Gdy wskaźnik stanu świeci się, ustawiony jest poziom mocy H. Wentylator wytwarza silny strumień powietrza.
Gdy wskaźnik stanu świeci się, ustawiony jest poziom mocy M. Wentylator wytwarza średnio silny strumień powietrza.
Gdy wskaźnik stanu świeci się, ustawiony jest poziom mocy L. Wentylator wyt-
L
warza lekki strumień powietrza.
Jeśli świeci się jeden ze wskaźników stanu, funkcja timera jest aktywna przez
określony czas. Jeśli zaświeci się kilka wskaźników stanu, funkcja zegara
sterującego jest aktywna przez całkowitą sumę czasu.
PL
7 Pilot zdalnego sterowania
7.1 Uruchamianie pilota zdalnego sterowania
• Wyciągnąć osłonę styków z komory baterii (20).
Pilot zdalnego sterowania jest teraz aktywny.
78
Page 80

Instrukcja obsługi
7.2 Objaśnienie przycisków
Wentylatorem można sterować również za pomocą pilota zdalnego sterowania.
W poniższej tabeli opisano funkcje przycisków na pilocie zdalnego sterowania.
Oznaczenie Opis
OFF Aby wyłączyć wentylator, należy nacisnąć przycisk.
TIMER
MODE Nacisnąć przycisk w celu ustawienia żądanego trybu.
SWING Nacisnąć przycisk w celu włączenia lub wyłączenia funkcji oscylacji.
Nacisnąć przycisk , aby aktywować funkcję timera. Naciśnij przycisk ponownie, aby
przedłużyć czas trwania funkcji wyłącznika czasowego.
ON/SPEED
7.3 Wymiana baterii
W razie potrzeby należy wymienić pustą baterię na nową tego samego typu. Patrz rozdział 2.4.
1. Otwórz komorę baterii (20), przesuwając małą dźwignię w bok, a następnie wyciągnij komorę baterii.
2. Wyjmij pustą baterię.
3. Umieść nową baterię w komorze baterii biegunem dodatnim skierowanym do góry.
4. Ponownie zamknij komorę baterii.
5. Zużytą baterię należy zutylizować w odpowiedni sposób.
Patrz również rozdział 10.2.
Nacisnąć przycisk, aby włączyć wentylator. Ponownie nacisnąć przycisk, aby wybrać
poziom mocy.
PL
8 Podłączenie i obsługa
8.1 Uruchomienie
1. Wybrać odpowiednie miejsce dla wentylatora.
Należy zwrócić szczególną uwagę na warunki wymienione w rozdziale 1 „ Zasady bezpieczeństwa“.
2. Podłączyć kabel sieciowy (17) wentylatora do wolnego i łatwo dostępnego gniazdka.
3. Obrócić przód wentylatora w kierunku, w którym ma być wentylowany.
Wentylator jest teraz gotowy do pracy.
4. Ustaw poziom mocy, tryb i funkcję timera za pomocą przycisków funkcyjnych (16) lub pilota zdalnego sterowania (12).
5. Po użyciu wyłączyć wentylator.
8.2 Regulacja wysokości
Wysokość wentylatora można regulować w zakresie od 108 do 128 cm.
8. Przed przystąpieniem do regulacji wysokości należy wyjąć kabel zasilający z gniazdka.
9. Obrócić pierścień blokujący (19) w kierunku przeciwnym do ruchu wskazówek zegara, aby go poluzować.
10. Obciążyć stopą bazę i chwycić wentylator za obudowę, gdzie znajdują się przyciski funkcyjne i wskaźniki stanu.
11. Przesuwać górną część wentylatora w górę lub w dół aż do ustawienia żądanej wysokości i przytrzymać wenty-
lator w tej pozycji.
12. Drugą ręką obrócić pierścień blokujący zgodnie z ruchem wskazówek zegara, aby go dokręcić.
Wysokość wentylatora jest teraz wyregulowana.
8.3 Regulacja kąta nachylenia
Można również wyregulować kąt nachylenia wentylatora.
1. Przed przystąpieniem do regulacji kąta nachylenia należy wyjąć kabel zasilający z gniazdka.
2. Obrócić śrubę blokującą (18) w kierunku przeciwnym do ruchu wskazówek zegara, aby ją poluzować.
3. Trzymając wentylator za kratkę ochronną, przesuwać go w przód i w tył wzdłuż osi poziomej, aż do ustawienia
żądanego kąta nachylenia. Przytrzymać wentylator w tej pozycji.
4. Drugą ręką obrócić śrubę blokującą zgodnie z ruchem wskazówek zegara, aby ją dokręcić.
Kąt nachylenia wentylatora jest teraz wyregulowany.
79
Page 81

9 Konserwacja, pielęgnacja, przechowywanie i transport
Produkt jest bezobsługowy
UWAGA! Szkody materialne
• Przed czyszczeniem należy zawsze odłączyć wtyczkę sieciową.
• Do czyszczenia używać wyłącznie suchej i miękkiej ściereczki.
• Nie stosować żadnych środków czyszczących i chemicznych.
• W przypadku nieużywania przez dłuższy czas produkt przechowywać w miejscu niedostępnym dla dzieci, w suchym otoczeniu
chronionym przed pyłem.
• W przypadku nieużywania przez dłuższy czas należy wyjąć baterie/akumulator.
• Regularnie sprawdzać prawidłowe zamocowanie produktu/śruby.
• Przechowywać w chłodnym i suchym miejscu.
• Przechować oryginalne opakowanie i skorzystać z niego w przypadku transportu.
• Prace konserwacyjne, demontaż i naprawy mogą być przeprowadzane wyłącznie przez wykwalikowany personel.
10 Wskazówki dotyczące odpadów
10.1 Produkt
Zgodnie z europejską dyrektywą WEEE urządzeń elektrycznych i elektronicznych nie wolno wyrzucać razem z odpadami
domowymi. Ich elementy składowe trzeba osobno przekazać do recyklingu lub utylizacji, ponieważ nieprawidłowo
zutylizowane substancje toksyczne lub niebezpieczne mogą trwale zaszkodzić zdrowiu i środowisku.
Po zakończeniu przydatności produktu, klienci są zobowiązani obowiązującymi przepisami do usuwania urządzeń
elektrycznych i elektronicznych poprzez ich bezpłatne przekazanie producentowi, dostawcy lub przekazanie do publicznych miejsc
zbiórki. Szczegóły są regulowane przepisami krajowymi. Obecność tego symbolu na produkcie, w podręczniku użytkownika, albo na
opakowaniu implikuje te określenia. Poprzez stosowanie tego rodzaju separacji odpadów, stosowania i usuwania odpadów, jakimi są
zużyte urządzenia, użytkownicy mają swój udział w ochronie środowiska naturalnego.
WEEE Nr.: 82898622
10.2 Baterii
Baterii i akumulatorów nie wolno wyrzucać razem z odpadami domowymi. Ich elementy składowe muszą być osobno
przekazywane do recyklingu lub utylizacji, ponieważ nieprawidłowo utylizowane substancje trujące lub niebezpieczne mogą
trwale zaszkodzić środowisku.
Konsumenci są zobowiązani do nieodpłatnego zwrotu wspomnianych elementów po zakończeniu ich eksploatacji do
producenta, punktu sprzedaży lub specjalnych, publicznych punktów odbioru. Szczegółowe informacje na ten temat są zawarte
w przepisach poszczególnych krajów. O wymaganiach tych informuje symbol umieszczony na produkcie, w instrukcji obsługi lub na
opakowaniu. Taka segregacja surowców oraz recykling i utylizacja zużytych baterii i akumulatorów stanowią ważny wkład w ochronę
środowiska.
D-34000-1998-0099
PL
10.3 Opakowania
Opakowania można bezpłatnie dołączać do pojemników zbiorczych – papier do pojemnika na makulaturę, tworzywa sztuczne
do żółtego worka oraz szkło do pojemnika na szkło.
DE4535302615620
11 Deklaracja zgodności z normami UE
Za pomocą oznakowania CE Goobay®, zarejestrowana marka Wentronic GmbH, deklaruje, że produkt spełnia zasadnicze
wymagania i wytyczne zawarte w przepisach europejskich.
12 Stosowane symbole
Tylko do użytku wewnętrznego IEC 60417- 5957
Prąd zmiennyt IEC 60417- 5032
Prąd stały IEC 60417- 5031
Recykling ISO 7001 - PI PF 066
Klasa ochronności, Klasa II IEC 60417- 5172
80
Page 82

REV2021-11-05
V1�0aw
Goobay
by Wentronic GmbH
Pillmannstraße 12
38112 Braunschweig
Germany
Made in China
© by Wentronic Deutschland
Hotline: +49 (0180) 5005882
E-Mail: info@goobay�de
Web: www�wentronic�com/content/mygoobay/
*(0,14 € / Minute aus dem deutschen Festnetz)
(0�14 € / minute from German landline)
(0,14€/minutedepuisunpostexeallemand)
(0,14€/minutodallaretessatedesca)
(0,14€/minutodesdeelteléfonojoalemán)
(0,14 € / minuut van Duitse vaste lijn)
(0,14 € / minut fra tysk fastnet)
(0,14 € / minut från tysk fast telefon)
(0,14€/minutazněmecképevnélinky)
(0,14 € / minuta z niemieckiej linii stacjonarnej)
®
16 Zoll Standventilator
16 Inch Pedestal Fan
Ventilateur sur pied de 16 pouces
Ventilatore a piedistallo da 16 pollici
Ventilador de pedestal de 16 pulgadas
Ventilator op voetstuk van 16 Zoll
16 tommer piedestalventilator
16 tum Piedestaläkt
16palcový podstavcový ventilátor
Wentylator podłogowy 16 cali
 Loading...