

Page 1
Schaltnetzteil NTS 120 W easy USB LCD 8A
54794
Switching mode power supply NTS 120 W easy USB LCD 8A
54794
Bedienungsanleitung
Manual
Page 2

Bedienungsanleitung
Schaltnetzteil NTS 120 W easy USB LCD 8A 54794
ACHTUNG! Lesen Sie die Bedienungsanleitung vollständig und sorgfältig durch.
Sie ist Bestandteil des Produktes und enthält wichtige Hinweise zur korrekten
Inbetriebnahme und Benutzung. Bewahren Sie sie auf, damit Sie diese bei
Weitergabe des Gerätes an andere Personen übergeben können.
Inhaltsverzeichnis: Seite:
1 Beschreibung und Funktion 2
2 Bestimmungsgemäßer Gebrauch 2
3 Sicherheitshinweise 3
4 Lieferumfang 3
5 Grasche Darstellung 4
6 Bedienung 4
6.1 Netzteilnutzung 4
6.2 Laden des Notebookakkus 5
6.3 Nutzung der USB-Ladefunktion 5
7 Pege, Wartung, Lagerung und Transport 5
8 Problembehebung 5
9 Gewährleistung und Haftung 6
10 Technische Daten 6
11 DC Adapter-Übersicht 7
12 Entsorgungshinweise 7
13 EU-Konformitätserklärung 7
1 Beschreibung und Funktion:
Ihr Produkt ist ein universales, mikroprozessorgesteuertes Schaltnetzteil für Notebooks,
Mini-Notebooks, Displays, usw. Es verfügt über 10 verpolungssichere Adapterstecker für
viele gängige Modelle und einen separaten 5,0 Volt USB-Ausgang zum Laden oder
Betreiben von MP3-Playern, Digitalkameras, Handys, usw. Die LCD-Anzeige am Kabel
informiert Sie mit weißer Beleuchtung über die Spannung am DC-Stecker. Einstellungen
werden automatisch erkannt. Es ist weltweit einsetzbar. Die DC-Stecker sind auf die
jeweilige Ausgangsspannung voreingestellt. Wählen Sie einfach den passenden Stecker zu
Ihrem Gerät aus.
Sicherheitsausstattung: - antistatische Oberäche und feuerfestes Gehäuse
- Übertemperaturschutz bei 85°C, kurzschlusssicher
- Überspannungssschutz bei 24 V, Überlastungsschutz bei
> 8,0 A und Ladezeitüberwachung
2 Bestimmungsgemäßer Gebrauch:
Ihr Produkt ist nur zum Laden und betreiben der in Kapitel 1 genannten Geräte vorgesehen.
Ein anderer Gebrauch ist nicht gestattet. Die Verwendung darf nur in trockenen Innenräumen erfolgen. Das Nichtbeachten und Nichteinhalten dieser Bestimmungen und der
Sicherheitshinweise kann zu schweren Unfällen und Schäden an Personen und Sachen
führen.
2
Page 3

3 Sicherheitshinweise:
ACHTUNG! Die Montage und Demontage des Produktgehäuses sowie die
Wartung der Elektronik darf nur durch ausgebildetes Elektro-Fachpersonal
erfolgen! Es besteht u. a. Stromschlag- und Kurzschlussgefahr!
• Ihr Produkt ist kein Spielzeug und gehört nicht in Kinderhände, weil zerbrechliche,
kleine und verschluckbare Teile enthalten sind, die bei unsachgemäßem Gebrauch Per sonen schädigen können!
• Bitte installieren und Lagern Sie das Produkt und das Zubehör so, dass keine Personen
oder Sachen z.B. durch Herabstürzen oder Stolpern verletzt oder beschädigt werden
können.
• Lassen Sie Verpackungsmaterial nicht einfach liegen, da sich spielende Kinder daran
schneiden können. Weiterhin besteht die Gefahr des Verschluckens und Einatmens
von Kleinteilen und Dämmmaterial.
• Stellen Sie anhand der Bedienungsanleitung Ihres zu betreibenden Gerätes, wie
Laptop, Handy, usw. sicher, dass die Anschlüsse und Betriebsspannungen zum Netzteil
kompatibel sind und umgekehrt.
• Ein defektes Gerät darf nicht in Betrieb genommen werden, sondern muss sofort
vom Netz getrennt und gegen eine unbeabsichtigte Weiterbenutzung gesichert werden.
Im Reparaturfall darf das Gerät nur von Elektro-Fachkräften geöffnet und repariert
werden, die aufgrund ihrer Ausbildung dazu befugt sind. Ein Selbsteingriff birgt die
Gefahr eines Stromschlags und führt zum Erlöschen des Garantieanspruchs.
• Betreiben Sie das Gerät nur am 100-240 V ~/ 50-60 Hz Wechselstromnetz.
• Ziehen Sie bei Nichtgebrauch und Gewitter das Netzkabel aus der Steckdose.
• Setzen Sie das Gerät keiner starken Hitze oder Feuchtigkeit aus, bzw. Stellen, die mit
Wasser in Berührung kommen können.
• Legen und stellen Sie keine Gegenstände auf das Gerät.
• Für den Einsatz in Industriebetrieben sind die entsprechenden gesetzlichen Bestim-
mungen zur Unfallverhütung einzuhalten.
• Setzen Sie das Gerät und dessen Zubehör keinen hohen mechanischen Belastungen
aus.
• Modizieren und ändern Sie den Artikel und dessen Zubehörteile nicht! Beachten Sie
dazu auch das Kapitel „Gewährleistung und Haftung“
• Verwenden Sie keine beschädigten Teile.
• Das Gerät darf nur in trockenen Innenräumen installiert und betrieben werden.
• Das Gerät erwärmt sich während des Betriebes.
4 Lieferumfang:
- 1 x Schaltnetzteil
-10 x DC-Adapterstecker mit Verpolschutz
- 1 x Schutzkonatkt-Netzstecker
- 1 x Bedienungsanleitung
3
Page 4
Bedienungsanleitung
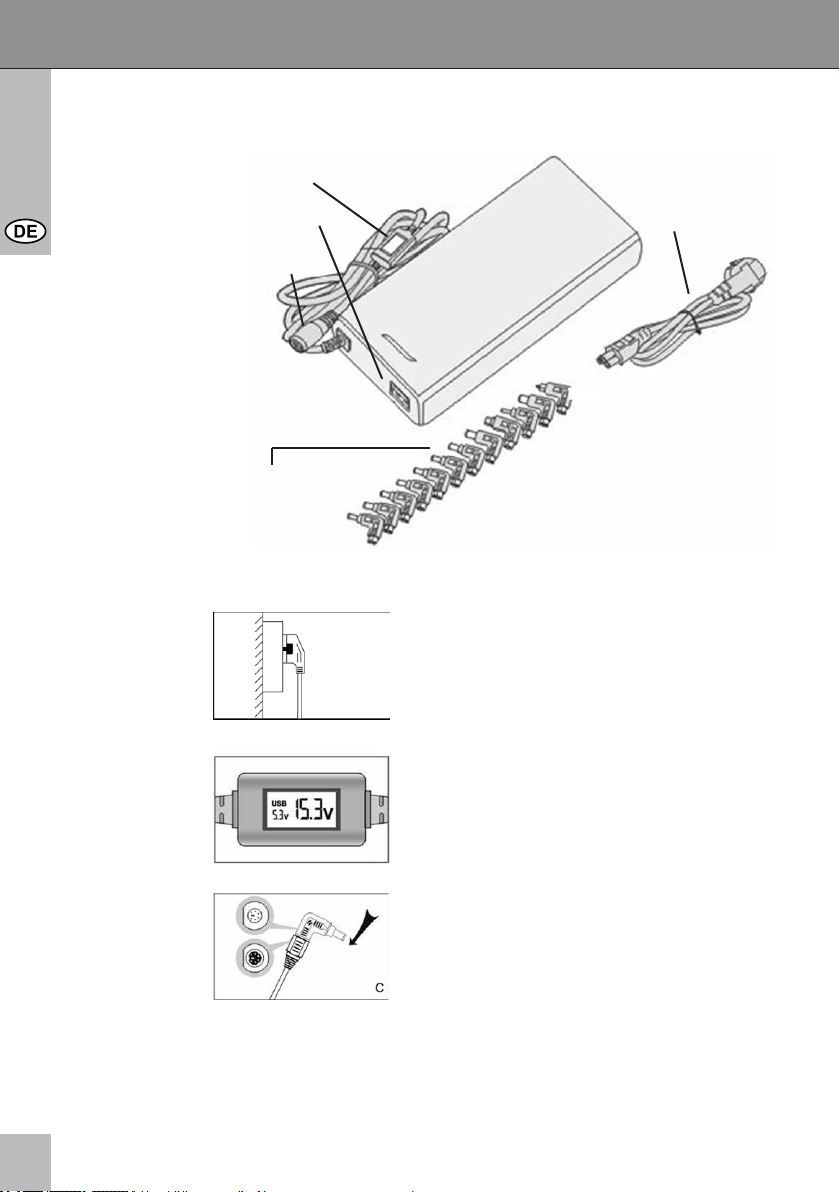
5 Grasche Darstellung:
6 Bedienung:
6.1 Netzteilnutzung:
A
LCD-Anzeige
USB Ausgang
DC Anschluss
DC Adapterstecker
100-240 V AC
Netzstecker
1. Verbinden Sie das AC-Netzkabel mit dem
Netzteil.
2. Stecken Sie das andere Ende des AC- Netzkabels
in eine 100-240 V AC Steckdose ohne dass ein
DC-Adapterstecker angeschlossen ist. (Bild A)
B
C
4
3. Die LED-Betriebsanzeige und das LCD-Display
leuchtet und zeigt 15-15,6 V DC an. (Bild B)
4. Wählen Sie anhand der technischen Daten und
der Bedienungsanleitung z.B. Ihres Laptops
den passenden DC-Adapterstecker und
verbinden Sie ihn mit der DC-Kupplung des
Netzgerätes. (Bild C). Achten Sie auf korrekte
Polung. Die Spannungen sind voreingestellt.
5. Verbinden Sie das Netzgerät jetzt mit Ihrem
Laptop. Das LCD-Display zeigt ähnlich wie in
Abb. B die relative Ausgangsspannung.
Vergleichen Sie diese vor dem Anschalten mit
den technischen Daten Ihres Notebooks.
Page 5
6.2 Laden des Notebookakkus:
Der Geräteakku wird automatisch bei Betrieb über das Netzteil geladen. Den Ladestatus
entnehmen Sie Ihrem Gerät.
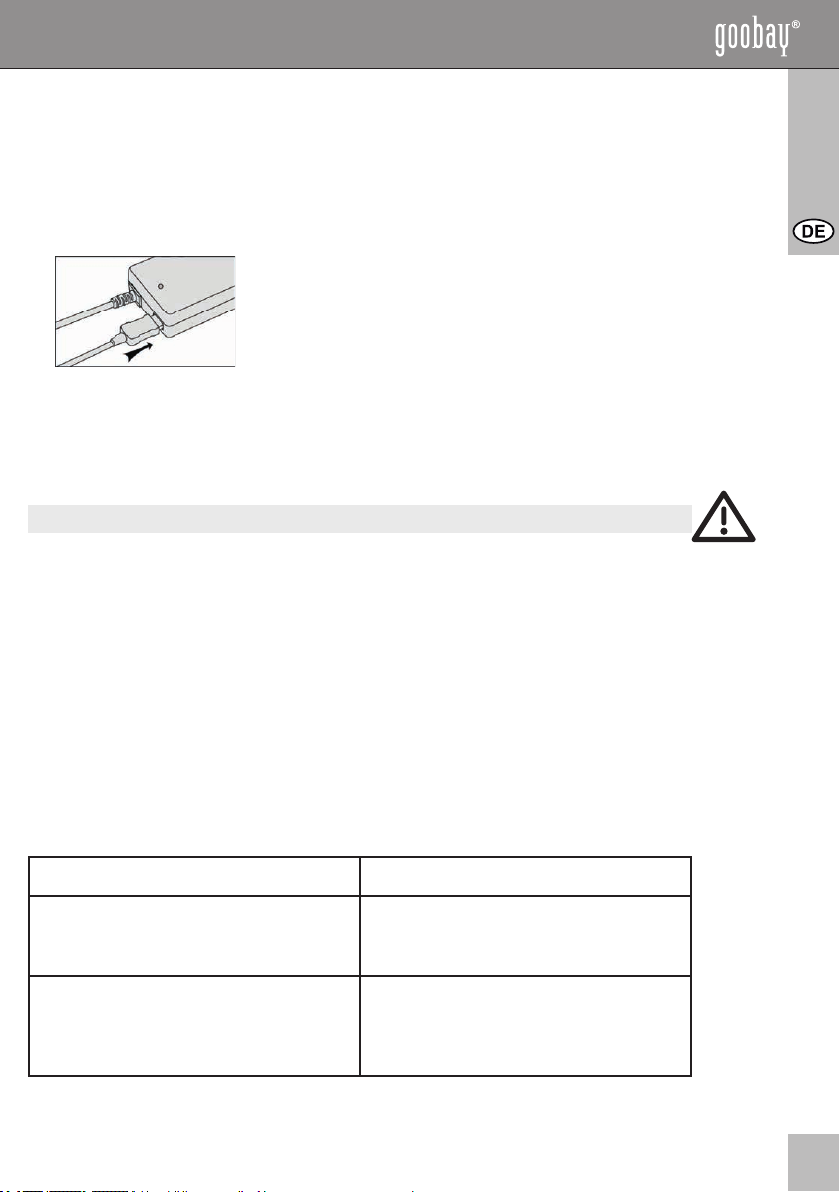
6.3 Nutzung der USB-Ladefunktion:
D
Den Ladestatus entnehmen Sie Ihrem USB-Gerät. Ist kein DC-Stecker montiert, zeigt das
Netzteil standardmäßig 15,5V an, sonst die Spannung des jeweiligen DC-Steckers, was für
den USB-Ladevorgang oder USB-Betrieb unrelevant ist.
1. Folgen Sie Schritt 1-3 aus Kapitel 6.1.
2. Verbinden Sie ein USB-Ladekabel Ihres USB-Gerätes,
wie MP3-Player, Handy, usw. mit Ihrem Gerät und der
USB-Buchse des NTS 120 W easy USB LCD 8A um die
USB-Ladefunktion zu aktivieren. (Bild D)
7 Pfl ege, Wartung, Lagerung und Transport:
ACHTUNG! Es besteht Stromschlag- und Kurzschlussgefahr!
• Das Gerät ist wartungsfrei.
• Ziehen Sie immer zuerst den Netzstecker!
• Reinigen Sie Ihr Produkt mit einem trockenen oder bei starker Verschmutzung mit einem
leicht angefeuchteten Leinentuch. Verwenden Sie keine Reinigungsmittel und lassen Sie
keine Feuchtigkeit ins Geräteinnere kommen. Achten Sie hierbei unbedingt auf die
stromführenden Leitungen Ihres Gerätes!
• Vermeiden Sie Stellen mit hohen Temperaturen, Feuchtigkeit, bzw. Stellen, die nass
werden können, auch bei P ege, Wartung, Lagerung und Transport.
• Beachten Sie die Sicherheitshinweise bzgl. P ege, Wartung, Lagerung und Transport.
• Das Produkt muss außerhalb des Ein ussbereiches von Kindern aufbewahrt werden.
• Heben Sie die Originalverpackung als Staub- und Feuchtigkeitsschutz und für den
Transport auf. Achten Sie auf die Sicherheitszeichen auf der Verpackung.
8 Problembehebung:
Problem Abhilfe
Die Netzteileinstellung funktioniert nicht. Achten Sie auf die Montagereihenfolge
in Kapitel 6.1. Achten Sie auf schlüssige
Kabelverbindungen.
Die Akkuladefunktion arbeitet nicht. Achten Sie auf die Montagereihenfolge.
Prüfen Sie den Ladestatus vorher und achten Sie auf schlüssige Kabelverbindungen.
Siehe auch Kapitel 6.2.
5
Page 6

Bedienungsanleitung
Die USB-Ladefunktion ist gestört. Lesen Sie kapitel 6.3 und achten Sie auf
andere Fragen Wenden Sie sich an Ihren Händler.
9 Gewährleistung und Haftung:
• Der Hersteller gewährt 2 Jahre Garantie.
• Da der Hersteller keinen Einuss auf örtliche Gegebenheiten und die Installation des
Produktes hat, deckt die Garantie nur das Produkt selbst ab.
• Falls ein Fehler oder Defekt an Ihrem Gerät festgestellt werden sollte, wenden Sie sich
bitte an Ihren Fachhändler und zeigen Sie ggf. Ihre Quittung oder Rechnung als
Kaufnachweis vor. Ihr Händler wird den Fehler entweder vor Ort beheben, oder das
Gerät an den Hersteller weiterleiten. Sie erleichtern unseren Technikern Ihre Arbeit sehr,
wenn Sie eventuelle Fehler ausführlich beschreiben – nur dann haben Sie Gewähr,
dass auch selten auftretende Fehler mit Sicherheit gefunden und beseitigt werden!
• Sollte Ihr Händler nicht erreichbar sein, können Sie uns auch direkt kontaktieren.
• Der Hersteller haftet nicht für Personen- oder Sachschäden, die durch unsachgemäße
Installation oder Bedienungsschritte, die nicht in dieser Anleitung beschrieben sind,
entstanden sind. Dazu zählt u. a. jegliche Änderung und Modikation des Produktes und
seines Zubehörs.
• Ein anderer als in dieser Bedienungsanleitung beschriebener Einsatz ist unzulässig und
führt zu Gewährleistungsverlust, Garantieverlust und Haftungsausschluss.
• Druckfehler behält sich der Hersteller vor.
• Der Hersteller behält sich weiterhin das Recht vor, Änderungen an Geräten, Verpackun gen und sämtlichen Begleitpapieren wie Bedienungsanleitungen ohne vorherige
Ankündigung zu vollziehen.
schlüssige Kabelverbindungen.
10 Technische Daten:
Betriebsspannung 100-240 V ~ AC / 50-60 Hz
Ausgangsspannung ADAPTOR 5-24,0 V DC an 8,0 A (max. 120 W)
USB 5,0 V DC an 1,0 A (max. 5W)
Netzstecker Schutzkontakt-Stecker
max. Ausgangsstrom 8,0 A
max. Ausgangsleistung 120 W
Maße 142 x 34 x 64 mm (ohne Kabel)
Gewicht 0,66 kg (mit Kabel)
6
Page 7

11 DC Adapter-Übersicht:
Größe Ausgangs-
spannung (Range)
N04 19V (18,1-19,9V) 6,3 A 4,8x1,7x10,7
N13 15V (14,3-15,7V) 8 A 6,3x3,0x10,7 TOSHIBA: 15V-3/4/5/6/8A, NEC: 15V/6A ...
N18 19V (18,1-19,9V) 6,3 A 5, 5x2 ,1x10 ,7 ACER: 19V-3,16/3,42/4,74A LITEON: 19V-3,16/3,42A,
N07 19V (18,1-19,9V) 6,3 A 5,5x 2,5x10,7
N14 16V (15,2-16,8V) 7,5 A 5,5x2,5x10,7 IBM: 16V-2,2/3,36/3,5/4,5/7,5A ...
N19 19V (18,1-19,9V) 6,3 A 5,5x3,0x10,7
N06 16V (15,2-16,8V) 7,5 A 6,0x4,3x10,7
N09 19,5V (18,5 -20,4V) 6,15 A 6,0x4,3x10,7
N24 20V (19,0-21,0V) 6,15 A 7,9x 12 xφ 9.5 IBM/LENOVO: 20V-3,25/4,5A ...
N01 9,5V (9,0-10,0V ) 3 A 4,8x1,7x10,7 ASUS: 9,5V-2,315/3A SONY: 10,5V-1,9A ...
max. Aus -
gangsstrom
Adaptergröße (mm)
DC-F
DC-F
PIN 1. 0
PIN 1. 0
PIN 1. 0
Kompatibilität
HP/COMPAQ : 18,5V-2,7/3,5/3,8/4,9/6,3/6,5A, DELTA:
19V-2,64A, ASUS: 19V-2,64A, NEC: 19V-2,64A ...
NEC: 19V-3,16A ...
IBM: 19V- 4,2A , DELL: 19V-3,16/3,42 /6,3A HP/
COM PAQ: 18,5V-4,9A , 19V-4,9A , DELTA: 19V2,64A , 18,5V-6,5A, 19V- 6,3A TOSHIBA: 19V3,16/3,42/4,74/6,3A, ASUS: 19V-4,74A, LS: 20V -3,25A,
NEC: 19V-2,6 4/3,16/6,3A , LITEON: 19V- 3,16/ 3,42/
3,95/4,74A, GATEWAY: 19V-3,16/3,42/3,68/4,74/6,3A
SAMSU NG: 19V-3,16/3,75/4,22/4,74A ...
SONY: 16V-3,42/3,75/4A, FUJITSU: 16V-3,36 /3,75A, ...
SONY: 19,5V-2,7/3/4,1/4,7/5,13/6,15A, FUJITSU: 19V3,16/3,69/4,22A ...
12 Entsorgungshinweise:
Elektrische und elektronische Geräte dürfen nach der europäischen WEEE
Richtlinie nicht mit dem Hausmüll entsorgt werden. Deren Bestandteile müssen
getrennt der Wiederverwertung oder Entsorgung zugeführt werden, weil giftige
und gefährliche Bestandteile bei unsachgemäßer Entsorgung die Gesundheit
und Umwelt nachhaltig schädigen können.
Sie sind als Verbraucher nach dem Elektrogesetz (ElektroG) verpichtet, elektrische und
elektronische Geräte am Ende ihrer Lebensdauer an den Hersteller, die Verkaufsstelle
oder an dafür eingerichtete, öffentliche Sammelstellen kostenlos zurückzugeben.
Einzelheiten dazu regelt das jeweilige Landesrecht. Das Symbol auf dem Produkt, der
Betriebsanleitung oder/und der Verpackung weist auf diese Bestimmungen hin. Mit dieser
Art der Stofftrennung, Verwertung und Entsorgung von Altgeräten leisten Sie einen
wichtigen Beitrag zum Schutz unserer Umwelt.
WEEE Nr.: 82898622
13 EU-Konformitätserklärung:
Mit dem CE Zeichen erklärt Goobay®, eine registrierte Marke der Wentronic
GmbH, dass das Produkt die grundlegenden Anforderungen und Richtlinien
der europäischen Bestimmungen erfüllt.
7
Page 8

Manual
NTS 120 W easy USB LCD 8A 54794
ATTENTION! Please read the user manual completely and carefully. It is part of
the product and includes important information for proper installation and use.
Keep this guide to have it available, when there are uncertainties, or the product
will be passed on.
Content: Page:
1 Description and Function 8
2 Intended Use 8
3 Notes on Safety 9
4 Parts Package 9
5 Graphic Diagram 10
6 Operating 10
6.1 Using the Power Supply 10
6.2 Charging Notebook Batteries 11
6.3 Using the USB Function 11
7 Care, Maintenance, Storage and Transport 11
8 Troubleshooting 11
9 Warranty and Liability 12
10 Specications 12
11 DC Adaptor Plug Overview 13
12 Notes on Waste Disposal 13
13 EU Declaration of Conformity 13
1 Description and Function:
Your product is an universal, microprocessor controlled switching mode power supply for
Notebooks, Mini-Notebooks, Displays, etc. It comes with 10 adaptor plugs with reverse
polarity protection for lots of models and a separated 5.0 Volts USB output for charging or
operating MP3-Players, Camcorders, Mobile Phones, etc. The LC Display at the cable
informs you about the charging status and the used voltage with white backround light. The
NTS 120 W easy USB LCD 8A is useable worldwide. The device takes all settings automatically by itself, controlled by the selected DC adaptor plug. The DC adaptor plugs are preset
to the appropriate output voltage. Only select the right adaptor plug for your device.
Security Features: - antistatic surface and re-resistant housing
- Protection against excess temperature at 85°C,
short-circuit safe
- Over voltage protection at 24 V, over current protection at
8.0 A and control of the charging time
2 Intended Use:
Your product is made for charging and operating devices like described in chapter 1. We do
not permit using the product in other ways. Use the product only in dry interior rooms. If not
attending to these regulations and notes on safety, it might causes fatal accidents, injuries
and damages to persons and property.
8
Page 9

3 Notes on Safety:
ATTENTION! Only skilled electricians may assemble and disassemble the
housing of the product. There is a risk of electric shock and short circuit!
• Your product is not a toy and is not meant for children, because it contains small parts
which can be swallowed and injured when used inappropriately!
• Please install and store the product and its accessories in a way persons cannot be
injured, or objects not be damaged for example by dropping or stumbling.
• Please remove or store the packing materials well, because children may cut themsel-
ves on them while playing. Furthermore, there is a risk of swallowing and inhalating of
incidentals and insulating material.
• Also read the manual of your device, which is to be charged or operated, like Notebook,
Mobile Phone, etc. for checking the compatibility and tting of the connectors to the
power supply, and the other way round.
• A defective device may not be put into operation, but must be disconnected from mains
and protected against further use. Repairing, such as assembling and disassembling
the housing is only allowed to skilled professionals. By repairing it yourself you will
loose all warranties and there is a risk of electric shock and short circuit.
• Drive the product only with 100 to 240 V ~ / 50-60 Hz a.c. networks.
• Unplug the mains cable when not in use and during thunder storms.
• Avoid places with high humidity, or places which might come into contact with water.
• Do not place things on the device.
• Mind and follow the terms of law and health care for using the device in industry.
• Never expose the product to high mechanical pressure.
• Do not modify or change the product or its accessories! Also mind chapter “warranty
and liability“.
• Do not use damaged parts.
• The device may only be installed and used in dry interior rooms.
• The device may growing warm during use.
4 Parts Package:
- 1 pc power supply
-10 pcs DC adaptor plugs with reverse polarity protection
- 1 pc mains cable - safety plug
- 1 pc user`s manual
9
Page 10

Manual
5 Graphic Diagram:
LCD display
USB output
DC
connection
DC adaptor plug
6 Operating:
6.1 Using the power supply:
A
B
100-240 V AC
mains plug
1. Connect the AC cord to the power supply unit.
2. Connect the other end of the AC cord with a
100-240 V AC mains socket without having
already connected a DC adaptor plug. (Fig. A)
3. The indicator LED and the LCD display ashes
on and displays 15 to 15.6 V DC. (Fig. B)
10
C
4. Select the tting DC adaptor plug by checking
the specications and the manual of your
device, like Notebook e.g. and plug it into the DC
jack of the power supply unit. (Fig. C)
5. Now connect the power supply with the device.
The display shows the relative output voltage
similar to (Fig. A) Compare this with your
Notebook data before switching it on and mind
right polarity.DC voltages are preset.
Page 11

6.2 Charging Notebook Batteries:
The notebook battery is charged automatically during operation. Take the charging status
from the notebook directly.
6.3 Using the USB Function:
D
Take the charging status from your USB device directly. Is no DC adaptor plug assembled,
15.5 V is adjusted for the DC output. Otherwise the voltage of the assembled DC adaptor
plug is shown. This is not relevant for USB charging or operating.
1. Follow step 1-3 of chapter 6.1.
2. Connect the USB cable of your USB device, like MP3-
Players, Mobile Phones, etc. with your USB device and
the USB socket of the NTS 120 W easy USB LCD 8A to
activate the USB charging function. (Fig. D)
7 Care, Maintenance, Storage, and Transport:
ATTENTION! There is a risk of electric shock and short circuit!
• The device is maintenance-free.
• Always disconnect the mains plug from mains at rst!
• Use a dry linen cloth to clean your product, or use a slightly moist cloth for heavy stains.
Look out for live cables of your device during cleaning! Do not use any cleaning supplies
and avoid liquid entry to the device.
• Avoid places with high temperatures, humidity, or places which can become wet, also
during care, maintenance, storage, and transport.
• Mind the notes on safety also regarding care, maintenance, storage and transport.
• Keep the product away from children!
• Reposit the original packaging as protection from dust and humidity for transporting.
• Follow the safety symbols on the packing during transport.
8 Troubleshooting:
Problem Help
The adjustment of the power supply does
not work.
The charging function of the battery does
not work.
The USB charging function does not work. Read chapter 6.3 and mind proper connec-
Mind the assembling in right order in
chapter 6.1. Check all cable connections for
proper tting.
Mind the assembling in right order. Check
the charging status of the battery before
charging and mind proper connections of
all cables. Also read chapter 6.2.
tions of all cables.
11
Page 12

Manual
other questions Contact your dealer.
9 Warranty and Liability:
• The producer grants a 2 years warranty to a new device.
• As the manufacturer has no inuence on installation, warranty of the product only
applies to the product.
• If any fault or damage is detected on your device, please contact your dealer and provide
your sales slip or invoice as evidence of the purchase, if necessary. Your dealer will
repair the fault either on site, or send the device to the manufacturer. You make the work
of our technicians considerably easier, describing possible faults in detail – only then you
can be assured that faults, occurring only rarely, will be found and repaired with
certainty! If your dealer cannot be contacted, you can also contact us directly.
• The manufacturer is not liable for damages to persons or property caused by improper
installation or operation not described in this guide. This includes, among others, any
alteration and modication of the product and its accessories.
• Any use other than described in this user manual is not permitted, and causes loss of
warranty, loss of guarantee, and non-liability.
• We reserve our right for misprints and changes of the device, packing, or user manual.
10 Specications:
Operating voltage 100-240 V ~ AC / 50-60 Hz
Output voltage ADAPTOR 5-24.0 V DC at 8.0 A (max. 120 W)
USB 5.0 V DC at 1.0 A (max. 5W)
Mains plug Safety plug
Max. output current 8.0 A
Max. output power 120 W
Dimensions 142 x 34 x 64 mm (without cable)
Weight 0.66 kg (with cable)
12
Page 13

11 DC Adaptor Plug Overview:
Tip Output voltage
(Ra nge)
N04 19V (18.1-19.9V) 6.3 A 4.8x1.7x10.7
N13 15V (14.3-15 .7V) 8 A 6. 3x3x10.7 TOSHIBA: 15V- 3/4/5/6/8A, NEC: 15V/6A ...
N18 19V (18.1-19.9V) 6.3 A 5.5 x2.1x10.7 ACER: 19V-3.16/3.42/4.74A LITEON: 19V-3.16/3.42A,
N07 19V (18.1-19.9V) 6.3 A 5.5x 2.5x10.7
N14 16V (15. 2-16.8V) 7.5 A 5.5x2. 5x10.7 IBM: 16V-2.2/3.36/3.5/4.5/7.5A ...
N19 19V (18.1-19.9V) 6.3 A 5.5 x3.0x10 .7
N06 16V (15. 2-16.8V) 7.5 A 6 .0x4.3x10.7
N09 19.5 V (18.5-20.4V) 6.15 A 6.0x 4.3x10.7
N24 20V (19.0-21.0V) 6.15 A 7.9 x12 xφ9 .5 I BM/LENOVO: 20V-3.25/4.5A ...
N01 9.5V (9.0-10.0V) 3 A 4.8x1.7x10 .7 ASUS: 9.5V-2.315/3A SONY: 10.5V-1.9A ...
Max. output
current
Size (mm) Compatibility
HP/COMPAQ : 18.5V-2.7/3.5/3.8/4.9/6.3/6.5A, DELTA:
DC-F
DC-F
PIN 1. 0
PIN 1. 0
PIN 1. 0
19V-2.64A, ASUS: 19V-2.64A, NEC: 19V-2.64A ...
NEC: 19V-3.16A ...
IBM: 19V- 4.2A , DELL: 19V-3.16/3.42/6.3A HP/
COM PAQ: 18.5V-4.9A , 19V-4.9A , DELTA: 19V-
2.64A , 18.5V- 6.5A, 19V- 6.3A TOSHIBA: 19V-
3.16/3.42/4.74/6.3A, ASUS: 19V-4.74A, LS: 20V -3.25A,
NEC: 19V-2.6 4/3.16/6.3A, LITEON: 19V-3.16/ 3.42/
3.95/4.74A, GATEWAY: 19V-3.16/3.42/3.68/4.74/6.3A
SAMSU NG: 19V-3.16/3.75/4.22/4.74A ...
SONY: 16V-3.42/3.75/4A, FUJITSU: 16V-3.36/3.75A, ...
SONY: 19.5V-2.7/3/4.1/4.7/5.13/6.15A, FUJITSU: 19V-
3.16/3.69/4.22A ...
12 Note on Waste Disposal:
According to the European WEEE directive, electrical and electronic equipment
must not be disposed with consumers waste. Its components must be recycled
or disposed apart from each other. Otherwise contaminative and hazardous
substances can pollute our environment.
As a consumer, you are committed by law to dispose electrical and electronic devices to
the producer, the dealer, or public collecting points at the end of the devices lifetime for
free. Particulars are regulated in national right. The symbol on the product, in the user`s
manual, or at the packaging alludes to these terms. With this kind of waste separation,
application, and waste disposal of used devices you achieve an important share to
environmental protection.
WEEE No: 82898622
13 EU Declaration of Conformity:
With the CE sign Goobay®, a registered trademark of the Wentronic GmbH
ensures, that the product is conformed to the basic standards and directives.
13
Page 14

Manual
14
Page 15

15
Page 16

Revision Date: 2016-06-24
Version 3
®
Goobay
by Wentronic GmbH
Pillmannstraße 12
38112 Braunschweig
Germany
www.goobay.de
info@goobay.de
Made in China
 Loading...