

Page 1

SOUL 7W KIT
QUICK GUIDE
Ver. 1
Page 2
1. G2 Call App Android - Monitor WiFi Setup.................................Page 1
2. G2 Call App Android - Monitor WiFi Setup.................................Page 6
3. Proximity Reader Programming..................................................Page 10
Page 3

G2 Call App - Android
Monitor WiFi Setup
For GL-ART7W Monitor
Page 4
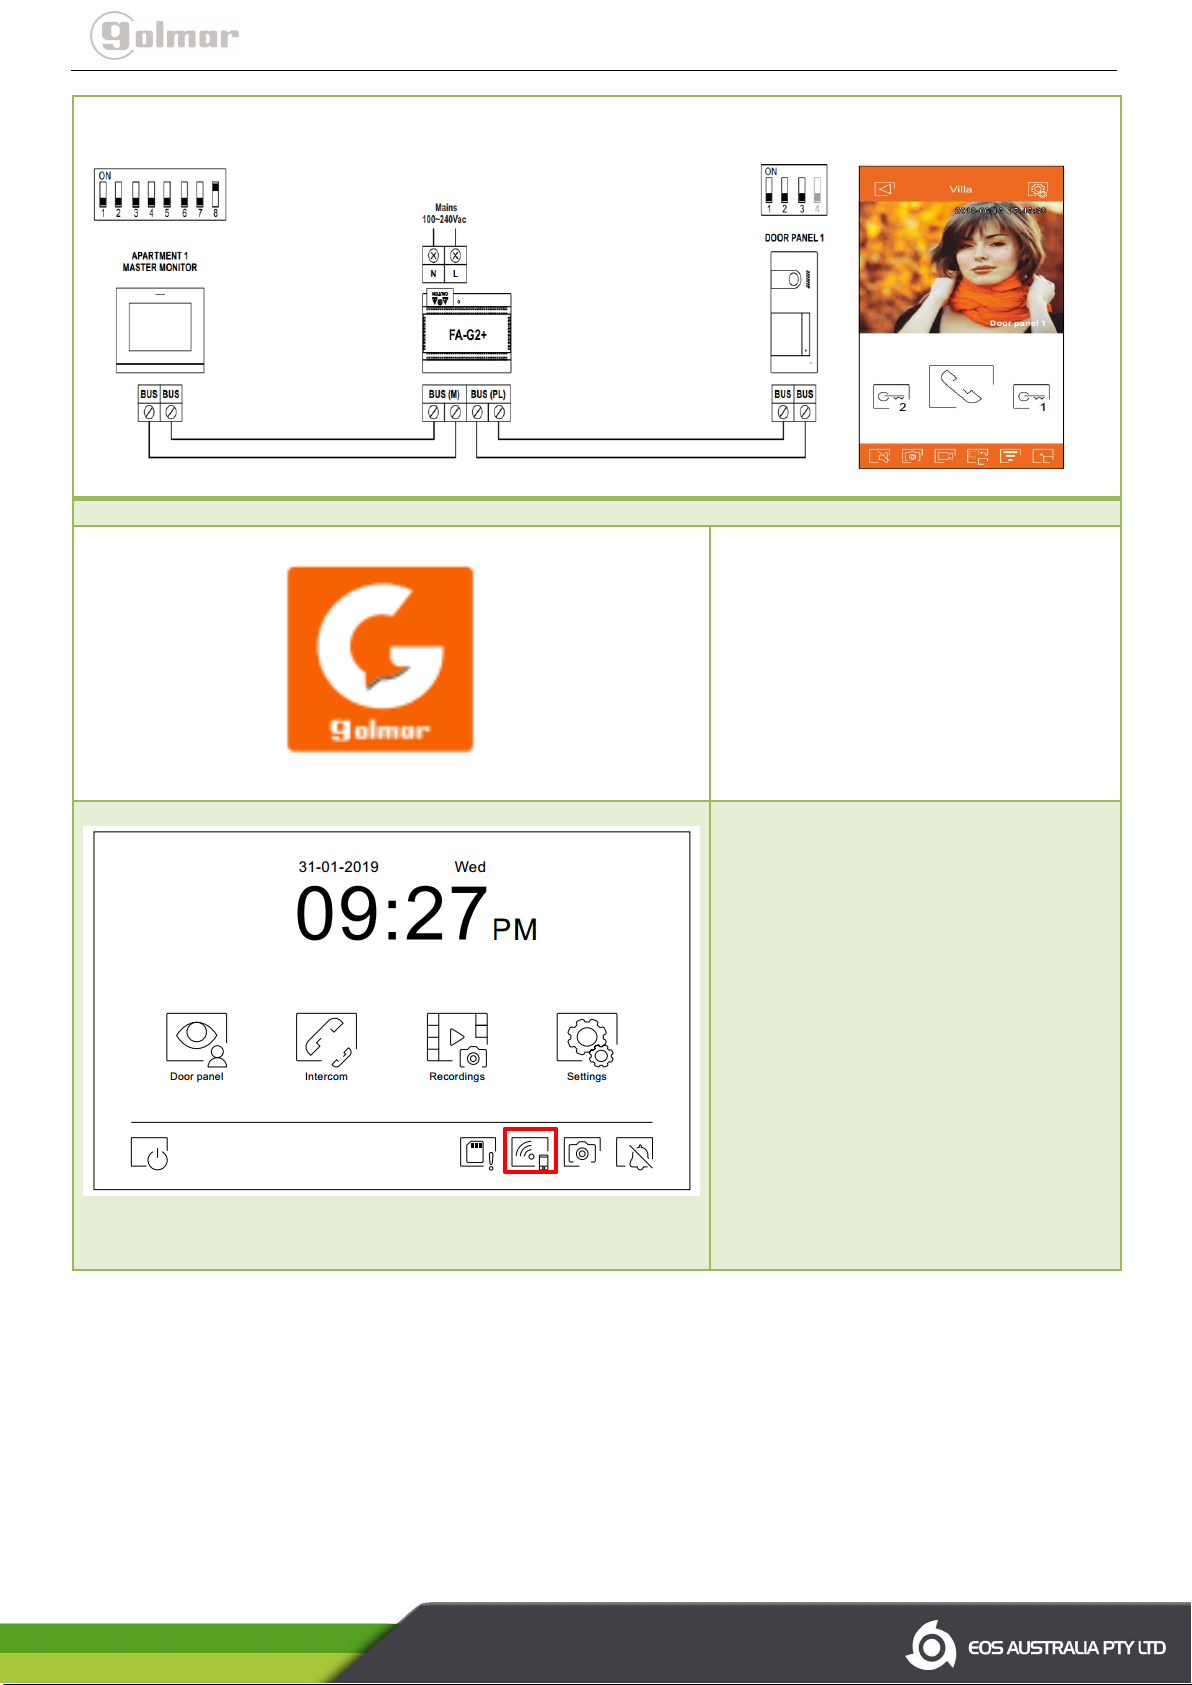
One apartment with one access door and one monitor
Step 1. Download and install the G2call
application on your mobile phone.
Step 2. Activate the Wi-Fi functionality
using the Wi-Fi icon from the main
menu.
How to active the Wi-Fi:
1. Touch the monitor screen to
wake up the display.
2. Press and hold the Wi-Fi
icon for about 5 seconds.
Page | 2
Page 5
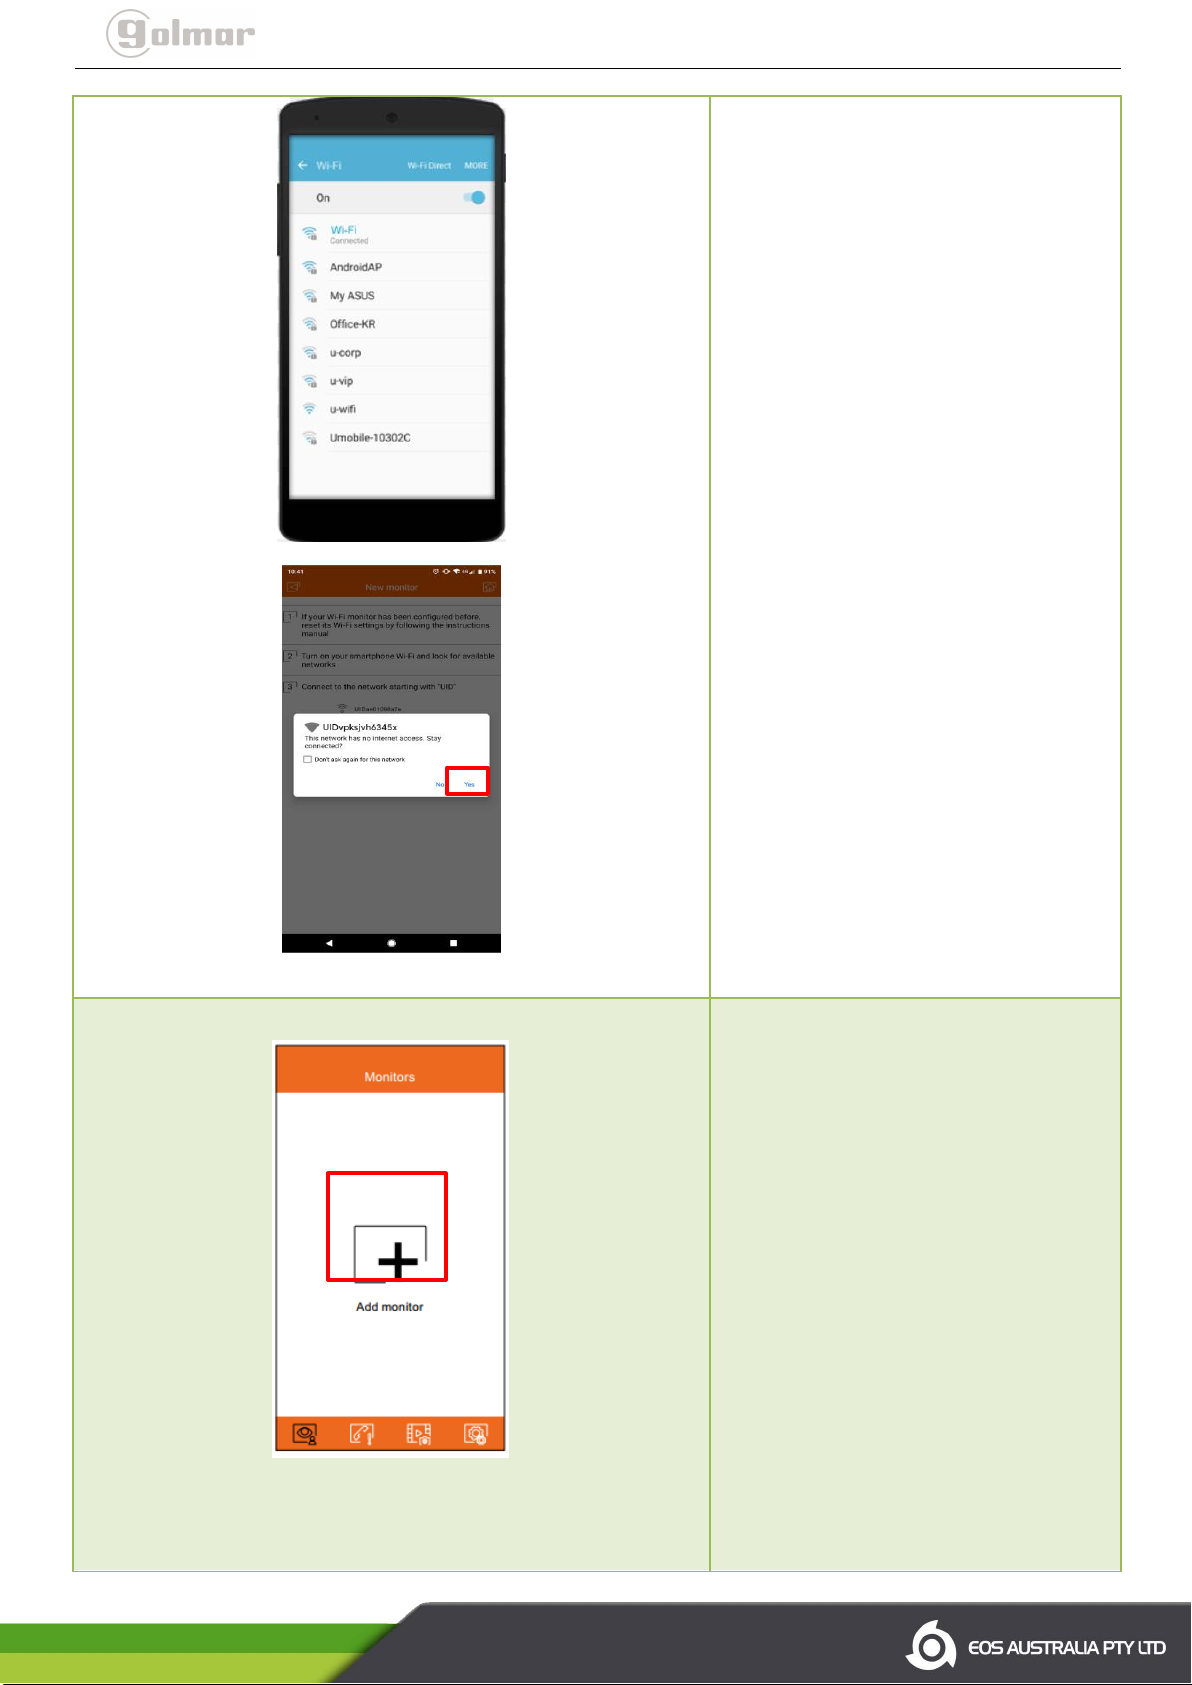
For Google Pixel phone only.
Step 3. Connecting Mobile phone to the
Wi-Fi Monitor UID.
- In your mobile wireless network
settings, search the monitor UID.
- Select the monitor UID to connect to
your mobile phone wireless.
Example:
Wi-Fi Monitor UID: UIDvpks8r79u
Note: If you are using Google Pixel
phone. please allow the “This network
has no internet access. Stay
connected?”. Click “YES”
Step 4. To start Initial registration of
the monitor on your G2call.
- Open the G2call application on your
Mobile phone.
- Click “Add monitor”.
Page |3
Page 6
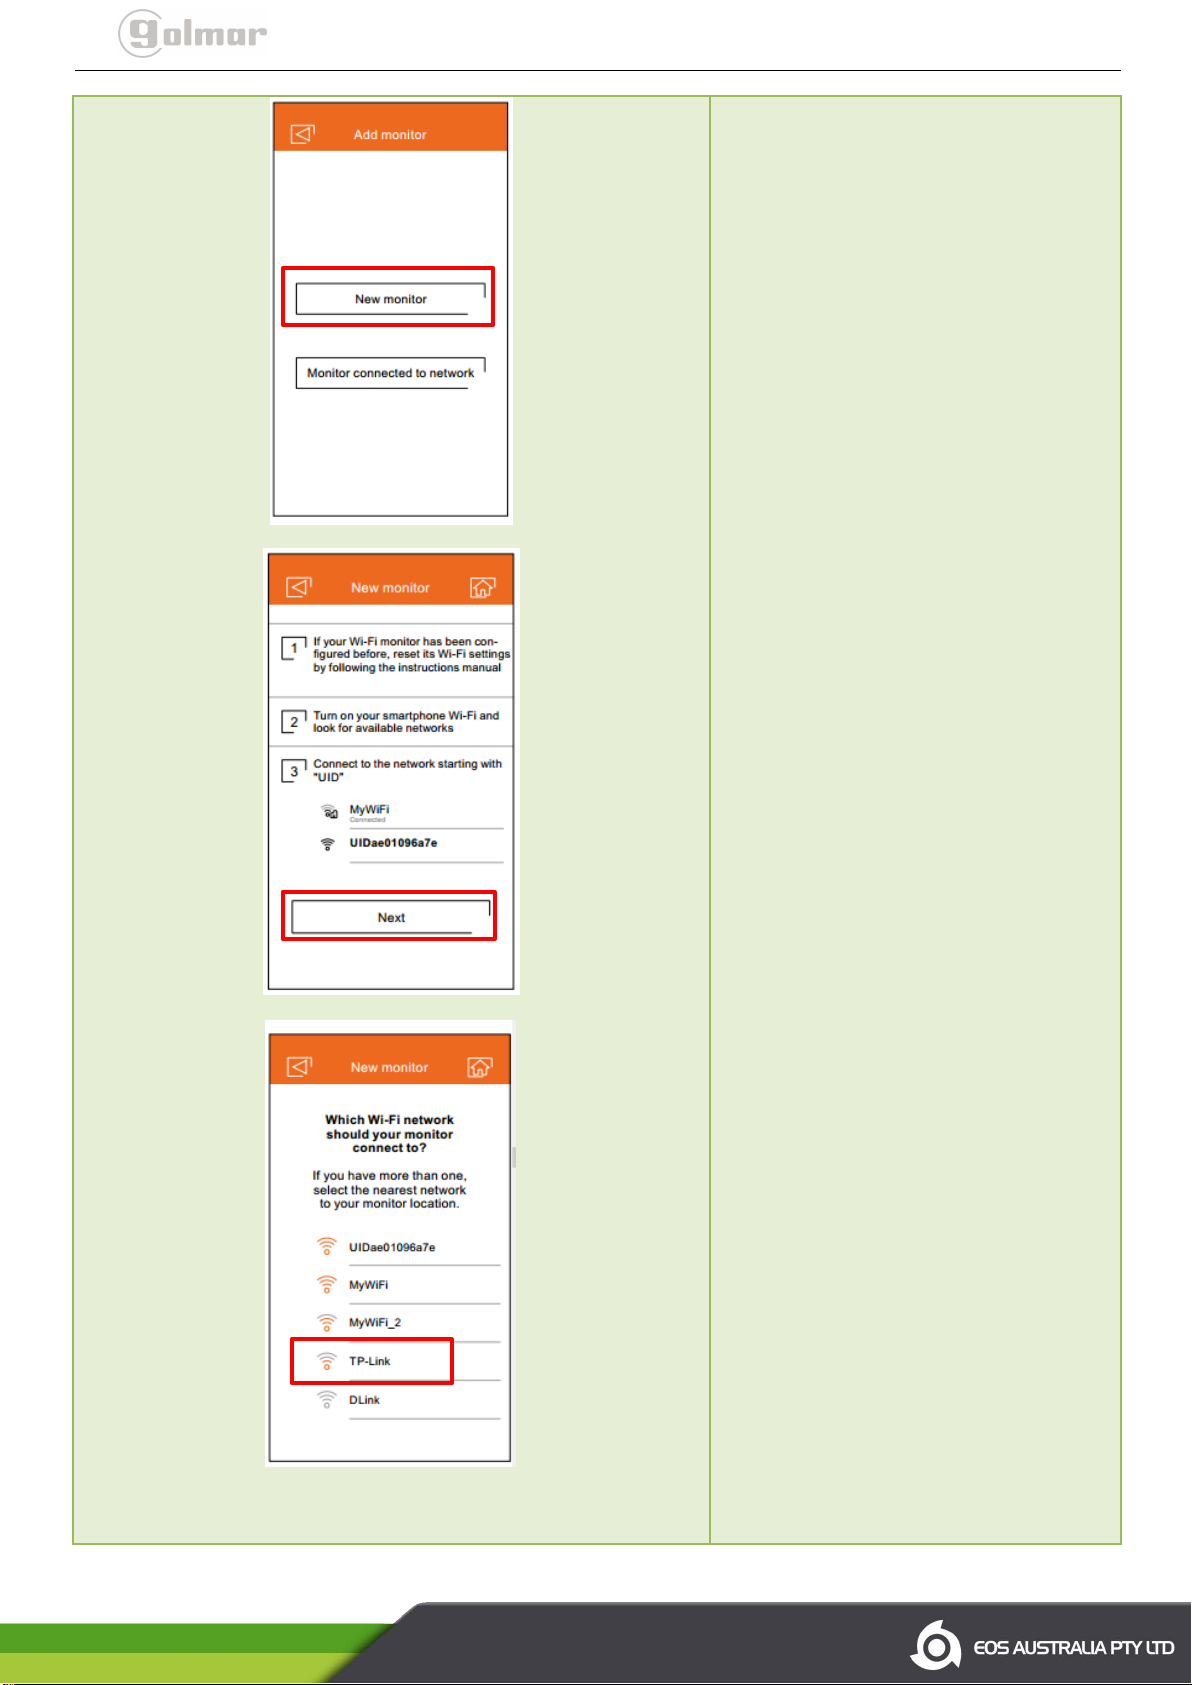
- Click “New monitor”.
- Click “Next”
- Find and select your Home Wi-Fi SSID
and enter the password.
Note: Some Android phones show a
“Connection in progress” message.
Please wait until this message
disappears.
Page | 4
Page 7
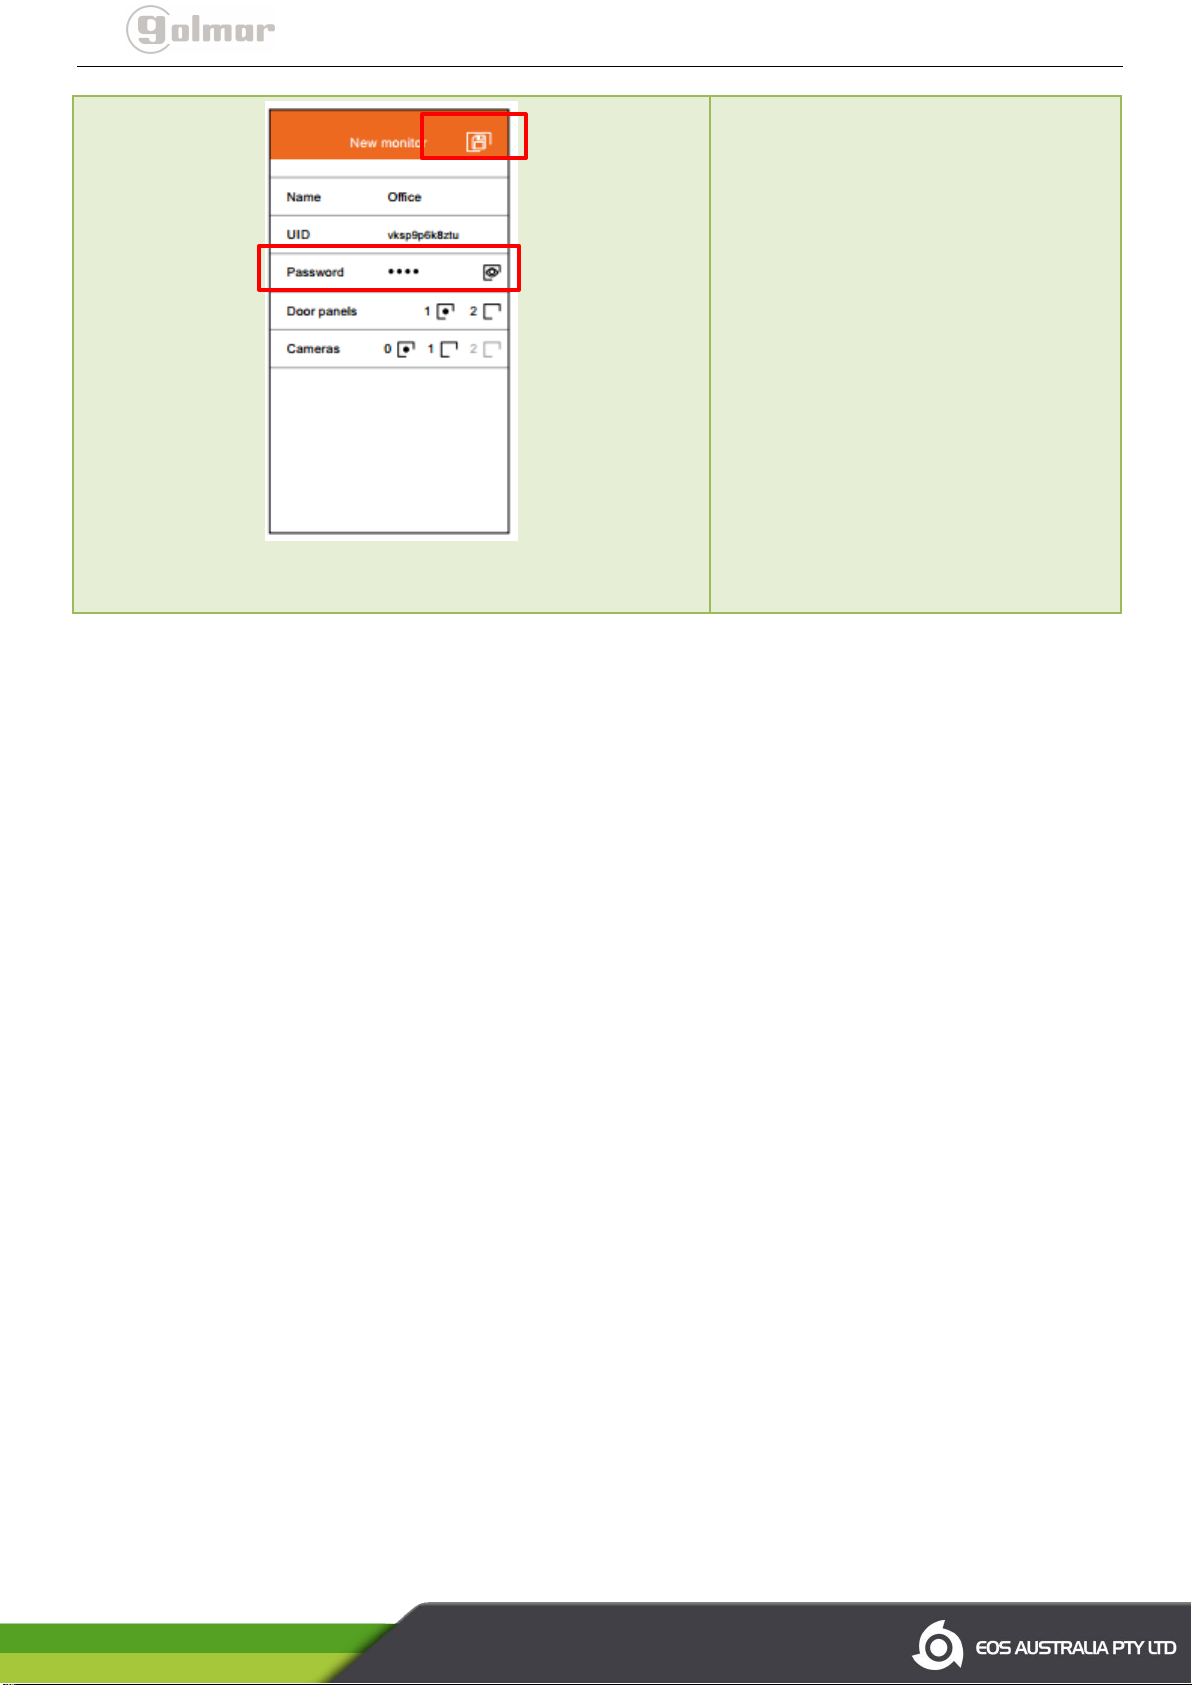
- Next, enter the password “1234 “ and
click the “SAVE” icon.
Note: The settings will ask you to
change the default password before
previewing.
- Click “Confirm” and enter the new
password.
Password is numeric and can be from 1
to 15 digits.
Page | 5
Page 8

G2 Call App - iOS
Monitor WiFi Setup
For GL-ART7W Monitor
Page 9
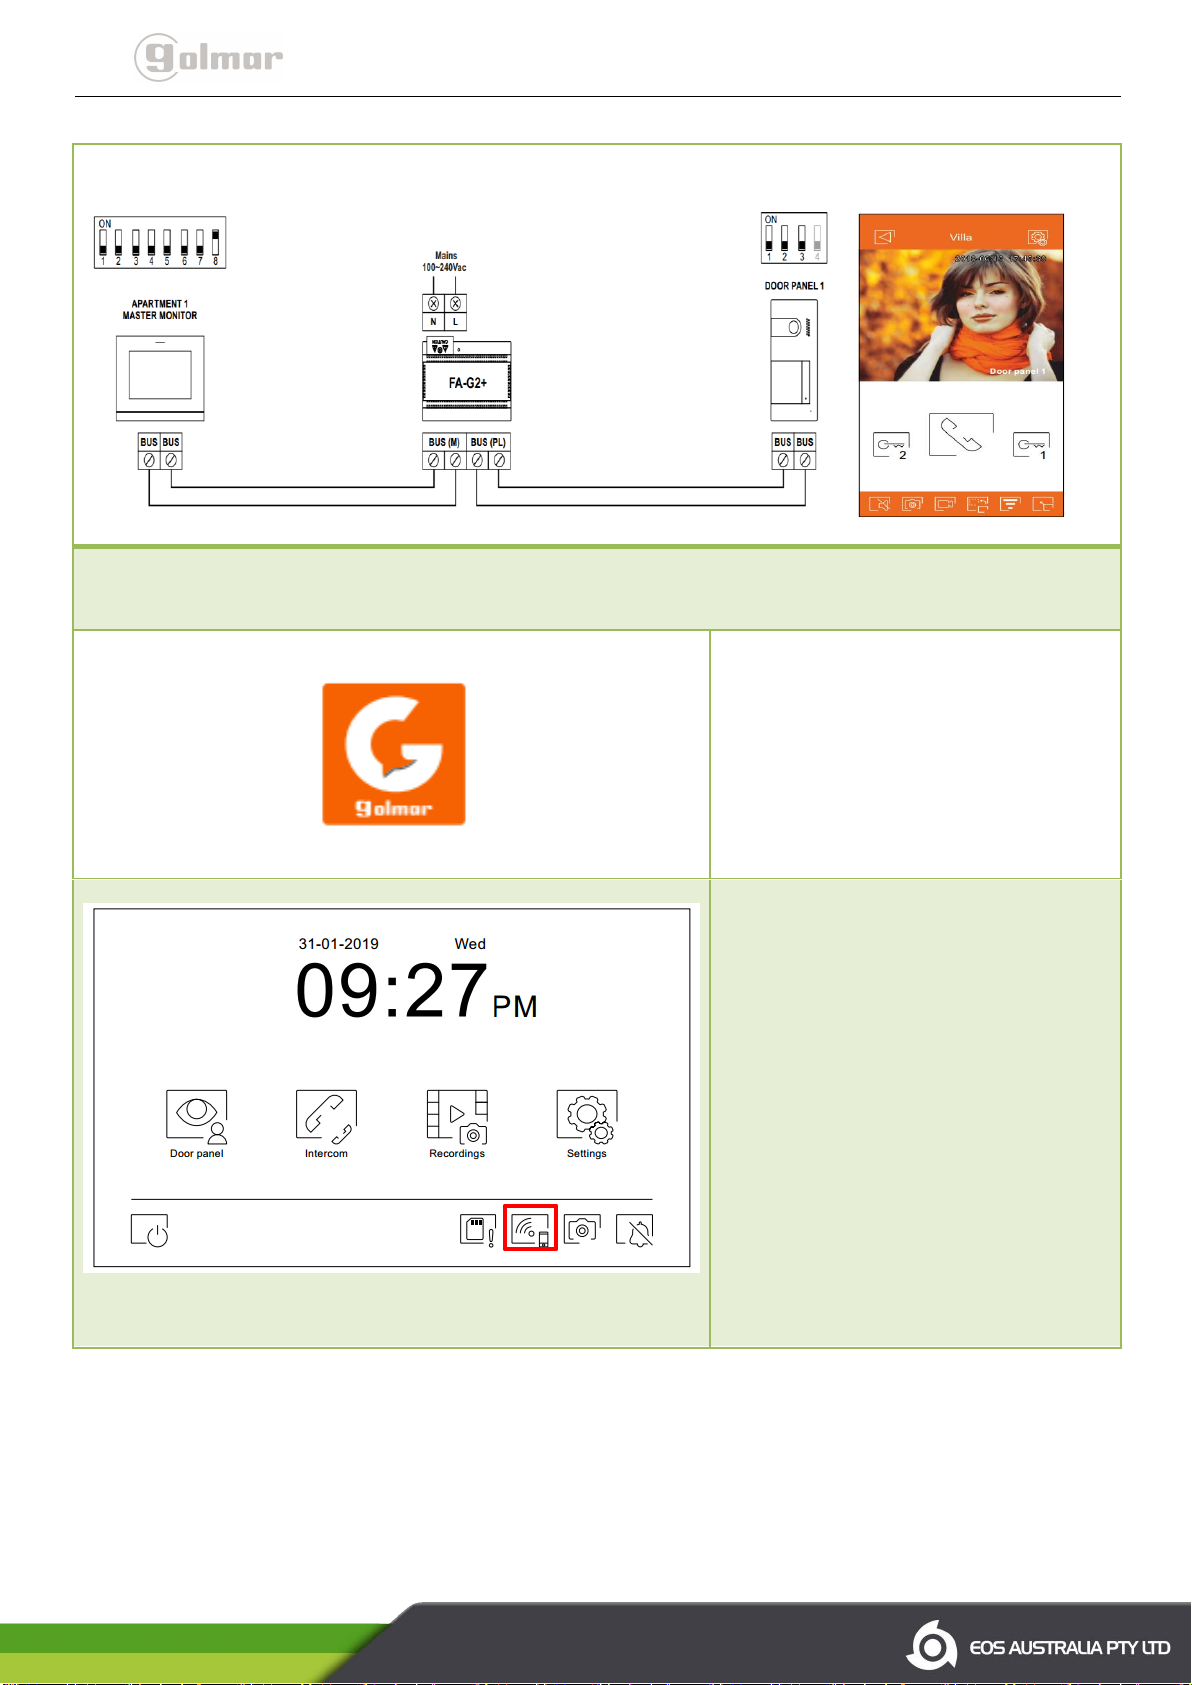
One apartment with one access door and one monitor
Step 1. Download and install the G2call
application on your mobile phone.
Step 2. Activate the Wi-Fi functionality
using the Wi-Fi icon from the main
menu.
How to active the Wi-Fi.
1. Touch the monitor screen to
wake up the display.
2. Press and hold the Wi-Fi
icon for about 5 seconds.
Page | 7
Page 10
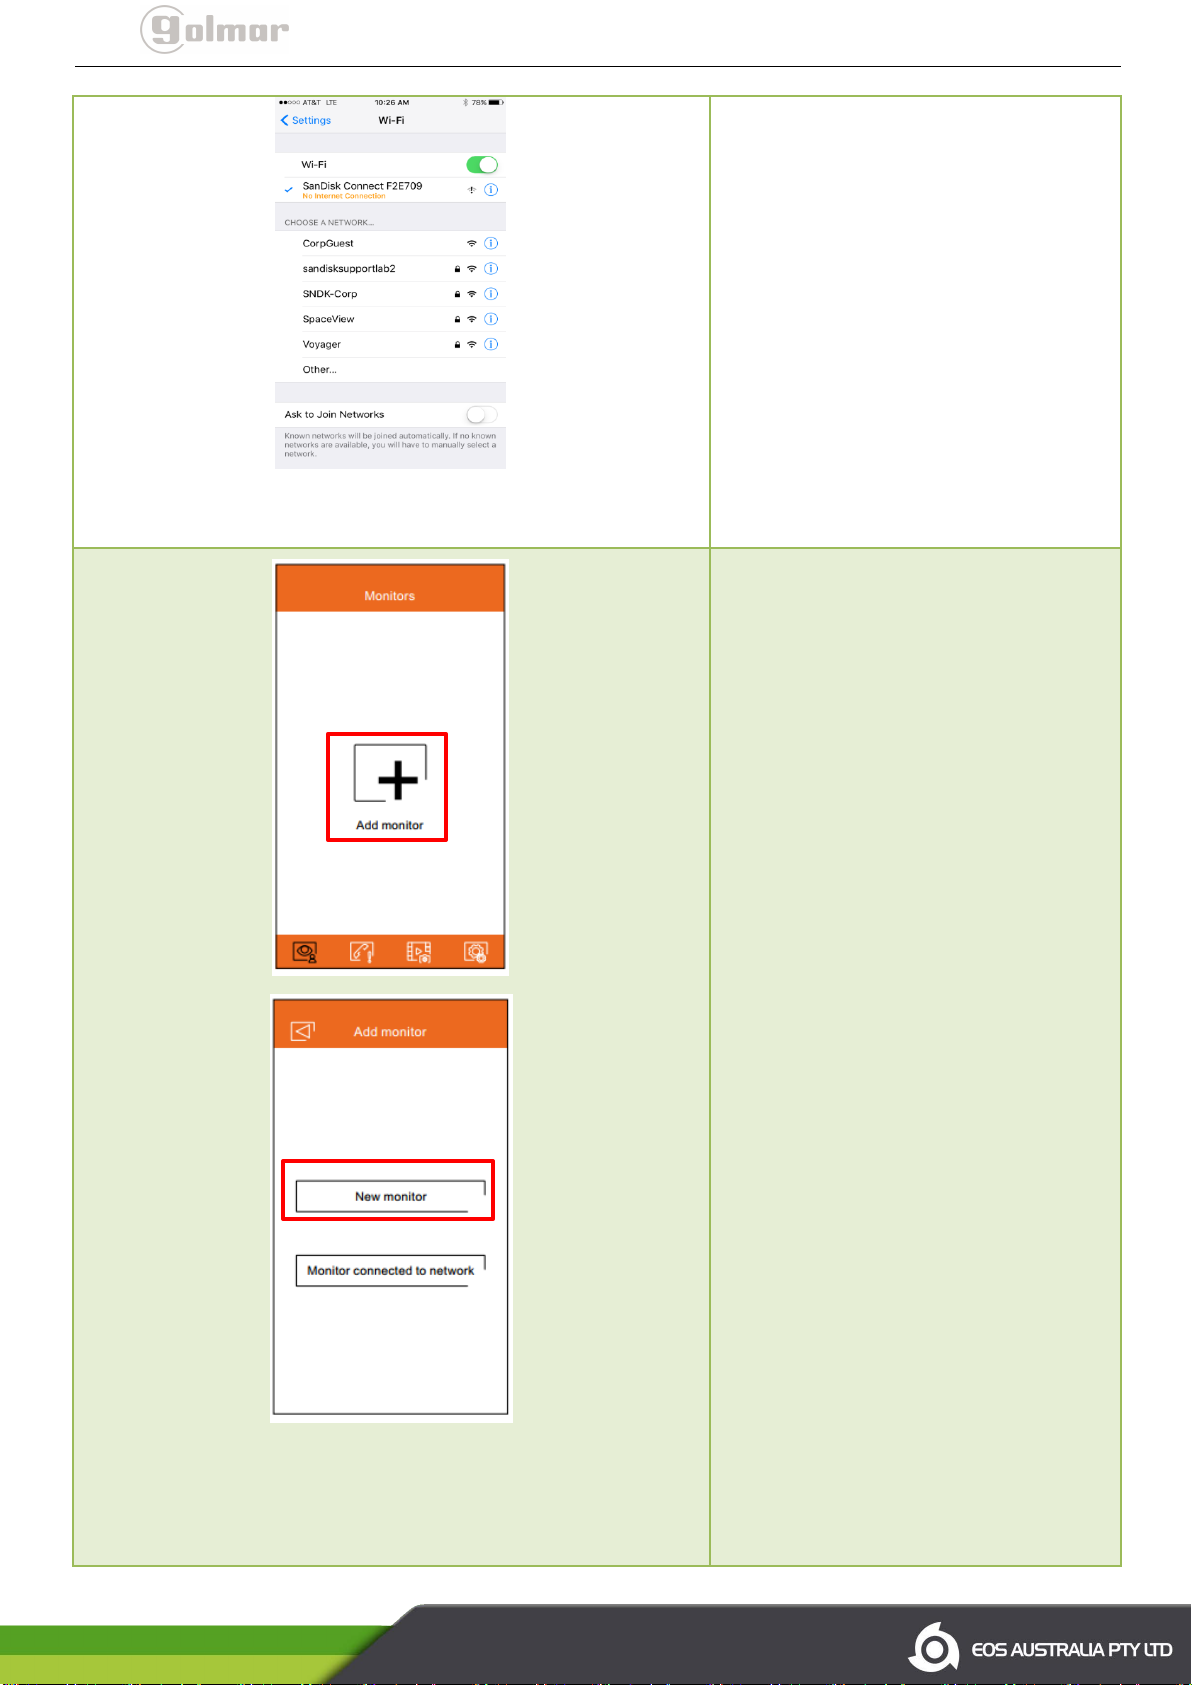
Note: No need to “Forget your Home Wi-Fi” Mobile wireless.
Step 3. Connecting Mobile phone to the
Wi-Fi Monitor UID.
- With your mobile wireless network
settings, search the monitor UID.
- Select the monitor UID to connect to
your mobile phone wireless.
Example:
Wi-Fi Monitor UID: UIDvpks8r79u
Step 4. To start Initial registration of
the monitor on your G2call.
- Open the G2call application on your
Mobile phone.
- Click “Add monitor”.
- Click “New monitor”.
Page | 8
Page 11
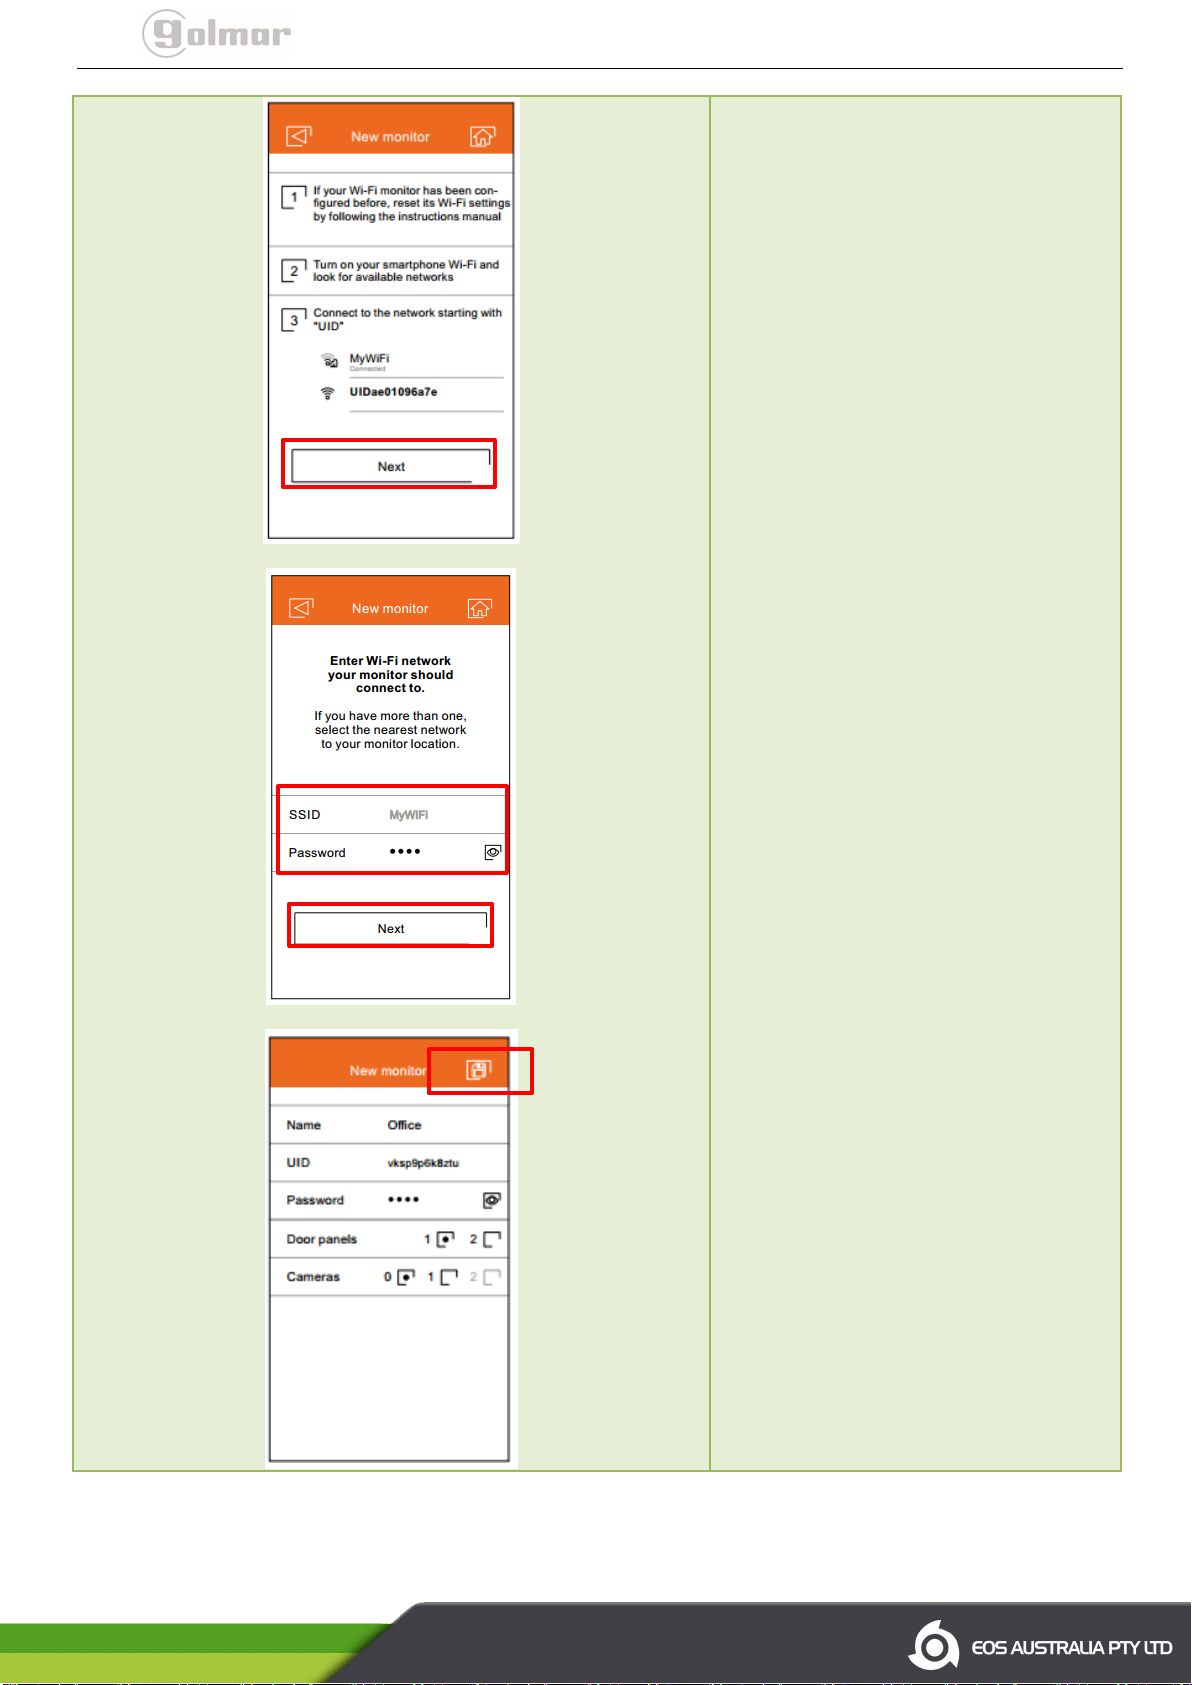
- Click “Next”
- Enter your Home Wi-Fi SSID and the
Wi-Fi password
- Click “Next”
Wait until the “Waiting monitor
pairing…. 150” is finished.
- Click “SAVE” icon
Note: Default password is 1234. The
settings will ask you to change the
default password before previewing.
- Click “Confirm” then enter new
password.
Password is numeric and can be from 1
to 15 digits.
Page | 9
Page 12

Proximity Reader
Programming
For GL-SOUL/1 Door Station
Page 13
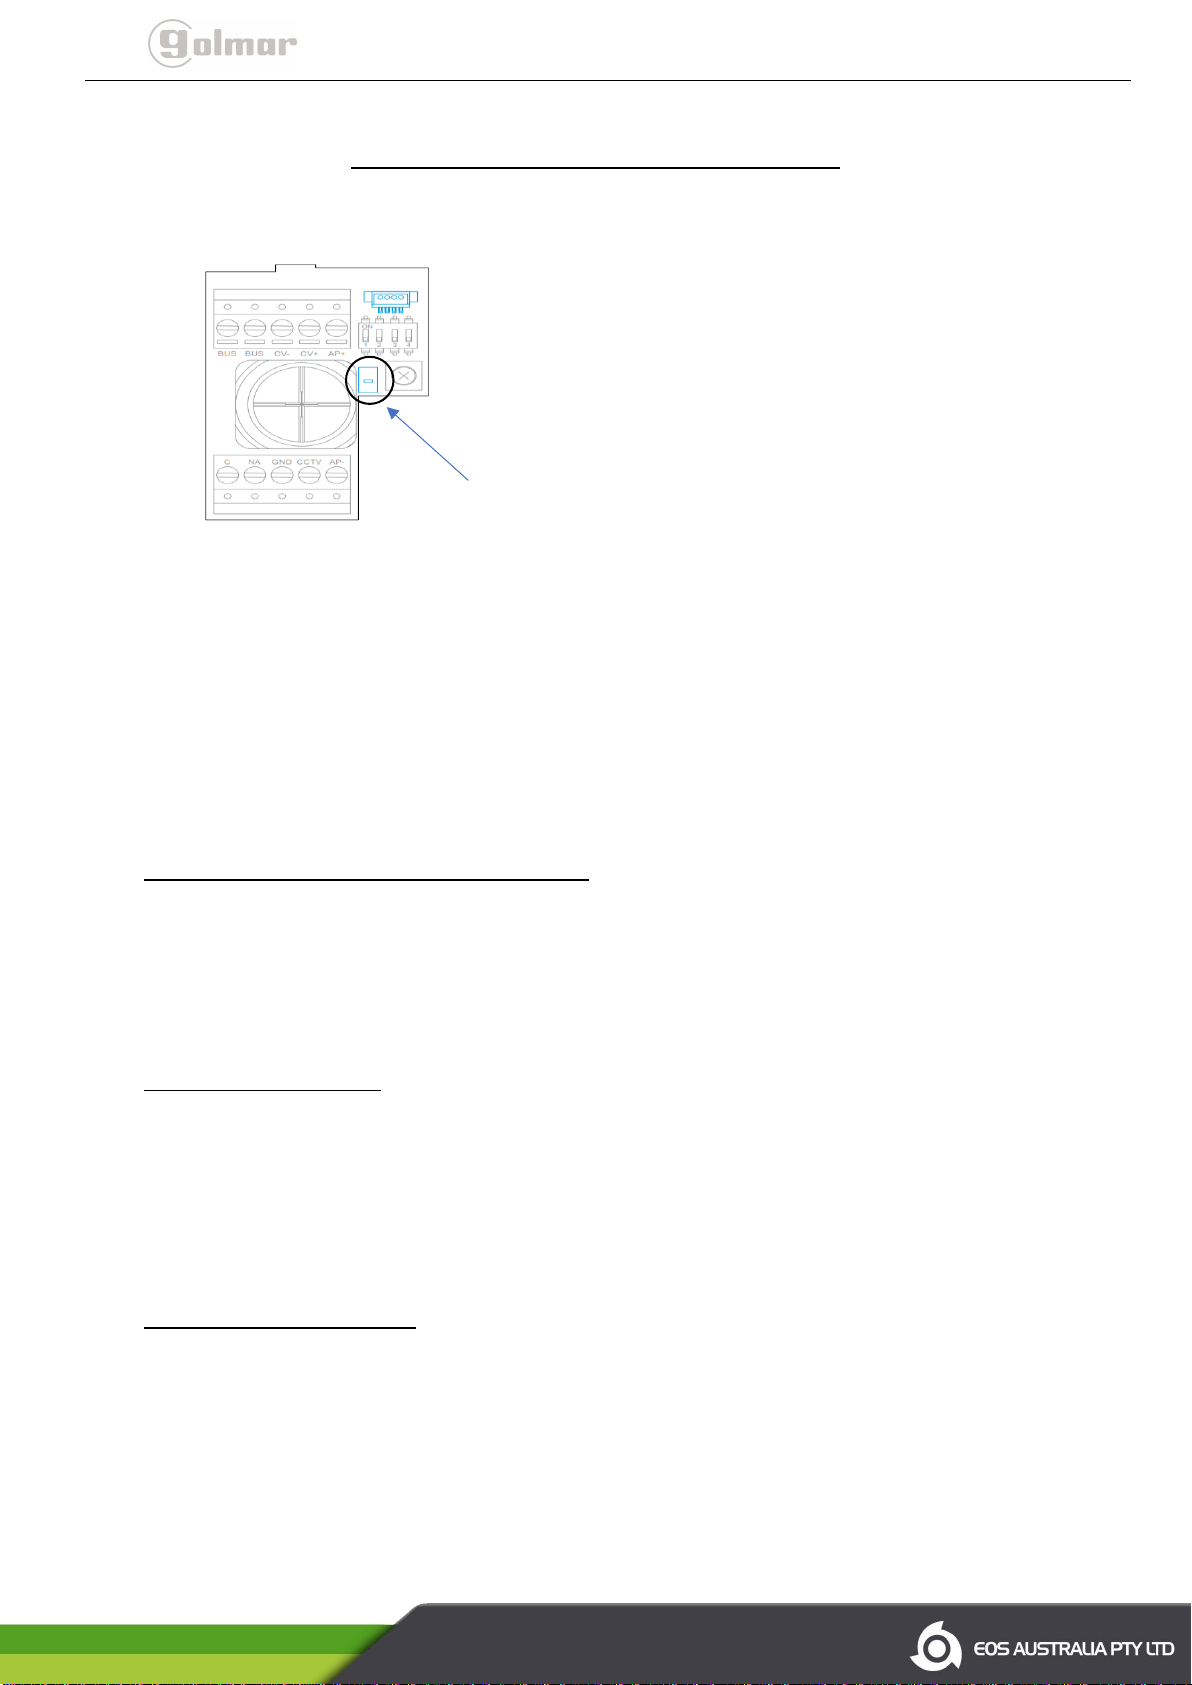
SOUL ART Door Panel Proximity Reader Programming
SOUL DOOR PANEL:
( T ) – Programming button.
Notes: By default, Programming keys and user keys are not created.
Proximity key (Recommend):
- YELLOW KEY - use for programming key.
- BLUE KEY – use for registration key.
- GREY KEY – use for user keys
Page | 11
User key accessing tone:
- Emitting One (1) tone – User key registered.
- Emitting Two (2) tones – User key Not registered
Creation of Programming and Registration keys:
Note: Creating programming and registration keys will erases the memory of the proximity reader.
How to create of Programming and Registration keys.
Step 1. Press the programming button of the proximity reader ( T ): the door panel will emit six (6) short tones.
Step 2. Swipe the YELLOW KEY (Programming key): the door panel will emit short tone.
Step 3. Swipe the BLUE KEY (Registration key): the door panel will emit long tone.
Notes: If after pressing the ( T ) programming button and no card/Fob key swipes within ten (10) seconds, the
door panel will emit a long tone, and the memory will be completely erased.
Adding GREY KEY (User key):
Step 1. Swipe the BLUE KEY (Registration key): the door panel will emit four (4) tones.
Step 2. Swipe the GREY KEY (User key): the door panel will emit one (1) tone. (Swipe more user key to add)
Step 3. After swiping all GREY KEY (User keys) WAIT FOR TEN (10) SECONDS: the door panel will emit long
tone to end the programming.
Notes: After swiping the BLUE KEY (Registration key) and no swipe GREY KEY (User key) within ten (10)
seconds, the door panel will emit a long tone to end the programming.
Deleting all GREY KEY (User key):
Warning! This will delete all User keys.
Step 1. Swipe the YELLOW KEY (Programming key): the door panel will emit four (4) tones.
Step 2. Swipe any registered GREY KEY (User key): the door panel will emit long tone to confirm all GREY KEY’s
(User key) are deleted.
Notes: After Ten (10) seconds, if the GREY KEY (User key) has not been swipe, the door will emit long tone to
end the programming and no deleting all user key will be done.
 Loading...